Citroen C4 Dag (2013 year). Manual - part 12
 

  Index      Citroen     Citroen C4 Dag - service manual 2013 year in english


Search            


Content   ..  10  11  12  13   ..


Citroen C4 Dag (2013 year). Manual - part 12


9

D R I V I N G

175 

         MEMORISING SPEEDS 

 This memorisation of speeds applies 

to both the speed limiter and the cruise 

control. 
 You can memorise up to 5 speeds in 

the system. By default, a few speeds 

are already memorised. 

      Press the  "MEM"  button to display 

the list of speeds memorised.   

  Selection 

 To select a memorised speed: 
      press and hold the " 

+ " or " 

- " but-

ton; the system stops at the nearest 

memorised speed, 

     press and hold again the " + " or " - " 

button to select another memorised 

speed.  

 A reminder of the speed and the state 

of the system (on/off) is displayed in the 

instrument panel.  

 For safety reasons, the driver 

must only carry out these opera-

tions when stationary.  

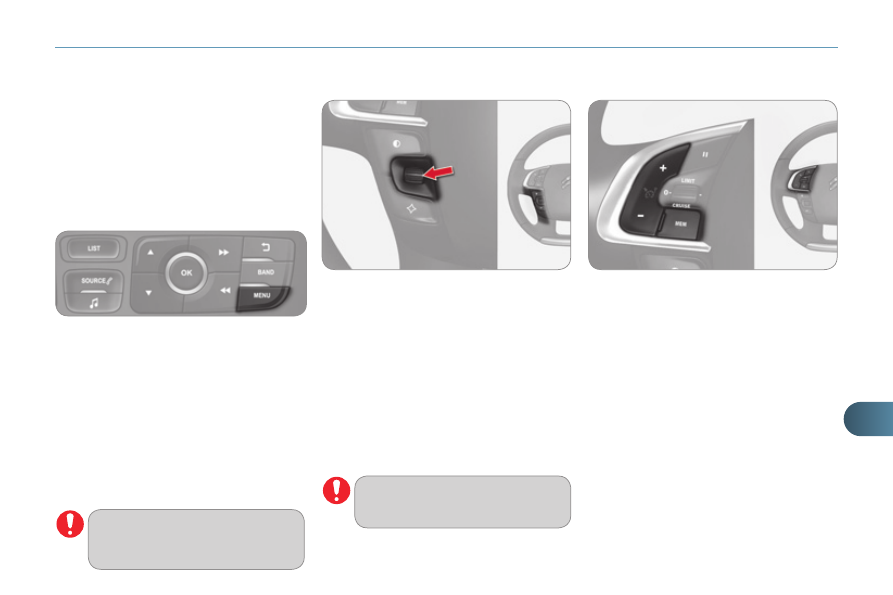
      Go to the main menu by pressing 

the  "MENU"  button: 

    Select the "Personalisation-confi -

guration" menu and confi rm. 

     Select "Vehicle parameters" menu 

and confi rm. 

     Select the "Driving assistance" line 

and conform. 

    Select "Speeds memorised" line 

and confi rm. 

     Modify the speed. 
    Select " 

OK " and confi rm to save the 

modifi cations.  

  With your Audio system 

  With the eMyWay satellite 

navigation system 

      Go to the main menu by pressing 

the left hand thumb wheel at the 

bottom of the steering wheel. 

    Select the "Vehicle parameters" 

menu and confi rm. 

     Select the "Driving assistance" line 

and confi rm. 

     Select the "Speeds memorised" line 

and confi rm. 

     Modify the speed. 
    Select " 

OK " and confi rm to save the 

modifi cations.  

 These operations are only pos-

sible when stationary with this 

system.  

  Access 

9

D R I V I N G

176 

 The programmed information is 

grouped together in the instrument 

panel screen. 
  6.    Speed limiter on / off indication. 
  7.   Speed limiter mode selection indi-

cation. 

  8.    Programmed speed value. 
  9.    Selection of a memorised speed.  
 

(see "Memorising speeds")  

  Displays in the instrument panel 

      SPEED LIMITER 

 System which prevents the vehicle 

from exceeding the speed programmed 

by the driver. 
 When the programmed speed limit is 

reached, pressing the accelerator ped-

al no longer has any effect. 

 The speed limiter cannot, in any 

circumstances, replace the need 

to respect speed limits, nor can 

it replace the need for vigilance 

and responsibility on the part of 

the driver. 

 The functions of this system are 

grouped together on the steering 

mounted controls. 
   1.   Speed limiter mode selection wheel. 
  2.   Programmed value decrease but-

ton. 

  3.   Programmed value increase button. 
  4.   Speed limiter on / off button. 
  5.   List of memorised speeds display 

button.  


(see the "Memorising speeds" sec-

tion)   

  Steering mounted controls 

  Operation 

 The speed limiter is  switched on  man-

ually: it requires a programmed speed 

of at least 20 mph (30 km/h). 
 The speed limiter is  

switched off  by 

manual operation of the control. 
 The programmed speed can be ex-

ceeded temporarily by pressing the 

accelerator  fi rmly beyond the point of 

resistance. 
 To return to the programmed speed, 

simply release the accelerator pedal. 
 The programmed speed remains in the 

memory when the ignition is switched 

off.  

9

D R I V I N G

177 

  Programming 

       Turn dial  1  to the  "LIMIT"  posi-

tion: the speed limiter mode is 

selected but is not switched on 

(Pause).  

 You do not have to switch the speed 

limiter on in order to set the speed. 

      Set the speed value by pressing button  

2  or  

3  (e.g.: 

55 mph (90 km/h)).  

 You can then change the programmed speed using but-

tons  2  and  3 : 
   -  

by + or - 1 mph (km/h) = short press, 

  -  

in steps of + or - 5 mph (km/h) = maintained press.  

 If speed memorisation is available and activated on your 

vehicle, the programmed speed will stop at the closest 

memorised speed; refer to the corresponding paragraph. 
      Switch the speed limiter on by pressing button  4 . 
     Switch the speed limiter off by pressing button  4 : the 

display confi rms that it has been switched off (Pause). 

  Exceeding the programmed speed 

 Pressing the accelerator pedal to exceed the programmed 

speed will not have any effect unless you press the pedal 

 fi rmly  past the  point of resistance . 
 The speed limiter is deactivated temporarily and the pro-

grammed speed, which is still displayed, fl ashes. 
 Returning to the programmed speed, by means of inten-

tional or unintentional deceleration of the vehicle, automati-

cally cancels the fl ashing of the programmed speed.  

  Exiting the speed limiter mode 

      Turn dial  1  to the  "0"  position: the 

speed limiter mode is deselected. It 

disappears from the screen.   

  Operating fault 

 In the event of a fault with the speed 

limiter, the speed is cleared resulting in 

fl ashing of the dashes. 
 Have it checked by a CITROËN dealer 

or a qualifi ed workshop. 

 On a steep descent or in the 

event of sharp acceleration, the 

speed limiter will not be able to 

prevent the vehicle from exceed-

ing the programmed speed. 
 To avoid any risk of jamming of 

the pedals: 
   -   ensure that the mat is posi-

tioned correctly, 

  -  do 

not 

fi t one mat on top of 

another.   

     Switch the speed limiter back on by pressing button  4  

again.   

9

D R I V I N G

178 

 The cruise control system can-

not, in any circumstances, re-

place the need to respect speed 

limits, nor can it replace the need 

for vigilance and responsibility 

on the part of the driver. 
 You are advised to keep your 

feet near the pedals at all times.  

      CRUISE CONTROL 

 System which automatically maintains 

the speed of the vehicle at the value 

programmed by the driver, without any 

action on the accelerator pedal. 

 The functions of this system are grouped 

together on the steering mounted con-

trols. 
   1.   Cruise control mode selection dial. 
  2.   Speed programming/value decrease 

button. 

  3.   Speed programming/value increase 

button. 

  4.   Cruise control off/resume button. 
  5.   Memorised speeds display button.  
 

(see "Memorising speeds")  

  Steering mounted controls 

 The programmed information is grouped 

together in the instrument panel screen. 
  6.   Cruise control off/resume indica-

tion. 

  7.   Cruise control mode selection indi-

cation. 

  8.    Programmed speed value. 
  9.    Selecting a stored speed.  
 

(see "Storing speeds")  

  Displays in the instrument panel 

  Operation 

 The cruise control is  

switched on  

manually: it requires a minimum ve-

hicle speed of 25 mph (40 km/h) and 

engagement of: 
   -  

fourth gear on the manual gearbox, 

  -  

second gear on the electronic gear-

box system or automatic gearbox, 

in sequential driving mode, 

  -  position 


A  on the electronic gearbox 

system or  D  on an automatic gear-

box.  

 The cruise control is  switched off  man-

ually or by pressing the brake or clutch 

pedal or on triggering of the ESP sys-

tem for safety reasons. 
 It is possible to exceed the programmed 

speed temporarily by pressing the ac-

celerator pedal. 
 To return to the programmed speed, 

simply release the accelerator pedal. 
 Switching off the ignition cancels any 

programmed speed value.  

9

D R I V I N G

179 

 When the cruise control is 

switched on, be careful if you 

maintain the pressure on one of 

the programmed speed changing 

buttons: this may result in a very 

rapid change in the speed of your 

vehicle. 
 Do not use the cruise control on 

slippery roads or in heavy traffi c. 
 On a steep descent, the cruise 

control will not be able to prevent 

the vehicle from exceeding the 

programmed speed. 
 On steep climbs or when towing, 

the programmed speed may not 

be reached or maintained. 
 To avoid any risk of jamming of 

the pedals: 
   -   ensure that the mat is posi-

tioned correctly, 

  -  never 

fi t one mat on top of 

another.   

  Programming 

      Turn dial  1  to the  "CRUISE"  po-

sition: the cruise control mode is 

selected but is not switched on 

(Pause). 

     Set the programmed speed by ac-

celerating to the required speed, 

then press button  

2  or  

3  (e.g.: 

70 mph (110 km/h)); the cruise 

control system is activated (ON).  

 You can then change the programmed speed using but-

tons  2  and  3 : 
   -  

by + or - 1 mph (km/h) = short press, 

  -  

in steps of + or - 5 mph (km/h) = maintained press.  

 If storing speeds is available and activated on your vehicle, 

the programmed speed will stop at the closest stored speed; 

refer to the corresponding section. 
      Stop the cruise control system by pressing button  4 : 

this is confi rmed in the screen (Pause). 

  Exceeding the programmed speed 

 Intentional or unintentional exceeding of the programmed 

speed results in fl ashing of this speed in the screen. 
 Return to the programmed speed, by means of intentional 

or unintentional deceleration of the vehicle, automatically 

cancels the fl ashing of the speed.  

  Exiting cruise control mode 

      Turn dial  1  to the  "0"  position: the cruise control mode 

is deselected. It disappears from the screen.   

     Switch on the cruise control again with another press 

on button  4 .   

  Operating fault 

 In the event of a cruise control malfunc-

tion, the speed is cleared resulting in 

fl ashing of the dashes. 
 Have it checked by a CITROËN dealer 

or a qualifi ed workshop. 

9

D R I V I N G

180 

      PARKING SPACE SENSORS 

  System which measures the parking 

space available between two vehicles 

or obstacles. It measures the size of the 

space and gives you information on: 
   -   the possibility of fi tting into a free 

space, depending on the dimensions 

of your vehicle and the distances 

needed for manoeuvring, 

  -  

the level of diffi culty of the manoeuvre 

to be performed.  

 The system does not measure spaces 

which are clearly much smaller or larg-

er than the size of the vehicle.  

  Displays in the instrument panel 

   -  

 on fi xed:  the function is selected by 

a press on control  A . 

  -  

 off:  the function is not selected,   

 The parking space sensor 

function warning lamp can 

have two different states: 

  Operation 

 You have identifi ed a parking space: 
      Press button  A  to select the function. 
     Operate the direction indicator on 

the side where the space is to be 

measured; a message is displayed 

to confi rm that measurement is in 

progress. 

    During measurement, go forward 

the length of the space, at a speed 

less than 12 mph (approx. 20 km/h), 

to prepare for your manoeuvre. 

     Once the measurement has been 

completed, the system informs you 

of the level of diffi culty of the ma-

noeuvre by a message in the multi-

function screen accompanied by an 

audible signal.  

9

D R I V I N G

181 

  The function displays the following types 

of message: 

  Parking possible  

  Parking diffi cult  

  Parking not advised   

 The function deselects itself automati-

cally: 
   -  

when you engage reverse gear, 

  -  

when you switch off the ignition, 

  -  

if measuring is not requested, 

  -  within 

fi ve minutes of selection of 

the function, 

  -   if the vehicle speed exceeds the 

threshold of 45 mph (approx. 70 km/h) 

for one minute.  

  If the lateral distance between your ve-

hicle and the parking space is too large, 

the system may not be able to measure 

the space.  

 If there is a fault, have the sys-

tem checked by a CITROËN 

dealer or a qualifi ed workshop.   

  The system remains available after 

each measurement and can therefore 

measure several spaces in succession. 
 In poor or wintry weather, ensure that 

the sensors are free of dirt, ice or snow. 
 The parking space sensor system de-

activates the front parking sensors 

when measuring forwards. 

9

D R I V I N G

182 

      PARKING SENSORS 

 This system indicates the proximity of an 

obstacle (person, vehicle, tree, gate, etc.) 

which comes within the fi eld of detection 

of sensors located in the bumper. 
 Certain types of obstacle (stake, road-

works cone, etc.) detected initially will 

no longer be detected at the end of the 

manoeuvre due to the presence of blind 

spots.  

  This function cannot, in any cir-

cumstances, take the place of 

the vigilance and responsibility 

of the driver.   

 The system is switched on by engaging 

reverse gear. This is accompanied by 

an audible signal. 
 The system is switched off when you 

exit reverse gear. 

  Rear parking sensors 

  Audible assistance 
 The proximity information is given by an 

intermittent audible signal, the frequen-

cy of which increases as the vehicle ap-

proaches the obstacle. 
 The sound emitted by the speaker (right 

or left) indicates the side on which the 

obstacle is located. 
 When the distance between the vehicle 

and the obstacle becomes less than 

approximately thirty centimetres, the 

audible signal becomes continuous.   

   Visual assistance 
 This supplements the audible signal 

by displaying bars in the multifunction 

screen which move progressively near-

er to the vehicle. When the obstacle is 

near, the "Danger" symbol is displayed 

in the screen.   

9

D R I V I N G

183 

 In addition to the rear parking sensors, 

the front parking sensors are triggered 

when an obstacle is detected in front 

and the speed of the vehicle is still below 

6 mph (10 km/h). 
 The front parking sensors are interrupted 

if the vehicle stops for more than three 

seconds in forward gear, if no further ob-

stacles are detected or when the speed 

of the vehicle exceeds 6 mph (10 km/h). 

       Front parking sensors 

  Deactivation/Activation of the front 

and rear parking sensors 

 The function is deactivated by pressing 

this button. The indicator lamp in the 

button comes on. 
 Pressing this button again reactivates 

the function. The indicator lamp in the 

button goes off.   

  Operating fault 

   The function will be deactivated 

automatically if a trailer is being 

towed or a bicycle carrier is fi t-

ted (vehicle fi tted with a towbar 

or bicycle carrier recommended 

by CITROËN).   

  In bad weather or in winter, en-

sure that the sensors are not 

covered with mud, ice or snow. 

When reverse gear is engaged, 

an audible signal (long beep) in-

dicates that the sensors may be 

dirty. 
 Certain sound sources (motor-

cycle, lorry, pneumatic drill, etc.) 

may trigger the audible signals 

of the parking sensor system.   

 In the event of a malfunction 

of the system, when reverse 

gear is engaged this warn-

ing lamp is displayed in the instrument 

panel and/or a message appears in the 

screen, accompanied by an audible 

signal (short beep). 
 Contact a CITROËN dealer or a quali-

fi ed workshop. 

  The sound emitted by the speaker (front 

or rear) indicates whether the obstacle 

is in front or behind.    

10

C H E C K S

184 

 TOTAL & CITROËN 

  Partners in performance and 

protecting the environment 

  Innovation in the search for 

performance 
 For over 40 year, the TOTAL Research and 

Development departments have developed 

for CITROËN, lubricants to match the 

latest technical innovations on CITROËN 

vehicles, both for competition and for 

everyday motoring. 
 For you, this is an assurance that you will 

obtain of the best performance for your 

engine.  

  Optimum protection for your 

engine 
 By having your CITROËN vehicle 

serviced with TOTAL lubricants, 

you are contributing towards im-

proving the life and performances 

of your engine, while also protect-

ing the environment. 

  prefers    

10

C H E C K S

185 

            BONNET 

     Push the exterior safety catch  B  to 

the left and raise the bonnet. 

  Opening 

      Open the front left door. 
     Pull the interior bonnet release le-

ver  A , located at the bottom of the 

door aperture. 

     Unclip the stay  C  from its housing 

on the back of the bonnet. 

     Fix the stay in the notch to hold the 

bonnet open.  

  The location of the interior bonnet 

release lever prevents opening of 

the bonnet while the front left door 

is closed.  

  Closing 

     Take the stay out of the support 

notch. 

     Clip the stay in its housing on the 

back of the bonnet. 

     Lower the bonnet and release it at 

the end of its travel. 

     Pull on the bonnet to check that it is 

secured correctly.   

  Do not open the bonnet in high 

winds. 
 When the engine is hot, handle 

the exterior safety catch and the 

bonnet stay with care (risk of 

burns).   

       Before doing anything under the 

bonnet, switch off the Stop & 

Start system to avoid any risk of 

injury resulting from an automatic 

change to START mode.  

10

C H E C K S

186 

           RUNNING OUT OF FUEL 

(DIESEL)  

  1.6 litre HDi engine 

      Fill the fuel tank with at least fi ve

litres of diesel. 

     Open the bonnet. 
     If necessary, unclip the styling cover 

for access to the priming pump. 

    Squeeze and release the priming 

pump repeatedly until resistance is 

felt (there may be resistance at the 

fi rst press). 

     Operate the starter until the engine 

starts (if the engine does not start 

at the fi rst attempt, wait around 

15 seconds before trying again). 

     If the engine does not start after a 

few attempts, operate the priming 

pump again then start the engine. 

     Clip the styling cover back in place. 
     Close the bonnet.   

       2 litre HDi engine 

      Fill the fuel tank with at least fi ve li-

tres of Diesel. 

     Open the bonnet. 
     If necessary, unclip the style cover 

for access to the priming pump. 

     Slacken the bleed screw. 
    Squeeze and release the priming 

pump repeatedly until fuel appears 

in the transparent pipe. 

     Tighten the bleed screw. 
     Operate the starter until the engine 

starts (if the engine fails to start 

at the fi rst attempt, wait around 

15 seconds before trying again). 

     If the engine fails to start after a few 

attempts, operate the priming pump 

again, then the starter. 

     Put the style cover back in position 

and clip it in place, ensuring that it 

has clipped correctly. 

     Close the bonnet.   

  If the engine does not start fi rst 

time, don't keep trying but start 

the procedure again from the be-

ginning.   

  On vehicle fi tted with HDi engines, the 

fuel system must be primed if you run 

out of fuel; refer to the corresponding 

engine compartment view.  

  If the tank on your vehicle is fi tted with 

a misfuel prevention device, refer to the 

"Misfuel prevention (Diesel)" section.  

10

C H E C K S

187 

               PETROL ENGINES 

 The various caps and covers allow access for checking the levels of the various fl uids and for replacing certain components. 

   1.   Power steering reservoir. 
  2.   Screenwash and headlamp wash 

reservoir. 

  3.  Coolant reservoir. 

  4.  Brake fl uid reservoir. 
  5.  Battery/Fuses. 
  6.  Fusebox. 

  7.  Air fi lter. 
  8.   Engine oil dipstick. 
  9.  Engine oil fi ller cap.  

10

C H E C K S

188 

  *   According to engine.  

              DIESEL ENGINES 

 The various caps and covers allow access for checking the levels of the various fl uids, for replacing certain components and 

for priming the fuel system. 

   1.   Power steering reservoir. 
  2.   Screenwash and headlamp wash 

reservoir. 

  3.  Coolant reservoir. 

  4.  Brake fl uid reservoir. 
  5.  Battery/Fuses. 
  6.  Fusebox. 
  7.  Air fi lter. 

  8.   Engine oil dipstick. 
  9.  Engine oil fi ller cap. 
  10.  Priming  pump * . 
  11.  Bleed screw * .  

10

C H E C K S

189 

       CHECKING LEVELS  

  Take care when working under 

the bonnet, as certain areas of 

the engine may be extremely hot 

(risk of burns) and the cooling 

fan could start at any time (even 

with the ignition off).   

  The check is carried out either 

when the ignition is switched 

on using the oil level indicator 

in the instrument panel, or us-

ing the dipstick. 

 It will only be correct if the vehicle is on 

level ground and the engine has been 

off for more than 30 minutes. 
 It is normal to top up the oil level be-

tween two services (or oil changes). 

CITROËN recommends that you check 

the level, and top up if necessary, every 

3 000 miles (5 000 kms). 
 After topping up the oil, the check when 

switching on the ignition with the oil 

level indicator in the instrument panel 

is not valid during the 30 minutes after 

topping up.  

                  Oil level 

  Engine oil change 
 Refer to the maintenance and warranty 

guide for details of the interval for this 

operation. 
 In order to maintain the reliability of the 

engine and emission control system, 

the use of additives in the engine oil is 

prohibited.  

           Brake fluid level 

  Changing the fl uid 
 Refer to the maintenance and warranty 

guide for details of the interval for this 

operation.  

  Fluid specifi cation 
 The brake fl uid must conform to the 

manufacturer's recommendations.   

           Power steering fluid level 

 The power steering fl uid  level 

should be close to the "MAX" 

mark. With the engine cold, un-

screw the cap to check the level.  

           Coolant level 

  The coolant level should be 

close to the "MAX" mark but 

should never exceed it. 
 When the engine is warm, the 

temperature of the coolant is regulated 

by the fan. 
 In addition, as the cooling system is 

pressurised, wait at least one hour after 

switching off the engine before carrying 

out any work. 
 To avoid any risk of scalding, unscrew 

the cap by two turns to allow the pres-

sure to drop. When the pressure has 

dropped, remove the cap and top up 

the level.  

  Fluid specifi cation 
 The coolant must conform to the manu-

facturer's recommendations.   

  Check all of these levels regularly, in 

line with the maintenance and warranty 

guide. Top them up if necessary, unless 

otherwise indicated. 
 If a level drops signifi cantly, have the 

corresponding system checked by a 

CITROËN dealer or a qualifi ed  work-

shop.  

  Oil specifi cation 
 The oil must be the correct grade for 

your engine and conform to the manu-

facturer's recommendations.   

        The cooling fan may start after 

switching off the engine: take 

care with articles and clothing 

that might become caught by the 

fan blades.   

 The brake fl uid level should be 

close to the "MAX" mark. If it is 

not, check the brake pad wear. 

10

C H E C K S

190 

         Used products 

 Avoid prolonged contact of used 

oil or fl uids with the skin. 
 Most of these fl uids are harmful 

to health or indeed very corro-

sive. 

 Do not discard used oil or fl uids 

into sewers or onto the ground. 
 Take used oil to a CITROËN 

dealer or a qualifi ed  workshop 

(France) or to an authorised 

waste disposal site.  

         Additive level (Diesel with 

particle emissions filter) 

 The additive reservoir low level is indi-

cated by: 

  Topping up 
 The reservoir must be topped up with-

out delay by a CITROËN dealer or a 

qualifi ed workshop.   

   -  

fi xed illumination of the par-

ticle emissions fi lter  warning 

lamp, accompanied by an au-

dible signal and a message 

that the particle emissions 

fi lter additive level is too low.  

  Screenwash / headlamp wash 

fluid level 

  Specifi cation of the fl uid 
 To ensure optimum cleaning and to 

avoid freezing, the fl uid should never be 

topped up or replaced by plain water. 
 In wintry conditions, the use of a fl uid 

with an ethyl alcohol or methanol base 

is recommended.   

 To check the level or top up 

the  fl uid on vehicle fi tted  with 

headlamp washers, immobilise 

the vehicle and switch of the 

engine. 

      Open the bonnet and secure it with 

the stay. 

     Open the screenwash reservoir fi ll-

er cap. 

     Take and pinch the level gauge to 

block its breather. 

     Remove the gauge completely from 

the reservoir to read the level in the 

transparent section. 

     Top up if necessary. 
    Refi t  the  fi ller cap to the reservoir 

and close the bonnet.  


Content   ..  10  11  12  13   ..