Chery Tiggo 5 (T21). Service manual - part 500
 

  Index      Chery     Chery Tiggo 5 (T21) - service and repair manual 2014 year


Search            copyright infringement  


Content   ..  498  499  500  501   ..


Chery Tiggo 5 (T21). Service manual - part 500


 47–

16

47

Hood Hinge Assembly

Removal

HINT:

 Use the same procedures for the right side and left side.

 Procedures listed below are for the left side.

1. Turn off all the electrical equipment and ignition switch.
2. Disconnect the negative battery cable.
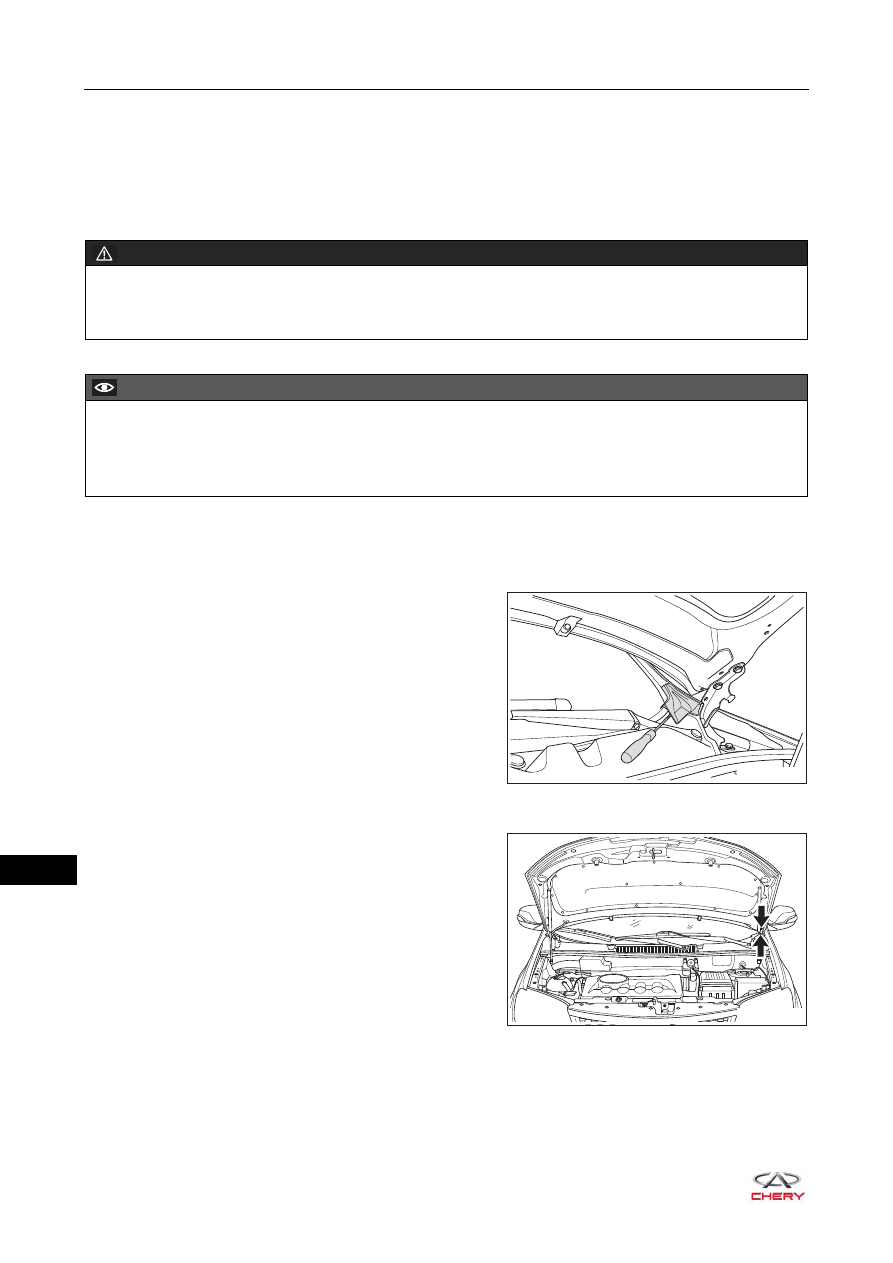
3. Remove the front windshield lower garnish left cover plate.

a. Using a screwdriver wrapped with protective tape, pry 

up the claws on front windshield lower garnish left 
cover plate.

b. Remove the front windshield lower garnish left cover 

plate.

4. Remove the hood left hinge assembly.

a. Remove 2 fixing bolts (arrow) between hood hinge 

assembly and hood assembly.

(Tightening torque: 23 ± 2 N·m)

WARNING

 When removing hood hinge assembly, an assistant is needed to hold hood. Prevent hood from dropping 

or sudden closing to cause accidents during operation.

CAUTION

 Be sure to wear safety equipment to prevent accidents when removing hood hinge assembly.
 When removing hood hinge assembly, prevent hood from dropping to damage body or front windshield 

during operation.

RT21480490

RT21470130

 47–

17

47

b. Remove the fixing bolt (arrow) between hood hinge 

assembly and front fender assembly.

(Tightening torque: 10 ± 1 N·m)

c. Remove 2 fixing bolts (arrow) between hood hinge 

assembly and body.

(Tightening torque: 23 ± 2 N·m)

d. Remove the hood hinge Assembly.

Installation

Installation is in the reverse order of removal.

RT21480250

RT21470150

WARNING

 When installing hood hinge assembly, an assistant is needed to hold hood. Prevent hood from dropping 

or sudden closing to cause accidents during operation.

CAUTION

 After installing hood hinge assembly, it is necessary to adjust hood.
 When installing hood hinge assembly, prevent hood from dropping to damage body or front windshield 

during operation.

 47–

18

47

Hood Cable Assembly

Removal

1. Turn off all the electrical equipment and ignition switch.
2. Disconnect the negative battery cable.
3. Remove the radiator grille assembly (

See page 48-8

).

4. Remove the water tank upper crossmember trim board (

See page 48-10

). 

5. Remove the water tank upper crossmember deflector. 

a. Remove 2 plastic clips (arrow) and the fixing nut (1) 

from the water tank upper crossmember deflector.

(Tightening torque: 10 ± 1 N·m)

b. Remove the water tank upper crossmember deflector. 

6. Remove the hood lock assembly.

a. Remove 2 fixing nuts (arrow) from the hood lock 

assembly.

(Tightening torque: 10 ± 1 N·m)

b. Disengage the hood cable assembly (arrow) from the 

slot.

c. Remove the hood lock assembly.

CAUTION

 Be sure to wear safety equipment to prevent accidents when removing hood cable assembly.
 Try to prevent body paint surface from being scratched when removing hood cable assembly.

1

RT21370050

RT21370060

RT21370061

 47–

19

47

7. Remove the hood grip assembly.

a. Remove 2 fixing crews (arrow) from the hood grip 

assembly.

(Tightening torque: 1.5 ± 0.5 N·m)

b. Disengage the hood grip assembly in the direction of 

arrow as shown in the illustration.

c. Disengage the hood cable (arrow) to separate it from 

the hood grip assembly.

8. Remove the hood cable assembly.

a. Disengage the hood cable assembly from the clips.
b. Remove the hood cable assembly.

RT21470160

RT21470170

RT21470171

RT21470180


Content   ..  498  499  500  501   ..