Alfa Romeo Stelvio MCA (2023 year). Manual in english - page 1


  Index      Manuals     Alfa Romeo Stelvio MCA (2023 year). Manual in english


Search            copyright infringement  


Content      ..      1       2         ..


Alfa Romeo Stelvio MCA (2023 year). Manual in english - page 1


GETTING TO KNOW YOUR CAR

DASHBOARD . . . . . . . . . . . . . . . . . . . . . . . . . . . . . . . . . . . . . . . . . . . . . . . . . . . . . . . . . . . . . . .12
THE KEYS . . . . . . . . . . . . . . . . . . . . . . . . . . . . . . . . . . . . . . . . . . . . . . . . . . . . . . . . . . . . . . . . . . .13
IGNITION DEVICE . . . . . . . . . . . . . . . . . . . . . . . . . . . . . . . . . . . . . . . . . . . . . . . . . . . . . . . . . .15
ENGINE IMMOBILIZER . . . . . . . . . . . . . . . . . . . . . . . . . . . . . . . . . . . . . . . . . . . . . . . . . . . .16
ALARM . . . . . . . . . . . . . . . . . . . . . . . . . . . . . . . . . . . . . . . . . . . . . . . . . . . . . . . . . . . . . . . . . . . . . . 17
DOORS . . . . . . . . . . . . . . . . . . . . . . . . . . . . . . . . . . . . . . . . . . . . . . . . . . . . . . . . . . . . . . . . . . . . . .18
SEATS . . . . . . . . . . . . . . . . . . . . . . . . . . . . . . . . . . . . . . . . . . . . . . . . . . . . . . . . . . . . . . . . . . . . . . 22
HEAD RESTRAINTS . . . . . . . . . . . . . . . . . . . . . . . . . . . . . . . . . . . . . . . . . . . . . . . . . . . . . . 26
STEERING WHEEL . . . . . . . . . . . . . . . . . . . . . . . . . . . . . . . . . . . . . . . . . . . . . . . . . . . . . . . . 27
REAR-VIEW MIRRORS . . . . . . . . . . . . . . . . . . . . . . . . . . . . . . . . . . . . . . . . . . . . . . . . . . . 28
EXTERNAL LIGHTS . . . . . . . . . . . . . . . . . . . . . . . . . . . . . . . . . . . . . . . . . . . . . . . . . . . . . . . 30
INTERIOR LIGHTS . . . . . . . . . . . . . . . . . . . . . . . . . . . . . . . . . . . . . . . . . . . . . . . . . . . . . . . . 35
WINDSCREEN WIPER . . . . . . . . . . . . . . . . . . . . . . . . . . . . . . . . . . . . . . . . . . . . . . . . . . . . 36
CLIMATE CONTROL SYSTEM . . . . . . . . . . . . . . . . . . . . . . . . . . . . . . . . . . . . . . . . . . . 38
ELECTRIC WINDOWS . . . . . . . . . . . . . . . . . . . . . . . . . . . . . . . . . . . . . . . . . . . . . . . . . . . . 43
ELECTRIC SUNROOF . . . . . . . . . . . . . . . . . . . . . . . . . . . . . . . . . . . . . . . . . . . . . . . . . . . . . 44
BONNET . . . . . . . . . . . . . . . . . . . . . . . . . . . . . . . . . . . . . . . . . . . . . . . . . . . . . . . . . . . . . . . . . . . . 45
TAILGATE . . . . . . . . . . . . . . . . . . . . . . . . . . . . . . . . . . . . . . . . . . . . . . . . . . . . . . . . . . . . . . . . . .46
INTERIOR FITTINGS . . . . . . . . . . . . . . . . . . . . . . . . . . . . . . . . . . . . . . . . . . . . . . . . . . . . . . 48
WIRELESS CHARGING SYSTEM - WCPM (Wireless Charge Pad

Module) . . . . . . . . . . . . . . . . . . . . . . . . . . . . . . . . . . . . . . . . . . . . . . . . . . . . . . . . . . . . . . . . . . . . . 50
ENVIRONMENTAL PROTECTION SYSTEMS . . . . . . . . . . . . . . . . . . . . . . . . . .51

In-depth knowledge of your new car starts here.

The handbook you are reading will tell you how things are

done, and how it works in a simple, direct way.

That’s why we advise you to read it seated comfortably on

board, so that you can see immediately what is described here

for yourself.
CarManuals2.com

 GETTING TO KNOW YOUR CAR

12

DASHBOARD

1

9490100

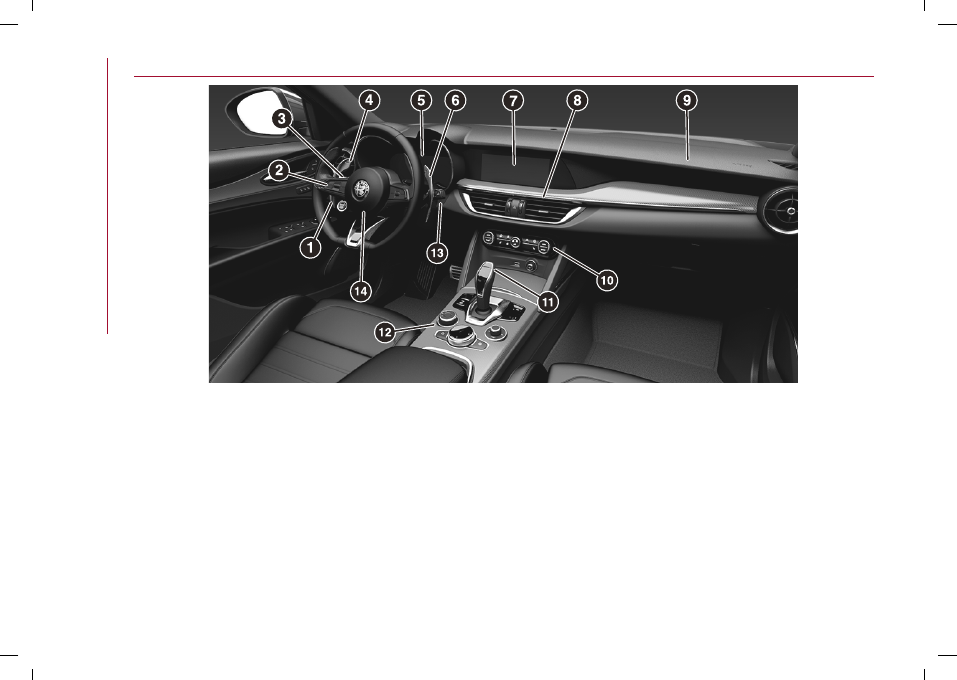
1 Exterior light switch / 2 Steering wheel controls: Cruise Control (where provided) / Active Cruise Control (where provided) / HAS

system (where provided) / TSR system (where provided) / TJA system (where provided) / ISC system (where provided) / 3 Left

stalk (external lights) / 4 Automatic transmission left shift paddle / 5 Instrument panel display / 6 Automatic transmission right

shift paddle / 7 Connect system / 8 Central air vents / 9 Passenger front airbag / 10 Automatic dual-zone climate control system /

11 Automatic transmission lever / 12 Controls on central tunnel (Alfa DNA™ Pro / Rotary Pad and interaction with Connect system) /

13 Right stalk (wiper) / 14 Steering wheel - Driver front airbag

CarManuals2.com

13

THE KEYS

ELECTRONIC KEY

1)

1)

The car is equipped with an electronic
key with a Keyless Start function fig. 2,

provided in duplicate.

2

04016S0010EM

OPERATION

Unlocking the doors and the tailgate

Briefly press the

button: unlocking

of doors and tailgate, timed switching-

on of ceiling lights and single flashing of

direction indicators (if activated from

the Connect system).
When the function is available, press and

release the unlock button on the remote

control once only to unlock the driver's

door or twice within 1 second to unlock all

doors and the tailgate.
It is however possible to change the

current setting through the Connect

system menu, so that the system

unlocks:

all doors on the first press of the

remote control button;

only the driver door on the first press

of the remote control button (where

provided);

the tailgate, "independently" or "with

doors".
Moreover, the Connect system can

be used to activate or deactivate the

flashing of the direction indicators upon

locking/unlocking the doors and activate

the "courtesy light" function (dipped

beam headlights and direction indicators

switch on) upon unlocking the doors. For

further information, see paragraph

"Settings" in the "Connect" supplement.
The doors can always be unlocked by

putting the metal insert inside the driver

side door lock.

Door and tailgate locking

Briefly press the

button: locking of

doors and tailgate, timed switching-off

of ceiling lights and double flashing of

direction indicators (if activated from

Connect system).
If one or more doors are open, the doors

are locked and this is indicated by a

rapid flashing of the direction indicators

(where provided). The doors prepare for

locking, which is active from the moment

they are closed. The doors will unlock

again only if the key presence is detected

inside the passenger compartment.
The doors can always be locked by

putting the metal insert inside the driver

side door lock.

Automatic window opening/closing

function

(where provided)
Prolonged pressing of button : open all

windows.
Prolonged pressing of button : close all

windows.

Tailgate opening

Rapidly press the

button twice to

open the tailgate remotely. The direction

indicators will flash twice to indicate that

the tailgate has been opened.

REPLACING THE ELECTRONIC KEY

BATTERY

1)

To replace the battery, proceed as

follows:

press in the points shown fig. 3 and

slide the cover off downwards;

remove the key insert fig. 4;

CarManuals2.com

 GETTING TO KNOW YOUR CAR

14

3

04016S0002EM

4

04016S0003EM

remove the battery cap fig. 5 by

rotating it anticlockwise;

remove the battery from its housing

fig. 6 and replace it with a new one of the

same type.

5

04016S0004EM

6

04016S0005EM

Proceed in reverse order to reassemble

the key.
WARNING The battery replacement

operation must be carried out with care,

in order not to damage the electronic

key.

REQUEST FOR ADDITIONAL KEYS

The system can recognise up to 8 keys

with remote control.
Only use keys that have been specially

coded for the car electronics.

If an electronic key is coded for a car, it

cannot be used on any other car.

Duplicating keys

If you need a new electronic key, go to

an Alfa Romeo Dealership, taking an

ID document and the car ownership

documents.

WARNING

1)

Do not swallow the battery. Danger of

chemical burns. The keys contain a small

battery. If the battery is swallowed, it

can cause severe internal burns in just 2

hours and cause death. Keep new and used

batteries out of the reach of children. If

the battery compartment does not close

securely, discontinue use of the product

and keep it out of reach of children. If you

believe that batteries may have been

swallowed or inserted inside the body,

seek medical attention immediately. The

emergency key (where provided) must be

immediately inserted into the electronic key

to prevent easy access to the battery.

IMPORTANT

1)

The electronic components inside the key

may be damaged if the key is subjected to

strong shocks. In order to ensure complete

efficiency of the electronic devices inside

the key, it should never be exposed to direct

sunlight.

CarManuals2.com

15

IMPORTANT

1)

Used batteries may be harmful to the

environment if not disposed of correctly.

They must be disposed of as specified by

law in the special containers or taken to an

Alfa Romeo Dealership, which will take care

of their disposal.

IGNITION DEVICE

OPERATION

2) 3) 4) 5) 6)

To activate the ignition device fig. 7

the electronic key must be inside the

passenger compartment.

7

04026V0001EM

The ignition device has the following

possible states:

STOP: engine off, steering column

locked. Some electrical devices (e.g.

central door locking system, alarm, etc.)

are still available;

ON (single button press): all electrical

devices are available. This state can be

selected by pressing the ignition device

button once, without pressing the brake

pedal;

AVV: engine starting. This state can be

selected by pressing the ignition device

button once and pressing the brake

pedal.
After starting the engine, insert the
electronic key into housing 1 fig. 8 beside

the shift lever on the central tunnel.

8

04206S0554EM

NOTE With the ignition device ON, if

30 minutes pass with P (Park) mode

engaged and the engine off, the ignition

device will automatically move to the

STOP position.
NOTE With motor started, it is possible

to go away from the car taking the

electronic key with you. The engine will

still be running. The car will indicate the

absence of the key on board when the

door is closed.
WARNING If the battery was

disconnected, do not start the engine

immediately after reconnecting the

terminals, but press the start button,

without operating the pedals, to turn on

the instrument panel and then start the

engine.
The

symbol on the instrument panel

will remain on, indicating that the

steering must be initialised. To do this,

turn the steering wheel from one end to

the other and bring it back to the centre

position within 30 seconds from starting

the engine. If faults persist (warning

lights appearing on the instrument

panel), stop the engine, wait for at

least 5 seconds and repeat the starting

procedure described above.

STARTING WITH FLAT KEY BATTERY

If the remote control battery is flat,

proceed as follows to start the car:

lift the front armrest;

CarManuals2.com

 GETTING TO KNOW YOUR CAR

16

lay the key on the indicated spot,

positioning as shown in fig. 9.

9

04026S0995EM

STEERING COLUMN LOCK

(where provided)

Activation

The steering lock is engaged when the

driver door is opened with the ignition

device button at STOP.

Deactivation

The steering column lock disengages

when the ignition device is pressed and

the electronic key is recognised.

WARNING

2)

Always take the key with you when

you leave your car to prevent someone

from accidentally operating the controls.

Remember to engage the electric parking

brake. Never leave children unattended in

the car.

3)

It is absolutely forbidden to carry out any

after-market operation involving steering

system or steering column modifications

(e.g. installation of anti-theft device) that

could adversely affect performance,

invalidate the warranty, cause SERIOUS

SAFETY PROBLEMS and also result

in the car not meeting type-approval

requirements.

4)

Before leaving the vehicle, ALWAYS

engage the handbrake. Activate mode P

(Park) and press the ignition device to set it

to STOP. When leaving the vehicle, always

lock all the doors by pressing the button on

the handle.

5)

For versions equipped with the Keyless

Start system, do not leave the electronic

key inside or near the car or in a place

accessible to children. Do not leave the car

with the ignition device in ON position. A

child could activate the electric window

winders, other controls or even start the car.

6)

If the ignition device has been tampered

with (e.g. an attempted theft), have it

checked over by the Alfa Romeo Dealership

before driving again.

ENGINE IMMOBILIZER

The Engine Immobilizer system prevents

unauthorised use of the car preventing to

start the engine.
The system does not need to be

enabled/activated: operation is

automatic, regardless of the fact that the

car's doors are locked or unlocked.

IRREGULAR OPERATION

If, during starting, the key code is not
correctly recognised, the

symbol

appears the instrument panel (see the

instructions in the "Warning lights and

messages" chapter in the "Knowing

the instrument panel" section). This

condition leads to the engine stopping

after 2 seconds. In this case, bring the

ignition device to STOP and then to ON; if

it is still blocked, try with the other keys

provided. If it is still not possible to

start the engine, contact an Alfa Romeo

Dealership.
If the

symbol is displayed while

driving, this means that the system is

running a self-diagnosis (e.g. due to

a voltage drop). If the display persists,

contact an Alfa Romeo Dealership.

WARNINGS

Do not tamper with the Engine

Immobilizer system. Any

modifications/alterations could

CarManuals2.com

17

cause the protection function to be

deactivated.
The Engine Immobilizer system is not

compatible with certain aftermarket

remote starting systems.

ALARM

(where provided)

ALARM ACTIVATION

The alarm goes off in the following cases:

wrongful opening of

doors/bonnet/boot (perimeter

protection);

operation of ignition device with a key

which is not validated;

cutting of the battery leads;
movement inside the passenger

compartment (volumetric protection,

where provided);

anomalous lifting/tilting of the car

(anti-lift protection, where provided).
Activation of the alarm triggers the horn

and the direction indicators.
WARNING The function is ensured by

the Engine Immobilizer system, which is

automatically activated when you get out

of the car taking the electronic key with

you and locking the doors.
WARNING The alarm is adapted to meet

requirements in various countries.

TURNING THE ALARM ON

With the doors, bonnet and boot closed

and the ignition device turned to STOP,

point the electronic key towards the car
and press and release button . The

alarm can also be engaged by pressing

the "door lock" button, located on the

door external handle. For further

information, see "Passive Entry" in the

"Doors" chapter.
Except on some versions for specific

markets, the system produces a visual

and acoustic warning and enables door

locking.
With the alarm on, the warning lights

on the door handle trims remain on

continuously fig. 10.

10

9550202

In case of faults the system will generate

a further acoustic signal.
If a second acoustic signal is emitted

after the alarm is switched on, wait about

4 seconds and switch off the alarm by

pressing the

button. Check that the

doors, bonnet and tailgate are closed

properly and then reactivate the system
by pressing the

button.

If the alarm emits an acoustic signal even

when the doors, tailgate and luggage

compartment are closed properly, a

system fault has occurred: in this case,

contact an Alfa Romeo Dealership

TURNING THE ALARM OFF

Press the button. The following actions

are performed:

two brief flashes (where provided) of

the direction indicators;

two brief acoustic signals (where

provided);

doors are unlocked.

The alarm can also be disengaged by the

holder of the key, by grasping one of the

front handles. For further information

see the "Passive Entry" item in the

"Doors" paragraph.
WARNING The alarm does not switch off

when the central opening is activated

using the metal insert in the key.

VOLUMETRIC/ANTI-LIFTING

PROTECTION

(where provided)
To ensure the correct operation of the

protection, completely close the side

windows.

CarManuals2.com

 GETTING TO KNOW YOUR CAR

18

To exclude the function, press button
fig. 11 before activating the alarm.
When the function is turned off, this

is indicated by the LED on the button

flashing for several seconds.

11

04046S0002EM

DISARMING THE ALARM

To completely disable the alarm (e.g.

during a long period of car inactivity),

lock the doors by turning the metal

insert, found inside the electronic key, in

the door lock.

DOORS

LOCKING/UNLOCKING DOORS FROM

THE INSIDE

Central locking/unlocking

If all doors are closed properly, they will

automatically be locked once the car has

exceeded about 20 km/h ("Auto relock"

function active).
Press the button on the driver side ,

passenger side fig. 12 or rear (where

provided) door panel trims to lock the

doors.
With the doors locked, press the

button on the front door panel trims to

unlock them.

12

9550183

LOCKING/UNLOCKING DOORS FROM

THE OUTSIDE

Locking from the outside

With the doors closed, press the

button on the key.
In any case, the doors can be locked with

all the doors closed and the tailgate

open. When the button

on the key

is pressed, all the locks are closed,

including that of the open tailgate. The

latter will be locked when it is closed.

2)

Door unlocking from the outside

Press the button

on the key.

Locking/unlocking doors from the

outside in an emergency

If the battery is flat or the remote control

is faulty, you can lock/unlock the doors

from the outside by inserting and

rotating the metal insert (available inside

the electronic key) in the lock of the

driver side door.

PASSIVE ENTRY

(where provided)

3)

The Passive Entry system can identify

the presence of an electronic key near

the doors and the tailgate.
The system enables the doors (or the

tailgate) to be locked/unlocked without

pressing any buttons on the electronic

key.
The key is detected only after the

system recognises the presence of a

hand in one of the front handles. If the

detected key is valid, the doors and the

tailgate are unlocked (the elements that

open depend on the Connect system

settings).

CarManuals2.com

19

Where the function is provided, grasping

the handle of the driver's door unlocks

the driver's door only, or all the doors,

depending on the mode set in the

Connect system.
WARNING If wearing gloves, or if it has

rained and the door handle is wet, the

activation sensitivity of the Passive

Entry function may be reduced, resulting

in a longer reaction time.

Door locking

To lock the doors, proceed as follows:

make sure that you have the electronic

key and are close to the driver or

passenger side door handle;

press the "door locking" button fig. 13

on the handle: this will lock all the doors

and the tailgate. Locking the doors will

also activate the alarm (where provided).

13

04056S0003EM

WARNING After pressing the "door

locking" button, you need to wait two

seconds before the doors can be

unlocked again using the door handle. It is

therefore possible to check whether the

car is locked correctly by pulling the door

handle within 2 seconds. The doors will

not be unlocked again.
The doors and tailgate can anyway
be locked pressing button

on the

electronic key or on the inner door panel.

Driver side door emergency opening

If the electronic key does not work, e.g.

because its battery is flat or the car

battery is flat, the emergency metal

insert inside the key can anyway be used

to operate the lock, unlocking the driver

side door.
To extract the metal insert, proceed as

follows:

Press in the points shown fig. 14 and

slide the cover off downwards;

remove the key insert from its housing

fig. 15;

insert the metal insert in the driver

side door lock and turn it to unlock the

door.

14

04016S0002EM

15

04016S0003EM

NOTE The metal insert of the key has

no forced insertion direction and can be

inserted indifferently in the lock.

WARNINGS

To avoid leaving the electronic key inside

the car accidentally, the Passive Entry

function features an automatic door

unlocking function.
If one of the car doors is open and the

"door lock" button is pressed located

on the front door handles, or the button

CarManuals2.com

 GETTING TO KNOW YOUR CAR

20

in the door panel inner trim , once all

the doors are closed, the car checks the

inside and outside of the car to check for

the presence of enabled electronic keys.
When pulling the handle, do not press the

door lock/unlock button on the handle

fig. 16.

16

04056S0004EM

If one of the electronic keys is detected

inside the car and no other active

electronic key is detected outside

the car, the Passive Entry function

automatically unlocks all the car doors,

sounds three times and operates the

direction indicators.
If, on the contrary, one or more

electronic keys are inside the passenger
compartment, pressing the button

on

the remote control the keys inside the

passenger compartment are temporarily

disabled.
The car will

not unlock

the doors if one of

the following situations is present:

an unauthorised electronic key close

to the car has been detected outside.
If the Passive Entry function is

disabled using the Connect system, the

protections to avoid leaving accidentally

the electronic key inside the car are

deactivated.

Boot access

Approach the tailgate with a valid

electronic key and press the opening
button fig. 17 to access the boot.

17

04056V0005EM

WARNING If the electronic key is

inadvertently forgotten inside the boot

and an attempt is made to close it

from the outside, the tailgate will not

lock unless another electronic key is

recognised outside and close to the car.

With the doors locked, if only the tailgate

is unlocked and a key is detected inside

when it is locked again, the tailgate will

be unlocked again and the lights will flash

twice.

WARNING Before driving make sure the

tailgate is closed correctly.

Tailgate locking

The tailgate may still be locked by
pressing the

button on the electronic

key, by pressing the door lock button on

the external handles or by pressing the

button on the door panel.

System activation/deactivation

The Passive entry system can be

activated/deactivated using the Connect

system.

POWER LOCK DEVICE

(where provided)

7)

This safety device inhibits the operation

of the interior door handles and the door

locking/unlocking button.
It thereby prevents the opening of

the doors from inside the passenger

compartment, serving as an obstacle to

break-in attempts (e.g. broken window).
We recommend that you activate the

device each time you park your car.

Activating the device

The device is enabled on all the doors by
pressing the

button on the key twice

quickly.
The direction indicators flash 3 times to

let you know that the device is active.

CarManuals2.com

21

If one or more of the doors are not closed

correctly, the device will not activate,

thus preventing a person from getting

stuck inside the passenger compartment

by entering the car through, and then

closing, the open door.

Deactivating the device

The device disengages automatically:

when the doors are unlocked (pressing

button

on the key with remote

control);

when the ignition device is set to ON.

CHILD LOCK

8) 9)

This system prevents the rear doors

from being opened from the inside.
This device (1) fig. 18 can be engaged only

with the doors open:

position : device engaged (door

locked);

position : device not engaged (door

may be opened from the inside).
The device remains engaged even if the

doors are electrically unlocked.
WARNING The rear doors cannot be

opened from the inside when the child

lock is engaged.

18

04056S0037EM

UNLOCKING THE DOORS WITH A FLAT

BATTERY

Proceed as follows to unlock the doors if

the car battery is flat.

Rear doors and passenger door

Proceed as follows:

insert the metal insert of the

electronic key in the release device
housing (2) fig. 18;

turn the key clockwise for the right

door locks or anticlockwise for the left

door locks;

remove the key from the housing.

Proceed in one of the following ways to

realign the door lock device (only when

the battery charge has been restored):

press the

button on the electronic

key;

press the

button on the door panel;

open by inserting the key insert in the

driver's door lock;

operate the internal door handle.

WARNING For the rear doors, if the

child lock device was engaged and the

previously described locking procedure

carried out, operating the internal handle

will not open the door but will only realign

the lock release device. To open the door,

the outside handle must be used. The

door central locking/unlocking buttons

are not deactivated when the emergency

lock is engaged.

WARNING

7)

Once the Power Lock system is engaged,

it is impossible to open the doors from

inside the car. Before getting out of the car,

please therefore check that there is no-one

left inside.

8)

NEVER leave children unattended inside

the car, let alone leave the car with the

doors unlocked in a place that children can

access easily. Children may seriously, or

even fatally, injure themselves. Also ensure

that children do not inadvertently operate

the electric parking brake, the brake pedal

or the automatic transmission lever.

9)

Always use this device when carrying

children. After engaging the device on both

rear doors, check that it is actually engaged

by trying to open a door with the internal

handle.

CarManuals2.com

 GETTING TO KNOW YOUR CAR

22

IMPORTANT

2)

Make sure to take the key with you once

a door or the boot is locked, to prevent

forgetting the key inside the car. If the key is

locked inside, it can only be retrieved by

using the second key provided.

3)

The operation of the recognition system

depends on various factors, such as, for

example, any electromagnetic wave

interference from external sources (e.g.

mobile phones), the charge of the battery in

the electronic key and the presence of metal

objects near the key or the car. In these

cases it is still possible to unlock the doors

by using the metal insert in the electronic

key (see description on the following pages).

SEATS

WARNING Carry out the adjustment

while sitting on the seat involved (driver

side or passenger side).
Driver seat adjustment must also be

carried out remembering that, keeping

the shoulders resting firmly against the

backrest, the wrists must be able to

reach the top of the steering wheel rim.
It must also be possible to fully press the

brake pedal with the right foot.

FRONT SEATS WITH MANUAL

ADJUSTMENT

10)

4)

Longitudinal adjustment

11)

Lift lever (1) fig. 19 and push the seat

forwards or backwards.

19

04066V0001EM

Height adjustment

Pull lever B (2) fig. 19 upward or push

downward to reach the desired height.

Backrest angle adjustment

Use lever (3) fig. 19 to adjust the

backrest angle, accompanying it with

the movement of the torso (operate

the lever until the desired position is

reached, then release it).

Folding the backrest forward

(where provided)
The front passenger seat can be folded
forward by operating lever (3) fig. 19.
During this operation, accompany the

backrest down with your free hand.

Folding the backrest down further

increases the size of the load

compartment.

“SPARCO” CARBONSHELL SPORT

SEATS

(where provided)

Longitudinal adjustment

Lift lever (1) fig. 20 and push the seat

forwards or backwards.

11)

20

04066S0002EM

Height adjustment

(electric)
Press the button (2) fig. 20 up or down

until the required height is reached.

Backrest angle adjustment

Use lever (3) fig. 20 to adjust the

backrest angle, accompanying it with

the movement of the torso (operate

the lever until the desired position is

reached, then release it).

CarManuals2.com

23

ELECTRICALLY ADJUSTABLE FRONT

SEATS

5)

These buttons for electrically to adjust

the seat height, the lengthwise position

in relation to the car and the angle of the

backrest.

21

04066V0003EM

Height and/or cushion tilt adjustment

Act on the rear part of the switch (1)
fig. 21.

Longitudinal adjustment

Push switch (1) fig. 21 forwards or

backwards to move the seat in the

corresponding direction.

Backrest angle adjustment

Push switch (2) fig. 21 forwards or

backwards to adjust the backrest in the

corresponding direction.

Power lumbar adjustment

Use the joystick (3) fig. 21 to operate the

lumbar support device.

WARNING The electrical adjustment is

only allowed when the ignition device is

turned to ON and for about 2 minutes

after it is turned to STOP. The seat can

also be moved after opening/closing

the door for about 2 minutes; car

locking/unlocking or switching on of the

centre front ceiling light.

Seat angle adjustment (tilting)

(where provided)
The seat angle can be set to four

positions. Lift or lower the front of
control (1) fig. 21 to move the front of the

seat in the corresponding direction.

Release control (1) when the seat has

reached the desired position.

Backrest width adjustment

(where provided)
Push the switches (4) fig. 21 to adjust the

width of the backrest by means of the

lateral padding.

Seat cushion extension

(where provided)
Lift the lever (6) fig. 22 and push the front

of the cushion forward or back. It can

move a few centimetres.

22

04066S0017EM

Storing the driver’s seat positions

The buttons (5) fig. 23 allow you to store

and recall three different driver’s seat

positions.
You can store and recall for 20 minutes

with the ignition device in the STOP

position or with the ignition device in

the ON position, the engine running and

the car moving. The performed position

memorisation is confirmed by a beep.

To memorise a seat position, adjust it

with the various controls, then press the

button where you want to memorise the

position for 1.5 seconds.
To memorise the position. When a

new seat position is memorised, the

previously memorised position on

the same button is automatically

overwritten.
Recalling a memorised position is also

possible for about 3 minutes after the

doors are opened and about 1 minute

after the engine is stopped. To recall a

CarManuals2.com

 GETTING TO KNOW YOUR CAR

24

memorised position, press the relevant

button briefly.

23

04066V0015EM

EASY ENTRY FUNCTION

The Easy Entry function is designed to

retract the driver side seat automatically

by 2.36 in (60 mm) to make it easier for

the driver to get in and out of the car.
The movement is activated only if the

seat is set to a driving position which is in

“front” of the central pillar of the car.
The function is associated with

electrically adjustable front seats for

each of the three stored positions.
The Easy Entry function can be

activated/deactivated using the Connect

system.

Activating entrance mode

With the door open and the ignition

switch at STOP, the driver side seat will

be in a position retracted by 2.36 in

(60 mm) with respect to the driving

position set by the user.

When the door is closed and the ignition

device is in the ON position, the seat will

automatically return to the set driving

position.
If the seat is moved manually while it is

still in retracted position, it will remain

in the new set position when the car is

entered again.
NOTE If the seat is moved manually

while it is still in retracted position, it will

remain in the new set position when the

car is entered again.

Activating entrance mode

With the door open and the ignition

switch at STOP, the driver side seat will

be in a position retracted by 2.36 in

(60 mm) with respect to the driving

position set by the user.
When the door is closed and the ignition

device is in the ON position, the seat will

automatically return to the set driving

position.
WARNING If the seat is moved manually

while it is still in retracted position, it will

remain in the new set position when the

car is entered again.

Activating exit mode

In order to help the driver get out of the

car, the driver side seat will move back by

2.36 in (60 mm) when the ignition device

is in STOP mode and the driver side door

is opened.

NOTE Pressing any button on the

seat memory or control panel will

immediately interrupt the automatic

positioning function (antipanic function).

The operation must be repeated to

complete the function.

FRONT SEAT ELECTRIC HEATING

(where provided)
With ignition device at ON, press the
buttons

fig. 24 on the dashboard.

24

04066V0110EM

You can select three heating levels:

"

maximum heating

": three LEDs lit on

the buttons;

"

medium heating

": two LEDs lit on the

buttons;

"

minimum heating

": one LED lit on the

buttons.
After selecting one heating level, you

need to wait for a few minutes until warm

air flows into the compartment.

CarManuals2.com

25

When the "maximum heating" setting is

selected, the heater produces a boosted

heat level for the first minutes of

operation. After this, the heat lowers to

reach the normal temperature level for

the selected function.
The seat heating function can also be

activated using the Connect system:

see the description on the dedicated

supplement.
WARNING The electric heating function

cannot be activated when the engine off.

It only works with the engine running.
WARNING The set heating level is

stored when the engine is stopped and is

restored if the engine is restarted within

a few minutes, otherwise the system will

remain off.

REAR SEATS

12)

The rear seats can accommodate two

passengers (QV version) or three

passengers (other versions).
The seats and the seat belts are

considered as components of the

protection system for the car's

occupants.
WARNING Refer to the "Passenger

protection systems" chapter in the

"Safety" section for the positioning of

the seat belts.

SPLIT FOLDING REAR SEAT

Partial extension of the boot (1/3 or

2/3)

Extending the right side of the boot (1/3

of the rear seat) allows you to carry two

passengers on the left part of the rear

seat, while extending the left side (2/3

of the rear seat) allows you to carry one

passenger.
Proceed as follows:

completely lower the rear seat head

restraints;

place the seat belt so that it doesn't

impede the movement of the backrest

while tilting it;

operate the left-hand lever (1), fig. 25

(inside the boot) to fold down the left

side, or the mirror image right-hand

lever to fold down the right side of

the backrest. It will fold forwards

automatically. If necessary, accompany

the backrest during the initial stage of

tilting.

25

04066V0009EM

Full expansion of the boot

Tilting the rear seat completely forwards

allows maximum loading volume.
Proceed as follows:

completely lower the rear seat head

restraints;

place the seat belts so that they don't

impede the movement of the backrest

while tilting it;

operate the levers (1) fig. 25 to fold

down the backrests. They will fold

forwards automatically. If necessary,

accompany the backrests during the

initial stage of tilting.
It is also possible to disengage sections

of the rear seat from inside the

passenger compartment using one of the

two levers located under the rear seat

fig. 26. Each lever folds down the section

of the backrest on the same side.

26

04066V0007EM

Repositioning seat backrests

13)

Move the seat belts to the side, making

CarManuals2.com

 GETTING TO KNOW YOUR CAR

26

sure that they are correctly extended

and not twisted and that they are not

trapped behind the backrests of the

seats, then lift the backrests pushing

them back until you hear the locking click

on both attachment mechanisms.

Central backrest section tilting

Before tilting the backrest, make sure

that the rear central seat belt is not

fastened and that there are no objects

in the central part of the cushion (if there

are any, remove them).
Using the fig. 27 strap, release the central

part of the backrest from its housing and

tilt it using the head restraint.

27

04066V0008EM

Central backrest section repositioning

Using the head restraint, lift the central

portion upwards, accompanying it during

its movement, lightly press to make sure

that it is properly attached. Make sure

that the armrest is properly attached

by trying to move it. If it is not attached

correctly, repeat the operation.

WARNING

10)

All adjustments must be carried out only

with the car stationary and engine off.

11)

After releasing the adjustment lever,

always check that the seat is locked on the

guides by trying to move it back and forth.

If the seat is not locked into place, it may

unexpectedly slide and cause the driver to

lose control of the car.

12)

Always make sure that all those on

board the car are seated and are wearing

their seat belts correctly.

13)

Make sure the backrests are properly

secured at both sides to prevent them

from moving forward, in the event of sharp

braking, with possible impact with of the

passengers.

IMPORTANT

4)

The fabric upholstery of the seats has

been designed to withstand long-term wear

deriving from normal use of the car. Some

precautions are however required. Avoid

prolonged and/or excessive rubbing against

clothing accessories such as metal buckles

and Velcro strips which, by applying a high

pressure on the fabric in a small area, could

cause it to break, thereby damaging the

upholstery.

5)

Do not place any kind of items under

the electrically adjusted seats as they

could impede their movement or otherwise

damage the controls.

HEAD RESTRAINTS

ADJUSTMENTS

14)

Upward adjustment: raise the head

restraint until it clicks into place.
Downward adjustment: press button (1)
fig. 28 and lower the head restraint.

28

04076V0001EM

REAR HEAD RESTRAINTS

(adjustments)

Upward adjustment: raise the head

restraint until it clicks into place.
Downward adjustment: press button (1)
fig. 29 and lower the head restraint.

CarManuals2.com

27

29

04076V0002EM

HEAD RESTRAINTS (removal)

Proceed as follows to remove the head

restraints:

raise the head restraints to their

maximum height;

press the button (1), lift the head

restraint, then, pressing the device (2)
fig. 28 (front head restraints) or (1) and (2)
fig. 29 (rear head restraints), remove it.
WARNING Always re-position the rear

head restraints if they had been removed

before starting to drive normally. Re-

fit the rods of the head restraints in

their housings, holding buttons (1) and

(2) pressed. Then, re-position the head

restraints according to your needs.

WARNING

14)

Head restraints must be adjusted so

that the head, rather than the neck, rests

on them. Only in this case they can protect

your head correctly. Any removed head

restraints must be repositioned correctly, in

order to protect the occupants in the event

of a collision: follow the instructions above.

STEERING WHEEL

15) 16) 17) 18) 19)

ADJUSTMENTS

The steering wheel can be adjusted both

in height and in depth.
To carry out the adjustment move the
lever (1) fig. 30 downwards in position

(A), then adjust the steering wheel to the

most suitable position and then lock it in

this position moving the lever (1) again in

position (B).

30

9490237

ELECTRIC STEERING WHEEL HEATING

(where provided)
With ignition device at ON, press the
button

fig. 31 on the climate control

system dashboard.

CarManuals2.com

 GETTING TO KNOW YOUR CAR

28

31

04066V0111EM

When the function is on, the LED on the

button switches on.
WARNING If this function is activated

with the engine stopped the battery may

run down.

WARNING

15)

All adjustments must be carried out only

with the car stationary and engine stopped.

16)

It is absolutely forbidden to carry out

any after-market operation involving

steering system or steering column

modifications (e.g. installation of anti-theft

device) that could adversely affect

performance, invalidate the warranty, cause

SERIOUS SAFETY PROBLEMS and also

result in the car not meeting type-approval

requirements.

17)

People who are insensitive to skin pain

due to old age, chronic disease, diabetes,

spine cord injury, medical treatment, alcohol

use, exhaustion or other physical conditions,

must be careful when using the steering

wheel heater as it could cause burns even at

low temperature, especially if used for long

periods.

18)

Do not place objects on the steering

wheel that may create heat insulation, such

as coverings permanently fixed to the

steering wheel of any type or material. It

may cause the steering wheel heating

device to overheat.

19)

Do not place any objects on the steering

wheel (e.g. permanently fixed covers of any

type or material) which could interfere with

the capacitive hand detection sensor on the

steering wheel of the ABSA (Active Blind

Spot Assist), LKA (Lane Keeping Assist), TJA

(Traffic Jam Assist) or HAS (Highway Assist)

systems (where applicable).

REAR-VIEW MIRRORS

ELECTROCHROMIC REAR-VIEW

MIRROR

The electrochromic rear-view mirror

has an ON/OFF button fig. 32 to

activate/deactivate the electrochromic

anti-glare function.

32

04106S0002EM

DOOR MIRRORS

20)

Electric adjustment

The mirrors can only be adjusted with the

ignition device at ON.
Select the desired mirror using device (1)
fig. 33:

device in position (A): left mirror

selected;

device in position (B): right mirror

selected.

33

04106V0004EM

To adjust the selected mirror, use device

(1) in the four directions.
WARNING Once adjustment is complete,

rotate device (1) to position (D) to

prevent accidental movements.

Manual folding

To fold the mirrors move them from

the open position to the closed position
fig. 34.

CarManuals2.com

29

34

04106V0005EM

Electric folding

(where provided)
With the device (1) in position (D) move it
to position (C) fig. 33. Turn the device (1)

again to position (C) to return the mirrors

to the driving position.
NOTE In case of involuntary movement

of the mirrors (following a crash)

beyond the normal operating position,

the system will activated an auxiliary

realignment cycle when the first

opening/closing command is imparted.

The mirror will therefore return to the

overtravel position which was reached by

accident, will fold and then open to the

correct position.
If the device (1) is pressed again during

door mirror folding (from closed to open

position and vice versa), their movement

direction is reversed.

Automatic activation

Activating the central door locking

system from outside the car

automatically folds the mirrors: they

return to the driving position when the

ignition switch is turned to the ON

position.
If the exterior mirrors were folded using

device (1), they can only be returned

to the driving position using the same

device.

Activation/deactivation of the

function

The electric mirror folding function

can be activated/deactivated using

the Connect system menu (the

default setting of the function"Off").

Alternatively, you can choose to

open/close the mirrors automatically

when opening/closing the doors (using

the electronic key or the Passive Entry

system).
WARNING The hand-controlled electric

folding operation can be enabled only

when the car speed is lower than 30 mph

(50 km/h), so they can only be manually

controlled up to that speed.
WARNING The mirrors must always be

open while driving and should never be

folded.

ELECTROCHROMIC EXTERIOR

MIRRORS

(where provided)

These mirrors can automatically modify

its reflecting action to prevent dazzling

the driver. The electrochromic rear-view

mirror function on/off button fig. 32 is

the same for all rear-view mirrors.

ELECTRIC DOOR MIRROR HEATING

Pressing the

button on the

climate control system activates

the demisting/defrosting of the door

mirrors.

WARNING

20)

As door mirrors are curved, and

therefore they may slightly alter the

perception of distance.

CarManuals2.com

 GETTING TO KNOW YOUR CAR

30

EXTERNAL LIGHTS

LIGHT SWITCH

The following controls are available

in the panel on the left of the steering
wheel: fig. 35
(1)- side lights, daylight running lights,

dipped beam headlight switch;
(2) : ring nut for adjusting the brightness

of the instrument panel and the graphics

on the control buttons;
(3): rear fog lights button.

35

9490200

The external lights can be switched

on only when the ignition device is in

position ON, except for the parking

lights. See the "Parking lights" paragraph,

in this chapter for more information.
The instrument panel and the various

controls on the dashboard will be lit up

when the exterior lights are switched on.

AUTO FUNCTION (Dusk sensor)

This is implemented by an infrared LED

sensor on the windscreen that works in

conjunction with the rain sensor. It is able

to detect variations in the outside light

level based on the light sensitivity set

through the Connect system.
The dusk sensor sensitivity can be

adjusted according to 3 levels: level

1=minimum sensitivity, level 2=average

sensitivity, level 3=maximum sensitivity.
The higher the sensitivity set, the lesser

is the external light variation needed to

switch the lights on (e.g. with a setting on

level 3 at sunset the headlights come on

earlier than levels 1 and 2).

Function activation

Turn the light switch to the

position.

WARNING The function can only be

activated with the ignition device at ON.

Function deactivation

Turn the light switch to a position other
than .

DIPPED BEAM HEADLIGHTS

Turn the light switch to

to switch

on the side lights, the lights on the

instrument panel and the dipped beam

headlights.
The

warning light switches on in the

instrument panel.

DAYTIME RUNNING LIGHTS (DRL) AND

SIDE LIGHTS (Daytime Running Lights)

(where provided)

21) 22)

With the ignition device turned to ON and
the light switch turned to position

the

daytime running lights are automatically

activated; the other lights and interior

lighting remain off.
Where provided, if the direction

indicators are operated, the brightness

of the corresponding DRL will be

decreased as long as the direction

indicators are on.
Where provided, the DRL can be

activated/deactivated from Connect

system, by selecting the following

functions in sequence on the main MENU:

"Settings", "Lights" and "Daytime Lights".
WARNING For markets where DRL use

is not required, these lights work as side

lights and they are switched on and off

jointly with the main beam headlights.

REAR FOG LIGHT

The fog light button is integrated with

the light switch.
Press the

button to switch the light

on/off.
The rear fog light switches on only when

the dipped headlights are on. The light
can be switched off by pressing the

CarManuals2.com

31

button again or by switching off the

dipped beam headlights.
When the engine is stopped with the rear

fog lights on, if will be switched off the

next time the engine is started.

PARKING LIGHTS

They are switched on if, within a few

seconds from stopping the engine, the
light switch is taken first to the
position and then to position . All side

lights switch on, if you want to leave only

those on one side (right/left) switched

on, you need to move the direction

indicators control on the position on the

side you wish to leave on.
When a front door is opened with the
light switch in position , a tone will

be heard to inform the driver that the

parking lights are on.
The

warning light switches on in the

instrument panel.
WARNING Turning the ignition switch

to ON turns off the parking lights, which

were on only on one side.

HEADLIGHTS OFF TIMER

The "Follow Me" function delays the

switching off of the headlights after the

engine has been stopped.
The function can be enabled from

the Connect system by selecting the

following functions from the main

menu in sequence: "Settings", "Lights"

and "Follow me"; the side lights and the

dipped beam headlights stay on for a

time that can be set between 30, 60 and

90 seconds.

Function activation

With the headlights on, take the ignition

device to the STOP position: the timer

starts when the light switch is turned to
the

position.

WARNING To activate this function the

headlights must be deactivated within

2 minutes after the ignition device has

been taken to STOP.

Function deactivation

This function is deactivated by switching

on the headlights, the side lights or

bringing the ignition device to ON.

ANIMATIONS

(where provided)
Depending on the version, with the

ignition device in the STOP position, an

animated sequence of front and rear

lights may can be shown when the doors

are unlocked.
Then they light up fixed. The function

is activated from the display menu on

the instrument panel or using the Alfa

Connect system.
Only the direction indicators will light up

when only the tailgate is unlocked.
Activating the alarm or hazard warning

lights will disable the function.

AFS (Adaptive Frontlight System)

function

(where provided)
This is a system which directs the main

light beam, horizontally and vertically,

and continuously and automatically

adapts it to the driving conditions round

bends/when cornering.
The system directs the light beam to

light up the road in the best way, taking

into account the speed of the car, the

bend/corner angle and the speed of

steering.
The function is enabled using the display

menu of the Connect system.
The function is enabled when the low

beam headlights are on.
In the case of LED matrix headlights to

comply with type-approval requirements

and to avoid dazzling oncoming drivers,

the AFS functionality must be disabled if

the driver's seat is on the left-hand side

of the vehicle and driving in countries

with the right-hand lane (and vice versa).

MAIN BEAM HEADLIGHTS

To switch on the fixed main beam

headlights, push the left stalk forwards
towards the instrument panel fig. 36. The
light switch must be turned to

or .

The symbol appears on the instrument

panel display when the main beam
headlights are on

CarManuals2.com

 GETTING TO KNOW YOUR CAR

32

36

9550234

The main beam headlights are switched

off by pushing the left stalk forward
again. The symbol

might disappear on

the instrument panel display.

Blinking

The flashing of the main beam headlights

is activated by pulling the left stalk

towards the steering wheel, the lights

remain on while you are operating the

lever.

Automatic high beam (AHB system)

headlights

(where provided)
The AHB system is used to switch

the high beam headlights on and off

automatically and to adapt the lighting

near towns.

Function enabling

This function is enabled using the "Driver

Assistance" Menu and then selecting

"Comfort" in the Connect system with
the light switch turned to position .

Function activation

The first time the main beam headlights

are activated (pushing the left lever is

displayed the function is activated (the

symbol appears in the instrument

panel)).
The symbol

appears on the instrument

panel display when the main beam

headlights are on.
The function activates the high beam

headlights when the speed is higher than

25 mph (40 km/h).
When the speed is lower than 15 mph

(25 km/h) and the function is active,

the function switches the main beam

headlights off.
If the fixed main beam headlights are

operated quickly again (pushing the left

stalk towards the instrument panel), the
warning light/icon

will switch on in

the instrument panel and the main beam

headlights will be switched on fixed until

the speed exceeds 25 mph (40 km/h).
When the speed of 25 mph (40 km/h)

is exceeded again, the automatic

functioning is reactivated.
If the left stalk is pushed again in

this condition, to request main beam

headlight deactivation, the function

deactivates and the main beam

headlights switch off.

Function deactivation

To deactivate the automatic function

rotate the light switch ring to position .
WARNINGS
The correct operation of the automatic

high beam function may be influenced by:

presence of reflections on road sign

surfaces;

dim light of other road users (e.g.

cyclists or pedestrians);

bad weather (rain or fog);
presence of dirt on the sensor or

obstruction of the sensor;

damage to the windscreen or presence

of dirt or ice/snow or misting up of the

windscreen;

presence of vehicles approaching in

the opposite direction partially obscured

by a central obstacle.
WARNING Make sure that the

windscreen is always defrosted and

demisted in winter.

GLARE-FREE

The “Glare-Free” function assists the

driver when driving on out-of-town roads

with poor lighting conditions by allowing

the use of main beam lights even in the

presence of other cars without the risk

of dazzling them.
The glare-free effect is achieved by

arrays of LEDs, which are dynamically

switched on and off to detect a shaded

CarManuals2.com

33

area at the headlights of every vehicle

on the road (including motorbikes and

bicycles), based on information about the

headlights of other cars provided by the

forward-facing digital camera located on

the windscreen below the interior rear-

view mirror.
The glare-free system is of the multi-

shadow type, as it can create up to four

light tunnels at the same time, and each

tunnel area is as wide as the obstacle

that must not be dazzled.
The figure shows an example of different

scenarios:

(1) two cars are travelling in front in the

same direction;

(2) another car is overtaking;
(3) another car is travelling in the

opposite direction.
The system can detect and react to

vehicles ahead or oncoming within

seconds.

37

9550196

Activation mode

The digital camera is the same as the

one used for automatic main beam and,

as with automatic main beam, the Glare

Free function must be activated on the

Connect system by ticking the automatic

main beam dimming option.
The glare-free function will be activated

after the following actions:

starting the engine;
turning the light switch to ;
turning on the lights;
turning the left stalk to "Main beam

headlights" on.
The glare-free function is activated if:

the vehicle speed is equal to or

greater than 22 mph (35 km/h) during the

activation phase of the function;

the ambient light is not sufficient for

safe and comfortable driving;

there is traffic outside the cities.

When the system is active, the white
symbol

appears on the display, the

blue

symbol replaces the previus one

and indicates that all or only some of the

LED of the main beam headlights are on

at the moment.
In the event that the entire main beam

module has to be switched off to achieve

a glare-free effect on the instrument

panel, only the green indicator will remain

lit.

The blue symbol

will be displayed

again when the situation allows partial

or full use of the high beam headlights

without causing glare.

Notes

some unpredictable conditions, such

as dirt, dust, films or other obstructions

on the camera lens, may affect the

proper functioning of the glare-free

function

heavy rain and fog can affect the

performance of the system or lead to

its deactivation, leaving the high beam

headlights on for longer than the nominal

operating conditions. This can dazzle

other cars and cause disturbance. To

avoid this, the high beam headlights must

be switched off manually;

when the function is deactivated, the

minimum operating speed is 9 mph (15

km/h);

the correct operation of the Glare-

Free function is guaranteed if the car

speed is less than or equal to 155 mph

(250 km/h).

DIRECTION INDICATORS

The direction indicators could assume

two different flashing strategies:

continuous or temporary (Lane Change).
To activate the continuous flashing

function, move the left lever until end of

stroke (unstable):

CarManuals2.com

 GETTING TO KNOW YOUR CAR

34

up

: right direction signal activated,

the warning light

flashes on the

instrument panel;

down

: left direction signal activated,

the warning light

flashes on the

instrument panel.
Warning light

or

will blink on the

instrument panel.
The direction indicators turn of

automatically when the car is brought

back onto a straight course or by moving

the lever in the opposite direction until

the first click (about half way).

"Lane Change" function

When you want to signal the change of

the driving lane, move the lever until the

first impulse (about half stroke).
The direction indicator on the side

selected will be activated for 3 flashes

and then go out automatically. To turn of

the flashing before the end of the cycle,

move the stalk in the opposite direction

until the first click (about half way).

“CORNERING LIGHTS” FUNCTION

(where provided)
The function activates with the main

beam headlights switched on: for wide

wheel rotation angles, a light will turn

on, built in the headlight referring to

the turning side which will extend the

nighttime visibility angle.

HEADLIGHT ALIGNMENT ADJUSTMENT

Light beam direction

The correct aiming of the headlights is

important for the comfort and safety

of not only the driver but all other road

users. This is also covered by a specific

rule of the highway code.
The headlights must be correctly

aligned to guarantee the best visibility

conditions for all drivers while travelling

with headlights on.
Check the light beam alignment every

time the load or its distribution changes.
Contact a Alfa Romeo Dealership to have

the headlights checked and adjusted, if

necessary.

INSTRUMENT PANEL AND CONTROL

BUTTON GRAPHIC BRIGHTNESS

ADJUSTMENT

With side lights or headlights on, move
the ring (1) fig. 38 upwards to increase

light brightness of the instrument panel

and of the control button graphics, or

ring downwards to decrease it.
The control is pulsed so that for

every action the level intensity

increases/decreases, up to a maximum

of seven.

38

9490197

WARNING

21)

The daytime running lights are an

alternative to the dipped headlights while

driving during the daytime in countries

where it is compulsory to have lights on

during the day; where it is not compulsory,

the use of daytime running lights is

permitted.

22)

Daytime running lights cannot replace

dipped beam headlights while driving at

night or through tunnels. The use of daytime

running lights is governed by the highway

code of the country in which you are driving.

Comply with legal requirements.

CarManuals2.com

35

INTERIOR LIGHTS

FRONT CEILING LIGHT

Switch (1) turns light (8) on/off.
Switch (2) activates/deactivates the

rear ceiling buttons.

Switch (3) turns all lights inside the

ceiling lights (front and rear) in the

passenger compartment on/off.

Switch 4 activates or deactivates

turning ceiling lights (6), (7) and (8) on/off

when the doors are opened/closed. The

lights switch on/off gradually.

Switch (5) turns light (6) on/off.

39

04136S0071EM

WARNING Before getting out of the car,

make sure that the ceiling light is off; if a

light is left on, it will automatically switch

off approximately 15 minutes after the

engine has been stopped.

Timing while getting into the car

The ceiling lights switch on according to

the following modes:

for a few seconds when the doors are

unlocked;

for about 3 minutes when one of the

doors is opened;

for a few seconds when the doors are

locked.
Timing is interrupted when the ignition

device is turned to ON.
Three modes are provided for switching

off:

when all doors are closed, the three-

minute timer will stop and a few-seconds

one will start. This timing will stop when

the ignition device is turned to ON;

when doors are locked (either with

remote control or with key inserted

on driver side door), the ceiling light

switches off;

the interior lights are switched off in

any case after 15 minutes to preserve

battery charge.

Timing while getting out of the vehicle

After positioning the ignition device

to STOP, the ceiling lights switch on as

follows:

for a few seconds after the engine

stops;

for about 3 minutes when one of the

doors is opened;

for a few seconds when one of the

doors is closed.
The timing stops automatically when the

doors are locked.

GLOVE COMPARTMENT LIGHT

This light comes on automatically when

the glove compartment is opened and

switches off when it is closed regardless

of the ignition device status.

40

04136V0003EM

INTERIOR AMBIENT LIGHTING

The brightness of the interior passenger

compartment lights can be adjusted

through the Connect system. The

brightness can be adjusted at seven

levels.

CarManuals2.com

 GETTING TO KNOW YOUR CAR

36

DOOR LIGHT

The light fig. 41 comes on automatically

when the door is opened and switches

off when it is closed regardless of the

ignition device status.

41

04136V0007EM

There is also an additional light on the

car, located under each exterior front

door handle, fig. 42.

42

04136S0005EM

REAR CEILING LIGHT

The rear ceiling lights buttons are

activated or deactivated with button (2)

fig. 39 of the front ceiling lights.

43

04136S0004EM

Switch (3) fig. 43 turns light (2) on/off.
Switch (4) turns light (1) on/off.
The lights switch on when a door opened.
The light switches off automatically

after a few minutes if a door is left open.

To switch it on again, open another door

or close and reopen the same door.

BOOT CEILING LIGHTS

The ceiling lights switch on/off

regardless of the position of the ignition

switch.
If the boot is left open, the lights will

automatically switch off after 15 minutes

to preserve the battery life.

WINDSCREEN WIPER

The right stalk controls screen

wiper/washer operation.
This operates only with the ignition

device at ON.

WINDSCREEN WIPER/ WASHER

Operation

6) 7)

The ring fig. 44 can be set to the

following positions:

screen wiper off.

rotating the ring nut to the

first position activates the

first sensitivity level of the

rain sensor.

rotating the ring nut to the

second position activates the

second sensitivity level of the

rain sensor.

rotating the ring nut to the

third position activates the

first continuous speed level

of the windscreen wipers in

manual mode.

rotating the ring nut to the

fourth position activates the

second continuous speed

level of the windscreen

wipers in manual mode.

CarManuals2.com

37

44

9490214

Move the stalk upwards (it only has

unstable positions) to activate the MIST

function. It only operates while the stalk

is held in this position. When released,

the stalk will return to its default

position and the windscreen wiper will be

automatically stopped. This function is

useful to remove small deposits of dust

from the windscreen, or morning dew.
WARNING This function does not

activate the windscreen washer;

windscreen washer fluid will not

therefore be sprayed onto the

windscreen. To spray windscreen washer

fluid onto the windscreen, the washing

function must be used.
With ring in position

or , the

windscreen wiper will automatically

adapt its operating speed to the speed of

the car.
WARNING Windscreen washer

operation is disabled when the outside

temperature is below 3°C: no jet will

come out of the windscreen washer

nozzles and the windscreen wiper blades

will not move.

Rain sensor sensitivity level

Positions

and

correspond also to

sensitivity level 1 and 2 of the rain sensor.

Smart washing function

Pull the stalk towards the steering wheel

(unstable position) to activate a washing

cycle.
Hold the stalk pulled to activate

both the windscreen washer jet and

the windscreen wiper with a single

movement, until the stalk is released.

RAIN SENSOR

This is located behind the interior

rear view mirror, in contact with the

windscreen fig. 45 and can detect the

presence of rain and, consequently,

manage the cleaning of the windscreen in

accordance with the amount of water on

the screen.

45

04146V0002EM

The sensor has an adjustment range

which varies progressively from wiper

still (no stroke) when the windscreen is

dry, to wiper at 2nd continuous speed

(fast continuous operation) with intense

rain.

Activation

8) 9)

Turn the ring fig. 44 to position

or

to activate the rain sensor.
Activation of the sensor is signalled by

a flick of the wiper, which indicates that

the command has been acquired.
The variation in sensitivity during rain

sensor operation is also signalled by a

flick of the wiper (command acquired

and implemented). This stroke is also

executed with the windscreen dry.
If the windscreen washer is used with

the rain sensor activated, the normal

washing cycle is performed, after which

the rain sensor resumes its normal

automatic operation.
WARNING Keep the glass in the sensor

area clean.
WARNING With the windscreen wiper
ring turned to the

or

position,

wiping operates automatically and is

disabled when the external temperature

is below 0°C.

CarManuals2.com

 GETTING TO KNOW YOUR CAR

38

Deactivation

Use ring fig. 44 or turn the ignition device

to STOP.
In the event of malfunction of the rain

sensor whilst it is active, the windscreen

wiper operates intermittently at a speed

consistent with the sensitivity setting of

the rain sensor, regardless of whether

there is rain on the glass, while sensor

failure is indicated on the display.
The sensor continues to operate and it

is possible to set the windscreen wiper
to continuous mode

or . The failure

indication remains for as long as the

sensor is active.
The rain sensor is able to recognise,

and automatically adjust itself in the

presence of the following conditions:

presence of dirt on the controlled

surface (e.g. salt, dirt, etc.);

presence of streaks of water caused

by the worn windscreen wiper blades;

difference between day and night.

23)

REAR WINDOW WIPER/WASHER

Engaging reverse gear with the

windscreen wiper operating activates a

single cycle of the rear window wiper.
Moving the stalk fig. 44 (it only has

unstable positions):

towards the instrument panel

activates the rear window washer

(a brief push activates one washing

cycle, keeping the stalk pushed washes

continuously until the stalk is released);

downwards

(with reverse gear

engaged) this activates/deactivates the

continuous

operation of the rear window

wiper, regardless of the movement of the

windscreen wiper;

downwards

(with reverse gear

not

engaged) this activates/deactivates

intermittent

operation (with actuating

frequency of about 3 seconds) of the

rear window wiper, regardless of the

movement of the windscreen wiper.

WARNING

23)

Make sure the device is turned off

whenever the windscreen glass must be

cleaned.

IMPORTANT

6)

Never use the screen wiper to remove

layers of snow or ice from the windscreen

glass. In such conditions, the windscreen

wiper may be subjected to excessive

stress and the motor cut-out switch, which

prevents operation for a few seconds, may

intervene. If operation is not subsequently

restored, even after restarting the engine,

contact an Alfa Romeo Dealership.

7)

Do not operate the windscreen wiper with

the blades lifted from the windscreen.

8)

Do not activate the rain sensor when

washing the car in an automatic car wash.

9)

Make sure the device is switched off if

there is ice on the windscreen glass.

CLIMATE CONTROL SYSTEM

2)

GAS IDENTIFICATION LABEL

(where provided)
The label fig. 46 is applied onto the front

end of the bonnet.

46

04156S0007EM

SYSTEM MAINTENANCE

In winter, the climate control system

must be turned on at least once a month

for about 10 minutes.
Have the system inspected at an Alfa

Romeo Dealership before the summer.

CarManuals2.com

39

IMPORTANT

2)

The system uses R1234yf coolant gas,

which does not pollute the environment in

the event of accidental leakage. Under

no circumstances use R134a and R12

fluids, which are incompatible with the

components of the system.

CarManuals2.com

 GETTING TO KNOW YOUR CAR

40

 AUTOMATIC DUAL-ZONE CLIMATE CONTROL SYSTEM

CONTROLS ON THE CLIMATE CONTROL FRONT PANEL

47

04156S0077EM

1. Driver side temperature adjustment knob 2. Left side AUTO function activation button (automatic operation) 3. Left side air

distribution selection button 4. MAX-DEF function activation button (rapid defrosting/demisting); 5. Fan speed adjustment knob

6. Heated rear window on/off button 7. Right side air distribution selection button 8. Right side AUTO function activation button

(automatic operation) 9. Right side temperature adjustment knob 10. SYNC function activation button (set temperature alignment)

left side/passenger side 11. Right side seat heater activation button; (where provided, see the "Seats" chapter) 12. Climate control

compressor on/off button 13. Steering wheel heater activation button; (where provided, see the "Steering wheel" chapter) 14. Left

side seat heater activation button; (where provided, see the "Seats" chapter) 15. Internal air recirculation and automatic operation

on/off button.

CarManuals2.com

41

CONTROLS ON CONNECT SYSTEM DISPLAY

48

12126V0977EM

1. Climate control system on/off graphic button 2. Driver side AUTO function activation graphic button (automatic operation) 3.

Graphic button for turning the climate control system compressor on/off 4. Graphic button for turning internal air recirculation

on/off (three "states" available: “OFF” or "Manual" or "Automatic") 5. Graphic buttons for activating/deactivating the MAX-DEF

function (rapid defrosting/demisting) 6. Heated rear window on/off graphic button 7. Passenger side AUTO function activation

graphic button (automatic operation) 8. Graphic button for activating the SYNC function (alignment of set temperatures) on

driver/passenger side 9. Graphic bar for temperature adjustment on driver side 10. Graphic buttons for air distribution selection on

driver side 11. Graphic bar for adjusting the fan speed 12. Graphic buttons for air distribution selection on passenger side 13. Graphic

bar for temperature adjustment on passenger side

CarManuals2.com

 GETTING TO KNOW YOUR CAR

42

 DESCRIPTION

Air flow to the windscreen

and front side window vents

to demist/defrost them.

Air flow at central and side

dashboard vents to ventilate

the chest and the face during

the hot season.

Air flow to the front and

rear footwell vents. This air

distribution setting heats

the passenger compartment

most quickly, giving a prompt

sensation of warmth.

Air flow distributed between

footwell vents (hotter air) and

central and side dashboard

vents (cooler air). This air

distribution setting is useful

in spring and autumn on

sunny days.

Air flow distributed

between footwell vents and

windscreen and front side

window defrosting/demisting

vents. This distribution

setting allows the passenger

compartment to be warmed

effectively and prevents the

windows from misting.

Air flow distribution

between windscreen

demisting/defrosting

vents and side and central

dashboard vents. This

allows air to be sent to the

windscreen in conditions of

strong sunlight.

Air flow distribution to all

vents on the vehicle.

In AUTO mode, the climate control

system automatically manages the

air distribution. When set manually,

the air distribution is indicated by the

respective symbols on the Connect

system display switching on.

START&STOP EVO

The automatic dual-zone climate control

system manages the Start&Stop Evo

system (engine off and car is at a

standstill) to ensure adequate comfort

inside the car.
In particular, the climate control system

turns off the Start&Stop Evo if:

the climate control system is in AUTO

mode (LED on the button switched

on) and the temperature conditions

inside the car are far from a comfort

temperature;

the climate control system is in LO

maximum cooling;

the climate control system is set to

MAX-DEF.
When the Start&Stop Evo system is

active (engine off and car stationary),

the climate control system will request

restarting of the engine if the inside

temperature conditions rapidly

deteriorate (or if the user requests

maximum cooling – LO – or quick

demisting – MAX-DEF).
With Start&Stop Evo function on

(engine off and car stopped), the flow is

reduced as much as possible, to keep the

compartment comfort conditions for

longer.
The electronic climate control system

control unit attempts to manage

the decreased comfort caused by

switching off the engine as far as

possible (switching off the compressor

and engine coolant pump). However,

it is possible to give priority to the

climate control system by switching off

the Start&Stop Evo by pressing the

button located on the dashboard

controls to the left of the steering wheel.
In particularly severe climate conditions

it is recommended to limit the use of the

Start&Stop Evo system to prevent the

compressor from continuously switching

on and off, with consequent rapid misting

of the windows and accumulation of

CarManuals2.com


Content      ..      1       2         ..


//////////////////////////////////////////