Snowmobile Ski-Doo TRAIL ACE SERIES (REV GEN5). OPERATOR’S GUIDE (2024) - page 2
BODY AND SEAT
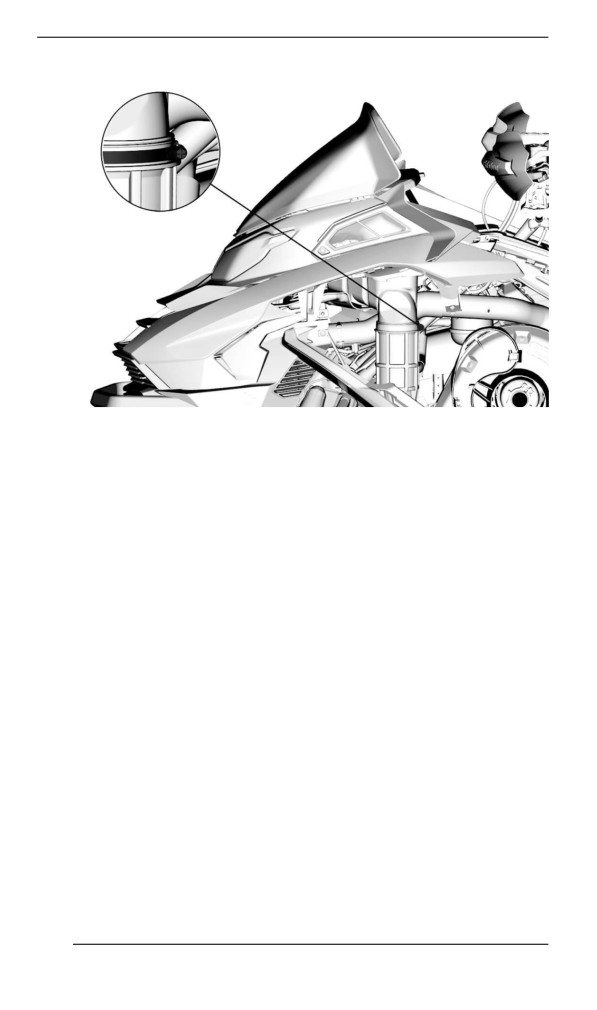
6. Remove the upper body module.
1. Grab the upper body module in the gauge support area.
2. Pull the module forward.
3. Remove the module from the vehicle.
Installing the Upper Body Module
The installation is the reverse of the removal procedure. However, pay
attention to the following.
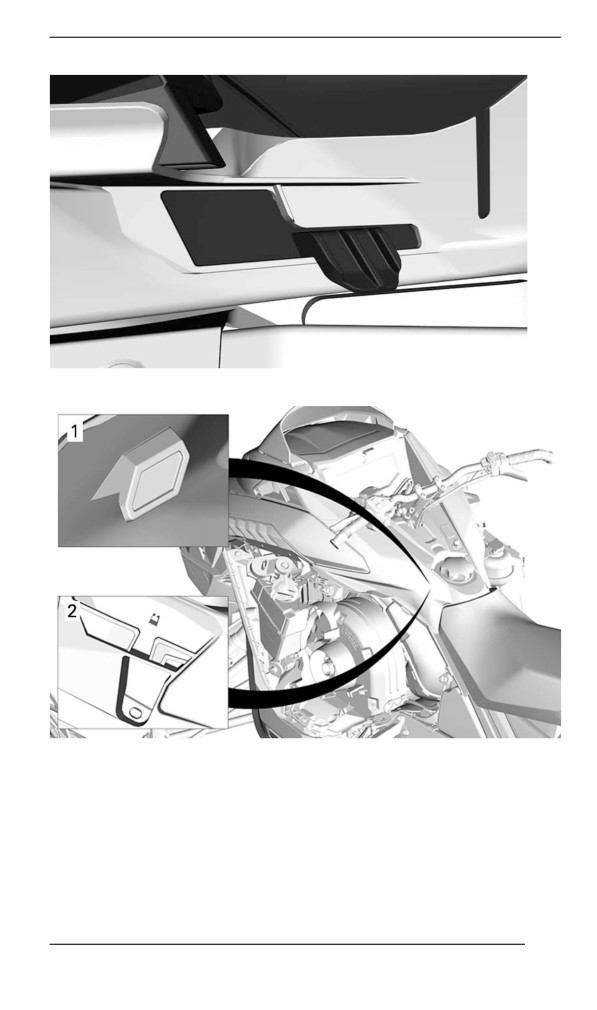
1. Ensure to engage front hood tabs in front bottom pan, and rear
side hood tabs in rear console when pushing the module back in
place.
122
BODY AND SEAT
FRONT HOOD TAB
TYPICAL
1. Rear end hooks
2. Console slots
2. Ensure to connect the air intake hose.
123
BODY AND SEAT
Tightening Torque
1.0 ± 0.2 Nm
Intake duct clamp
(9 ± 2 lbf-in)
3. On both sides, install the upper body module retaining screws.
Tightening Torque
1.8 ± 0.2 Nm
Upper body module screw
(16 ± 2 lbf-in)
4. Connect the module connectors.
Seat
Removing the Seat
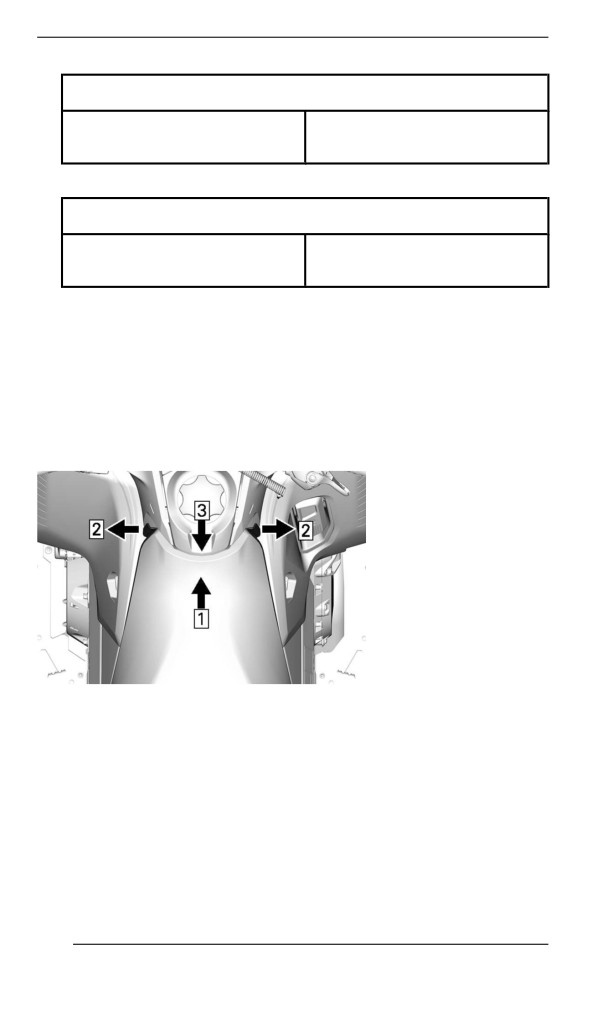
1. Unlock seat
1. Push in the center of the seat frontward.
2. Pull on both sides to disengage the ball studs.
1. Push
2. Pull
3. Lift up and backward to unlock seat
With Heated Seat
124
BODY AND SEAT
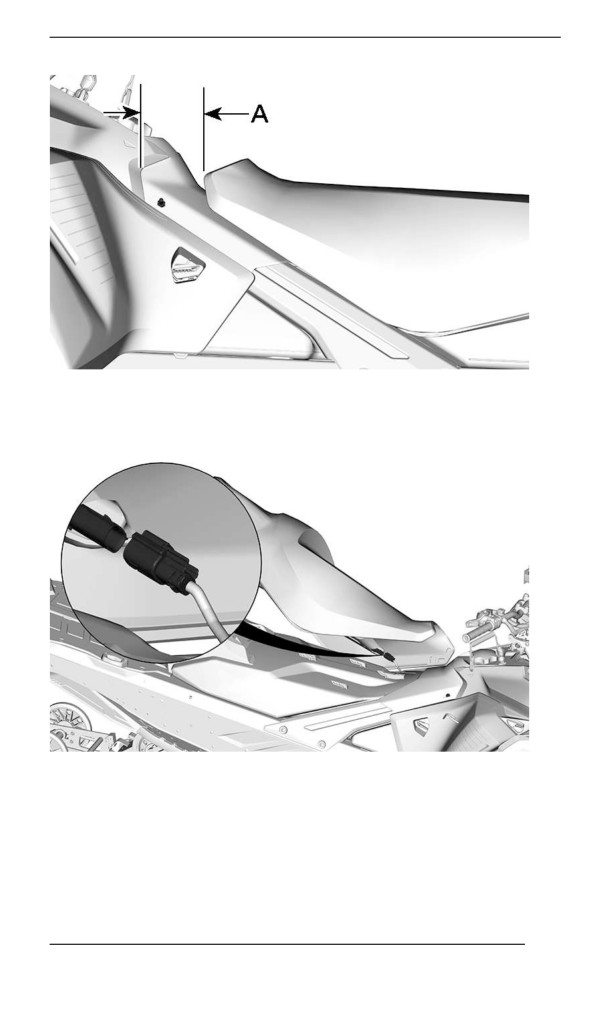
- A = Just enough to disengage the seat from the fuel tank
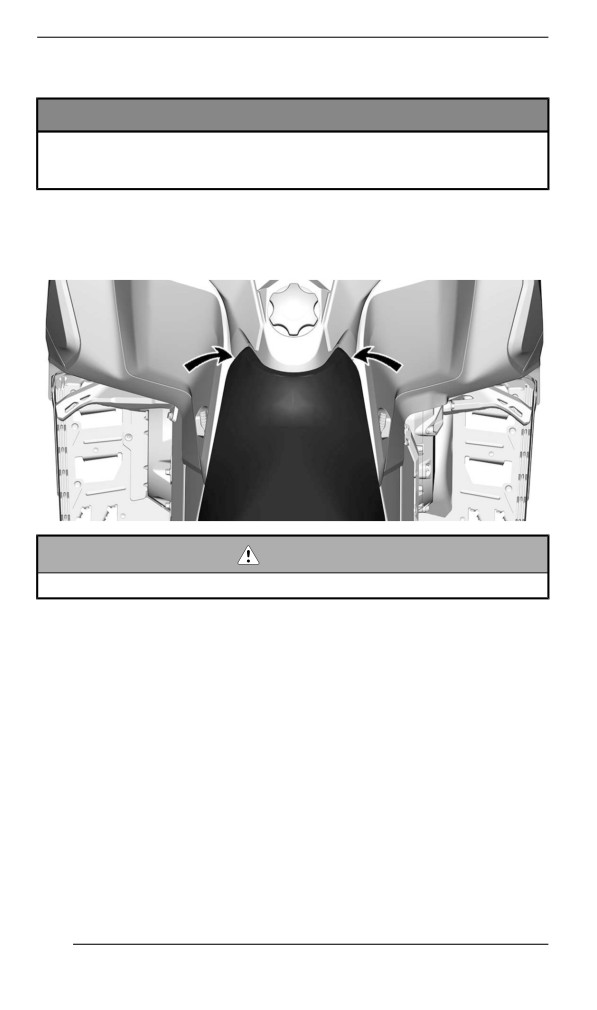
2. Disconnect the heated seat harness.
All Models
3. Remove the seat.
125
BODY AND SEAT
Installing the Seat – Ball Stud Lock
NOTICE
Riding the vehicle with any objects between the seat and the
fuel tank could damage the fuel tank. NEVER place any objects
between seat and fuel tank.
1. Connect the heated seat harness.
2. Place seat over the hooks, then slide it forward.
3. Engage both ball studs at front.
WARNING
Make sure seat is securely latched before riding.
Passenger Handholds (if equipped)
The passenger handholds provide a strong holding point and comfort
for the passenger on long rides.
Adjjusting the Passenger Handholds
To adjust the handhold height, proceed as follows:
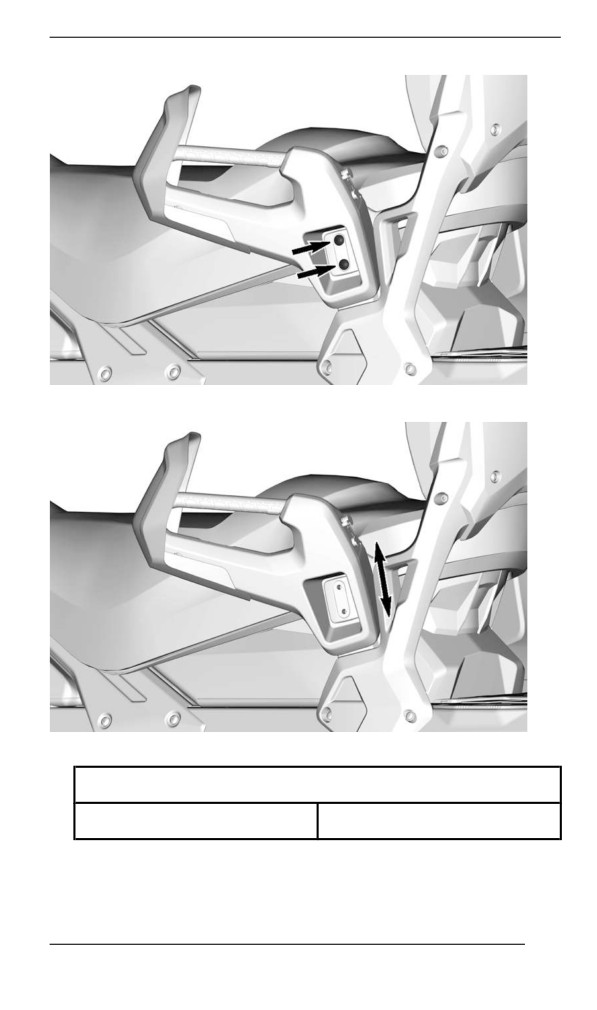
1. Remove the screws.
126
BODY AND SEAT
2. Raise or lower the handhold to suit passenger's comfort.
3. Reinstall the screws. Tighten to specification.
Tightening Torque
Handhold screw
24.5 ± 3.5 Nm (18 ± 3 lbf-ft)
127
EQUIPMENT
Some features may not apply to your model or could be optional.
Operator''s Guiide
The Operator's Guide should be stored in the Front Storage
Compartment.
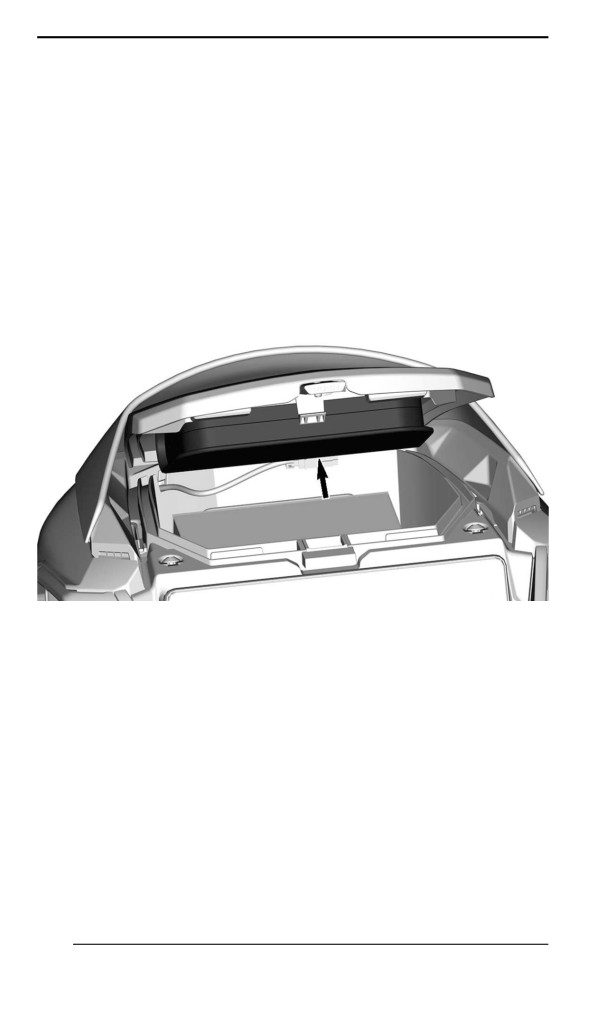
Heated Celll Case (iif equipped)
A heated cell case is mounted underneath the front storage compart-
ment cover. It allows to keep your cell phone at a warm temperature
while charging.
The temperature inside the case is kept between 5° C and 15° C (41°
F and 59° F).
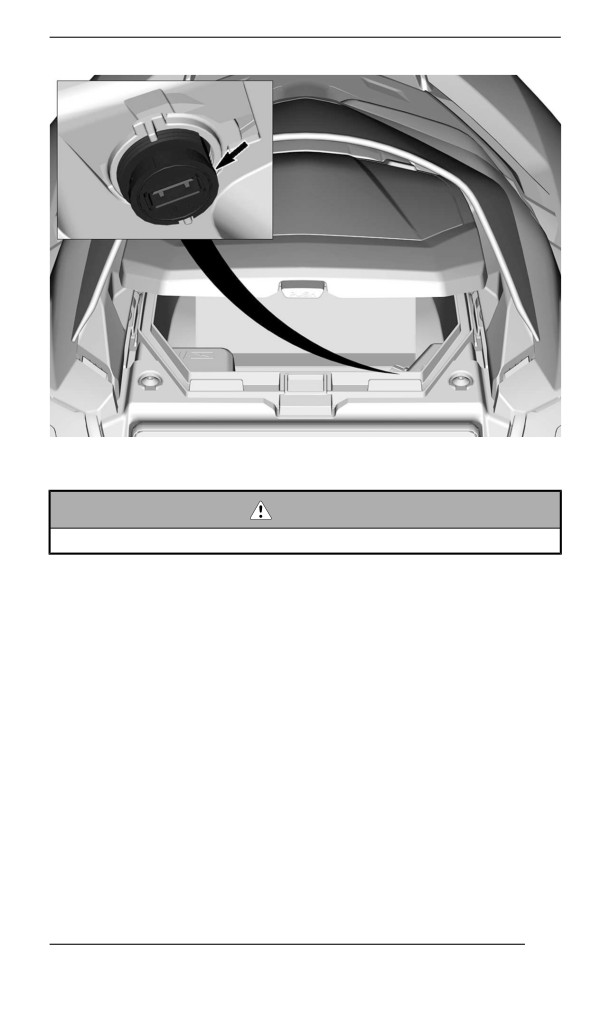
Power Outllet - USB (if equiipped)
The USB power Outlet is located in the front storage compartment. It
allows to charge your cell phone while stored in the heated cell case.
128
EQUIPMENT
Adjustablle Handlebar Riiser (If Equipped)
WARNING
Always stop engine before adjusting handlebar.
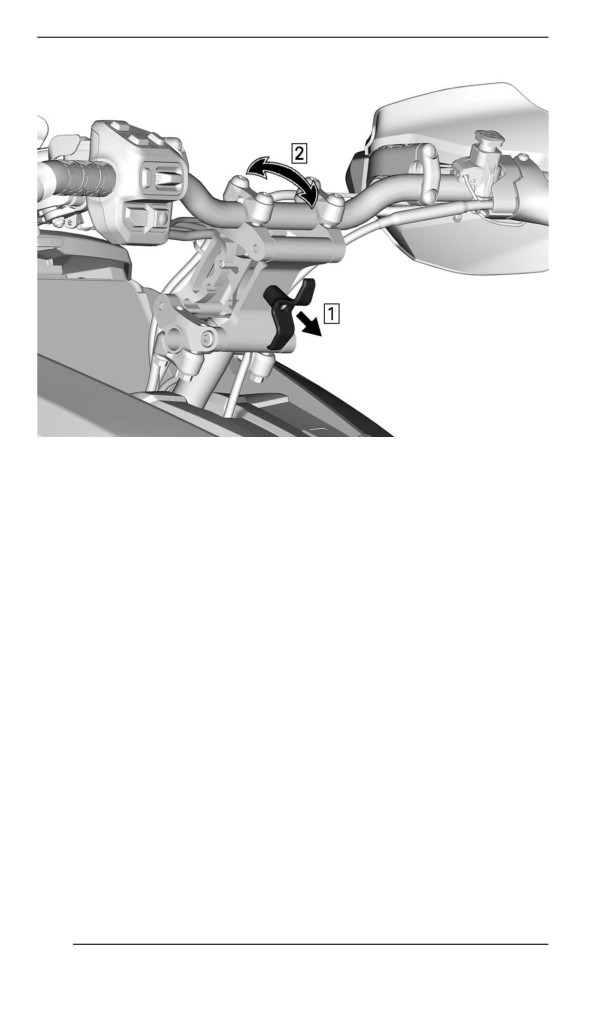
The handlebar can be set in four different positions.
To change handlebar position, pull lever and position handlebar as
desired.
129
EQUIPMENT
Step 1. Pull lever
Step 2. Position handlebar
Move the handlebar back and forth to make sure mechanism is se-
curely engaged.
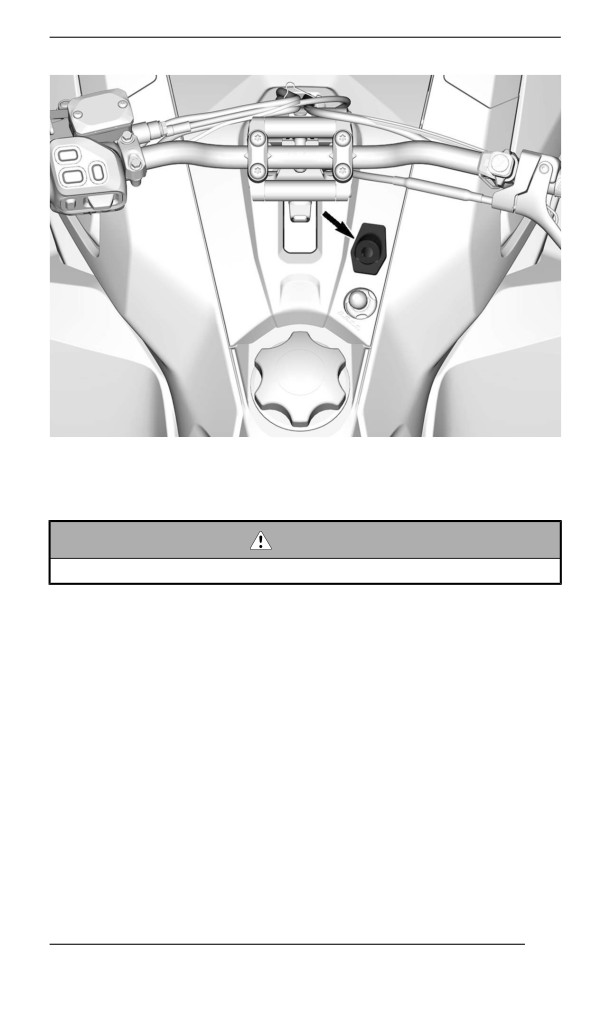
Electriic Visor Jack Connector
An electric visor can be connected to the jack connector. A stress re-
lief extension is supplied with the vehicle.
130
EQUIPMENT
Adjustablle Mirrors (if equiipped)
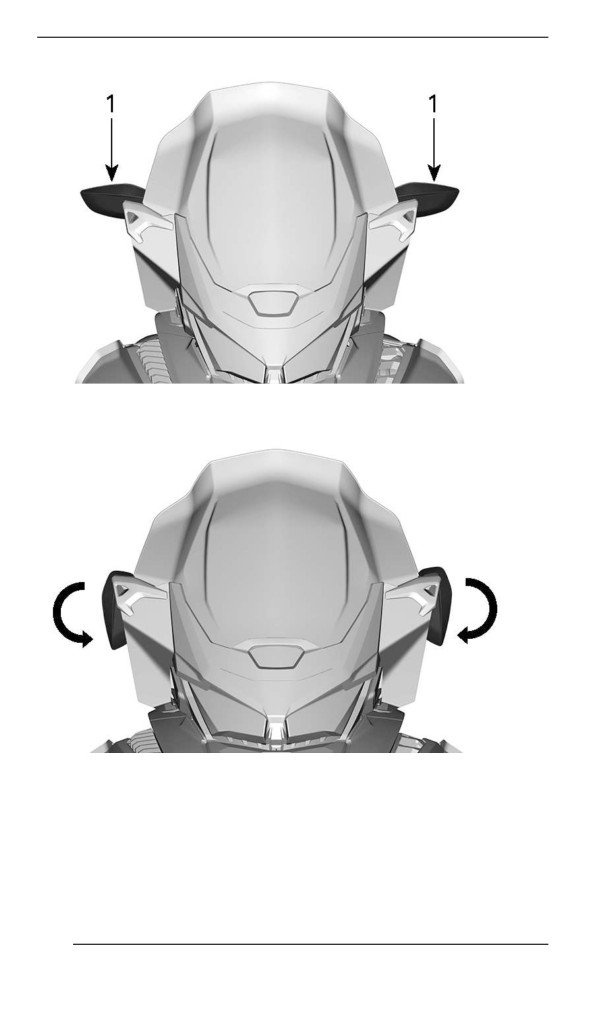
Each mirror can be adjusted to suit operator's preference.
WARNING
Adjust with vehicle at rest in a safe place.
When installing a cover, the mirrors can be tilted downward to ease
installation.
131
EQUIPMENT
TYPICAL
1. Mirrors
TYPICAL
132
EQUIPMENT
Driive Belt Guard
Removing the Drive Belt Guard
WARNING
NEVER operate engine:
– Without shields and belt guard securely installed.
– With hood and/or side panels opened or removed.
NEVER attempt to make adjustments to moving parts while en-
gine is running.
NOTE:
Belt guard is purposely made slightly oversize to maintain tension on
its pins and retainers preventing undue noise and vibration. It is impor-
tant that this tension be maintained when reinstalling.
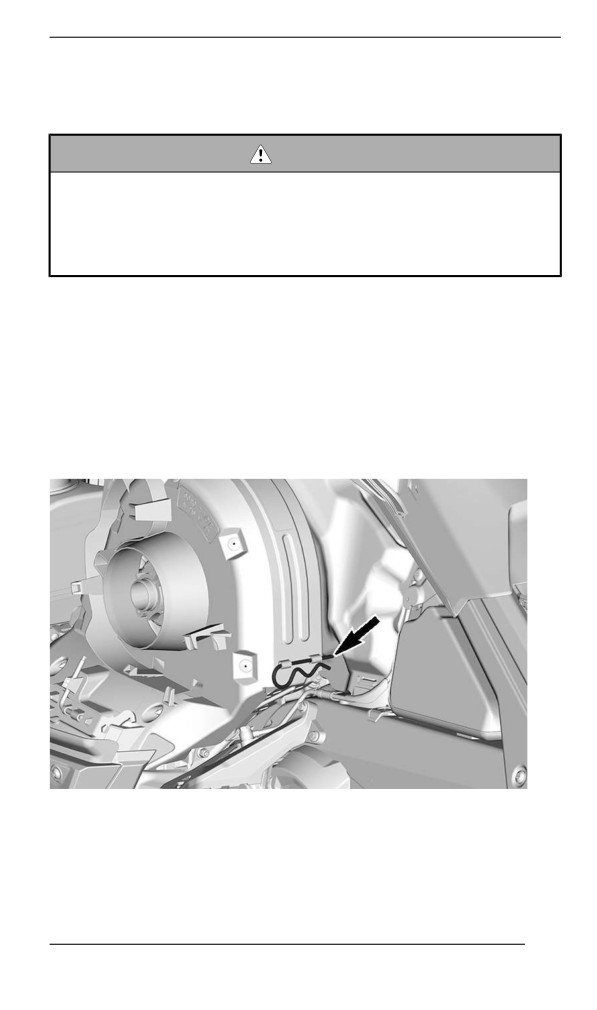
Remove tether cord cap from engine cut-off switch.
Open the LH side panel. See procedure in this section.
Remove retaining pin.
TYPICAL
Lift rear portion of guard then release from front tab.
133
EQUIPMENT
Installing the Drive Belt Guard
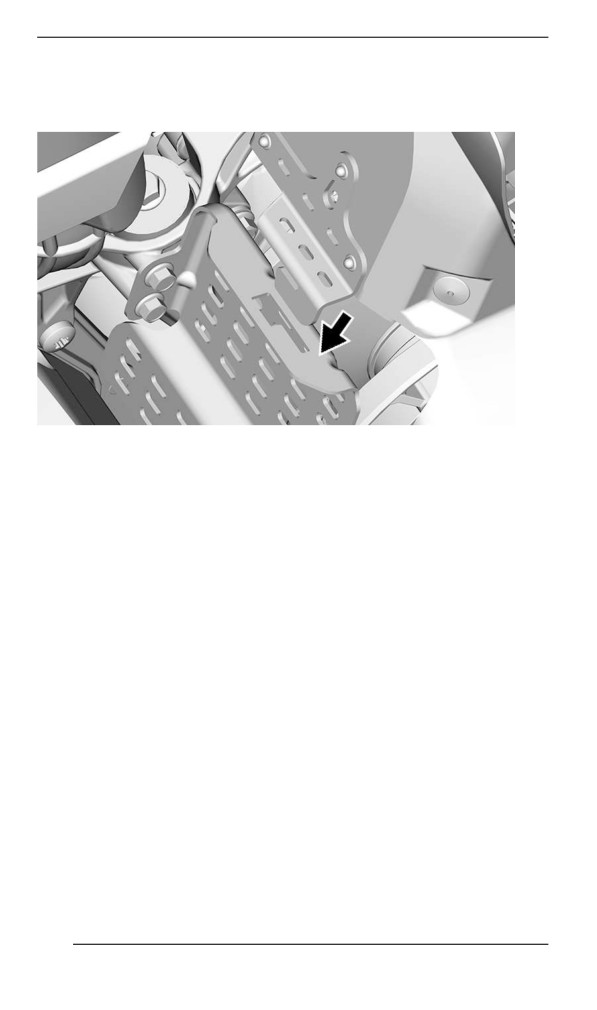
1. Insert belt guard tab in front support slot.
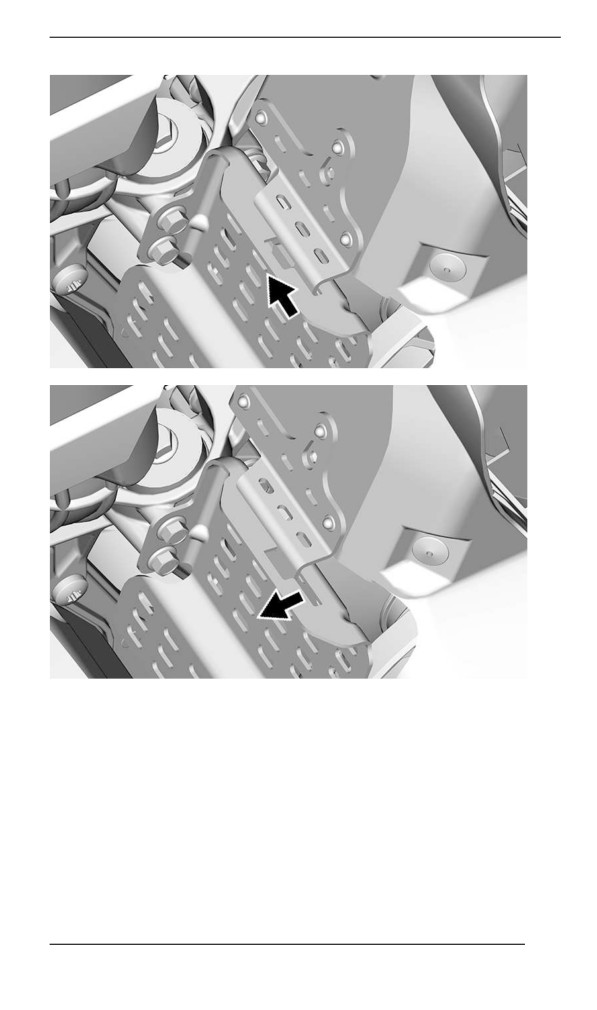
2. Push drive belt guard toward engine then toward front of vehicle.
134
EQUIPMENT
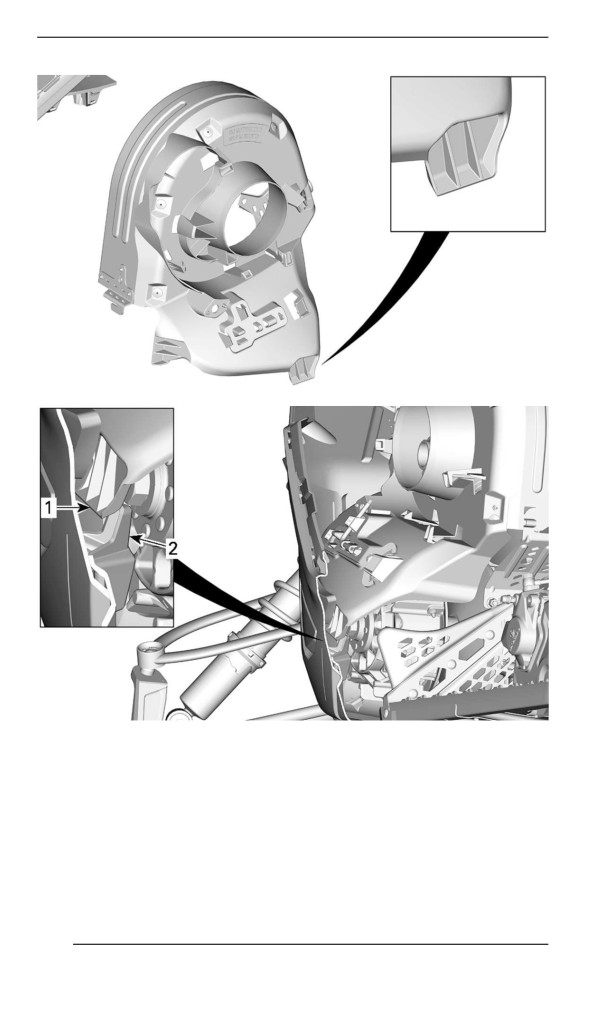
3. Insert belt guard tab between bottom pan and hook.
135
EQUIPMENT
LH SIDE BOTTOM PAN - CROSSCUT VIEW
1. Belt guard tab
2. Bottom pan hook
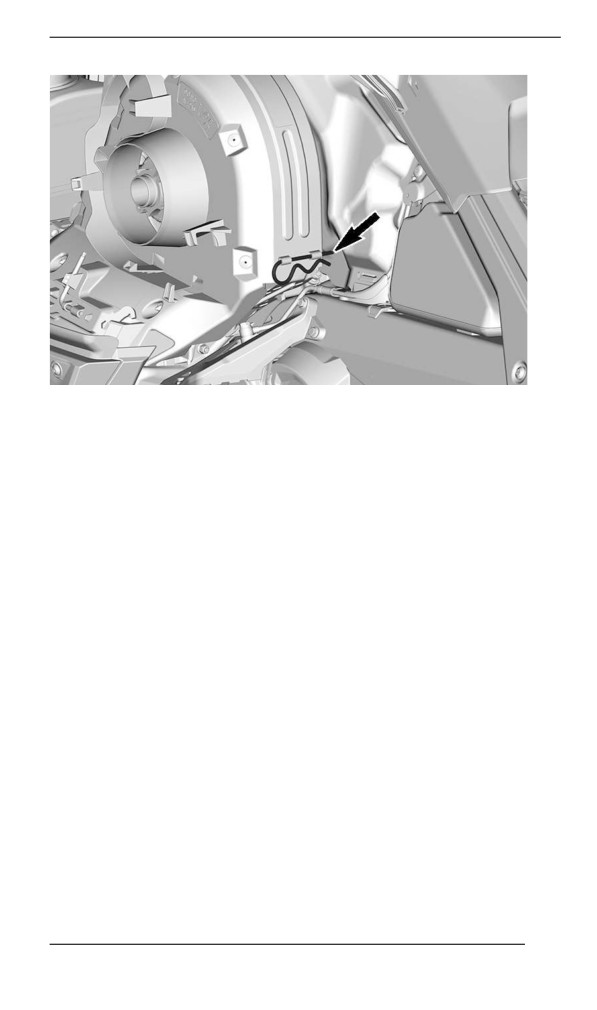
4. Position the rear portion of the belt guard over the retainer and se-
cure it using the retaining pin.
136
EQUIPMENT
Spare Driive Bellt Hollder
A spare drive belt can be stored in a holder located on the drive belt
guard.
NOTE:
The spare drive belt is not supplied with the snowmobile.
Position spare drive belt into drive belt guard slot.
137
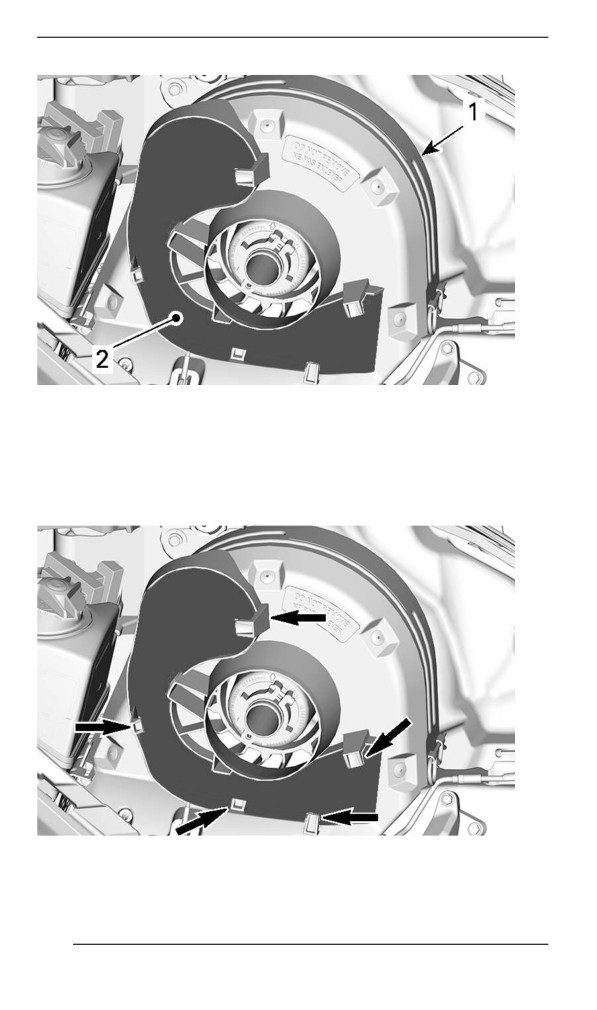
EQUIPMENT
TYPICAL
1. Drive belt guard
2. Slot
Secure in place by sliding it behind the tabs.
TYPICAL
138
EQUIPMENT
Tools
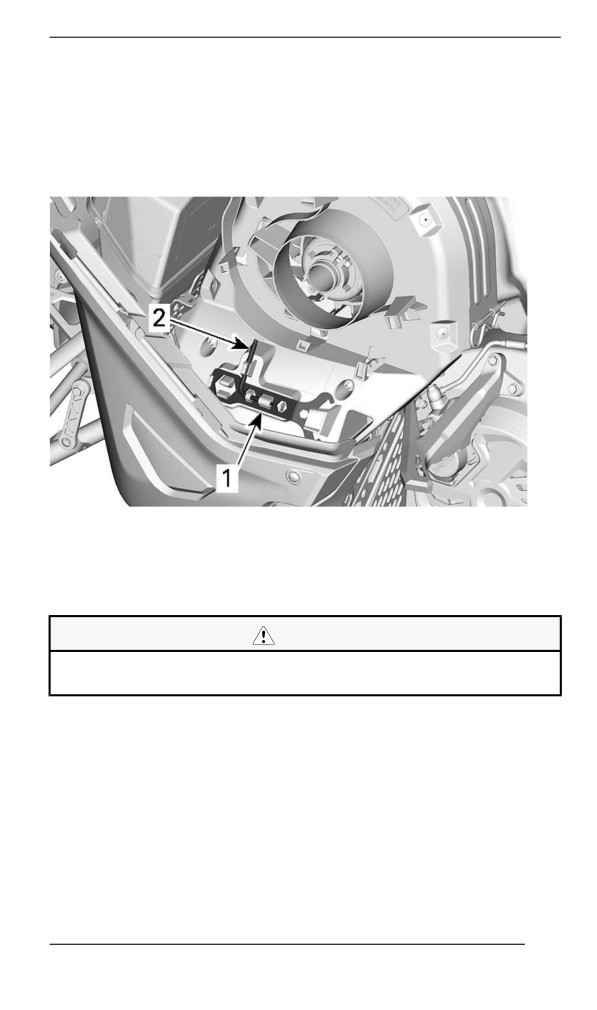
A part of the drive belt guard is designed to hold the tools allowing for
basic maintenance.
The tools are supplied with the vehicle. They should always be in-
stalled in their proper location and orientation.
TYPICAL - DRIVE BELT GUARD TOOLS LOCATION
1. Suspension adjustment tool
2. Pulley expander and headlight adjustment tool
Install in the following sequence:
CAUTION
Make sure tools are secured properly. Tools may detach and
cause damage to rotating parts.
1. Slide the suspension adjustment tool open end under retaining tab.
139
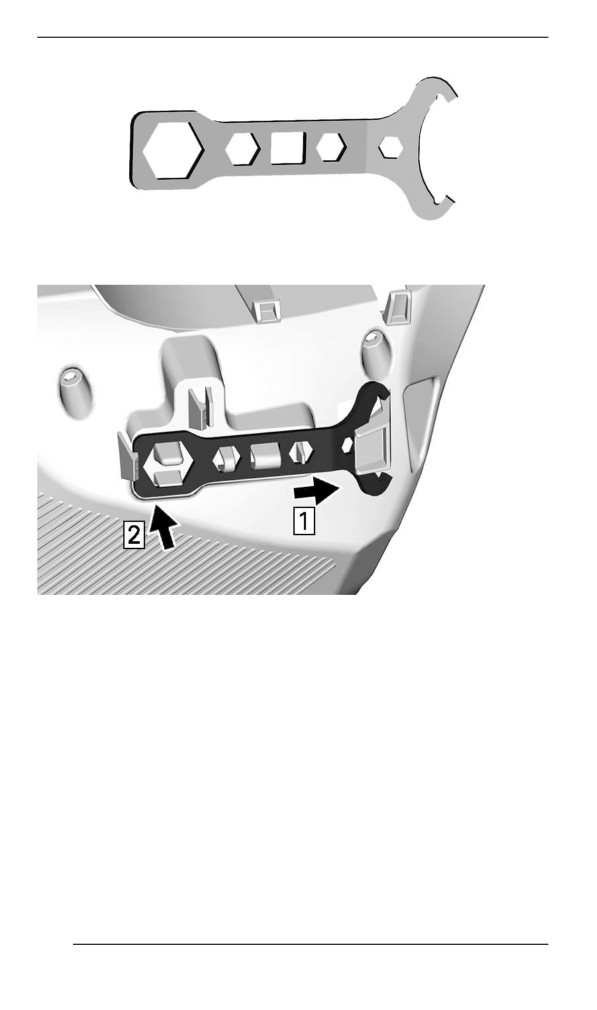
EQUIPMENT
SUSPENSION ADJUSTMENT TOOL
2. Press the closed end on the retaining tabs.
3. Slide the Pulley expander and headlight adjustment tool short end
into hole.
140
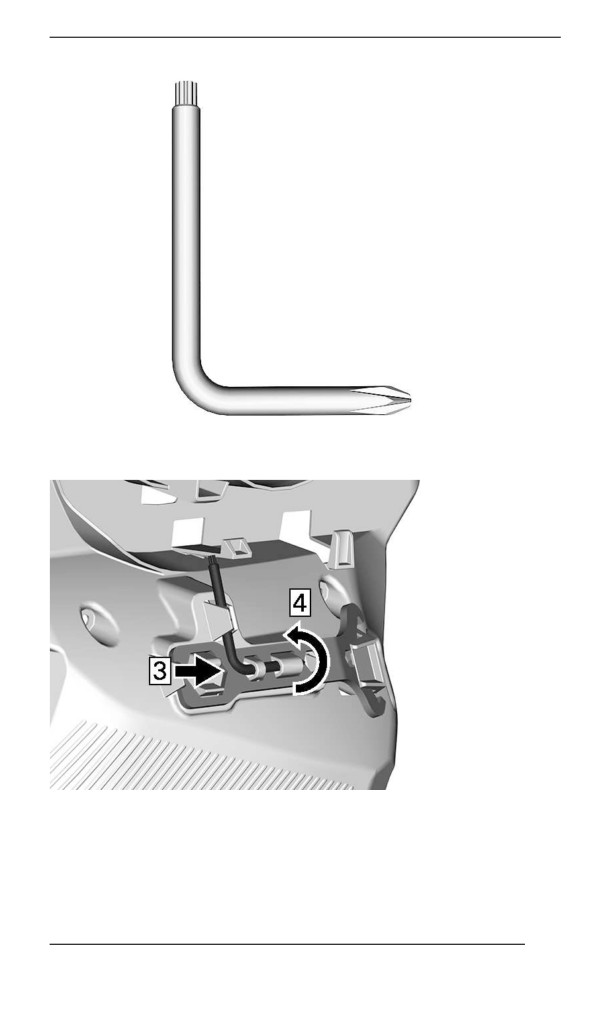
EQUIPMENT
PULLEY EXPANDER AND HEADLIGHT ADJUSTMENT TOOL
4. Rotate and clip long end in place.
141
EQUIPMENT
Cargo Box (iif equipped)
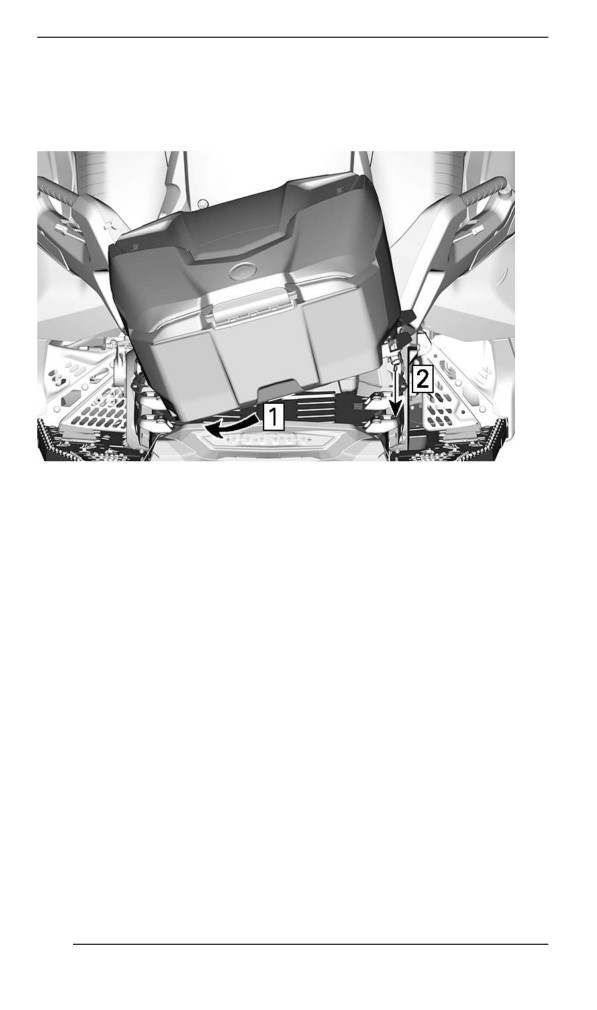
The cargo box is secured by LinQ attachment. To Install, follow the
steps.
1. Slide cargo box toward LH side.
2. Lower cargo box.
142
EQUIPMENT
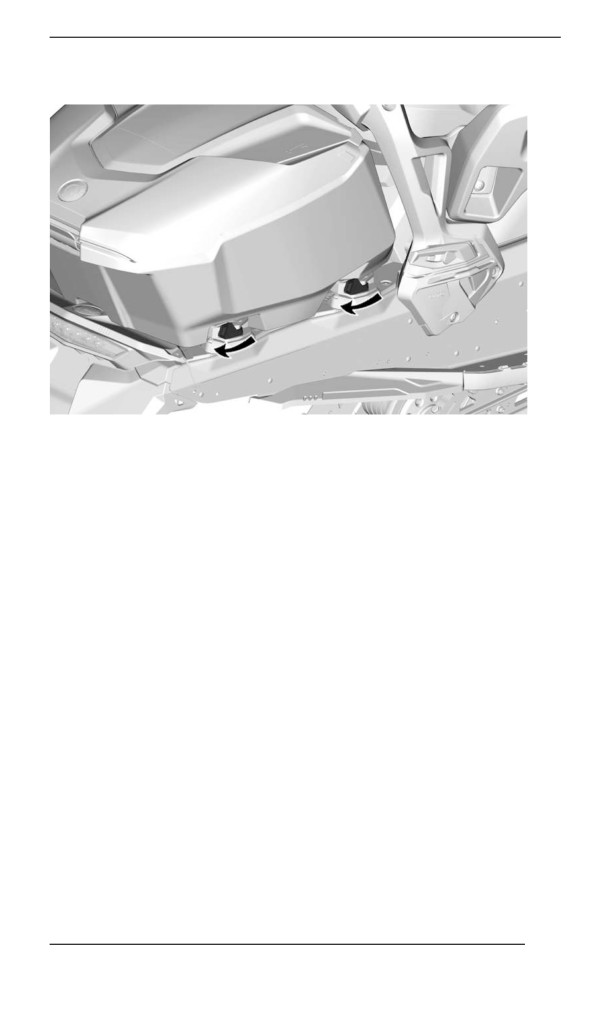
Turn LinQ levers toward the rear of the vehicle to lock.
143
GAUGE – 4.5” DIGITAL DISPLAY
Mulltiifunction Diispllay
Lower Display
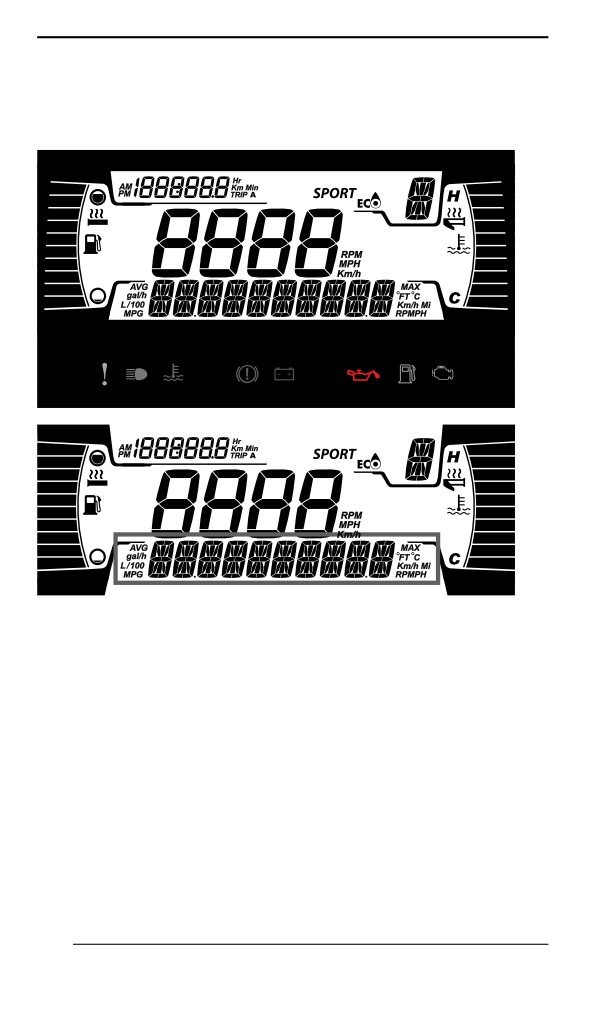
May display the following:
- RPM
- Speed
- Engine Temperature
- Fuel Statistics
- Settings
- Messages
- Outside temperature (if equipped)
To change the displayed information, use the gauge LOWER (M) but-
ton, or the Mode button on the handlebar multifunction switch, if
equipped.
The SPEED STAT display shows the maximum and the averaged
speed. Hold LOWER button for 3 seconds to reset.
When the SPEED display is chosen, the RPM is shown in the TRIP
display.
144
GAUGE - 4.5” DIGITAL DISPLAY
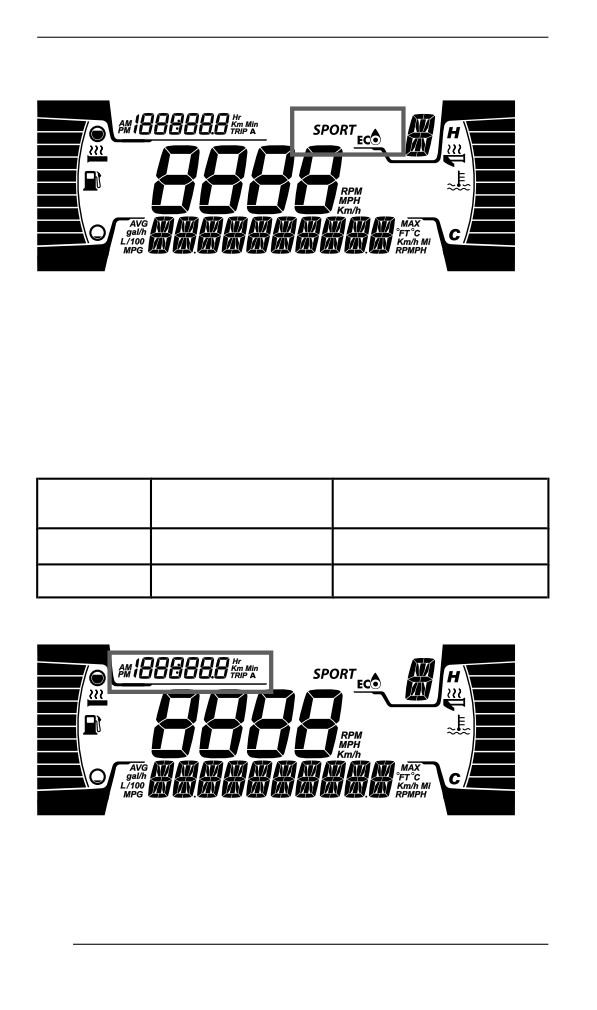
Left Lateral Display
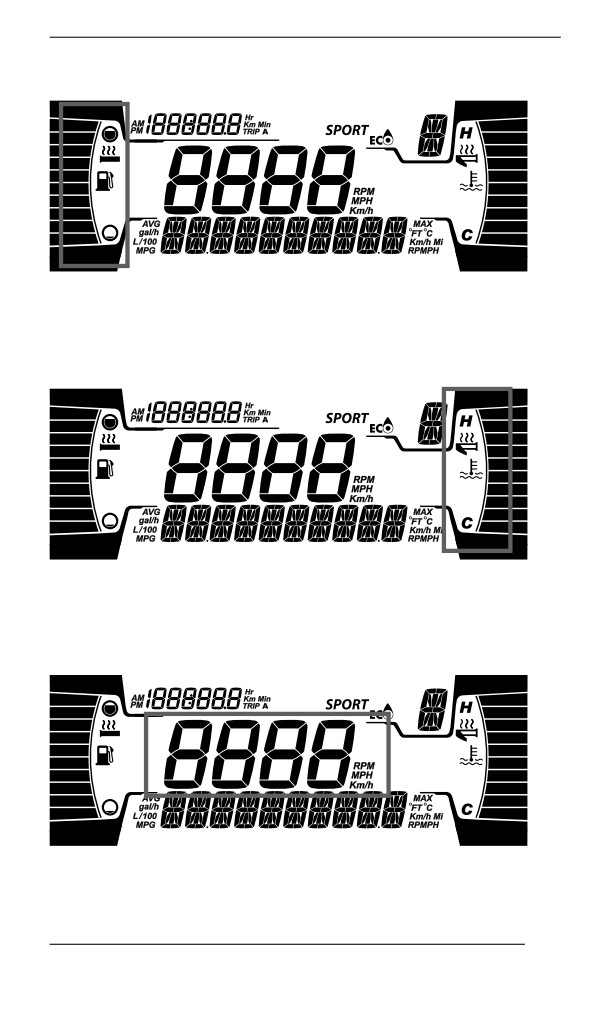
The left lateral display includes:
- Fuel level indicator
- Heated Grip level
Right Lateral Display
The right lateral display includes:
- Engine Temperature
- Heated throttle indicator
Central Display
Display the RPM of the engine or the vehicle speed in Km/h or MPH.
145
GAUGE - 4.5” DIGITAL DISPLAY
Driving Mode Display
The MODE display indicates the selected mode of operation:
- SPORT
- ECO
- STANDARD
NOTE:
When in STANDARD mode, no information is displayed.
A message of the selected mode will be displayed on the lower display
at activation and deactivation as follow:
DRIVING
MESSAGE AT
MESSAGE AT
MODE
ACTIVATION
DEACTIVATION
Sport
Sport
Sport OFF
Eco
Eco
Eco OFF
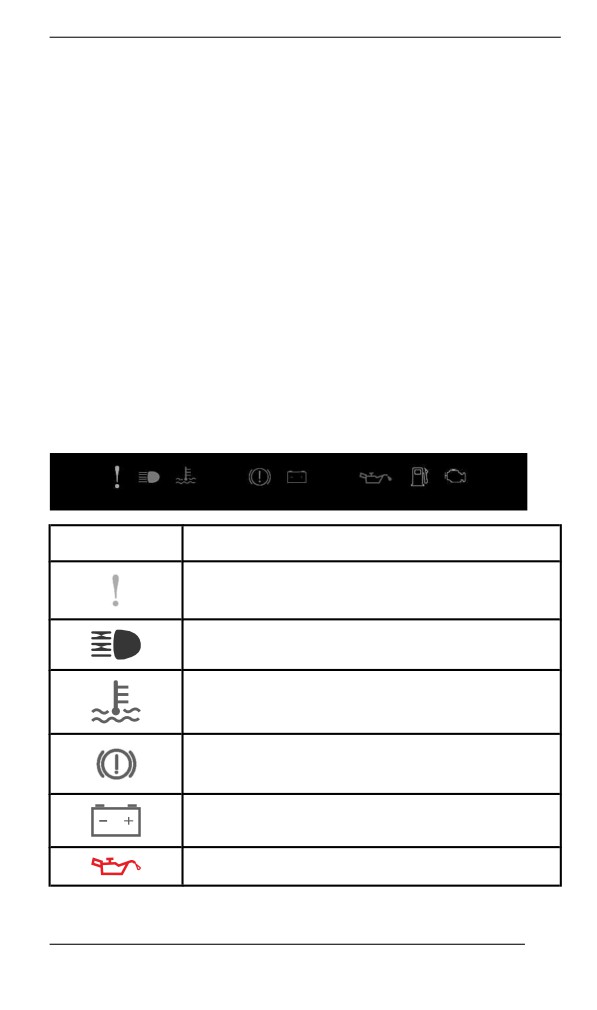
Trip Display
This display shows trip informations:
- Cumulative distance odometer
- Trip A hours
146
GAUGE - 4.5” DIGITAL DISPLAY
- Trip A distance (Km or mph)
- Vehicle hour meter
- Clock (If battery equipped)
To change the displayed information, use the gauge UPPER (T) but-
ton, or the Trip button on the handlebar multifunction switch, if
equipped.
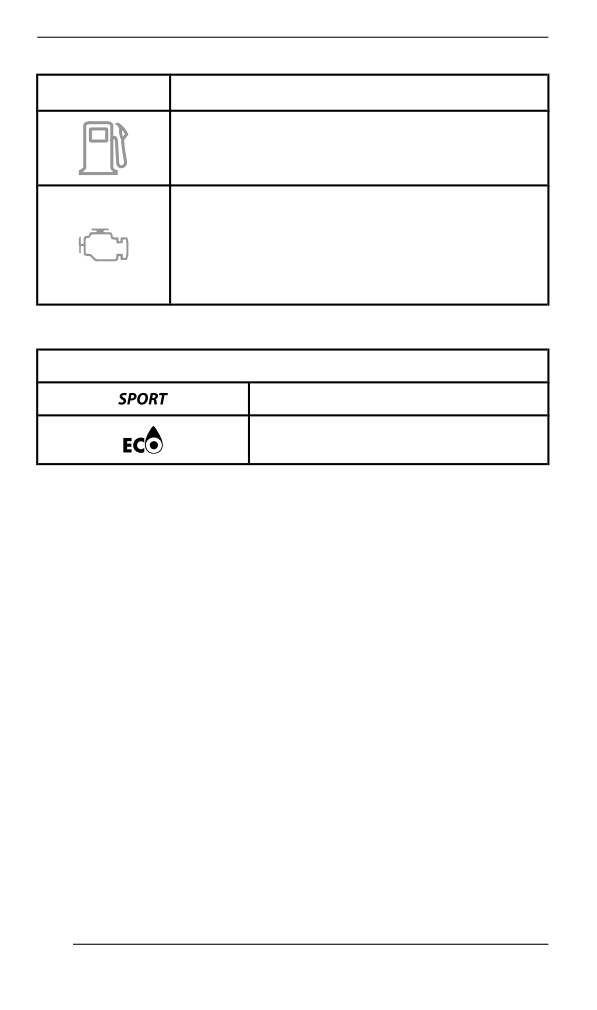
Warniing Lamps and Indiicators
The following indicator lamps will alert you to a vehicle condition that
may become serious. Some lamps will illuminate when starting the ve-
hicle to make sure they work. If any lamps remain on after starting the
vehicle, refer to the respective system warning lamp for further
information.
NOTE:
Some warning indicators appear in the display of the multifunction
gauge and function the same as an indicator lamp but do not display
when starting the vehicle.
Telltale Lights - Lower Bar
Lights
Description
ORANGE - Vehicle malfunction
BLUE - The high beam are selected
RED - The engine temperature is too high.
RED - Parking brake is engaged or malfunction
of the brake system
RED - The battery voltage too low or problem
with the electrical system
RED - Low engine oil pressure (if applicable)
147
GAUGE - 4.5” DIGITAL DISPLAY
Lights
Description
ORANGE - Low fuel level
ORANGE
Turn on: Malfunction of the vehicle emissions
control system
Blink: Engine problems, the limp home mode is
activated. Have the vehicle serviced
immediately.
Icons and Indicators - Multifunction Display
Icons and Indicators
Denotes SPORT mode is selected.
Denotes ECO mode is selected.
148
GAUGE - 4.5” DIGITAL DISPLAY
Settiings
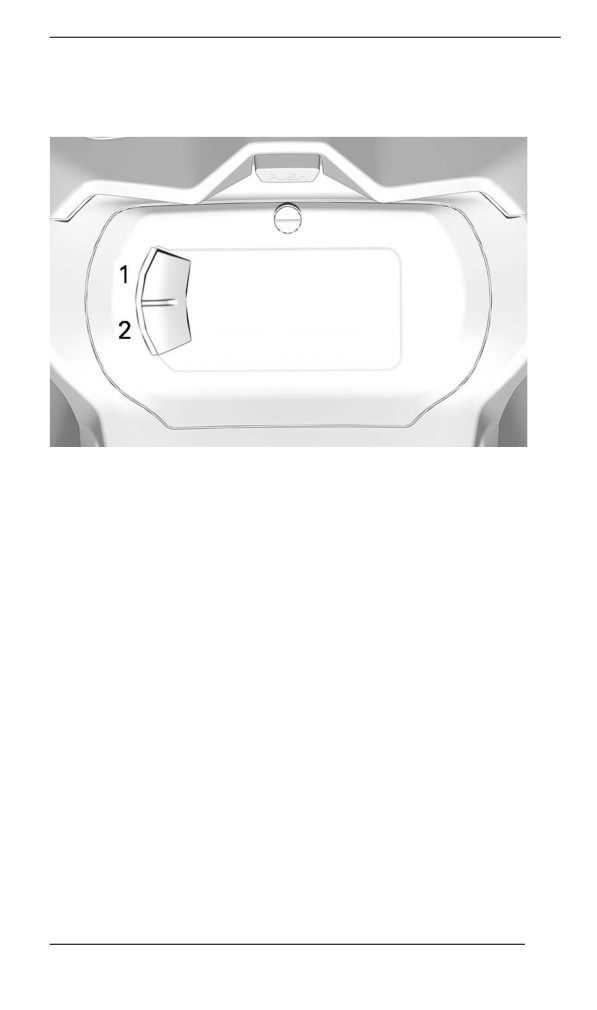
Setup
1. Upper button (Trip)
2. Lower button (Menu)
NOTE: A Trip and a Menu buttons can be found on the handlebar
multifunction switch, if equipped.
Using the LOWER (M) button, select SETTINGS and hold to enter
setting menu.
Reset Stats
Using LOWER button, select RESET STAT and hold to reset.
Unit Selection
This multifunction gauge is factory preset in metric units but it is possi-
ble to change it to imperial units.
Using LOWER button, select UNITS and hold button to change units.
Setting Clock
Using LOWER button, select CLOCK to change the clock.
1. Press LOWER button to select clock display.
2. Push and hold LOWER button for 1 second.
149
GAUGE - 4.5” DIGITAL DISPLAY
3. Press LOWER button to select 12:00 AM PM or 24:00 time base.
4. Push and hold LOWER button to acknowledge selection.
5. Press LOWER button to change hours (hours flash).
6. Push and hold LOWER button to acknowledge hour selection.
7. Press LOWER button to switch to minutes (minutes flash).
8. Push and hold LOWER button to acknowledge minutes selection.
Setting Language
The gauge display language can be changed. Refer to an authorized
BRP snowmobile dealer for language availability and to setup the
gauge to your preference.
150
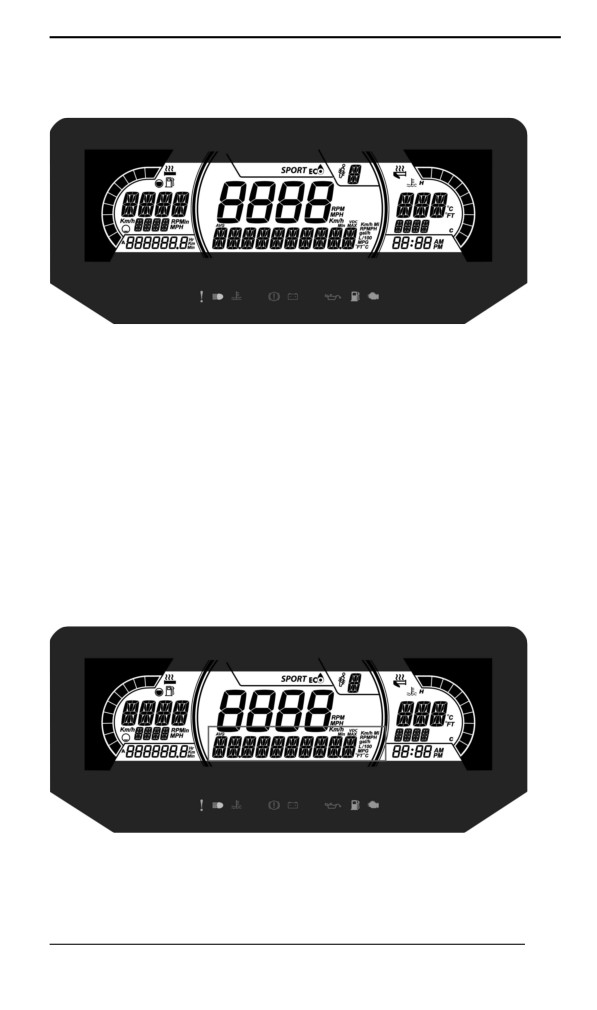
GAUGE – 7.2” DIGITAL DISPLAY
Multifunctiion Display
1. Select the upper or center display by using the MENU (M) button
on the multifunction switch. Refer to Secondary Controls for Menu/
Set button location.
2. While the desired display is flashing, navigate through the display,
by using the SET (S) button on the multifunction switch.
Once the desired information is displayed, press the MENU (M)
button or wait 5 seconds to confirm.
To reset
- Average speed
- Top speed
- Total fuel consumption
Press and hold the SET (S) button while display is flashing.
Lower Display
7.2" DIGITAL LOWER DISPLAY
May display the following:
- Settings
151
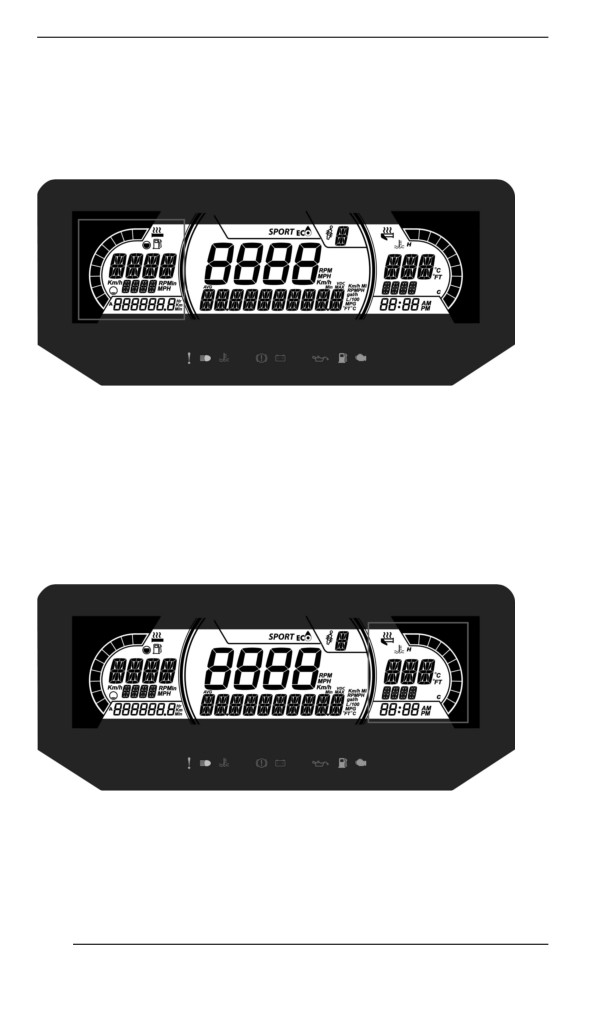
GAUGE - 7.2” DIGITAL DISPLAY
- Messages
The SPEED display shows the Maximum and the averaged speed.
Hold MENU button for 3 seconds to reset.
Left Lateral Display
The left lateral display includes:
- Fuel level indicator
- Heated Grip level
- Trip distance A and B (Km or mph)
- Cumulative hours
- Speed
- RPM
- Odometer
Right Lateral Display
The right lateral display includes:
- Engine Temperature
- Heated throttle indicator
- Clock
152
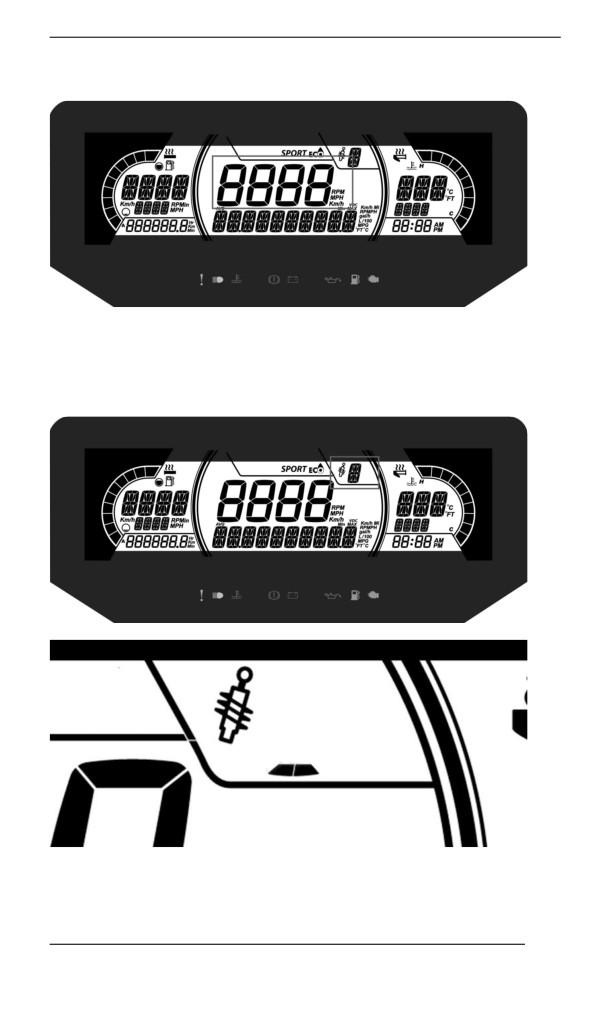
GAUGE - 7.2” DIGITAL DISPLAY
Central Display
Display the vehicle speed in Km/h (or MPH) or the RPMs. Refer to
Settings.
Smart-Shox Suspension Display (if equipped)
This icon appears and blinks when entering suspension mode selec-
tion or when suspension fault occurs.
153
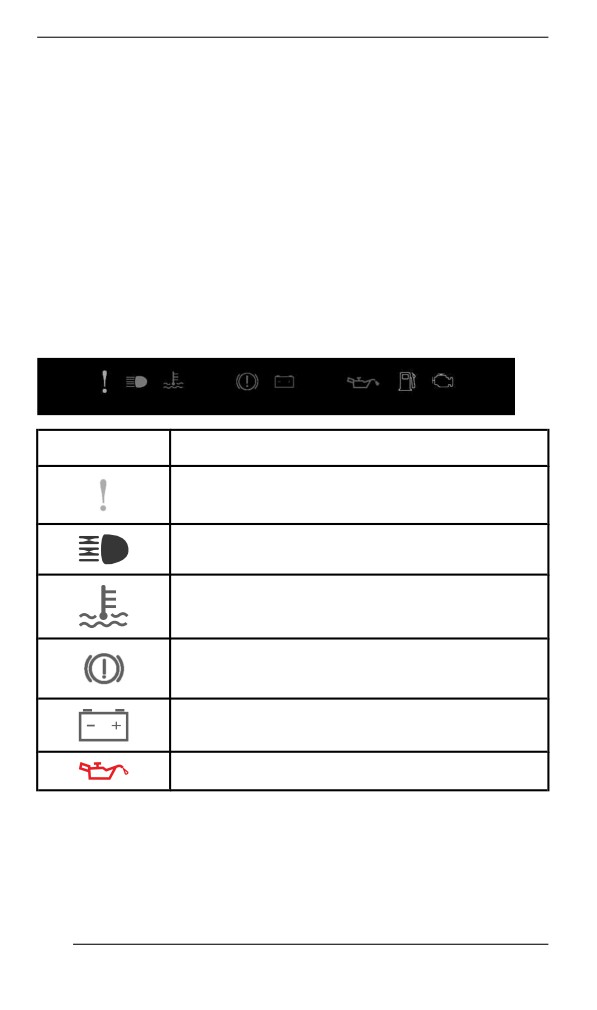
GAUGE - 7.2” DIGITAL DISPLAY
Refer to TUNE YOUR RIDE section for selection procedure.
Warning Lamps and Indicators
The following indicator lamps will alert you to a vehicle condition that
may become serious. Some lamps will illuminate when starting the ve-
hicle to make sure they work. If any lamps remain on after starting the
vehicle, refer to the respective system warning lamp for further
information.
NOTE:
Some warning indicators appear in the display of the multifunction
gauge and function the same as an indicator lamp but do not display
when starting the vehicle.
Telltale Lights - Lower Bar
Lights
Description
ORANGE - Vehicle malfunction
BLUE - The high beam are selected
RED - The engine temperature is too high.
RED - Parking brake is engaged or malfunction
of the brake system
RED - The battery voltage too low or problem
with the electrical system
RED - Low injection oil level
154
GAUGE - 7.2” DIGITAL DISPLAY
Lights
Description
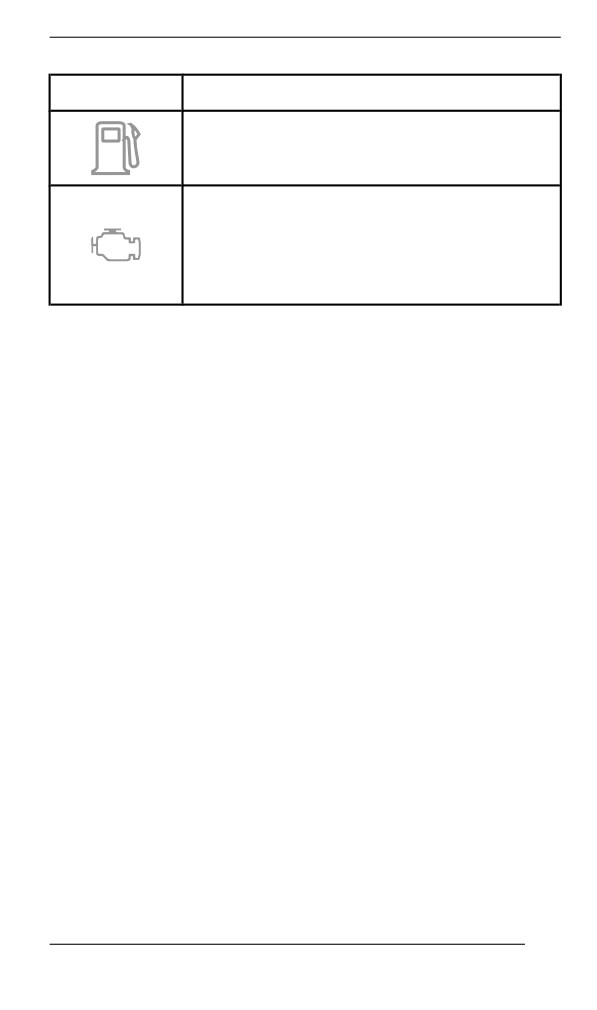
ORANGE - Low fuel level
ORANGE
Turn on: Malfunction of the vehicle emissions
control system
Blink: Engine problems, the limp home mode is
activated. Have the vehicle serviced
immediately.
Settiings
Setup
Using MENU button, select SETTINGS and hold to enter setting
menu. Various options are available such as swapping the SPEED
and RPM in the Central Display.
Unit Selection
This multifunction gauge is factory preset in metric units but it is possi-
ble to change it to imperial units.
Using MENU button, select UNITS and hold button to change units.
Setting Clock
Using MENU button, select CLOCK and hold to change units.
1. Press MENU button to select clock display.
2. Push and hold MENU button for 1 second.
3. Press MENU button to select 12:00 AM PM or 24:00 time base.
4. Push and hold MENU button or OK button to acknowledge
selection.
5. Press MENU button to change hours (hours flash).
6. Push and hold MENU button or OK button to acknowledge hour
selection
7. Push MENU button to switch to minutes (minutes flash).
8. Press MENU button to change minutes.
Setting Language
The gauge display language can be changed. Refer to an authorized
BRP snowmobile dealer for language availability and to setup the
gauge to your preference.
155
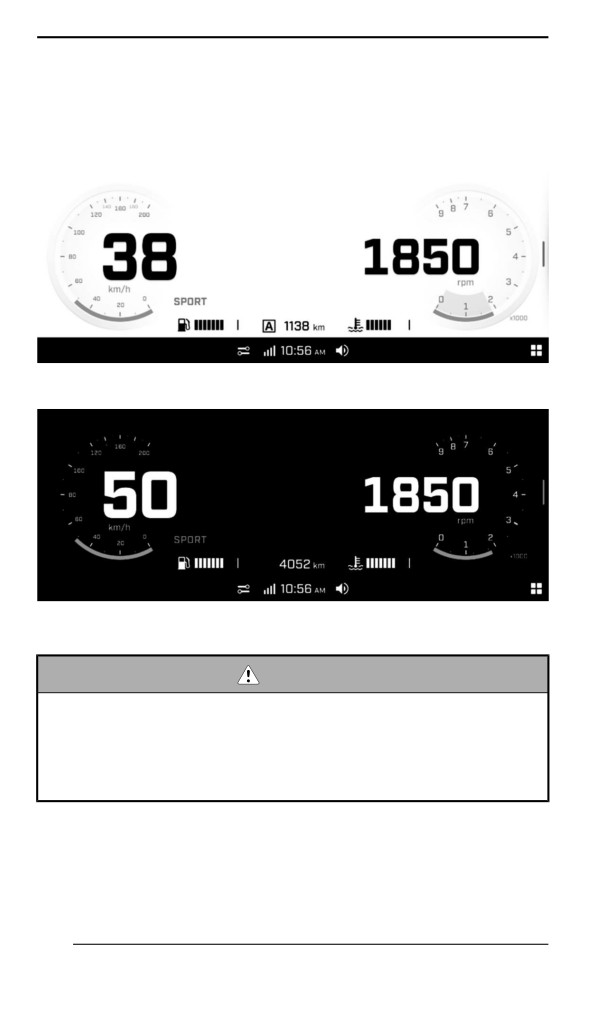
GAUGE – 10.25” COLOR TOUCHSCREEN
DISPLAY
Default Display
Light Mode
Dark Mode
Naviigatiing the Diigital Display
WARNING
Reading or tampering with the multifunction gauge can distract
you from the operation of the vehicle, particularly from con-
stantly scanning the environment. Always pay attention to road
conditions, ensure your environment is clear and free from ob-
stacles. Furthermore, when riding, only glance at the multifunc-
tion gauge briefly to maintain awareness of road conditions.
The multifunction gauge includes digital gauges (speedometer and
tachometer), indicator lamps and an infotainment center with a digital
screen.
156
GAUGE - 10.25” COLOR TOUCHSCREEN DISPLAY
We recommend you practice selecting some functions on the infotain-
ment center before getting on the road. You will get used to them and
they will be easier to use on the road.
Use the handlebar multifunction switch to navigate (touchscreen not
available when riding). Refer to Secondary Controls.
Pressing the Applet Switcher button on the handlebar multifunction
switch will make the modal view appear on top of the cluster.
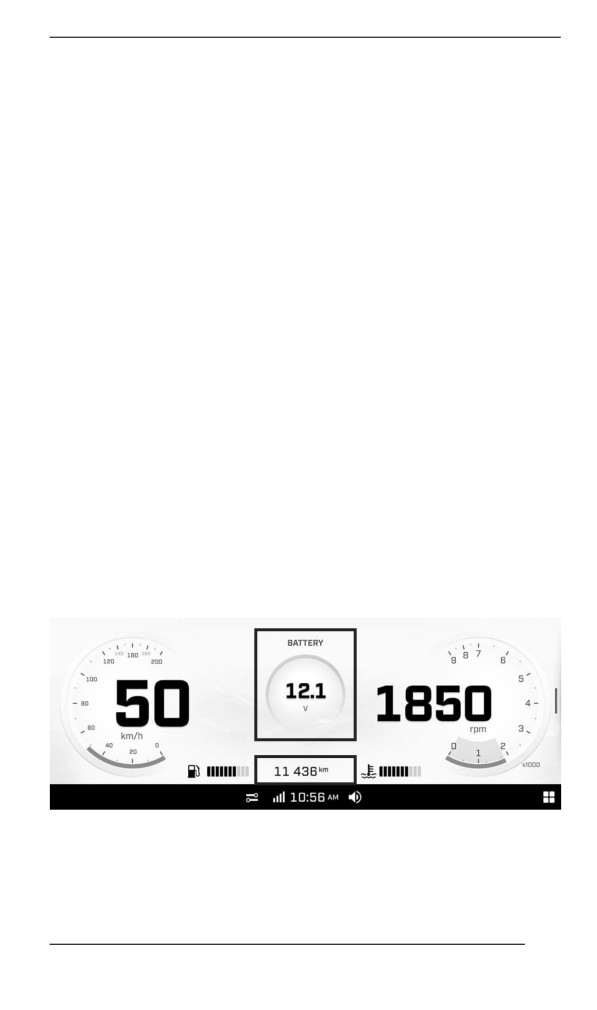
Center Diispllay
In full gauge view, long press in the upper center of the screen to show
one of the following extra gauges. Cycle through the extra gauges with
additional long presses.
- Battery voltage
- Coolant temperature
- Belt temperature (if equipped)
- Smart-Shox suspension type (if equipped)
- Altitude (if equipped)
- Ratio boost % (if equipped)
- Air suspension (if equipped)
In full gauge view, long press the lower center of the screen to show
one the following information. Cycle through the informations with ad-
ditional long presses.
- Vehicle total distance
- Trip A distance
- Trip A hours
- Trip B distance
- Trip B hours
- Vehicle total hours
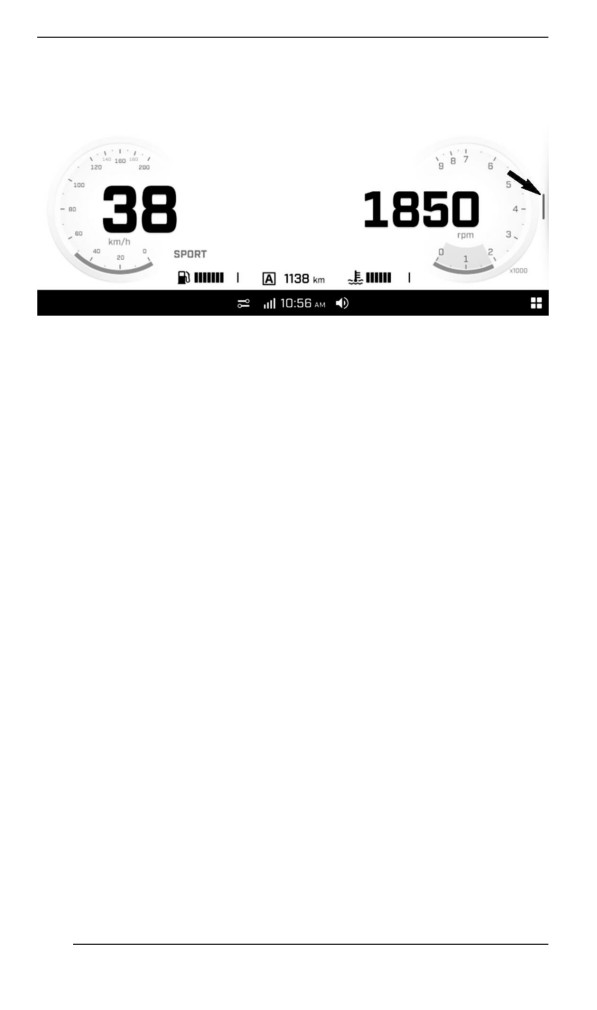
Narrow Viiew Display
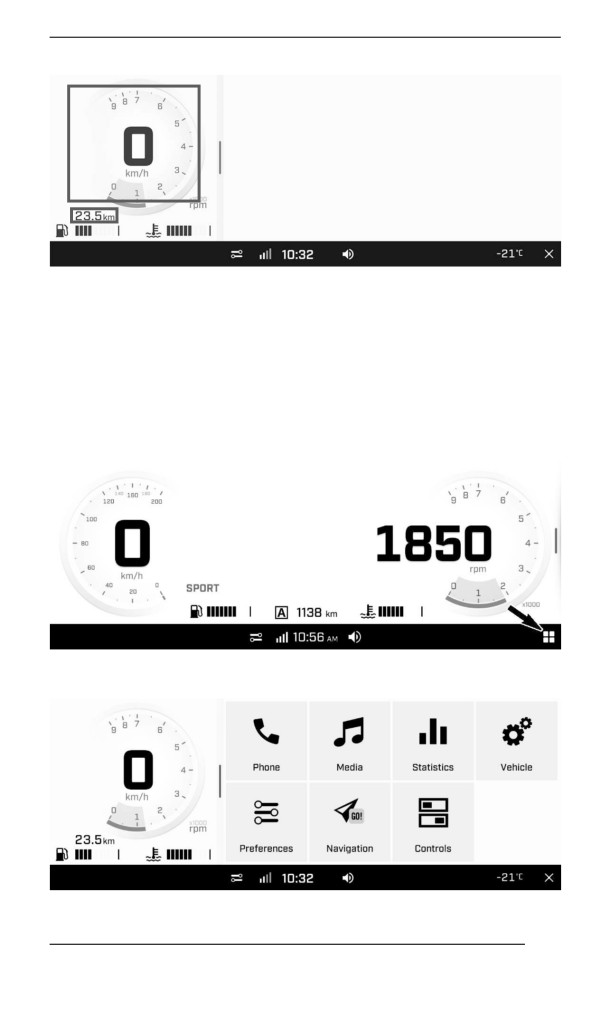
To change from full gauge view to narrow view, open an app or slide
the divider on the right side.
157
GAUGE - 10.25” COLOR TOUCHSCREEN DISPLAY
To change back to full gauge view, long press on Applet switcher or
slide the divider back in place.
The size of the left and right lateral displays cannot be adjusted.
Left Lateral Display
In narrow view, the left lateral display includes:
- Fuel level indicator
- Engine temperature
- Speedometer
- Tripmeter
- RPM
In narrow view, long press the speedometer to change the display be-
tween speedometer only or speedometer and RPM.
In narrow view, long press the tripmeter to show one of the following
information. Cycle through the informations with additional long
presses.
- Current ride distance
- Trip A distance
- Trip A hours
- Trip B distance
- Trip B hours
- Current ride hours
158
GAUGE - 10.25” COLOR TOUCHSCREEN DISPLAY
Right Lateral Display
In narrow view, the right lateral display includes various apps. Refer to
App Menu for more information.
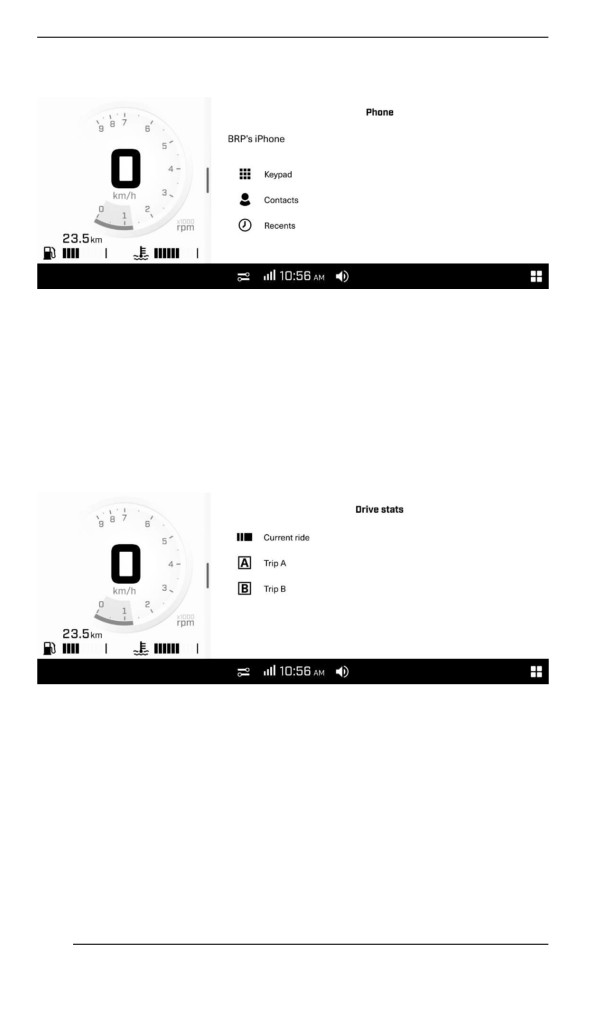
App Menu
To access the app menu, press the app menu icon on the bottom-right
corner.
Press on an app icon to open it.
159
GAUGE - 10.25” COLOR TOUCHSCREEN DISPLAY
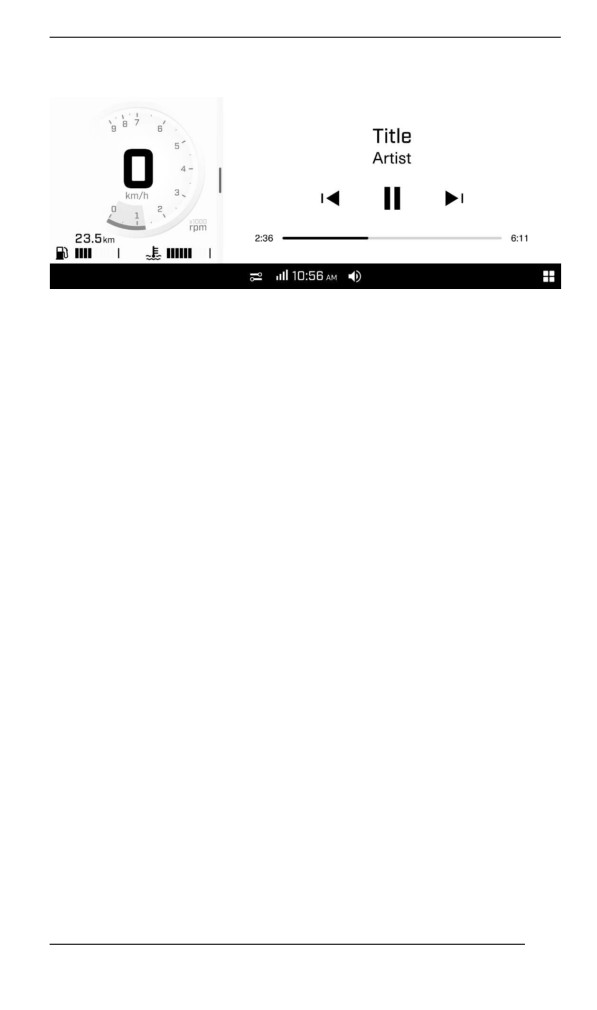
Phone
The phone applet menu is to access:
- The keypad
- The phone contact list
- The phone history
NOTE:
To have access to the Phone menu, a phone and rider helmet (Head-
set) must be paired. Refer to Pair your Smartphone Via Bluetooth.
Statistics
The Statistics applet is used to get :
- Trip distance information
- Trip elapsed time information
- Average speed
3 sets of statistics are kept in memory. Trip A and Trip B can be reset
independently. Current ride statistic will be reset when the vehicle
restart.
160
GAUGE - 10.25” COLOR TOUCHSCREEN DISPLAY
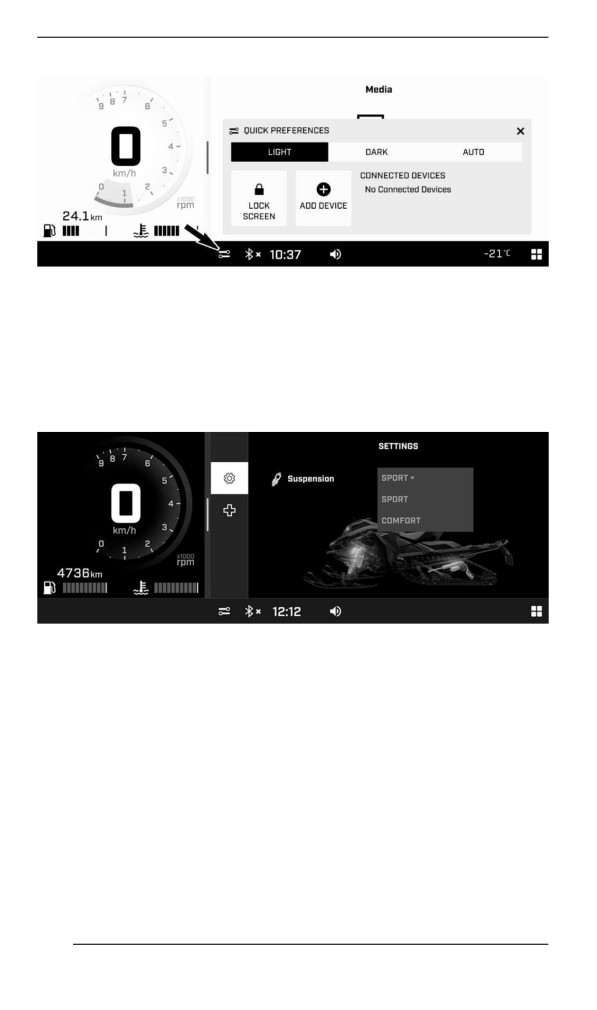
Media
The Media applet allows to manage music listened in the helmet audio
system.
Gives also song informations when available.
This vehicle is not equipped with speakers. An appropriate helmet
audio system is required to listen to music.
Preferences
The Preferences applet is to:
- Adjust the display brightness and appearance (Light/Dark/Auto)
- Pair Bluetooth devices:
- Phone
- Driver headset
- Passenger headset
- Connect vehicle to a Wi-Fi network
- Access General settings:
- Adjust the units (Imperial/Metric)
- Set the language
- Set the date and time
- Software update
- Get information about manufacturer information and device
regulatory compliance
- Reset to factory settings
- Defining the apps to be used with the App Switcher button while
riding
- Defining the settings to be used with the Ride Settings button while
riding
It is recommended to check for software updates regularly.
Quick Preferences
To access the Quick Preferences menu, press the following icon.
161
GAUGE - 10.25” COLOR TOUCHSCREEN DISPLAY
The Quick Preferences menu is to:
- Adjust the display appearance (Light/Dark/Auto)
- Lock the screen (press and hold anywhere on the screen to
unlock)
- Add a Bluetooth device
- View connected Bluetooth devices
Vehicle Settings
The Vehicle Settings applet is to:
- View vehicle Health:
- Vehicle information
- Faults (codes and description)
- Procedures (summerization)
- Adjust Smart-Shox suspension settings (if equipped)
162
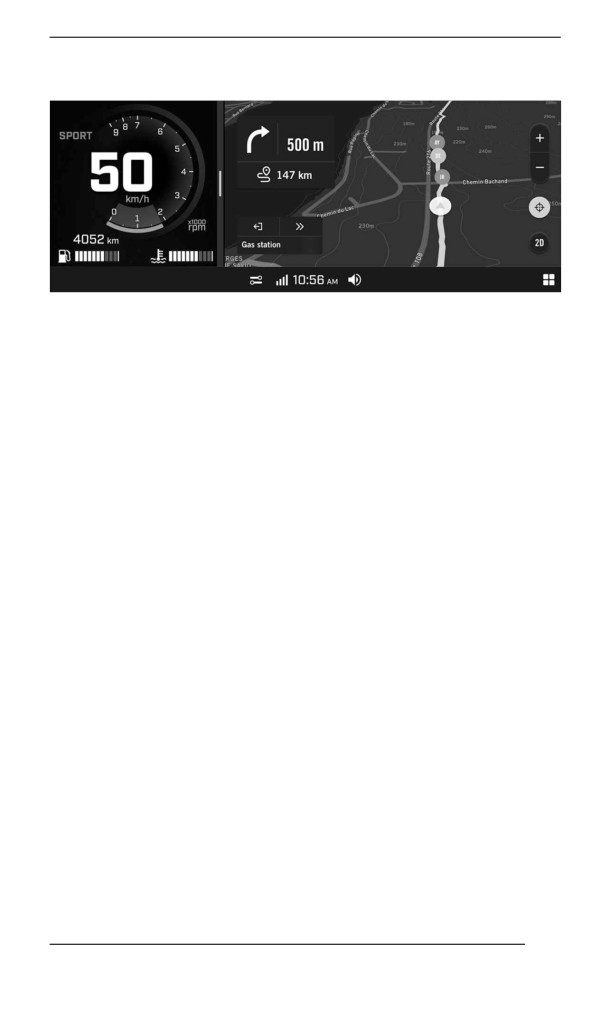
GAUGE - 10.25” COLOR TOUCHSCREEN DISPLAY
With the BRP GO! App
To use the Navigation applet on the display, you must connect (USB
connection) a mobile device with the BRP GO! app. The app can be
downloaded from the Apple App Store or Google Play Store via a sim-
ple search.
NOTE: For more information on the BRP GO! app, see the BRP GO!
section in this manual or visit the Ski-Doo website.
NOTE:
The smartphone must be connected with a USB cable to the USB port
located in the glove box.
User's personal data will be deleted from the cluster when the phone
disconnected.
User agrees that personal data (contact list and call history) be trans-
ferred to the cluster when smartphone is connected.
Warniing Lamps and Indiicators
The following indicator lamps will alert you to a vehicle condition that
may become serious. Some lamps will illuminate when starting the ve-
hicle to make sure they work. If any lamps remain on after starting the
vehicle, refer to the respective system warning lamp for further
information.
NOTE:
Some warning indicators appear in the display of the multifunction
gauge and function the same as an indicator lamp but do not display
when starting the vehicle.
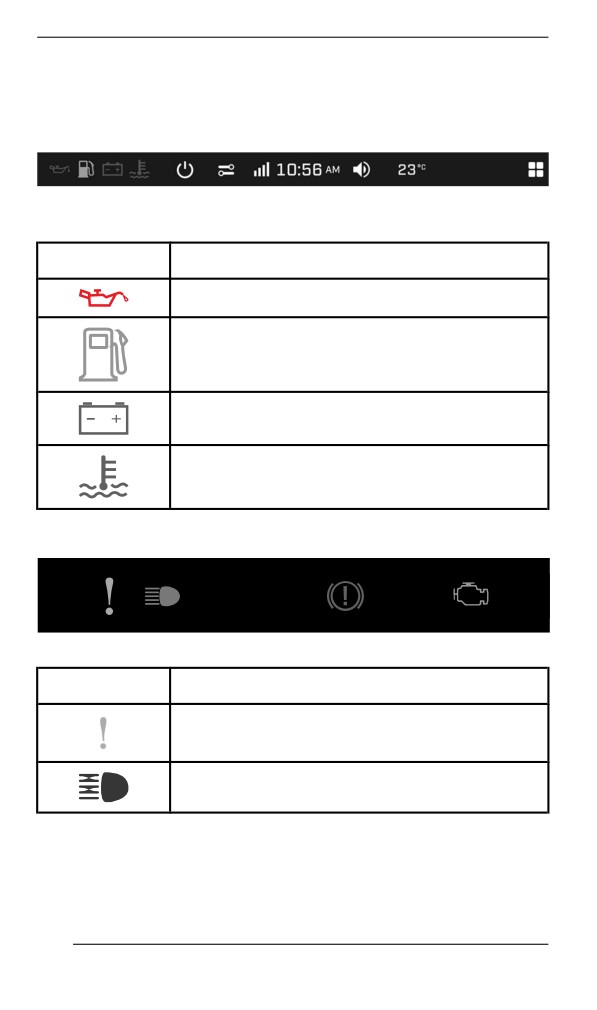
Telltale Lights
The telltale lights are separated on two levels:
163
GAUGE - 10.25” COLOR TOUCHSCREEN DISPLAY
- Digital bar
- Physical bar
Digital Bar
DIGITAL PILOT LAMP
–
10.25” COLOR DIGITAL
TOUCHSCREEN
Lights
Description
RED - Low engine oil pressure (if applicable)
ORANGE - Low fuel level
RED - The battery voltage too low or problem
with the electrical system
RED - The engine temperature is too high.
Physical Bar
PILOT LAMPS – 10.25” COLOR DIGITAL TOUCHSCREEN
Lights
Description
ORANGE - Vehicle malfunction
BLUE - The high beam are selected
164
GAUGE - 10.25” COLOR TOUCHSCREEN DISPLAY
Lights
Description
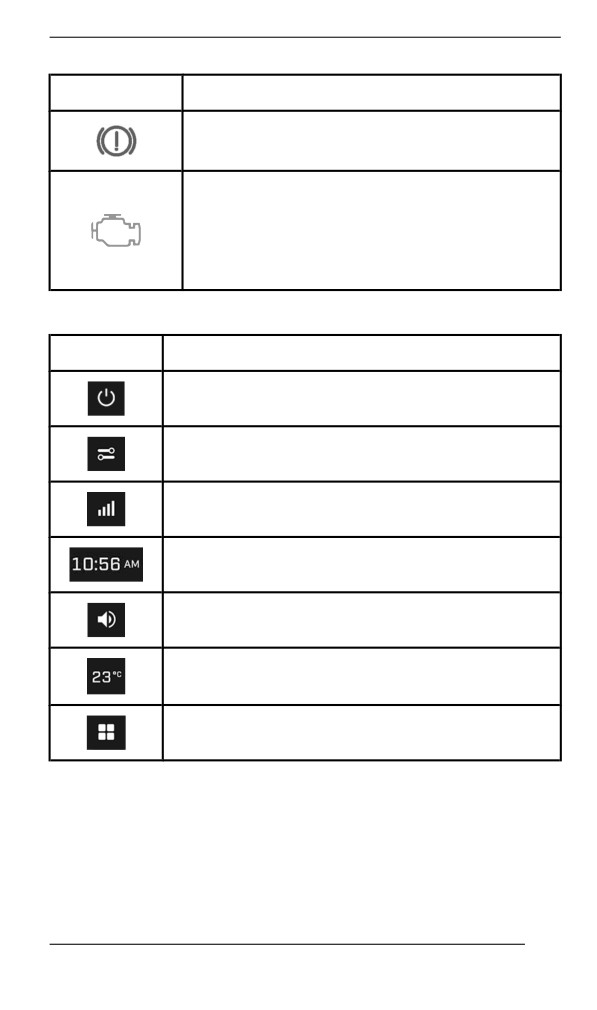
RED - Parking brake is engaged or malfunction
of the brake system
ORANGE
Turn on: Malfunction of the vehicle emissions
control system
Blink: Engine problems, the limp home mode is
activated. Have the vehicle serviced
immediately.
Icons and Indicators - Multifunction Display
Icon
Description
Shut down
Quick Preferences
Smartphone Network connection
Clock
Audio Volume
Ambient Temperature
App menu
Pairiing your Smartphone Viia Bluetooth
On the Vehicle
1. Open the App menu.
2. Go to “Preferences”.
3. Select “Bluetooth”.
165
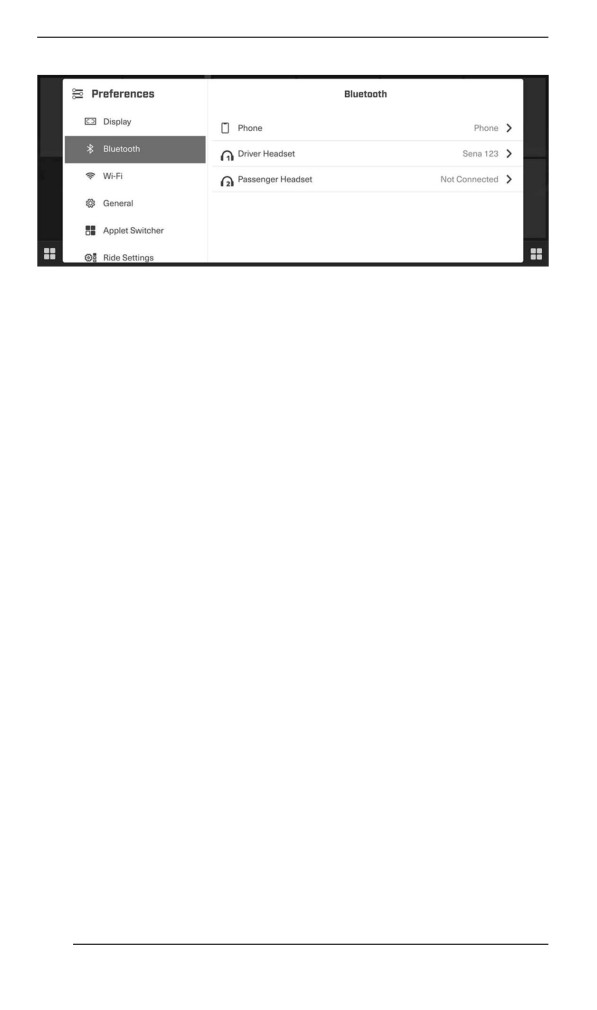
GAUGE - 10.25” COLOR TOUCHSCREEN DISPLAY
4. Select “Phone”.
5. Select “Add Device”.
NOTE: More than one smartphone can be paired with the vehicle.
However, only one will connect at any given time.
On the Phone
1. Activate your phone's bluetooth function.
Refer to your manufacturer's user guide for detailed procedure.
2. Select the bluetooth name of your vehicle display in the list of avail-
able devices.
3. A confirmation number will appear on the display and on the
phone. Make sure that the numbers match.
4. Press Pair on your phone.
5. Allow Contacts and Favorite Sync on your phone.
Pairing a Headset
To pair a headset, refer to Pairing your Smartphone Via Bluetooth and
select “Driver Headset” or “Passenger Headset”.
BRP GO! App
1) Download the BRP GO! Smartphone App
Download the BRP GO! app via the App Store for Apple™ or the Goo-
gle™ Play Store for Android.
2) Connect your smartphone using a USB cable
It is recommended to use an original charging cable from the smart-
phone OEM to optimize transfer between the phone and the vehicle.
Use the front USB port.
1. Unlock your phone screen
166
GAUGE - 10.25” COLOR TOUCHSCREEN DISPLAY
2. Connect your phone charging cable
3. A checkmark will appear on your phone screen once the connec-
tion is done.
3) Access the Navigation applet
In the App Menu, select "Navigation". You can also access the Navi-
gation applet if it is set in the Applet Switcher app rotation.
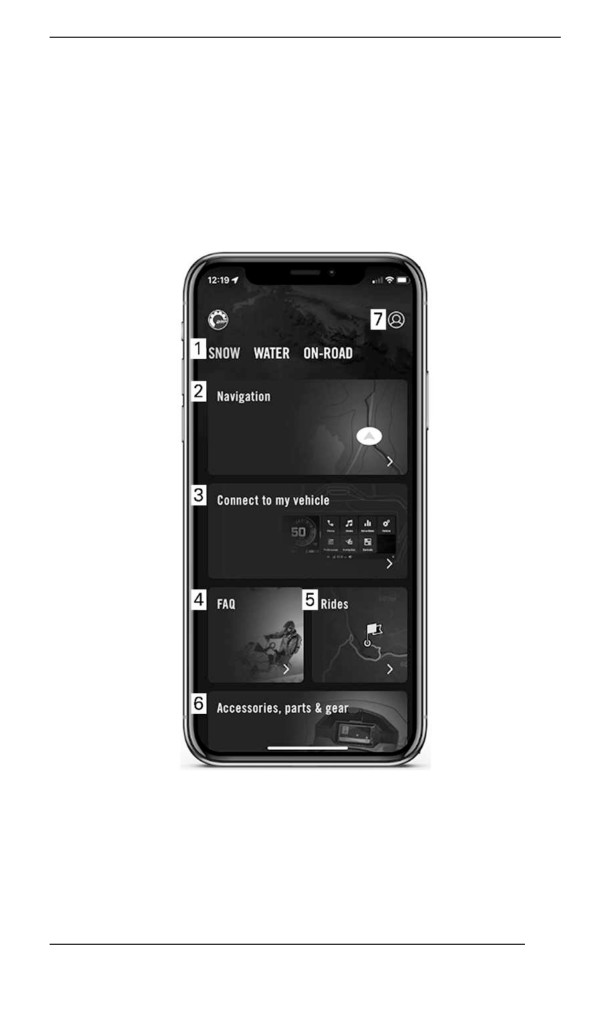
Quiick Tour of the BRP GO! App
1. Playground: Select your playground to see content related to your
vehicle. For Ski-Doo snowmobiles, select the Snow playground.
2. Navigation: Access all the navigation features of the app such as
route planning, turn-by-turn navigation, friends location, offline nav-
igation, and more. You can access thousands of snowmobile trails
across North America and Europe on the map.
167
GAUGE - 10.25” COLOR TOUCHSCREEN DISPLAY
3. Connect to my vehicle: Easily access content on how to connect
the BRP GO! app to your vehicle display.
4. FAQ: This link takes you to answers of common questions asked
by riders like you. An internet connection is required.
5. Rides: Easily access your planned and completed rides made with
the Navigation features of the BRP GO! app.
6. Accessories, parts & gear : This link takes you to the online store
of your vehicle. An internet connection is required.
7. My Profile: Manage your profile and your account settings.
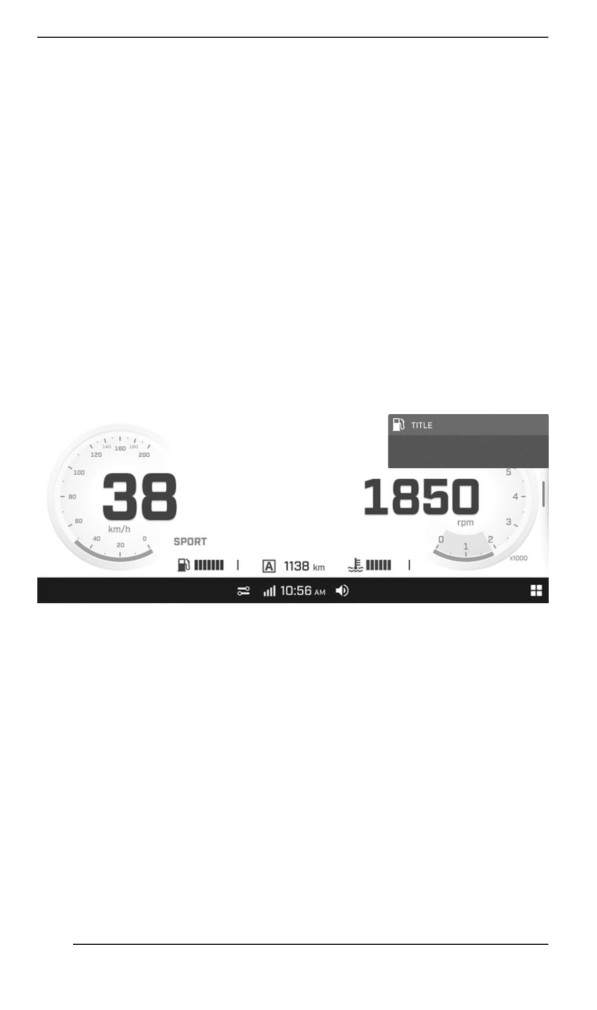
Messages in Multiifunctiion Gauge
Important information about vehicle condition is displayed on the multi-
function gauge. When starting the engine, always look at the gauge
for any indicator lamps or special messages.
Important information messages can also be displayed temporarily to
assist indicator lamps.
Notifications will always appear at the top right corner of the screen.
10.25” COLOR DIGITAL TOUCHSCREEN
There are two types of notifications:
- Vehicle notifications include warning, caution and notice messages
- Infotainment notifications include messages regarding connected
devices
Vehicle notifications have priority over infotainment notifications when
they are both present at the same time.
In the event vehicle goes into LIMP HOME, BRP recommends having
the vehicle transported. If you operate the vehicle in LIMP HOME,
avoid abrupt maneuvers and immediately go to the nearest authorized
BRP snowmobile dealer to have your vehicle serviced before riding
again. In LIMP HOME, the engine RPM is limited and therefore the ve-
hicle speed.
168
FUEL
Fuel Requiirements
NOTICE
Always use fresh gasoline. Gasoline will oxidize; the result is
loss of octane, volatile compounds, and the production of gum
and varnish deposits which can damage the fuel system.
Alcohol fuel blending varies by country and region. Your vehicle has
been designed to operate using the recommended fuels, however, be
aware of the following:
- Use of fuel containing alcohol above the percentage specified by
government regulations is not recommended and can result in the
following problems in the fuel system components:
- Starting and operating difficulties.
- Deterioration of rubber or plastic parts.
- Corrosion of metal parts.
- Damage to internal engine parts.
- Inspect frequently for the presence of fuel leaks or other fuel sys-
tem abnormalities if you suspect the presence of alcohol in gaso-
line exceeds the current government regulations.
- Alcohol blended fuels attract and hold moisture which may lead to
fuel phase separation and can result in engine performance prob-
lems or engine damage.
Recommended Fuel
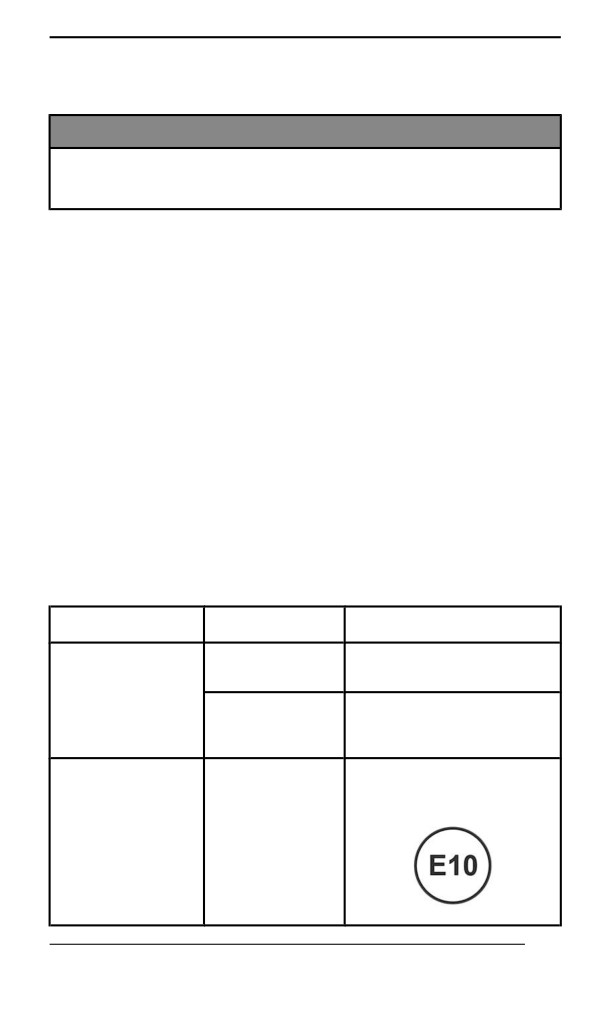
Use unleaded gasoline containing MAXIMUM 10% ethanol. The gaso-
line must have the following minimum octane requirements:
Fuel type
Engine
Minimum octane rating
87 AKI (RON+MON)/2
900 ACE
92 RON
Fuel with NO
ethanol
900 ACE Turbo
91 AKI (RON+MON)/2
900 ACE Turbo
95 RON
R
91 AKI (RON+MON)/2
95 RON
900 ACE
Fuel which may
900 ACE Turbo
contain up to 10%
900 ACE Turbo
MAX ethanol
R
169
FUEL
NOTICE
Never experiment with other fuels. Engine or fuel system dam-
ages may occur with the use of an inadequate fuel.
NOTICE
Do NOT use fuel from fuel pumps labeled E85.
Use of fuel labeled E15 is prohibited by U.S. EPA Regulations.
Fueling Procedure
WARNING
Always stop engine before refueling.
WARNING
Fuel is flammable and explosive under certain conditions.
Never use an open flame to check fuel level.
Never smoke or allow flame or spark in vicinity.
Always work in a well-ventilated area.
NOTE:
Do not sit or lean on seat when fuel tank cap is not properly installed.
1. Stop engine.
2. Have operator and passenger get off vehicle.
WARNING
Do not allow anyone seated on the vehicle while fueling.
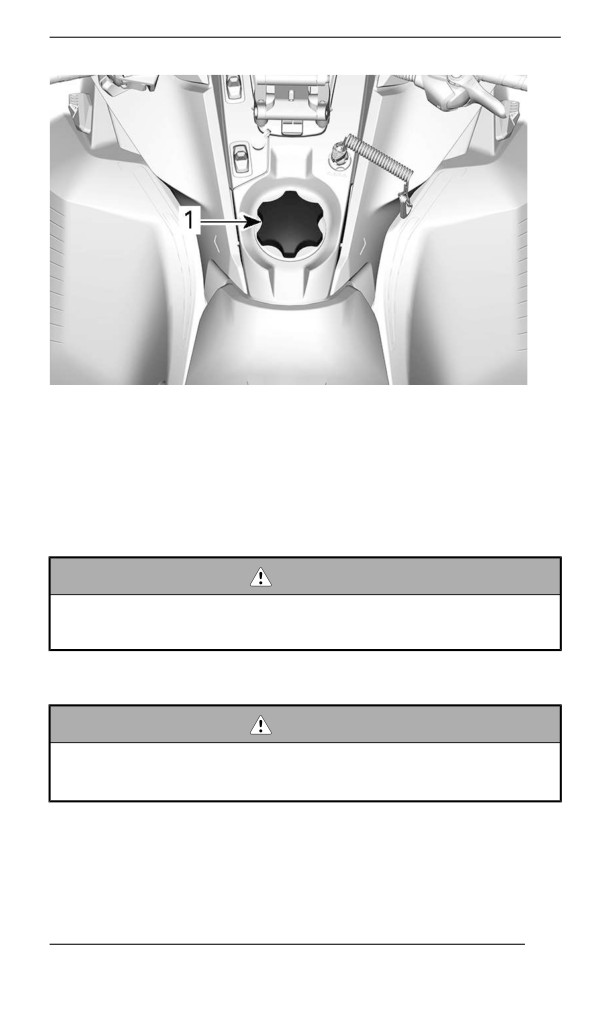
3. Unscrew slowly the fuel reservoir cap counterclockwise to stabilize
pressure before removing it.
NOTE:
A short whistling sound is normal.
170
FUEL
TYPICAL
1. Fuel tank cap
4. Insert the spout into the filler neck.
5. Pour fuel slowly so that air can escape from the tank and prevent
fuel flow back. Be careful not to spill fuel.
6. Stop filling when the fuel reaches the bottom of filler neck. Do not
overfill.
WARNING
Never top up the fuel tank before placing the vehicle in a warm
area. As temperature increases, fuel expands and may
overflow.
7. Fully tighten fuel reservoir cap clockwise.
WARNING
Always wipe off any small fuel spillage from the vehicle. If a ma-
jor spillage occurs, remove side panels to remove fuel vapors
from engine compartment before starting.
NOTE:
Do not sit or lean on seat when fuel tank cap is not properly installed.
171
ENGINE OIL
Recommended Oiil
Rotax® engines were developed and validated using the XPS™ oil.
BRP recommends the use of its XPS engine oil or an equivalent at all
time. Do not add any oil additives to the recommended engine oil.
Damages caused by the use of an oil not suitable for the engine or by
adding of an oil additives may not be covered by the BRP Limited
Warranty.
XPS RECOMMENDED Engine Oil
4T 0W40 Synthetic oil
IF THE RECOMMENDED XPS ENGINE OIL IS NOT
AVAILABLE
Use a 0W40 4-stroke SAE synthetic engine oil meeting or
exceeding the following lubricant industry specifications.
Always check the API service label certification on the oil container,
it must contain at least the indicated standard.
- API service classification SN
172
BREAK-IN PERIOD
Operation Duriing Break-In
Engine
During the break-in period:
- Avoid prolonged full throttle operation.
- Avoid sustained accelerations.
- Avoid prolonged cruising speeds.
- Avoid engine overheating.
However, brief accelerations and speed variations contribute to a
good break-in.
During a predetermined period, the engine management system con-
trols some engine parameters.
The duration is based on fuel volume. It will take approximately two
fuel tanks to complete the break-in.
During this period:
- The engine performance and behavior will not be optimal.
- The fuel and oil consumption will be higher.
Drive Belt
A new drive belt requires a break in period of 50 km (30 mi).
During the break-in period:
- Avoid strong acceleration and deceleration.
- Avoid pulling a load.
- Avoid high speed cruising.
If the vehicle creeps, lower the drive belt height from the preliminary
setting. Refer to Drive Belt in maintenance procedure.
173
DRIVING MODES
WARNING
Whenever changing operating mode, make sure to maintain sit-
uational awareness while riding.
ECO Mode
(Fuel Economy Mode)
When ECO mode is selected (fuel economy mode), vehicle torque
and speed are limited whereby an optimal cruising speed is main-
tained in order to reduce fuel consumption.
Once activated, ECO mode will remain active until it is deactivated by
the operator.
Standard Mode
When in Standard mode, no indicator is in the multifunction gauge.
Sport Mode
WARNING
Ensure passenger is advised to hold on tightly before activating
Sport mode. Sport mode provides increased acceleration.
When selected, Sport mode provides for instant throttle response and
more rapid accelerations than Standard or ECO mode.
Once activated, Sport mode will remain active until it is deactivated by
the operator.
A message of the selected mode will be displayed at activation and
deactivation as follow:
Operating mode
Message at Activation
Sport
SPORT MODE
Standard
STANDARD MODE
Eco
ECO MODE
174
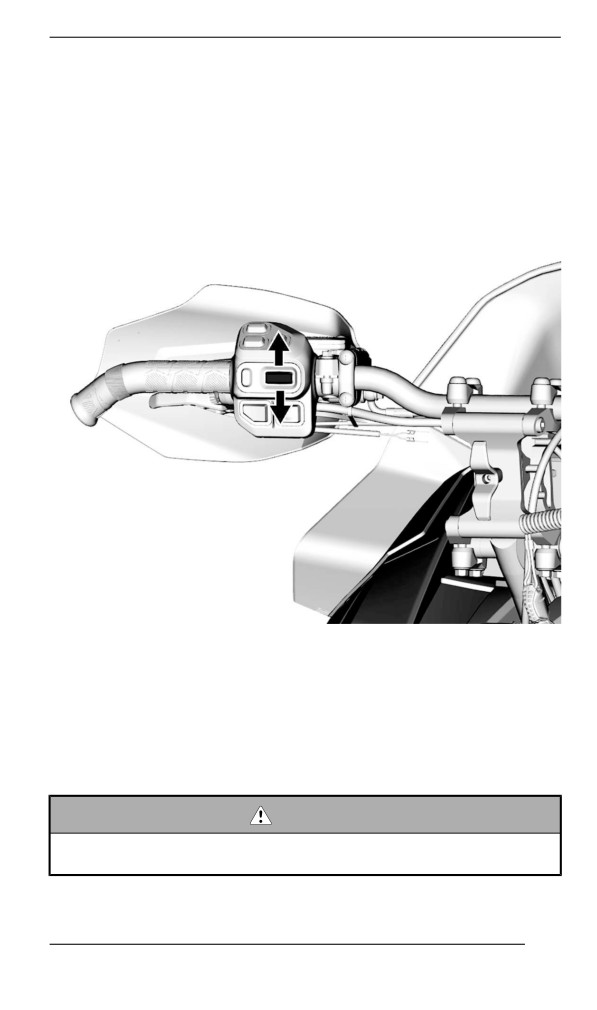
DRIVING MODES
Navigating the Driviing Modes
Use ECO/ Standard/ Sport Mode switch to navigate between power
levels, from ECO (reduced power) to Standard (full power) to Sport (in-
creased response).
While driving, press the switch upwards to increase power. To de-
crease power, press the switch downwards.
TYPICAL
To activate Standard mode when in Sport mode, press down the
switch once.
To activate ECO mode when in Sport mode, press down the switch
twice.
To activate ECO mode when in Standard mode, press down the
switch once.
WARNING
Ensure passenger is advised to hold on tightly before activating
Sport mode. Sport mode provides increased acceleration.
175
DRIVING MODES
To activate Sport mode when in Standard mode, press up the switch
once.
To activate Sport mode when in ECO mode, press up the switch
twice.
To activate Standard mode when in ECO mode, press up the switch
once.
WARNING
When adjusting modes, be sure to maintain situational aware-
ness of other snowmobiles, obstacles, or persons.
176
BASIC PROCEDURES
Engine Startiing Procedure
Procedure
1. Apply parking brake.
2. Recheck throttle control lever operation.
3. Put your helmet on.
4. Ensure that the tether cord cap is installed on the engine cut-off
switch and that the cord is attached to your clothing eyelet.
5. Ensure that the emergency engine stop switch is in the ON position
(up).
WARNING
Never depress throttle while starting engine.
6. Release parking brake.
NOTE:
For an initial cold start, do not release parking brake. Perform the ve-
hicle warm-up procedure as explained below.
7. Depress the START button to engage the electric starter and start
the engine. Release button immediately when engine has started.
NOTICE
Do not engage electric starter for more than 10 seconds at a
time. A rest period should be observed between the cranking
cycles to allow electric starter to cool down.
Emergency Startiing
Do not attempt any emergency starting procedure. Have the battery
charged or replaced.
Vehicle Warm-Up
Before every ride, vehicle has to be warmed up as follows.
1. Start engine as explained in ENGINE STARTING PROCEDURE
(PAGE 177) ENGINE STARTING PROCEDURE above.
2. Allow engine to warm up one or two minutes at idle speed.
NOTE:
Engine will shut down after approximately 12 minutes of idling.
177
BASIC PROCEDURES
3. Disengage parking brake.
4. Apply throttle until drive pulley engages. Drive at low speed the first
two or three minutes.
NOTICE
If vehicle does not move when throttle is applied, stop engine,
remove tether cord cap from the engine cut-off switch, then do
the following.
– Check if skis are stuck on the ground. Lift one ski at a time
by the handle, then put it down.
– Check if track is stuck on the ground. Lift rear of snowmobile
enough to clear track from the ground, then drop.
– Check rear suspension for hard snow or ice accumulation
that could interfere with track rotation. Clean the area.
– Validate that transmission is engaged (not in neutral).
CAUTION
Beware of injuries by using proper lifting techniques, notably
using your legs force. Do not attempt to lift the rear of vehicle if
it is above your limits.
WARNING
Make sure tether cord cap is removed before standing in front
the vehicle, getting close to the track or rear suspension
components.
NOTE:
Warm-up is electronically controlled. During this period (up to 10 mi-
nutes depending on ambient temperature), engine RPM is limited.
Shiiftiing iin Reverse
1. Bring vehicle to a complete stop.
2. Apply and hold brake. Remain seated, refer to Rider Position (Re-
verse Operation) in Riding the vehicle for posture information.
3. With engine at idle speed, select reverse (R) gear using the re-
verse lever or Start / RER button.
Models with Reverse Lever
178
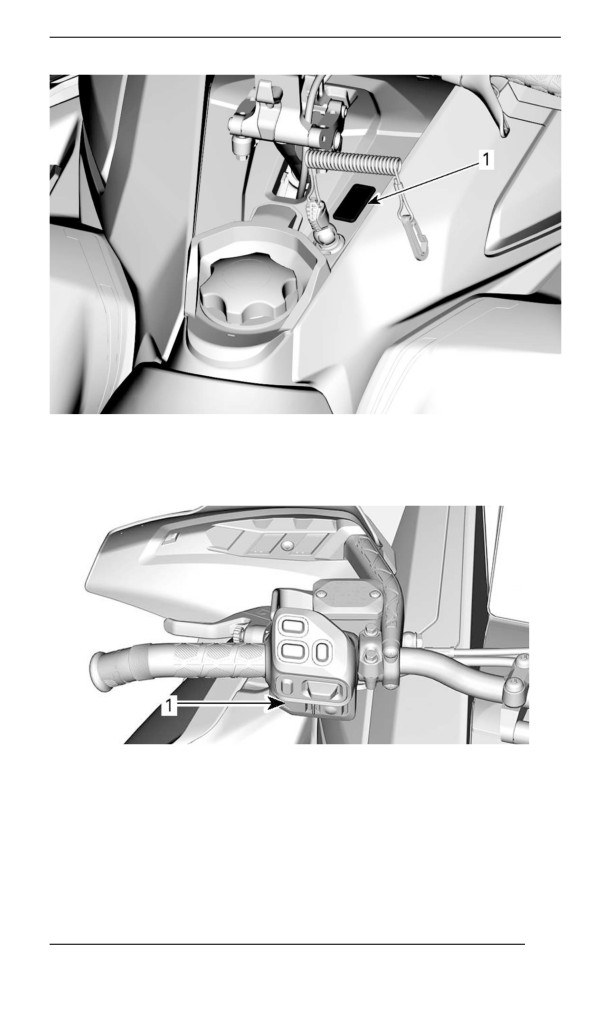
BASIC PROCEDURES
TYPICAL
1. Reverse lever
Models with Start / RER button
1. Start / RER button
4. Wait until reverse beeper sounds, then gently depress throttle
lever.
179
BASIC PROCEDURES
WARNING
The reverse speed is not limited. Always proceed with caution
as fast reverse could result in loss of vehicle stability. Come to
complete stop before activating the reverse. Always remain
seated and apply the brake before shifting. Ensure the path be-
hind is clear of obstacles or bystanders before proceeding.
Shiiftiing iin Forward from Reverse
1. Bring vehicle to a complete stop.
2. Apply and hold brake.
3. Press and release the RER button or reverse lever.
4. Apply throttle slowly and evenly. Allow drive pulley to engage then
accelerate carefully.
Shutting Off the Engiine
Release throttle lever and wait until engine has returned to idle speed.
Shut off the engine using either the emergency engine stop switch or
by pulling off the tether cord cap from the engine cut-off switch.
WARNING
Always remove the tether cord cap from engine cut-off switch
when vehicle is not in operation in order to prevent accidental
engine starting or to avoid unauthorized use by children or
others or theft.
180
RIDING CONDITIONS AND YOUR
SNOWMOBILE
Alltiitude
At factory, your snowmobile was calibrated to be used within an alti-
tude range (relative to sea level).
A new snowmobile has a tag attached to the handlebar indicating its
calibration. Refer to Safety Information on Vehicle.
If for any reason you don't know your snowmobile calibration, contact
an authorized BRP snowmobile dealer.
If your snowmobile is to be used at an altitude outside the specified
range, have it calibrated accordingly by an authorized BRP snowmo-
bile dealer.
NOTICE
An inappropriate altitude calibration would decrease perform-
ance and may cause serious damage to the snowmobile.
Temperature
The engine management of these engines provides the optimum air/
fuel ratio for all temperatures.
Hard Packed Snow
All models covered in this guide which are equipped with a minimum
track profile of 44 mm (1.75 in) are built for deep snow conditions and
should never be used during a prolonged period of time in marginal or
hard packed snow conditions.
In the event you have to ride in these types of conditions:
- Avoid exceeding a speed of 70 km/h (45 mph) in all conditions
- Avoid hard acceleration (over 75% of throttle)
- Ice scratchers should be applied
- Engine temperature should not exceed 75% on the temperature
gauge.
NOTICE
Running these types of tracks at high speed on a trail, on hard
packed surfaces or on ice puts more stress on the lugs, which
tends to heat up as a result. It also could drastically reduce the
life of specific wear parts. To avoid potential degradation, de-
lamination or damages to the track and wear parts, reduce your
speed and minimize the distance that is being ridden on these
types of surfaces.
181
RIDING CONDITIONS AND YOUR SNOWMOBILE
Vehicles Equipped with Ice Scratchers
Ice scratchers are equipped on the vehicle to increase engine cooling
efficiency, to lubricate and to cool track clips and sliders. They must
be used whenever on ice, hard packed snow, or any conditions that
do not lift enough snow particles into the rear suspension and the
tunnel.
NOTICE
Although it is not recommended to ride a snowmobile equipped
with a high lug profile track on trails or hard packed snow condi-
tions, it is highly suggested to combine idler wheels and ice
scratchers on a vehicle used in these conditions.
IMPORTANT
Ridding in these trail conditions puts the reliability of the track and
its warranty at risk
If equipped with the following track profile heights, never exceed the
recommended sustained vehicle speeds listed.
Track Profile Height
Maximum Sustained Speed
57 mm (2.25 in)
110 km/h (70 MPH)
60 mm (2.36 in)
64 mm (2.52 in)
95 km/h (60 MPH)
75 mm (3 in)
182
TUNE YOUR RIDE
Snowmobile handling and comfort depend upon multiple adjustments.
WARNING
Suspension adjustment could affect vehicle handling. Always
take time to familiarize yourself with the vehicle''s behavior after
any suspension adjustment have been made. Always adjust LH
and RH suspension components to the same setting.
Choice of suspension adjustments vary with carrying load, operator's
weight, personal preference, riding speed and field condition.
NOTE:
Some adjustments may not apply to your snowmobile.
WARNING
Before proceeding with any suspension adjustment, remember:
– Park in a safe place.
– Remove the tether cord cap from the engine cut-off switch.
– Use appropriate lifting device or have assistance to share
lifting stress. If a lifting device is not used, use proper lifting
techniques, notably using your legs force.
– Do not attempt to lift the front or rear of vehicle if it is above
your limits.
– Support front of vehicle off the ground with a suitable device
before adjusting suspension.
– Support rear of vehicle off the ground with a wide-base
snowmobile stand with a rear deflector panel.
– Make sure support device is stable and secure.
The best way to set up the suspension is to customize each adjust-
ment one at a time. Various adjustments are interrelated. It may be
necessary to readjust center spring after adjusting front springs for in-
stance. Test run the snowmobile under the same conditions; trail,
speed, snow, operator riding position, etc. Proceed methodically until
you are satisfied.
Following are guidelines to fine-tune suspension. Use suspension ad-
justment tool provided in the tool kit.
Ski Runner Depth Setting (Piilot TX Skiis)
Pilot TX skis enables the rider to dial in the amount of ski bite for con-
ditions and riding style.
A knob adjacent to the ski leg raises or lowers the ski runner.
183
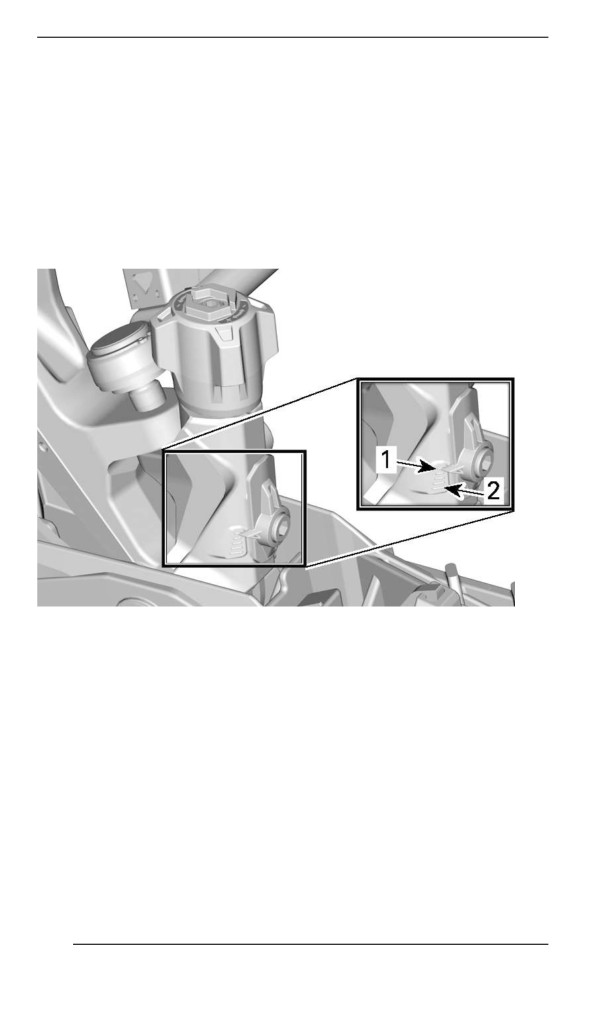
TUNE YOUR RIDE
Ski behavior depends largely on trail conditions but also on ski runner
adjustment. Same as drivers behavior adapts to trail condition
change.
Ski runner bottom face conditions must be regularly checked espe-
cially if the snow condition is marginal such as a lack of snow, pres-
ence of rocks or sand. Snowmobile must be driven slowly when on
paved surfaces in order to prevent overheating of the ski runner bot-
toms and as such, damage to carbide inserts. Ski runners must be re-
placed as soon as any of the carbide inserts are worn out or missing.
Worn out runner usage may lead to damage of ski sole.
RUNNER DEPTH ADJUSTMENT KNOB
1. Position 1
2. Position 5
184
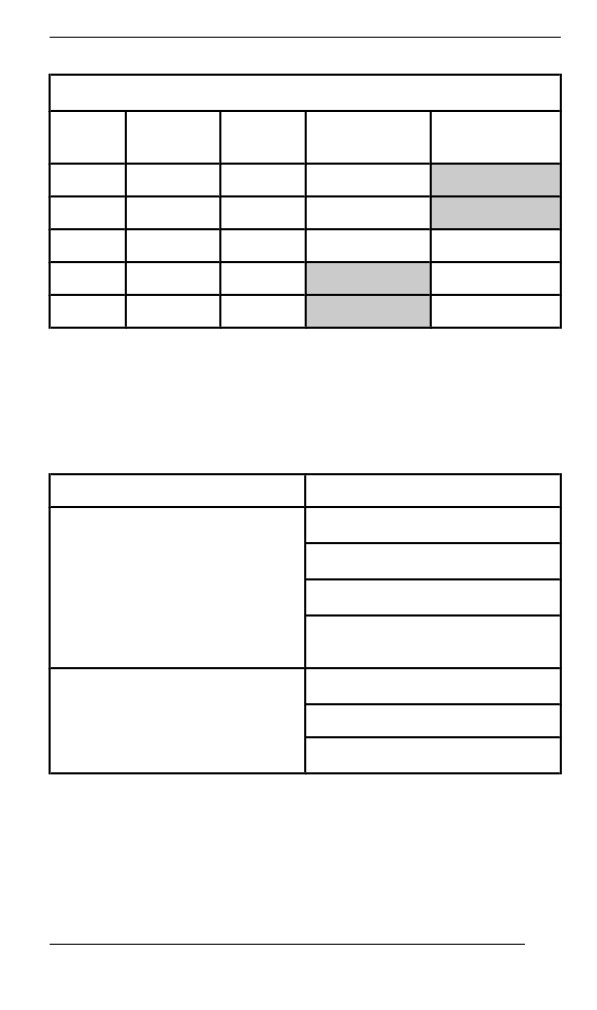
TUNE YOUR RIDE
Pilot TX Ski Adjustability
Posi
Lateral
Han
Possible
Possible
tion
grip
dling
understeering
oversteering
1
***
2
**
**
**
3
***
***
4
****
****
**
5
*****
*****
***
Front Suspensiion Adjustments
Front Springs
Front spring preload has an effect on front suspension firmness.
Front spring preload also has an effect on the steering behavior.
Action
Result
Firmer front suspension
Higher front end
Increasing preload
More precise steering
More bump absorption
capability
Softer front suspension
Decreasing preload
Lower front end
Lighter steering
185
TUNE YOUR RIDE
Action
Result
Less bump absorption
capability
WARNING
Adjust both springs to the same preload. Uneven adjustment
can cause poor handling and loss of stability, and/or control,
and increase the risk of an accident.
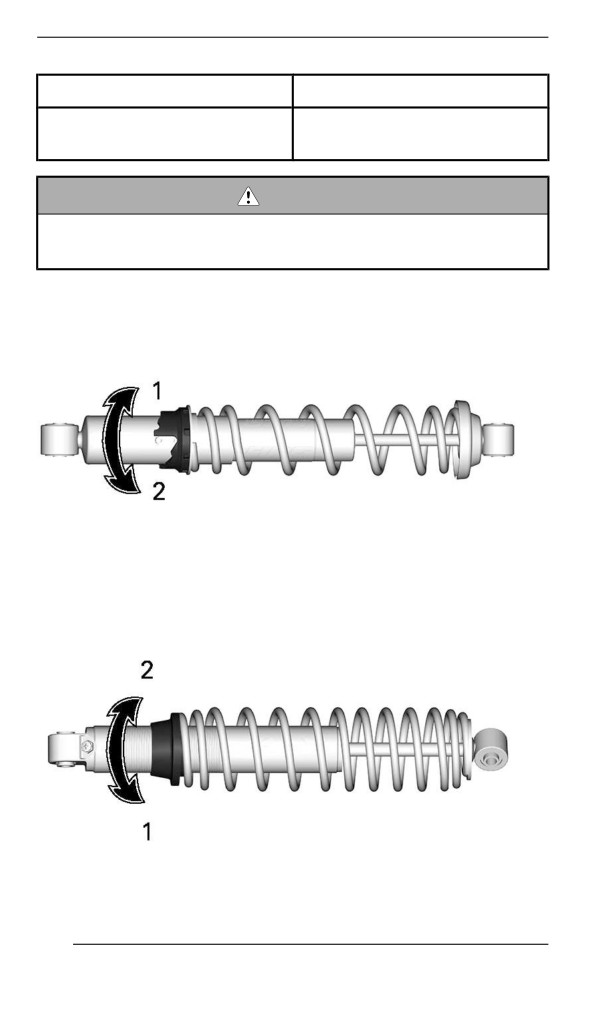
Cam Type Adjuster
Using the suspension adjustment tool provided in the tool kit, turn the
cam to increase or decrease the spring preload.
1. Increase preload
2. Decrease preload
Ring Adjuster – Type 1
Grab and turn the ring and the spring to increase or decrease the
spring preload.
1. Increase preload
2. Decrease preload
186
TUNE YOUR RIDE
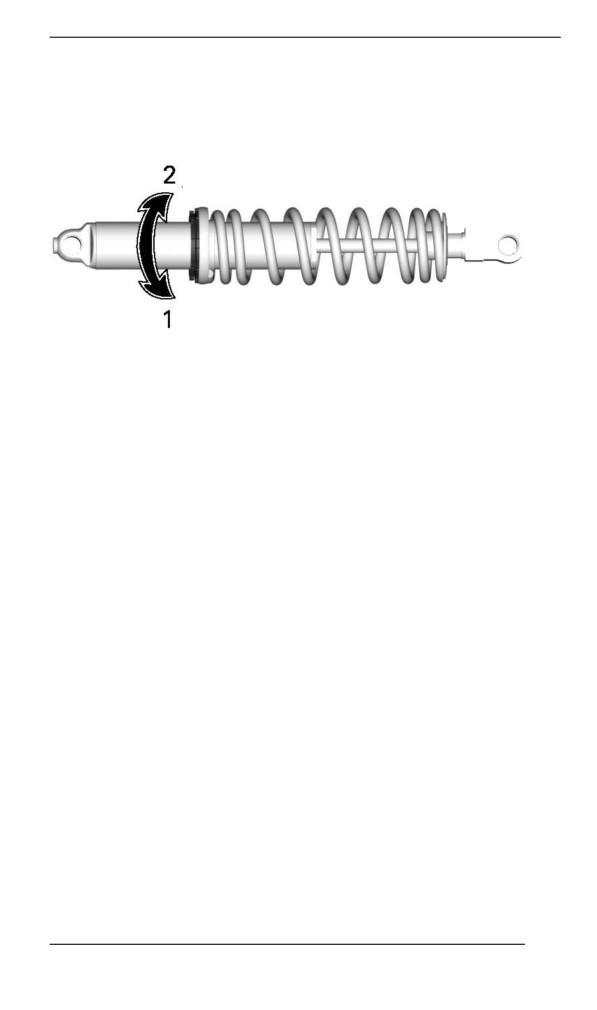
Ring Adjuster – Type 2
Grab and turn the ring and the spring to increase or decrease the
spring preload.
1. Increase preload
2. Decrease preload
Front Shock Absorber Adjustments (KYB PRO Series Only)
Front Shock Compressiion Damping (KYB PRO
Series Only)
NOTE:
Both low and high speed compression damping are adjusted
simultaneously.
Low speed compression damping controls how the shock absorber re-
acts to a low suspension velocity (slow compression strokes, in most
cases when riding at lower speeds).
High speed compression damping controls how the shock absorber
reacts to a high suspension velocity (quick compression strokes, in
most cases when riding at higher speeds).
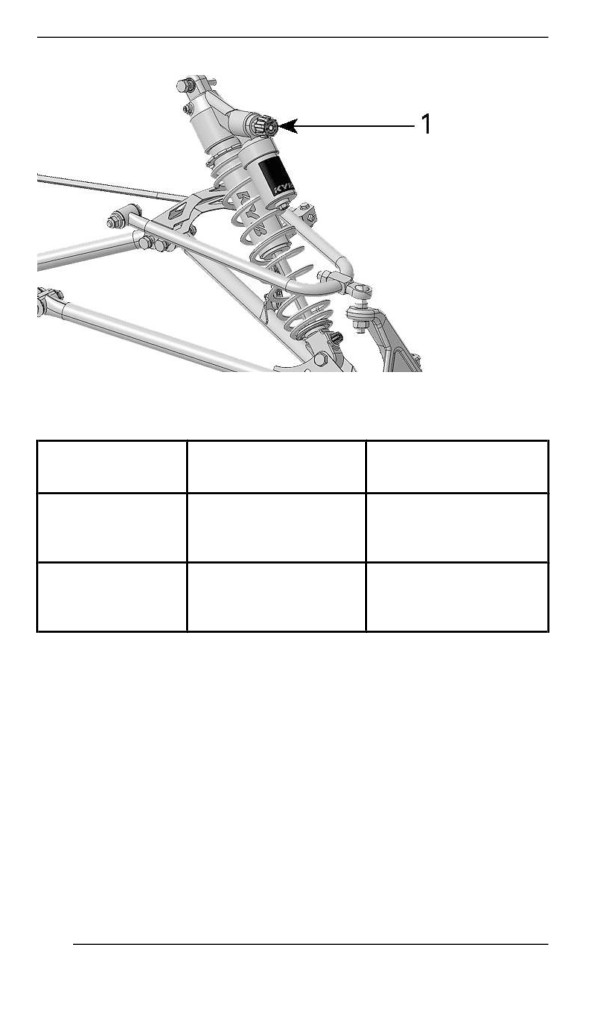
To adjust, turn the adjuster button located on the reservoir.
187
TUNE YOUR RIDE
1. Compression damping adjuster button
Result on big and
Turning
Action
small bumps
Increasing
Firmer compression
Clockwise
compression
damping
damping force
Decreasing
Counter
Softer compression
compression
Clockwise
damping
damping force
188
TUNE YOUR RIDE
Rear Suspension Adjjustments
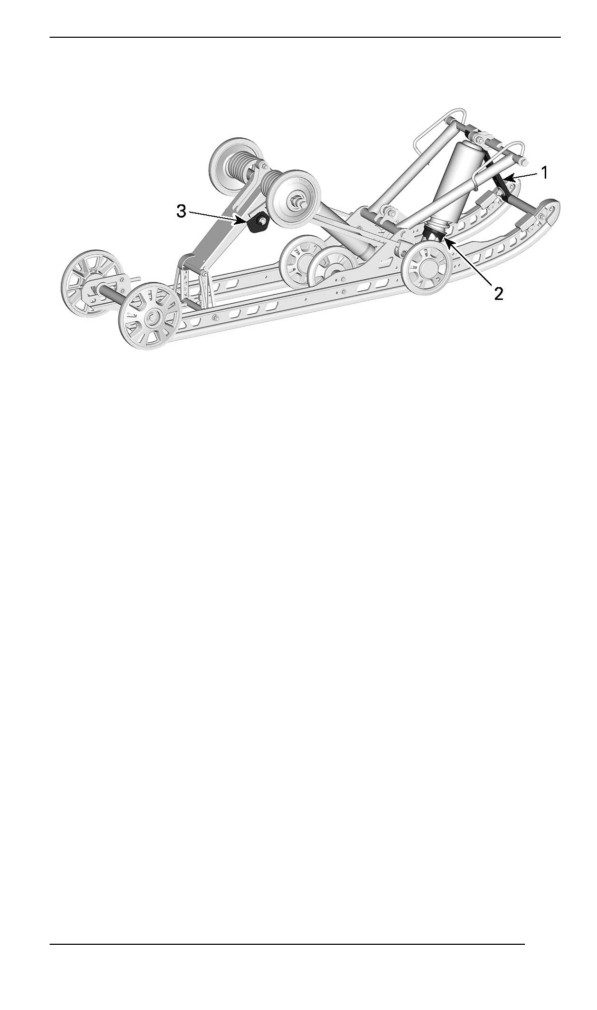
SC-5M
1. Stopper strap
2. Center spring
3. Rear spring
189
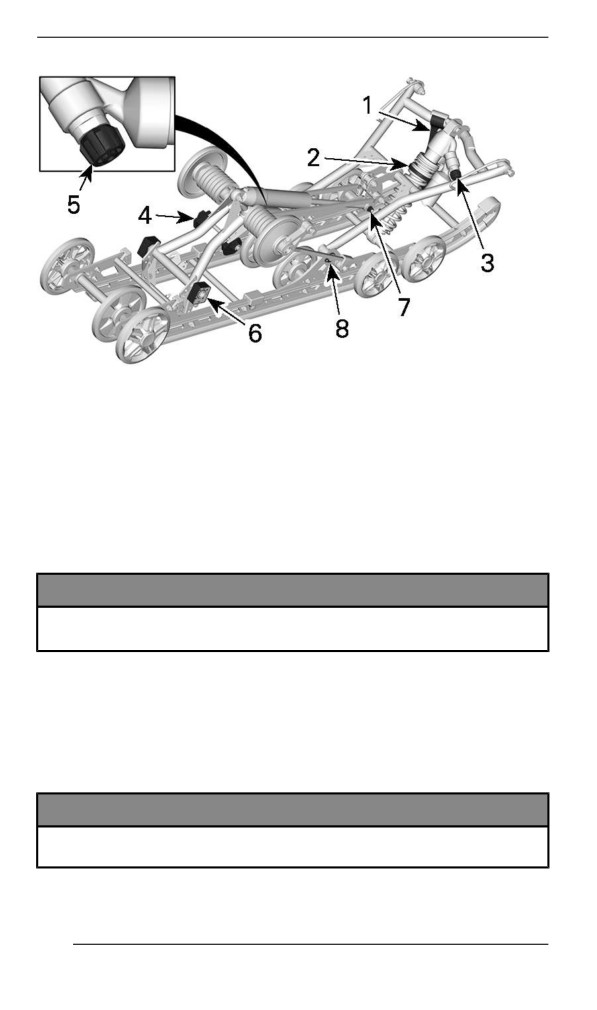
TUNE YOUR RIDE
RMOTION-X
1. Stopper strap
2. Center spring
3. Center shock absorber
4. Rear spring
5. Rear shock absorber
6. Coupling blocks
7. Rear shock lower pivot
8. Front arm
NOTICE
Whenever adjusting rear suspension, check track tension and
adjust if necessary.
Stopper Strap – SC-5M
Stopper strap length has an effect on the amount of weight the center
spring has to carry especially during acceleration, therefore on the
front end uplift.
Stopper straps length also has an effect on center spring travel.
NOTICE
Whenever stopper strap length is changed, track tension must
be checked.
190

TUNE YOUR RIDE
Action
Result
Lighter ski pressure under
acceleration
Increasing stopper strap length
More center spring travel
More bump absorption
capability
Heavier ski pressure under
acceleration
Decreasing stopper strap length
Less center spring travel
Less bump absorption
capability
NOTE:
Stopper strap could be set to position 5 and 6. Below are illustrations
for position 4 and 6. Smaller numbers correspond to a longer strap
setting.
NOTE:
Do NOT set to a position lower than 5. It could lead to center shock
damage.
191
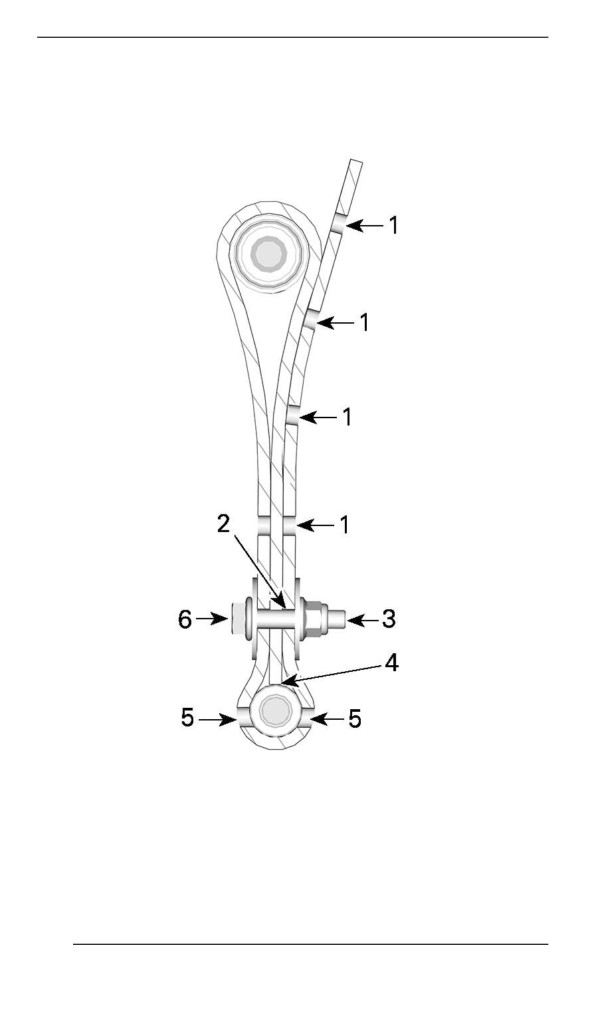
TUNE YOUR RIDE
STOPPER STRAP POSITION
5
(5TH HOLE, FACTORY
SETTINGS)
1. Free holes
2.
5th hole from end
3. Towards rear
4. Tip of strap touching strap axis
5. Two holes left open between screw head and nut
6. Towards front
192
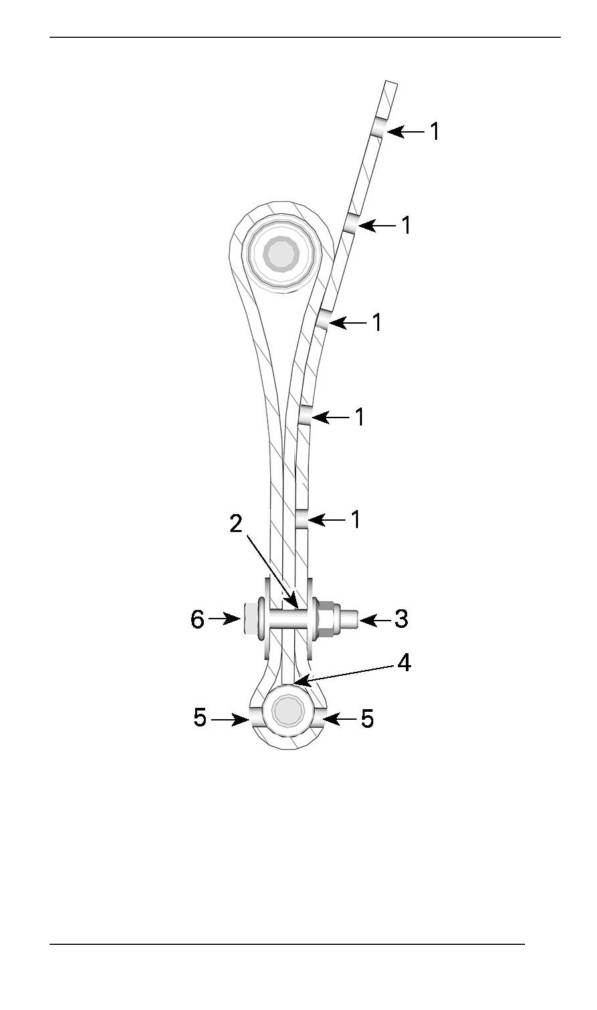
TUNE YOUR RIDE
STOPPER STRAP POSITION 6 (6TH HOLE)
1. Free holes
2.
6th hole from end
3. Towards rear
4. Tip of strap touching strap axis
5. Two holes left open between screw head and nut
6. Towards front
193
TUNE YOUR RIDE
Always install the stopper strap bolt as close as possible to the lower
shaft.
NOTE:
Decreasing the stopper strap length may reduce comfort.
When operating the snowmobile in deep snow, it may be necessary to
vary stopper strap length and/or riding position, to change the angle at
which the track rides on the snow. Operator's familiarity with the vari-
ous adjustments as well as snow conditions will dictate the most effi-
cient combination.
Generally, a longer stopper strap setting gives better performance in
deep snow on a flat landscape.
Stopper Strap – rMotion-X
Stopper strap length has an effect on the amount of weight the center
spring has to carry especially during acceleration, therefore on the
front end uplift.
Stopper straps length also has an effect on center spring travel.
NOTICE
Whenever stopper strap length is changed, track tension must
be checked.
Action
Result
Lighter ski pressure under
acceleration
Increasing stopper strap length
More center spring travel
More bump absorption
capability
Heavier ski pressure under
acceleration
Decreasing stopper strap length
Less center spring travel
Less bump absorption
capability
194
TUNE YOUR RIDE
NOTE:
Stopper strap could be set to position 1, 2, 3, 4 and 5. Below are illus-
trations for position 1 and 3. Smaller numbers correspond to a longer
strap setting.
195
TUNE YOUR RIDE
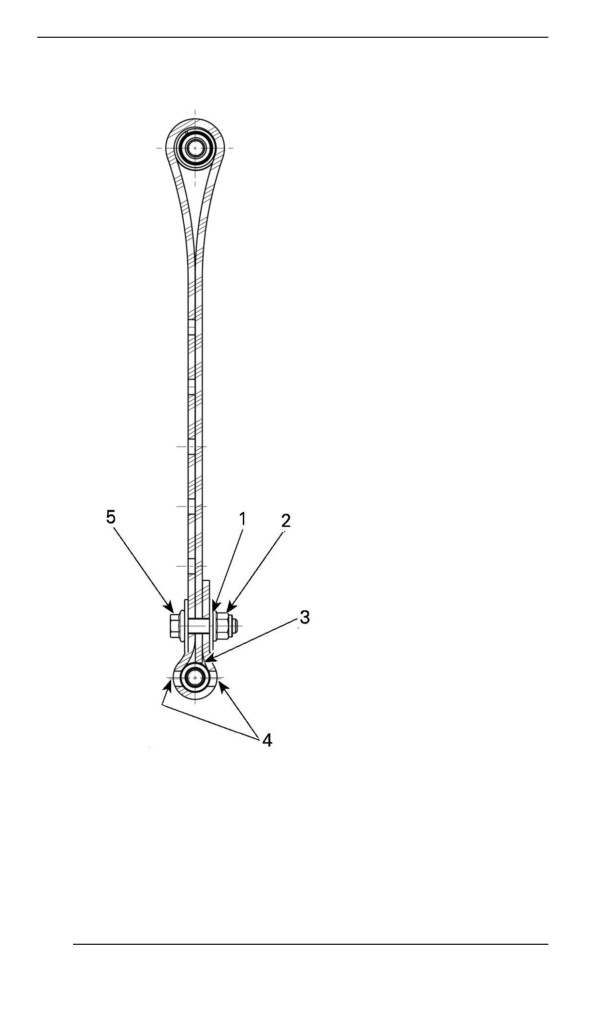
STOPPER STRAP POSITION 1 (1ST HOLE, LONGEST) – FAC-
TORY SETTING
1.
1st hole from end
2. Towards rear
3. Tip of strap touching strap axis
4. Two holes left open between screw head and nut
5. Towards front
196
TUNE YOUR RIDE
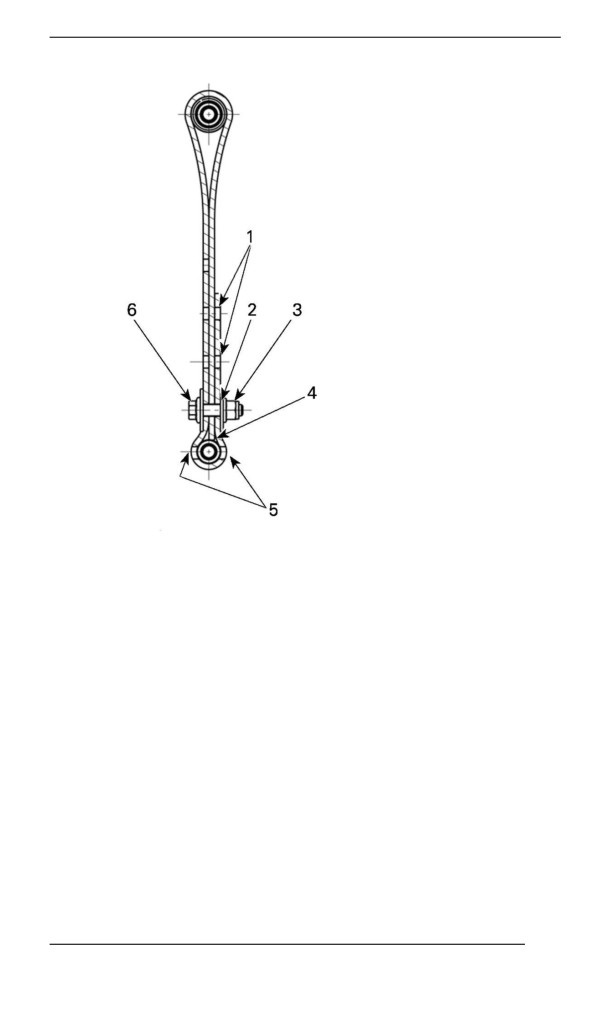
STOPPER STRAP POSITION 3 (3RD HOLE)
1. Free holes
2.
3rd hole from end
3. Towards rear
4. Tip of strap touching strap axis
5. Two holes left open between screw head and nut
6. Towards front
NOTE:
Decreasing the stopper strap length may reduce comfort. If too much
weight transfer is felt, try to correct it by adjusting the coupling blocks
first. Always install stopper strap bolt as close as possible to the lower
shaft.
When operating the snowmobile in deep snow, it may be necessary to
vary stopper strap length and/or riding position, to change the angle at
which the track rides on the snow. Operator's familiarity with the vari-
ous adjustments as well as snow conditions will dictate the most effi-
cient combination.
197
TUNE YOUR RIDE
Generally, a longer stopper strap setting gives better performance in
deep snow on a flat landscape.
Center Spring
Center spring preload has an effect on steering effort, handling and
bump absorption.
Also, since center spring preload adjustment puts more or less pres-
sure on the front of the track, it has an effect on the performance in
deep snow.
Action
Result
Lighter steering
More bump absorption
capability
Increasing preload
Better deep snow starts
Better deep snow performance
and handling
Heavier steering
Less bump absorption
Decreasing preload
capability
Better trail handling
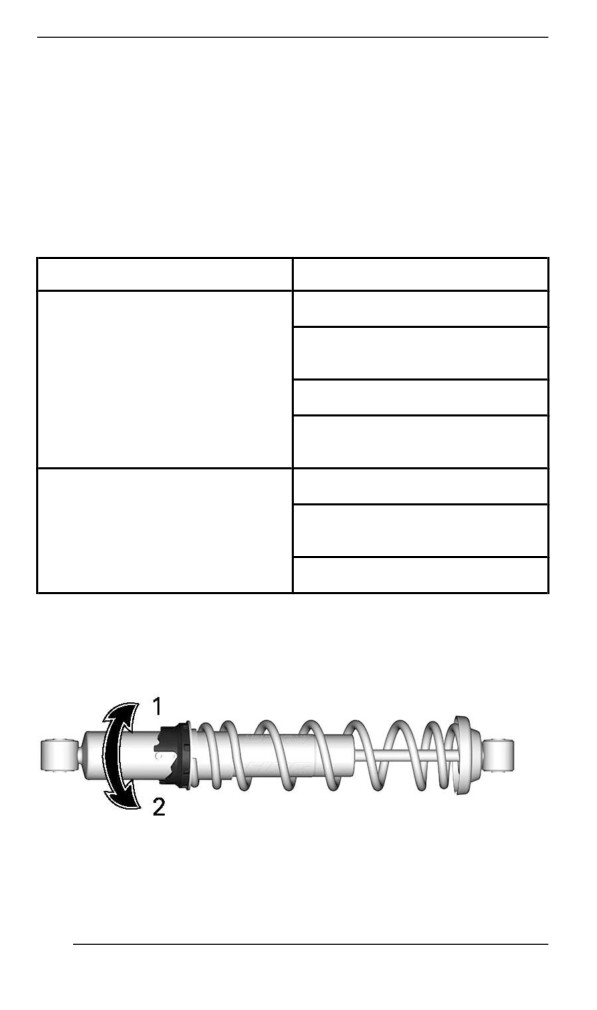
Cam Type Adjuster
Using the suspension adjustment tool provided in the tool kit, turn the
cam to increase or decrease the spring preload.
1. Increase preload
2. Decrease preload
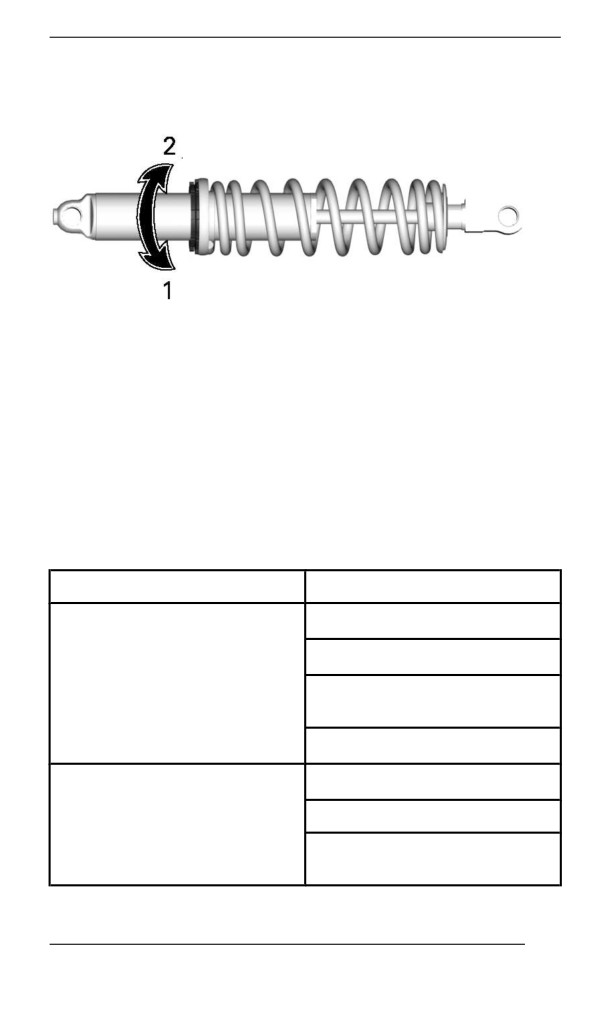
Ring Type Adjuster
198
TUNE YOUR RIDE
Grab and turn the ring and the spring to increase or decrease the
spring preload.
1. Increase preload
2. Decrease preload
Rear Spring
Rear spring preload has an effect on comfort, ride height and load
compensation.
Also, adjusting rear spring preload shifts more or less weight to the
snowmobile front end. As a result, more or less weight is applied to
the skis. This has an effect on performance in deep snow, steering ef-
fort and handling.
Slight suspension bottoming occurring under the worst riding condi-
tions indicates a good choice of spring preload.
Action
Result
Firmer rear suspension
Higher rear end
Increasing preload
More bump absorption
capability
Heavier steering
Softer rear suspension
Lower rear end
Decreasing preload
Less bump absorption
capability
199
TUNE YOUR RIDE
Action
Result
Lighter steering
Better performance and
handling in deep snow
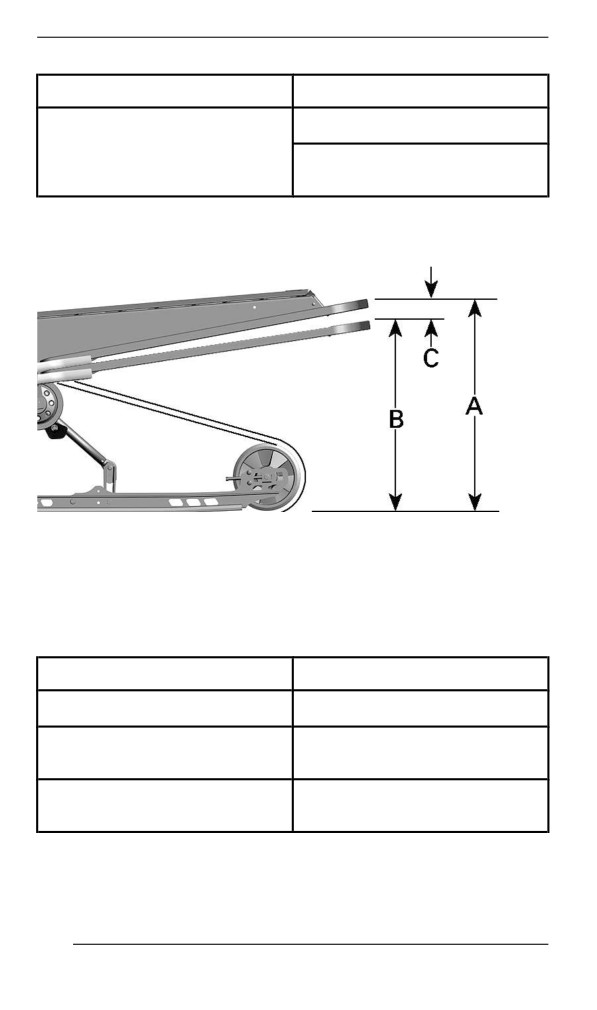
Refer to the following to determine if preload is correct.
TYPICAL - PROPER ADJUSTMENT
- A = Suspension fully extended
- B = Suspension has collapsed with operator, passenger and load
added
- C = Distance between dimension “A” and “B”, see table below
C
What to do
50 to 75 mm (2 to 3 in)
No adjustment required
More than
Adjusted too soft. Increase
75 mm (3 in)
preload
Less than
Adjusted too firm. Decrease
50 mm (2 in)
preload
200
TUNE YOUR RIDE
NOTE:
If the specification is unattainable with the original springs, see an au-
thorized Ski-Doo dealer for other available springs.
To increase spring preload using tool, always turn the left side adjust-
ment cam in a clockwise direction, and the right side cam in a counter-
clockwise direction.
CAUTION
Never set preload cams directly from position 5 to 1 or directly
from position 1 to 5.
WARNING
Both rear spring preload must be set at the same position. Oth-
erwise vehicle behavior may be unpredictable, and suspension
may become warped.
The adjustment cams have 5 different settings, 1 being the softest.
201
TUNE YOUR RIDE
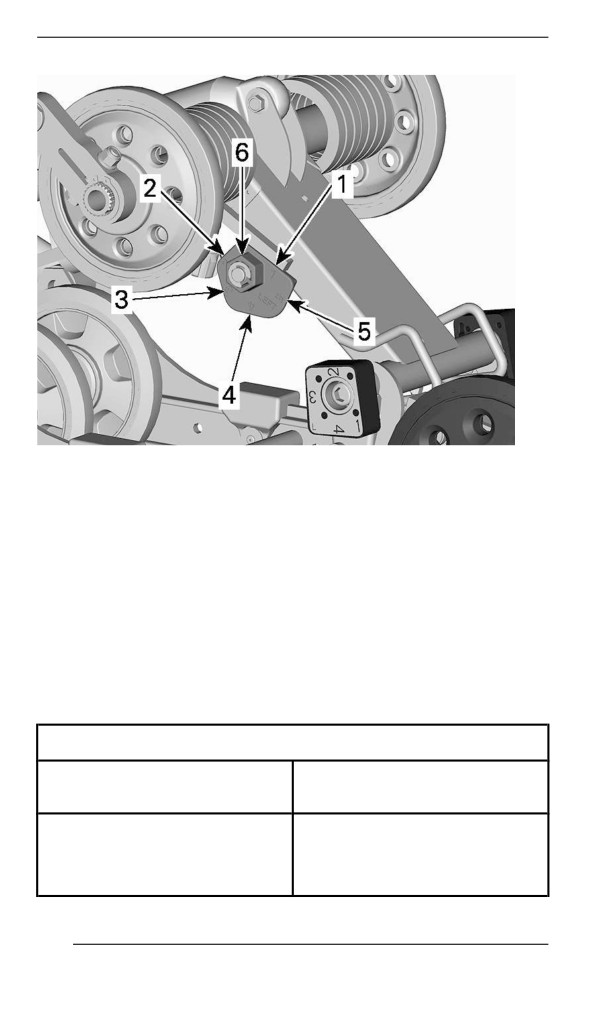
TYPICAL - LH SIDE SHOWN
1. Position 1
2. Position 2
3. Position 3
4. Position 4
5. Position 5
6. Adjustment nut
Front arm Adjustments (rMotion-X)
The lower pivot of the front arm can be set to2 different positions.
The lower pivot adjustment has an effect on the vehicle handling dur-
ing acceleration.
Front arm lower pivot position
Factory setting. Best for
Upper
cornering under acceleration.
Does not keep as much
pressure on skis while engine is
Lower
pulling. Best for bumpy trail
under acceleration.
202
TUNE YOUR RIDE
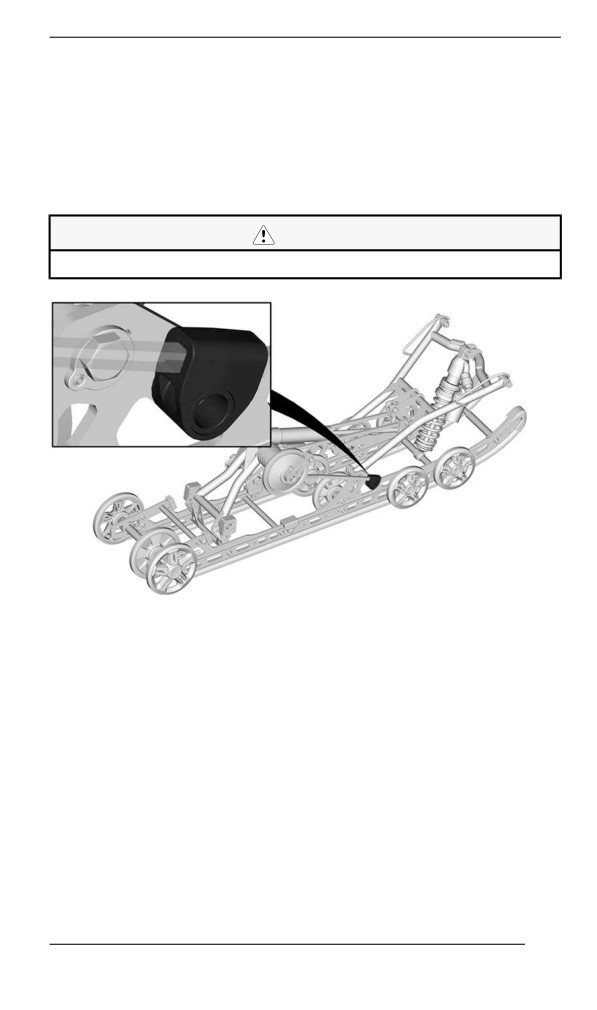
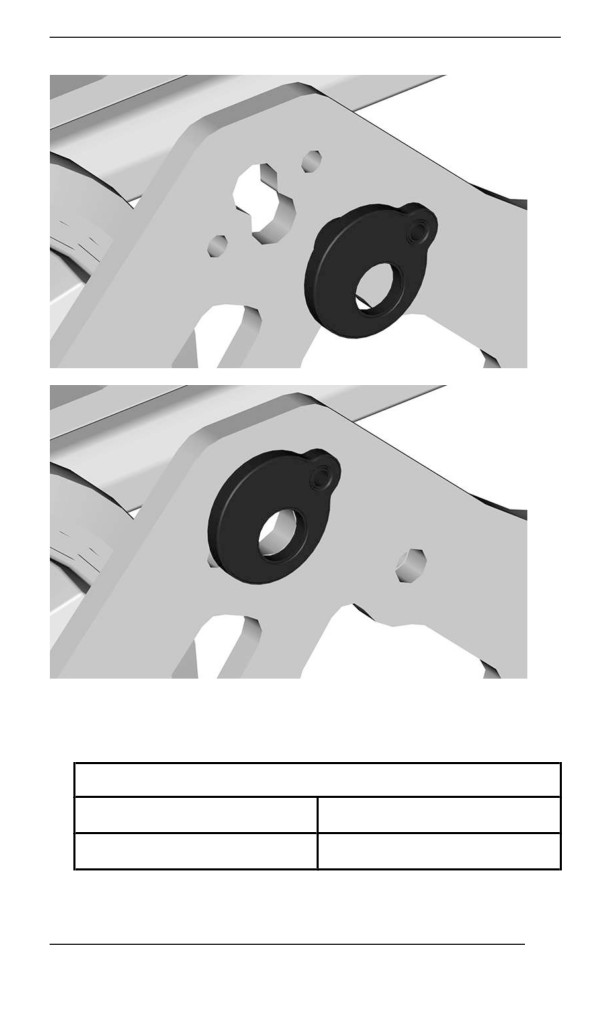
To change the front arm pivot position, process as follows:
1. Lift rear of the vehicle and support it off the ground.
2. Release the track tension. Refer to Track tension adjustment in
Maintenance procedures.
3. Set rear spring preload to minimum. Refer to rear spring.
4. Firmly hold the spring support and remove the spring support
screw.
CAUTION
Spring supports are spring loaded.
5. Remove the front arm lower screw.
203
TUNE YOUR RIDE
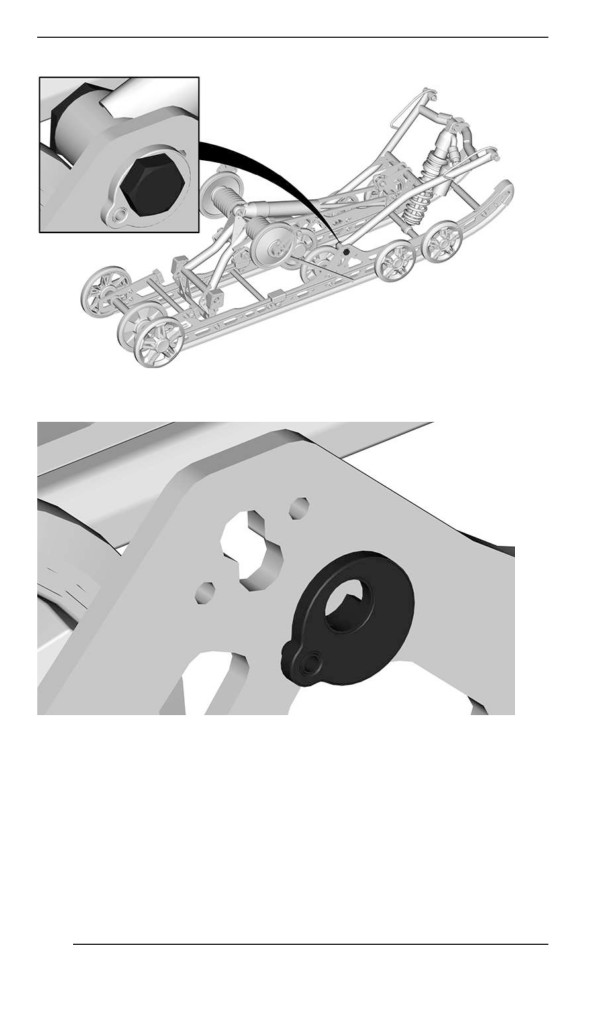
6. Remove the cam, pivot 180°, reinstall in the rail.
204
TUNE YOUR RIDE
7. Reinstall the arm with a new screw and tighten to specification.
8. Reinstall the spring support with a new nut and tighten to
specification.
TIGHTENING TORQUE
Arm pivot screw
125 ± 10 Nm (92 ± 7 lbf-ft)
Rear spring support nut
24.5 ± 3.5 Nm (18 ± 3 lbf-ft)
205
TUNE YOUR RIDE
9. Repeat the steps for the other side.
10. Adjust the rear spring settings.
11. Adjust the track tension.
Center Shock Absorber
Center Shock Compression Dampiing (If Equiipped)
NOTE:
Both low and high speed compression damping are adjusted
simultaneously.
Low speed compression damping controls how the shock absorber re-
acts to a low suspension velocity (slow compression strokes, in most
cases when riding at lower speeds).
High speed compression damping controls how the shock absorber
reacts to a high suspension velocity (quick compression strokes, in
most cases when riding at higher speeds).
Result on big and small
Action
bumps
Increasing compression
Firmer compression damping
damping force
Decreasing compression
Softer compression damping
damping force
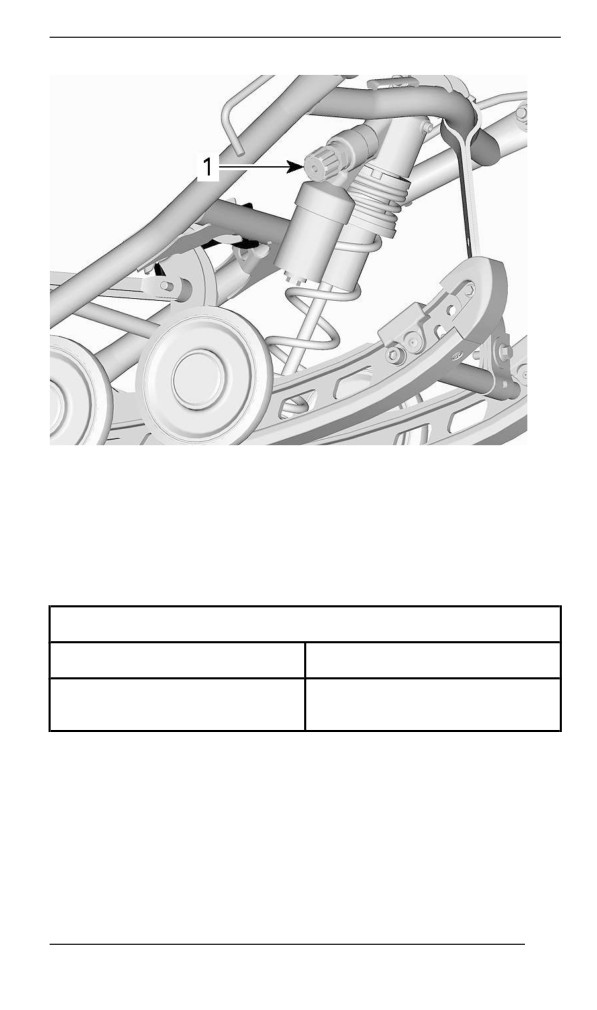
To adjust, turn clockwise to increase damping force and counterclock-
wise to decrease damping force.
206
TUNE YOUR RIDE
1. Center shock compression damping adjustment knob
Rear Shock Absorber
Rear Shock Posiitiion (rMotiion-X)
The lower pivot of the rear shock can be set to 2 different positions.
Rear shock lower pivot position
Upper
Softer absorption
Lower
Reference absorption
(from factory)
To change the shock lower pivot position, process as follows:
1. Lift rear of the vehicle and support it off the ground.
2. Remove stopper strap screw to release tension.
3. Remove the shock lower screw and nut.
207
TUNE YOUR RIDE
NOTE:
It may be necessary to lower the vehicle and slightly compress the
suspension to remove the load.
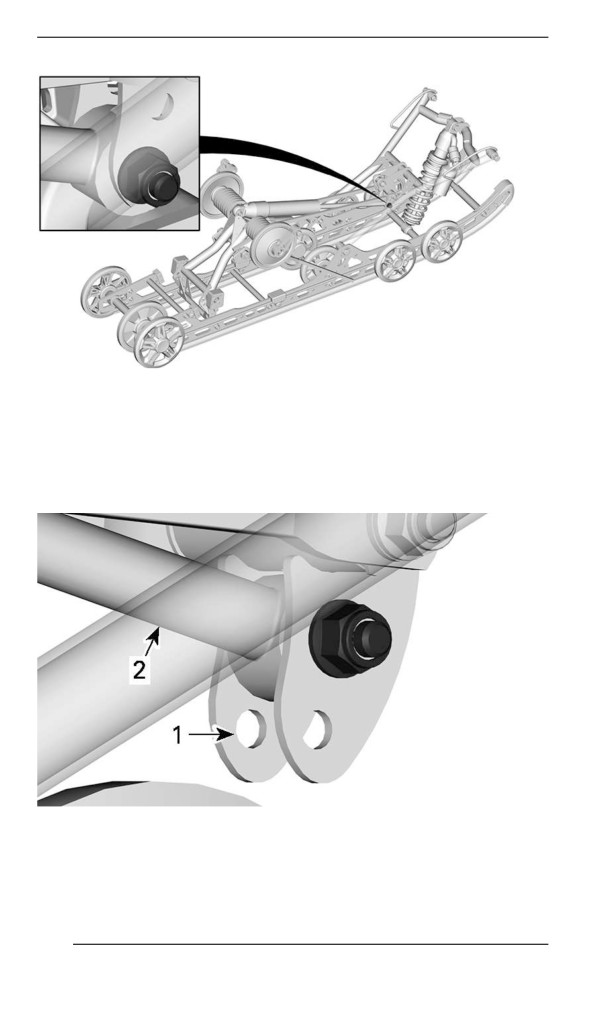
4. Align shock with the upper hole.
5. Install the screw with a new nut and tighten to specification.
1. Lower position (from factory)
2. Shock absorber rod in upper position
6. Reinstall stopper strap screw with a new nut.
208
TUNE YOUR RIDE
TIGHTENING TORQUE
Rear shock lower nut
24.5 ± 3.5 Nm (18 ± 3 lbf-ft)
Stopper strap nut
10 ± 2 Nm (89 ± 18 lbf-in)
7. Verify track tension and adjust if required.
Rear Shock Compression Damping (If Equiipped)
NOTE:
Both low and high speed compression damping are adjusted
simultaneously.
Low speed compression damping controls how the shock absorber re-
acts to a low suspension velocity (slow compression strokes, in most
cases when riding at lower speeds).
High speed compression damping controls how the shock absorber
reacts to a high suspension velocity (quick compression strokes, in
most cases when riding at higher speeds).
Result on big and
Turning
Action
small bumps
Increasing
Firmer compression
Clockwise
compression
damping
damping force
Decreasing
Counter
Softer compression
compression
Clockwise
damping
damping force
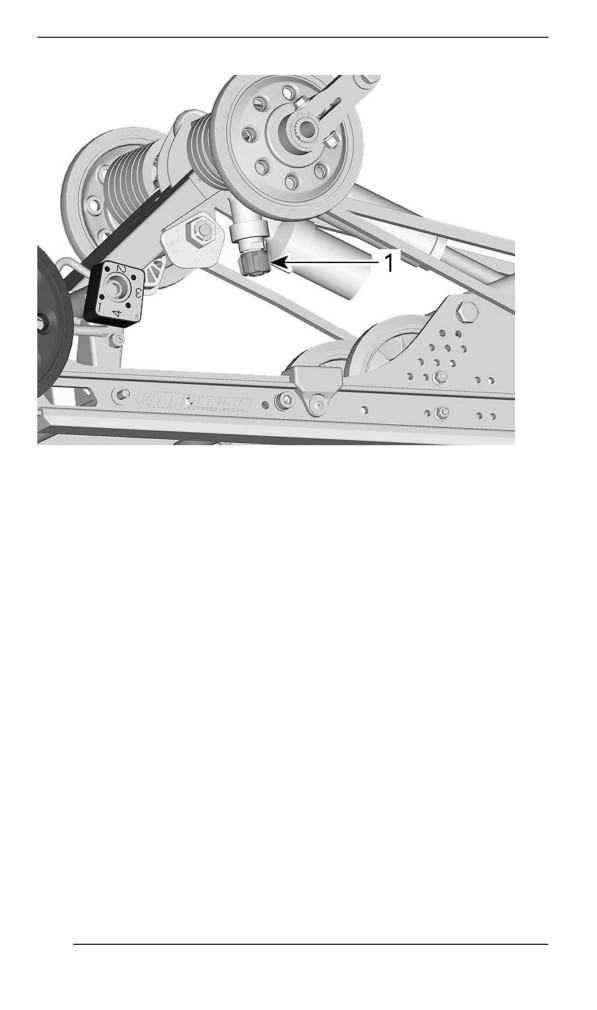
To adjust, turn the adjuster button located on the oil reservoir on shock
clockwise to increase compression damping force and counterclock-
wise to decrease compression damping force.
209
TUNE YOUR RIDE
TYPICAL - WITH PIGGYBACK RESERVOIR
1. Compression damping adjustment button
Rear Shock Absorber (ACS)
The operator can adjust the comfort and ride height by adjusting the
air pressure inside the air shock absorber.
To adjust, proceed as follows:
Model with the 7.2“ Diigital Display
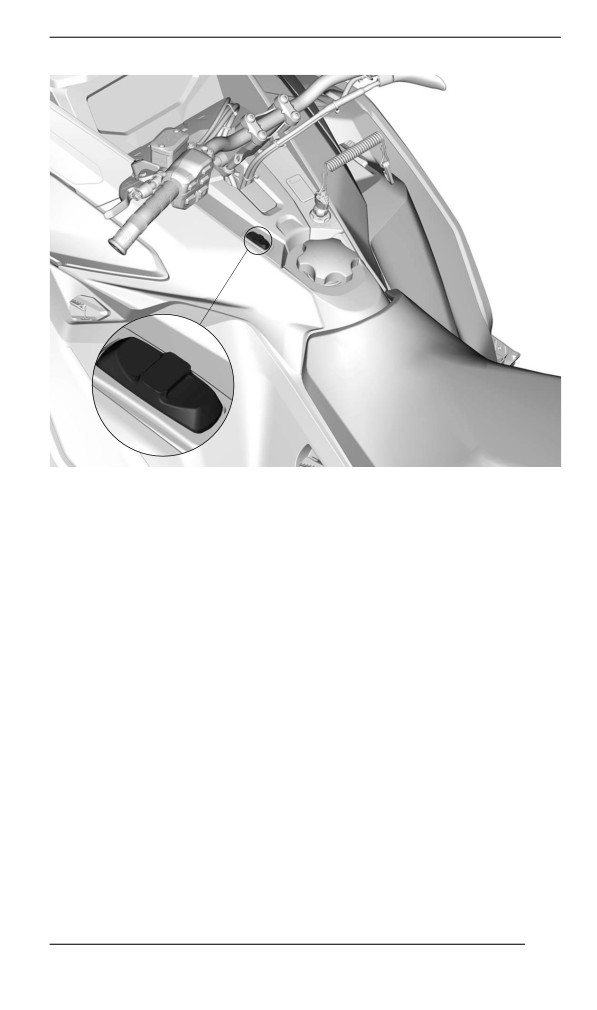
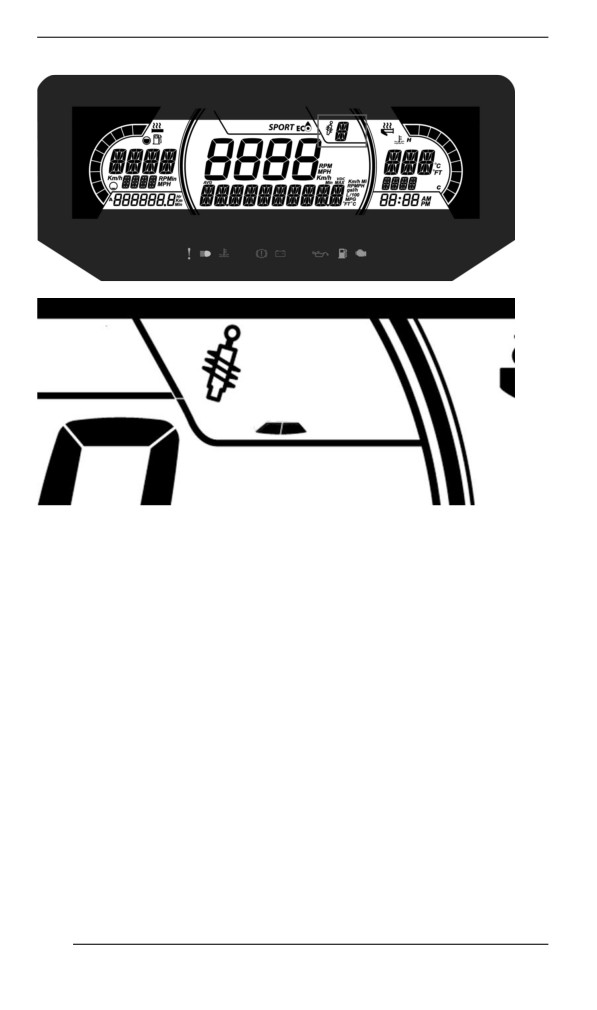
1. To adjust the air compressed suspension (ACS), press the switch
until the desired level.
210
TUNE YOUR RIDE
NOTE:
The shock icon is blinking when changing the mode.
211
TUNE YOUR RIDE
Model with the 10.25” Touchscreen Color Display
There are multiple ways to change the suspension level.
Changing the suspension level using the touchscreen
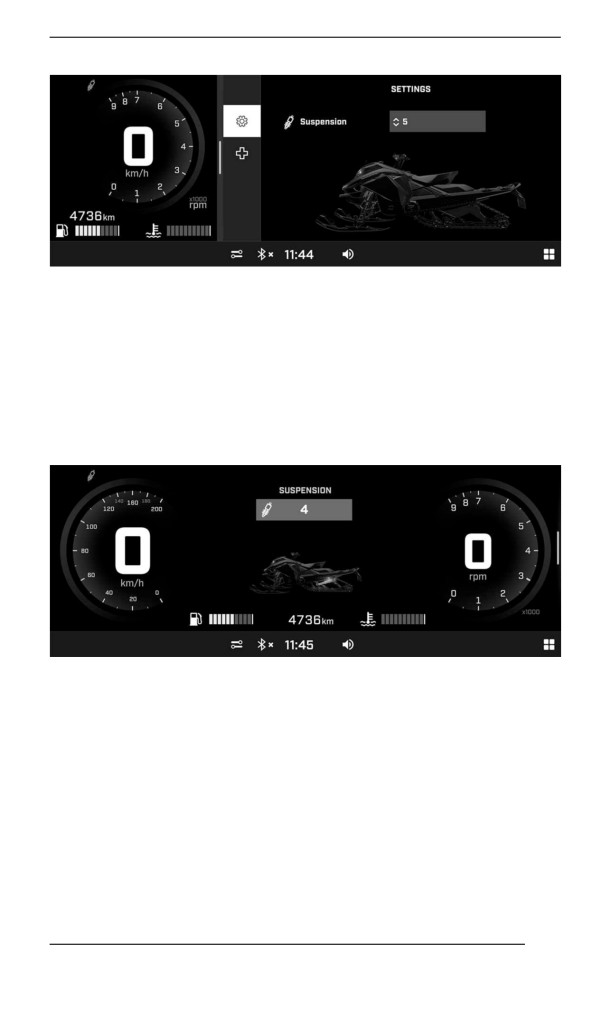
1. Go to vehicle menu.
2. Use the touchscreen to select the desired level.
212
TUNE YOUR RIDE
NOTE: The display shows the actual suspension setting (a number
from 1 to 5, 1 being the softest setting).
NOTE: When the level is changing, the suspension icon will flash in
white until it reaches its level. The suspension icon will disappear after
the suspension reaches the desired level.
Changing the suspension level using the center gauge
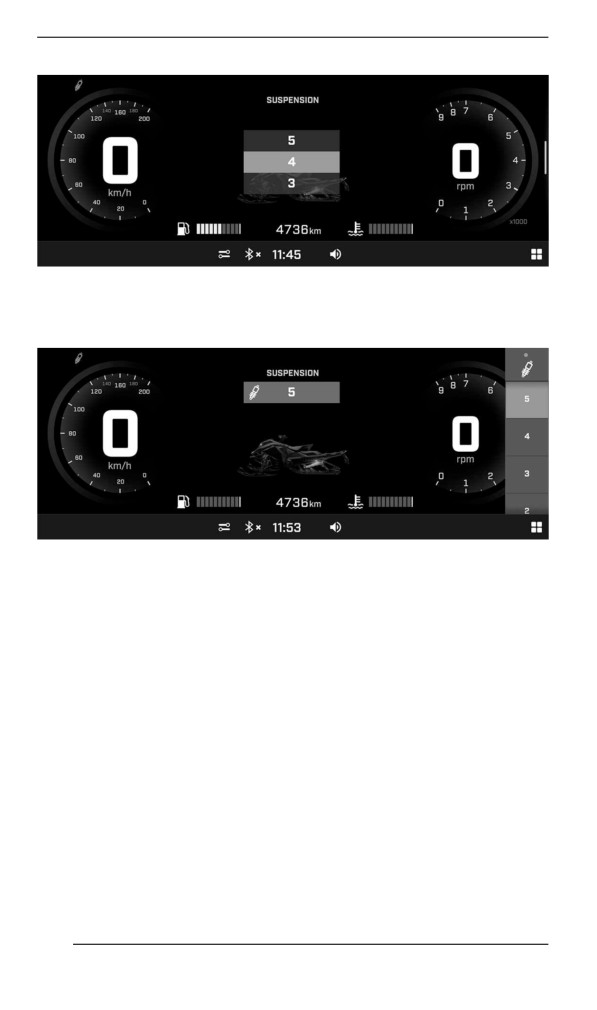
3. Select the suspension as the center gauge.
4. Use the touchscreen or the up/down button of the multifunction
switch to change the suspension level.
213
TUNE YOUR RIDE
Changing the suspension level using the ride setting button
5. Press the ride setting button until you land on the suspension mo-
dal view.
6. Use the touchscreen or the up/down button of the multifunction
switch to change the suspension level.
Coupling Blocks (rMotion–X)
The adjustment of the coupling blocks has an effect on vehicle han-
dling during acceleration only.
NOTE:
A high coupling block setting will reduce both comfort and transfer
under acceleration.
To adjust, push on release button under cam and turn coupling block
to the desired setting.
Place the desired setting number towards rubber stopper. No tools
required.
214
TUNE YOUR RIDE
WARNING
Both blocks must be set at the same position. Otherwise ve-
hicle behavior may be unpredictable and suspension may be-
come warped.
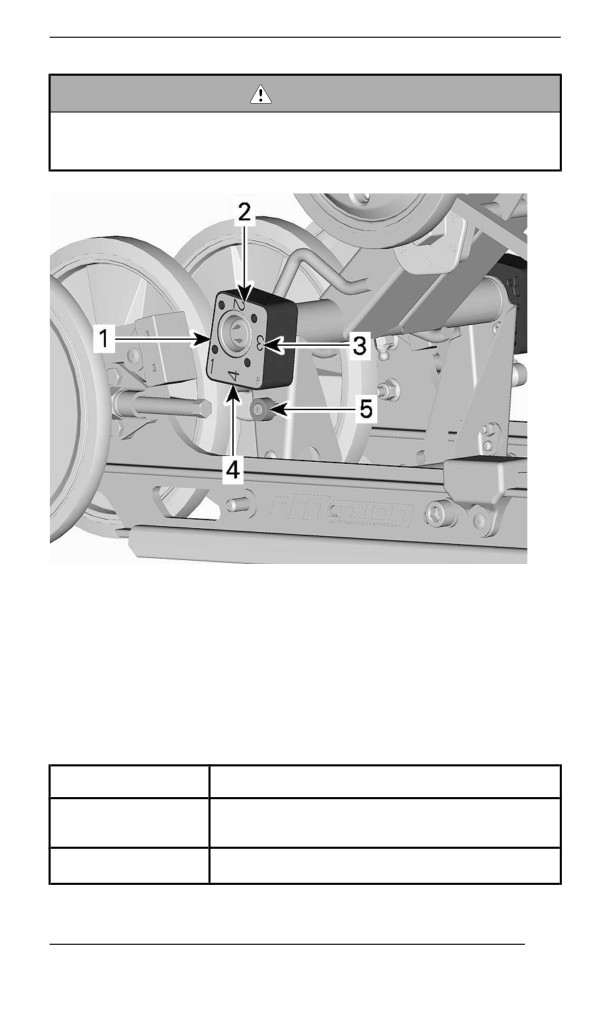
COUPLING BLOCK - RIGHT SIDE VIEW(R - RIGHT EMBOSSED
ON BLOCK)
1. Position 1 (minimum)
2. Position 2
3. Position 3
4. Position 4 (maximum)
5. Release button
Coupliing Blocks Setting
Position
use
More ski lift during acceleration - and best
1
comfort
2
Intermediate setting
215

TUNE YOUR RIDE
Position
use
3
Intermediate setting
Less ski lift during acceleration - and some
4
comfort loss
Adjjustment Tips Accordiing to Vehicle Behavior
Problem
Corrective measures
Check ski alignment.
-
Reduce front suspension spring
Front suspension darting
preload.
-
Increase center spring preload.
–
Reduce rear spring preload.
-
Reduce front suspension spring
Steering feels too heavy
preload.
at steady speeds
-
Increase center spring preload.
-
Set coupling blocks to a lower
Steering feels too heavy
position (if equipped).
during acceleration
-
Reduce rear spring preload.
–
Lengthen limiter strap.
-
Set coupling blocks to a higher
Too much ski lift during
position (if equipped).
cornering or acceleration
-
Shorten limiter strap.
–
Increase rear spring preload.
–
Reduce rear spring preload.
Rear of snowmobile
-
Reduce compression damping
seems too stiff
adjustment
if equipped
Rear of snowmobile
-
Increase rear spring preload.
seems too soft
–
Increase compression damping
adjustment
Rear suspension is
if equipped.
frequently bottoming
-
Increase rear spring preload.
–
Increase center spring preload.
216
TUNE YOUR RIDE
Problem
Corrective measures
- Lengthen limiter strap.
- Reduce center spring preload.
- Increase rear spring preload.
Snowmobile seems to
- Increase front suspension spring
pivot around its center
preload.
- Shorten limiter strap.
- Set coupling blocks to a lower
Track spins too much at
position (if equipped).
start
- Lengthen limiter strap.
Smart-Shox Suspensiion Mode
The Smart-Shox suspension is an electronic controlled compression
and rebound damping system integrated in each shock absorbers.
It is possible to choose between three modes of damping. These
modes set the level of damping to match the rider's preferences.
The following Smart-Shox modes are preset in the vehicle.
Smart-Shox Mode
This mode provides maximum comfort. The
Comfort
suspension moves freely while controlling body
movement to avoid bottoming out and enhance
cornering and acceleration.
This mode enhance handling and provides comfort
in straight line. The suspension minimizes body
Sport
movement in cornering, accelerating and braking
while offering optimal calibration to face bumpy
trails.
This mode is the stiffer of all, maximize the flat
Sport+
cornering and always ready to tackle the most
extreme situations.
217
TUNE YOUR RIDE
Model with the 7.2“ Digital Display
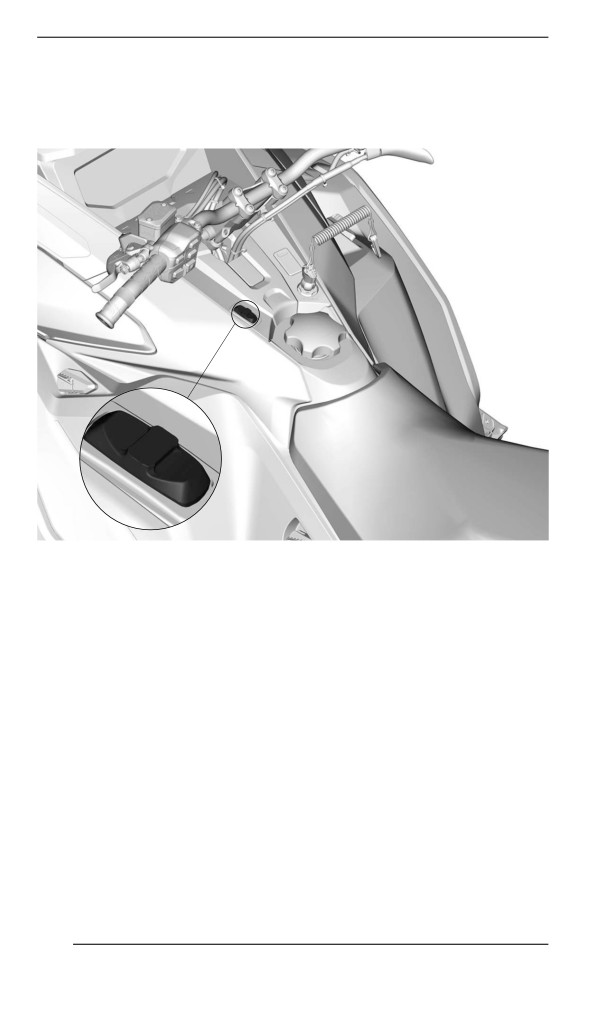
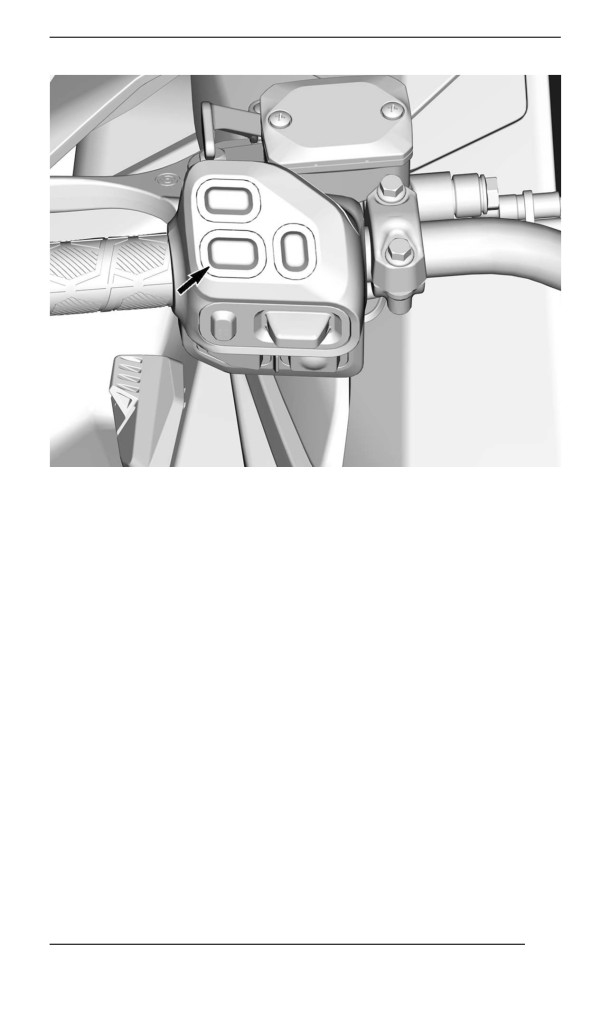
1. To select the Smart-Shox mode, press the switch until the desired
mode appears in the display.
218
TUNE YOUR RIDE
NOTE:
The shock icon is blinking when changing the mode.
219
TUNE YOUR RIDE
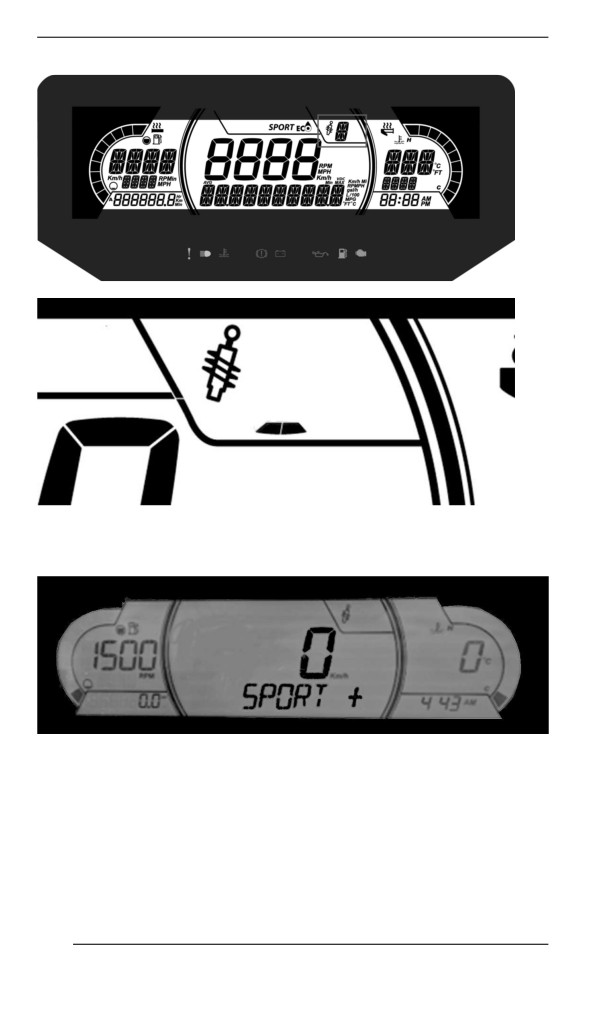
2. Check the multifunction gauge to confirm the active Smart-Shox
mode.
SPORT+ MODE - 7.2” DIGITAL DISPLAY
Model with the 10.25” Touchscreen Color Display
There are multiple ways to change the Smart-Shox mode.
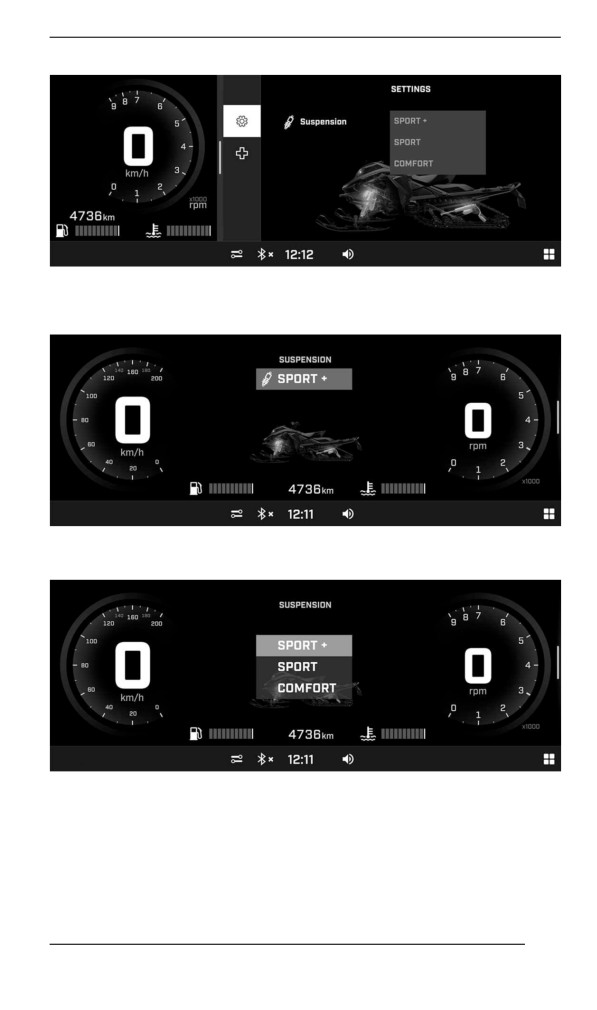
Changing the Smart-Shox mode using the touchscreen
1. Go to vehicle menu.
2. Use the touchscreen to select the desired mode.
220
TUNE YOUR RIDE
Changing the Smart-Shox mode using the center gauge
3. Select the suspension as the center gauge.
4. Use the touchscreen or the up/down button of the multifunction
switch to change the Smart-Shox mode.
Changing the Smart-Shox mode using the ride setting button
5. Press the ride setting button until you land on the suspension mo-
dal view.
221
TUNE YOUR RIDE
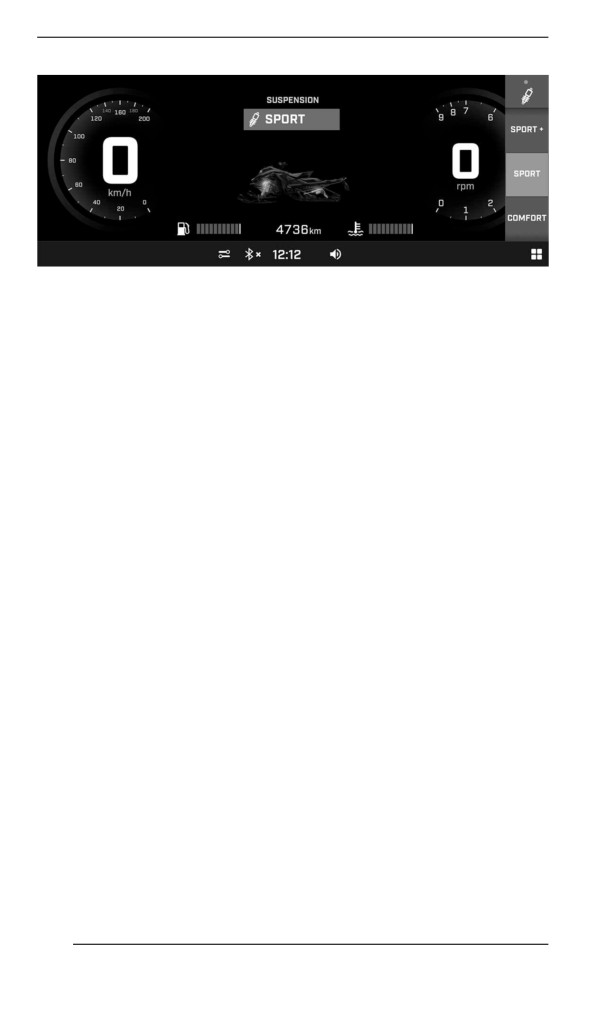
6. Use the touchscreen or the up/down button of the multifunction
switch to change the Smart-Shox mode.
222
MAINTENANCE
223
MAINTENANCE SCHEDULE
Maintenance is very important to keep your vehicle in safe operating
condition. The vehicle should be serviced as per the maintenance
schedule.
Proper maintenance is the owner’s responsibility. A warranty claim
may be denied if, among other things, the owner or operator caused
the problem through improper maintenance or use.
Perform periodic checks and follow the maintenance schedule. The
maintenance schedule does not exempt the pre-ride inspection.
WARNING
Failure to properly maintain the vehicle according to the main-
tenance schedule and procedures can make it unsafe to
operate.
EPA Regullatiion - Canadiian and USA Vehiiclles
A repair shop or person of the owner''s choosing may maintain,
replace, or repair emission control devices and systems. These in-
structions do not require components or service by BRP or authorized
BRP snowmobile dealers.
Although an authorized BRP snowmobile dealer has an in-depth tech-
nical knowledge and tools to service your vehicle, the emission-related
warranty is not conditioned on the use of an authorized BRP snowmo-
bile dealer or any other establishment with which BRP has a commer-
cial relationship.
Proper maintenance is the owner’s responsibility. A warranty claim
may be denied if, among other things, the owner or operator caused
the problem through improper maintenance or use.
For emission-related warranty claims, BRP is limiting the diagnosis
and repair of emission-related parts to the authorized BRP snowmo-
bile dealers. For more information, please refer to the US EPA Emis-
sions PERFORMANCE WARRANTY contained in the warranty
section.
You must follow the instructions for fuel requirements in the fueling
section of this manual. Even if gasoline containing greater than ten
volume percent ethanol is readily available, the US EPA issued a pro-
hibition against the use of gasoline containing greater than 10 vol %
ethanol that applies to this vehicle. The use of gasoline containing
greater than 10 vol% ethanol with this engine may harm the emission
control system.
224
MAINTENANCE SCHEDULE
Traill/ Crossover/ Utillity Usage
Whether your vehicle is a Trail, Crossover, or Utility model, these
types of usage require maintenance tasks to be performed between
the regular yearly intervals. These are identified as A + in the chart
below.
If you regularly ride in trails, explore the countryside, or work with
your snowmobile, follow the A+ Trail / Crossover / Utility interval and
perform the tasks outlined in the chart below.
Extreme Cold Condition
An engine that is frequently operated at or below an ambient tempera-
ture of -25 °C (-13 °F) will require an increase in service and mainte-
nance schedule.
Any combustion engine operated at these low ambient temperature
will collect an increased amount of condensation at every startup/
warm-up.
Since the engine is not reaching operating temperatures for extended
periods of time, the oil is starting to be strongly diluted with water and
gas residue (more water content).
An engine needs to reach operating temperature, in order to be able
to evaporate condensate out of the oil.
If daily usage (work or leisure driving cycle) is similar to those men-
tioned below, BRP strongly recommends changing the oil at least
once a month.
Parameters of an increase in service and maintenance schedule:
- Engine not reaching the proper operating temperature during nor-
mal daily usage
- Multiple starts and stops without reaching operating temperature
- Short idle periods
- Low RPM driving cycle in short distances without reaching operat-
ing temperature.
NOTE:
BRP strongly recommends the installation of a block heater to help
warm up the liquids, this will also help to extend the oil lifetime.
225
MAINTENANCE SCHEDULE
Maiintenance Schedulle
Make sure to perform proper maintenance at recommended intervals
as indicated in the tables.
The maintenance chart indicates the items needing to be addressed
based on 2 criteria, whichever happens first:
- Calendar time
- Odometer reading.
Your driving habits determines the factors you shall adhere too. For
example:
- Someone who uses their vehicle every other weekend trail riding
with friends would most likely follow the odometer reading to de-
termine the frequency of his maintenance.
- Someone who uses their vehicle seldomly over the year or only on
a few occasions would follow the calendar time to determine the
frequency of his maintenance.
IMPORTANT: The following tables show the appropriate mainte-
nance application for the first 3 years. For subsequent years, repeat
the same pattern alternatively.
Maiintenance Overviiew
Calendar
Trail/ Cross
Odometer
Time
Over/ Utility
Every
1500 km (1000 mi)
A+
Month
1 Year
3000 km (2000 mi)
A
Every
4500 km (3000 mi)
A+
Month
2 Years
6000 km (4000 mi)
A and B
Every
7500 km (5000 mi)
A+
Month
226
MAINTENANCE SCHEDULE
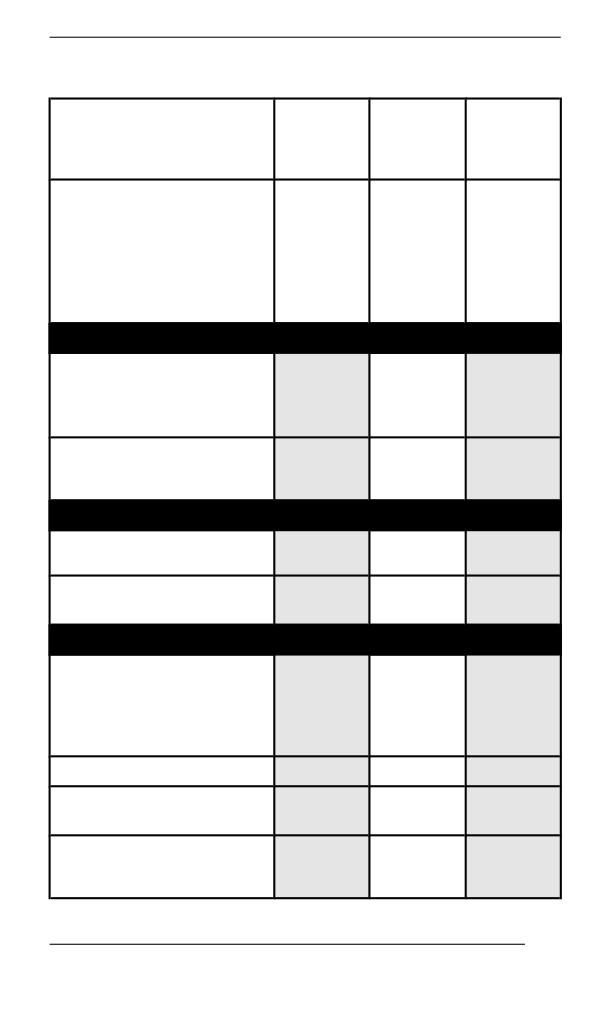
600 ACE/ 900 ACE Engines
TRAIL /
CROSSOVER
A+
A
B
/ UTILITY
Every
Every 2
A=Adjust
Every
month
years
C=Clean
year
or
or
I=Inspect
or
1500
6000
L=Lubricate
3000 km
km
km
R=Replace
(2000
(1000
(4000
T=Torque
mi)
mi)
mi)
Air and Fuel Delivery
Fuel components (fuel
cap, hoses, clamps and
I
tank fixation) and
function
R
In-line fuel filter
Every 5
years
Body and Chassis
Body panels and
I, T
hardware
Pivots, latches, hinges
L
and key barrels
Engine and Cooling
Engine cooling
components (coolant
concentration, coolant
I, A
level, hose condition,
clamps, leaks)
Engine oil and oil filter
R
Engine seals and
I
gaskets
R
Spark plugs
Every 3
years
227
MAINTENANCE SCHEDULE
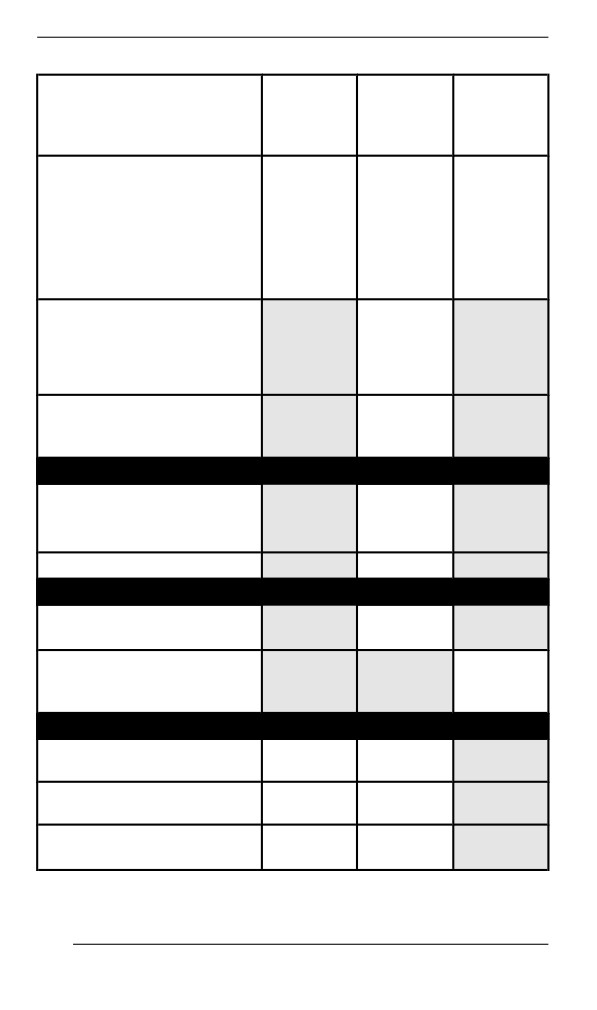
TRAIL /
CROSSOVER
A+
A
B
/ UTILITY
Every
Every 2
A=Adjust
Every
month
years
C=Clean
year
or
or
I=Inspect
or
1500
6000
L=Lubricate
3000 km
km
km
R=Replace
(2000
(1000
(4000
T=Torque
mi)
mi)
mi)
or
10 000
km
(6000
mi)
R
Engine coolant
Every 5
years
Exhaust and Emissions
Exhaust components
(gaskets, pipes, muffler
I
condition, leaks)
Exhaust manifold
T
Brake
Brake components and
I, L
function
R
Brake fluid
Every
2
years
Drive
Chaincase drive chain
A
A
tension
Gearbox / chaincase oil
I
I
level
Track alignment and
A
I, A
tension
228
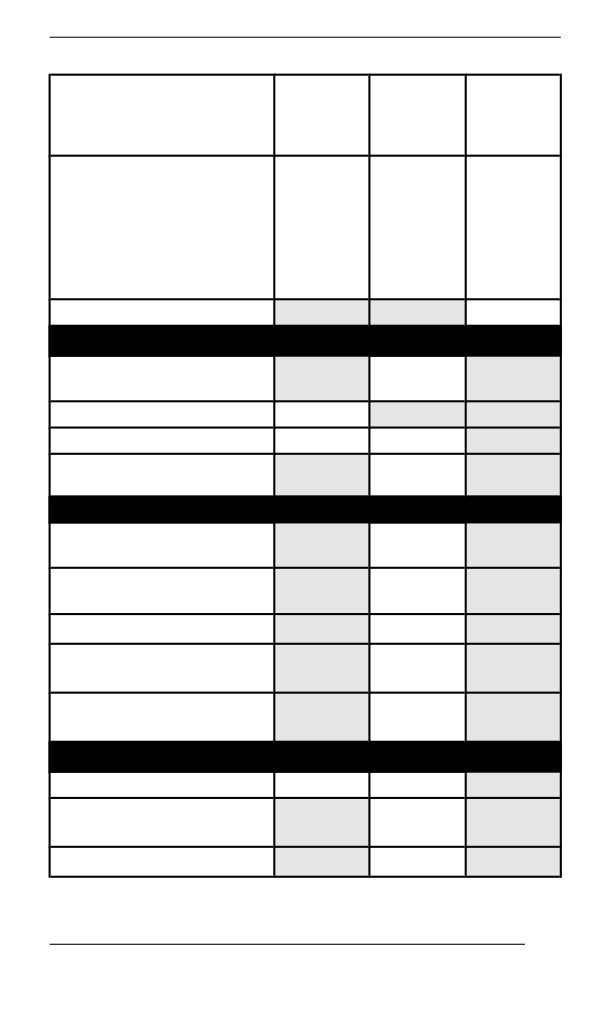
MAINTENANCE SCHEDULE
TRAIL /
CROSSOVER
A+
A
B
/ UTILITY
Every
Every 2
A=Adjust
Every
month
years
C=Clean
year
or
or
I=Inspect
or
1500
6000
L=Lubricate
3000 km
km
km
R=Replace
(2000
(1000
(4000
T=Torque
mi)
mi)
mi)
Gearbox / chaincase oil
R
Continuously Variable Transmission (CVT)
CVT components and
I,
C, L
function
CVT drive belt condition
I
CVT drive belt tension
A
A
Drive pulley retaining
T
screw
Electrical
Battery connections and
I
condition
Electrical harness
I
routing
Headlight aim
A
Modules and applicable
I
software updates
Operation of control
I
switches and lighting
Steering and Controls
Ski runners
I
I
Gearbox position lever
I, A
operation
Steering alignment
I, A
229
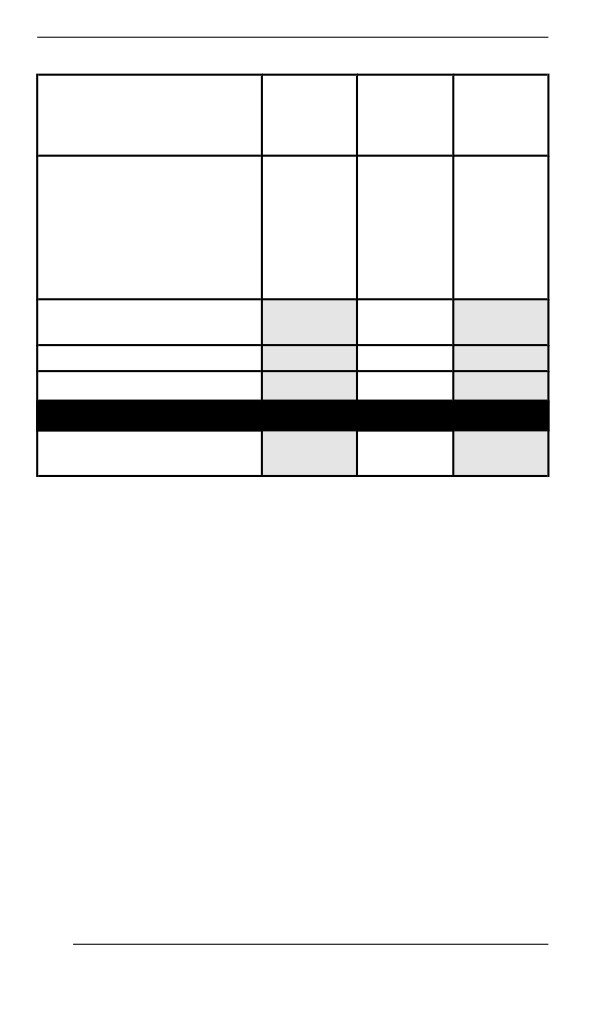
MAINTENANCE SCHEDULE
TRAIL /
CROSSOVER
A+
A
B
/ UTILITY
Every
Every 2
A=Adjust
Every
month
years
C=Clean
year
or
or
I=Inspect
or
1500
6000
L=Lubricate
3000 km
km
km
R=Replace
(2000
(1000
(4000
T=Torque
mi)
mi)
mi)
Steering components
I
and function
Throttle cable
A
Throttle operation
I
Suspension
Suspension components
I, L
and function
230
MAINTENANCE SCHEDULE
900 ACE Turbo/ R
TRAIL /
CROSSOVER
A+
A
B
/ UTILITY
Every
Every 2
A=Adjust
Every
month
years
C=Clean
year
or
or
I=Inspect
or
1500
6000
L=Lubricate
3000 km
km
km
R=Replace
(2000
(1000
(4000
T=Torque
mi)
mi)
mi)
Air and Fuel Delivery
Fuel components (fuel
cap, hoses, clamps and
I
tank fixation) and
function
R
In-line fuel filter
Every 5
years
Body and Chassis
Body panels and
I, T
hardware
Pivots, latches, hinges
L
and key barrels
Engine and Cooling
Engine cooling
components (coolant
concentration, coolant
I, A
level, hose condition,
clamps, leaks)
Engine oil and oil filter
R
Engine seals and
I
gaskets
R
Spark plugs
Every 3
years
231
MAINTENANCE SCHEDULE
TRAIL /
CROSSOVER
A+
A
B
/ UTILITY
Every
Every 2
A=Adjust
Every
month
years
C=Clean
year
or
or
I=Inspect
or
1500
6000
L=Lubricate
3000 km
km
km
R=Replace
(2000
(1000
(4000
T=Torque
mi)
mi)
mi)
or
10 000
km
(6000
mi)
R
Engine coolant
Every 5
years
Exhaust and Emissions
Exhaust components
(gaskets, pipes, muffler
I
condition, leaks)
Exhaust manifold
T
R
Every 3
years
or
Turbo exhaust gasket
10 000
km
(6000
mi)
Brake
Brake components and
I, L
function
R
Brake fluid
Every 2
years
232
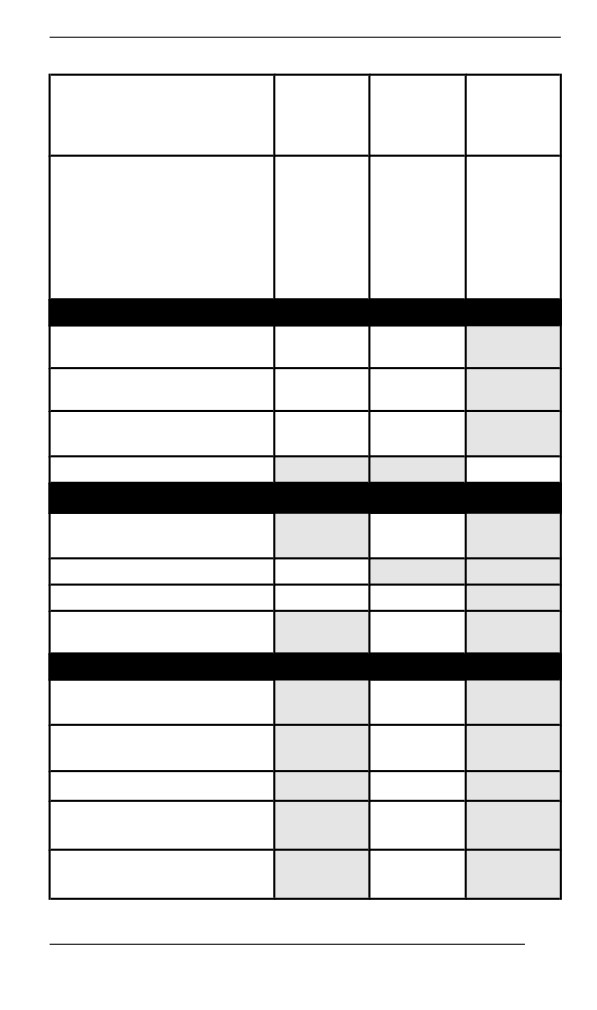
MAINTENANCE SCHEDULE
TRAIL /
CROSSOVER
A+
A
B
/ UTILITY
Every
Every 2
A=Adjust
Every
month
years
C=Clean
year
or
or
I=Inspect
or
1500
6000
L=Lubricate
3000 km
km
km
R=Replace
(2000
(1000
(4000
T=Torque
mi)
mi)
mi)
Drive
Chaincase drive chain
A
A
tension
Gearbox / chaincase oil
I
I
level
Track alignment and
A
I, A
tension
Gearbox / chaincase oil
R
Continuously Variable Transmission (CVT)
CVT components and
I, C, L
function
CVT drive belt condition
I
CVT drive belt tension
A
A
Drive pulley retaining
T
screw
Electrical
Battery connections and
I
condition
Electrical harness
I
routing
Headlight aim
A
Modules and applicable
I
software updates
Operation of control
I
switches and lighting
233
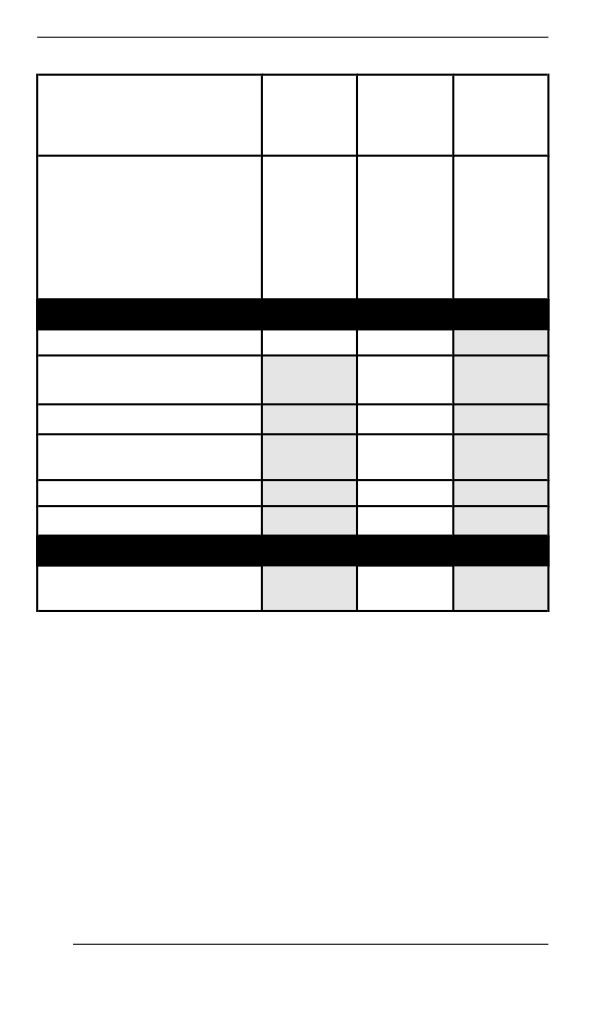
MAINTENANCE SCHEDULE
TRAIL /
CROSSOVER
A+
A
B
/ UTILITY
Every
Every 2
A=Adjust
Every
month
years
C=Clean
year
or
or
I=Inspect
or
1500
6000
L=Lubricate
3000 km
km
km
R=Replace
(2000
(1000
(4000
T=Torque
mi)
mi)
mi)
Steering and Controls
Ski runners
I
I
Gearbox position lever
I, A
operation
Steering alignment
I, A
Steering components
I
and function
Throttle cable
A
Throttle operation
I
Suspension
Suspension components
I, L
and function
234
MAINTENANCE PROCEDURES
This section includes instructions for basic maintenance procedures.
WARNING
Turn off the engine, remove tether cord cap and follow these
maintenance procedures when performing maintenance. If you
do not follow proper maintenance procedures you can be in-
jured by hot parts, moving parts, electricity, chemicals or other
hazards.
WARNING
Should removal of a locking device be required (e.g. lock tabs,
self-locking fasteners, etc.) when undergoing disassembly/as-
sembly, always replace with a new one.
Engine Coollant
WARNING
Never open coolant tank cap when engine is hot.
Engine Coolant Level Verification
Open the RH side panel, see Body and Seat.
Check coolant level at room temperature. Liquid should be at cold lev-
el line of coolant tank.
NOTE:
When checking level at low temperature it may be slightly lower than
the mark.
If additional coolant is necessary or if entire system has to be refilled,
refer to an authorized BRP snowmobile dealer, repair shop or person
of your own choosing.
235
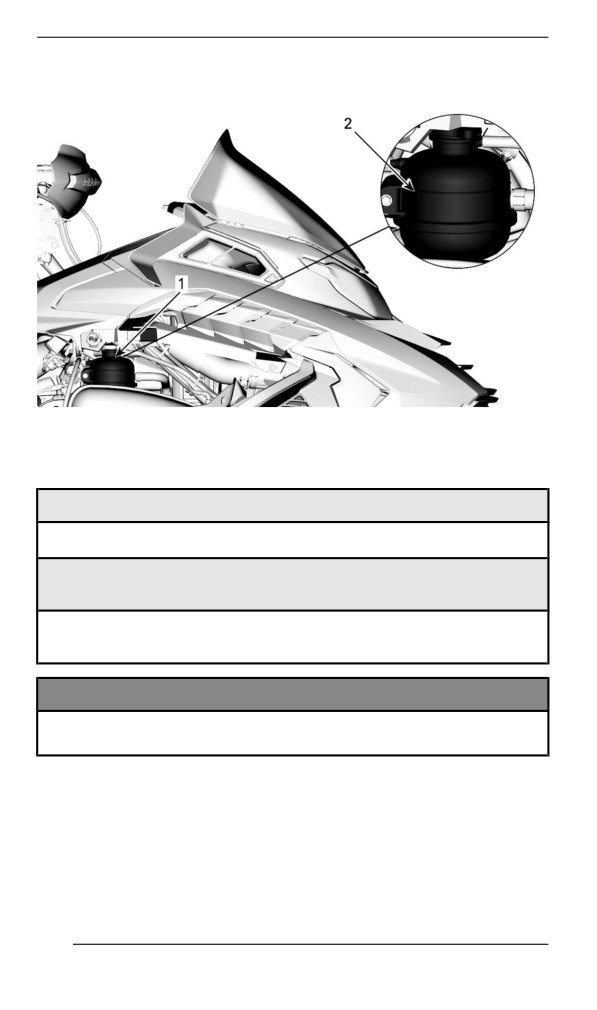
MAINTENANCE PROCEDURES
1. Coolant reservoir
2. COLD line
Recommended Engine Coolant
RECOMMENDED COOLANT
XPS Extended life pre-mixed coolant
IF THE RECOMMENDED XPS COOLANT IS NOT
AVAILABLE
Distilled water and antifreeze solution (50% distilled water, 50%
antifreeze)
NOTICE
Always use ethylene-glycol antifreeze containing corrosion in-
hibitors specifically for internal combustion aluminum engines.
Engiine Oiil
Extreme Cold Condition
An engine that is operated in -25°C/-13°F and below environment will
require an increase in service and maintenance schedule.
236
MAINTENANCE PROCEDURES
Any combustion engine operated in such a low load and rather cold
operating temperature collects an increased amount of condensation
at every startup/warm-up.
Since the engine is not reaching operating temperatures for extended
periods of time, the oil is starting to be strongly diluted with water and
gas residue (more water content).
An engine needs to reach operating temperature, in order to be able
to evaporate condensate out of the oil.
If daily usage (work or leisure driving cycle) is similar to those men-
tioned below, BRP strongly recommends changing the oil at least
once a month.
Parameters of an increase in service and maintenance schedule:
- Engine not reaching the proper operating temperature during nor-
mal daily usage
- Multiple starts and stops without reaching operating temperature
- Short idle periods
- Low RPM driving cycle in short distances without reaching operat-
ing temperature.
NOTE:
BRP strongly recommends the installation of a block heater to help
warm up the liquids, this will also help to extend the oil lifetime.
Recommended Oil
Rotax® engines were developed and validated using the XPS™ oil.
BRP recommends the use of its XPS engine oil or an equivalent at all
time. Do not add any oil additives to the recommended engine oil.
Damages caused by the use of an oil not suitable for the engine or by
adding of an oil additives may not be covered by the BRP Limited
Warranty.
237
MAINTENANCE PROCEDURES
XPS RECOMMENDED Engine Oil
4T 0W40 Synthetic oil
IF THE RECOMMENDED XPS ENGINE OIL IS NOT
AVAILABLE
Use a 0W40 4-stroke SAE synthetic engine oil meeting or
exceeding the following lubricant industry specifications.
Always check the API service label certification on the oil container,
it must contain at least the indicated standard.
- API service classification SN
Verifying the Engine Oil Level
NOTICE
Check level before each ride and refill if necessary. Do not
overfill. Operating the engine with an improper level may se-
verely damage engine. Wipe off any spillage.
Place vehicle on a level surface and proceed as follows to check oil
level:
1. Start engine and let it reach its normal operating temperature. En-
gine is at normal temperature when rear radiator gets warm, indi-
cating that the thermostat is open.
2. Let engine run at idle for 30 more seconds.
3. Stop engine.
4. Open the LH side panel. Refer to Body and Seat.
5. Remove the drive belt guard, refer to Drive Belt Guard.
6. Remove dipstick from the filler tube, then wipe it clean.
7. Completely insert dipstick in the filler tube.
8. Remove dipstick and check the oil level. Oil level should be be-
tween the MIN and MAX marks as shown, add if necessary.
238
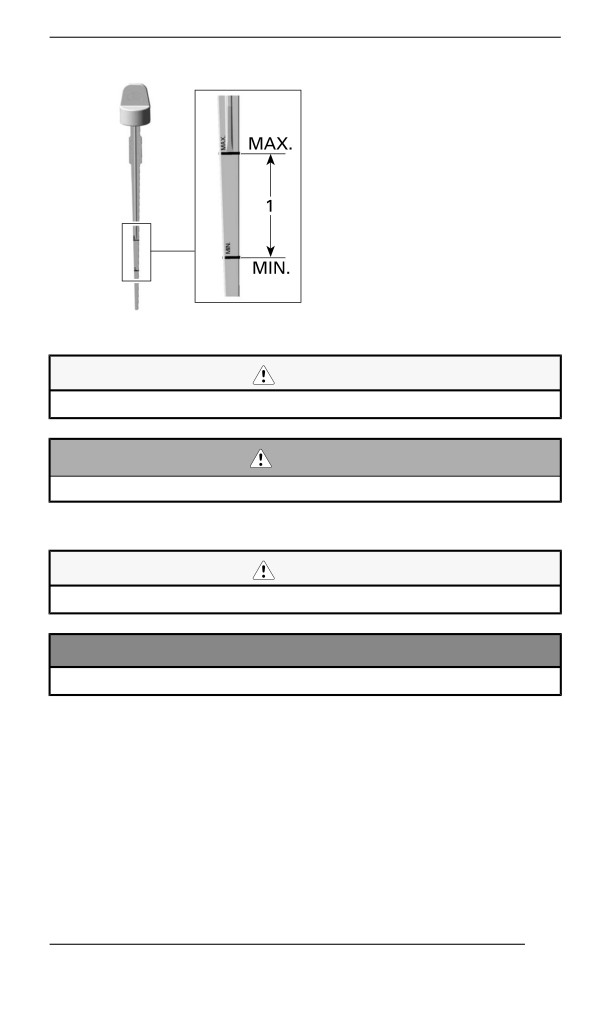
MAINTENANCE PROCEDURES
1. Oil level between MIN. and MAX.
CAUTION
Engine oil can be very hot.
WARNING
Wipe off any oil spills. Oil is highly flammable when heated.
Replacing the Engine Oil
CAUTION
The engine oil can be very hot. Wait until engine oil is warm.
NOTICE
Engine oil and oil filter must be replaced at the same time.
1. Bring engine to its normal operating temperature.
2. Place vehicle on a level surface.
3. Remove the LH side panel.
4. Remove dipstick.
239
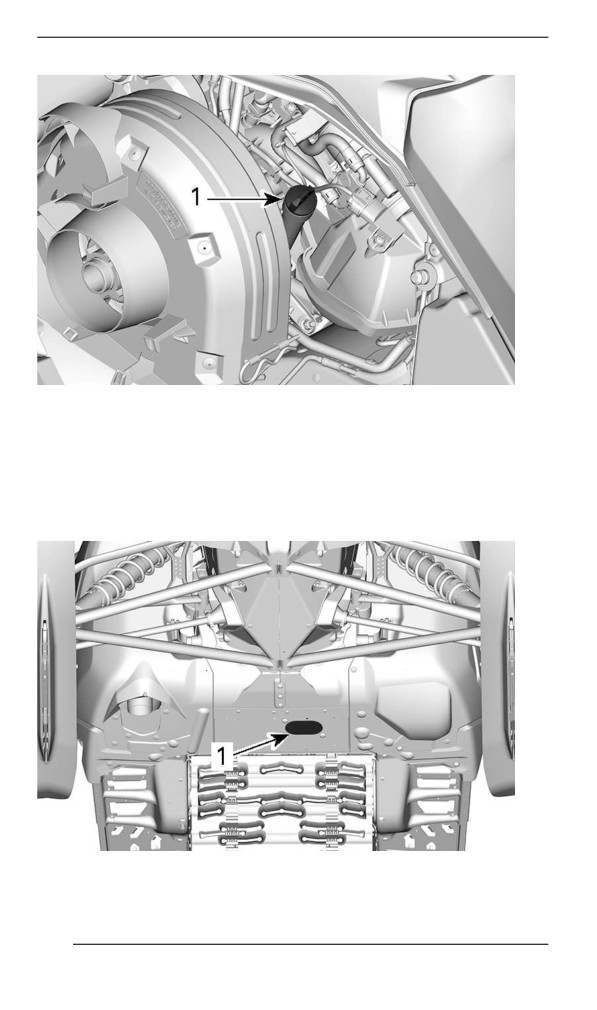
MAINTENANCE PROCEDURES
LH SIDE OF VEHICLE
1. Oil tank dipstick
5. Remove the oil filter. Refer to the procedure in this subsection.
6. From underneath the vehicle, access the drain plug:
1. Remove one access cover retaining screw and loosen the
other.
1. Drain plugs access cover
240
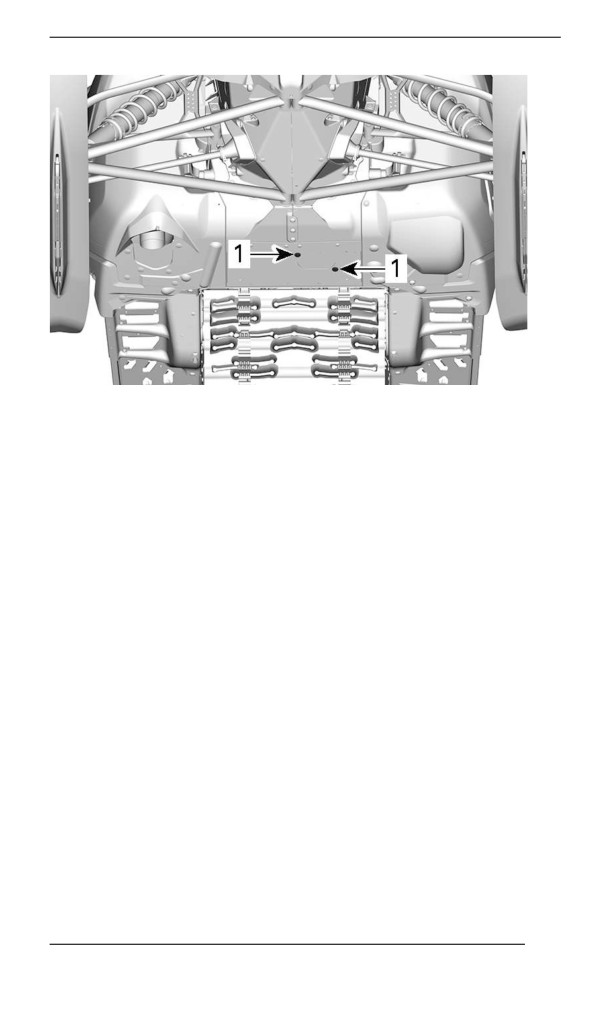
MAINTENANCE PROCEDURES
PIVOT THE ACCESS COVER
1. Retaining screws
2. Pivot the access cover to clear the bottom pan opening.
7. Clean drain plug area.
8. Place a drain pan under the bottom pan opening.
9. Remove engine drain plugs in the following order.
241
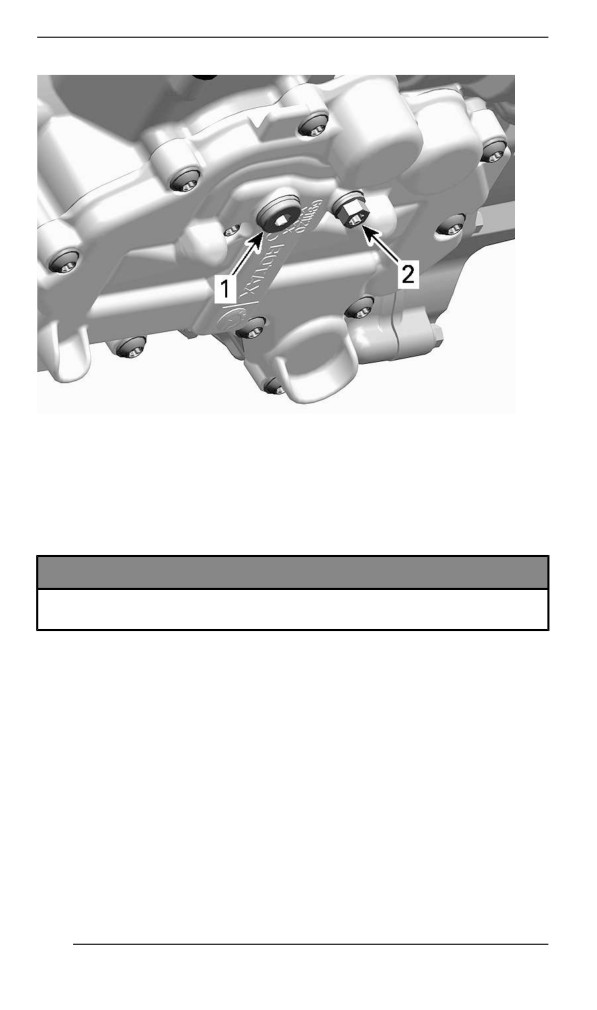
MAINTENANCE PROCEDURES
UNDERNEATH THE ENGINE
1. Main drain plug
2. Secondary drain plug
10. Allow oil to drain completely.
11. Install NEW sealing washers on oil drain plugs.
NOTICE
Never use a sealing washer a second time. Always replace with
a new one.
242