Snowmobile Polaris 650 Pro RMK 155 / 650 RMK Khaos 146 Slash / 850 Pro RMK 155. Owner’s Manual (2024) - page 4
 

  Index      Manuals     Snowmobile Polaris 650 Pro RMK 155 / 650 RMK Khaos 146 Slash / 850 Pro RMK 155. Owner’s Manual (2024)


Search            copyright infringement  


Content      ..     2      3      4      5     ..


Snowmobile Polaris 650 Pro RMK 155 / 650 RMK Khaos 146 Slash / 850 Pro RMK 155. Owner’s Manual (2024) - page 4


NOTICE

Never adjust spring preload to an installed length longer than the factory length

or shorter than the minimum length as shown in the following chart. Damage to

the suspension could result. When decreasing preload, make sure at least two

turns of preload are holding the retainer against the spring.

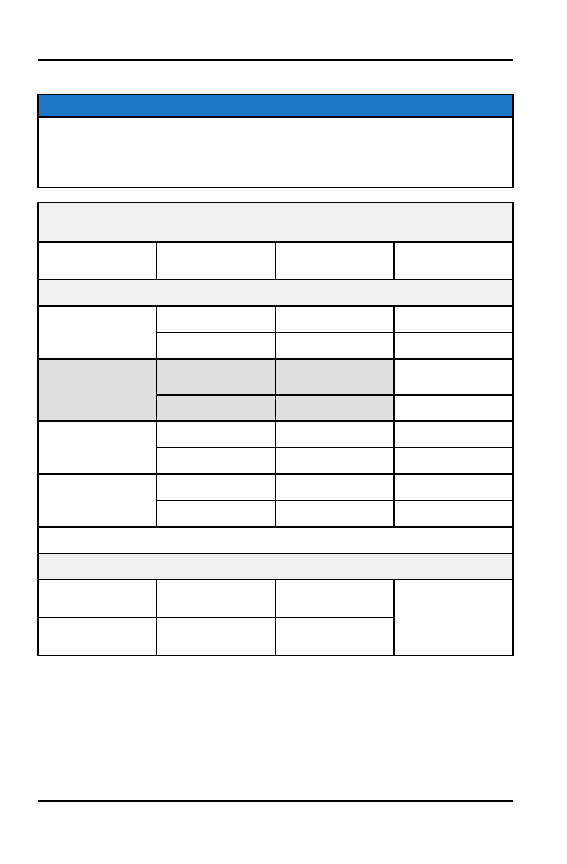
Initial RTS Shock Preload Settings

(Measure spring length with suspension off the ground)

Rider Weight

Model

Factory Installed

Length

Minimum Installed

Length

For Factory-Installed Springs

<160 lb (<73 kg)

PRO RMK

10.75 in (27.3 cm)

9.8 in (24.9 cm)

RMK KHAOS

10.375 in (26.3 cm)

9.8 in (24.9 cm)

160-220 lb (73-100

kg)

PRO RMK & RMK

KHAOS

*10.5 in (26.7 cm)

9.8 in (24.9 cm)

PRO RMK (Velocity)

*10.25 in (26 cm)

9.8 in (24.9 cm)

220-280 lb (100-127

kg)

PRO RMK

10.125 in (25.7 cm)

9.8 in (24.9 cm)

RMK KHAOS

10.125 in (25.7 cm)

9.8 in (24.9 cm)

280-340 lb (127-154

kg)

PRO RMK

9.8 in (24.9 cm)

9.8 in (24.9 cm)

RMK KHAOS

10 in (25.4 cm)

9.8 in (24.9 cm)

*Factory Setting

For Optional 250 lb./in. Stiff Springs (see your dealer)

250-300 lb (113-136

kg)

ALL

10.25 in (26 cm)

10 in (25.4 cm)

300-350 lb (136-159

kg)

ALL

10 in (25.4 cm)

100

THE PERFECT FIT

FACTORY CLICKER SETTINGS (IF EQUIPPED)

RMK KHAOS models come factory-equipped with Walker Evans Racing®
Velocity shocks. Velocity shocks utilize dual shock clickers to control bottoming
and ride comfort. To reset rear track shock clickers, rotate the clicker to full stiff,
and then back off the same number of clicks for each shock. PRO RMK models
equipped with Velocity shocks do not have dual shock clickers.

NOTICE

Speed refers to the rate of shock compression, not speed of vehicle.

The outside clicker

q

adjusts shock compression during high speed

compression events.

Turn clicker clockwise to increase compression and

counterclockwise to decrease compression.

The inside clicker

w

adjusts shock compression during low speed

compression events.

Turn clicker clockwise to increase compression and

counterclockwise to decrease compression.

RMK KHAOS

PRO RMK

MODEL

CLICKER SETTING

(FROM FULL STIFF)

PRO RMK (Velocity)

6

RMK KHAOS

High-Speed: 4

Low-Speed: 6

101

THE PERFECT FIT

HANDLEBAR COMPONENT ALIGNMENT

Always loosen the mounting screws before moving a handlebar component.
Moving a component without first loosening its mounting screws may cut
grooves into the handlebar, making it difficult to secure the component.

CAUTION

Take care to avoid damaging hand warmer/brake switch wires when moving

components.

COMPONENT TORQUE VALUES

IMPORTANT

Do not over-torque the components listed below. Overtightening can lead to

component damage.

COMPONENT

TORQUE

q

Handlebar Hook Screw

Aluminum: 10 ft-lbs (13.5 N·m)
Steel: 18 ft-lbs (24 N·m)

w

Handlebar Clamp Screws

35 in-lbs (4 N·m)

e

Throttle Block Cover Screws

6 in-lbs (0.7 N·m)

r

Throttle Block Set Screw

27 in-lbs (3 N·m)

102

THE PERFECT FIT

COMPONENT

TORQUE

t

Engine Stop Switch Mounting Screw

12 in-lbs (1.4 N·m)

y

Brake Master Cylinder Mounting Screw

70 in-lbs (8 N·m)

u

PERC Button Mounting Screw

35 in-lbs (4 N·m)

BRAKE MASTER CYLINDER ALIGNMENT

1. Loosen the mounting screw.

2. Move the master cylinder to desired

position.

3. Torque screw

y

to specification. Do

not over-torque.

TORQUE

Brake Cylinder Mounting Screw

70 in-lbs (8 N·m)

THROTTLE BLOCK ALIGNMENT

1. Slightly loosen the set screw

r

on the bottom of the

throttle block housing.

2. Move the control block to

desired position.

3. Torque the set screw to

specification. Do not
over-torque.

4. With the engine off, test

throttle lever movement after
tightening the screw.

TORQUE

Throttle Block Set Screw

27 in-lbs (3 N·m)

103

THE PERFECT FIT

THROTTLE BLOCK COVER

Adjusting the throttle block cover
screws is not required to align
the position of the throttle block.
Removing the cover screws
should only be necessary if
replacing or removing the
throttle block from the handlebar
assembly. See your authorized
Polaris dealer or certified
technician for throttle
replacement information.

TORQUE

Throttle Block Cover Screws

6 in-lbs (0.7 N·m)

PERC BUTTON ALIGNMENT

1. Loosen the mounting screw

u

.

2. Move the PERC button to the

desired position.

3. Torque screw to

specification. Do not
over-torque.

TORQUE

PERC Button Mounting Screw

35 in-lbs (4 N·m)

ENGINE STOP SWITCH ALIGNMENT

CAUTION

The stop switch must be positioned in an easily accessible location.

104

THE PERFECT FIT

1. Slightly loosen the set screw

t

on the bottom of the

housing.

2. Move the switch to the

desired position.

3. Tighten the screw to

specification. Do not
over-torque.

TORQUE

Engine Stop Switch Mounting Screw

12 in-lbs (1.4 N·m)

HANDLEBAR HOOK ALIGNMENT

1. Slightly loosen the hook

mounting screw

q

. Do not

remove the screw.

2. Rotate hook to the desired

position.

3. Torque screw to

specification. Do not
over-torque.

TORQUE

Handlebar Hook Screw

10 ft-lbs (13.5 N·m)

105

THE PERFECT FIT

HANDLEBAR ANGLE ADJUSTMENT

1. Locate the handlebar clamp

q

at the top of the steering

post.

2. Secure the clamp bolts

A

with an Allen® wrench, and
loosen each of the four nuts

B

.

3. Move the handlebar forward

or backward to desired
angle.

4. Ensure that the handlebars and all components DO NOT touch the gas tank,

windshield or other part of the machine when handlebars are turned fully left
or right.

5. Torque handlebar clamp nuts to specification. Do not over-torque.

TORQUE

Handlebar Clamp Nuts

35 in-lbs (4 N·m)

CARBIDE SKAGS

A skag is a replaceable bar attached to the underside of the ski to assist in
turning the snowmobile and to prevent ski wear caused by contact with roads
and other bare terrain. See page 163.

NOTICE

Do not install studs on this snowmobile. Damage will occur.

106

THE PERFECT FIT

TOE HOLD POSITION ADJUSTMENT

1. Locate two toe hold mounting bolts toward the front of the tunnel and running

boards.

2. Select the mounting position that best fits the rider’s boot or riding style.

a. Option

q

: Low

b. Option

w

: Mid

c. Option

e

: High

d. Option 4: Completely removed

NOTICE

Toe hold partially hidden for clarity.

3. Reinstall two toe hold mounting bolts. Torque bolts to specification.

TORQUE

Toe Hold Mounting Bolts:

8.9 ft-lbs (12 N·m)

107

THE PERFECT FIT

CAUTION

In a crash or rollover, a rider’s footwear can get caught on the toe hold and

cause injury. To avoid injury, ensure toe hold is mounted high enough to allow a

rider’s boot to evacuate in a crash or rollover. Install toe hold in highest position

if unsure on mounting location. Do not install toe hold if rider’s boot is large

enough to prevent evacuation when the toe hold is in the highest position.

108

THE PERFECT FIT

PRE-RIDE INSPECTIONS

PRE-RIDE CHECKLIST

Inspect all items on the checklist for proper operation or condition before each
use of the snowmobile. Procedures are outlined in the referenced sections.

ITEM

SEE SECTION

Drive Belt and QUICKDRIVE Belt

page 146

Steering System

page 111

Recoil Rope

page 114

Coolant Level

page 144

Injection Oil Level

page 126

Parking Brake Lock/Brake
Lever/Brake System

page 112, page 113, and page 146

Auxiliary Shut-Off Switch (Engine
Stop Switch)

page 115

Ignition Switch

page 115

Headlight/Taillight/Brakelight

page 115

Suspension Mounting Bolts

page 110

Skags (Wear Bars)

page 163

Ski Saddle and Spindle Bolts

page 110

Hood and Side Panel Fasteners

page 140

Throttle Lever/Safety Switch

page 127

Rear Wheel Idler Bolt

page 158

Tether Switch/Strap (if equipped)

page 115

Track Alignment/Condition

page 157 and page 160

Rail Slide Condition

page 165

109

PRE-RIDE INSPECTIONS

PRE-RIDE SUSPENSION INSPECTION

Loose nuts and bolts can reduce your snowmobile's reliability and cause
needless repairs and down time. Before beginning any snowmobile trip, a visual
inspection will uncover potential problems. Check the following items on a
weekly basis or before any long trip.

ITEM

SEE SECTION

Check suspension mounting bolts for
tightness.

-

Check rear idler wheel bolt for
tightness.

Check rear idler adjusting bolt
locknuts for tightness.

-

Check front torque arm limiter strap
condition.

-

Check rail slide condition.

page 165

Check track tension.

Check ski runner/skag condition.

page 163

Check ski spindle bolts for tightness.

-

Check tie rod end nuts for tightness.

-

110

PRE-RIDE INSPECTIONS

BEFORE STARTING THE ENGINE

Before starting the engine, always refer to all safety warnings pertaining to
snowmobile operation. Never start the engine without checking all vehicle
components to be sure of proper operation.

WARNING

Operating the vehicle with worn, damaged, contaminated, or malfunctioning

components could result in serious injury or death. Never start the engine

without checking all vehicle components to be sure of proper operation.

READ AND UNDERSTAND YOUR OWNER'S
MANUAL

Read the Owner's Manual completely and refer to it often. The manual is your
guide to safe and enjoyable snowmobiling experience.

STEERING SYSTEM

WARNING

Ice and snow build-up may interfere with the steering of your snowmobile,

resulting in serious injury or death. Keep the underhood area free of snow and

ice.

Before driving, manually turn the skis to the left and right to be sure ice and
snow are not interfering with full left and right steering. If difficulty is
encountered, remove ice and snow build-up that may be obstructing the steering
linkage.

THROTTLE LEVER

The throttle and brake are the primary controls of your snowmobile. Always
make sure both are functioning properly.

Squeeze the throttle lever to make sure it compresses evenly and smoothly.
When released, the lever should immediately return to the idle position without
binding or hesitation. If the throttle does not function smoothly, or if you discover
excessive lever freeplay, DO NOT start the engine. Have the throttle serviced
immediately.

THROTTLE SAFETY SWITCH

Test the throttle safety switch system before the snowmobile is operated.

111

PRE-RIDE INSPECTIONS

BRAKES

Always check the following items for proper operation before starting the engine.

PARKING BRAKE LEVER LOCK

Use the parking brake lever lock only when you want the snowmobile to remain
stationary; for example, when parked on an incline for a period of five minutes or
less.

1. Brake Lever

2. Parking Brake Lever Lock

3. Master Cylinder

Reservoir/Cover

BRAKE LEVER TRAVEL

Squeeze the brake lever. It
should move no closer to the
handgrip than 0.5 in (1.3 cm)

q

.

A smaller distance indicates low
brake fluid level or air in the
hydraulic system. Refer to the
brake bleeding information on
page 148. An authorized
POLARIS dealer or other
qualified technician can assist.

LEVER FEEL

If the brake lever feels “spongy” after a rollover or other event, squeeze the lever
10 times. If correct lever travel is not achieved, check the brake fluid level and
condition. Add fluid as needed. See the Brake Fluid section for details.

WARNING

Continued use of “spongy” brakes may cause a complete loss of brakes, which

could result in serious injury or death. Always have the brakes serviced at the

first sign of sponginess.

112

PRE-RIDE INSPECTIONS

PARKING BRAKE LEVER LOCK

Use the parking brake lever lock only when you want the snowmobile to remain
stationary; for example, when parked on an incline for a period of five minutes or
less.

LOCK ENGAGEMENT

To engage the lock, squeeze the brake lever tightly and push forward on the
lock. Hold the lock forward while releasing the brake lever.

NOTICE

If the brake lever is squeezed tightly enough, the lock will move freely into

place. Do not force the lock or it may break.

The parking brake light on the gauge will light up if the parking brake lever lock is
set while the engine is running. It will also be lit when the service brake is in use.
If the parking brake light does not come on when the parking brake or service
brake is in use, have it serviced by your authorized POLARIS dealer.

LOCK RELEASE

To release the lock, squeeze the brake lever tightly. The lock will return to the
unlocked position.

WARNING

If the parking brake lever lock is partially or entirely engaged while riding, the

brakes may overheat, resulting in brake damage. In extreme cases it could

cause a fire, which could result in serious injury or death. Always ensure that

the lever lock is completely disengaged before operating the snowmobile.

TRACK

Track damage or failure caused by operation on ice, poor lubrication conditions,
or excessive speed voids the track warranty.

WARNING

Operating the snowmobile with a damaged track increases the possibility of

track failure, which could cause loss of control resulting in serious injury or

death. Always inspect the track for damage before using the vehicle.

113

PRE-RIDE INSPECTIONS

WARNING

Use of traction products such as studs increases the possibility of track

damage and/or failure. Driving at high speeds for extended periods of time in

marginal lubrication could severely damage track rods, break track edges, and

cause other track damage. Examples of marginal lubrication would include

frozen bodies of water without snow cover, icy trails, and no-snow conditions.

HOOD AND SIDE PANEL FASTENERS

CAUTION

The hood and side panels of the snowmobile protect the operator from moving

parts. Never operate a snowmobile with the hood or side panels open or

removed. Always ensure that the hood and side panels are securely in place

before starting the engine.

RECOIL ROPE

Inspect the recoil rope and handle for excessive wear, and make sure the knot
securing the rope inside the handle is secure. If excessive wear is found, your
authorized POLARIS dealer can provide a replacement.

114

PRE-RIDE INSPECTIONS

START THE ENGINE AND CHECK

Before starting the engine, always refer to all safety warnings pertaining to
snowmobile operation. Never engage the starter when the engine is running.
Never start the engine without checking all vehicle components to be sure of
proper operation. See page 111.

ENGINE STOP SWITCH

Check the auxiliary shut-off switch for proper operation. Push the switch down to
stop the engine. Pull it up to allow restarting.

IGNITION SWITCH

Make sure the engine stops when the ignition switch is turned to OFF.

TETHER SWITCH

Remove the tether from the switch to ensure the engine stops immediately.

LIGHTING

Check the headlight (high and low beam), taillight, and brake light. Replace
burned out lamps before operating.

OPERATING AREA

Before driving away, check your surroundings. Be aware of obstacles and make
sure bystanders are a safe distance from the snowmobile.

115

PRE-RIDE INSPECTIONS

116

OPERATION

STARTING THE ENGINE

IMPORTANT

Engaging the starter when the engine is running WILL result in serious engine

damage, especially if the engine is in reverse. Never engage the starter when

the engine is running.

1. Install the tether switch by securing the tether cap to the base on the

console. Clip the end of the tether securely to your clothing.

2. Turn the key to the ON position.

3. Pull the engine stop switch up to the RUN position.

4. If equipped with electric start, turn the key to START to crank the engine.

Release the key to the ON position when the engine starts.

5. If not equipped with electric start, grasp the starter handle and pull slowly

until the recoil engages; then pull abruptly to crank the engine.

TIP

Don’t pull the starter rope to the fully extended position and don’t allow it to

snap back into the housing. Damage may result.

6. If the engine does not start after several attempts, slightly depress the

throttle no more than 0.25 in (2.54 cm) open while cranking the engine.
When the engine starts,

immediately

release the throttle.

CAUTION

To avoid injury and/or engine damage, do not operate the electric starter or

pull-rope starter while the engine is running.

NOTICE

Operating the vehicle immediately after cold starting could cause engine

damage. Allow the engine to warm up for several minutes before operating the

vehicle. If cold drive-away is attempted, the engine RPM may stumble slightly

to protect the engine.

117

OPERATION

RESTARTING THE ENGINE

If the engine has been stopped using the engine stop switch, restart the engine
using the normal starting procedure. If the engine fails to start, do the following:

1. Re-install the tether switch by securing the tether cap to the base on the

console. Ensure the end of the tether is secured to your clothing.

2. Push the engine stop switch down to the OFF position.

3. Turn the key to the OFF position.

4. Pull the recoil rope handle several times to clear the engine.

5. Restart the engine using the normal starting procedure.

BREAK-IN PERIOD

ENGINE BREAK-IN

IMPORTANT

Engines equipped with an electronic oil pump do not require initial fuel premix.

Excessive heat build-up during the first three hours of operation will damage
close-fitted engine parts. Do not operate at full throttle or high speeds for
extended periods during the first three hours of use. Vary the throttle openings
and vehicle speeds to reduce friction on all close-fitting machined parts, allowing
them to break in slowly without damage.

CAUTION

Never mix brands of oil. Serious chemical reactions can cause injection system

blockage, resulting in serious engine damage. Oils may also be incompatible

and the result could be sludge formation, filter blockage, and reduced cold

weather flow rates. All Polaris oils are compatible with each other.

Drive with extra caution during the break-in period. Perform regular checks on
fluid levels, lines, and all other important areas of the snowmobile.

AUTOMATIC ENGINE BREAK-IN TIMERS

NOTICE

The Patriot engine management system utilizes both a fuel injector break-in

period and oil pump enrichment program. The duration of these break-in

programs are independent of each other and are timed-out based on engine

run-time at and above a specified engine RPM.

118

OPERATION

BREAK-IN FUNCTION

ENGINE RUN TIME

DURATION

DESCRIPTION

Fuel Injectors

2 hours *

2% additional fuel

Patriot Engine Oil Pump

Enrichment Period

10 Hours *

15% additional enriched

oil supply to engine

* = Total engine run time above 3,500 RPM

OIL INJECTION SYSTEM

Always check and fill the oil bottle during pre-ride inspection and refueling.

NOTICE

Serious engine damage can occur without the proper lubrication. Check the oil

bottle level often during the first tank of fuel. If the oil level doesn't go down,

contact your authorized POLARIS dealer or other certified technician

immediately.

DRIVE BELT BREAK-IN

The break-in period for a new drive belt is 30 miles (48 km). During this time,
vary the throttle position under 50% and limit full throttle use.
New drive belts should be washed with warm, soapy water and allowed to air dry
prior to use.
Always take time to warm up the belt and driveline prior to operating the
snowmobile. Free the track and skis from the ground before engaging throttle.

QUICKDRIVE BELT BREAK-IN

The break-in period for a new QUICKDRIVE belt is 100 miles (160 km). During
the 100 miles of belt break-in, the rider will hear a sound made by the drive
system. After the break-in period, the sound will become similar to that of a
traditional chaincase.
Improper track tension can result in track ratcheting, which will affect
QUICKDRIVE belt durability. Always maintain proper track tension.
During the break-in period, this belt sheds a fiber-type material in and around the
drive system. Use a dry shop towel to clean the residue.
Stop occasionally and allow the snowmobile to cool after high throttle/high track
load events. This will help the QUICKDRIVE belt achieve maximum
performance and it will also break in the engine, drive belt and sprockets
properly.

119

OPERATION

On-trail break-in should be performed at speeds no more than 50 MPH (80
km/h).
Always be cautious when jumping and landing a snowmobile. Avoid “power-on”
landings. Damage caused to any component due to improper use or abuse is
not covered by warranty.

TRACK BREAK-IN

It is very important to inspect and adjust track tension after every ride for the first
150 miles (240 km) of use to ensure the proper tension during the break-in
period. Aggressive riders in certain snow conditions may need to adjust track
tension as early as 20 miles (32 km). After the break-in period track tension
should be inspected every 150 miles (240 km).

IMPORTANT

Track tension must be kept at specification – neither too loose nor too tight.

Overly loose track tension is inefficient and overly tight tension causes

premature wear or drive train system failures.

NOTICE

Ratcheting occurs when the drive shaft drivers slip on the track. A ratcheting

event typically produces extreme vibration and is often experienced when the

track is subjected to heavy loads.

Early wear can be caused by two conditions – improper track tension and/or
sustained trail riding at high speeds without scratchers. Neither condition results
from a defect in the track, and wear caused by either or both of these conditions
is not covered by warranty.

Loose tracks reduce drive system efficiency because:

• Track tension constantly varies on snowmobiles as the rear suspension

extends and compresses.

• Loose track tension increases the chance for the drive shaft to ratchet in high

load driving modes. Track ratcheting may damage the track and drive nubs.

• Loose track tension decreases rail slider life and can cause uneven slider

wear.

• The slack in a loose track bows out in front of the rail tips. This bowing effect

significantly reduces drive system efficiency, creates drag, and changes the
approach angle of the rear suspension, which decreases the snowmobile's
ability to get on top of the deep snow.

120

OPERATION

TRACK WARM-UP

WARNING

A loose track or flying debris could cause serious injury or death. Stand clear of

the front of the snowmobile and the moving track. Never hold the snowmobile

up or stand behind it while warming up the track. Do not use excessive throttle

during warm-up or when the track is free-hanging. Use a stable rear support.

WARNING

Use of traction products such as studs, ice growsers, etc. will increase the
possibility of track damage and/or failure. This could cause loss of control,

resulting in serious injury or death. Always inspect for track damage before

operating the snowmobile.

Follow these steps to ensure proper warm-up of the engine, drive train and
track.

1. Use an appropriate stand to securely support the rear of the snowmobile at

the rear bumper. The track should be about 4 inches (10 cm) off the ground.

2. Start the engine and allow it to warm up two to three minutes.

3. Depress the throttle abruptly and allow the track to rotate several revolutions.

TIP

It will take longer to warm up the track sufficiently during colder outdoor

temperatures.

4. Release the throttle, apply the brakes, shut off the engine and lower the

snowmobile to the ground.

5. Grasp the skis by their front loops and move them from side to side to loosen

snow and ice.

SLIDE RAIL AND TRACK COOLING

NOTICE

Inadequate cooling and lubrication will lead to overheating of the slide rail and

track, resulting in premature wear and failure. Reduce speeds and frequently

drive into fresh snow to allow adequate cooling and polishing of the slide rail

and track surfaces. Avoid operating on ice, hard-packed surfaces or roads.

121

OPERATION

RAIL SCRATCHERS

Some models are equipped with rail scratchers to help prevent overheating
when riding on ice or hard-packed snow.

NOTICE

Do not install accessory bogie wheels on the inside of the rail beams if your

model is equipped with a remote reservoir rear track shock or damage will

occur. The rail scratchers must be removed as they interfere with the

accessory bogie wheels.

DEEP LUG TRACK OPERATION

Deep lug tracks are designed specifically for operation in deep snow conditions.
Operating with deep lug tracks on low snow, on hard-packed trails, on ice or at
sustained high speeds may cause track overheating, lug separation and/or rail
slider damage.

Track damage attributed to track overheating and/or lug

separation is not covered under the POLARIS limited warranty policy.

Never exceed the maximum recommended sustained vehicle speeds listed for
the following deep lug tracks.

Track adjustment is critical for proper handling. Always maintain correct tension
and alignment. It is important to inspect adjust track tension after every ride for
the first 150 miles (240 kg) to ensure the proper tension during the break-in
period. Aggressive riders in certain snow conditions may need to adjust track
tension as early as 20 miles (32 kg). After the break-in period, track tension
should be inspected every 150 miles (240 kg).

Deep Lug Track Type

Maximum Sustained Speed

2.0 Crossover Track

70 MPH (110 km/h)

Series 6 (2.6 in)

60 MPH (95 km/h)

Series 8 (2.75 in)

60 MPH (95 km/h)

Series 9 (3.25 in)

50 MPH (80 km/h)

122

OPERATION

FUEL

WARNING

Gasoline is highly flammable and explosive under certain conditions.

• Always exercise extreme caution whenever handling gasoline.
• Always refuel outdoors or in a well-ventilated area.
• Always turn off the engine before refueling.
• Do not overfill the tank. Do not fill the tank neck.
• Do not smoke or allow open flames or sparks in or near the area where

refueling is performed or where gasoline is stored.

• If gasoline spills on your skin or clothing, immediately wash it off with soap

and water and change clothing.

• Never start the engine or let it run in an enclosed area. Engine exhaust

fumes are poisonous and can cause loss of consciousness or death in a
short time.

WARNING

The engine exhaust from this product contains chemicals known to cause

cancer, birth defects or other reproductive harm. Operate this vehicle only

outdoors or in well-ventilated areas.

FUEL RECOMMENDATION

NOTICE

Prolonged exposure to petroleum based products may damage paint. Always

protect painted surfaces when handling fuel.

NORTH AMERICAN FUEL

For peak performance, POLARIS recommends the use of fresh quality,
non-oxygenated 91 octane level fuel or above. Although 87 octane fuel is
usable, some engine performance will be lost and fuel economy will decrease.
NEVER use unleaded fuels with an ethanol rating of E15 or E85 as severe
engine damage may occur.

The tables below indicate the recommended fuel for your Patriot engine. Use the
indicated fuel setting with your gauge when choosing fuel.

IMPORTANT

NEVER use fuel containing more than 10 percent ethanol, including E85 or 88

E15 fuel, in your snowmobile.

123

OPERATION

650 MODELS

ETHANOL CONTENT

87 (R+M)/2

91 (R+M)/2

Non-Ethanol Fuel

ETHANOL/NON-PRE-

MIUM MODE

PREMIUM MODE

Up to 10% Ethanol

ETHANOL/NON-PRE-

MIUM MODE

ETHANOL/NON-PRE-

MIUM MODE

Shaded cells indicate the optimum fuel recommendation for this engine.

850 MODELS

ETHANOL CONTENT

87 (R+M)/2

91 (R+M)/2

Non-Ethanol Fuel

ETHANOL/NON-PRE-

MIUM MODE

PREMIUM MODE

Up to 10% Ethanol

ETHANOL/NON-PRE-

MIUM MODE

ETHANOL/NON-PRE-

MIUM MODE

Shaded cells indicate the optimum fuel recommendation for this engine.

PATRIOT BOOST AND 9R MODELS

ETHANOL CONTENT

91 (R+M)/2

Non-Ethanol Fuel

PREMIUM MODE

Up to 10% Ethanol

ETHANOL/NON-PREMIUM MODE

Shaded cells indicate the optimum fuel recommendation for this engine.

INTERNATIONAL FUEL

For peak performance, POLARIS recommend the use of 98 octane E0 gasoline
or higher octane. If lower octane is used, some engine performance will be lost
and fuel economy will decrease. Do not use gasoline with higher ethanol rating
than E10.

124

OPERATION

650 MODELS

ETHANOL CONTENT

95 RON

98 RON

Non-Ethanol

ETHANOL/NON-PRE-

MIUM MODE

PREMIUM MODE

1-10% Ethanol or
MTBE

ETHANOL/NON-PRE-

MIUM MODE

ETHANOL/NON-PRE-

MIUM MODE

Shaded cells indicate the optimum fuel recommendation for this engine.

850 MODELS

ETHANOL CONTENT

95 RON

98 RON

Non-Ethanol

ETHANOL/NON-PRE-

MIUM MODE

PREMIUM MODE

1-10% Ethanol or
MTBE

ETHANOL/NON-PRE-

MIUM MODE

ETHANOL/NON-PRE-

MIUM MODE

Shaded cells indicate the optimum fuel recommendation for this engine.

PATRIOT BOOST AND 9R MODELS

ETHANOL CONTENT

98 RON

Non-Ethanol

PREMIUM MODE

1-10% Ethanol or MTBE

ETHANOL/NON-PREMIUM MODE

Shaded cells indicate the optimum fuel recommendation for this engine.

FUEL SYSTEM DEICERS

If you use non-ethanol fuel (sometimes labeled “non-oxygenated”), POLARIS
recommends the regular use of isopropyl-based fuel system deicer. Add 1-2
ounces per gallon (8-16 ml per liter) of gasoline to prevent damage resulting
from fuel system icing. Never use deicers or additives containing methanol.
POLARIS recommends the use of Carbon Clean.

IMPORTANT

If you use fuel with up to 10% ethanol (sometimes labeled “oxygenated”) do

not add deicers or additives that contain any form of alcohol. Adding deicer to

oxygenated fuels could result in severe engine damage.

125

OPERATION

OIL

OIL RECOMMENDATION

IMPORTANT

Some non-recommended two-cycle engine oils, especially those formulated
for warm weather product use, may not provide adequate cold weather pour

point properties. These oils may increase the recoil rope pull effort in cold /

sub-zero temperatures, resulting in excess fuel injection and subsequent plug

fouling.

NEVER mix oil brands or use non-recommended oil. Mixing oil or using

non-recommended oil may result in engine damage.

Oil Recommendation

VES Extreme Highest Performance Full Synthetic 2-Cycle Oil

LOW OIL LEVEL

NOTICE

The oil level indicator lamp will not engage unless engine is fully started.

Always maintain the oil level between
the “add” mark

q

and the bottle neck.

Do not fill the bottle neck.

1. Immediately stop the engine if the

low oil indicator light comes on.

2. Open the left side panel.

3. View the oil level in the oil bottle.

4. Add oil as needed before operating.

NOTICE

Operating the snowmobile without adequate engine lubrication can result in

serious engine damage. Always check the oil level when refueling. Add oil as

needed.

The oil bottle cap is vented to allow proper oil flow. Your authorized POLARIS
dealer can assist with recommended replacement parts.

126

OPERATION

ENGINE STOP SWITCH

Push down on the engine stop
switch

q

to ground out the

ignition and stop the engine
quickly. Pull the switch up to the
ON position to allow restarting.

THROTTLE SAFETY SWITCH

When working properly, the
throttle safety switch is designed
to stop the engine whenever all
pressure is removed from the
throttle lever and the throttle
cable or valves do not return to
the normal closed position. The
throttle lever pin

q

releases

pressure to the safety switch

w

and stops the engine.

WARNING

Operating the snowmobile with a faulty throttle safety switch can result in

serious injury or death in the event of an accident. If the throttle safety switch

does not shut off the engine during a carburetor/throttle system malfunction,

immediately push down the engine stop switch. Do not start the engine again

until the malfunction has been corrected by your authorized POLARIS dealer.

To test the throttle safety switch, do the following:

127

OPERATION

1. Sit on the seat.

2. Start the engine and allow it

to idle.

3. Hold the throttle lever pin

q

stationary by exerting
pressure in the direction
shown in the illustration.

4. Apply a slight amount of

throttle. A properly
functioning switch must shut
down the engine.

THROTTLE LEVER

WARNING

An improperly functioning throttle lever may cause erratic snowmobile behavior

and loss of control, which could result in serious injury or death. If the throttle

lever does not work properly, DO NOT start the engine.

If the engine stops abruptly when the throttle lever is released:

1. Turn the ignition switch to OFF.

2. Visually inspect the throttle cable and carburetor/throttle body to determine

what caused the safety switch to activate.

3. Test the throttle lever by compressing and releasing it several times. The

lever and cable must return to the idle position quickly and completely.

4. If the throttle lever operates properly, turn the ignition switch on and go

through normal starting procedures.

5. If the engine doesn't start, your authorized POLARIS dealer can perform this

service.

Excessive freeplay in the throttle cable may cause the safety switch to activate,
preventing the engine from starting. If this occurs, return the snowmobile to an
authorized POLARIS dealer for service.

If an emergency exists and it's necessary to start the engine, the throttle safety
switch and engine stop switch may be disconnected from the wire harness.
When these switches are disconnected, the ignition key switch must be used to
shut off the engine. DO NOT continue to operate the snowmobile with the throttle
safety switch disconnected. Return the snowmobile to an authorized POLARIS
dealer for service as soon as possible.

128

OPERATION

VEHICLE CONTROL SYSTEM

The vehicle control system on your vehicle helps to limit excessive operational
temperatures of the vehicle brake system. If the brake and throttle system are
operated at the same time and either of the following conditions are triggered,
check the brake system to ensure that there are no obstructions that would
prevent the lever from moving freely and returning to its disengaged position.
The two step warning and performance reduction sequence will engage when
the following conditions are met:

Step One–

• The engine speed is above 4500 RPM
• The brake is engaged
• The throttle is engaged

After 4 consecutive seconds, the power output from the engine will be
decreased. A warning message will also appear on your display. To clear the
display message and regain full power, restart the vehicle.

Step Two–

• The engine speed is above 2500 RPM
• The brake is engaged
• The throttle is engaged

After 15 consecutive seconds, the vehicle will shut down. If shutdown occurs,
check the brake system to ensure the parking brake is not engaged.

POLARIS ELECTRONIC REVERSE CONTROL
(PERC)

WARNING

Improper reverse operation, even at low speeds, may cause loss of control,

resulting in serious injury or death. Damage will occur to the chaincase or

transmission if shifting is attempted when the engine is operating above idle

speed.

• Shift to or from reverse only when the snowmobile is stopped and when

engine speed is at idle.

• Look behind the vehicle before and while backing.
• Avoid sharp turns.
• Apply throttle slowly.

Electronic reverse will activate only if the engine RPM is below 3000.

129

OPERATION

CAUTION

Engaging the starter when the engine is running WILL result in serious engine

damage, especially if the engine is in reverse. Never engage the starter when

the engine is running.

IMPORTANT

If equipped, secure rail scratchers to rail beams so they do not bend when in

reverse.

ENGAGING REVERSE

1. Stop the snowmobile and leave the engine idling.

2. Make sure the area behind your vehicle is clear.

3. Push the yellow button on the left-hand control for one second, then release.

The engine will automatically reduce RPM and start a reverse rotation. A
flashing reverse light on the instrument panel will indicate that the
transmission is in reverse.

4. Apply the throttle slowly to make sure the transmission is in reverse. The

maximum engine RPM will be 5000 when in reverse.

TIP

If the engine stops running, the snowmobile will be in forward gear when it's

restarted.

DISENGAGING REVERSE

1. Stop the snowmobile and leave the engine idling.

CAUTION

Engaging the starter when the engine is running WILL result in serious engine

damage, especially if the engine is in reverse. Never engage the starter when

the engine is running.

2. Push the reverse button for one second and release. The engine will slow

and begin to rotate forward. The light on the instrument panel will shut off.

3. Apply the throttle slowly to make sure the vehicle is in forward.

EMERGENCY STOPPING

The following chart lists methods for stopping the snowmobile in the event of an
emergency.

130

OPERATION

SYSTEM

WHAT IT DOES

Ignition Switch

Interrupts ignition circuit

Brake

Slows jackshaft

Engine Stop Switch

Interrupts ignition circuit

Throttle Safety Switch

Interrupts ignition circuit

Tether Switch

Interrupts ignition circuit

DAILY STORAGE

At the end of each ride, park the snowmobile on a level surface and support it at
the rear with an appropriate track stand. The track should be suspended
approximately 4 inches (10 cm) off the ground.

Remove the key and cover the snowmobile.

131

OPERATION


Content      ..     2      3      4      5     ..