Snowmobile Polaris 650 Pro RMK 155 / 650 RMK Khaos 146 Slash / 850 Pro RMK 155. Owner’s Manual (2024) - page 3
 

  Index      Manuals     Snowmobile Polaris 650 Pro RMK 155 / 650 RMK Khaos 146 Slash / 850 Pro RMK 155. Owner’s Manual (2024)


Search            copyright infringement  


Content      ..     1      2      3      4      ..


Snowmobile Polaris 650 Pro RMK 155 / 650 RMK Khaos 146 Slash / 850 Pro RMK 155. Owner’s Manual (2024) - page 3


CONFIGURE GAUGE SCREEN

The display allows up to four customized gauge screens. All but one screen can
be deleted; one will always remain as the default.

NOTICE

In the gauge configuration panel, display buttons and hand controls will not

work. You must use the touchscreen to change screen settings and layouts.

Follow the instructions below to create customized gauge screens.

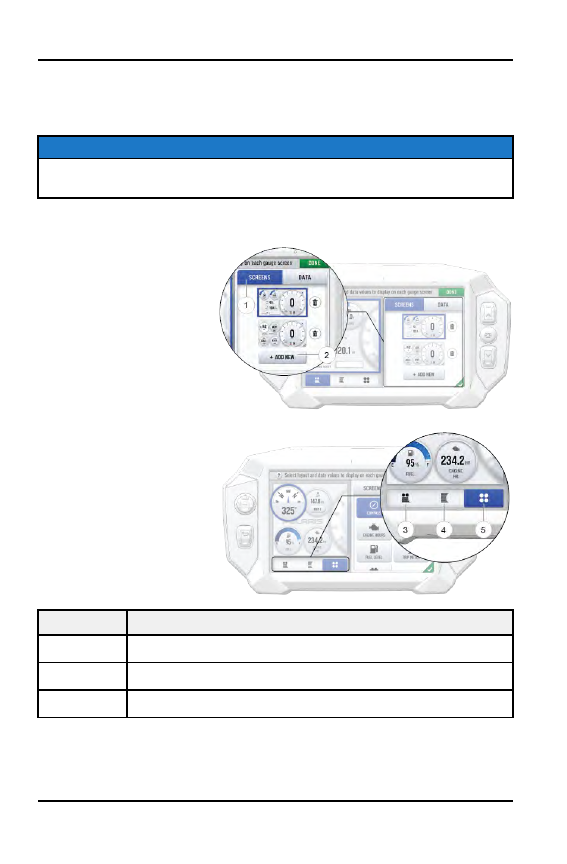
1. Press the

Gear

icon in

the bottom right corner
of the touchscreen.

2. On the right side of the

configuration panel,
press the

Screens

tab

q

followed by the

Add

New

button

w

.

3. In the left side panel,

choose a gauge layout
from the three provided
options.

ICON

DESCRIPTION

e

Two circular widgets and up to three linear widgets.

r

Up to five linear widgets.

t

Four circular widgets.

68
RIDE COMMAND DISPLAY

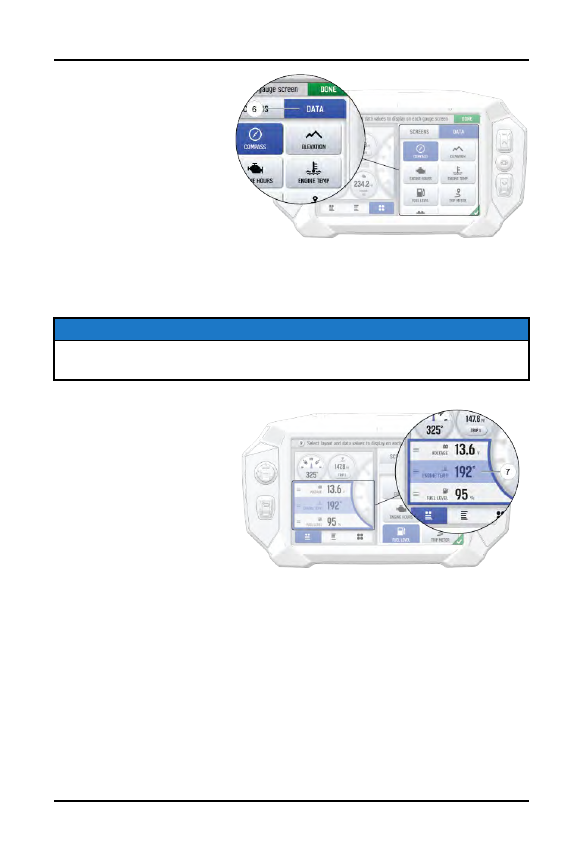
4. Select the

Data

tab

y

.

As the widget slots on
the left are selected,
the selection of what
data item to populate
that widget slot with is
selected on from the list
on the right. For single
value slots, choose 1
data item. For list slots,
choose up to 3 or up to
5 data items,
depending on the
configuration of the
gauge layout as
selected above.

TIP

Keep your display software up-to-date as more widget options become

available. For more information, see page 89.

5. Reorder the widgets by

pressing and holding
down on the widget and
sliding the widget up or
down into the desired
position.

6. Click the green check mark or

Done

to close the configuration panel.

69

RIDE COMMAND DISPLAY

GAUGE VIEW MODE

Press

q

to toggle between the two available gauge view modes, analog and

digital.

70

RIDE COMMAND DISPLAY

ICON BAR

The Icon Bar is located across the top of the touchscreen and displays cell
phone, headset, and wireless internet connectivity, fuel level, compass heading
and local time.

NOTICE

The Icon Bar will not appear when the Badge Panel is open.

ICON

DESCRIPTION

FUNCTION

q

Mobile Device
Indicator

Displays icon if mobile device is connected

w

Headset Indicator

Displays icon if headset is connected

e

Cellular Signal
Strength

Displays current cellular signal strength

r

Wireless Internet
Signal Strength (if
equipped)

Displays current wireless internet signal
strength (if equipped)

t

Engine
Temperature

Displays current engine temperature

y

Fuel Level

Displays current fuel capacity percentage

u

Vehicle Direction

Displays vehicle direction

i

Clock

Displays current time

71

RIDE COMMAND DISPLAY

BADGE PANEL

The Badge Panel provides easy access to frequently used features, basic
display and vehicle controls, and a list of recent notifications.

ACCESSING THE BADGE PANEL

There are two ways to open the Badge Panel, press the

Badge Panel

button

(Polaris Logo)

q

at the top of the touchscreen or the

Polaris Menu

hard button

w

on the right of the display.

72

RIDE COMMAND DISPLAY

FEATURES

NOTICE

PRESS and HOLD the

Polaris Menu

hard button for 2 seconds to disable the

touchscreen.

q

Badge Panel Button

w

Display Brightness

e

Display Mode

r

App Tray

t

Controls Tab

y

Notifications Tab

u

Heated Grips (if equipped)

i

Fuel Type

o

Lock Vehicle Button (activated by

dealer)

a

All Settings Button

APP TRAY

The App Tray provides easy access to key features on the display screen. Tap
on any of the listed icons to navigate to that display screen. For example, tap the

Maps

button to navigate to the Map Screen, or press the

Music

button to

navigate to the Audio Screen.

CONTROLS TAB

Press the

Controls

tab to change display mode, display brightness, activate

heated grips, and change fuel type.

73

RIDE COMMAND DISPLAY

DISPLAY MODE

From the Controls tab, select the

Display Mode

from the available options. The

display mode can be set to Day, Night, or AUTO mode.

Day Mode

Night Mode

DISPLAY BRIGHTNESS

From the Controls tab, select

Display Brightness

by moving the touchscreen

slider to the left or right. Press the AUTO check box to allow the screen to adjust
automatically based on ambient light conditions.

FUEL SETTING

Change the fuel type in the Badge Panel by opening the Controls tab and
pressing the

Fuel Type

button.

You can also navigate to the fuel type selection from the Vehicle Info category by
pressing the

All Settings

button. See page 76 for more information.

There are two fuel options available. Choose the fuel description that best fits
the fuel type in your vehicle’s tank.

91+ E0 Fuel

= 91 PREMIUM MODE

ANY E10 OR UNSURE Fuel

= 87 ETHANOL MODE

NOTICE

If 7S guage is not fully booted before riding, the FUEL MODE will default to

ETHANOL MODE.

For specific fuel recommendations for your vehicle, reference your Owner’s
Manual.

LOCK VEHICLE BUTTON

If your vehicle is equipped with a pin activated security system (P.A.S.S.), the

Lock Vehicle

button will appear on the Badge Panel. Press this button to lock

the vehicle before powering off the engine. To unlock your vehicle, you will be
prompted to enter a preset passcode. To set up P.A.S.S., see page 79.

74

RIDE COMMAND DISPLAY

NOTICE

The P.A.S.S. feature must be activated by your authorized POLARIS dealer

using Polaris Digital Wrench. See authorized POLARIS dealer for setup and

activation.

NOTIFICATIONS TAB

Press the

Notifications

tab to view DTC codes, installed software, and vehicle

warnings.

ENGINE OVERHEAT INDICATOR

If the engine goes over temperature, a red banner will appear at the top of your
display stating: ENGINE OVERHEATING – STOP IMMEDIATELY.

The appearance of this banner indicates continued operation of your
snowmobile could result in serious engine damage. The engine management
system will automatically reduce engine power and set a fault. Stop the engine
immediately. Allow the engine to cool down.

NOTICE

If engine overheating seems to be caused by something other than poor

cooling conditions, see your authorized POLARIS dealer or other qualified

technician for service.

75

RIDE COMMAND DISPLAY

WARNING FEATURES

Safety and proper vehicle usage are key to having your snowmobiles run for
many years to come. The following safety and ownership tools have been added
through the 7S display.

ENGINE BREAK-IN PERIOD

The display provides a status of how far along you are in your engine break-in
process. To view the status, navigate to All Settings and then Info. – The display
provides a warning if you accelerate for a period of time with the parking brake
set on the vehicle

PARK BRAKE WARNING

The display provides a warning if you accelerate for a period of time with the
parking brake set on the vehicle.

TIP-OVER WARNING

The display provides a warning when a vehicle tip-over event is detected and
provides an alert indicating a delayed vehicle start.

ALL SETTINGS

From All Settings, you can view important details about your vehicle and
personalize your touchscreen display. The settings menu is comprised of four
categories: Vehicle Info, General, Time, and Vehicle Settings.

To open Settings, press the

Badge Panel

button on the

display and then the

All

Settings

button

q

from

the touchscreen.

INFORMATION

From the Info tab you can view the following:

76

RIDE COMMAND DISPLAY

• Vehicle Identification

Number (VIN)

• Model Number
• Installed Software

Version

• Mileage
• Total Engine Hours
• Next Service Interval

GENERAL

From the General tab you can do the following:

• Connect to Ride

Command account

• Manage wireless

internet connections (if
equipped)

• Manage Bluetooth®

devices

• Change the display

language

• Set the speed units of

measure (mph or km/h)

• Set the temperature

units (F or C)

• System information
• Update software
• Update maps and trails

TIME

From the Time tab you can do the following:

77

RIDE COMMAND DISPLAY

• Set time from internal

GPS location

• Set time zone
• Set time (if GPS time is

not enabled)

• Set date
• Enable GPS Time

(automatically sets the
time to the time zone
you are currently in)

• Set the time format

(12-hour or 24-hour)

78

RIDE COMMAND DISPLAY

VEHICLE

From the Vehicle tab you can do the following:

• Access vehicle

diagnostics

• GPS Status
• Set fuel type
• Customize heated grip

temperatures

PIN ACTIVATED SECURITY SYSTEM (P.A.S.S.)
(IF EQUIPPED)

NOTICE

The P.A.S.S. feature must be activated by your authorized POLARIS dealer

using Polaris Digital Wrench. See your authorized POLARIS dealer for setup

and activation.

Snowmobiles equipped with a 7S display have the ability to lock the snowmobile
into a low power mode until a security passcode is entered. Locking the
snowmobile using the Lock Vehicle button will limit the vehicle’s RPM so the
vehicle will remain motionless.

NOTICE

The vehicle can be locked only when the engine is running and the vehicle is

not in motion. If the engine is OFF, the Lock Vehicle button will be disabled.

CHANGING YOUR PASSCODE

The default passcode is available at the time of vehicle purchase. Changing the
passcode will always require the old passcode. To change the security
passcode, do the following:

1. Go the Settings menu by pressing the

Badge Panel

button followed by the

All Settings

button.

2. Select

Vehicle Settings

from the left toolbar.

3. Select

Change Passcode

.

4. Enter the existing/old passcode.

79

RIDE COMMAND DISPLAY

5. Enter the new passcode.

6. Enter the new passcode again.

7. A popup box should appear confirming your passcode has changed.

ENABLE P.A.S.S.

NOTICE

After activating P.A.S.S. for the first time you must power down the vehicle and

allow the electronic control module (ECM) to fully shutdown before restarting.

This may take up to three minutes.

1. Go the Settings menu by pressing the

Badge Panel

button followed by the

All Settings

button.

2. Select

Vehicle Settings

from the left toolbar.

3. Select

Passcode Unlock

.

4. Turn off the vehicle using the key ignition switch.

DISABLE P.A.S.S.

1. Go the Settings menu by pressing the

Badge Panel

button followed by the

All Settings

button.

2. Select

Vehicle Settings

from the left toolbar.

3. Select

Passcode Unlock

.

4. Enter passcode code to disable P.A.S.S.

LOCKING YOUR SNOWMOBILE

To lock your vehicle, do the following:

1. Stop vehicle completely. Keep the engine running.

2. Press the

Badge Panel

button to open the Badge Panel.

3. Press the Lock Vehicle button.

4. Enter your 4-digit passcode.

UNLOCKING YOUR SNOWMOBILE

To unlock your vehicle, do the following:

80

RIDE COMMAND DISPLAY

1. Start the engine.

2. A banner will appear that top of the display screen prompting you to enter

your passcode. Click on the ribbon or the

Unlock Vehicle

button from the

Badge Panel.

3. Enter your 4-digit passcode.

AUDIO SCREEN

NOTICE

Your snowmobile is not equipped with a speaker system. Audio can only be

transmitted through a Bluetooth® media device or headset. Only one device

and one headset can be connected at a time.

Audio playback through
USB or Bluetooth®
devices are compatible
with your Ride Command
display. The Music Screen
allows you to access music
stored on your smartphone
or other music device. You
can pair your device using
Bluetooth®, or by
connecting it to the
display’s USB port.

DEVICE REQUIREMENTS

Audio playback is only available on USB flash drives formatted to ex-FAT® or
FAT32 and operating systems iOS® 10 and Android® 5.0 or newer.

PHONE SCREEN

Connect a smart phone and headset to listen to audio, make and receive calls
and text messages, access a phone’s contact list, and call history.

When a smartphone is
connected to the display,
users are able to make
phone calls from the
display through the
keypad, recent calls, or
their contacts by pressing
the phone icon in the
device manager screen or
through the pull down
menu.

81

RIDE COMMAND DISPLAY

The Ride Command display is compatible with Android® and iOS®. Go to

https://ridecommand.polaris.com/en-us/supported-devices

for latest operating

system compatibility.

NOTICE

There is no built-in microphone in the display. Phone call audio will play

through the phone speakers or a Polaris approved headset if connected. Some

dial options may be unavailable at speeds greater than 3 mph (5 km/h).

MAP SCREEN

Press the

Map

button from

the App Tray in the Badge
Panel or press the

Back

button to cycle to the map
screen. The map will
center you based on the
location of the in-vehicle
GPS.

NOTICE

Controls on the map surface disappear after 10 seconds of inactivity, return

with a tap anywhere on the map.

82

RIDE COMMAND DISPLAY

ZOOM

Use the

Plus

and

Minus

buttons

q

on the left side of the screen, the 5–way

user interface (UI) control, or pinch the screen with your fingers to zoom in and
out on the map.

The waypoint icon appears when navigation is in use and the GPS is routed to a
specific waypoint. Press the

Waypoint

icon

w

to focus on the destination point.

To set the focus back to your location, press the

Target

icon in the bottom right

corner of the screen.

• Pinch zoom
• Plus / Minus button
• Auto-zoom to way-point while navigating
• Current zoom level relative to maximum and minimum zoom

MAP ORIENTATION

The compass icon on the
right side of the screen
toggles how the map
orients itself during
navigation. There are two
orientation options: North
Up and Course Up.
Pressing the

Compass

icon will also re-center your
vehicle if not already
centered.

83

RIDE COMMAND DISPLAY

MAP ORIENTATION

MAP ICON

North Up view locks the maps orientation so that
North is always at the top of the screen, regardless
of your vehicle’s position or direction.

Course Up view rotates the map to match the
direction of your vehicle.

POINTS OF INTEREST (POI)

Points of interest (POI), such as restaurants, gas stations, hotels, dealers, and
more, are available from the map screen. POI will display on the Map Screen as
you zoom in and out of the map. Tap on the

POI

icon to view more information

about the location.

GO TO NAV

Go to Nav is available from the Map Screen when viewing a waypoint or point of
interest (POI). Pressing

Go to Nav

will display the distance and directional

bearing of the POI.

NOTICE

Go to Nav does not provide turn-by-turn directions to a POI.

SNAP TO TRAIL

Easily plan rides on your Ride Command mobile app (iOS®/Android®) and on
the Ride Command website. Select your start point, end point, and any stops in
between and the tool will automatically snap your route to the optimal route on
trails or your previously tracked or planned rides. The tool also allows you to
easily adjust and reorder stops.

84

RIDE COMMAND DISPLAY

GROUP RIDE (WHERE AUTHORIZED)

Invite your friends to a group to see their live location on the map of your
smartphone, tablet, or in-vehicle Ride Command display.

For information on how
Group Ride works and for
instructions on how to set
up Group Ride using your
smartphone, or with a
vehicle-to-vehicle (V2V)
antenna, tap the

i

icon

q

beside the title from the
Group Ride Panel.

For a video on setting up a Group Ride, please visit:

https://www.youtube.

com/watch?v=ZCWIOXLGYUY

85

RIDE COMMAND DISPLAY

CREATING A RIDE GROUP

To create a Ride Group, do the following:

1. From the Map Menu, tap the

Map Menu

icon at the bottom of the screen and

select the

Group Ride

button.

2. On the Group Ride Panel, tap the

New Group

button

w

to create a group for

others to join.

3. Enter a name in the

Group Name

field.

4. Select whether to enable a passcode. When enabled, you will be prompted

to enter a 4–digit passcode.

NOTICE

If

Passcode Required

is left unselected, any rider can freely join your Ride

Group.

5. Select the

Create Group

button.

Your newly created group is now shown. If your ride group has the passcode
enabled, other riders must enter your chosen passcode to join the group. .

NOTICE

After a second rider joins, the map will switch to zoom-to-group and as you ride

it will automatically zoom to keep all riders in view. Tap the zoom control to

return to manual zoom mode.

86

RIDE COMMAND DISPLAY

JOINING A RIDE GROUP

NOTICE

The display requires a GPS lock, indicated by a blue a navigation arrow

marker, before you are able to setup or join a group ride.

To join a group, do the following:

1. From the Map Menu,

tap the

Map Menu

icon

at the bottom of the
screen and select the

Group Ride

button.

2. Nearby ride groups will

display in order of
distance.

3. Tap the

Join

button

e

to join a group.

NOTICE

You can only be active in one ride group at a time.

Close the pop-up to show the map view of your chosen ride group. Other riders
appear as dots on the map. If a rider is moving, the dot includes a heading arrow
pointing in the direction they are riding. The Ride Group Panel on the side of the
screen shows the name of the group and lists all group members with their
name, icon color, distance and bearing from you to that rider.

NOTICE

The map is set to zoom-to-group and as you ride it will automatically zoom to

keep all riders in view. Tap the zoom control to return to manual zoom mode.

DISPLAY MAINTENANCE

CARE AND MAINTENANCE

To clean the display shell, use a soft cloth with mild soap and water. Do not use
harsh or abrasive cleaners. For best results, use a micro-fiber towel to clean the
screen.

87

RIDE COMMAND DISPLAY

NOTICE

Certain products will damage the screen and other plastic surfaces. Do not use

alcohol to clean the display. Immediately clean off any gasoline that splashes

on the display.

CREATE ACCOUNT

You can create a personalized Ride Command account either by computer at

https://ridecommand.polaris.com

or in the Polaris Ride Command app, which

can be downloaded to your personal device through your phone’s application
store.

ON YOUR COMPUTER

Create Account

1. Open your preferred internet browser and navigate to

https://ridecommand.

polaris.com

.

2. From the top menu bar, click

Create Account

.

3. In the pop-up, type your email address and password.

4. Accept the Terms of Service agreement.

5. You should receive a confirmation email from Polaris within 24 hours of

creation.

Add Your Vehicle

6. After signing into your Ride Command account, click on

Garage

from the top

menu bar.

7. Press the

+

button to add vehicle.

8. Type in your vehicle’s VIN number.

9. Add a vehicle nickname, such as “My Snowmobile”.

10. Press the

Add My Vehicle

button.

ON YOUR DEVICE

Create Account

1. Download and install the Polaris Ride Command app from your phone’s

application store.

2. You may receive a prompt that “Ride Command” wants to access to location

information. Click

Continue

.

3. Tap the menu button and select

Log In or Sign Up

from the dropdown

menu.

88

RIDE COMMAND DISPLAY

4. Select the

Sign Up

tab.

5. Type your email address and password.

6. Accept the Terms of Service agreement.

7. You should receive a confirmation email from Polaris within 24 hours of

creation.

Add Your Vehicle

8. Press the

More

button on the home screen.

9. Select

Garage

from the options menu.

10. Press the

+

button.

11. Connect your phone to your vehicle via Bluetooth

®

or press the

Enter Your

VIN

button.

12. Add a vehicle nickname, such as “My Snowmobile”. This is optional.

13. Type in your vehicle’s VIN number.

14. Press

Next

from the top ribbon.

SOFTWARE & MAP UPDATES

OVER-THE-AIR (IF EQUIPPED)

Displays equipped with Wi-Fi connectivity will check for updates automatically
once the display is successfully connected to a network. When a software
update is available, a notification will be shown on the display. The notification
will prompt you to download and install the update.

USB DRIVE

NOTICE

Before updating the display, always export your existing rides and waypoints to

a secondary USB drive to avoid losing them. Do not save them to the same

USB used for installing the software update. You must use an empty USB drive

for all software and map updates.

To update the display software, complete the following steps:

ON YOUR PERSONAL COMPUTER

NOTICE

For optimal download speed and connection stability, it is recommended to

have a wired internet connection to your personal computer while downloading

updates to your USB flash drive.

89

RIDE COMMAND DISPLAY

1. Go to

ridecommand.polaris.com

.

2. Log in to your account, or create a new account.

3. Click

Garage

on the menu bar and select

Map & Software Updates

from

the menu.

4. From the list of displays, click

7” Snow (7S)

from the list.

5. Follow the on-screen direction on how to download the latest software or

map to a USB flash drive (8+ GB).

ON YOUR SNOWMOBILE

NOTICE

The USB port is located in the storage compartment behind the display.

1. Plug the USB drive into your vehicle's USB port and turn on the display.

2. On the Ride Command display, press the

Badge Panel

button at the top of

the screen, followed by

All Settings

.

3. Select

General

from the tabs on the left, and scroll down to

Update

Software

or

Update Maps / Trails

.

4. Select the file you wish to load (the latest will be automatically displayed next

to the newest version detected on the USB drive for software updates).

5. The display will reboot and install the software or map updates.

6. After your display has restarted and you’ve determined the update to be

successful, power down your vehicle before disconnecting your USB flash
drive from the vehicle.

ERROR MESSAGES

If an error occurs while updating your software or map, perform one or all of the
following measures to resolve the issue:

1. Ensure you are using a Tier 1 USB flash drive. For more information on USB

requirements, see page 91.

2. Remove and reconnect the USB flash drive securely.

3. Ensure display files are not inside a folder on the flash drive.

4. Only Polaris display files should be on the flash drive while performing

updates. Remove other files, if necessary.

5. Format the USB drive on your personal computer using FAT32 or exFAT

®

formatting systems.

6. Try a different USB flash drive.

90

RIDE COMMAND DISPLAY

USB HARDWARE

SOFTWARE UPDATES

For software update, POLARIS recommends using a SanDisk

®

or similar USB

flash drive with a minimum of 1GB or larger in available memory, formatted
using exFAT

®

file system. For best results remove all files from the flash drive

before starting the update process.

MAP, TRAIL AND POINTS OF INTEREST UPDATES

For Map, Trail and Point of Interest updates, a 64GB or larger USB drive is
required (USB 3.0 drive is highly recommended). USB drive must be formatted
to exFAT

®

before copying files onto it.

91

RIDE COMMAND DISPLAY

92

THE PERFECT FIT

SUSPENSION QUICK SET-UP GUIDE

WARNING

Suspension systems contain moving components that can crush or cut. Keep

hands clear of the suspension while the engine is running, someone is sitting

on the seat, or the suspension is in motion. NEVER adjust the suspension

while vehicle is in operation.

The front and rear suspensions on your MATRYX RMK snowmobile are easy to
adjust. Just remember three simple steps:

1. Ride your snowmobile.

2. Adjust the

rear track shock spring

to tune

vehicle balance

(ski pressure and

weight transfer).

3. Adjust

shock clickers

(if equipped) to tune

ride quality

(stiffer or softer ride).

Step 1: Ride your snowmobile.

Ride the snowmobile in various terrain to fully experience the existing
suspension settings before making any adjustments.

Step 2: Adjust the rear spring to tune vehicle balance.

After riding, you should be able to determine if the snowmobile needs more or
less transfer.

• For more transfer,

decrease

the rear track spring preload.

• For less transfer,

increase

the rear track spring preload.

For lighter steering, decrease the rear track spring preload or increase the front
track shock spring preload.

Step 3: Adjust shock clickers (if equipped) for ride quality.

For models equipped with monotube shocks, always adjust the rear track shock
spring preload to enhance bottoming resistance.

Walker Evans Racing® Velocity shocks come equipped with an inside clicker
(low-speed) and an outside clicker (high-speed). These clickers adjust shock
compression for high- and low-speed trail events. Adjust the clickers to control
bottoming and adjust ride comfort.

93

THE PERFECT FIT

• Turn clicker counter-clockwise to decrease damping for a softer ride.
• Turn clicker clockwise to increase damping for a stiffer ride and less

bottoming.

• Always adjust the low-speed adjustment control first. If desired ride is not

achieved, adjust the high-speed adjustment control to improve ride.

NOTICE

Always adjust the clicker at least one click below full stiff (full clockwise) or

shock damage will occur.

Test ride the snowmobile and continue making spring and clicker adjustments
until you achieve the perfect ride.

SHOCK LOCATIONS

q

Front (IFS) shocks

w

Front track shock

e

Rear track shock

94

THE PERFECT FIT

SHOCK COMPRESSION DAMPING

Shock compression damping is available for RMK KHAOS, and optional for
PRO-RMK.

The primary adjustment for overall vehicle balance is RTS spring preload.
Always perform the this adjustment first. After adjusting RTS spring preload to
your satisfaction, compression damping adjustments can be made to control
ride quality and bottoming resistance.

Compression damping can be adjusted on both the front and rear suspension.
Make adjustments in 2-click increments, then test ride. When adjusting the front
suspension, always adjust both clickers equally.

To stop bottoming

of the front or rear suspension (stiffer ride), rotate the clicker

(s) clockwise two clicks (as viewed from the top of the clicker), then test ride.
Repeat the adjustment until bottoming stops and the desired ride quality is
achieved.

For a more plush ride

at the front or rear suspension, rotate the clicker(s)

counter-clockwise two clicks, then test ride. Repeat the adjustment until the
desired ride quality is achieved.

INDEPENDENT FRONT SUSPENSION (IFS)

IFS SHOCK ADJUSTMENTS

Always perform shock spring preload adjustments with the weight of the vehicle
removed from the shock and with the shock at full extension.

FACTORY PRELOAD SETTINGS

IMPORTANT

The factory installed length of the IFS Shock Spring is equal to the maximum

installed free length.

MONOTUBE

VELOCITY

95

THE PERFECT FIT

FACTORY SPRING

FACTORY

INSTALLED LENGTH

MINIMUM INSTALLED

LENGTH

PRO RMK Monotube

10.25 in (26 cm)

9.5 in (24.13 cm)

PRO RMK (Velocity)

10.25 in (26 cm)

10 in (25.4 cm)

RMK KHAOS
Lightweight Spring

10.34 in (26.26 cm)

10 in (25.4 cm)

RMK KHAOS Standard
Spring

10.25 in (26 cm)

9.78 in (24.8 cm)

FACTORY CLICKER SETTINGS (IF EQUIPPED)

RMK KHAOS models come factory-equipped with Walker Evans Racing®
Velocity shocks. Velocity shocks utilize dual shock clickers to control bottoming
and ride comfort. To reset IFS clickers, rotate the clicker to full stiff, and then
back off the same number of clicks for each shock. PRO RMK models equipped
with Velocity shocks do not have dual shock clickers.

NOTICE

Speed refers to the rate of shock compression, not speed of vehicle.

The outside clicker

q

adjusts shock compression during high speed

compression events.

Turn clicker clockwise to increase compression and

counterclockwise to decrease compression.

The inside clicker

w

adjusts shock compression during low speed

compression events.

Turn clicker clockwise to increase compression and

counterclockwise to decrease compression.

RMK KHAOS

PRO RMK

96

THE PERFECT FIT

MODEL

CLICKER SETTING

(FROM FULL STIFF)

PRO RMK (Velocity)

6

RMK KHAOS

High-Speed: 4

Low-Speed: 6

REAR SUSPENSION

FRONT TRACK SHOCK SETTINGS

Factory settings, combined with user adjustments to the rear track shock spring
(RTSS), should be all that’s necessary to provide the best riding experience for
most riders. The primary adjustment for overall vehicle balance is RTSS
preload. Perform this adjustment first.
For models equipped with high/low speed compression adjustment, see page
99.

FACTORY SPRING SETTINGS

Always perform shock spring preload adjustments with the weight of the vehicle
removed from the shock and with the shock at full extension. Limiter straps
should be disconnected in order to obtain an accurate preload measurement.

MONOTUBE

VELOCITY

NOTICE

Never adjust spring preload to an installed length longer than the factory length

or shorter than the minimum length as shown in the following chart. Damage to

the suspension could result. When decreasing preload, make sure at least two

turns of preload are holding the retainer against the spring.

97

THE PERFECT FIT

FACTORY SPRING

FACTORY INSTALLED

LENGTH

MINIMUM INSTALLED

LENGTH

PRO RMK

8.5 in (21.59 cm)

8.5 in (21.59 cm)

RMK KHAOS

6.45 in (16.38 cm)

6.1 in (15.49 cm)

PRO RMK (Velocity)

6.34 in (16.1 cm)

5.84 in (14.83 cm)

CLICKER SETTINGS (IF EQUIPPED)

RMK KHAOS models come factory-equipped with Walker Evans Racing®
Velocity shocks. Velocity shocks utilize dual shock clickers to control bottoming
and ride comfort. To reset front track shock clickers, rotate the clicker to full stiff,
and then back off the same number of clicks for each shock. PRO RMK models
equipped with Velocity shocks do not have dual shock clickers.

NOTICE

Speed refers to the rate of shock compression, not speed of vehicle.

The outside clicker

q

adjusts shock compression during high speed

compression events.

Turn clicker clockwise to increase compression and

counterclockwise to decrease compression.

The inside clicker

w

adjusts shock compression during low speed

compression events.

Turn clicker clockwise to increase compression and

counterclockwise to decrease compression.

RMK KHAOS

PRO RMK

98

THE PERFECT FIT

MODEL

CLICKER SETTING

(FROM FULL STIFF)

PRO RMK (Velocity)

6

RMK KHAOS

High-Speed: 4

Low-Speed: 6

REAR TRACK SHOCK SETTINGS

For riders who weigh 160-220 lbs. (73-100 kg), test ride at factory settings, then
make fine-tuning adjustments

. See the following initial RTS Shock Preload

Settings table.

For riders outside the 160-220 lbs. (73-100 kg) weight range, adjust the
factory-set preload to the following installed lengths as a starting point, then test
ride before making fine-tuning adjustments. Do not exceed the minimum and
maximum installed length requirements. See the following initial RTS Shock
Preload Settings table.

Always perform shock spring preload adjustments with the weight of the vehicle
removed from the shock and with the shock at full extension. If adjustments to
the factory-installed springs are not sufficient for riders over 300 lbs. (136 kg),
optional stiffer springs are available. Your authorized POLARIS dealer can
assist.

NOTICE

Do not install accessory bogie wheels on the inside of the rail beams if your

model is equipped with a remote reservoir rear track shock or damage will

occur. The rail scratchers must first be removed as they interfere with the

accessory bogie wheels.

FACTORY SPRING SETTINGS

Always perform shock spring preload adjustments with the weight of the vehicle
removed from the shock and with the shock at full extension.

MONOTUBE

VELOCITY

99

THE PERFECT FIT


Content      ..     1      2      3      4      ..