Emergency War Surgery (2004) - page 9
Extremity Fractures
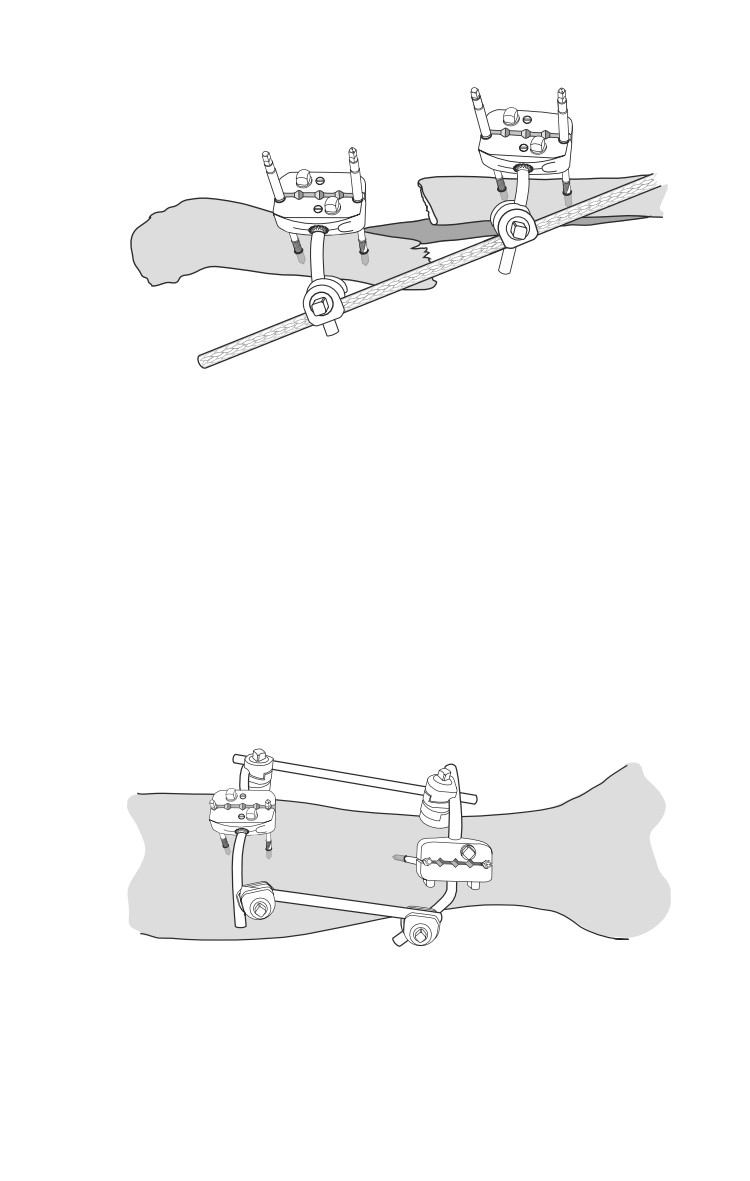
Fig. 23-22. Addition of the cross bar and two bar-to-bar clamps.
Have your assistant apply longitudinal traction to reduce the frame,
and then tighten the frame in alignment.
Technique to span knee.
ο Indications are proximal tibia fractures, distal femur
fractures, or extensive knee injuries, or vascular repairs in
the popliteal fossa.
Fig. 23-23. Two-bar apparatus. As the majority of tibia fractures are
unstable, it creates a more stable construct by adding a second bar.
This requires the use of two of the kits but makes little difference when
you are using the tub container at the CSH or equivalent hospitals.
23.17
Emergency War Surgery
ο
Check the distal vascular status of the limb prior to and
after the procedure. If there is a vascular injury, refer to
Chapter 27, Vascular Injuries.
ο
An assistant will be required to help apply the frame.
ο
General reduction maneuver should be longitudinal
traction with slight (10°-15°) flexion at the knee.
ο
Pins are placed anterior medial on the proximal tibia and
antero-lateral on the distal femur. Pin placement should
be outside of the zone of injury, at least three fingerbreadths
from a fracture site, and outside of the knee joint. At the
distal femur, a longitudinal stab incision is made over the
antero-lateral aspect of the bone, so that the pin may be
inserted into the center of the bone at about a 45° angle
from the horizontal. Depending on the fracture config-
uration, it may also be placed directly anteriorly, though
it is generally better to avoid the quadriceps tendon.
ο
Blunt dissection is used to create a corridor to the bone.
ο
A single pin is inserted by hand through both cortices of
the bone fragment.
ο
A multipin clamp is used as a guide for a second pin. The
second pin must be parallel to the first and also bicortical
— care should be taken to maintain pin alignment. The
proximal tibia should be palpated on the anterior medial
surface and the anterior and posterior border should be
identified. Midway anterior/posterior, a 1-cm longitudinal
stab incision should be made and a blunt soft tissue
dissection made to bone.
ο
A multipin clamp should be used as a guide to insert a
second pin in the proximal tibia.
ο
The two pin clusters (femur and tibia) should be connected
via two elbows, two bar-bar clamps, and a single bar. The
knee should be aligned.
ο
A second bar should be added in the manner described
above.
Technique to span ankle.
ο An assistant will be required to help apply the frame and
reduce the ankle.
23.18
Extremity Fractures
ο
General indications are for open distal tibia fractures and
open ankle wounds.
ο
Pins should be inserted on the anterior medial surface of
the tibia and the medial aspect of the calcaneus.
ο
Check the distal vascular status prior to and after the
procedure. Mark where the posterior tibial and dorsalis
pedis artery pulses can be felt.
ο
Palpate the anterior medial border of the tibia. Make a 1-
cm longitudinal incision midway between the anterior and
posterior border of the tibia. Insert the most distal pin on
the tibia outside the zone of injury, at least three
fingerbreadths from the fracture site.
ο
Using a multipin clamp as a guide, insert a second pin in
the tibia more proximal to the first. The pin must be parallel
and be aligned in the longitudinal axis to the first.
ο
Palpate the medial border of the calcaneus. Make a
longitudinal incision over the calcaneus away from the
posterior neurovascular structures: dissect to the bone
with a clamp and insert the pin.
ο
Using a multipin clamp as a guide, insert a second pin in
the calcaneus.
ο
Connect the two clamps via two elbows, two bar-bar
clamps, and a single bar.
Skeletal traction.
ο Skeletal traction provides a quick means to immobilize a
large number of fracture cases with a minimum of technical
support.
ο Indications.
♦ Patients who are expected to have more than one
procedure in the same forward hospital prior to
evacuation.
♦ Large casualty load.
ο Technique.
♦ Large threaded Steinman pins are used to obtain skeletal
traction of a femur or tibia.
♦ Aseptic preparation of a pin site is necessary prior to
placement.
♦ Apply local anesthetic to pin site.
23.19
Emergency War Surgery
♦ Incise skin and dissect to bone bluntly.
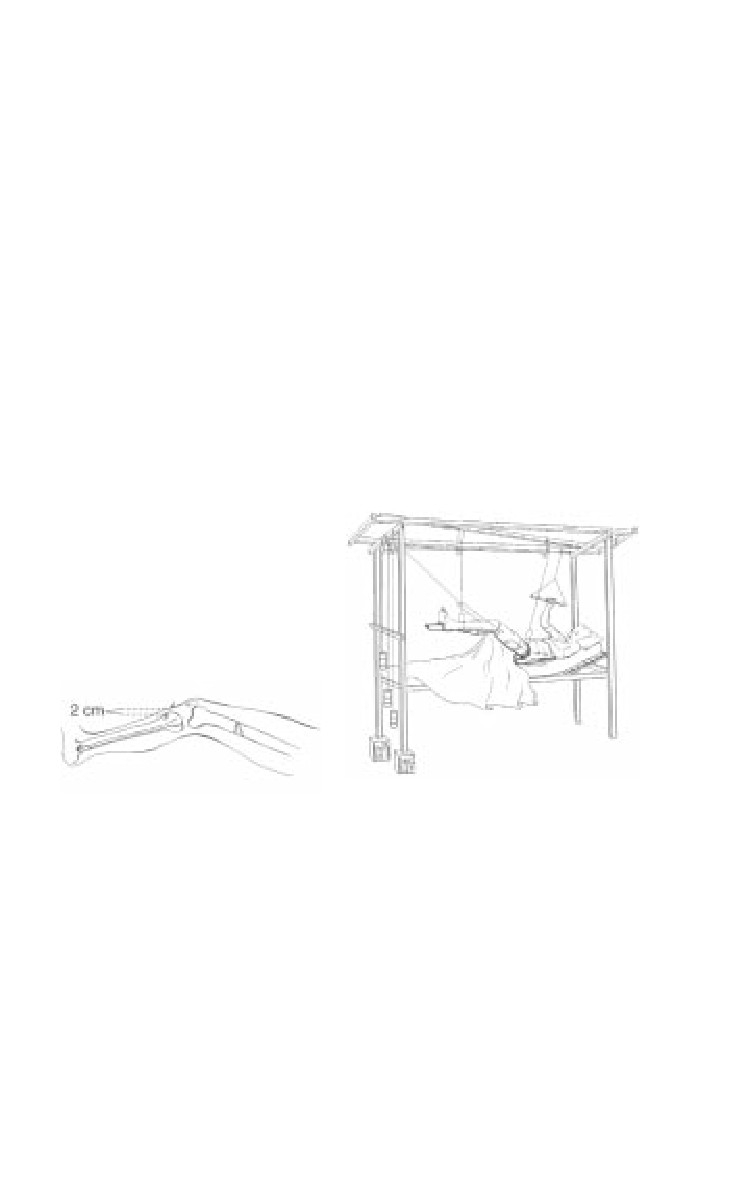
♦ For femur fractures, incision is made 2 cm posterior and
lateral to the tibial tuberosity (directly under, as in Fig.
23-24). Place pin from lateral to medial through and
through the proximal tibia.
♦ Apply a Thomas splint with Pierson device, with weight
applied midthigh (10-20 lb), to the leg (10-20 lb), and
to the traction pin (20-40 lb) to obtain balanced skeletal
traction as shown in Fig. 23-25.
♦ For tibia fractures, incise medially 2 cm anterior and 2
cm cephalad from the tip of the heel. Place the pin from
medial to lateral through and through the calcaneus.
Place the leg on a Bohler-Braun frame and apply traction
to the calcaneal pin (10-20 lb).
♦ Wait at least 1/2 hour after applying traction to obtain
radiographs.
Care in the evacuation
chain.
ο Patients do not
improve in the
evacuation system.
Fig. 23-24. Thomas splint with Fig. 23-25. Bohler-Braun frame with
Pierson device.
traction.
Consider patient safety during evacuation when planning
procedures.
ο Medications should be arranged prior to departure. Ensure
adequate pain control.
ο Skeletal traction should not be used for transportation.
23.20
Extremity Fractures
ο Casts should be bivalved. Follow neurovascular status
during transport because casts may act as tourniquets due
to tissue swelling.
ο All documentation, including radiographs, should
accompany the patient.
23.21
Chapter 24
Open-Joint Injuries
Introduction
Open injuries to the joints are rarely immediately life
threatening. They are frequently quite dramatic in appearance
and draw the inexperienced caregiver’s attention away from
the truly life threatening, associated injuries. Neurovascular
structures are in close proximity to the major joints, and may
require vascular management and repair. Open joints have
long-term morbidity and some secondary mortality from
infection due to missed injury or inadequate treatment.
All open-joint injuries must be explored and treated
within 6 hours to prevent infection and joint destruction.
With rare exceptions, closed-joint injuries should be treated
nonoperatively in the combat zone. Definitive intervention and
rehabilitation usually require months before complete recovery.
Thus, patients with closed injuries to major joints should be
evacuated from the theater for definitive surgical intervention
and rehabilitation.
The key to treating open-joint injures is recognition.
Once identified, goals are prevention of infection and
preservation/restoration of normal joint function.
Signs of possible open-joint injury are a wound associated
with the following:
ο Proximity to a joint.
ο Periarticular fracture.
ο Exposed joint.
ο Effusion.
24.1
Emergency War Surgery
ο Loss of joint motion.
ο Intra-articular air or foreign body on biplanar radiographs.
ο Abnormal joint aspiration demonstrating hemarthrosis.
ο Extravasation from joint on diagnostic injection.
Open-joint injuries always require surgery. Joint
aspiration/injection may be performed to confirm a
suspected open joint. If in doubt, treat as an open-joint
injury to prevent missed injury sequelae.
The technique for aspiration/injection involves:
ο Sterile prep.
ο 18-gauge needle, 30-cc syringe.
ο Enter suspected joint, avoiding neurovascular structures.
ο Attempt aspiration — if blood is aspirated a hemarthrosis
is present.
ο If no hemarthrosis, inject with normal saline (methylene
blue if available) until joint is fully distended — the joint
is damaged if extravasation is detected.
ο If there is no extravasation, open joint injury may still be
present.
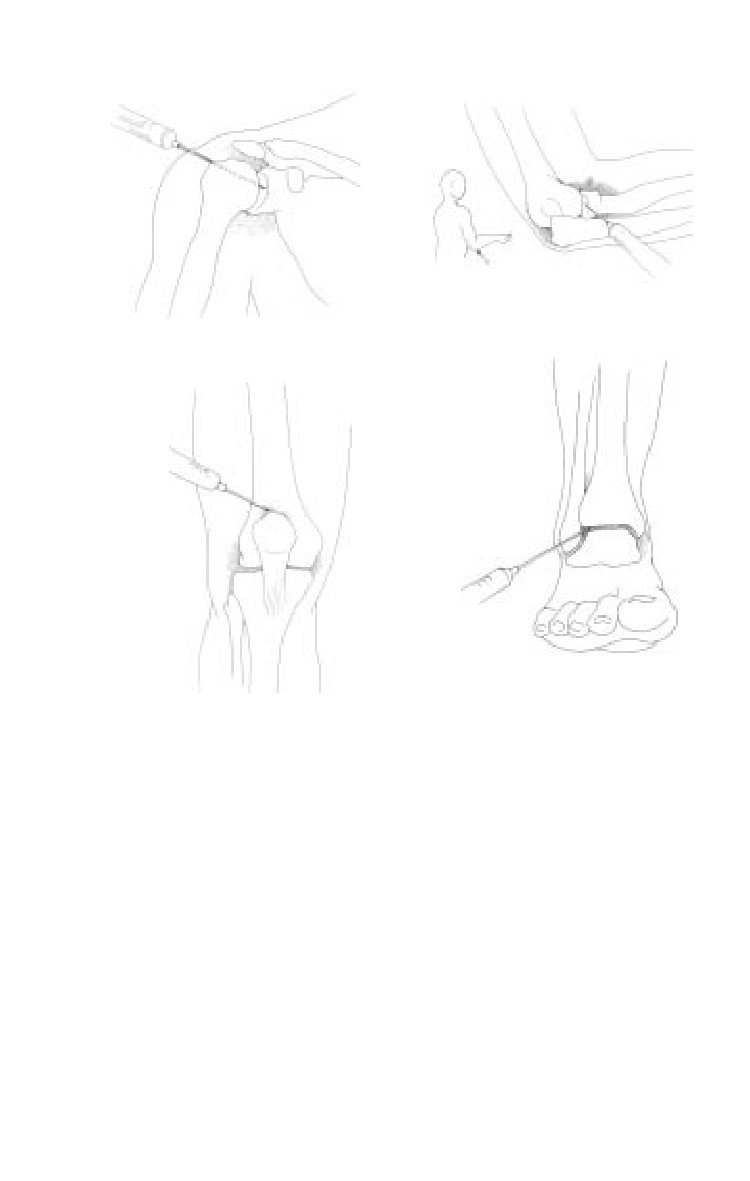
Approaches for aspiration are shown for the shoulder, elbow
(Lateral), knee (Medial parapatellar), and ankle (Antero-
lateral) (Fig. 24-1a,b,c,d).
Treatment of All Open-Joint Injury
IV antibiotics should be started ASAP after wounding, and
continued postop for 48 hours.
Tourniquet control of operative bleeding is essential.
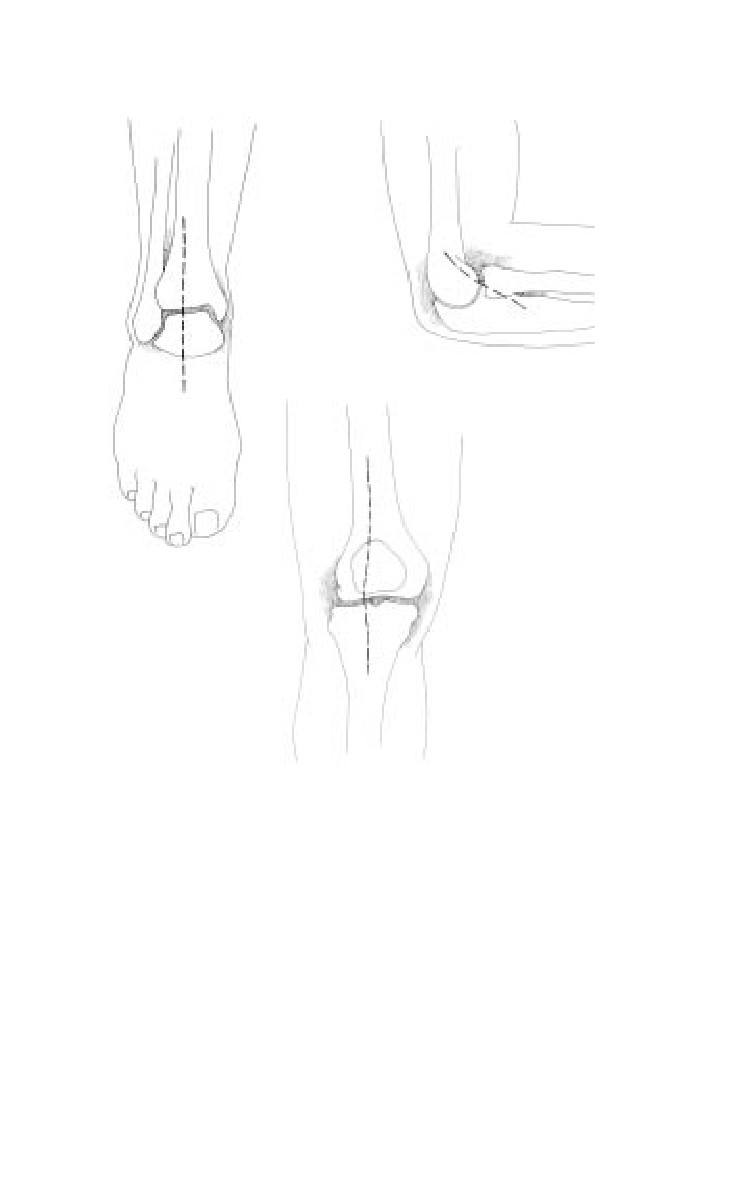
Standard arthrotomy incisions are utilized (Fig. 24-2a,b,c).
(Wound margins are incorporated if possible, provided they
do not compromise exposure or create non-viable flaps).
The extremity must be draped free to allow full range of
motion during surgery.
All intra-articular foreign material, loose cartilage (including
flaps), blood clots, and detached bony fragments without
major articular surface must be removed.
24.2
Open-Joint Injuries
Shoulder
Elbow
b
a
Ankle
Knee
d
c
Fig. 24-1a,b,c,d. Aspiration/injection approaches to the shoulder,
elbow, knee, and ankle.
All recesses must be explored and all damaged tissue must
be removed.
The joint must be thoroughly irrigated with normal saline
(pulse lavage and 6 to 9 L is recommended).
Internal fixation is contraindicated with the exception of
large articular fragments that may be stabilized with Kirscher
wire (K-wire) or Steinmann pins.
24.3
Emergency War Surgery
Ankle
Elbow
b
Knee
a
c
Fig. 24-2a,b,c. Surgical approaches to the ankle, elbow, and knee.
Close synovium if possible without tension and without
surgical tissue advancement. The remainder of the wound
should never be closed at the initial surgical exploration.
If synovial closure is not possible, the joint should be dressed
open with moist fine mesh gauze occlusive dressing.
The wound should be reexplored in 48-72 hours.
A bivalved cast or splints can be used to stabilize the joint.
24.4
Open-Joint Injuries
If there are delays in evacuation or inability to move the
patient, the following steps can be taken:
ο Delayed primary closure (DPC) can be undertaken in 4-7
days if there are no signs of infection.
ο If there is extensive soft-tissue loss, split-thickness skin
grafts may be applied to granulating synovium.
After DPC, gentle range-of-motion therapy is begun, based
on consideration of any associated fractures or neurovascular
injuries.
Any time joint infection is suspected, the joint should
be immediately explored/re-explored.
Signs of Joint Sepsis
Persistent swelling.
Marked pain.
Local warmth.
Fever.
Intense pain with restriction of the range of motion.
Special Considerations for Hip Wounds
Open injuries of the hip joint are problematic for several
reasons.
ο Difficulty in diagnosis.
ο Highly virulent organisms leading to mortality or long-
term morbidity.
Violations of the hollow viscus organs associated with
fractures that extend into the acetabulum or femoral neck
uniformly contaminate the joint.
ο Ruling out joint involvement is difficult in the field
environment due to poor radiographic support and
difficulty in reliable joint aspiration/injection. Therefore,
a high index of suspicion with a low threshold for joint
exploration is essential for preventing devastating
complications.
Presacral drainage is highly encouraged in rectal injury with
joint extension.
24.5
Emergency War Surgery
Hip Exploration Technique
Semilateral or lateral decubitus position, with the abdomen,
pelvis, and full lower extremity prepped and draped free.
A tibial traction pin to suspend the leg from the ceiling is
advantageous.
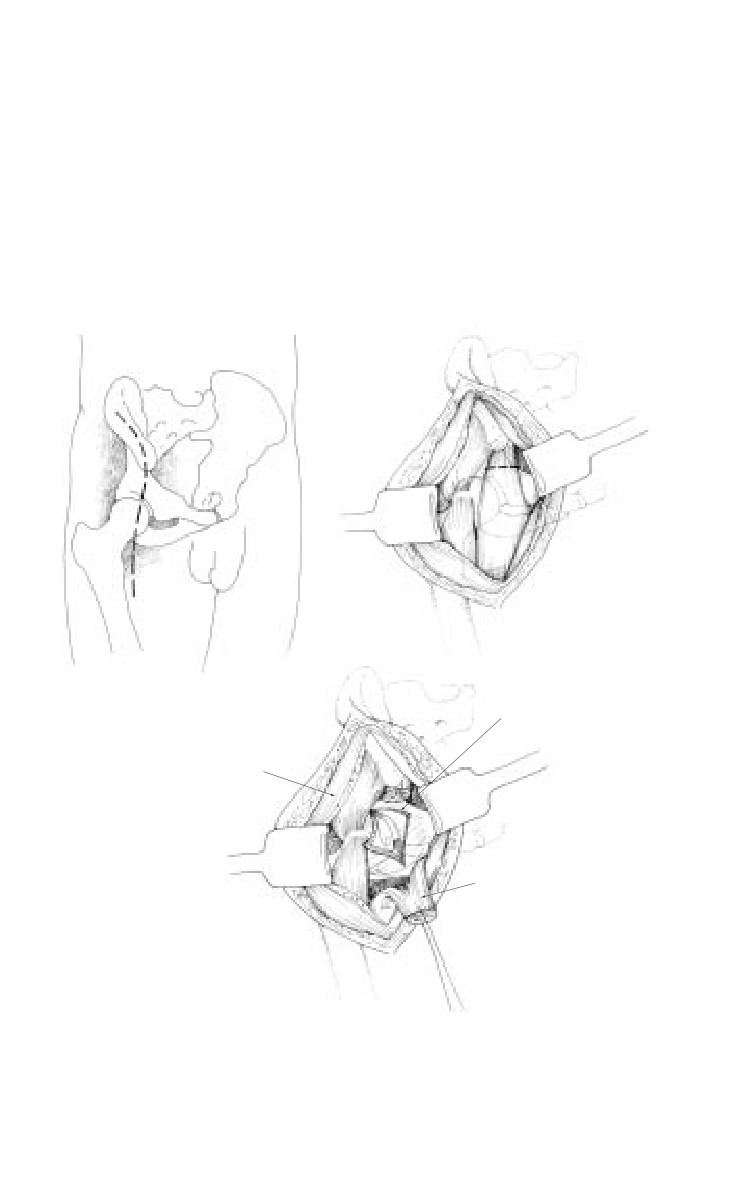
Anterior iliofemoral (Fig. 24-3a,b,c) approach gives the most
extensive exposure to the hip, acetabulum, and ilium. (If the
incision was extended superior and posterior, closure of the
b
a
Joint Capsule
Iliofemoral Tract
Rectus Femoris
c
Fig. 24-3a,b,c. Anterior iliofemoral approach to the hip.
24.6
Open-Joint Injuries
superior/posterior aspect of the incision only over the iliac
crest is necessary at the initial surgery to prevent muscle
retraction and subsequent inability to close the wound.)
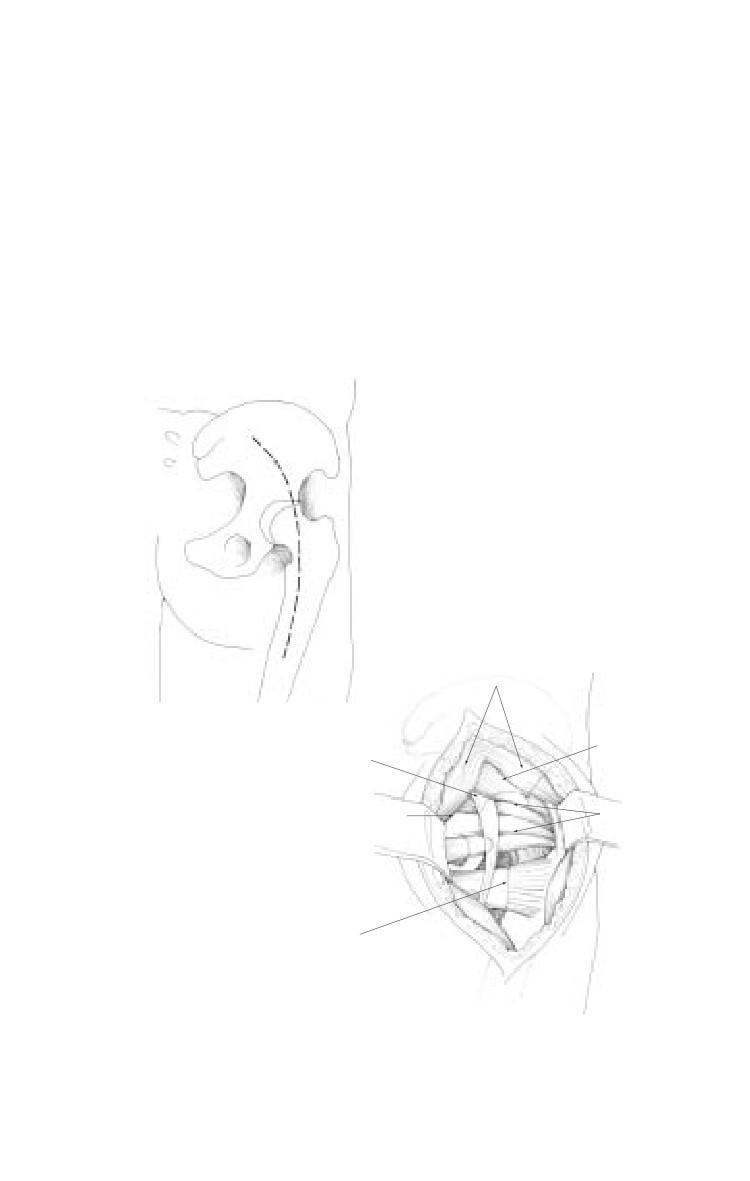
A posterior or Kocher approach (Fig. 24-4a,b) allows for
posterior exposure and allows for posterior drainage. It may
be used in conjunction with the iliofemoral approach or in
select cases alone for debridement. In an echeloned care/
delayed evacuation scenario, dependent posterior drainage
may be more critical than currently practiced in the civilian
environment.
Gluteus Maximus
a
Piriformus
Sciatic Nerve
Sup & Inf
Obdurator Internus
Gemelius
Quadratus Femoris
b
Fig. 24-4a,b. Posterior approach to the hip.
24.7
Emergency War Surgery
Complete fractures of the femoral neck/head should be
resected due to nearly uniform complications of sepsis and
avascular necrosis.
Except as described above, the surgical incision is not closed.
Dressing of the wound is as previously described. The patient
may be placed in a spanning external fixator from the iliac
crest to the distal femur, or placed in a one and one-half hip
spica cast. (See Chapter 23, Extremity Fractures, for diagram.)
Special Considerations for the Shoulder
Often associated with life-threatening thoracic or vascular
injuries. See Chapter 27, Vascular Injuries, for approaches to
the axillary and subclavian arteries.
Technique for shoulder exploration:
ο
Semilateral position will allow both anterior and posterior
approaches to the glenohumeral joint.
ο
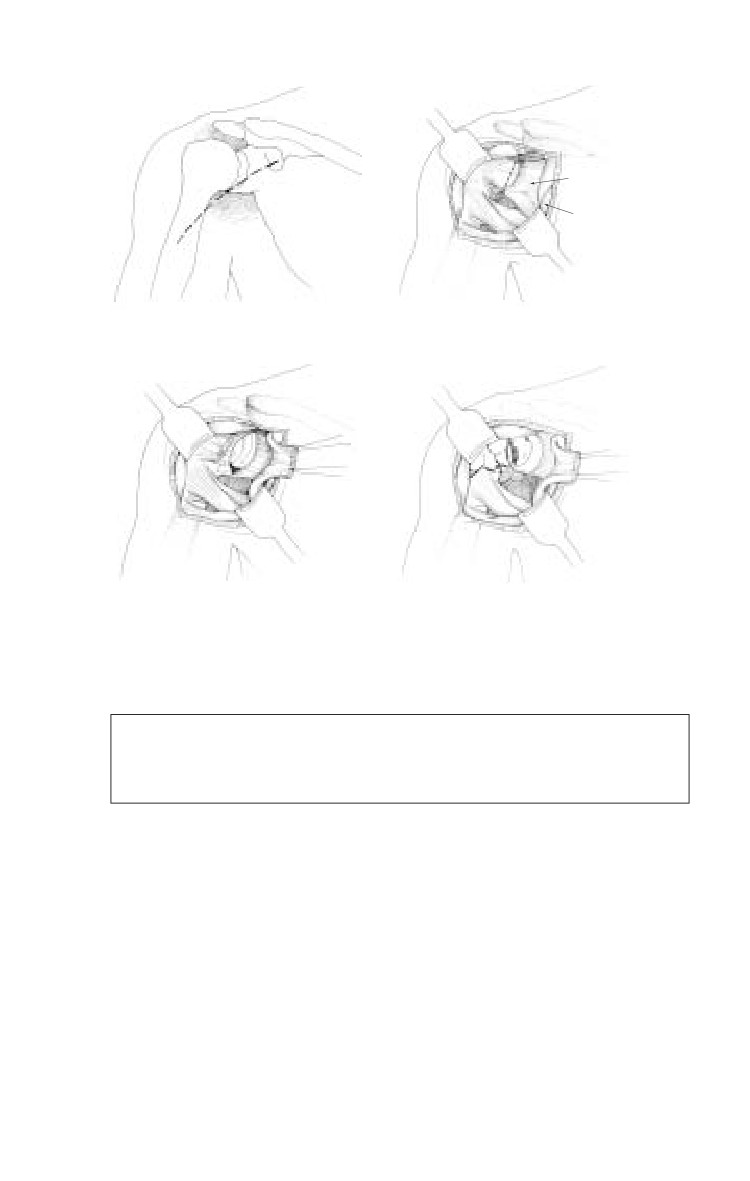
Anterior deltopectoral approach is recommended (Fig. 24-
5a,b,c,d). (Detachment of the short biceps, coracobrachialis,
and pectoralis minor off the coracoid may be needed for
adequate exposure.) The subscapularis is detached and the
joint capsule is trimmed of devitalized tissue. All attempts
are made to preserve the supraspinatus attachment.
ο
Loose fragments or a completely devitalized humeral head
are resected to prevent infection. In an echeloned care/
delayed evacuation scenario, dependent posterior
shoulder drainage may be more critical than currently
practiced in the civilian environment.
ο
At the time of the DPC, 4-7 days later, the infraspinatus
and teres minor are reattached if previously detached.
ο
A Velpeau dressing is utilized for the wounds.
ο
For transport, the shoulder can be wrapped in plaster,
suspending the cast from the opposite shoulder for
comfort. If this is not feasible, a sling and swath,
immobilizing the arm against the chest wall, may be used.
These patients will require litter transport.
24.8
Open-Joint Injuries
Subscapular
Pectoralis Major
Latissimus Dorsi
b
a
Joint Capsule
Shattered Humoral Head
c
d
Fig. 24-5a,b,c,d. Anterior deltopectoral approach to the shoulder.
The key to success in dealing with open joints is a high
index of suspicion. If the joint is open, then aggressive
surgical management is imperative.
24.9
Chapter 25
Amputations
Introduction
Battle casualties who sustain amputations have the most severe
extremity injuries.
Historically, one in three patients with a major amputation
(proximal to the wrist or ankle) will die, usually of
exsanguination.
Though amputations are visually dramatic, attention must
be focused on the frequently associated life-threatening
injuries.
Goals for initial care are to preserve life, prepare the
patient for evacuation, and leave the maximum number
of options for definitive treatment.
The following are indications for amputation.
ο Partial or complete traumatic amputation.
ο Irreparable vascular injury or failed vascular repair
with an ischemic limb.
ο Life-threatening sepsis due to severe local infection,
including clostridial myonecrosis.
ο Severe soft-tissue and bony injury to the extremity
precluding functional recovery.
The surgeon must balance the realistic likelihood of ultimate
reconstruction of a functional extremity against the risk of death
associated with attempts to preserve a limb. It is always desirable
to secure the opinion of a second surgeon before amputating.
The tactical situation may require amputation in cases where
the limb might otherwise have been preserved.
25.1
Emergency War Surgery
Battlefield amputations are unique.
ο Most commonly due to explosive munitions, with
penetration and blast effects (see Chapter 1, Weapons
Effects and Parachute Injuries).
ο Involve a large zone of injury with a high degree of
contamination, which may affect the level of amputation
and/or surgical intervention.
ο Require staged treatment with evacuation out of the
combat zone prior to definitive closure.
Amputations should be performed at the lowest viable
level of soft tissues, in contrast to traditional anatomic
amputation levels (eg, classic above knee (AK), below
knee (BK), and so forth), to preserve as much limb as
possible. A longer stump is desirable for final prosthetic
fitting.
The Open Length Preserving Amputation (formerly
Open Circular Amputation) procedure has two stages.
ο Initial. Complete the amputation at lowest possible
level of bone and prepare the patient for evacuation
to the next level of care.
ο Reconstructive. Involves final healing of the limb to
obtain the optimal prosthetic stump.
ο Final level of amputation and definitive treatment
of the residual limb should occur in the stable
environment of a CONUS hospital, not in the
combat zone hospital.
o
All viable skin and soft tissues distal to the indicated level
of bone amputation should be preserved for use in
subsequent closure of the amputation stump. These tissues
may be considered “Flaps of Opportunity” and can add
length to the stump. This is especially true for amputations
below the knee. Short tibial stumps can be saved with
posteriorly based flaps because the gastrocnemius and
soleus are frequently preserved following landmine injury.
25.2
Amputations
To save length, any shape or form of a viable muscle or
skin flap should be preserved. The lowest level may be an
oblique or irregular wound, creating an oblique or
irregular residual limb.
Technique of Amputation
Surgical preparation of the entire limb, because planes of
injury may be much higher than initially evident.
Tourniquet control is mandatory. If a tourniquet was placed
in the prehospital setting for hemorrhage control, it is prepped
entirely within the surgical field.
Excise nonviable tissue.
ο Necrotic skin and subcutaneous tissue or skin without
vascular support.
ο Muscle that is friable, shredded, grossly contaminated, or
noncontractile. (This muscle is usually at the level of the
retracted skin.)
ο Bone that is grossly contaminated or devoid of soft tissue
support. Bone is transected at a level at which it has the
potential for coverage. (This is usually at the level of the
retracted muscle.)
Identify and securely ligate major arteries and veins to
prevent hemorrhage in transport.
Identify nerves, apply gentle traction, and resect proximally
to allow for retraction under soft tissue. Ligate the major
nerves.
Preserved muscle flaps should not be sutured, but should be
held in their intended position by the dressing.
Flaps should not be constructed at the initial surgery, to
facilitate later closure.
In blast injuries, particularly landmine injuries, the blast forces
drive debris proximally along fascial planes. It may be necessary
to extend incisions proximally parallel to the axis of the extremity
to ensure adequate surgical decontamination of the wound.
The stump is never closed primarily.
25.3
Emergency War Surgery
Special considerations.
ο
Primary Symes (ankle disarticulation) has a high failure
rate due to heel pad necrosis during transport. The wound
should simply be debrided, retaining the clean hindfoot
(talus and calcaneus).
ο
Primary knee disarticulation is problematic due to skin
and tendon retraction necessitating reamputation at a
higher less functional level. It is preferable to leave even a
very short (1-2 cm) clean transtibial stump, even though
nonfunctional, to prevent retraction.
ο
Fractures, when present proximal to the mangled segment,
should not determine amputation level, but must be
treated appropriately (cast, external fixator) to preserve
maximal length.
ο
Plan the initial amputation solely on the qualities of the
wound and surrounding tissues, never on the hope of
achieving a particular level or flap pattern as a final result.
The combat surgeon’s goal is a thorough and complete
debridement. Trying to preserve marginal tissue in the
hope that a better stump can be constructed may lead to
subsequent infection and a higher amputation level.
Dressings and Prevention of Skin Retraction
Since amputations must be left open, skin retraction is likely,
causing the loss of usable limb length by making definitive
closure difficult. This is particularly true of a patient who is the
evacuation chain. Because of this, patients who will be evacuated
should be placed in skin traction in order to leave the wound
open and prevent skin retraction. Surgeons working for the
International Committee of the Red Cross (ICRC) in a stable
environment have successfully treated refugees by delayed
primary closure. However, ICRC surgeons work in a relatively
stable environment where evacuation is not a consideration for
the refugee population. This situation does not apply to those
in the air evacuation system.
Skin Traction
Ideally, skin traction should be maintained throughout the
course of treatment. If evacuation times are reliably very short
25.4
Amputations
(1-3 days), skin traction may be omitted. If there is the possibility
of any delay, use skin traction to preserve limb length. When
tactical conditions or resources are not available for application
of casts, skin traction may be applied through weights off the
end of the bed before and after transport.
ο
Dry fine mesh gauze is loosely placed over the open
wound. Preserved flaps are not suspended freely, but are
held in their intended position by the dressing (Fig. 25-1).
ο
Absorbent dressing is
placed over the stump.
ο
Tincture of benzoin is
applied proximally on
the skin up to 2 cm from
the wound edge, but not
including the preserved
flap.
ο
A stockinette for skin
traction is applied.
ο
Wrap stockinette with a
figure-of-8 elastic wrap.
ο
Two to six pounds of trac-
tion is applied through
the stockinette/wrap.
This may simply involve
a weight attached via
parachute cord to the
stockinette. However,
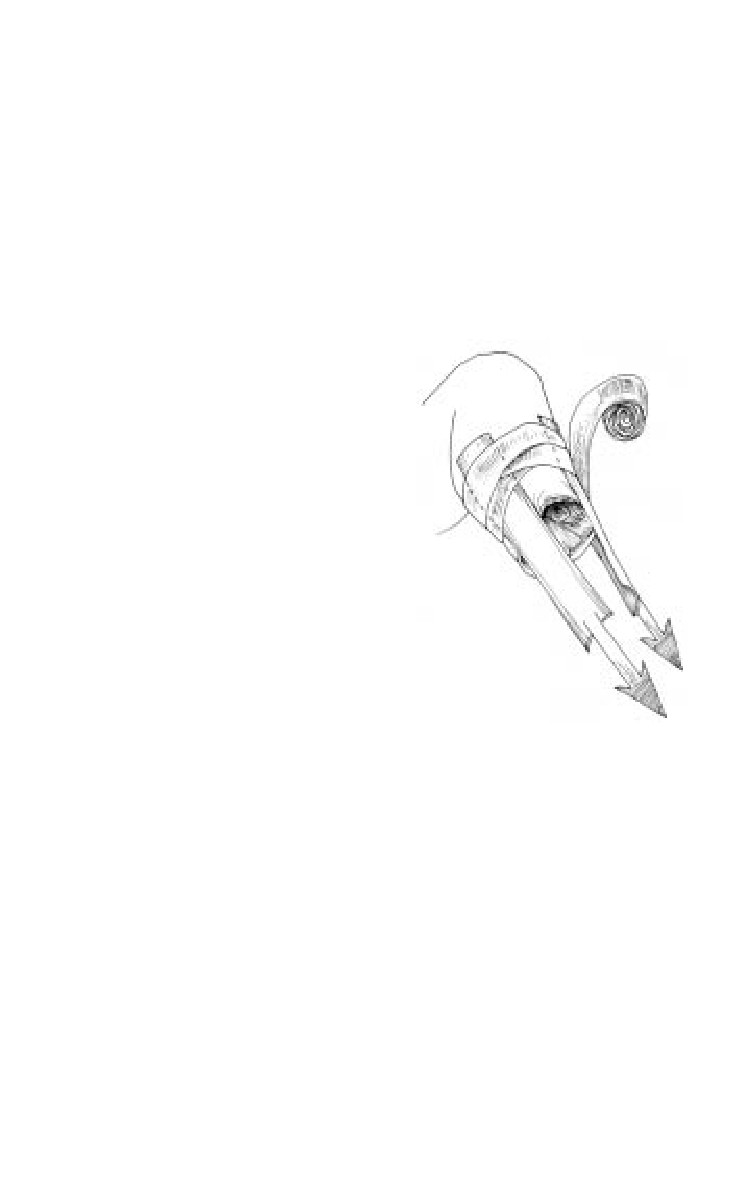
Fig. 25-1. Skin Tractions
during transport, hanging
weights are problematic
and may be substituted with a light elastic such as surgical
tubing or elastic exercise tubing applied through a
transportation cast described below.
ο
A transportation cast should be applied to prevent
contracture and allow for continuous traction (Fig. 25-2).
Postoperative Management
Prevention of contracture.
ο BK amputations are at risk for knee flexion contractures.
These contractures are preventable by using a long leg cast.
25.5
Emergency War Surgery
Cast
Pad
Spreader
Pad
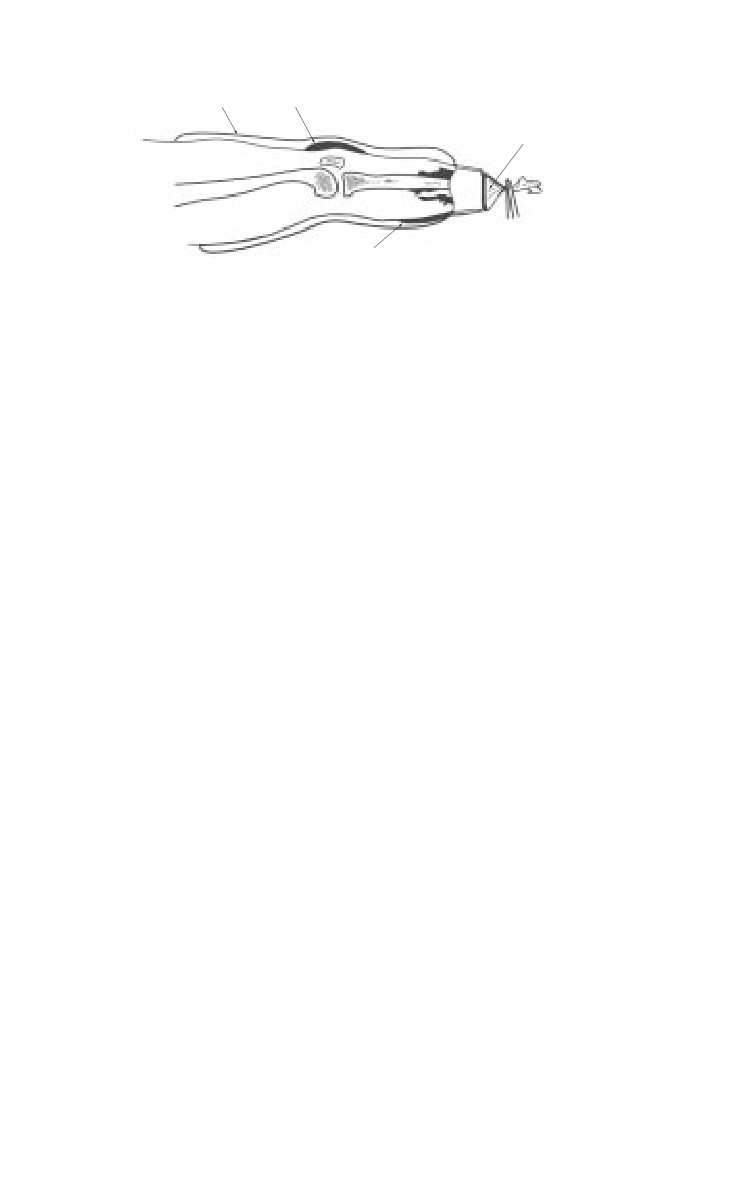
Fig. 25-2. Transportation cast allows for continuous traction.
Splinting in extension requires closer monitoring. Pillows
should never support the knee, because of the increased
risk of flexion contractures.
ο AK amputations are at risk for hip-flexion contractures.
Prone positioning and active hip extension exercises will
avoid this complication. When the casualty is supine,
sandbags may be applied to the anterior distal thigh as
well.
Prevention of hemorrhage: A tourniquet should be readily
available at the bedside or during transport for the first week
following injury.
Pain control: Patient comfort is paramount following
amputation, particularly if dressing changes are required.
Adequate analgesia should be available and the patient
should be counseled regarding phantom limb pain.
Transportation Casts
Prior to evacuation, transportation casts should be applied to
maintain traction of the residual limb and support the soft
tissues. The transportation cast is a well-padded cast that has
integral skin traction maintained by use of an outrigger.
Cast Application Techniques
Low Hip Spica cast
Indications: Transfemoral amputation.
Technique.
ο Adequate anesthesia is administered and the patient is
placed on the fracture table.
25.6
Amputations
ο
Nonviable tissue is excised, as indicated above.
ο
Stockinette or Webril is applied over lower abdomen and
thigh on side of amputation. Stockinette should already
be applied for skin traction.
ο
Felt padding is placed over sacrum and anterior superior
iliac spine (ASIS).
ο
Towel is placed over abdomen to allow breathing space.
ο
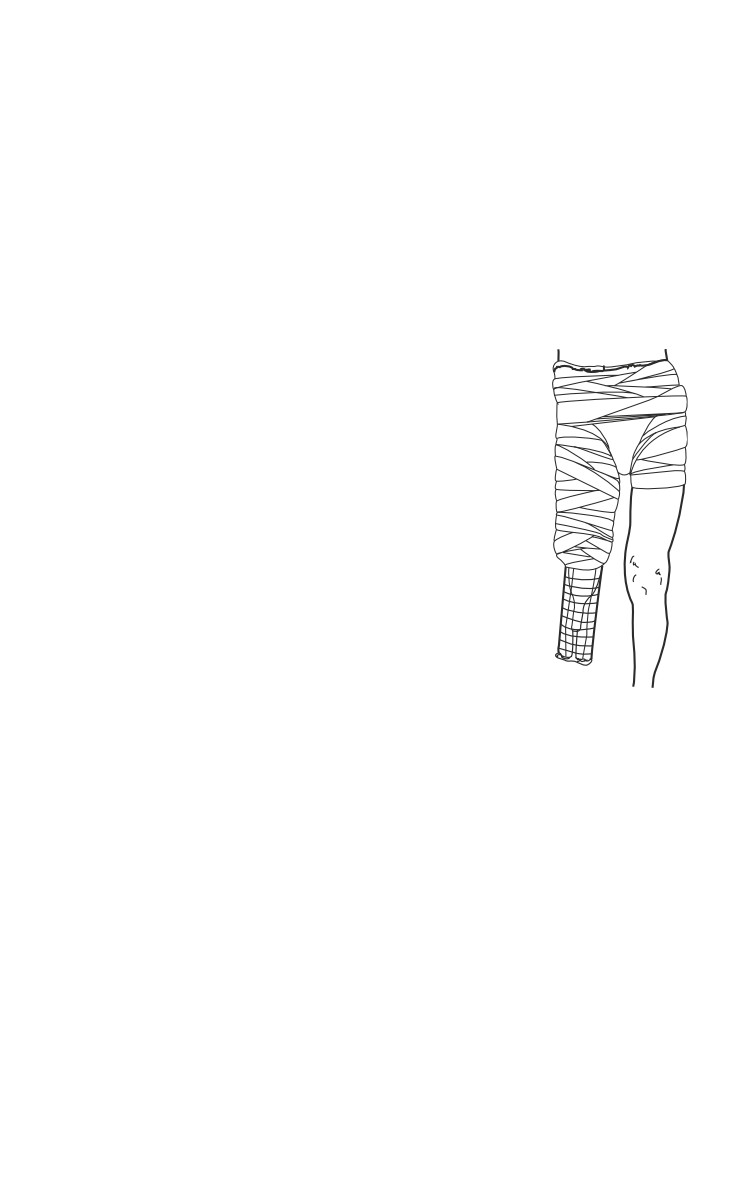
Six-inch Webril or similar cotton batting is wrapped in 1-2
layers (Fig. 25-3).
ο
Six-inch plaster is then rolled over the
Webril from the ASIS to the end of the
residual limb on the affected side. Splints
are applied over the posterior, lateral,
and groin areas. Use a finishing roll after
turning down the edges of the stock-
inette to give it a neat appearance.
ο
Prior to the last roll, a Cramer wire splint
should be attached over the distal end
of the cast to provide skin traction via
the stockinette.
ο
An adequate perineal space must be left
for hygiene.
ο
The towel should be removed, the cast
bivalved, and a circular area over the
abdomen should be cut out.
ο
Use an indelible marker to label the cast
Fig. 25-3. Low
with the date of injury and surgery(ies).
hip spica cast.
Indications: Transtibial amputations.
Technique.
ο Adequate anesthesia is provided. The wound is evaluated,
nonviable tissue is excised, and the wound is irrigated.
ο Stockinette is applied to the distal end of the residual limb
with tincture of Benzoin to maintain skin traction.
ο Two to three layers of Webril are applied from the
amputation to the proximal thigh.
ο A six-inch plaster is then rolled over the thigh and leg.
ο Prior to application of the last layer, a Cramer wire splint
should be incorporated over the distal end of the residual
limb. Apply skin traction when the cast is dry.
25.7
Emergency War Surgery
ο Bivalve the cast.
ο Label the cast with dates of injury and surgery(ies).
Shoulder Spica Cast
Indications: Transhumeral amputation.
Technique.
ο Administer adequate anesthesia.
ο Irrigate wound and excise nonviable tissue.
ο Apply stockinette to axilla for skin traction applied with
tincture of Benzoin.
ο Wrap Webril over chest wall and around to edge of residual
limb.
ο Apply 4-6 in. plaster over the Webril.
ο A Cramer wire splint outrigger should be applied with
the last roll to allow for connection of the stockinette and
application of skin traction.
ο Label the cast with dates of injury and surgery(ies).
Long Arm Cast
Indications: Transradial amputation.
Technique.
ο Administer adequate anesthesia.
ο After treatment of open wounds and application of a
dressing, apply a stockinette over the distal edge of the
residual limb.
ο Apply 4-inch Webril from the residual limb to the axilla.
ο Apply 4-inch plaster from the residual limb to the axilla.
ο Use plaster to incorporate a Cramer wire splint over the
distal edge of the residual limb in order to apply skin
traction.
ο Bivalve the cast.
ο Label the cast with dates of injury and surgery(ies).
25.8
Chapter 26
Injuries to the Hands and Feet
Introduction
Combat injuries to the hands and feet differ from those of the
arms and legs in terms of mortality and morbidity. Death is rare,
but a minor wound, causing no lasting impairment if inflicted,
for example, on the thigh, can result in life-long disability when
it occurs in a hand or foot. The hands and feet have an important
commonality: an intricate combination of many small structures
that must function smoothly together.
Types of Injury
Nonbattle injuries resulting in laceration of the hands and
crush injuries involving either the hands or feet are common.
Such crush injuries may result in compartment syndrome.
Missile and blast injuries involving the hands and feet are
common in combat and may result in mutilating injuries with
a permanent loss of function.
The Hand
Even apparently minor wounds distal to the wrist crease
may violate tendon sheaths and joints, resulting in a
serious deep space infection. Such wounds require a high
index of suspicion for injury and a low threshold for
operative exploration.
Evaluation and Initial Management
The casualty’s upper extremities should be exposed.
Rings, watches, and other constrictive material must be
removed immediately.
26.1
Emergency War Surgery
A preliminary neurologic exam should be performed and
documented.
Vascular status of the hand should include an assessment of
radial and ulnar arteries (Allen test, Doppler, among others).
Treatment of Hand Compartment Syndrome
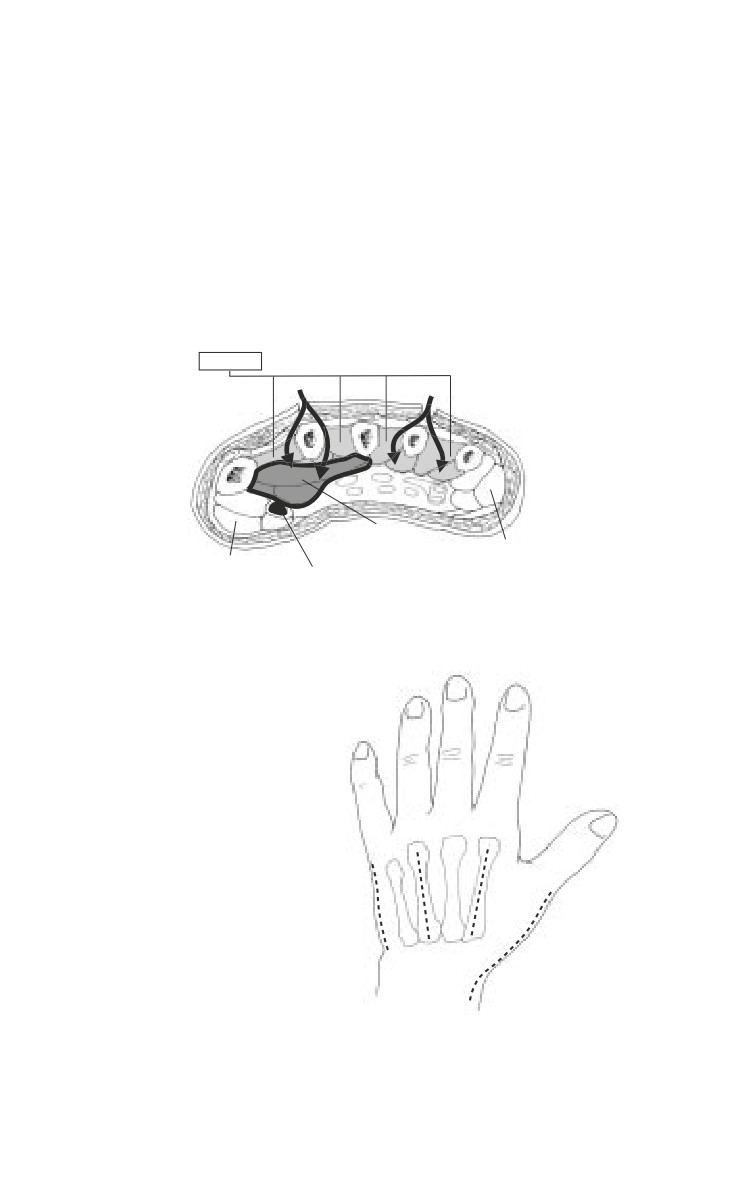
The hand has 10 separate fascial compartments (4 dorsal
interossei, 3 volar interossei, the thenar muscles, the
hypothenar muscles, and the adductor pollicis [Fig. 26-1]).
4 Dorsal
+ 3 Volar Interosseous Compartments
Adductor
Pollicis
Hypothenar
Thenar
Compartment
Compartment
Compartment
Ulna Nerve
Fig. 26-1. Compartments of the hand.
A complete hand fascio-
tomy consists of four
incisions (shown in Fig.
26-2).
One incision on the radial
side of the thumb meta-
carpal releases the thenar
compartment.
A dorsal incision over
the index finger meta-
carpal is used to release
the 1st and 2nd dorsal
interossei, and to reach
ulnar-to-index finger
metacarpal and to release
Fig. 26-2. Hand fasciotomy incisions.
the volar interossei and
adductor pollicis.
26.2

Injuries to the Hands and Feet
A dorsal incision over the ring finger metacarpal is used to
release the 3rd and 4th dorsal interossei, and to reach down
along the radial aspect of the ring finger and small finger
metatarsal to release the volar interossei.
An incision is placed at the ulnar aspect of the small finger to
release the hypothenar muscles.
Although compartments
are not well defined in the
fingers, grossly edematous
fingers may require release
of dermal and fascial
constriction; care should
be taken to place the skin
incision away from the
neurovascular bundles
(Fig. 26-3).
Fig. 26-3. Incisions for finger
fasciotomy.
Surgical Technique
Do not blindly clamp bleeding tissues because nearby
nerves may be injured. If unable to control the bleeding
with pressure, isolate the vessel under tourniquet control
and tie off or clamp under direct vision.
General or regional (block) anesthetic is required; local
infiltration of anesthetic is inadequate. Epinephrine is never
injected into the hands or fingers.
Although either the radial or ulnar artery may be ligated,
both should not be.
Thorough exploration under tourniquet down to normal
tissue is mandatory to define the extent of the injury.
Debridement removes buried foreign matter and deep
devitalized tissue.
ο Dead tissue is removed.
ο Tissue, including skin, with marginal or questionable
viability is left for subsequent evaluation to improve
chances for optimal outcome.
The fingers are not amputated unless irretrievably mangled.
26.3
Emergency War Surgery
Viable tissue, even though nonfunctional, is retained and
stabilized for later reconstruction.
Provisional stabilization of fractures with Kirscher wires (K-
wires) may enhance patient comfort and later management.
Specific Tissue Management
Bone: Unless extruding from the body or severely contam-
inated, fragments should be left in place. At forward hospitals,
only small K-wires should be used for internal fixation.
Tendon: Minimal excision of tendons should occur. No
attempt at repair should be made in the field.
Nerve: Do not excise nerve tissue. No attempt at repair should
be made in the field.
The ends of lacerated nerves and tendons may be tagged with
4-0 suture so that they may be more easily identified later
during definitive reconstruction and repair.
Closure of wounds is delayed; however, exposed tendon,
bone, and joint should be covered with viable skin, if
possible, to prevent desiccation.
Dressing and Splinting
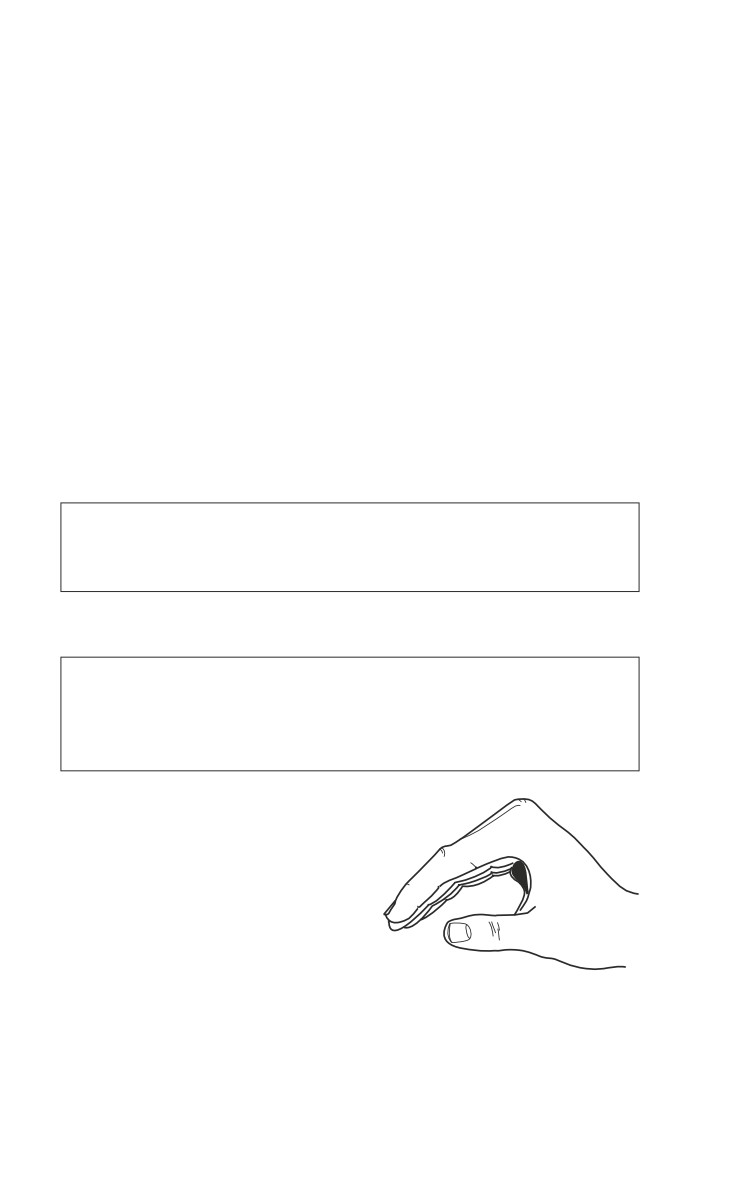
Splint the hand in the safe position (Fig. 26-4). The wrist
is extended 20°, the metacarpalphangeal joints are flexed
70°-90° and the fingers (proximal and distal interphan-
geal joints) are in full extension.
Fine mesh gauze is first laid on
the wounds and covered with a
generous layer of fluffed gauze.
The entire wound should be
covered but the fingertips left
exposed, if possible, to eval-
uate perfusion.
Fig. 26-4. Hand splint position.
26.4
Injuries to the Hands and Feet
A splint is applied, immobilizing all injured parts and
extending one bone or joint beyond. A palmar plaster slab is
routine, but a dorsal one may be added for additional stability.
The Foot
Penetrating injuries of the foot frequently result in prolonged
morbidity and disability. Crush injuries and injuries from blast
are more likely to result in an unsatisfactory result than are
wounds made by low-velocity bullets or isolated fragments. This
is especially true when there is loss of the heel-pad, significant
neurovascular injury or when the deep plantar space has been
contaminated. The ultimate goal of treatment of these injuries
is a relatively pain free, plantigrade foot with intact plantar
sensation.
Evaluation and Initial Management
The zone of injury with both open and closed injuries of the
foot is often more extensive than is apparent with the initial
inspection.
The vascular status of the foot should be assessed by
palpation of the dorsalis pedis and posterior tibial pulses.
An assessment of capillary refill in the toes should also be
made as a compartment syndrome of the foot can coexist with
intact pulses.
Anesthesia of the plantar aspect of the foot indicates an injury
to the posterior tibial nerve or one of its major branches and
portends a poor prognosis for a satisfactory outcome.
Compartment syndrome of the foot can occur even in the
presence of an open foot injury, and when identified, requires
emergency treatment.
At the time of debridement, small, contaminated bone
fragments without soft tissue attachment should be removed.
High-volume irrigation for all open wounds is mandatory.
All wounds should be left open.
26.5
Emergency War Surgery
Injuries to the Hindfoot
Severely comminuted, open fractures of the talus may require
talectomy, but this decision should be left to higher levels of
care.
The talus is best debrided through an anterolateral approach
to the ankle extended to the base of the 4th metatarsal.
Penetrating wounds into the plantar aspect of the heel pad
can be approached through a heel-splitting incision to avoid
excessive undermining of this specialized skin.
Transverse gunshot wounds of the hindfoot are best managed
by medial and lateral incisions with the majority of surgery
performed laterally to avoid medial neurovascular structure.
Injuries to the Midfoot
Tarsal and metatarsals are best approached through dorsal
longitudinal incisions. In addition, compartment release can
be adequately performed through longitudinal incisions
medial to the 2nd metatarsal and lateral to the 4th metatarsal
in order to leave a wide skin bridge.
Contamination of the deep plantar compartments of the foot
is best managed through a plantar medial incision that begins
1 inch proximal and 1 inch posterior to the medial malleolus
and extends across the medial arch ending on the plantar
surface between the 2nd and 3rd metatarsal heads. The medial
neurovascular structures must be identified during this
approach. A full compartment release can also be performed
through this incision.
Injuries to the Toes
Every effort should be made to preserve the great toe.
Amputation of the lateral toes is generally well-tolerated.
Foot Compartment Syndrome
There are 5 compartments in the foot.
ο The interosseous compartment is bounded by the lateral
1st metatarsal medially, metatarsals and dorsal interossous
fascia dorsally, and the plantar interosseous fascia
plantarly.
26.6
Injuries to the Hands and Feet
ο The lateral compartment is bounded by the 5th metatarsal
shaft dorsally, the plantar aponeurosis laterally, and the
intermuscular septum medially.
ο The central compartment is bounded by the intramuscular
septum laterally and medially, the interosseous fascia
dorsally, and the plantar aponeurosis plantarly.
ο The medial compartment is bounded by the inferior sur-
face of the 1st metatarsal dorsally, the plantar aponeurosis
extension medially, and the intramuscular septum laterally.
ο The calcaneal compartment contains the quadratus plantae
muscle.
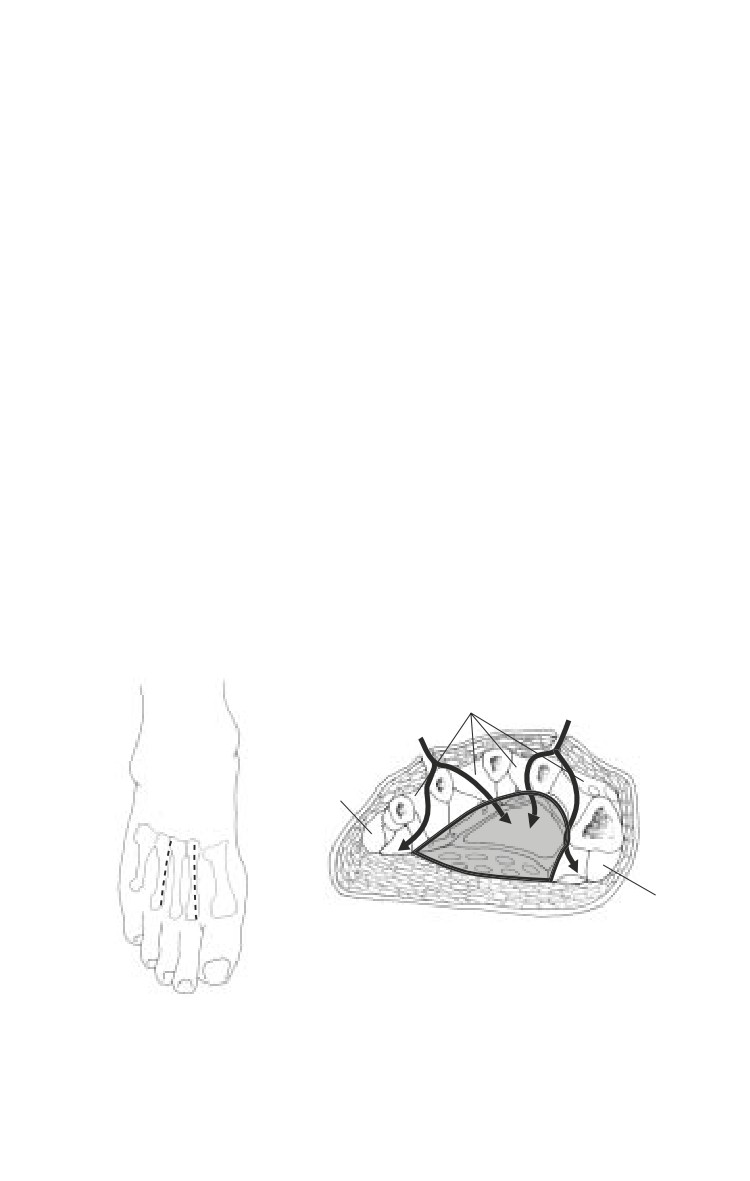
The foot may be released through a double dorsal incision.
One incision placed slightly medial to the 2nd metatarsal,
reaching between the 1st and 2nd metatarsals into the medial
compartment, and between the 2nd and 3rd metatarsals, into
the central compartment (Fig. 26-5).
A second dorsal incision is made just lateral to 4th metatarsal,
reaching between 4th and 5th metatarsals into the lateral
compartment.
To spare the dorsal soft tissue, a single incision medial
fasciotomy may be used.
Dorsal Interosseous Compartments
Lateral
Compartments
Central
Medial
Compartments
Fig. 26-5. Interosseous compartment releases through two dorsal
incisions.
26.7
Emergency War Surgery
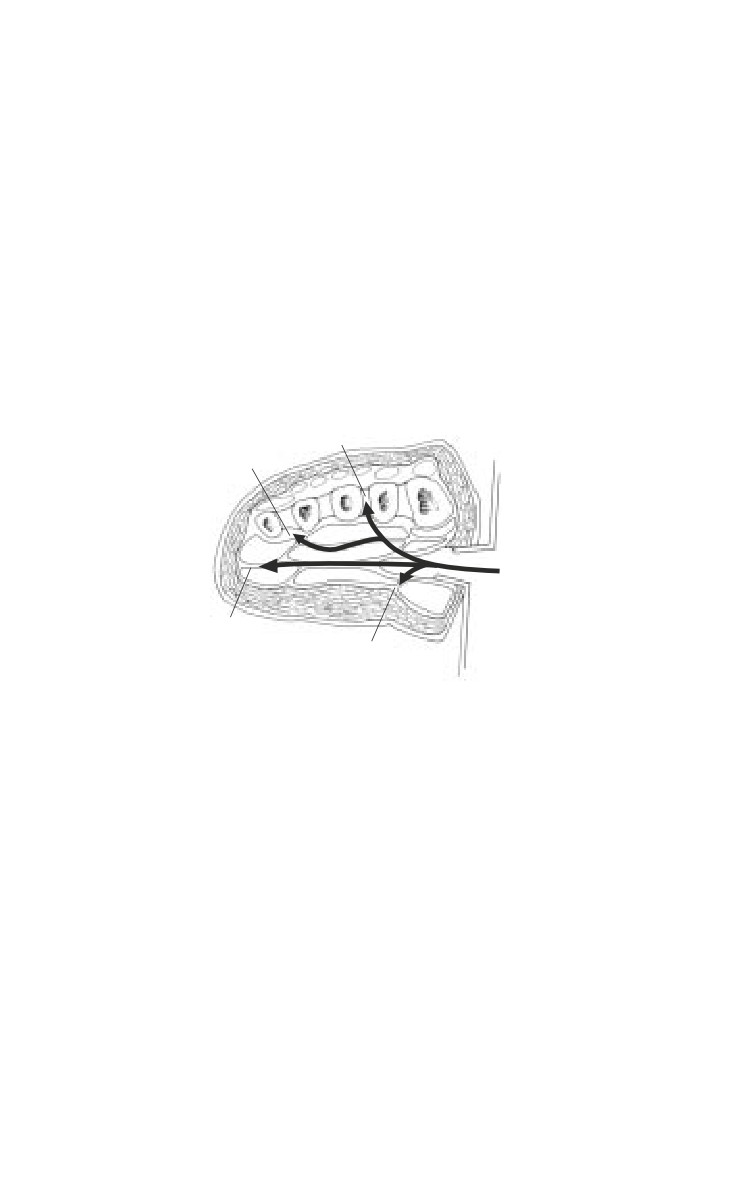
A medial approach to the foot is made through the medial
compartment, reaching across the central compartment into
the interosseous compartment dorsally and lateral compart-
ment releasing all the away across the foot (see description
in this chapter’s Injuries to the Midfoot and Fig. 26-6).
Fasciotomy wound management.
ο Following the fasciotomy, the fasciotomy wound undergoes
primary surgical wound management; all devitalized
tissue is removed.
ο As with all battle wounds, the fasciotomy is left open and
is covered with a sterile dressing.
Interosseous
Central
Lateral
Medial
Fig. 26-6. Central compartment releases through medial approach.
Stabilization
K-wires can be utilized for temporary stabilization.
A bivalved cast or splint is adequate for transport to a site of
more definitive care.
26.8
Chapter 27
Vascular Injuries
Introduction
History.
ο World War II: Popliteal artery injuries were routinely
ligated with a 73% amputation rate.
ο Korean War: Formal repair of peripheral arterial injuries
instituted.
ο Vietnam War: Further refinements in arterial repair; ampu-
tation rate for popliteal artery injuries is reduced to 32%.
There are various types of wounds seen in combat.
ο Low-velocity missile damages a blood vessel lying directly
in its path.
ο High-velocity missile blast effect causes fragmentation of
the missile or bone and widespread destruction, including
vascular injury at a distance.
ο Blunt trauma, often resulting from sudden deceleration in
motor vehicle accidents, falls, rail and air disasters.
ο Popliteal artery injury associated with posterior knee
dislocations.
Evaluation and Diagnosis
Physical examination — detailed examination is paramount.
ο Hard signs of arterial injury (pulsatile external bleeding,
enlarging hematoma, absent distal pulses, a thrill/bruit,
or ischemic limb) should lead to immediate surgical
exploration, without further preoperative studies.
♦ The 6 Ps of acute ischemia are: pain, pallor, pulse-
lessness, poikilothermia, paresthesia, and paralysis.
♦ Degree of injury and adequacy of collateral flow will
determine the severity of distal ischemia. Remember:
Warm ischemia of striated muscle for > 4-6 hours will
likely lead to myonecrosis and major amputation.
27.1
Emergency War Surgery
♦ Falsely attributing loss of pulse, diminished pulse, or
asymmetry of pulses to arterial spasm may cause delay
in detection/repair of limb-threatening arterial injury.
♦ Distal pulses may be intact in up to 20% of patients with
arterial injuries.
ο Soft signs of arterial injury that require additional
diagnostic evaluation include proximity of wound to major
vessels, history of hemorrhage/shock, nonexpanding
hematoma, diminished pulse, and anatomically related
nerve injury.
Doppler examination.
ο A patient with penetrating or blunt trauma who has a
normal distal pulse exam and ankle-brachial index (ABI)
> 1.0 does not require arteriography.
ο In the patient without a palpable pulse distal to the injury,
perform a Doppler examination and an ABI. ABI < 0.9 or a
difference in ABI between extremities of > 0.1 indicate an
arterial injury until proven otherwise. Because of extensive
collateral flow, injuries to the deep femoral or deep brachial
artery are not ruled out by this technique.
Duplex ultrasound (US).
ο Color flow duplex ultrasonography has demonstrated high
sensitivity and specificity for detecting arterial injuries. It
is noninvasive, portable, and painless, and repeated exams
are easily performed.
ο Duplex is highly operator-dependent and may fail to detect
all arterial injuries (eg, deep femoral or tibial injuries).
Contrast angiography.
ο Precise localization of vascular injury is useful in patients
with multiple pellet wounds (eg, shotgun blast), fractures,
and penetrating injuries to the neck and thoracic outlet.
ο Consider with high-velocity wounds, where arterial injury
may occur outside the path of the missile, or in the presence
of soft signs of arterial injury.
ο Consider as routine for knee dislocations where occult
arterial injuries may occur, and undetected delayed
popliteal artery thrombosis may lead to major amputation.
27.2
Vascular Injuries
Management Aspects
Initial management.
ο Control external bleeding immediately! Blind or
imprecise placement of vascular clamps in a bloody field
is discouraged. Direct pressure to the bleeding wound is
preferable; temporary tourniquet (BP cuff) placed
proximal to the injury site and inflated above systolic blood
pressure may be useful.
ο Administer IV antibiotics, tetanus toxoid, and analgesia.
ο In most long-bone fractures, resuscitation and fracture
alignment will restore distal flow.
ο Indications for operation for a suspected vascular injury:
♦ Hard signs as discussed above.
♦ Soft signs confirmed by duplex US and/or angiography.
Operative management.
ο Preparation and draping of injured extremity as well as
contralateral uninjured lower or upper extremity in case
repair requires autogenous vein graft.
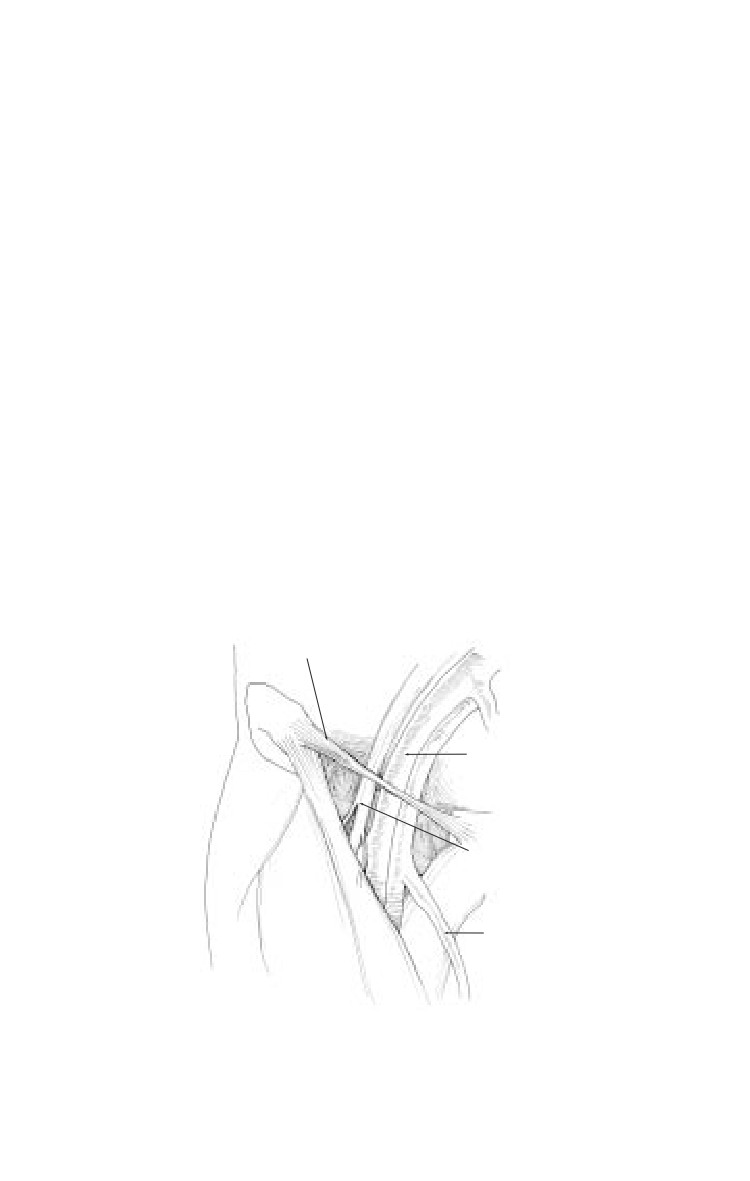
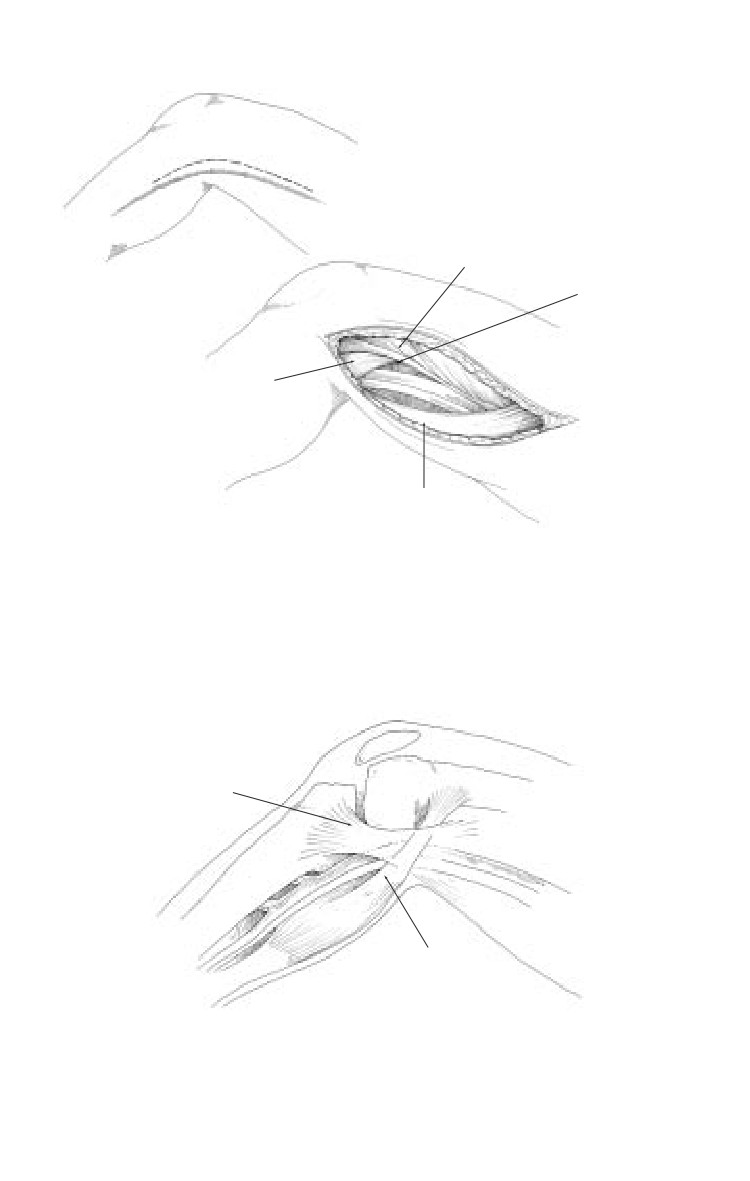
ο Surgical approaches to the femoral popliteal, and brachial
arteries are shown in Figures 27-1-Figure 27-5.
Inguinal Ligament
External Iliac Artery
Femoral Nerve
Rectus
Femoris
Saphenous Vein
Sartorius
Fig. 27-1. Inguinal anatomy.
27.3
Emergency War Surgery
a
Vastus Medialis
b
Adductor Magnus
Medial Head
Gastrocnemius
Sartorius
Fig. 27-2. Exposure of distal femoral and popliteal vessels.
Insertions of Sartorius,
Gracilis, Semitendinosus
Medial Head Gastrocnemius
Fig. 27-3. Medial approach to popliteal vessels.
27.4
Vascular Injuries
Semimembranosus
Semitendinosus
Biceps Femoris
Lesser Sapnenous Vein
Medial Head
Lateral Head
Gastrocnemius
Fig. 27-4. Posterior approach to popliteal vessels.
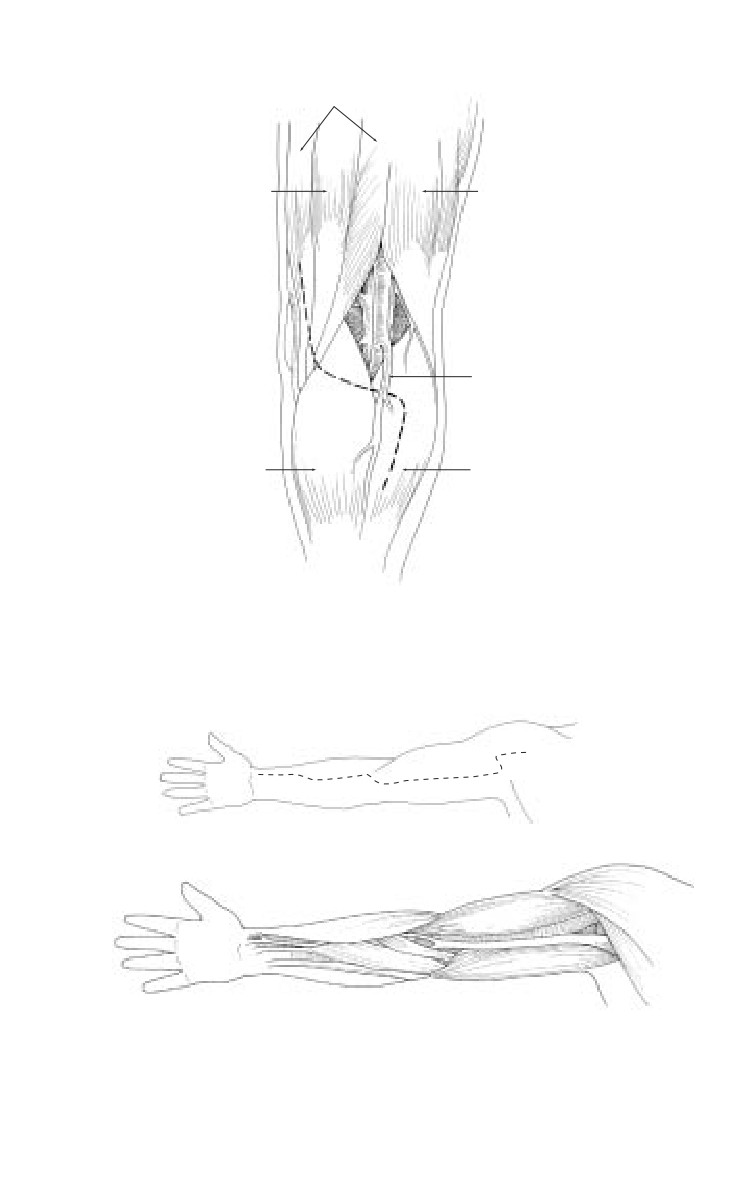
a
b
Fig. 27-5. Exposure of brachial and radial arteries.
27.5
Emergency War Surgery
ο Longitudinal incisions usually directly over injured vessel
followed by proximal and distal control. A tourniquet (eg,
blood pressure cuff) may occasionally be useful to obtain
proximal control or to improve intraoperative visualization.
ο Once control is obtained, perform the following steps:
♦ Debride injured vessels to macroscopically normal wall.
♦ Pass balloon catheters proximal and distal to remove
any residual thrombus.
♦ Flush both directions with heparinized saline.
ο Consider temporary intraluminal shunting.
♦ Successful shunt placement allows ample time for wound
debridement and copious irrigation, identification of
nerve injuries, and careful consideration of reconstruction
vs primary amputation.
Shunt placement technique.
ο Proximal and distal vessel control with Silastic vessel loops
or Rumel tourniquet.
ο Release proximal control to flush clot and place Argyle shunt.
ο Distal thrombectomy (Fogarty catheter) until no clot is returned.
ο Instill heparinized saline (20 U/mL) into distal vessel.
ο Place shunt into distal end and secure.
ο Check for distal pulse/perfusion.
In injuries to both artery and vein in which no shunt is used,
repair artery first to minimize ischemic time, followed by
venous repair.
Suture: 5-0 or 6-0 Prolene; 7-0 Prolene for small arteries. All
completed repairs must be tension free.
Upon completion, forward and back bleed repaired segment
until clear of air and debris prior to final closure.
Type of repair will depend on the extent of injury.
ο Lateral suture repair: Required for minimal injuries that,
when repaired, will not compromise the lumen > 25%,
result in a thrill, nor decrease pulse or Doppler signal.
ο Patch angioplasty: Needed for larger, tangential wounds;
to prevent stenosis.
ο End-to-end anastomosis: Excise extensively damaged
segments and perform anastomosis if able to mobilize ends
(generally, < 2 cm gap) without tension. An oblique
anastomosis is less likely to stenose.
27.6
Vascular Injuries
ο
Interposition graft: Required if the vessel cannot be
primarily repaired without undue tension.
♦ Autogenous vein grafts preferred, usually the contra-
lateral greater saphenous vein (GSV).
◊ Harvest vein from the contralateral limb, if possible.
The reason for this is in the injured limb, superficial
veins may be an important source of venous outflow
if deep veins are injured.
◊ Order of preference vein harvest for arterial conduit
is contralateral GSV, ipsilateral GSV (if no concom-
itant deep venous injury), contralateral lesser
saphenous vein (LSV), ipsilateral LSV (if no deep
venous injury), cephalic vein, and basilic vein.
♦ Prosthetic grafts may be required when autogenous
vein is inadequate or unavailable, expeditious repair is
indicated, or for large vessels (aortoiliac system) for
which there is a large size discrepancy.
◊ Polytetrafluoroethylene (PTFE) grafts are more resist-
ant to infection than Dacron and have acceptable
patency rates when used in the above-knee position.
◊ The use of prosthetic grafts can hasten the comple-
tion of a procedure in patients whose physiology
requires expeditious surgery.
◊ Prosthetics can also be used in areas of extensive
soft-tissue debridement as a “prolonged shunt”
where planned revision days to weeks later, out of
theatre, will be expected.
Graft coverage: Exposed vein grafts will desiccate, leading
to graft blow-out and potential exsanguination. They must
be covered by soft tissue or muscle; superficial muscles such
as sartorius or gracilis in the thigh may be mobilized to cover
a graft. If coverage is not possible, an alternate subcutaneous
or subfascial route through uncontaminated viable tissue
must be chosen.
Prolonged shunting: If the above techniques are unsuccessful
or precluded by patient physiology or the tactical environ-
ment, shunting (as outlined above) with the following
modifications can be used for up to 72 hours.
ο Replace silastic loops with suture, and secure firmly.
27.7
Emergency War Surgery
ο Systemic heparinization is not required.
ο Monitor distal perfusion hourly.
ο Re-evaluate/evacuate early for definitive repair.
Ligation of artery: If the above options for repair are
unsuccessful or unavailable, vessels can be ligated in light of
known rates of morbidity. Emphasis is Save Life Over Limb.
Intraoperative completion angiogram or duplex US (if
available) should be done to evaluate the technical adequacy
of the repair, visualize the runoff, and detect any missed distal
clot.
ο Full strength contrast 30-60 cc.
ο 20 gauge Angiocath.
ο Inflow occlusion.
Venous repair: Options are similar to arterial repairs outlined
above.
ο Ligation of major veins is acceptable in life-threatening
situations, although in a stable patient and time permitting,
venous repair should be performed and may enhance
arterial repair patency.
Compartment syndrome: Muscle compartments of the
forearm and palm in the upper extremity and anterior
compartments of the lower leg are particularly susceptible.
ο Indications for fasciotomy:
♦ 4-6 hour delay after vessel injury.
♦ Combined vein and artery injury.
♦ Arterial ligation.
♦ Concomitant fracture/crush, severe soft-tissue injury,
muscle edema or patchy necrosis.
♦ Tense compartment/compartment pressures exceeding
40 mm Hg.
♦ Prophylactic for patients with prolonged transport times
or long periods without observation (no surgical care
available enroute).
ο A standard two-incision, four-compartment approach for the
calf is simple and effective (see Chapter 22, Soft-Tissue Injury).
ο Arm fasciotomy will consist of a longitudinal centrally
placed incision over the extensor compartment and a
curvilinear incision on the flexor aspect beginning at the
antecubital fossa.
27.8
Vascular Injuries
Post-op care.
ο Palpable pulses obtained in the operating room (OR)
should remain palpable post-op.
♦ Pulse changes, even if Doppler signals remain, may
indicate graft thrombosis and should be investigated.
ο Consider low-dose heparin as deep vein thrombosis (DVT)
prophylaxis.
♦ Use with caution in multiply injured and head-injured
patients.
ο Slight elevation of injured extremity improves post-op
edema.
27.9