Vauxhall Mokka B (2023 year). Manual in english - page 5
 

  Index      Manuals     Vauxhall Mokka B (2023 year). Manual in english


Search            copyright infringement  


Content      ..     3      4      5      6     ..


Vauxhall Mokka B (2023 year). Manual in english - page 5


134

Infotainment system

1

)

If switched off: switch

power on / off
If switched on: mute system
Turn: adjust volume

2

Info Display
Home menu will be

displayed by a 3-finger

touch on screen

3

h

Open climate menu if available

4

c

Display navigation app

when phone projection is

active ................................... 143

5

b

Open audio menu:
Radio ................................... 141
External devices (USB,

Bluetooth) ............................ 143

6

a

Open phone menu .............. 148
Display phone projection

screen when phone

projection is active .............. 143

7

d

Open menu for picture

function ............................... 143

8

_

Open vehicle settings menu

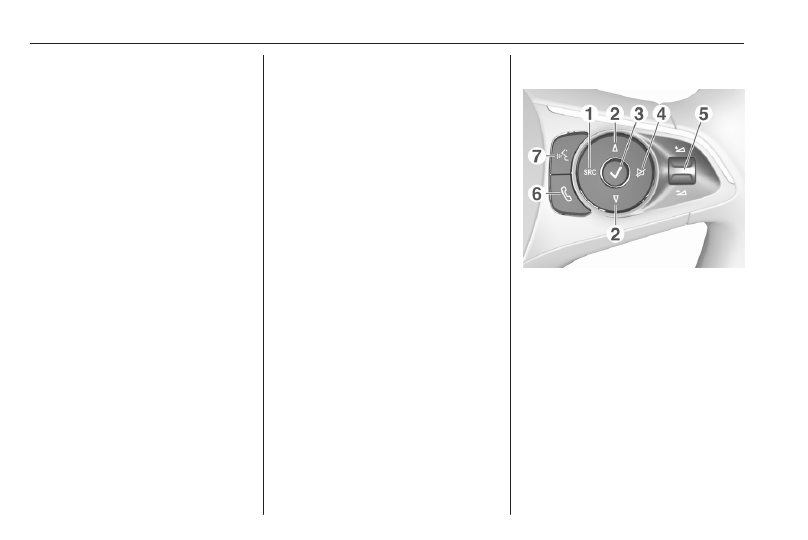
Steering wheel controls

1

SRC (Source)
Select audio source,

confirm selection with 

A

Long press: mute system

2

c

 / 

d

Select next / previous

preset radio station when

radio active .......................... 141
or select next / previous

track / picture when

external devices active ....... 143

Infotainment system

135

or select next / previous

entry in station list, media

list, call / contacts list when

operation started via

steering wheel controls
Confirm selection with 

A

3

A

Confirm selected item
or open station list, media list

4

e

Activate / deactivate mute

function

5

Y

 / 

Z

Turn upwards /

downwards: increase /

decrease volume

6

6

Short press: accept

incoming call
Long press: reject

incoming call, hang up call .. 148

or open call / contacts list . . . 148
If phone call active: open

call in progress menu 

7

Y

(with embedded speech

recognition)
Short press: activate

embedded speech recognition
Long press: activate

speech recognition in

Apple CarPlay™ or

Android™ Auto if phone

connected via USB port ...... 146
(without embedded

speech recognition)
Short press: activate

speech recognition in

Apple CarPlay™ or

Android™ Auto if phone

connected via USB port

Control elements

The Infotainment system is operated

via function buttons, a touch screen

and menus that are shown on the

display.
Inputs are made optionally via:

● the control panel on the

Infotainment system

● the touch screen
● audio controls on the steering

wheel

● the speech recognition 

3

 146

Switching the Infotainment

system on or off

Press 

)

. After switching on, the last

selected Infotainment source

becomes active.

Notice

Some functions of the Infotainment

system are only available if ignition

is switched on or engine is running.

136

Infotainment system

Automatic switch-off

If the Infotainment system has been

switched on pressing 

)

 while the

ignition is switched off, it will switch off

again automatically when the Eco

mode becomes active.

Setting the volume

Turn 

)

. The current setting is shown

on the display.
When the Infotainment system is

switched on, the last selected volume

is set.

Speed compensated volume

When the speed compensated

volume is activated, the volume is

adapted automatically to make up for

the road and wind noise as you drive.

Mute

Press 

)

 to mute the Infotainment

system.
To cancel the mute function,

press 

)

 again. The last selected

volume is set again.

Modes of operation

Audio-Media

Press 

b

 to display the main menu of

the last selected audio mode.

Changing the media source

Select SOURCES to display the

menu for media source selection.
Select the desired media source.
For a detailed description of:

● Radio functions 

3

 141

● External devices 

3

 143

Phone

Before the phone function can be

used, a connection has to be

established between the Infotainment

system and the mobile phone.
For a detailed description of

preparing and establishing a

Bluetooth connection between the

Infotainment system and a mobile

phone 

3

 148.

If the mobile phone is connected,

press 

a

 to display the main menu of

the phone function.

For a detailed description of mobile

phone operation via the Infotainment

system 

3

 148.

Infotainment system

137

Apps

To show specific apps of your

smartphone on the display of the

Infotainment system, connect your

smartphone.
Press 

a

 and touch Apple CarPlay or

Android Auto. A menu with different

selectable apps is displayed.
For a detailed description 

3

 143.

Settings

Press 

b

, select OPTIONS and then

select Audio settings to display the

respective menu.

For a detailed description.
Touch the top bar 

z

 of the screen to

display a menu for various system-

related settings.

For a detailed description.

Vehicle settings

Select 

_

 to open a menu for various

vehicle-related settings.
Vehicle personalisation 

3

 81.

Settings center

The Settings center provides quick

access to the following settings:

● dark screen
● brightness
● profiles
● system configuration
● privacy settings

Touch the top bar 

z

 of the screen to

display the Settings center.

Menu operation

The display of the Infotainment

system has a touch-sensitive surface

that allows direct interaction with the

displayed menu controls.

Caution

Do not use pointed or hard items

like ballpoint pens, pencils or

similar for touch screen operation.

Selecting or activating a screen

button or menu item

Touch a screen button or menu item.

138

Infotainment system

The corresponding system function is

activated, a message is shown, or a

submenu with further options is

displayed.

3

&

 and 

A

 / OK screen buttons

When operating the menus, touch

3

 or 

&

 in the respective submenu

to return to the next higher menu

level.
When no 

3

 or 

&

 screen button is

displayed, you are on the top level of

the respective menu.
On some screens 

A

 / OK needs to

be touched for confirmation after

selecting menu items or changing

settings. Otherwise all performed

selections or settings will be lost.

Scrolling a list

If there are more items available than

presentable on the screen, the list

must be scrolled.
To scroll through a list of menu items,

you may optionally:

● Place your finger anywhere on

the screen and move it upwards

or downwards.

Notice

Constant pressure must be applied

and the finger must be moved at a

constant speed.

● Touch 

S

 or 

R

 at the top or

bottom of the scroll bar.

● Touch anywhere on the guiding

line of the scroll bar.

● Move the slider of the scroll bar

up and down with your finger.

Updating a list

Touch 

U

 to manually update lists,

e.g. the station list.

Input fields and keyboards

Input fields are indicated by 

>

.

Touch the input field to open a

keyboard for text or number input.
Depending on the application or

function currently active, different

keyboards are displayed.
Keyboards for text input

Keyboards for text input may contain

several input fields. To enable a field

for text input, touch it.
To enter a character, touch the

respective screen button. The

character is entered upon release.
Touch and hold a letter screen button

to display associated letters in a letter

pop-up menu. Release and then

select the desired letter.

Infotainment system

139

To switch to the symbol keyboard,

touch 0..#.
To switch back to the letter keyboard

or to switch between capital and small

letters, touch Aa.
To switch the letter keyboard

between normal order and

alphabetical order, touch 

M

.

To delete the most recently entered

character or symbol, touch 

T

.

Audio settings

Press 

b

, select OPTIONS and then

select AUDIO SETTINGS.

Several predefined settings are

available to optimise the tone for a

specific style of music (e.g. Pop-

Rock or Classical).

To adjust the tone individually, select

User. Change the settings as desired.

Notice

If you change the settings of a

predefined setting, e.g. Pop-Rock,

this settings will be applied to the

User or Personalised setting.

Balance and fader

Select the Balance tab.

Several predefined settings are

available to adjust the volume

distribution inside the vehicle (e.g. All

passengers or Front only).

To change the current setting, e.g. All

passengers, select that setting and

then select the desired new setting

from the displayed list.
You may individually adjust the

predefined settings.
To define the point in the passenger

compartment where the volume is at

its highest level, move the cursor in

the illustration on the right side of the

screen to the desired point.
To return to the default factory

settings, select 

h

.

Volume settings

Press 

b

, select OPTIONS and then

select AUDIO SETTINGS. Then

select the Sound tab.

Audible touch feedback

If the audible touch feedback function

is activated, each touch of a screen

button or menu item is indicated by a

beeping sound.
To adjust the touch beep volume,

activate Touch tones and then adjust

the setting.

140

Infotainment system

Speed compensated volume

Activate or deactivate Volume linked

to speed.
If activated, the volume of the

Infotainment system is adapted

automatically to make up for the road

and wind noise as you drive.

Speech output

Select the Voice tab.
Adjust the volume for all speech

outputs of the system.

Ringtone

Select the Ringtones tab.
Adjust the ringtone volume of

incoming calls.

System settings

Touch the top bar 

z

 of the screen to

display the Settings center.
The configuration menu is accessible

via the Settings center.

Configuring the system

Select System configuration to

perform some basic system

configurations, e.g.:

● Adjust the display of units for

temperature or fuel consumption.

● Reset the system configuration to

factory defaults.

● Update the installed software

version.

● Adjust the privacy settings for

data sharing and vehicle position.

Changing display language

To adjust the language for the menu

texts, select Language and then

select the desired language.

Notice

If the selected display language is

supported by the embedded speech

recognition, the language of the

speech recognition will be changed

accordingly; if not, embedded

speech recognition will be not

available.

Adjusting time and date

Select Date and time.
To adjust the time and date, select the

respective tabs.

Adjusting the screen

Select Screen configuration.
Text scroll function

Select the Animation tab.
If long texts on the screen should be

scrolled automatically, activate

Automatic scrolling.
If Automatic scrolling is deactivated,

long texts are truncated.
Adjusting the brightness

Select Brightness and set the

brightness of the screen to the

desired level.

Infotainment system

141

Storing your personal settings

To go to the profile settings, touch the

top bar of the screen 

z

 and then

select Profiles.
You can store a multitude of settings

in a personal profile. For example, all

current tone settings, all radio presets

and a phone book.
In case you share the vehicle with

other people, this enables you to

restore your personal settings from

your profile at any time.
A maximum of three personal profiles

may be stored.
Additionally, a Common profile is

available. All settings done at any

time are automatically stored in that

profile. If no personal profile is

activated, the Common profile is

active.

Storing your personal profile

After performing all your personal

settings:
Select one of the personal profile

tabs.
Select the input field 

>

 and enter the

desired name of your personal profile.

Finally, confirm your inputs to store

them in your personal profile.

Activating your personal profile

Touch the top bar 

z

 of the screen,

then select Profiles and then select

the tab with the name of your personal

profile.

Activating the Common profile

If a personal profile is currently active:
Go to the Common profile tab and

then select Activate profile.

Resetting a personal profile

You can at any time reset a personal

profile to restore the default factory

settings on that profile.
Activate the respective profile and

then select Reset the profile.

Resetting the Common profile

You can at any time reset the

Common profile to restore the default

factory settings on that profile.
Select Common profile and then

select Reset the common profile.

Audio

Activating the radio

Press 

b

. The audio main menu last

selected is displayed.
If the radio main menu is not active,

select SOURCES and then select

Radio.

The station last played will be

received.

Selecting a waveband

Select OPTIONS and repeatedly

touch 

i

 to toggle between the

different wavebands.

142

Infotainment system

Searching for stations

Automatic station search

Briefly touch 

P

 or 

Q

 to play the

previous or next receivable station.

Manual station search

Press and hold 

P

 or 

Q

. Release when

the required frequency has almost

been reached.
A search is made for the next station

that can be received and it is played

automatically.

Station lists

In the station lists, all receivable radio

stations within the current reception

area are available for selection.
To display the station list of the

waveband currently active, select

List.
Select the desired station.
Update station lists

If the stations stored in the waveband-

specific station list can no longer be

received, the station lists must be

updated.
To start an update for the currently

active waveband, select 

U

.

Storing favourite stations

Up to 24 radio stations of all

wavebands can be stored as

favourites in the Presets list.
Select Presets to display the preset

buttons.

Storing the currently active station

Touch and hold the desired button in

the Presets list for a few seconds. The

respective frequency or station name

is displayed on the button.
If a station is already stored on a

preset button, that station will be

overwritten by the new one.
Alternatively, touch 

;

 Mem in the

radio main menu to store the currently

active station.

Storing a station from a station list

Select OPTIONS and then select the

desired waveband.
To store a station from the station list,

briefly touch 

;

 next to the desired

station. The station is stored and the

number of the preset button will be

displayed. To delete a station,

touch 

;

 again.

Alternatively, touch and hold the

name of the station until it is stored.

To delete the station, touch and hold

the name of the station again until a

corresponding message is displayed.

Retrieving stations

In the radio main menu select

Presets and then briefly touch the

preset button of the desired station.

Activating RDS

In the radio main menu, select

OPTIONS and activate RDS.
If RDS is activated, RDS is displayed

in the bottom line of the radio main

menu.

Infotainment system

143

Radio text

If RDS is activated, information on the

radio programme currently active or

the music track currently playing are

displayed below the programme

name.
To show or hide the information, go to

the OPTIONS menu and activate or

deactivate Information.

Traffic announcements

Many RDS stations broadcast traffic

news. If the traffic announcements

function is activated, radio or media

playback is interrupted for the

duration of a traffic announcement.
To activate traffic announcements, go

to the OPTIONS menu and activate

TA.
If TA is activated, TA is displayed in

the bottom line of the radio main

menu.

Digital audio broadcasting

Digital audio broadcasting (DAB)

broadcasts radio stations digitally.
DAB stations are indicated by the

programme name instead of the

broadcasting frequency.

FM-DAB Linking

This function enables switching from

an FM station to a corresponding

DAB station and vice versa.
Switching from FM to DAB occurs as

soon as a corresponding DAB station

is available. Therefore, it is

recommended to store favourite

stations as DAB stations to reduce

frequent switching.
Switching from DAB to FM occurs if

the signal is too weak to be picked up

by the receiver and the corresponding

FM station is available.

Notice

After switching, the volume might be

different.

Activation

Precondition is that RDS is activated

before FM-DAB Linking can be

activated.
To activate FM-DAB Linking, select

OPTIONS in the radio main menu and

then select FM-DAB Follow-up.
The following symbol will be

displayed when FM-DAB Linking is

activated:

Deactivation

To deactivate FM-DAB Linking, select

OPTIONS in the radio main menu and

then deselect FM-DAB Follow-up.
FM-DAB Linking will automatically be

deactivated when RDS is

deactivated.

External devices

A USB port is located in the centre

console.

Caution

To protect the system, do not use

a USB hub.

Notice

The USB ports must always be kept

clean and dry.

144

Infotainment system

USB ports

An MP3 player, USB device, SD card

(via USB connector / adapter) or

smartphone can be connected to the

USB port.
The Infotainment system can play

audio files or show picture files

contained in USB devices.
When connected to a USB port,

various functions of the devices

mentioned above can be operated via

the controls and menus of the

Infotainment system.

Notice

Not all auxiliary devices are

supported by the Infotainment

system.

Connecting / disconnecting a device

Connect one of the devices

mentioned above to a USB port. If

required, use the appropriate

connection cable. The music function

starts automatically.

Notice

If a non-readable USB device is

connected, a corresponding error

message appears and the

Infotainment system automatically

switches to the previous function.

To disconnect a USB device, select

another function and then remove the

USB device.

Caution

Avoid disconnecting the device

during playback. This may

damage the device or the

Infotainment system.

Bluetooth audio streaming

Streaming allows you to listen to

music from your smartphone.
For a detailed description on how to

establish a Bluetooth connection

3

 148.

If audio playback does not start

automatically, it may be necessary to

start the playback on the smartphone.

First adjust the volume on your

smartphone (to a high level). Then

adjust the volume of Infotainment

system.

File formats

The audio equipment supports

different file formats.

Activating the music function

Connecting the USB or Bluetooth

device.
If device already connected, but

playback of stored music files not

active:
Press 

b

, select SOURCES and then

select the respective source.
Playback of the audio tracks starts

automatically.

Playback functions

Interrupting and resuming playback

Touch 

5

 to interrupt playback. The

screen button changes to 

4

.

Touch 

4

 to resume playback.

Infotainment system

145

Playing the previous or next track

Touch 

P

 or 

Q

.

Fast forwarding and rewinding

Touch and hold 

P

 or 

Q

. Release to

return to normal playback mode.
Alternatively, you can move the slider

showing the current track position to

the left or right.

Playing tracks randomly

Select OPTIONS and touch the

Random icon repeatedly:

j

: play tracks of currently selected

list (album, artist, etc.) in random

order.

2

: play all tracks stored on

connected device in random order.

k

: play tracks of currently selected

list (album, artist, etc.) in normal

playback mode.

Repeating tracks

Select OPTIONS and touch the

Repeat icon 

n

 repeatedly to select

one of the following options:

n

: repeat tracks of currently

selected list (album, artist, etc.)

m

: repeat tracks of currently

selected list (album, artist, etc.) once

l

: play tracks of currently selected

list (album, artist, etc.) in normal

playback mode

Activating the picture viewer

Connecting the USB device.
If device already connected, but

picture viewer not active:
Press 

d

, select Photos and choose

the desired folder and picture.

Touch the screen to display the menu

bar.

Viewing the previous or next

picture

Touch 

f

 or 

g

.

Starting or stopping a slide show

Select 

4

 to view the pictures stored

on the USB device in a slide show.
Touch 

5

 to end the slide show.

Phone projection

The phone projection applications

Apple CarPlay and Android Auto

display selected apps from your

smartphone on the Info Display and

allow their operation directly via the

Infotainment controls.
Check with the device's manufacturer

if this function is compatible with your

smartphone and if this application is

available in the country you are in.

Preparing the smartphone

iPhone

®

: Make sure Siri

®

 is activated

on your phone.
Android phone: Download the

Android Auto app to your phone from

the Google Play™ Store.

146

Infotainment system

Connecting the smartphone

iPhone

Connect the phone to the USB port.
If the phone is already connected via

Bluetooth, upon connecting to the

USB port and launching Apple

CarPlay, the Bluetooth connection

will disconnect. After disconnecting

the USB connection, the phone will be

connected via Bluetooth again.
Android phone

Connect the phone via Bluetooth

3

 148 and then connect the phone to

the USB port.

Starting phone projection

If phone projection is not starting

automatically, press 

a

 and then

touch Apple CarPlay or

Android Auto.
The phone projection screen

displayed depends on your

smartphone and software version.

Returning to the Infotainment screen

Press, e.g., the 

b

 button on the

control panel.

Speech recognition

Embedded speech recognition

The embedded speech recognition of

the Infotainment system enables you

to operate various functions of the

Infotainment system via voice input. It

recognises commands and numeric

sequences independently of the

relevant speaker. The commands

and numeric sequences can be

spoken without a voice pause

between the individual words.
In the event of incorrect operation or

commands, the speech recognition

gives visual and / or acoustic

feedback and requests you to re-

enter the desired command. Apart

from this, the speech recognition

acknowledges important commands

and will enquire if necessary.
In general, there are different ways to

speak commands for performing the

desired actions.

Notice

To ensure that conversations inside

the vehicle do not lead to

unintentional triggering of the

system functions, the speech

recognition does not start until it has

been activated.

Important information

Language support

● Not all languages available for

the display of the Infotainment

system are also available for the

speech recognition.

● If the display language currently

selected is not supported by the

speech recognition, speech

recognition is not available.
In such a case, you need to select

another language for the display

if you want to control the

Infotainment system via voice

input. To change the display

language 

3

 132.

Activating speech recognition

Notice

Speech recognition is not available

during an active phone call.

Activation via the 

Y

 button on the

steering wheel

Press 

Y

 on the steering wheel.

Infotainment system

147

The audio system mutes, a voice

output message prompts you to say a

command, and help menus with the

most important commands currently

available are shown on the display.
The speech recognition is ready for

voice input, after a beep has been

given.
You can now say a voice command to

initiate a system function (e.g. playing

a preset radio station).

Adjusting the volume of voice

prompts

Press volume button on the steering

wheel upwards (increase volume)

Y

 or downwards (decrease volume)

Z

.

Interrupting a voice prompt

As an experienced user, you can

interrupt a voice prompt by briefly

pressing 

Y

 on the steering wheel.

Alternatively you can say "Set

dialogue mode as expert".
A beep is heard immediately, and a

command can be stated without

having to wait.

Cancelling a dialogue sequence

To cancel a dialogue sequence and

to deactivate the speech recognition,

press 

6

 on the steering wheel.

If you do not say any command for a

certain period of time, or if you say

commands that are not recognised by

the system, a dialogue sequence is

automatically cancelled.

Operation via speech commands

Follow the instructions given by voice

output and shown on the display.
For best results:

● Listen for the voice prompt and

wait for the beep before saying a

command or replying.

● Read the example commands on

the display.

● The voice prompt can be

interrupted by pressing 

Y

 again.

● Wait for the beep and then speak

the command naturally, not too

fast, not too slow.

Usually commands can be spoken in

a single command.

Voice pass-thru application

The voice pass-thru application of the

Infotainment system allows access to

the speech recognition commands on

your smartphone.
Voice pass-through is available via

the phone projection applications

Apple CarPlay and Android Auto.

Activating speech recognition

Press (without embedded speech

recognition) or press and hold (with

embedded speech recognition) 

Y

 on

the steering wheel until a speech

recognition session is started.

Adjusting the volume of voice

prompts

Turn 

)

 on the control panel or press

volume button on the steering wheel

upwards (increase volume) 

Y

 or

downwards (decrease volume) 

Z

.

Deactivating speech recognition

Press 

6

 on the steering wheel. The

speech recognition session is ended.

148

Infotainment system

Phone

The phone function provides you with

the possibility of having mobile phone

conversations via a vehicle

microphone and the vehicle

loudspeakers as well as operating the

most important mobile phone

functions via the Infotainment system

in the vehicle. To be able to use the

phone function, the mobile phone

must be connected to the

Infotainment system via Bluetooth.
Not all phone functions are supported

by every mobile phone. The usable

phone functions depend on the

relevant mobile phone and network

provider. You can find further

information on this in the operating

instructions for your mobile phone, or

you can enquire about them with your

network provider.

Important information for

operation and traffic safety

9

Warning

Mobile phones have effects on

your environment. For this reason

safety regulations and directions

have been prepared. You should

be familiar with the related

directions before you use the

telephone function.

9

Warning

Use of the hands-free facility while

driving can be dangerous because

your concentration is reduced

when telephoning. Park your

vehicle before you use the hands-

free facility. Follow the stipulations

of the country in which you find

yourself at present.
Do not forget to follow the special

regulations that apply in specific

areas and always switch off the

mobile phone if the use of mobile

phones is prohibited, if

interference is caused by the

mobile phone or if dangerous

situations can occur.

Pairing a device

During the pairing process, PIN code

exchange between the Bluetooth

device and the Infotainment system

and connection of the Bluetooth

devices to the Infotainment system

are carried out.

Important information

● Two paired Bluetooth devices

can be connected to the

Infotainment system at the same

time. One device in hands-free

mode, the other in audio

streaming mode, see description

on Bluetooth profile settings

below.
However, two devices cannot be

used in hands-free mode at the

same time.

● Pairing only needs to be carried

out once, unless the device is

deleted from the list of paired

devices. If the device has been

Infotainment system

149

connected previously, the

Infotainment system establishes

the connection automatically.

● Bluetooth operation considerably

drains the device's battery.

Therefore, connect the device to

the USB port for charging.

Pairing a new device

1. Activate the Bluetooth function of

the Bluetooth device. For further

information, see the operating

instructions for the Bluetooth

device.

2. Press 

a

 and then touch Bluetooth

search.
A search for all Bluetooth devices

in the near environment is

performed.

3. Select the Bluetooth device you

wish to pair from the displayed list.

4. Confirm the pairing procedure:

● If SSP (secure simple

pairing) is supported:

Confirm the messages on the

Infotainment system and the

Bluetooth device.

● If SSP (secure simple

pairing) is not supported:
On the Infotainment system:

a message is displayed

asking you to enter a PIN

code on your Bluetooth

device.
On the Bluetooth device:

enter the PIN code and

confirm your input.
The Infotainment system and

the device are paired.

5. The phone book is downloaded

automatically to the Infotainment

system. Depending on the phone,

the Infotainment system must be

allowed access to the phone

book. If required, confirm the

messages displayed on the

Bluetooth device.
If this function is not supported by

the Bluetooth device, a

corresponding message is

displayed.

Operations on paired devices

Press 

a

, select TEL and then select

Bluetooth connection.
A list of all paired devices is

displayed.

Changing the Bluetooth profile

settings

Touch 

%

 next to the desired paired

device.
Activate or deactivate the profile

settings as desired and confirm your

settings.

Connecting a paired device

Devices which are paired but not

connected are identified by 

X

.

Select the desired device to connect

it.

Disconnecting a device

The currently connected device is

identified by 

W

.

Select the device to disconnect it.

150

Infotainment system

Deleting a paired device

Touch 

f

 in the upper right corner of

the screen to display 

f

 icons next to

each paired device.
Touch 

f

 next to the Bluetooth device

you want to delete and confirm the

displayed message.

Climate control

151

Climate control

Climate control systems ............. 151

Heating and ventilation system 151

Air conditioning system ........... 152

Electronic climate control

system .................................... 154

Auxiliary heater ........................ 158

Temperature preconditioning . . 158

Air vents ..................................... 159

Adjustable air vents ................. 159

Fixed air vents ......................... 160

Maintenance .............................. 160

Air intake ................................. 160

Air conditioning regular

operation ................................ 161

Service .................................... 161

Climate control systems

Heating and ventilation

system

Controls for:

● temperature 

:

● air distribution 

w

>

 and 

y

● fan speed 

E

● demisting and defrosting 

$

● heated rear window and exterior

mirrors 

f

● heated seats 

"

Heated rear window 

3

 24.

Heated exterior mirrors 

3

 21.

Heated seats 

3

 30.

Temperature

Adjust the temperature by

turning 

:

 to the desired

temperature.
red area : warmer

blue area : colder
Heating will not be fully effective until

the engine has reached normal

operating temperature.

Air distribution

w

: to windscreen and front door

windows

>

: to head area via adjustable air

vents

y

: to foot well and windscreen

All combinations are possible.

Fan speed

Adjust the air flow by turning 

Z

 to the

desired speed.
clockwise

: increase

anticlockwise : decrease

152

Climate control

Demisting and defrosting

● Press 

$

: the air distribution is

directed towards the windscreen.

● Set temperature controller 

:

to warmest level.

● Set fan speed 

E

 to highest level.

● Switch on heated rear window 

f

.

● Open side air vents as required

and direct them towards the door

windows.

Air conditioning system

Controls for:

● temperature 

:

● air distribution 

w

x

 and 

y

● fan speed 

E

● demisting and defrosting 

$

● cooling A/C
● air recirculation 

n

● heated rear window and exterior

mirrors 

f

● heated seats 

"

Heated rear window 

3

 24.

Heated exterior mirrors 

3

 21.

Heated seats 

3

 30.

Some setting changes are indicated

briefly in the Info Display. Activated

functions are indicated by the LED in

the respective button.

Temperature

Adjust the temperature by

turning 

:

 to the desired

temperature.
red area : warmer

blue area : colder

Heating will not be fully effective until

the engine has reached normal

operating temperature.

Air distribution

w

: to windscreen and front door

windows

x

: to head area via adjustable air

vents

y

: to foot well and windscreen

All combinations are possible.

Fan speed

Adjust the air flow by turning 

E

 to the

desired speed.
clockwise

: increase

anticlockwise : decrease

Climate control

153

Cooling A/C

Press A/C to switch on cooling. The

LED in the button illuminates to

indicate activation. Cooling is only

functional when the engine is running

and fan is switched on.
Press A/C again to switch off cooling.
The air conditioning system cools and

dehumidifies (dries) as soon as the

outside temperature is slightly above

the freezing point. Therefore,

condensation may form and drip from

under the vehicle.
If no cooling or drying is required,

switch off the cooling system for fuel

saving reasons.

Activated cooling may inhibit

Autostops.
Stop-start system 

3

 167.

Air recirculation system

Press 

n

 to activate air recirculation

mode. The LED in the button

illuminates to indicate activation.
Press 

n

 again to deactivate air

recirculation mode.

9

Warning

The exchange of fresh air is

reduced in air recirculation mode.

In operation without cooling the air

humidity increases, so the

windows may mist up from inside.

The quality of the passenger

compartment air deteriorates,

which may cause the vehicle

occupants to feel drowsy.

In warm and very humid ambient air

conditions, the windscreen may mist

up from outside when cold air is

directed towards it. If windscreen

mists up from outside, activate

windscreen wiper and deactivate 

w

.

Maximum cooling

Briefly open the windows so that hot

air can disperse quickly.

154

Climate control

● Switch on cooling A/C.
● Press 

n

 for air recirculation

system on.

● Press 

x

 for air distribution.

● Set temperature control 

:

 to

coldest level.

● Set fan speed 

E

 to highest level.

● Open all vents.

Heated rear window 

3

 24.

Heated exterior mirrors 

3

 21.

Demisting and defrosting the

windows

● Press 

$

: the air distribution is

directed towards the windscreen.

● Set temperature controller 

:

to warmest level.

● Switch on cooling A/C, if

required.

● Switch on heated rear window 

f

.

● Open side air vents as required

and direct them towards the door

windows.

Notice

If 

à

 is pressed while the engine is

running, an Autostop will be inhibited

until 

à

 is pressed again.

If 

à

 is pressed while the engine is in

an Autostop, the engine will restart

automatically.

Stop-start system 

3

 167.

Electronic climate control

system

Controls for:

● temperature 

:

● MENU enters the Climate setting

menu in the Info Display

● fan speed 

E

● automatic mode AUTO
● cooling A/C
● manual air recirculation 

n

● demisting and defrosting 

$

● heated rear window and exterior

mirrors 

f

● heated seats 

"

Heated rear window 

3

 24.

Heated exterior mirrors 

3

 21.

Heated seats 

3

 30.

In automatic mode, temperature, fan

speed and air distribution are

regulated automatically.
Activated functions are indicated by

the LED in the respective control.
The electronic climate control system

is only fully operational when the

engine is running.

Climate control

155

Climate control settings menu

Press MENU to manually set the

following climate control funtions:

● air distribution 

w

x

 and 

y

● fan speed 

E

● temperature 

:

● cooling A/C
● automatic mode AUTO

Climate setting menu can also be

displayed in the Info Display.
Info Display 

3

 78.

Automatic mode AUTO

Basic setting for maximum comfort:

● Press AUTO, the air distribution

and fan speed are regulated

automatically.
Three different pre-set fan

speeds can be selected by

repeatedly tapping on AUTO

either on the climate control

panel or on the Info Display: soft,

normal or fast. The selected

setting is shown on the Info

Display.

● Open all air vents to allow

optimised air distribution in

automatic mode.

● Air conditioning must be

activated for optimal cooling and

demisting. Press A/C to switch on

air conditioning. The LED in the

button indicates activation.

● Set the preselected temperature

using the left or right rotary knob.

Recommended temperature is

22 °C.

Manual settings

Climate control system settings can

be changed by activating the

following functions:

Fan speed 

E

156

Climate control

Adjust the air flow by turning rotary

knob to the desired speed. Fan speed

can also be changed in the climate

settings menu. Press MENU to enter

the menu.
Turn rotary knob anticlockwise as far

as it will go: fan and cooling are

switched off.
To return to automatic mode, press

AUTO.

Air distribution 

w

x

y

Press MENU to enter the menu.

Touch in the Info Display:

w

: to windscreen and front door

windows

x

: to head area and rear seats via

adjustable air vents

y

: to front and rear foot well and

windscreen

To return to automatic air distribution,

press AUTO.

Temperature preselection 

:

Set the preselected temperature to

the desired value using the left or the

right rotary knob.
Recommended temperature is 22 °C.

The temperature is indicated in the

display and in the climate settings

menu.

If the minimum temperature Lo is set,

the climate control system runs at

maximum cooling, if cooling A/C is

switched on.
If the maximum temperature Hi is set,

the climate control system runs at

maximum heating.

Notice

If A/C is switched on, reducing the

set cabin temperature can cause the

engine to restart from an Autostop or

inhibit an Autostop.

Stop-start system 

3

 167.

Air conditioning A/C

Climate control

157

Press A/C to switch on cooling. The

LED in the button illuminates to

indicate activation. Cooling is only

functional when the engine is running

and climate control fan is switched on.
Press A/C again to switch off cooling.
The air conditioning system cools and

dehumidifies (dries) when outside

temperature is above a specific level.

Therefore, condensation may form

and drip from under the vehicle.
If no cooling or drying is required,

switch off the cooling system for fuel

saving reasons.

Maximum air conditioning AC/MAX

Press MENU to enter the climate

control settings menu.
Touch A/C MAX to activate/

deactivate maximum air conditioning.
The maximum air conditioning

function sets the temperature as low

as possible and adjusts the

distribution to all air vents. In addition,

it sets the air flow to maximum and

activates the air recirculation.

Manual air recirculation 

n

Press 

n

 to activate the air

recirculation mode. The LED in the

button illuminates to indicate

activation.
Press 

n

 again to deactivate

recirculation mode.

9

Warning

The exchange of fresh air is

reduced in air recirculation mode.

In operation without cooling, the

air humidity increases, so the

windows may mist up from inside.

The quality of the passenger

compartment air deteriorates,

which may cause the occupants to

feel drowsy.

In warm and very humid ambient air

conditions, the windscreen may mist

up from outside, when cold air is

directed towards it. If windscreen

mists up from outside, activate

windscreen wiper and deactivate 

w

.

Demisting and defrosting the

windows 

$

● Press 

$

. The LED in the button

illuminates to indicate activation.

● Temperature and air distribution

are set automatically and the fan

runs at high speed.

● Switch on air conditioning by

pressing A/C, if required.

158

Climate control

● Switch on heated rear window 

f

.

● To return to previous mode,

press 

$

 again. To return to

automatic mode, press AUTO.

Heated rear window 

3

 24.

Heated exterior mirrors 

3

 21.

Notice

If 

à

 is pressed while the engine is

running, an Autostop will be inhibited

until 

à

 is pressed again.

If 

à

 is pressed while the engine is in

an Autostop, the engine will restart

automatically.

Stop-start system 

3

 167.

Deactivation of electronic climate

control system

Cooling, fan and automatic mode can

be switched off by turning one of the

rotary knobs anticlockwise.
Activation by switching on the fan or

pressing AUTO.

Auxiliary heater

Air heater

Quickheat is an electric auxiliary air

heater which automatically warms up

the passenger compartment more

quickly.

Temperature

preconditioning

The temperature preconditioning

allows to heat or to ventilate the

vehicle's interior with ambient air.
The temperature preconditioning can

be programmed via the Info Display

or the MyVauxhall App.

Notice

On vehicles without integrated

navigation system, temperature

preconditioning can only be used via

the MyVauxhall App.
Notice

The temperature preconditioning is

only activated if the ignition is off and

the vehicle is locked.

If the charging level of the high

voltage battery is below 30%, the

temperature preconditioning is not

activated.
When the vehicle is plugged in,

battery charging takes precedence

over pre-conditioning.

Consequently, it can only be

activated if the battery is charged

above a threshold fixed at 80%.
If a recurrent heating / ventilation is

programmed and two heating /

ventilation procedures are carried

out without operating the vehicle, the

programming is deactivated.

Setting timer

Notice

Several timers can be programmed

and saved. It is recommended to

programme temperature

preconditioning with the vehicle

plugged in, in order to optimise the

long-term perfomance of the high

voltage battery.

Climate control

159

Press MENU .
Touch OPTIONS.

Select 

=

.

Touch + to define a new timer.
Touch --:--.
Enter time and day.
Press 

A

 to confirm the settings.

Press ON to activate the timer.

To delete a timer, press 

f

 at the top

of the Info Display and delete the

desired timer.
Confirm the deletion.
The heating / ventilation procedure

starts approx. 45 minutes before the

programmed time, and is maintained

ten minutes after it.

Air vents

Adjustable air vents

Centre air vents in the instrument

panel

Direct the flow of air by tilting and

swivelling the slats.
To close the vent, swivel the slats

inwards.

160

Climate control

Outer air vents in the instrument

panel

Direct the flow of air by tilting and

swivelling the slats.
To close the vent, swivel the slats

outwards.
At least two air vents must be open

while cooling is on.

9

Warning

Do not attach any objects to the

slats of the air vents. Risk of

damage and injury in case of an

accident.

Fixed air vents

Additional air vents are located

beneath the windscreen and door

windows and in the foot wells.

Maintenance

Air intake

The air intake in front of the

windscreen in the engine

compartment must be kept clear to

allow air intake. Remove any leaves,

dirt or snow.

Climate control

161

Air conditioning regular

operation

In order to ensure continuously

efficient performance, cooling must

be operated for a few minutes once a

month, irrespective of the weather

and time of year. Operation with

cooling is not possible when the

outside temperature is too low.

Service

For optimal cooling performance, it is

recommended to annually check the

climate control system, starting

three years after initial vehicle

registration, including:

● functionality and pressure test
● heating functionality
● leakage check
● check of drive belts
● cleaning of condenser and

evaporator drainage

● performance check

162

Driving and operating

Driving and

operating

Driving hints ............................... 163

Control of the vehicle ............... 163

Steering ................................... 163

Emergencies ........................... 163

Starting and operating ............... 164

New vehicle running-in ............ 164

Ignition switch positions ........... 164

Power button ........................... 164

Starting the engine .................. 166

Overrun cut-off ........................ 167

Stop-start system .................... 167

Parking .................................... 170

Engine exhaust .......................... 171

Exhaust filter ............................ 171

Catalytic converter ................... 171

AdBlue ..................................... 172

Electric drive unit ....................... 175
Automatic transmission .............. 177
Manual transmission .................. 180
Drive systems ............................ 181

Drive modes ............................ 181

Brakes ........................................ 182

Antilock brake system ............. 182

Parking brake .......................... 183

Brake assist ............................. 185

Hill start assist ......................... 185

Regenerative braking .............. 185

Ride control systems ................. 186

Electronic Stability Control and

Traction Control system ......... 186

Sport mode .............................. 187

Driver assistance systems ......... 187

Cruise control .......................... 188

Speed limiter ........................... 190

Adaptive cruise control ............ 192

Forward collision alert ............. 198

Active emergency braking ....... 200

Automatic post collision

braking .................................... 204

Front pedestrian protection ..... 204

Parking assist .......................... 205

Advanced parking assist ......... 211

Side blind spot alert ................. 216

Rear view camera ................... 217

Traffic sign assistant ................ 220

Lane departure warning .......... 223

Lane keep assist ..................... 224

Advanced lane keep assist ...... 226

Driver alert ............................... 228

Charging .................................... 230

General information ................. 230

Charging types ........................ 231

Charging cable ........................ 232

Programmable charging .......... 237

Charging status ....................... 238

Fuel ............................................ 239

Fuel for petrol engines ............. 239

Fuel for diesel engines ............ 240

Refuelling ................................ 241

Fuel consumption - CO

2

-

Emissions  .............................. 242

Trailer hitch ................................ 243

General information ................. 243

Driving characteristics and

towing tips .............................. 243

Trailer towing ........................... 243

Driving and operating

163

Driving hints

Control of the vehicle

Never coast with engine not

running

Many systems will not function in this

situation (e.g. brake servo unit, power

steering). Driving in this manner is a

danger to yourself and others.
All systems function during an

Autostop.
Stop-start system 

3

 167.

Pedals

To ensure the pedal travel is

uninhibited, there must be no mats in

the area of the pedals.
Use only floor mats, which fit properly

and are fixed by the retainers on the

driver side.

Steering

If power steering assist is lost

because the engine stops or due to a

system malfunction, the vehicle can

be steered but may require increased

effort.

Emergencies

9

Warning

Damage to the high voltage

battery or high voltage system can

create a risk of electric shock,

overheating, or fire.
If the vehicle has been damaged

or affected by a moderate to

severe crash, it must be inspected

as soon as possible by qualified

personnel. Until the technical

inspection has been carried out,

the vehicle must be stored outside

at a minimum distance of

5 metres from any structure or

other flammable objects.

If the vehicle has been damaged

or affected by flood or fire, it must

not be moved at all and has to be

inspected by qualified personnel

as soon as possible.

164

Driving and operating

Starting and operating

New vehicle running-in

Do not brake unnecessarily hard for

the first few journeys.
During the first drive, smoke may

occur because of wax and oil

evaporating off the exhaust system.

Park the vehicle in the open for a

while after the first drive and avoid

inhaling the fumes.
During the running-in period, fuel and

engine oil consumption may be

higher.
Additionally, the cleaning process of

the exhaust filter may take place more

often.
Exhaust filter 

3

 171.

Ignition switch positions

Turn key:

0 : ignition off: some functions

remain active until key is

removed or driver's door is

opened, provided the ignition was

on previously

1 : ignition on power mode: ignition

is on, diesel engine is preheating,

control indicators illuminate and

most electrical functions are

operable

2 : engine start: release key after

engine has been started

Steering wheel lock

Depending on version, the vehicle

may be equipped with a steering

wheel lock.

In this case, remove key from ignition

switch and turn steering wheel until it

engages.

9

Danger

Never remove the key from

ignition switch during driving as

this will cause, depending on

version, steering wheel lock.

Power button

The electronic key must be inside the

vehicle.

Driving and operating

165

Engine start

Operate the clutch pedal (manual

transmission), the brake pedal and

press Start/Stop.

Ignition on power mode without

starting the engine

Press Start/Stop without operating

clutch or brake pedal. Control

indicators illuminate and most

electrical functions are operable.

Engine and ignition off

Press Start/Stop briefly in each mode

or when engine is running and vehicle

is stationary. Some functions remain

active until driver's door is opened,

provided the ignition was on

previously.

Emergency shut off during driving

Press Start/Stop for 5 seconds

3

 166. Depending on version,

steering wheel locks as soon as

vehicle is stationary.

Steering wheel lock

Depending on version, the vehicle

may be equipped with a steering

wheel lock.
In this case, the steering wheel lock

activates automatically when:

● the vehicle is stationary.
● the ignition has been switched

off.

To release steering wheel lock, open

and close driver's door and switch the

ignition on power mode or start the

engine directly.

9

Warning

If the vehicle battery is discharged,

the vehicle must not be towed or

tow-started as the steering wheel

lock cannot be disengaged.

Operation in case of failure

If either the electronic key fails or the

battery of the electronic key is weak,

a message may be displayed in the

Driver Information Centre.

Hold the electronic key at the marking

on the steering column cover as

shown in the illustration.
On vehicles with manual

transmission, select neutral gear,

operate the clutch pedal, the brake

pedal and press Start/Stop.
On vehicles with automatic

transmission, set the selector lever to

position P, operate the brake pedal

and press Start/Stop.
This option is intended for

emergencies only. Replace the

electronic key battery as soon as

possible 

3

 8.


Content      ..     3      4      5      6     ..