Vauxhall Combo E (2023 year). Manual in english - page 4
 

  Index      Manuals     Vauxhall Combo E (2023 year). Manual in english


Search            copyright infringement  


Content      ..     2      3      4      5     ..


Vauxhall Combo E (2023 year). Manual in english - page 4


102

Instruments and controls

Info Display

The Info Displays can indicate:

● time 

3

 83

● outside temperature 

3

 82

● date 

3

 83

● Infotainment system, see

description in the Infotainment

system section

● indication of rear view camera

3

 276

● indication of panoramic view

system 

3

 273

● indication of parking assist

instructions 

3

 263

● navigation, see description in the

Infotainment system section

● vehicle and system messages

3

 106

● settings for vehicle

personalisation 

3

 107

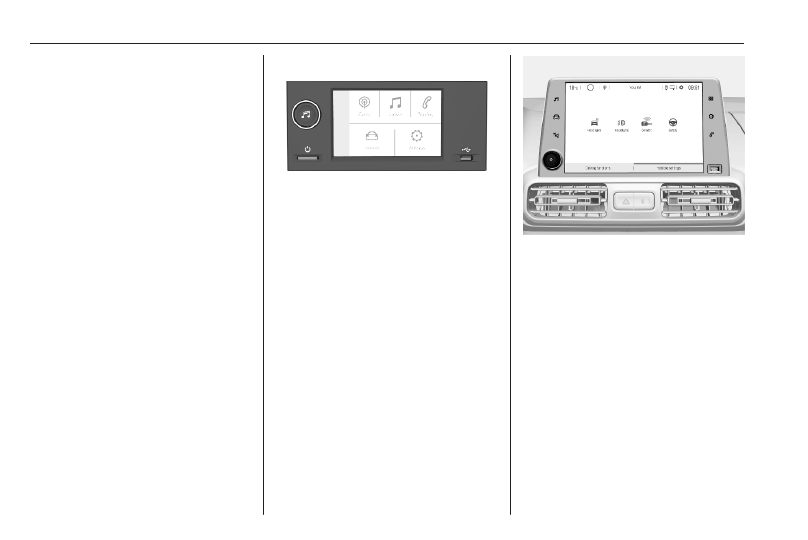
Radio (Infotainment system)

Press 

)

 to switch on the display.

Touch 

:

 to select system settings

(units, language, time and date).
Touch 

_

 to select vehicle settings or

driving functions.
Confirm a required function or

selection by touching.
Touch 

3

 on the display to return to

the previous page.

Multimedia / Multimedia Navi Pro

The illustrations show different

variants of the infotainment system.

Selecting menus and settings

There are three options to operate the

display:

● via buttons next to the display
● by touching the touchscreen with

the finger

● via speech recognition

Button and touch operation

Press 

)

 to switch on the display.

Press 

:

 to select system settings

(units, language, time and date).
Press 

_

 to select vehicle settings or

driving functions.
Touch required menu display icon or

a function with the finger.

Instruments and controls

103

Confirm a required function or

selection by touching.
Touch 

3

 or 

&

 on the display to exit

a menu without changing a setting.
For further information, see

Infotainment system section.
Speech recognition

Description see Infotainment system

section.
Flow

Notice

On vehicles equipped with the

Multimedia infotainment system, this

menu can only be used via the

MyVauxhall App.

This menu displays the current

energy flow within the electric system.

1. Press 

m

.

2. Select Flow.

Different colours show the energy

flow.

● green: electric engine operating
● blue: regenerating energy

Average consumption

Notice

On vehicles equipped with the

Multimedia infotainment system, this

menu can only be used via the

MyVauxhall App.

This menu displays the average

power consumption during the

current trip.

● green: electric energy consumed
● blue: electric energy generated

from the braking and

deceleration phases of the

vehicle used to recharge the

battery

The current trip is subdivided into time

steps. For each time step, the

average consumption is displayed.

The time steps can be modified.

1. Press 

m

.

2. Select Statistics.
3. Press + and - to modify the time

steps.

Vehicle personalisation 

3

 107.

Head-up display

The head-up display displays driver

information concerning the

instrument cluster onto a foldable

projection plane on the driver's side.
The information appears as an image

projected from a lense in the

instrument panel onto the projection

plane directly ahead in driver's view.

The image appears focused out

toward the front of the vehicle.

104

Instruments and controls

Head-up display shows:

● vehicle speed
● speed limits detected by the

speed sign recognition

● set speed of speed limiter
● set speed of cruise control
● forward collision alert
● navigation information.

Switching on

Press 

e

 to switch on the head-up

display.

Adjust position of head-up display

image

Press 

ä

 or 

å

 to centre the image. It

can only be adjusted up and down,

not side to side.

9

Warning

If the head-up display image is too

bright or too high in your field of

view, it may obstruct your view

when it is dark outside. Be sure to

keep the head-up display image

dim and placed low in your field of

view.

Adjust brightness

The head-up display image will

automatically dim and brighten to

compensate for outside lighting.

Brightness can also be adjusted

manually as needed:
Press 

e

 to brighten the display. Press

æ

 to dim the display.

The image can temporarily illuminate

depending on angel and position of

sunlight.

Switching off

Press 

æ

 and hold to turn the head-up

display off.

Language

Preferred language can be set in

vehicle personalisation menu 

3

 107.

Instruments and controls

105

Units

Units can be changed in vehicle

personalisation menu 

3

 107.

Care of head-up display

Clean the screen of the head-up

display with a soft cloth sprayed with

glass cleaner. Wipe the lens gently,

then dry it.

System limitations

Head-up display may not operate

properly when:

● The lens in the instrument panel

is covered by objects or not

clean.

● Display brightness is too dim or

bright.

● Image is not adjusted to the

proper height.

● The driver wears polarized

sunglasses.

If the head-up image is not correct for

other reasons, contact a workshop.

Rear view display

The rear view display is located at the

position of the interior mirror.
It provides the following views:

● standard rear view 

3

 26

● close rear view 

3

 276

● passenger side view 

3

 272

Switching on

Press 

m

 and confirm the message

with 

p

.

Selecting a view

Select the standard rear view or

passenger side view by pressing the

p

 on the bottom side.

Close rear view is automatically

activated when reverse gear is

engaged.

Switching off

Press 

m

.

106

Instruments and controls

Vehicle messages

Messages are indicated in the Driver

Information Centre, in some cases

together with a warning chime.

Press SET / CLR to confirm a

message.

Vehicle and service messages

The vehicle messages are displayed

as text. Follow the instructions given

in the messages.

Messages in the

Colour Info Display

Some important messages may

appear additionally in the

Info Display. Some messages only

pop-up for a few seconds.

Warning chimes

The warning chime regarding not

fastened seat belts has priority over

any other warning chime.
Whenever a warning chime sounds,

pay attention to the messages

displayed and the warning lights in

the Driver Information Centre.

When starting the engine or whilst

driving

The warning chime regarding not

fastened seat belts has priority over

any other warning chime.

● If a seat belt is not fastened.
● If a door or the tailgate is not fully

closed.

● If a certain speed is exceeded

with parking brake applied.

● If cruise control deactivates

automatically.

● If a programmed speed or speed

limit is exceeded.

● If a warning message appears in

the Driver Information Centre.

● If the electronic key is not in the

passenger compartment.

● If the parking assist detects an

object.

● If an unintended lane change

occurs.

● If the exhaust filter has reached

the maximum filling level.

If several warnings appear at the

same time, only one warning chime

will sound.

When the vehicle is parked and /

or the driver's door is opened

● With exterior lights on.

During an Autostop

● If the driver's door is opened.
● If any condition for a restart of the

engine is not fulfilled.

Instruments and controls

107

Vehicle personalisation

The vehicle's behaviour can be

personalised by changing the settings

in the Info Display.
Some functions are only displayed or

active when the engine is running.

Radio (Infotainment system)

Touch 

_

 to display the vehicle

personalisation menu.

Multimedia

Touch 

_

 to display the vehicle

personalisation menu.

Multimedia Navi Pro

Touch 

_

 to display the vehicle

personalisation menu.

108

Instruments and controls

Telematics services

Emergency call

Notice

In order to be available and

operational, the system requires

functioning vehicle electrics, mobile

service and GPS or GLONASS

satellite link. Depending on

equipment, a backup battery is

used.
Notice

The service is only available for

markets where it is legally required.

Furthermore, it depends on the

availability of the emergency centres

and the infrastructure in the country.

Status LED in the overhead

console

Illuminates green and red and

extinguishes after a short time, when

the ignition is switched on: the system

works properly.
Illuminates red: fault in the system.

Contact a workshop.
Flashes red: backup battery needs

replacement. Contact a workshop.

Emergency call

The emergency call function will

establish a connection to the nearest

public safety answering point (PSAP).

A minimum set of data including

vehicle and location information will

be sent to the PSAP.
In case of an emergency, press the

red SOS button in the overhead

console for more than two seconds.

The LED flashes green to confirm that

a connection to the nearest PSAP is

being established. The LED

illuminates steadily as long as the call

is active.
Pressing the SOS button immediately

a second time will terminate the call.

The LED switches off.

Automatic crash notification

In case of an accident with airbag

deployment and without damage of

needed hardware, an automatic

emergency call is established and an

automatic crash notification will be

transmitted to the next PSAP.

Vauxhall Connect

Vauxhall Connect comprises multiple

connected services accessible via

app, online or within the vehicle.

Notice

Full functionality of

Vauxhall Connect  is subject to

registration and proper activation.

Connected services may include live

navigation such as online traffic

information and vehicle status and

information such as maintenance

alerts.
Services accessible within the vehicle

also include emergency call and

breakdown call. These functions are

automatically activated. Terms and

conditions apply.
Emergency call 

3

 108.

Breakdown call

Pressing the 

.

 button in the

overhead console for more than two

seconds connects to a roadside

assistance service provider.

Instruments and controls

109

For information about coverage and

scope of services of the roadside

assistance, please refer to the

information provided by the Vauxhall

Retailer with the order form.

Privacy settings

Privacy settings of Vauxhall Connect

can be configured. This will impact

the set of data being sent, e.g., in

case a breakdown call is

triggered.The emergency call

function will not be impacted.
Depending on version, the privacy

settings can be changed by

simultaneously pressing 

.

 and

SOS in the overhead console or via

the system settings menu in the Info

Display.

110

Lighting

Lighting

Exterior lighting .......................... 110

Light switch .............................. 110

Automatic light control ............. 111

High beam ............................... 111

High beam assist ..................... 111

Headlight flash ......................... 112

Headlight range adjustment .... 113

Headlights when driving

abroad .................................... 113

Daytime running lights ............. 113

Hazard warning flashers .......... 113

Turn lights ................................ 114

Front fog lights ......................... 114

Rear fog light ........................... 114

Parking lights ........................... 115

Reversing lights ....................... 115

Misted light covers ................... 115

Interior lighting ........................... 115

Instrument panel illumination

control ..................................... 115

Interior lights ............................ 116

Reading lights .......................... 116

Sunvisor lights ......................... 116

Lighting features ........................ 117

Centre console lighting ............ 117

Entry lighting ............................ 117

Exit lighting .............................. 117

Vehicle locator lighting ............ 118

Peripheral lighting .................... 118

Battery discharge protection .... 118

Exterior lighting

Light switch

Turn light switch:
AUTO : automatic light control

switches automatically

between daytime running

light and headlight

8

: sidelights

9

: headlights

When switching on the ignition,

automatic light control is active.
Control indicator 

8


3

 98.

Lighting

111

Tail lights

Tail lights are illuminated together

with low/high beam and sidelights.

Automatic light control

When the automatic light control

function is switched on and the

engine is running, the system

switches between daytime running

lights and headlights automatically

depending on the external lighting

conditions and information given by

the wiper system.
Make sure the sensor is not blocked

3

 77, 

3

 26.

Daytime running light 

3

 113.

Automatic headlight activation

During poor lighting conditions the

headlights are switched on.
Additionally, headlights are switched

on if the windscreen wipers have

been activated for several wipes.

Tunnel detection

When a tunnel is entered, headlights

are switched on immediately.

High beam

Push lever to switch from low to high

beam.
Pull lever to deactivate high beam.

High beam assist

Once activated, the high beam assist

switches high beam automatically on

and off depending on vehicle speed

and detected objects by the camera

in the windscreen. This provides the

best light distribution to the driver in

each situation while avoiding dazzling

other road users.
This feature automatically activates

the high beam at night when vehicle

is faster than 15 mph.
It switches automatically back to low

beam when:

● A sensor detects the lights of

oncoming or preceding vehicles.

● Driving in urban areas.
● The vehicle is slower than

9 mph.

● It is foggy or snowy.
● Front or rear fog lights are

switched on.

112

Lighting

If there are no restrictions detected,

the system switches back to high

beam.

Activation

Indicator lever with 

f

 button

Activate high beam assist by pressing

f

 once.

The green control indicator 

f

illuminates continuously when the

assist is activated, the blue one 

7

illuminates when high beam is on.
Control indicator 

f


3

 98.

Deactivation

With high beam on, pull the indicator

lever once to deactivate high beam

assist. If a headlight flash is activated

when the high beam is off, the high

beam assist will remain activated.
Pushing the indicator lever to activate

manual high beam will deactivate

high beam assist. It is also

deactivated when fog lights are

switched on.
Press 

f

 once to deactivate high

beam assist.
The latest setting of the high beam

assist is being stored and remains set

when the ignition is switched on

again.

Headlight flash

To activate the headlight flash, pull

lever.
Pulling lever deactivates high beam.

Lighting

113

Headlight range adjustment

Manual headlight range

adjustment 

To adapt headlight range to the

vehicle load to prevent dazzling: turn

thumb wheel 

?

 to required position.

0 : front seats occupied

1 : all seats occupied

2 : all seats occupied and load

compartment laden

3 : driver's seat occupied and load

compartment laden

Headlights when driving

abroad

When driving in countries where

traffic drives on the opposite side of

the road, the headlights do not have

to be adjusted.

Daytime running lights

Daytime running lights increase

visibility of the vehicle during daylight.
They are switched on automatically

when the engine is running.
The system switches between

daytime running lights and low beam

automatically, depending on the

lighting conditions.

Hazard warning flashers

Hazard warning flashers are switched

on automatically in the following

situations:

● Braking in an emergency

(depending on the force of

deceleration).

● In the event of an accident.

They are switched off the first time

you accelerate or if you press 

¨

.

114

Lighting

Turn lights

up

: right turn lights

down : left turn lights
A resistance point can be felt when

moving the indicator lever.
Constant flashing is activated when

the indicator lever is being moved

beyond the resistance point. It is

deactivated when the steering wheel

is moved in the opposite direction or

indicator lever is manually moved

back to its neutral position.

Activate temporary flashing by

holding the indicator lever just before

the resistance point. Turn lights will

flash until indicator lever is being

released.
To activate three flashes, tap the

indicator lever briefly without passing

the resistance point.
If you forget to cancel the turn lights

for more than twenty seconds, the

volume of the audible signal will

increase if the speed is

above 40 mph.

Front fog lights

Operated by pressing 

>

.

Light switch in position AUTO:

switching on front fog lights will switch

headlights on automatically.

Rear fog light

Operated by pressing 

r

.

Light switch in position AUTO:

switching on rear fog light will switch

headlights on automatically.
Light switch in position 

8

: rear fog

light can only be switched on with

front fog lights.

Lighting

115

The vehicle rear fog light is

deactivated when towing a trailer or a

plug is connected with the socket,

e.g. when a bicycle carrier is used.

Parking lights

When the vehicle is parked, the

parking lights on one side can be

activated:

1. Switch off ignition.
2. Move indicator lever all the way up

(right parking lights) or down (left

parking lights).

Confirmed by a signal and the

corresponding turn lights control

indicator.

Reversing lights

The reversing light comes on when

the ignition is on and reverse gear is

selected.

Misted light covers

The inside of the light housing may

mist up briefly in poor, wet and cold

weather conditions, in heavy rain or

after washing. The mist disappears

quickly by itself; to help switch on the

headlights.

Interior lighting

Instrument panel

illumination control

Brightness of the following lights can

be adjusted when the exterior lights

are on:

● instrument panel illumination
● Info Display
● illuminated switches and

operation elements

Turn thumb wheel 

A

 and hold until

the desired brightness is obtained.

116

Lighting

Interior lights

During entry and exit of the vehicle,

the front and rear courtesy lights

automatically switch on and then off

after a delay.

Notice

In the event of an accident with

airbag deployment the courtesy

lights are turned on automatically.

Front and rear courtesy light

Operate rocker switch:

;

: automatic switching on

and off

press 

e

: on

press 

$

: off

Reading lights

Operated by pressing 

z

 and 

B

 in the

courtesy lights.

Illustration shows rear courtesy lights.

Sunvisor lights

Illuminates when the cover is opened.

Lighting

117

Lighting features

Centre console lighting

A spotlight integrated in the overhead

console illuminates the centre

console when headlights are

switched off.
The intensity can be adjusted in the

vehicle personalisation 

3

 107.

Entry lighting

Welcome lighting

Some or all of the following lights are

switched on for a short time by

unlocking the vehicle with the radio

remote control:

● headlights
● tail lights
● interior lights

The number of activated lights

depends on the surrounding light

conditions.
The lighting switches off immediately

when the ignition is switched on.
Starting off 

3

 218.

This function can be activated or

deactivated in the vehicle

personalisation 

3

 107.

The following lights will additionally

switch on when the driver's door is

opened:

● illumination of some switches
● Driver Information Centre

Exit lighting

The following lights are switched on if

the key is removed from the ignition

switch:

● interior lights
● instrument panel light

They will switch off automatically after

a delay. This function works only in

the dark.

Path lighting

Headlights, tail lights and number

plate lights illuminate the surrounding

area for an adjustable time after

leaving the vehicle.

Activating

1. Switch off the ignition.
2. Open the driver's door.
3. Pull the indicator lever.
4. Close the driver's door.

If the driver's door is not closed, the

lights switch off after two minutes.
Exit lighting is switched off

immediately if the indicator lever is

pulled while the driver's door is open.
This function can be activated or

deactivated in the vehicle

personalisation 

3

 107.

Info Display 

3

 102.

118

Lighting

Vehicle locator lighting

This function allows you to locate your

vehicle, e.g., in weak lighting

conditions using the remote control.

The headlights come on and the turn

lights flash for 10 seconds.
Press 

N

 on the remote control.

The vehicle must be locked more than

5 seconds.

Peripheral lighting

Peripheral lighting allows you to

switch on the position lights, low

beam and number plate lighting using

the remote control.
Press 

G

 on the remote control to

switch on peripheral lighting.
Press 

G

 a second time to switch off

peripheral lighting.

Battery discharge protection

To prevent discharge of the vehicle

battery when the ignition is switched

off, some interior lights are switched

off automatically after some time.

Infotainment system

119

Infotainment system

Multimedia Navi Pro ................... 119

Audio ....................................... 131

External devices ...................... 134

Navigation ............................... 137

Speech recognition .................. 148

Phone ...................................... 150

Multimedia ................................. 155

Audio ....................................... 165

External devices ...................... 168

Speech recognition .................. 170

Phone ...................................... 172

Touchscreen Radio ................... 177

Audio ....................................... 181

Speech recognition .................. 183

Phone ...................................... 183

Radio ......................................... 185

Audio ....................................... 194

External devices ...................... 196

Speech recognition .................. 198

Phone ...................................... 198

Multimedia Navi Pro

Introduction

Important information on operation

and traffic safety

9

Warning

Drive safely at all times. Only

operate the Infotainment system if

the traffic conditions allow a safe

usage.
In the interest of safety, it might be

appropriate to stop the vehicle

before operating the Infotainment

system (e.g. for entries of

addresses).

9

Warning

The usage of the navigation

system does not release the driver

from the responsibility for a

correct, vigilant attitude in road

traffic. Always follow the

applicable traffic rules.

9

Warning

In some areas one-way streets

and other roads and entrances

(e.g. pedestrian zones) that you

are not allowed to turn into are not

marked on the map. In such areas

the Infotainment system may

issue a warning that must be

accepted. Here you must pay

particular attention to one-way

streets, roads and entrances that

you are not allowed to drive into.

Radio reception

Radio reception may be disrupted by

static, noise, distortion or loss of

reception due to:

● changes in distance from the

transmitter

● multi-path reception due to

reflection

● shadowing

120

Infotainment system

Multimedia Navi Pro

Control panel

Infotainment system

121

1

X

If switched off: switch

power on / off
If switched on: mute system
Turn: adjust volume

2

c

Display embedded

navigation map ................... 137

3

_

Open vehicle settings menu 107

4

b

Open audio menu:
Radio ................................... 131
CD player ............................ 134
External devices (USB,

Bluetooth) ............................ 134

5

d

Open apps menu ................ 134

6

:

 / 

m

Open settings menu
or open charging settings

(electric vehicles)

7

a

Open phone menu .............. 150

8

Info Display / touch screen

with Home menu (Home

menu only visible after 3-

finger touch on screen)

9

USB port ............................. 134

Steering wheel controls

1

SRC (Source)
Select audio source,

confirm selection with 

G

Long press: mute system

2

ä

 / 

å

Select next / previous

preset radio station when

radio active .......................... 131
or select next / previous

track / picture when

external devices active ....... 134

122

Infotainment system

or select next / previous

entry in station list, media

list, call / contacts list when

operation started via

steering wheel controls
Confirm selection with 

G

3

G

Confirm selected item
or open station list, media list

4

x

Activate / deactivate mute

function

5

À

 / 

Á

Turn upwards /

downwards: increase /

decrease volume

6

v

Short press: accept

incoming call
Long press: reject

incoming call, hang up call .. 150

or open call / contacts list . . . 150
If phone call active: open

call in progress menu 

7

w

Short press: activate

embedded speech recognition
Long press: activate

speech recognition in

Apple CarPlay™ or

Android™ Auto if phone

connected via USB port ...... 148

Control elements

The Infotainment system is operated

via function buttons, a touch screen

and menus that are shown on the

display.
Inputs are made optionally via:

● the control panel on the

Infotainment system

● the touch screen
● audio controls on the steering

wheel

● the speech recognition 

3

 148

Switching the Infotainment

system on or off

Press 

X

. After switching on, the last

selected Infotainment source

becomes active.

Notice

Some functions of the Infotainment

system are only available if ignition

is switched on or engine is running.

Infotainment system

123

Automatic switch-off

If the Infotainment system has been

switched on pressing 

X

 while the

ignition is switched off, it will switch off

again automatically when the Eco

mode becomes active.

Setting the volume

Turn 

X

. The current setting is shown

on the display.
When the Infotainment system is

switched on, the last selected volume

is set.

Speed compensated volume

When the speed compensated

volume is activated, the volume is

adapted automatically to make up for

the road and wind noise as you drive.

Mute

Press 

X

 to mute the Infotainment

system.
To cancel the mute function, press

X

 again. The last selected volume is

set again.

Modes of operation

Audio-Media

Press 

b

 to display the main menu of

the last selected audio mode.

Changing the media source

Select SOURCES to display the

menu for media source selection.

Select the desired media source.
For a detailed description of:

● Radio functions 

3

 131

● CD player 

3

 134

● External devices 

3

 134

Navigation

Press 

c

 to display the navigation

map showing the area around the

current location.

124

Infotainment system

For a detailed description of basic

functions of the navigation system

3

 137.

Navigation menu

Select MENU to display the

navigation menu.

The navigation menu serves as

central entry point for:

● Address search and input
● Defining trips with several

waypoints

● Defining criteria for route

guidance

● Cancelling and resuming route

guidance

Navigation 

3

 137

Phone

Before the phone function can be

used, a connection has to be

established between the Infotainment

system and the mobile phone.

For a detailed description of

preparing and establishing a

Bluetooth connection between the

Infotainment system and a mobile

phone 

3

 150.

If the mobile phone is connected,

press 

a

 to display the main menu of

the phone function.

For a detailed description of mobile

phone operation via the Infotainment

system 

3

 150.

Network and connected services

Press 

d

 and then select OPTIONS

to display the Bluetooth, network and

connected services settings.

Infotainment system

125

To connect the vehicle to a Wi-Fi

network, touch 

y

. A list of all

available Wi-Fi networks is displayed.
It is also possible to share the Wi-Fi

connection for other devices.
To update the service and connection

status, go to the menu for connected

services 

z

 and touch 

R

.

To use the connected services, make

sure that data sharing and the vehicle

position are activated in the privacy

menu in the System settings.

Apps

To show specific apps of your

smartphone on the display of the

Infotainment system, connect your

smartphone.
Press 

d

 to display the main menu of

the apps mode.
Touch Apple CarPlay or

Android Auto. A menu with different

selectable apps is displayed.
For a detailed description 

3

 134.

Settings

Press 

:

 and then select Audio

settings to display the respective

menu.

For a detailed description.
Press 

:

 and then OPTIONS to

display a menu for various system-

related settings.

For a detailed description.

Vehicle settings

Select 

_

 to open a menu for various

vehicle-related settings.
Vehicle personalisation 

3

 107

Menu operation

The display of the Infotainment

system has a touch-sensitive surface

that allows direct interaction with the

displayed menu controls.

126

Infotainment system

Caution

Do not use pointed or hard items

like ballpoint pens, pencils or

similar for touch screen operation.

Selecting or activating a screen

button or menu item

Touch a screen button or menu item.

Notice

Most icons displayed in a menu, like

e

 or 

d

 in the illustrated example,

serve as screen buttons that initiate

certain actions if you touch them.

The corresponding system function is

activated, a message is shown, or a

submenu with further options is

displayed.

Ù

 and 

G

 screen buttons

When operating the menus, touch

Ù

 in the respective submenu to

return to the next higher menu level.
When no 

Ù

 screen button is

displayed, you are on the top level of

the respective menu.

After selecting menu items or

performing settings in a menu, touch

G

 to confirm your settings. Otherwise

all performed selections or settings

will be lost.

Shortcuts to important menus

The texts and icons displayed in the

top line, of e.g. the navigation main

menu, serve as shortcuts to some

important menus. For example, touch

the station name to open the station

list menu.

Infotainment system

127

Scrolling a list

If there are more items available than

presentable on the screen, the list

must be scrolled.
To scroll through a list of menu items,

you may optionally:

● Place your finger anywhere on

the screen and move it upwards

or downwards.

Notice

Constant pressure must be applied

and the finger must be moved at a

constant speed.

● Touch 

H

 or 

I

 at the top or

bottom of the scroll bar.

● Touch anywhere on the guiding

line of the scroll bar.

● Move the slider of the scroll bar

up and down with your finger.

Updating a list

Touch 

Ü

 to manually update, e.g.,

station lists, contacts lists or

destination lists.

Input fields and keyboards

Input fields are indicated by 

o

.

Touch the input field to open a

keyboard for text or number input.

Depending on the application or

function currently active, different

keyboards are displayed.
Keyboards for text input

Keyboards for text input may contain

several input fields. To enable a field

for text input, touch it.
To enter a character, touch the

respective screen button. The

character is entered upon release.
Touch and hold a letter screen button

to display associated letters in a letter

pop-up menu. Release and then

select the desired letter.
To switch to the symbol keyboard,

touch 0..#.

128

Infotainment system

To switch back to the letter keyboard

or to switch between capital and small

letters, touch Aa.
To switch the letter keyboard

between normal order and

alphabetical order, touch 

ç

.

To delete the most recently entered

character or symbol, touch 

k

.

To delete a character or symbol at

any point of your input: touch at the

desired point to place a blinking

cursor, then touch 

k

.

Audio settings

Press 

:

, select Audio settings and

then select the Ambience tab.

Several predefined settings are

available to optimise the tone for a

specific style of music (e.g. Pop-

Rock or Classical).
To adjust the tone individually, select

Personalised. Change the settings as

desired and then confirm your

settings.

Notice

If you change the settings of a

predefined setting, e.g. Pop-Rock,

this settings will be applied to the

User or Personalised setting.

Activating the Loudness function may

optimise the tone at low volume

levels.

Balance and fader

Select the Balance tab.

Several predefined settings are

available to adjust the volume

distribution inside the vehicle (e.g. All

passengers or Front only).
To change the current setting, e.g. All

passengers, select that setting and

then select the desired new setting

from the displayed list.
You may individually adjust the

predefined settings.
To define the point in the passenger

compartment where the volume is at

its highest level, move the cursor in

the illustration on the right side of the

screen to the desired point.

Infotainment system

129

To return to the default factory

settings, select Reset.

Volume settings

Press 

:

, select Audio settings and

then select the Sound tab.

Audible touch feedback

If the audible touch feedback function

is activated, each touch of a screen

button or menu item is indicated by a

beeping sound.
To adjust the touch beep volume,

activate Touch tones and then adjust

the setting.

Speed compensated volume

Activate or deactivate Volume linked

to speed.
If activated, the volume of the

Infotainment system is adapted

automatically to make up for the road

and wind noise as you drive.

Speech output

Select the Voice tab.

Adjust the volume for all speech

outputs of the system, e.g. traffic

announcements, navigation

messages etc.

Ringtone

Select the Ringtone tab.
Adjust the ringtone volume of

incoming calls.

System settings

Press 

:

 and then select OPTIONS.

Configuring the system

Select System settings to perform

some basic system configurations,

e.g.:

● Adjust the display of units for

temperature or fuel consumption.

● Reset the system configuration to

factory defaults.

● Update the installed software

version.

Changing display language

To adjust the language for the menu

texts, select Languages and then

select the desired language.

Notice

If the selected display language is

supported by the embedded speech

recognition, the language of the

speech recognition will be changed

accordingly; if not, embedded

speech recognition will be not

available.

Adjusting time and date

Select Setting the time-date.

130

Infotainment system

Changing time and date formats

To change the time and date formats,

select the respective tabs and then

select the desired formats.
Setting time and date

By default the displayed time and

date is automatically adjusted by the

system.
To manually adjust the displayed time

and date:
Select the Time tab.
Set Synchronization with GPS (UTC)

to OFF and then select the Time field

to set the desired time.
Select the Date tab and then select

the Date: field to set the desired date.

Adjusting the screen

Select Screen configuration.
Text scroll function

Select the Animation tab.
If long texts on the screen should be

scrolled automatically, activate

Automatic scrolling.
If Automatic scrolling is deactivated,

long texts are truncated.
Adjusting the brightness

Select Brightness and set the

brightness of the screen to the

desired level.

Storing your personal settings

Select Setting of the profiles.

You can store a multitude of settings

in a personal profile. For example, all

current tone settings, all radio

presets, one phone book, the map

settings and your preferred

addresses.
In case you share the vehicle with

other people, this enables you to

restore your personal settings from

your profile at any time.
A maximum of three personal profiles

may be stored.
Additionally, a Common profile is

available. All settings done at any

time are automatically stored in that

profile. If no personal profile is

activated, the Common profile is

active.
Storing your personal profile

After performing all your personal

settings:
Select one of the personal profile

tabs.
Select the input field 

o

 and enter the

desired name of your personal profile.
If you want to add a photo to the

profile:

Infotainment system

131

Connect a USB device with the

desired photo stored on it to the USB

port 

3

 134, touch the photo frame

and then select the desired photo.
Confirm your selection to download

the selected photo to the system.
Finally, confirm your inputs to store

them in your personal profile.
Activating your personal profile

Press 

:

 and then select the tab with

the name of your personal profile.
Activating the Common profile

If a personal profile is currently active:
Press 

:

 and then select Deactivate

profile.
Resetting a personal profile

You can at any time reset a personal

profile to restore the default factory

settings on that profile.
Select the respective profile and then

select Reset profile.
Resetting the Common profile

You can at any time reset the

Common profile to restore the default

factory settings on that profile.
Select Common profile and then

select Reset the common profile.

Audio

Activating the radio

Press 

b

. The audio main menu last

selected is displayed.
If the radio main menu is not active,

select SOURCES and then select

Radio.

The station last played will be

received.

Selecting a waveband

Repeatedly select Band to toggle

between the different wavebands.

Searching for stations

Automatic station search

Briefly touch 

<

 or 

>

 to play the

previous or next receivable station.

Manual station search

Press and hold 

<

 or 

>

. Release when

the required frequency has almost

been reached.
A search is made for the next station

that can be received and it is played

automatically.

Station tuning

If you exactly know the reception

frequency of a radio station, you may

enter that frequency manually.
Select OPTIONS, select Radio

stations and then select the desired

waveband.
Select Freq., enter the reception

frequency and confirm your input.
If a station is receivable on that

frequency, the respective station is

played.

132

Infotainment system

Station lists

In the station lists, all receivable radio

stations within the current reception

area are available for selection.
To display the station list of the

waveband currently active, select

List.
Select the desired station.
Update station lists

If the stations stored in the waveband-

specific station list can no longer be

received, the AM and the DAB station

lists must be updated. The FM station

list is updated automatically.
Select OPTIONS, select Radio

stations and then select the desired

waveband.
To start an update for the selected

waveband, select 

Ü

.

Storing favourite stations

Up to 15 radio stations of all

wavebands can be stored as

favourites in the Presets list.
Select Presets to display the preset

buttons.

Storing the currently active station

Touch and hold the desired button for

a few seconds. The respective

frequency or station name is

displayed on the button.
If a station is already stored on a

preset button, that station will be

overwritten by the new one.

Storing a station from a station list

Select OPTIONS, select Radio

stations and then select the desired

waveband.

Briefly touch the button next to the

desired station. Alternatively, select

Û

 to switch to the tiled view. Then

briefly touch 

 on the tile of the

desired station.
Select Add to favourites and then

touch and hold for a few seconds on

the list row where you want to store

the station.
If a station is already stored on a list

row, that station will be overwritten by

the new one.

Retrieving stations

In the radio main menu select

Presets and then briefly touch the

preset button of the desired station.

Infotainment system

133

Radio data system

Radio data system (RDS) is a service

of FM stations that considerably

facilitates the finding of the desired

station and its fault-free reception.

RDS configuration

Select General and then activate

Alternative frequency.
If Alternative frequency is activated,

RDS is displayed in the bottom line of

the radio main menu.
Radio text

If RDS is activated, information on the

radio programme currently active or

the music track currently playing are

displayed below the programme

name.
To show or hide the information,

activate or deactivate Display radio

text.
Traffic announcements

Many RDS stations broadcast traffic

news. If the traffic announcements

function is activated, radio or media

playback is interrupted for the

duration of a traffic announcement.

Select Announcements and then

activate or deactivate Traffic

announcement.
If Traffic announcement is activated,

TA is displayed in the bottom line of

the radio main menu.

Digital audio broadcasting

Digital audio broadcasting (DAB)

broadcasts radio stations digitally.
DAB stations are indicated by the

programme name instead of the

broadcasting frequency.

DAB Announcements

Besides their music programmes, a

lot of DAB stations also broadcast

announcements of various

categories. If you activate some or all

categories, the currently received

DAB service is interrupted when an

announcement of these categories is

made.
In the radio main menu select

OPTIONS, select Radio settings and

then select Announcements.

Activate the desired announcement

categories, e.g., News or Weather.

Different announcement categories

can be selected at the same time.

FM-DAB Linking

This function enables switching from

an FM station to a corresponding

DAB station and vice versa.
Switching from FM to DAB occurs as

soon as a corresponding DAB station

is available. Therefore, it is

recommended to store favourite

stations as DAB stations to reduce

frequent switching.
Switching from DAB to FM occurs if

the signal is too weak to be picked up

by the receiver.
Activation

Precondition is that Alternative

frequency is activated before FM-

DAB Linking can be activated.
To activate FM-DAB Linking, select

OPTIONS in the radio main menu and

then select FM-DAB Follow-up in the

Radio settings.
The following symbol will be

displayed when FM-DAB Linking is

activated:


Content      ..     2      3      4      5     ..