Traktor kontrol F1. Manual in english (2015) - page 3
TRAKTOR KONTROL F1 Reference
Delete Mode
4.5.4
Deleting the Entire Remix Deck
Sometimes you'll want to delete all contents and re-initialize a Remix Deck, a process also
known as "unloading" a Remix Deck. This is similar to deleting a page of Samples. To delete
(unload) an entire Remix Deck:
► Turn the encoder knob while in Delete mode until the Display reads "UL" for "UnLoad."
When in this position, the entire Sample Grid will start blinking red. Push the encoder
knob to delete the Remix Deck.
Deleting the entire Remix Deck resets the Deck back to a "new," or initialized state. This
ensures that any settings you have made to the various Sample Slots will be returned to
their default state.
4.6
Color Mode
With Color mode you can change the colors assigned to the Samples in the Sample Grid. Al-
though this might seem trivial at first, a consistent choice of colors can help you understand
what's in your Remix Deck at a glance.
Press SHIFT and the REVERSE (COLOR) button simultaneously to enter Color mode.
As with the other modes, activating Color mode disables some of the F1's controls, while leav-
ing others unaffected. The unaffected controls are:
• The Filter knobs
• The Volume faders
• The Mute (STOP) buttons
The controls which are disabled in Color mode are:
• SYNC (MASTER)
TRAKTOR KONTROL F1 - Manual - 92
TRAKTOR KONTROL F1 Reference
Color Mode
• QUANT (EDIT)
• CAPTURE (DELETE)
• REVERSE
• TYPE (PITCH)
• SIZE (SPEED)
• BROWSE (MIDI)
4.6.1
Activating Color Mode
To toggle Color mode on and off:
► Press SHIFT + REVERSE (COLOR).
When Color mode is active, both the SHIFT and REVERSE (COLOR) buttons blink on and off.
You can also disable Color mode by pressing the REVERSE (COLOR) button (without pressing
SHIFT).
4.6.2
Assigning Colors Using the Color Palette
While Color mode is active, pressing a single pad will transform the whole Pad Matrix into the
Color Palette selector. You can then select the color you want to assign to the pad by pressing
the pad associated with the target color.
1. Press the SHIFT + REVERSE (COLOR) buttons.
2. Select (by pressing) the pad you wish to change (the Pad Matrix shows the Color Palette
selector).
3. Press the pad showing the desired color.
4. If desired, select (by pressing) another pad for color assignment.
5. When you are finished assigning colors to the pads, press the REVERSE (COLOR) button
to return to Performance mode.
TRAKTOR KONTROL F1 - Manual - 93
TRAKTOR KONTROL F1 Reference
Color Mode
4.6.3
Assigning Colors Using the Encoder
It may be quicker for you to use the encoder knob to assign colors, especially if you want to
choose a color of a single pad while comparing it to the colors of the other pads of the Pad
Matrix.
1. Press the SHIFT + REVERSE (COLOR) buttons.
2. Press and hold the pad you wish to change.
3. While continuing to hold the pad, turn the encoder knob, which now steps through each
color of the Palette (one color per tick of the encoder knob).
4. When the pad displays the desired color, release the pad.
5. To continue with other pad color changes, press and hold another pad and choose the col-
or with the encoder knob in the same way.
6. When you are finished assigning colors, press the REVERSE (COLOR) button to return to
Performance mode.
It is a good idea to be familiar with both ways of assigning colors. There are times when the
Pad Matrix method (using the Pad Matrix as a Color Palette) might be best, especially when
you want to see all of the sixteen possible color choices at once. At other times, you might
want to select the color of one pad in relation to the pads around it. For example, you
might want to keep all the Samples from a specific song as the same color because using
the encoder knob makes it possible to see the color states of all the pads on a page while
adjusting the color of just a single pad.
4.6.4
Using Quick Color Assign
As with most other F1 modes, there is also a "quick" function which allows you to change pad
colors without first having to enter Color mode.
1. Press and hold both the SHIFT and REVERSE (COLOR) buttons.
2. Continue to hold at least one of the two buttons (if desired, you may now release either
the SHIFT or the REVERSE (COLOR) button).
3. Press the pad you wish to change — the Pad Matrix turns into the Color Palette selector.
4. Press the pad of the desired color and the pads return to the Sample Grid page, with the
selected pad shown in its new color.
5. Release the pad.
TRAKTOR KONTROL F1 - Manual - 94
TRAKTOR KONTROL F1 Reference
Type Mode
6. Repeat the process to continue editing pad colors or release the SHIFT and/or REVERSE
(COLOR) buttons to return to Performance mode.
You can also perform the Quick Color Assign using the encoder knob as described above:
1. Press and hold both the SHIFT and REVERSE (COLOR) buttons.
2. Continue to hold at least one of the two buttons (if desired, you may now release either
the SHIFT or the REVERSE (COLOR) button).
3. Press and hold the pad you wish to change.
4. While continuing to hold the pad, turn the encoder knob to choose a new color. Each tick
of the encoder knob steps through a different color of the Palette.
5. Release the pad.
6. Repeat the process to continue editing pad colors or release the SHIFT and/or REVERSE
(COLOR) buttons to return to Performance mode.
4.7
Type Mode
Type mode is for editing a number of play, sync, and trigger parameters of your Samples. It is
probably the most musically relevant mode since it determines how your Samples will actually
be played.
The TYPE (PITCH) button for activating Type mode.
Type mode is also a little different from most other modes because it also has four sub-modes
(see ↑4.7.1, Activating Type Mode and Selecting Sub Modes).
Type mode is what you'll be using to set up the basic playing parameters of your Samples.
Since there are a lot of different Type-centric parameters that you can edit with the F1, it
is a good idea to spend some time getting familiar with Type mode and its various sub-
modes.
As with most of the F1's modes, activating Type mode only affects some of the controls. The
unaffected controls are:
TRAKTOR KONTROL F1 - Manual - 95
TRAKTOR KONTROL F1 Reference
Type Mode
• The Filter knobs
• The Volume faders
• The Mute (STOP) buttons
The following controls will be disabled when Type mode is active:
• SYNC (MASTER)
• QUANT (EDIT)
• CAPTURE (DELETE)
• REVERSE (COLOR)
•
(PITCH)
• SIZE (SPEED)
• BROWSE (MIDI)
4.7.1
Activating Type Mode and Selecting Sub Modes
To activate Type mode:
► Press and release the TYPE (PITCH) button.
When Type mode is active, the TYPE (PITCH) button blinks on and off. When inactive, the
TYPE (PITCH) button will be dim.
As mentioned above, Type mode also has four sub-modes which you select with the encoder
knob. They are also shown on the F1's Display. The four sub-modes (and their indication on
the Display) are:
• Gate Override: Indicated by "GO" on the Display.
TRAKTOR KONTROL F1 - Manual - 96
TRAKTOR KONTROL F1 Reference
Type Mode
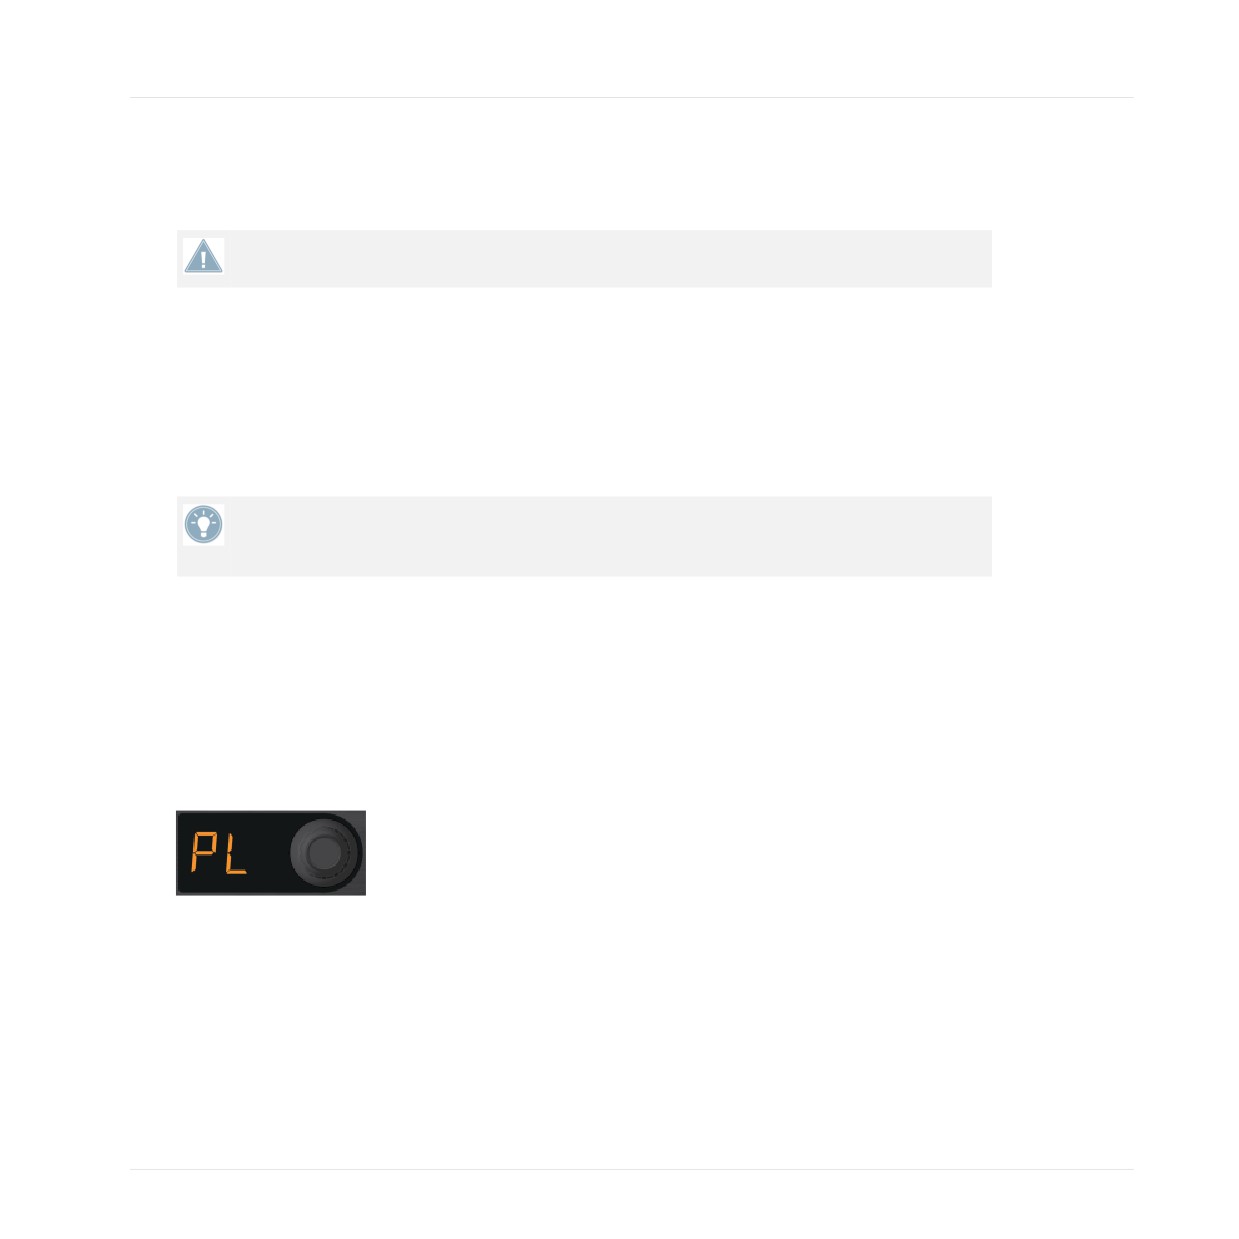
• Play Type: Indicated by "PL" on the Display.
• Trigger Type: Indicated by "tr" on the Display.
• Sync Type: Indicated by "Sy" on the Display.
4.7.2
Gate Override Sub-Mode
The Gate Override sub-mode lets you temporarily override the Trigger Type of all Sample Cells
so that they behave as if they are all set to Gate Trigger mode, where you must hold down a
pad for a Sample to play. This does not change the stored property of the Sample Cells — se-
lecting this mode does not change all the Sample Slots to Gate mode.
► To enter Gate Override sub-mode, press and release the TYPE (PITCH) button and turn
the encoder knob until you see "go" on the Display.
Note that while in Gate Override sub-mode you cannot scroll the pages of the Remix Deck's
Sample Grid because the encoder knob is being used for choosing the various Type sub-
modes.
When you enter or exit the Gate Override sub-mode, Samples which had already been playing
before entering the sub-mode will not change their play states. For example, if you have a loop-
ed (and latched) Sample playing when you activate Gate Override sub-mode, that Sample will
TRAKTOR KONTROL F1 - Manual - 97
TRAKTOR KONTROL F1 Reference
Type Mode
continue to play unless you hit its pad, which would change it to Gate Override sub-mode. In
this case (hitting the pad while in Gate Override sub-mode), the Sample will only play as long
as you hold the pad.
Samples which are already playing before you enter Gate Override sub-mode will continue
to play normally, unless you press their corresponding pads while in the sub-mode.
Latching Samples in Gate Override Sub-Mode
You can also latch Samples (regardless of their normal play states) while in Gate Override sub-
mode:
► In Gate Override sub-mode, press and hold a Sample, then press the Mute (STOP) button
on its slot.
In a "gated" play state, a Sample will only play as long as you are holding its pad. As soon
as you release the pad, the Sample will stop playing. On the other hand, in a "latch" play
state, a Sample will continue to play after releasing the pad.
4.7.3
Changing the Sample Play Type
Play Type refers to whether the Sample behaves as a One-shot or as a Loop. A Sample in Loop
mode will automatically restart when its end is reached, while a Sample in One-shot mode will
stop when the end of the Sample is reached.
► To enter Play Type sub-mode, press and release the TYPE (PITCH) button and turn the
encoder knob until you see "PL" on the Display.
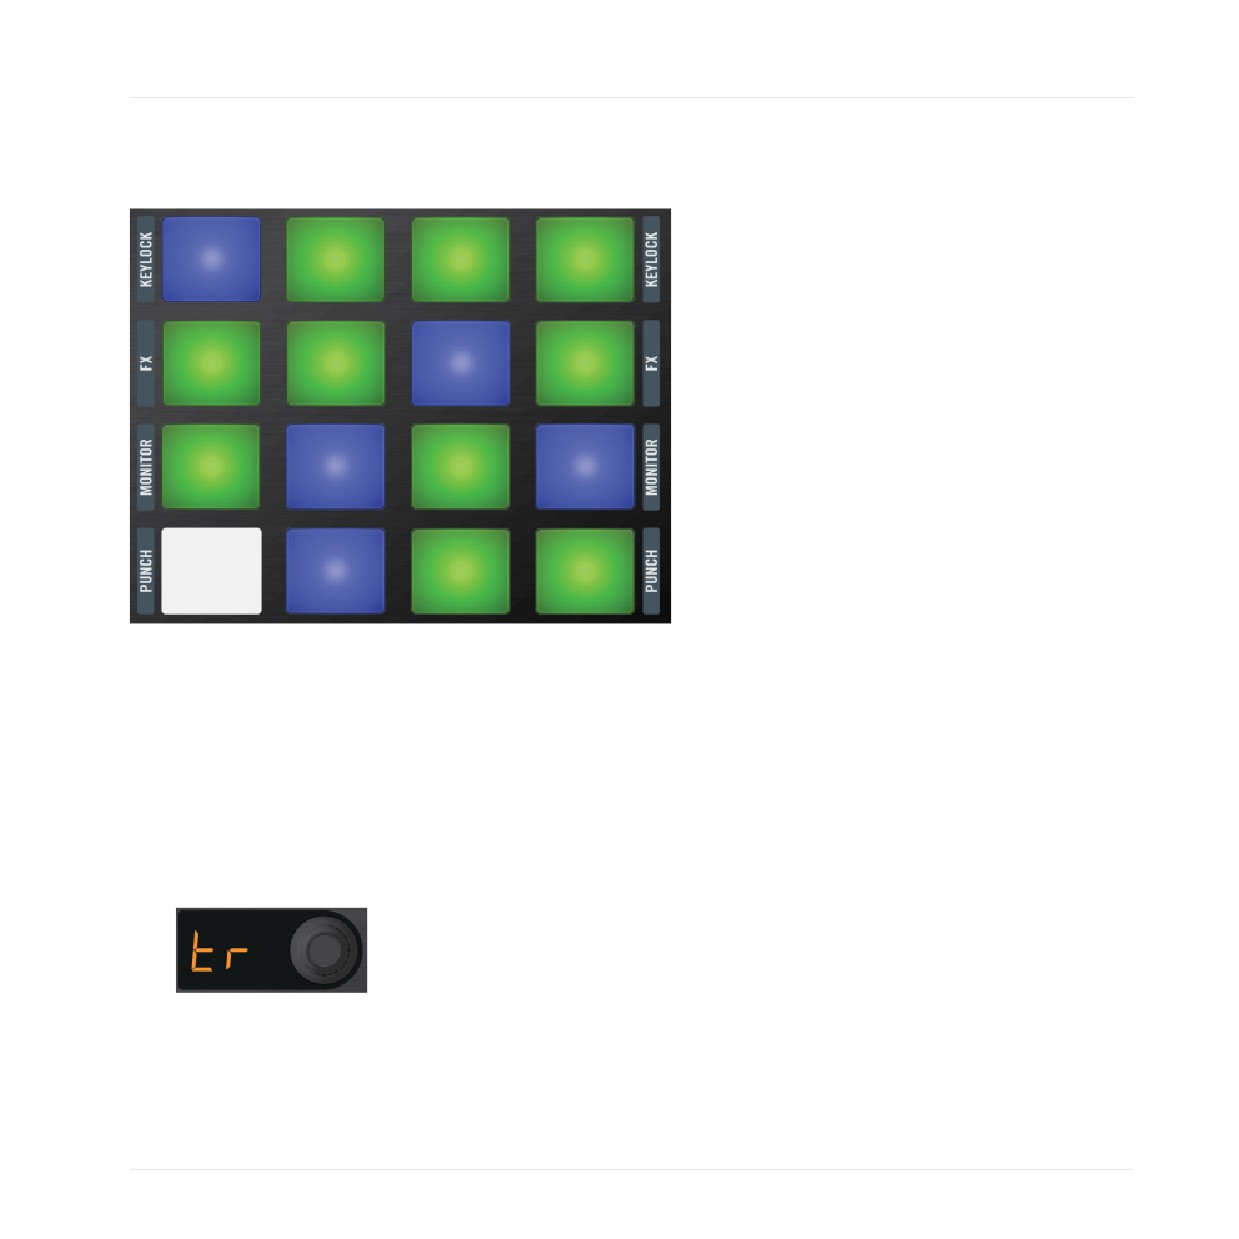
When you select the Play Type sub-mode, the pads light up to show the Play Type of the Sam-
ples:
• One-shot: pad is blue.
• Loop: pad is green.
• Empty Cell: pad is off.
TRAKTOR KONTROL F1 - Manual - 98
TRAKTOR KONTROL F1 Reference
Type Mode
Each time you tap an occupied pad, the Play Type will be toggled between One-shot and Loop,
and the color of the pad will show the new state.
The Pad Matrix in Play Type sub-mode. The green pads are Loops and the blue ones are One-shots. One of the pads is unlit
— it is empty.
4.7.4
Changing the Sample Trigger Type
The Trigger Type of a Sample determines whether it has a gated or a latched behavior. A gated
Sample will only play while you hold the pad down — releasing the pad causes the Sample to
stop. A latched Sample, by contrast, continues to play after you release the pad.
► To enter Trigger Type sub-mode, press and release the TYPE (PITCH) button and turn the
encoder knob until you see "tr" on the Display.
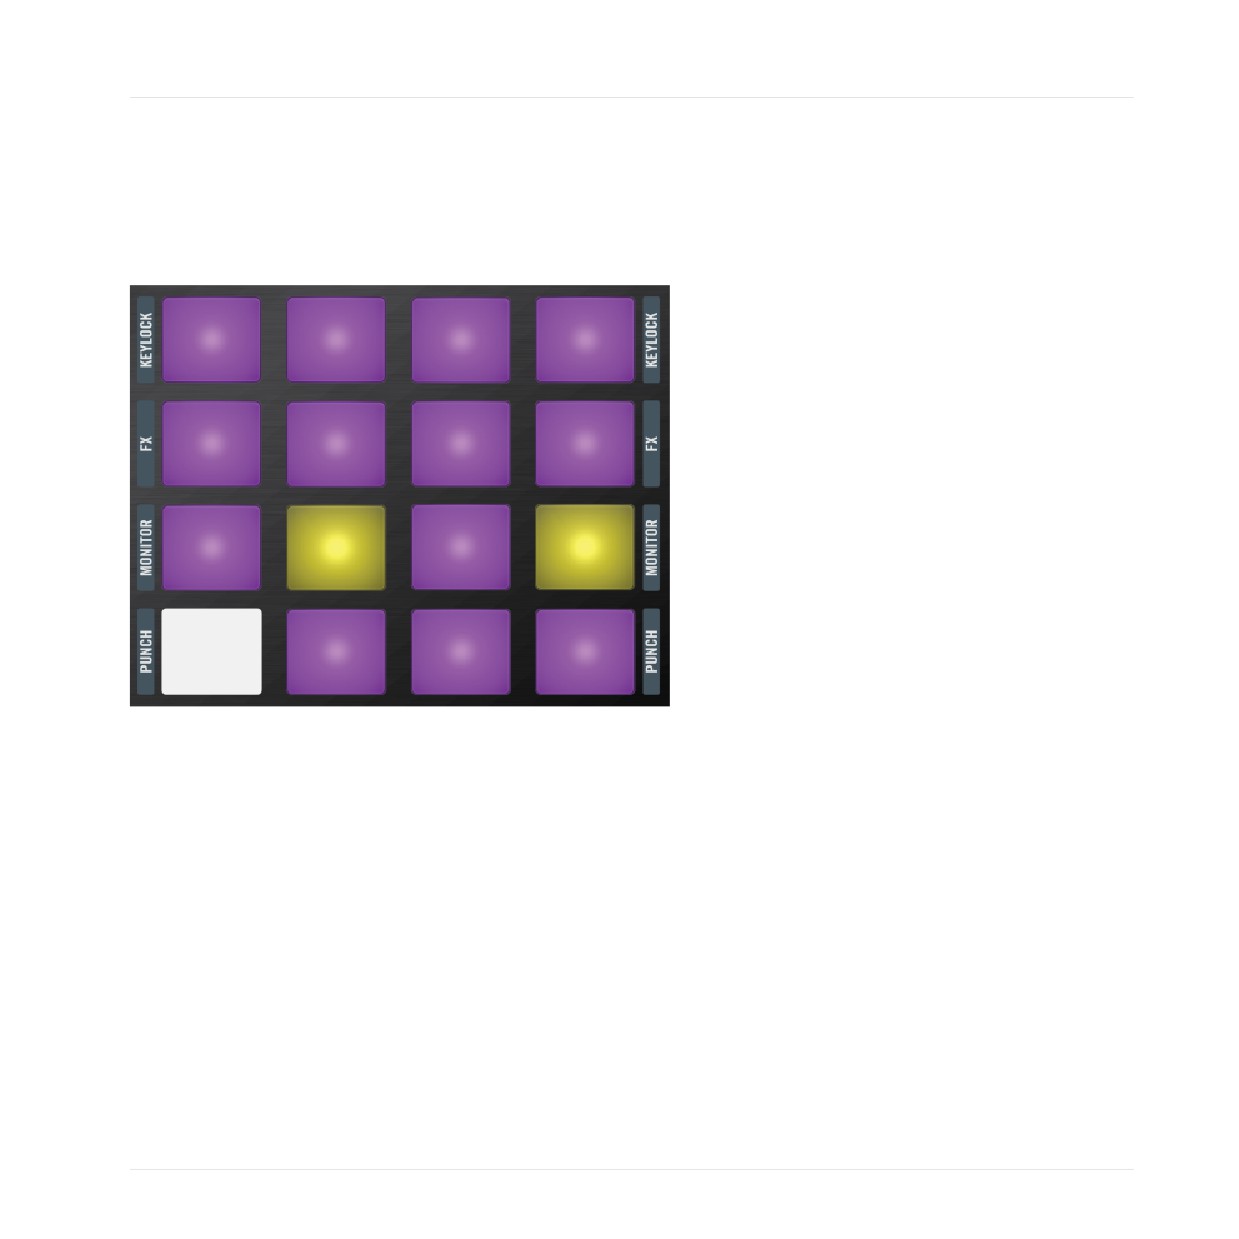
When you select the Trigger Type sub-mode, the pads light up to show the Trigger Type of the
Samples:
• Latched: pad is purple.
TRAKTOR KONTROL F1 - Manual - 99
TRAKTOR KONTROL F1 Reference
Type Mode
• Gated: pad is yellow.
• Empty Cell: pad is off.
As with the Play Type sub-mode, each time you tap an occupied pad, the Trigger Type will be
toggled between latched and gated.
The same Sample Grid page as in the above illustration. There are two gated Sample Cells on this page. Notice the empty
Sample Cell is unlit.
4.7.5
Changing the Sample Sync Type
The Sync Type of a Sample simply means the sync state of a Sample: either it is synced or
unsynced. The Remix Deck will change the speed of a synced Sample to match the Tempo and
internal timeline of the Deck. An unsynced Sample will ignore the Tempo and timeline of the
Deck and will merely scale the playback rate based on the Deck's Tempo Adjust value.
TRAKTOR KONTROL F1 - Manual - 100
TRAKTOR KONTROL F1 Reference
Type Mode
► To enter Sync Type sub-mode, press and release the TYPE (PITCH) button and turn the
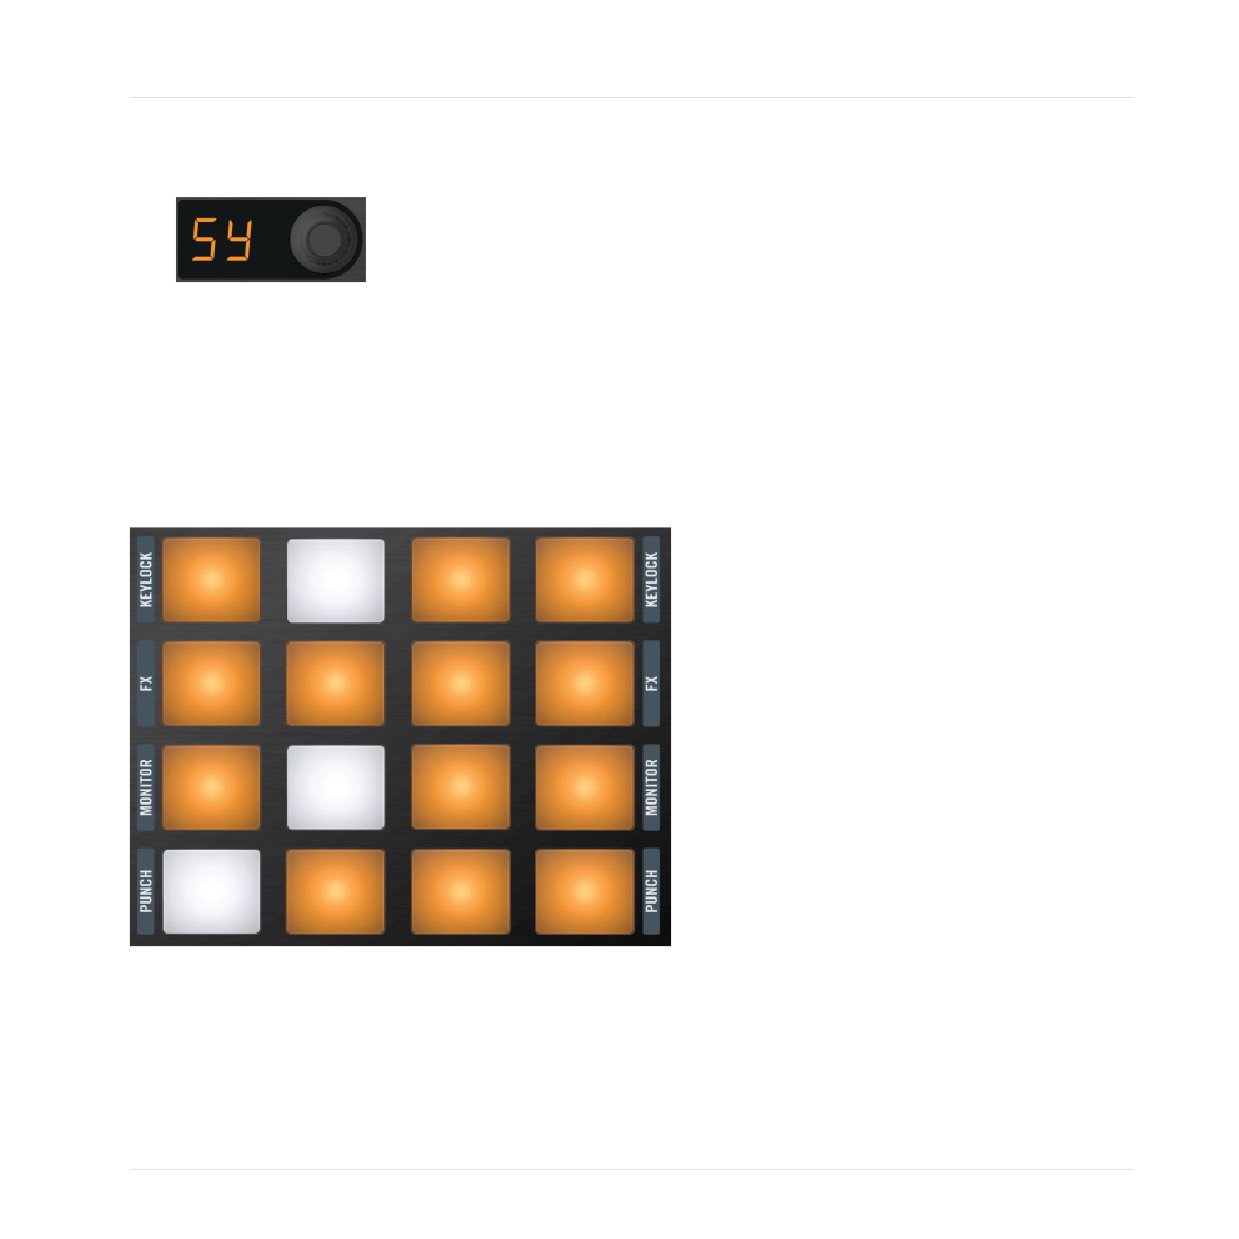
encoder knob until you see "SY" on the Display.
When you select the Sync Type sub-mode, the pads light up to show the Sync Type of the
Samples:
• Synced: pad is orange.
• Unsynced: pad is white.
• Empty Cell: pad is off.
As with the other sub-modes, tapping an occupied pad will toggle the sync state.
This time you can see several pads which are white — they will not be affected by sync.
TRAKTOR KONTROL F1 - Manual - 101
TRAKTOR KONTROL F1 Reference
Type Mode
4.7.6
Quick Type Function
You can quickly change the Type without having to enter Type mode first by pressing and hold-
ing the TYPE (PITCH) button. The most-recently selected sub-mode appears on the Display
and the pads will light up according to the sub-type state. You can then tap the pads to toggle
them between the two states of the active sub-type. Releasing the TYPE (PITCH) button re-
turns the F1 to Performance mode.
You can also change the sub-type when using the Quick Type function. Just turn the encoder
knob while holding the TYPE (PITCH) button and the new sub-mode appears on the Display,
with the pads lighting up according to the new sub-mode (see above).
4.7.7
Quick Type Function with Gate Override Mode
The Quick Type function also works with the Gate Override sub-mode. When you have this sub-
mode selected, holding the TYPE (PITCH) button cases all Samples to be subsequently trig-
gered in Gate mode. When you release the TYPE (PITCH) button, the normal Sample trigger
behavior is restored.
4.8
Pitch Mode
Pitch mode lets you match (or mismatch!) the keys of your Samples to other Samples or songs
playing in other Decks. It only works when Keylock is enabled for the Slot (see also ↑4.13.3,
Keylock).
Not only a fundamental tool for digital DJing, you can also be very creative using Pitch mode.
For example, by using the same vocal riff Sample on a number of different Sample Cells, you
can tune each one to a different key. You can even play melodies on your F1 with a battery of
differently-pitched Samples in One-shot mode mapped out over your Remix Deck.
When Pitch mode is active, the following controls will not be affected:
• Filter knobs
• Volume faders
• Mute (STOP) buttons
The following controls will be disabled when Pitch mode is active:
TRAKTOR KONTROL F1 - Manual - 102
TRAKTOR KONTROL F1 Reference
Pitch Mode
• SYNC (MASTER)
• QUANT (EDIT)
• CAPTURE (DELETE)
• REVERSE (COLOR)
• TYPE
• SIZE (SPEED)
• BROWSE (MIDI)
In order for Pitch mode to work, make sure Keylock is enabled for the Slot (↑4.13.3, Key-
lock).
4.8.1
Activating Pitch Mode
To activate Pitch mode:
► Press and hold SHIFT, then press and release TYPE (PITCH).
When Pitch mode is active, both the SHIFT and the TYPE (PITCH) buttons will blink on and
off.
You can exit Pitch mode by pressing both the SHIFT and TYPE (PITCH) buttons or by pressing
TYPE (PITCH) button alone.
Activate Pitch mode by pressing SHIFT and TYPE (PITCH).
4.8.2
Setting the Pitch with the Encoder
To change the pitch of a Sample:
1. Enter Pitch mode by pressing SHIFT + TYPE (PITCH).
2. Press and hold the pad you wish to change — you'll see the current pitch value on the
display.
TRAKTOR KONTROL F1 - Manual - 103
TRAKTOR KONTROL F1 Reference
Pitch Mode
3. While holding the pad, turn the encoder knob clockwise to raise the pitch or counter-
clockwise to lower the pitch.
4. Release the pad and press and hold another pad to repeat the process, if desired.
Each tick of the encoder knob moves the value up or down one semitone. The maximum pitch
range is +/- 12 semitones.
If Keylock is not enabled in the Slot, turning the encoder knob (to change pitch) will auto-
matically enable it so that the pitch change can take effect.
4.8.3
Resetting the Pitch Value of a Sample
To reset the pitch setting of a Sample — in other words, to bring the pitch change back to
zero:
1. Hold the pad to be reset and press the encoder knob.
2. The Display will update to show "0" for the pitch value. Release the pad, and if desired,
hold another pad to repeat the process.
4.9
Size Mode
Size mode lets you change the playable area of a Sample by moving the Sample end marker.
To make musical sense, the movement of the marker is constrained so that the length of the
playable area is always in multiples (or divisions) of 2 with respect to the full length of the
Sample. For example, possible lengths are: full length, 1/2 length, 1/4 length, 1/8 length, and
so on, or larger lengths like 2x length, 4x length, and so on.
Press the SIZE (SPEED) button to enter Size mode.
When Size mode is active, the following controls remain enabled:
• Filter knobs
• Volume faders
TRAKTOR KONTROL F1 - Manual - 104
TRAKTOR KONTROL F1 Reference
Size Mode
• Mute (STOP) buttons
The following controls will not be accessible when Size mode is active:
• SYNC (MASTER)
• QUANT (EDIT)
• CAPTURE (DELETE)
• REVERSE (COLOR)
• TYPE (PITCH)
•
(SPEED)
• BROWSE (MIDI)
► To activate Size mode, simply press the SIZE (SPEED) button.
→ When activated, the button blinks and all other mode buttons turn off.
4.9.1
Setting a Sample to Full Length Playback
If you wish to quickly set a Sample to play at its full length:
1. Enter Size mode by pressing the SIZE (SPEED) button.
2. Press and hold the desired pad.
3. Press and release the encoder knob.
→ Setting a Sample to full length playback in this way simply sets the end marker to the
end.
4.9.2
Adjusting the Sample End Position
To change the End Marker position:
1. Enter Size mode by pressing the SIZE (SPEED) button.
2. Press and hold the pad representing the Sample you want to edit.
3. Move the Sample End position by turning the encoder knob one tick to the left (counter-
clockwise) to cut the Sample length by half or one tick to the right (clockwise) to double
the Sample length.
TRAKTOR KONTROL F1 - Manual - 105
TRAKTOR KONTROL F1 Reference
Speed Mode
→ The display shows you the current length divider or multiplier.
4.10
Speed Mode
As its name implies, Speed mode lets you change the playback speed of your Samples.
Press SHIFT + the SIZE (SPEED) button to enter Speed mode.
When Speed mode is active, the following controls remain enabled:
• Filter knobs
• Volume faders
• Mute (STOP) buttons
The following controls will not be available when Speed mode is active:
• SYNC (MASTER)
• QUANT (EDIT)
• CAPTURE (DELETE)
• REVERSE (COLOR)
• TYPE (PITCH)
• SIZE
• BROWSE (MIDI)
4.10.1
Activating Speed Mode
To activate Speed mode:
► Hold SHIFT and then press the SIZE (SPEED) button.
TRAKTOR KONTROL F1 - Manual - 106
TRAKTOR KONTROL F1 Reference
Speed Mode
When Speed mode is activated, both the SHIFT and the SIZE (SPEED) buttons will blink on
and off. The two buttons become dim when you deactivate Speed mode.
4.10.2
Adjusting the Playback Speed of a Sample
To adjust the playback speed of a Sample:
1. Activate Speed mode by holding SHIFT + SIZE (SPEED).
2. Press and hold a pad — the current speed multiplier or divisor will appear on the Display.
3. Turn the encoder knob one tick to the right (clockwise) to double the speed.
4. Turn the encoder knob one tick to the left (counterclockwise) to halve the speed.
5. Release the pad when you have reached the desired speed.
You can change the speed from 1/4 to 4x the original speed.
4.10.3
Resetting the Playback Speed of a Sample
To quickly reset the speed to "1" (the original Sample playback speed) when in Speed mode:
► Press and hold the desired pad and press the encoder knob.
4.11
Edit Mode
The Edit mode is where you'll be doing your bread-and-butter global Sample editing like copy-
ing and pasting within your Remix Sets. But Edit mode also includes the sub-modes Sample
Start Offset and Sample Nudge.
Press SHIFT and the QUANT (EDIT) button to enter Edit mode.
Like most other F1 modes, when you activate Edit mode only a portion of the controls are af-
fected. The unaffected controls are:
TRAKTOR KONTROL F1 - Manual - 107
TRAKTOR KONTROL F1 Reference
Edit Mode
• The Filter knobs
• The Volume faders
• The Mute (STOP) buttons
The following controls are disabled when you enter Edit mode:
• SYNC (MASTER)
• QUANT
• CAPTURE (DELETE)
• REVERSE (COLOR)
• TYPE (PITCH)
• SIZE (SPEED)
• BROWSE (MIDI)
4.11.1
Activating Edit Mode and Selecting Sub-Modes
To toggle Edit mode on and off:
► Hold SHIFT and press the QUANT (EDIT) button.
When active, both the SHIFT and QUANT (EDIT) buttons will blink on and off. When you deac-
tivate Edit mode, SHIFT and QUANT (EDIT) will be dim.
As mentioned above, Edit mode has sub-modes for selecting its various functions. Select the
sub-modes with the encoder knob when Edit mode is active; the Display then shows the cur-
rent mode.
The Edit Sub-modes
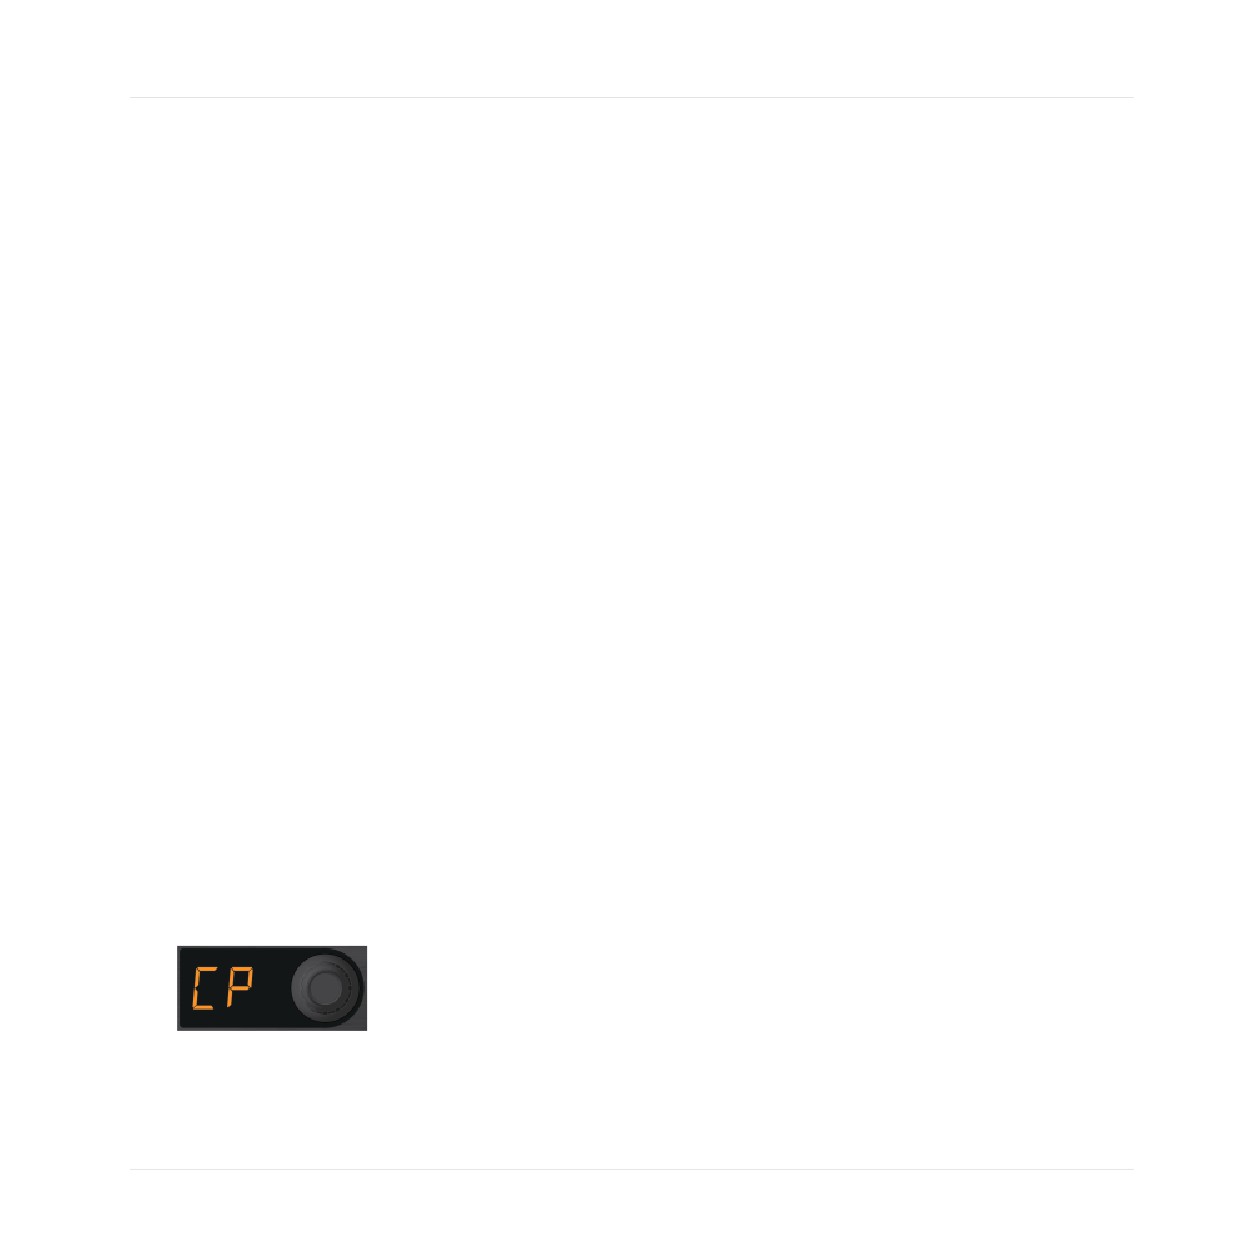
• Copy & Paste: Shown as "CP" on the Display. This is for making copies of a Sample.
TRAKTOR KONTROL F1 - Manual - 108
TRAKTOR KONTROL F1 Reference
Edit Mode
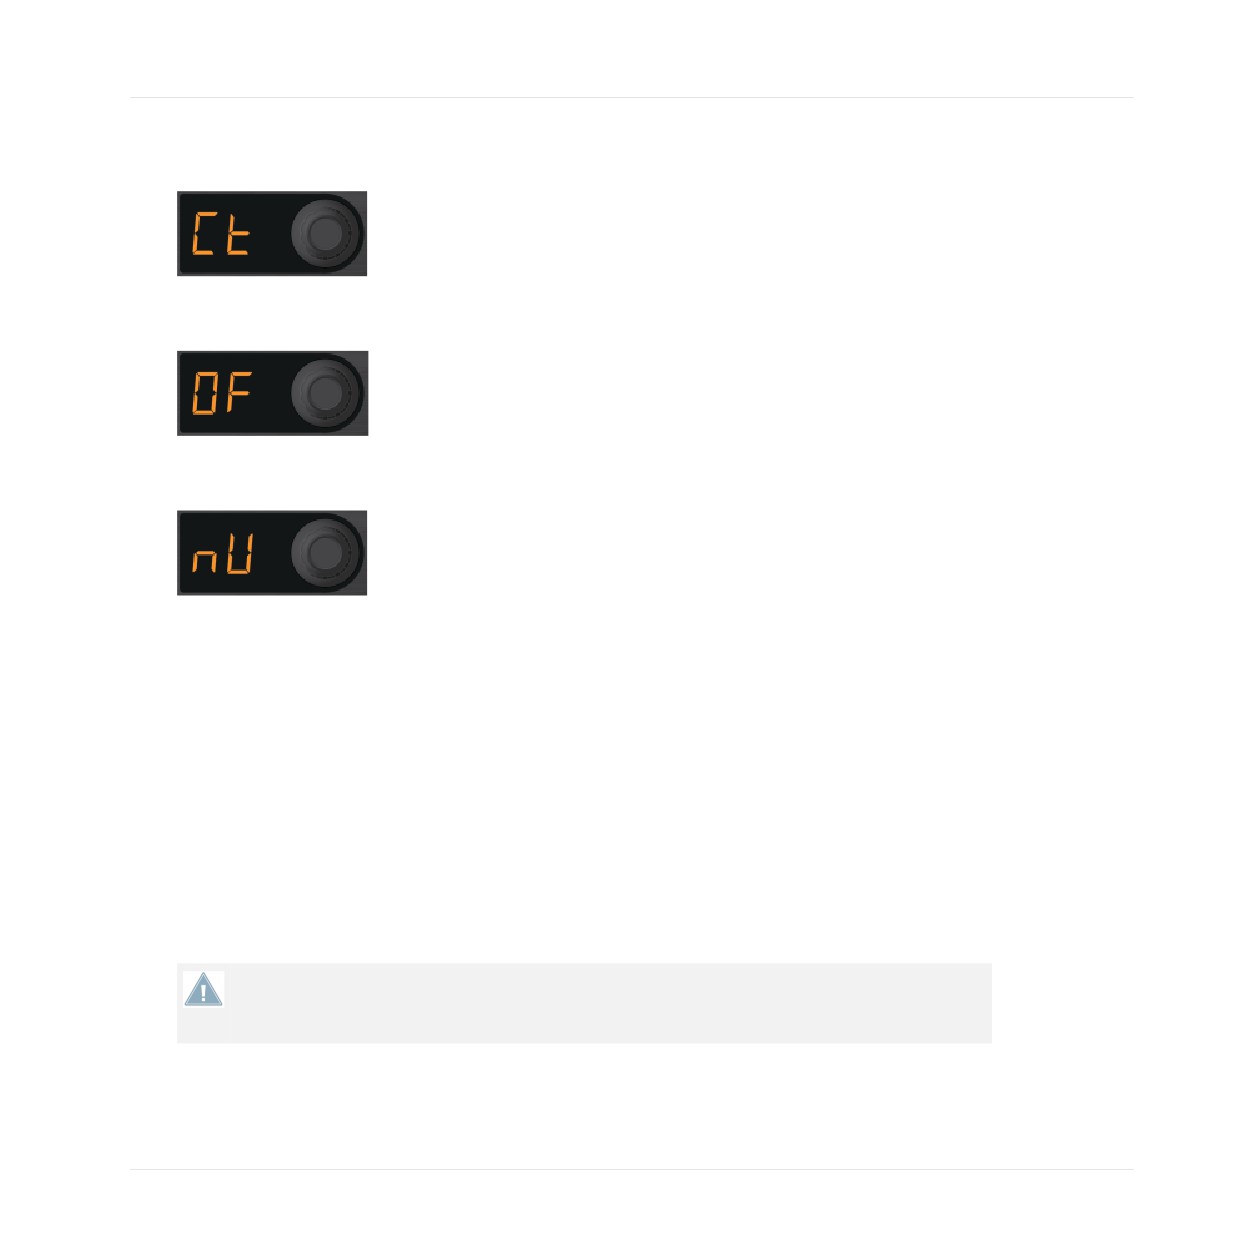
• Cut & Paste: Shown as "Ct" on the Display and used for moving a Sample to a new location
in the Sample Grid.
• Offset: Shown as "OF" on the Display. Offset shifts the playback position of the Sample by
1/16th note increments.
• Nudge: Shown as "nU" on the Display. This shifts the playback position of the Sample by
very small amounts (fractions of a 1/16th note) to correct alignment problems.
4.11.2
Sample Copy & Paste
Sample Copy & Paste is the way to duplicate your Samples so that you have multiples copies
in the same Remix Deck:
1. Activate Edit mode by pressing and holding SHIFT while pressing QUANT (EDIT).
2. Turn the encoder knob until "CP" ("Copy Paste") is visible on the Display.
3. Hit the pad you want to copy from. The Display now shows "PA" for "paste."
4. Hit the pad you want to copy to.
5. Either repeat steps 3 and 4 for further copying and pasting or exit Edit mode by pressing
SHIFT or QUANT (EDIT). Both buttons stop blinking and the F1 returns to Performance
mode.
If you have started copying and pasting, but decide that you want to cancel the operation,
just press either SHIFT or QUANT (EDIT) to exit Edit mode and return to Performance
mode.
TRAKTOR KONTROL F1 - Manual - 109
TRAKTOR KONTROL F1 Reference
Edit Mode
With Sample Copy & Paste, you can copy a single Sample across multiple Sample Cells (ei-
ther in the same Sample Slot or across different Slots). By using different parameters on
each Sample, you can then create mash-ups using different trigger and speed combina-
tions or play melodies by pitching short one-shots differently.
With Sample Copy & Paste, you can copy a single Sample across multiple Sample Cells (ei-
ther in the same Sample Slot or across different Slots). By using different parameters on
each Sample, you can then create mash-ups using different trigger and speed combina-
tions or play melodies by pitching short one-shots differently.
4.11.3
Sample Cut & Paste
Sample Cut & Paste is the way to arrange and re-arrange your Remix Set exactly how you want.
You can think of it as a way of simply moving your Samples around the Sample Grid to put
them where it makes most sense to you:
1. Activate Edit mode by pressing and holding SHIFT while pressing QUANT (EDIT).
2. Turn the encoder knob until "Ct" ("Cut") is visible on the Display.
3. Hit the pad you want to cut (i.e., remove the Sample and store it temporarily for pasting).
The Display now shows "PA" for "paste."
4. Hit the pad you want to paste to.
5. Either repeat steps 3 and 4 for further cutting and pasting or exit Edit mode by pressing
SHIFT or QUANT (EDIT). Both buttons stop blinking and the F1 returns to Performance
mode.
You can perform both Sample Copy & Paste, and Sample Cut & Paste between Sample Grid
pages as well as within a single page:
► After choosing the Sample to copy or cut (after Step 3 in both operations above, when
the Display shows "PA"), turn the encoder knob to change Sample Grid pages. As soon as
you turn the encoder knob, the Display will temporarily revert to showing the page num-
ber (as is the case in Performance mode) and you can then continue turning the encoder
knob until you have reached the desired page. Then continue the operation with Steps 4
and 5 in the operations above.
If you have started cutting and pasting, but decide that you want to cancel the operation,
just press either SHIFT or QUANT (EDIT) to exit Edit mode and return to Performance
mode.
TRAKTOR KONTROL F1 - Manual - 110
TRAKTOR KONTROL F1 Reference
Edit Mode
It might help to think of both Sample Copy & Paste and Sample Cut & Paste as operations
where there is always a source pad and a target pad.
4.11.4
Sample Start Offset
The Sample Start Offset sub-mode lets you move a Sample by 16th-note beat-divisions so that
it falls right where you want it. A classic use for Sample Start Offset would be to move a steady
closed hi-hat loop just to the right part of the beat. To perform the Sample Start Offset opera-
tion:
1.
Activate Edit mode by pressing and holding SHIFT while pressing QUANT (EDIT).
2.
Turn the encoder knob until "OF" ("Offset") is visible on the display.
3.
Press and hold the pad you want to offset. The display shows the current Offset Value,
which is 0 by default.
4.
While continuing to hold the pad, rotate the encoder knob. Each tick of the encoder knob
offsets by an increment of one 16th-note.
5.
Either repeat steps 3 and 4 for further cutting and pasting or exit Edit mode by pressing
SHIFT or QUANT (EDIT). Both buttons stop blinking and the F1 returns to Performance
mode.
Note that your Sample Start Offset value is always shown as a positive number. If you want
your Sample to start right on the downbeat, then Sample Start Offset will be at zero. A
Sample which is one bar long is 4 x 4 = 16 sixteenth notes long. That means that there the
maximum Offset Value can only be 15, since you start at zero! Once the maximum value is
reached on the Display (by turning the encoder knob), the Value wraps back around, start-
ing again at zero.
Used with Sample Copy & Paste, Sample Start Offset lets you move duplicated Samples
off-beat from each other. For example, instead of doubling the speed of a steady four-on-
the-floor kick loop, you could make a copy and then move the copy two 16th-notes forward,
thickening the sound and accelerating the pace.
Used with Sample Copy & Paste, Sample Start Offset lets you move duplicated Samples
off-beat from each other. For example, instead of doubling the speed of a steady four-on-
the-floor kick loop, you could make a copy and then move the copy two 16th-notes forward,
thickening the sound and accelerating the pace.
TRAKTOR KONTROL F1 - Manual - 111
TRAKTOR KONTROL F1 Reference
Edit Mode
4.11.5
Sample Nudge
Sample Nudge works together with Sample Start Offset (above) to fine-tune the start position
of a Sample. For example, if you have moved the Sample Start Offset to 6, then your Sample
will start one and a half beats "late." If you now use Sample Nudge, the Nudge amount will be
in relation to that offset position 6, or one and a half beats. To nudge Samples:
1. Activate Edit mode by pressing and holding SHIFT while pressing QUANT (EDIT).
2. Turn the encoder knob until "nU" ("Nudge") is visible on the display.
3. Press and hold the pad you want to nudge. The Display shows the current nudge amount
in percentage of a sixteenth note. The maximum values are +/-99%.
4. Turning the encoder knob to the right (clockwise) will increase the nudge amount. Turning
to the left (counterclockwise) will decrease the nudge amount.
5. Either repeat steps 3 and 4 for nudging or exit Edit mode by pressing SHIFT or QUANT
(EDIT). Both buttons stop blinking and the F1 returns to Performance mode.
Use Sample Nudge to correct small changes in timing for precise beat-matching. You can
also use Sample Nudge to move slightly out of the beat. This might be the case if you want
snares on beats two and four to be slightly "late" with relation to a steady hi-hat stream.
Experiment with Sample Nudge to humanize your remixes.
4.12
MIDI Mode
The default mode of the F1 when pressing SHIFT + BROWSE (MIDI) with TRAKTOR connect-
ed uses the high-resolution, high-speed NHL protocol, offering a great deal of interactivity and
"playability" specifically designed for using TRAKTOR's Remix Decks (User Map mode); howev-
er, there may be situations where you would like to use the F1 as a MIDI controller for control-
ling other MIDI-compatible software. In MIDI mode, the F1 will send ordinary MIDI-standard
signals.
TRAKTOR KONTROL F1 - Manual - 112
TRAKTOR KONTROL F1 Reference
MIDI Mode
4.12.1
Activating MIDI Mode
By default, the F1 uses a proprietary, NHL-based mapping when activating MIDI mode with
TRAKTOR (see ↑4.12.2, Using MIDI Mode with TRAKTOR (User Map Mode) for further infor-
mation). To activate ordinary MIDI mode with TRAKTOR, you need to first change TRAKTOR's
preferences:
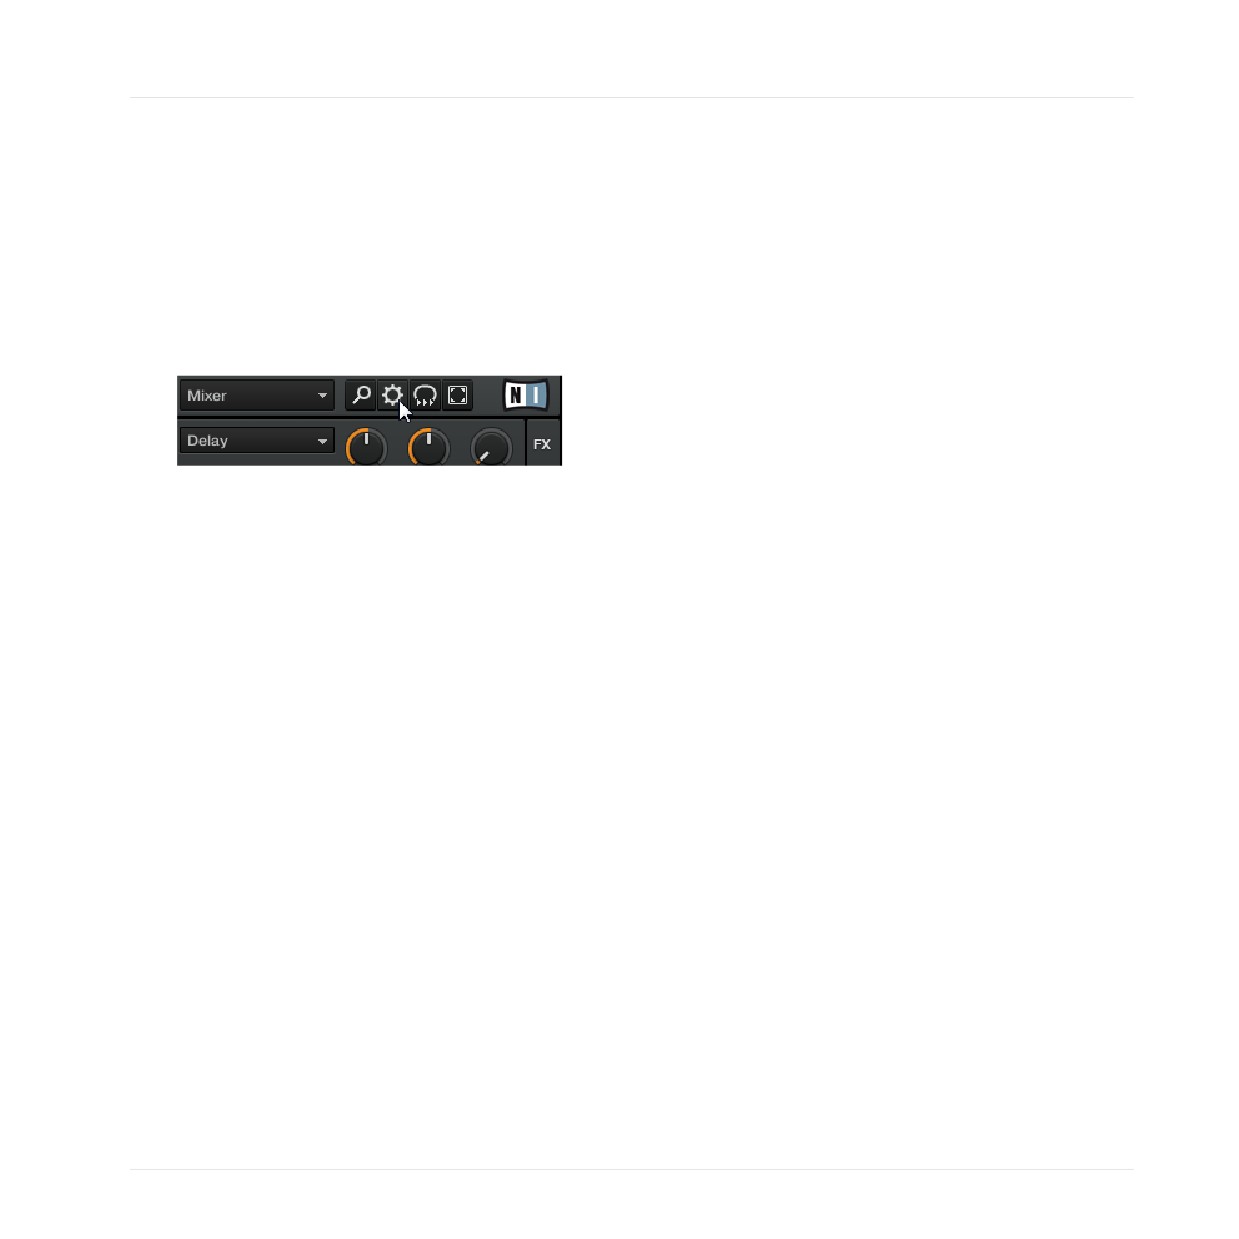
1. Open TRAKTOR's Preferences via File > Preferences..., or click the cog wheel symbol in
TRAKTOR's Header.
TRAKTOR KONTROL F1 - Manual - 113
TRAKTOR KONTROL F1 Reference
MIDI Mode
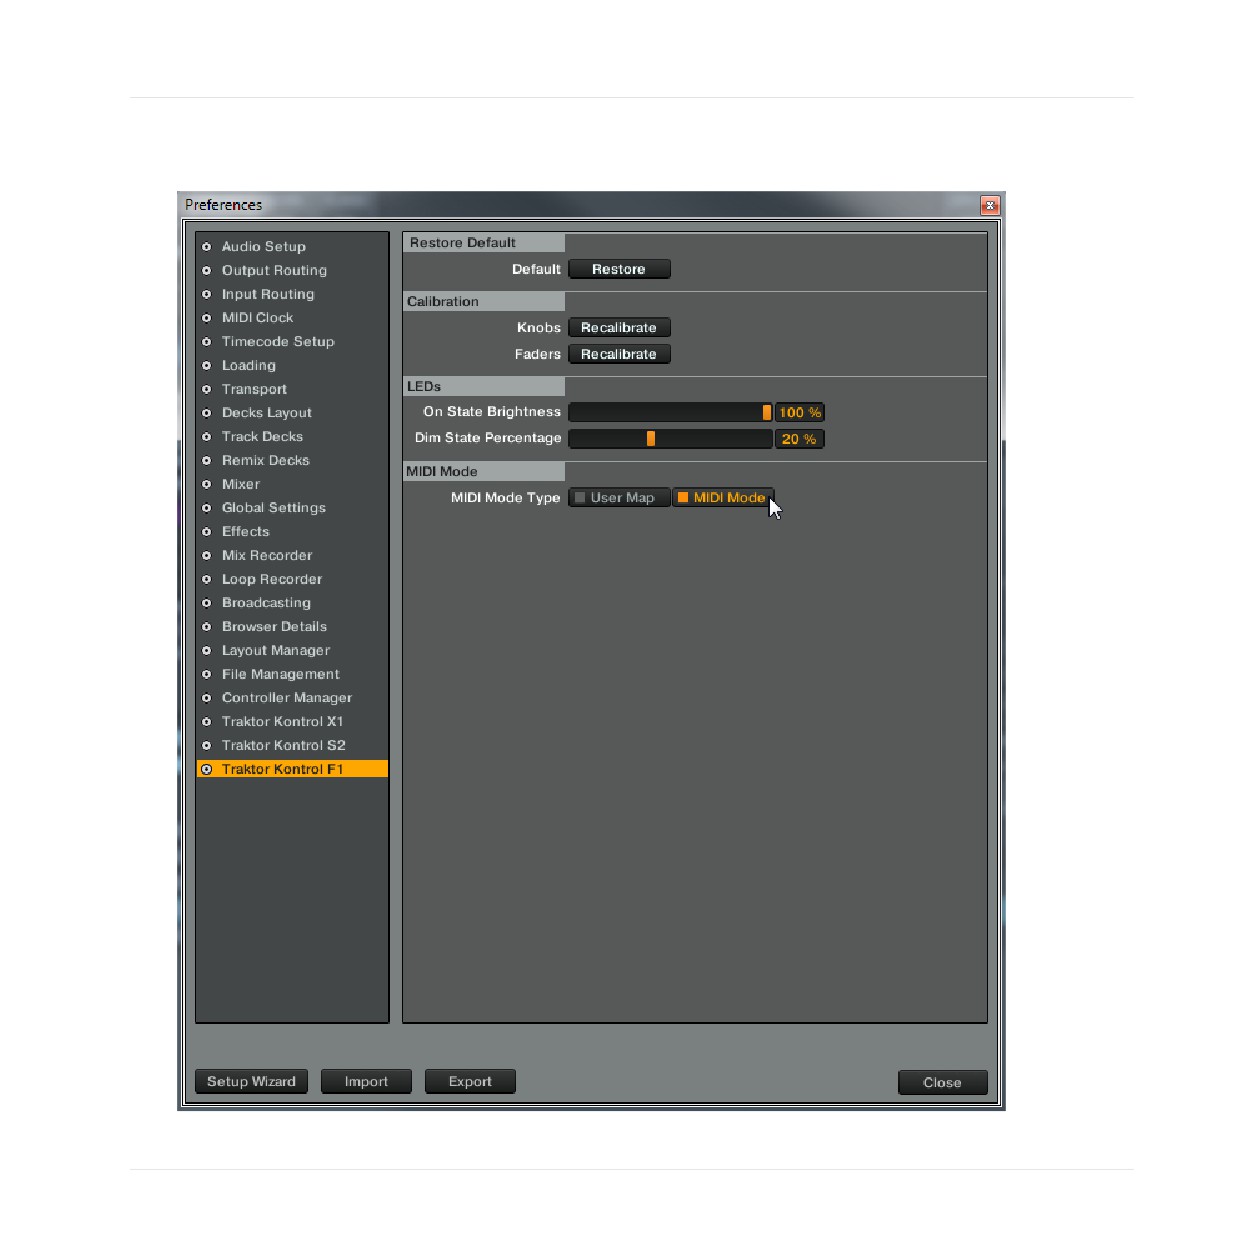
2. Check the MIDI Mode radio button in the Traktor Kontrol F1 section of the Preferences
window.
TRAKTOR KONTROL F1 - Manual - 114
TRAKTOR KONTROL F1 Reference
MIDI Mode
3. Close the Preferences window.
To now activate MIDI mode with TRAKTOR:
► Press SHIFT + BROWSE (MIDI) on your F1.
When you wish to return to Performance mode:
► Press SHIFT + BROWSE (MIDI) again.
4.12.2
Using MIDI Mode with TRAKTOR (User Map Mode)
When using the F1 with the TRAKTOR software, there is really no need to have it communicate
via MIDI. This is why activating MIDI mode with TRAKTOR by default activates an alternative,
NHL-based mapping for your F1 (which is also included as a .tsi file).
The alternate mapping gives you Hotcue, Loop, Beatjump, Browsing, and Loading controls and
is aimed for use by turntablists. It is mapped to Decks A and B only.
To activate User Map mode:
► Press SHIFT + BROWSE (MIDI) on your F1.
When you wish to return to the standard Performance mode:
► Press SHIFT + BROWSE (MIDI) again.
4.13
Sample Slot Parameters
The 64 Sample Cells of TRAKTOR's Remix Decks are organized in a Sample Grid of four verti-
cal Slots (columns) and sixteen rows, split into four pages. Each Sample Slot holds a Slot Play-
er with a number of parameters that can be assigned to it. The Sample Slot parameters are:
• KEYLOCK
• FX (Enable)
• MONITOR
• PUNCH
TRAKTOR KONTROL F1 - Manual - 115
TRAKTOR KONTROL F1 Reference
Sample Slot Parameters
4.13.1
Viewing the Sample Slot Parameter States
To view Sample Slot Parameter states:
► Push and hold SHIFT on your controller.
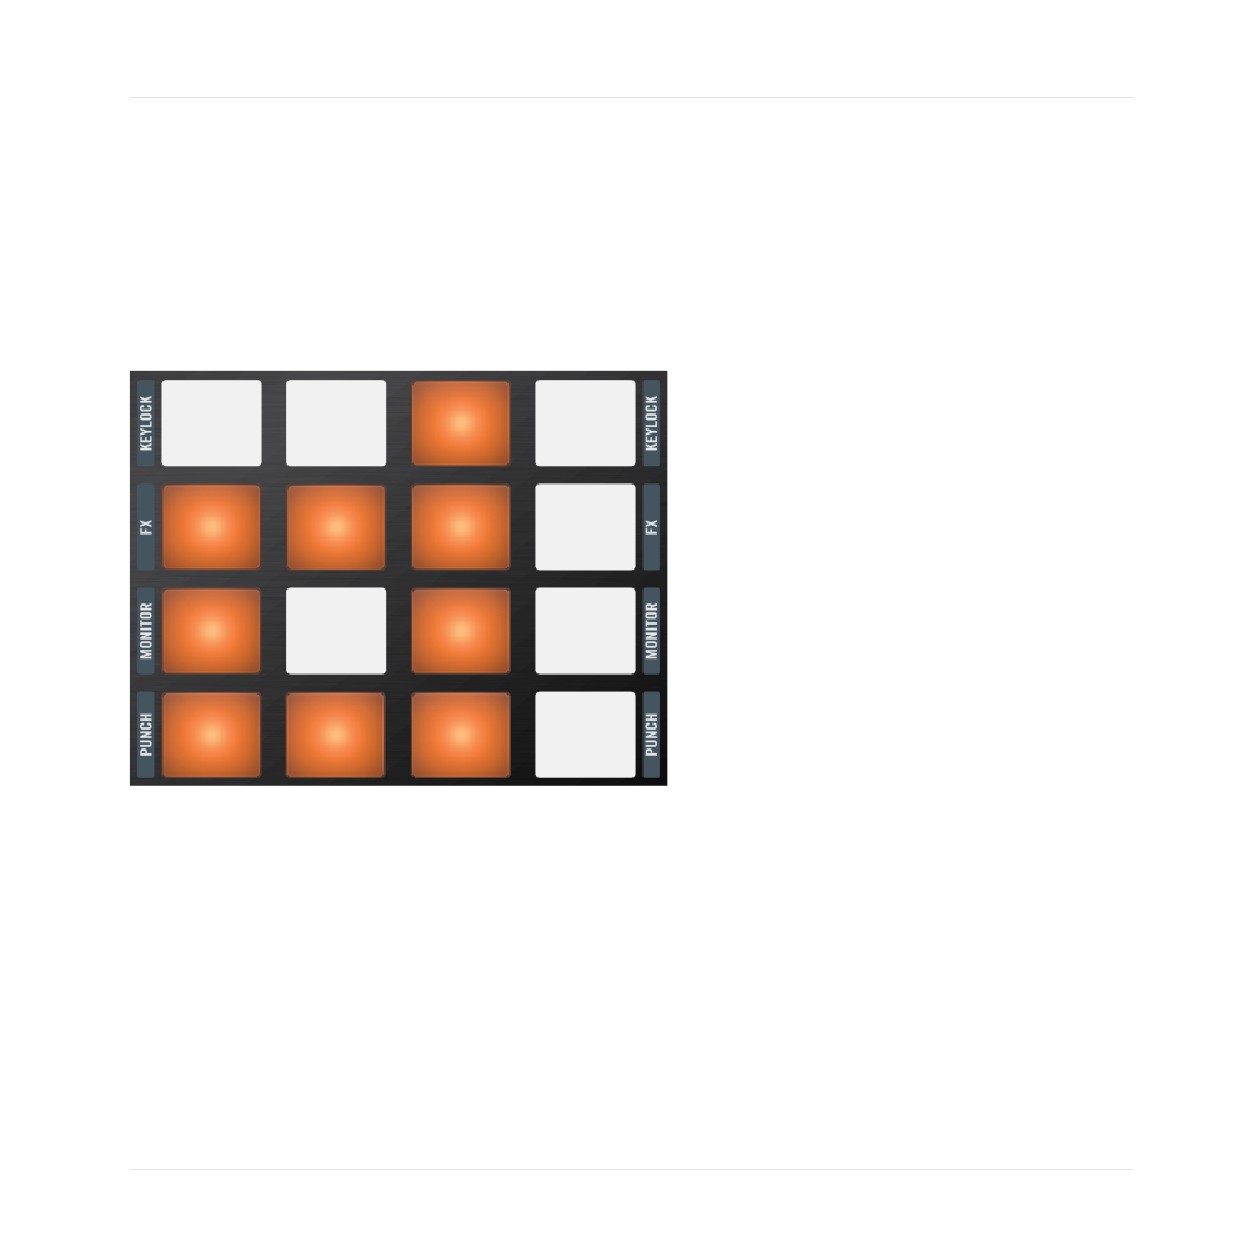
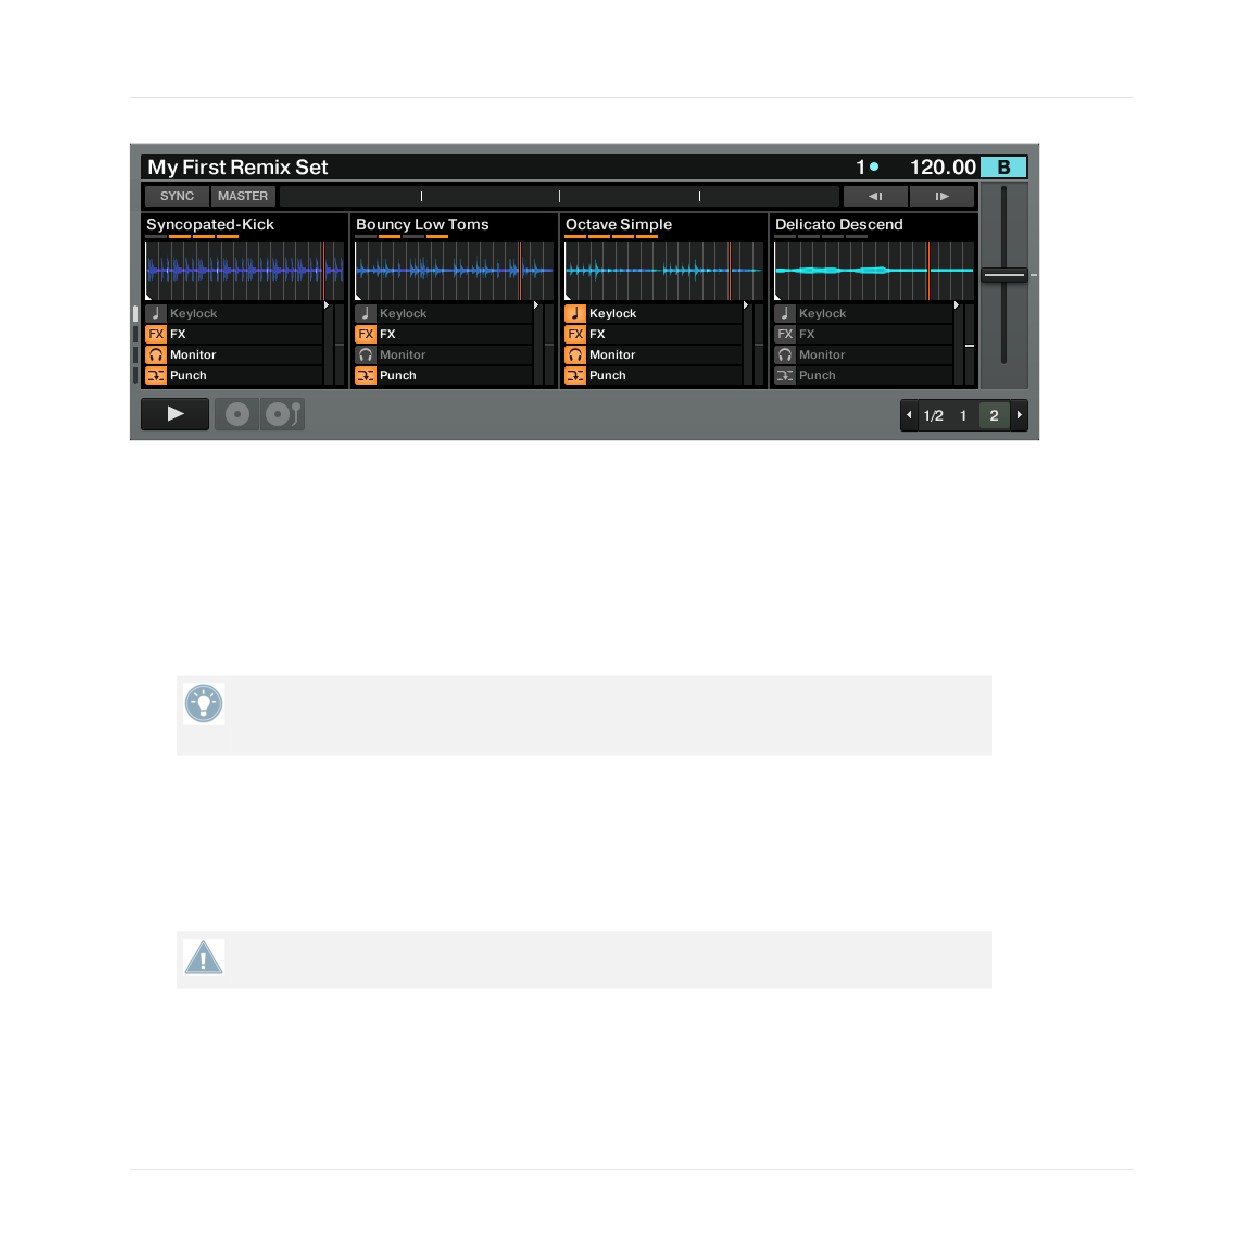
→ You can see the Sample Slot parameter states of the four Sample Slots at a glance on
both your F1 and in the software.
If a Sample Slot parameter is on, the corresponding pad lights up orange.
TRAKTOR KONTROL F1 - Manual - 116
TRAKTOR KONTROL F1 Reference
Sample Slot Parameters
The Sample Slot parameters also become visible in the software when pressing SHIFT on the F1.
4.13.2
Toggling the Slot Parameter States
To toggle the state of the Sample Slot parameters:
► Press and hold SHIFT and then tap the pads corresponding to the Slots and parameters
you wish to toggle.
Note that you don't have to hit one pad at a time to toggle Sample Slot parameter states.
Experiment using two, three, or four fingers to toggle multiple Sample Slot parameters at a
time.
4.13.3
Keylock
Keylock has the same function as a normal TRAKTOR Deck Keylock: the pitch of the Sample
will be "locked" so that it won't change when its playback speed changes. Furthermore, the
Sample's pitch parameter also affects playback when Keylock is enabled.
Pitch (used in Pitch mode) will only work when Keylock is enabled for the Sample Slot con-
taining the Sample.
TRAKTOR KONTROL F1 - Manual - 117
TRAKTOR KONTROL F1 Reference
Sample Slot Parameters
4.13.4
FX
When FX (Enable) is active, Samples playing in this Sample Slot will be routed through the FX
Unit assigned to the Remix Deck's channel in TRAKTOR's mixer. Note that this is independent
of the Remix Deck's filter parameters, which are controlled by the Filter knobs at the upper
part of the F1.
4.13.5
Monitor
When you enable Monitor, Samples in the Sample Slot are routed to the Mixer's Monitor Input.
Use Monitor to pre-listen to a Sample with your headphones before playing it live to an au-
dience.
4.13.6
Punch
When a Sample, either in One-shot or Loop mode, is triggered in a Sample Slot, the position of
that Sample is fixed to the Remix Deck's internal timeline. This is most noticeable when using
One-shot Samples since you can trigger the Sample, let it play, then wind the Deck backwards
to the original location of the Sample and play it again. Since only one Sample can be played
in a Slot at a time, triggering a new One-shot Sample will remove the previous Sample from
the Deck's internal timeline and will fix the new Sample to the current location.
This behavior is changed, however, when Punch mode is enabled. With Punch enabled, every
Sample you trigger will be placed in the same location as the previous Sample in the Deck's
internal timeline. What this means is that you can trigger a One-shot Sample, let it play, trigger
a different One-shot Sample in the Sample Slot, then wind the Deck backwards to the location
of the first Sample and you will hear the new Sample instead.
Punch mode is also beneficial when using Loops because it allows musical phrasing to be
maintained when switching Loops. Just as with One-shots, triggering a Loop while Punch mode
is enabled will place the Loop back at the location of the previous Loop. Because Loops repeat
themselves infinitely into the future and past of the Deck's internal timeline, you'll hear the
new Sample playing at your current playback location, but the Loop will be playing in the cor-
rect position as if it had been triggered back at the position of the first Loop.
TRAKTOR KONTROL F1 - Manual - 118
F1 Preferences
The F1 Preferences Section
5
F1 Preferences
Although the F1 is pretty straightforward right out of the box, you do have some important op-
tions to get things working exactly how you want.
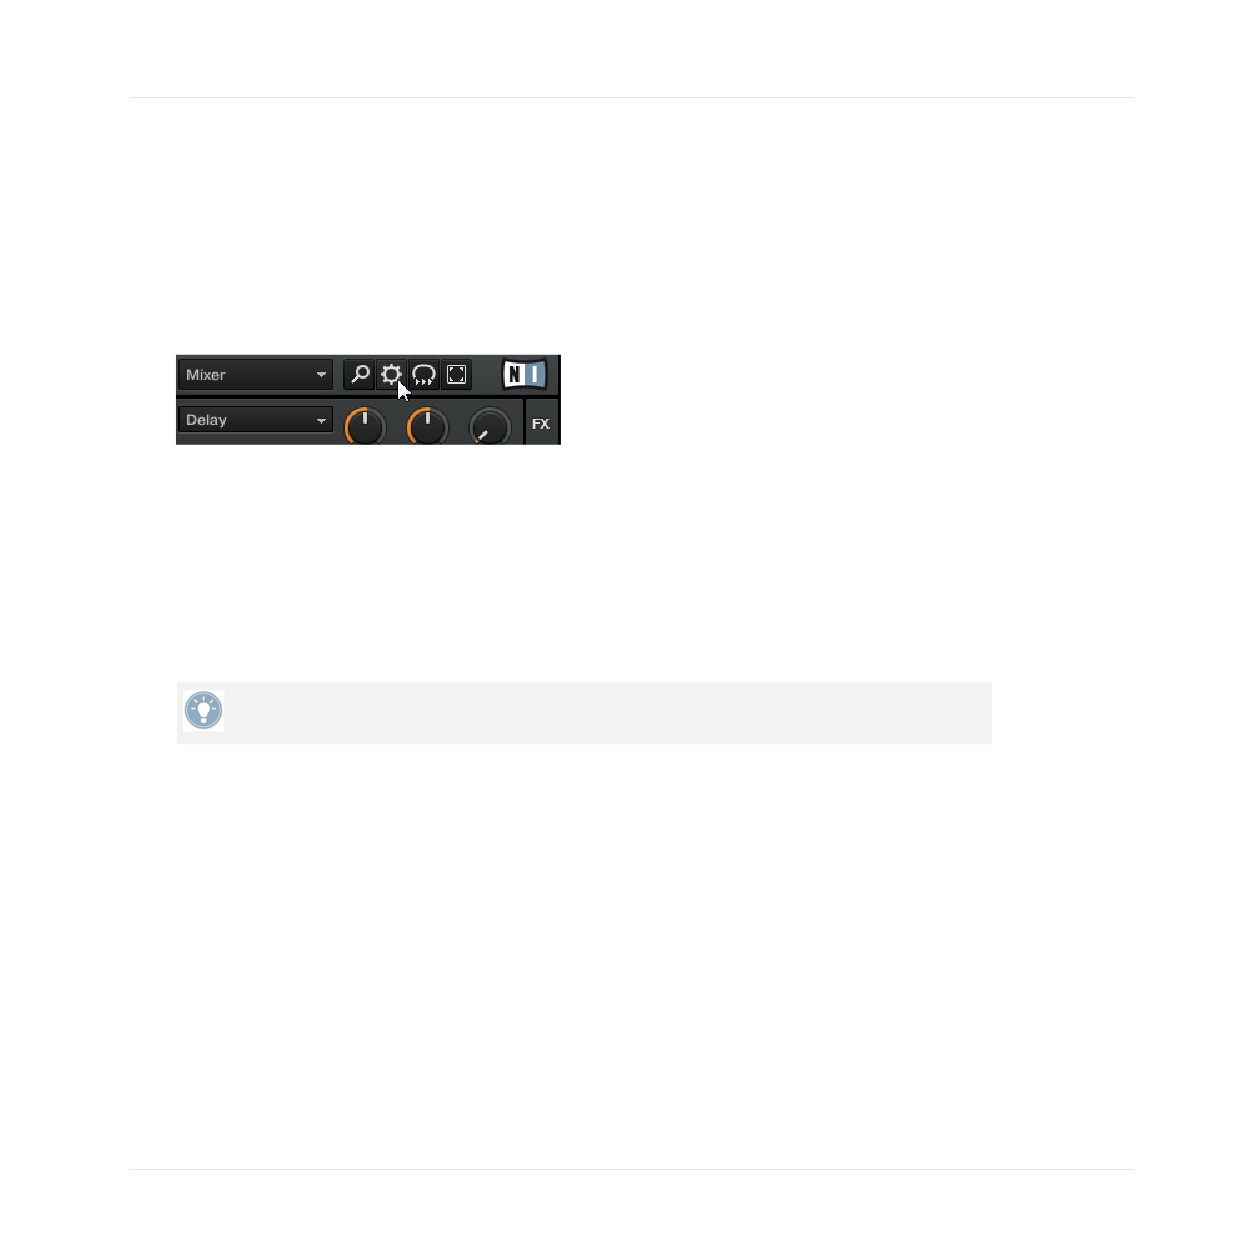
► You can open TRAKTOR's Preferences via File > Preferences..., or click the cog wheel
symbol in TRAKTOR's Header.
5.1
The F1 Preferences Section
Depending on whether you have one or more other TRAKTOR controllers in your setup — for
example, the TRAKTOR KONTROL X1, the TRAKTOR KONTROL S2, or the TRAKTOR KON-
TROL S4 — the dedicated settings page for the F1 will be located at or near the bottom of the
TRAKTOR Preferences window.
For a detailed description of all settings available in the Preferences window, please refer
to the TRAKTOR 2 Manual.
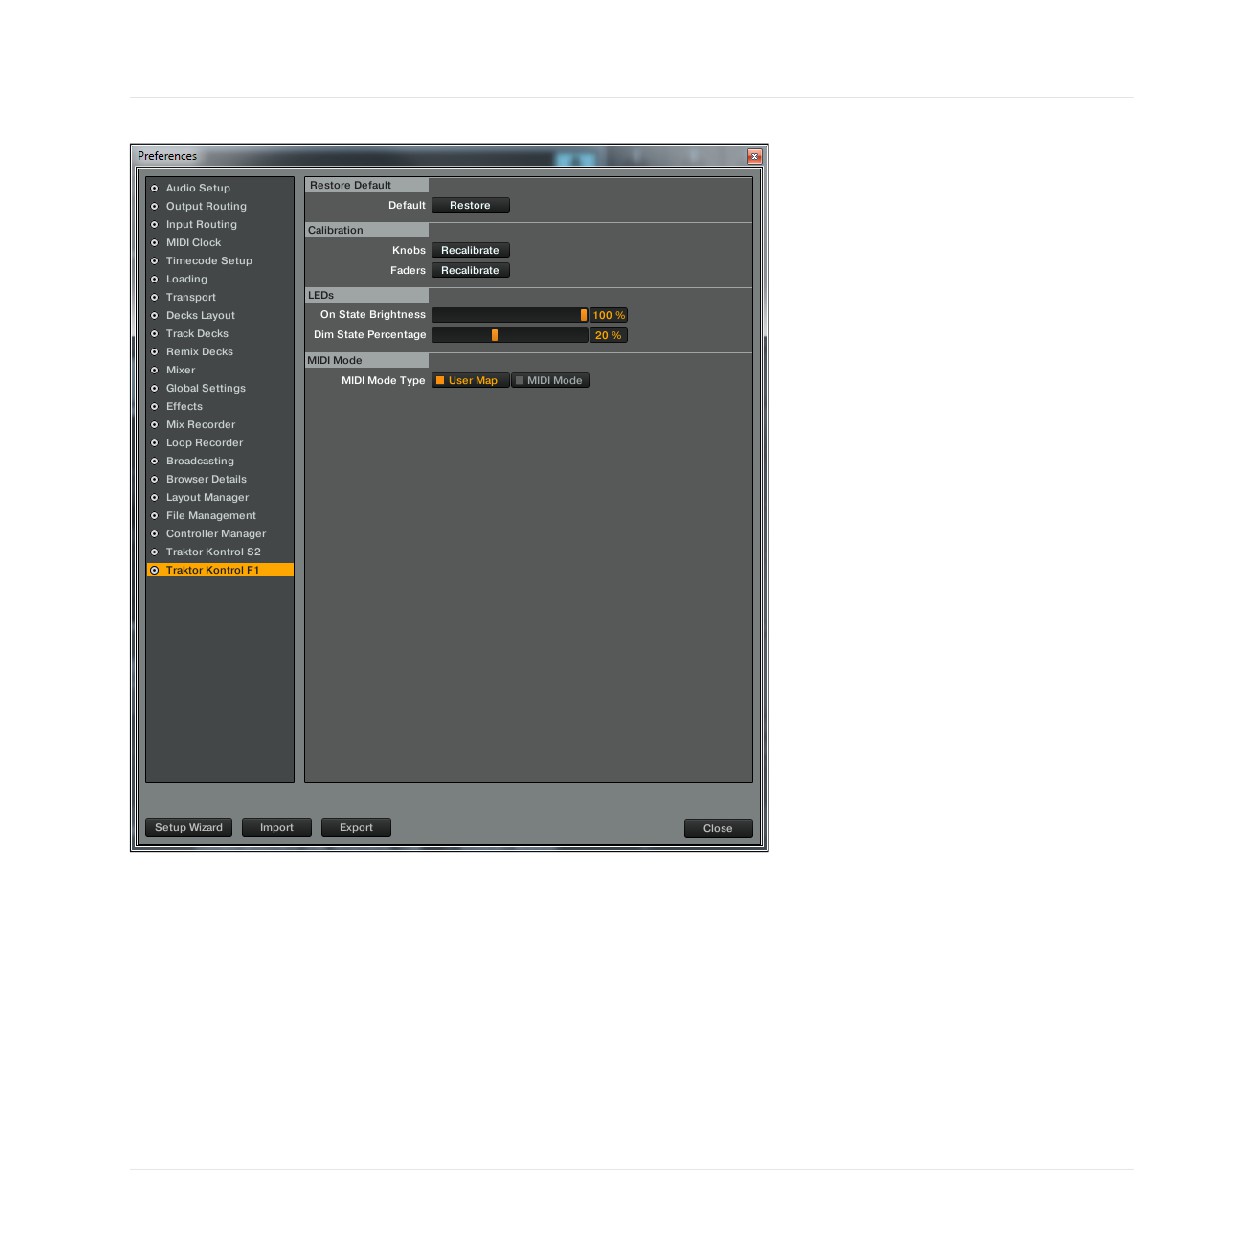
► To adjust the F1's settings, click on Traktor Kontrol F1 at the bottom left part of the Pref-
erences window.
TRAKTOR KONTROL F1 - Manual - 119
F1 Preferences
The F1 Preferences Section
The settings for your TRAKTOR KONTROL F1
In this page, settings are grouped into four sections, all of which are explained in the following
sub-chapters:
• Restore Default
• Calibration
• LEDs
• MIDI Mode
TRAKTOR KONTROL F1 - Manual - 120
F1 Preferences
The F1 Preferences Section
5.1.1
Restore Default
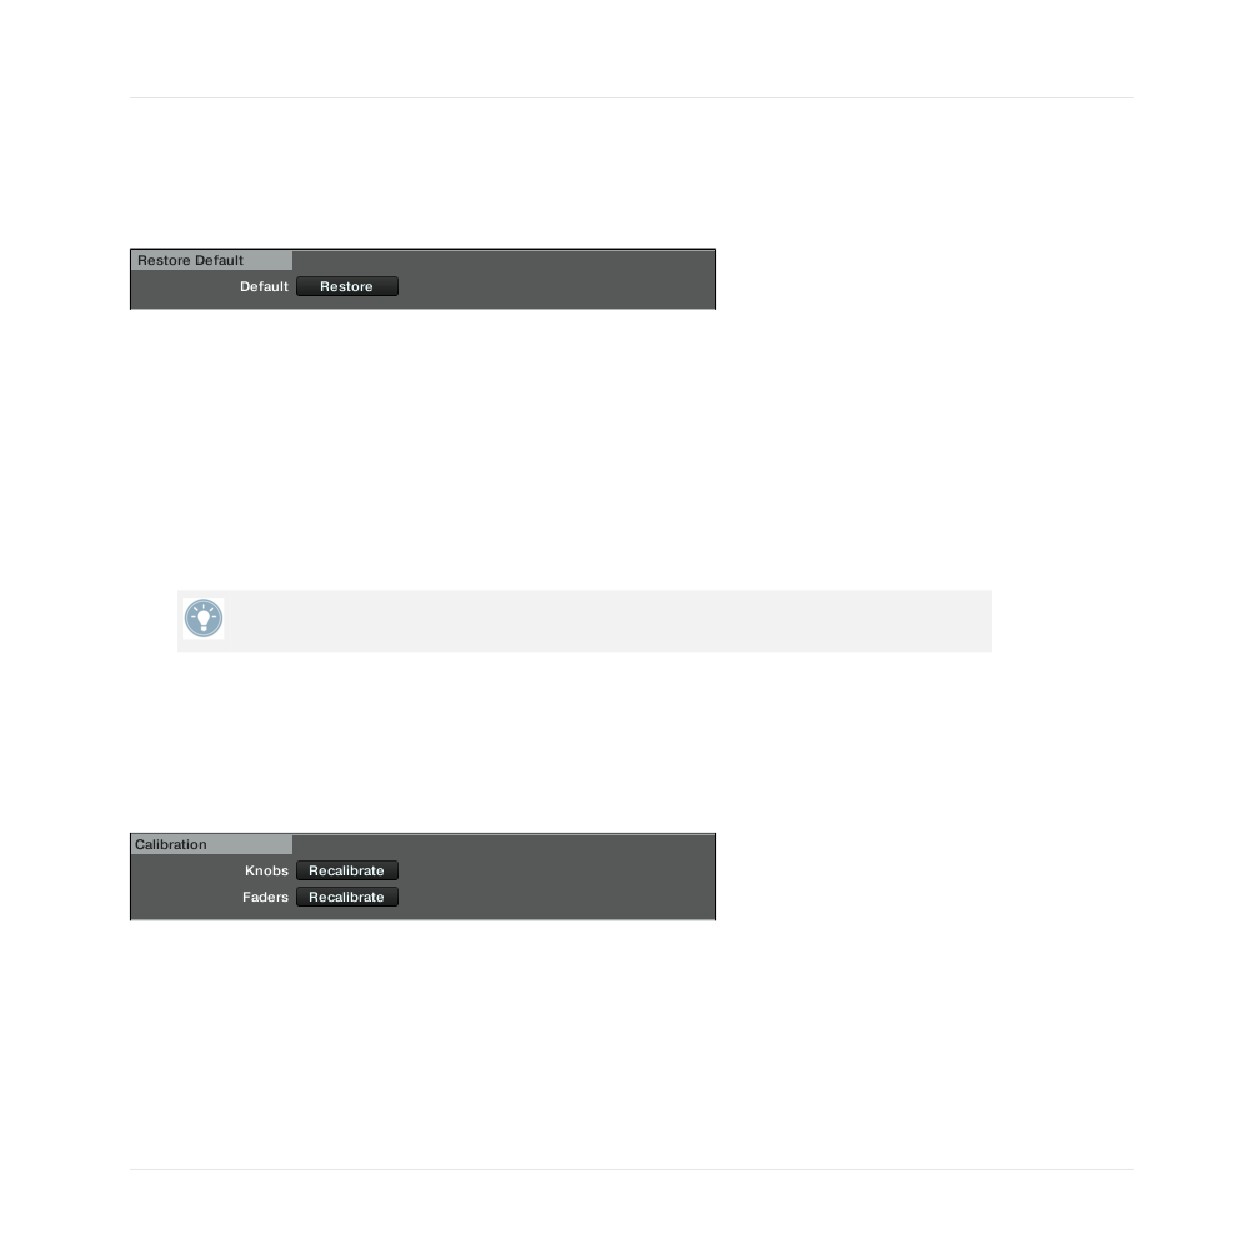
The Restore Default section contains just one element: the Restore button.
The Restore button.
Clicking on this button opens a warning message window, asking you if you really want to reset
TRAKTOR KONTROL F1 to its default factory settings:
► Click Yes to confirm resetting the F1 to its default state.
► Click No to go back to the Preferences window without changing anything.
→ Upon confirmation, the F1's settings will be restored to default. You are now ready to
start again with a fresh TRAKTOR KONTROL F1.
At any time, you can start the Setup Wizard to setup a fresh Deck and Controller selection.
Simply select Start Setup Wizard in the Help menu of TRAKTOR PRO 2's menu bar.
5.1.2
Calibration
As the name implies, this section lets you calibrate the Filter knobs and Volume faders on the
F1 in order to correct any inaccuracies of center position (for the knobs) and range (for the fad-
ers).
The Calibration section.
Since there are only two kinds of control elements which might ever need calibration, this sec-
tion is very simple:
• Knobs: for recalibrating the four Filter knobs on the F1.
• Faders: for recalibrating the four Volume faders on the F1.
TRAKTOR KONTROL F1 - Manual - 121
F1 Preferences
The F1 Preferences Section
5.1.3
LEDs
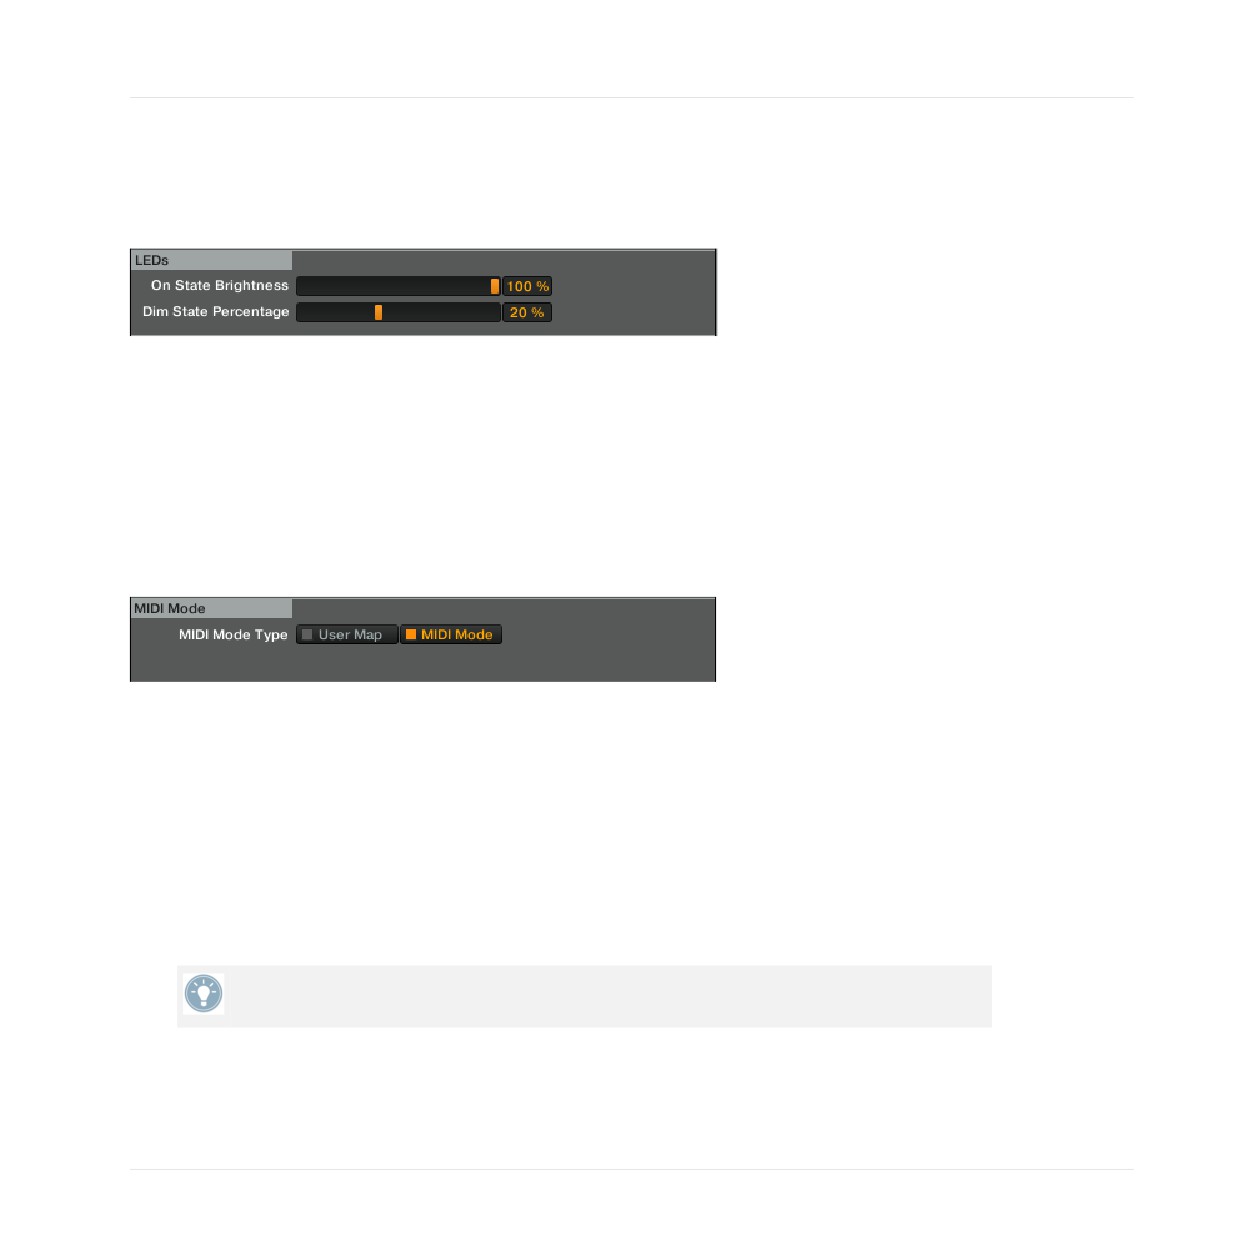
You can adjust the brightness of both states of your F1's LEDs in this section.
The LEDs section.
• On State Brightness: Sets the brightness for the On state of the LEDs.
• Dim State Brightness: Sets the brightness for the Dim state of the LEDs. This value is ex-
pressed as a percentage of the On state brightness.
5.1.4
MIDI Mode
These buttons determine what will happen when you press SHIFT+ BROWSE (MIDI) on the F1.
The MIDI Mode section.
• If you have MIDI Mode selected here, pressing SHIFT + BROWSE [MIDI] will switch the
F1 into ordinary MIDI mode.
• If User Map is selected, pressing SHIFT + BROWSE (MIDI) will not enter MIDI mode. In-
stead, it will load the User Mapping for the F1, thus, allowing you to quickly access your
own User Map, which still has support for the RGB LEDs and takes advantage of the high-
resolution controls on the F1 (which are transmitted via NHL rather than MIDI). See the
"Controller Manager" chapter from the TRAKTOR 2 Manual for more information on User
Maps.
Also have a look at ↑4.12, MIDI Mode for further information on the difference between
MIDI mode and User Map mode.
TRAKTOR KONTROL F1 - Manual - 122
F1 Preferences
The Remix Decks Preferences Section
5.2
The Remix Decks Preferences Section
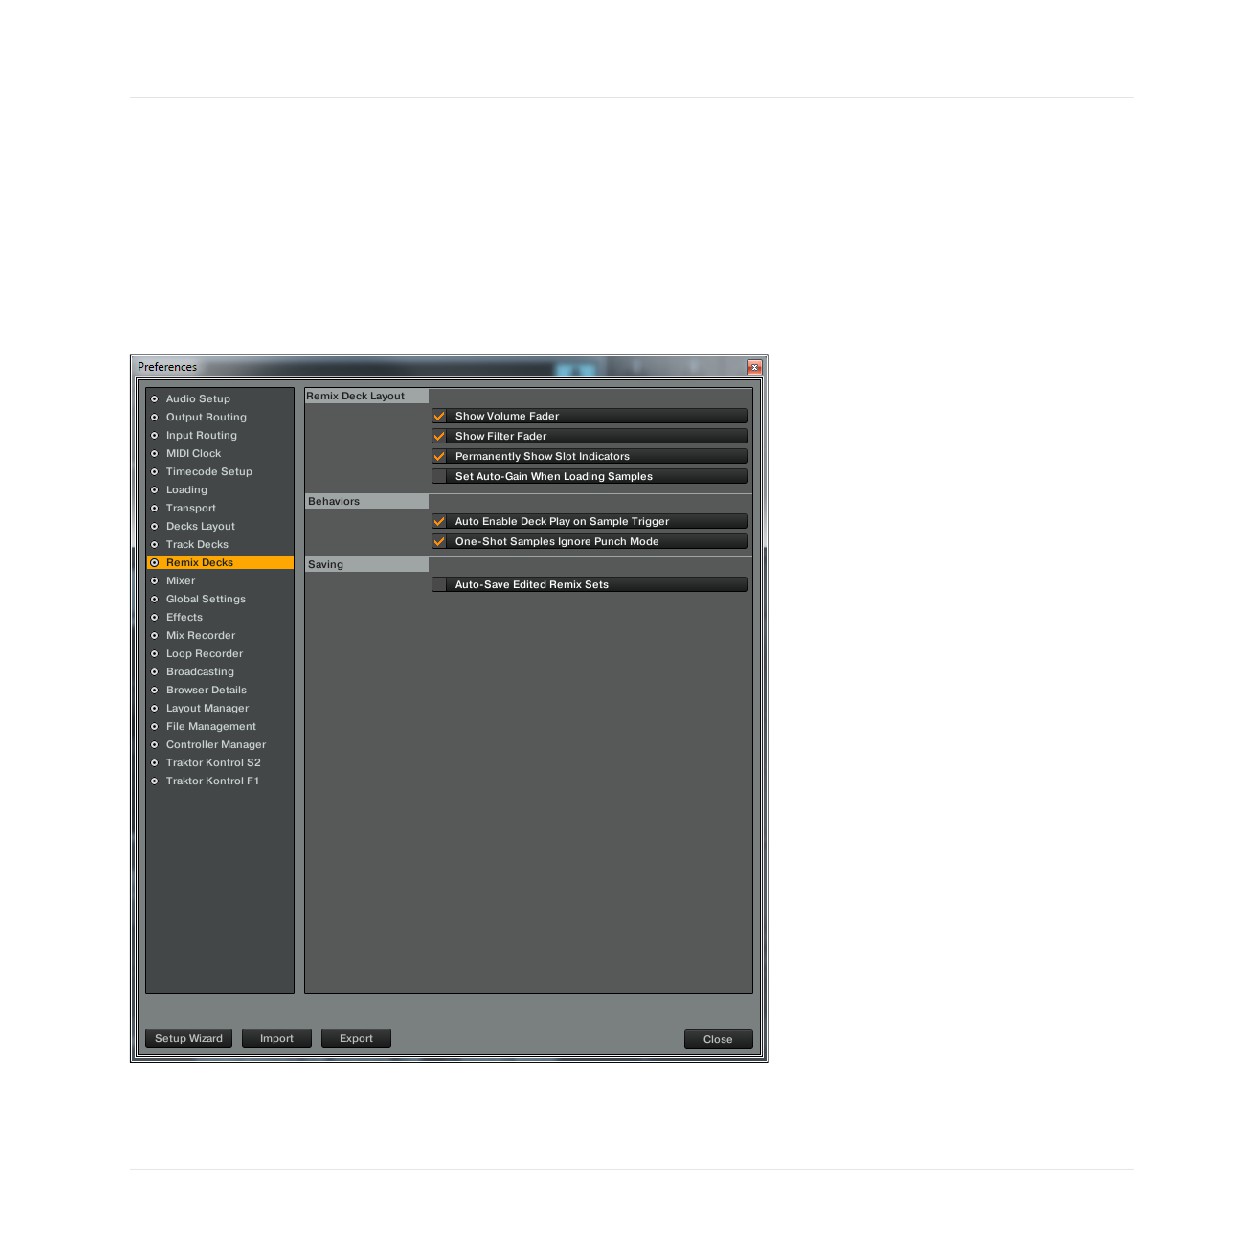
The Remix Deck section of TRAKTOR's Preferences window holds additional options for influ-
encing the default behavior of TRAKTOR's Remix Decks.
► To adjust the Remix Deck's settings, click on Remix Decks entry.
The Remix Deck settings in TRAKTOR's Preferences window.
TRAKTOR KONTROL F1 - Manual - 123
F1 Preferences
The Remix Decks Preferences Section
In this page, settings are grouped into three sections, all of which are explained in the follow-
ing sub-chapters:
• Remix Deck Layout
• Behaviors
• Saving
5.2.1
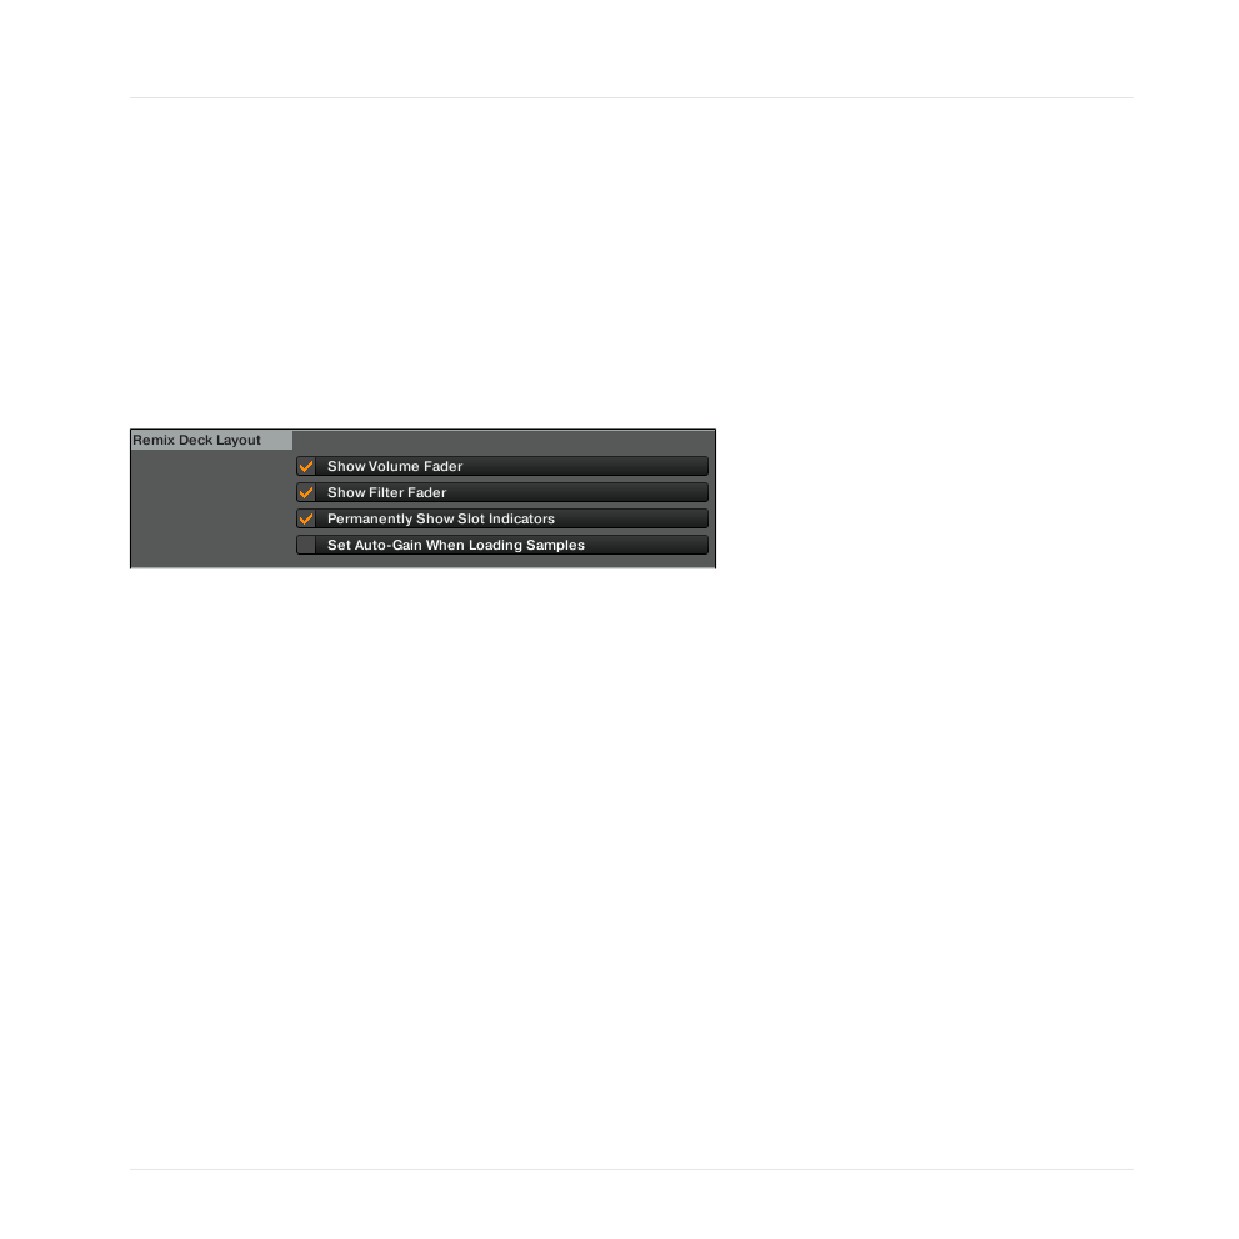
Remix Deck Layout
This section lets you change the Remix Deck Flavor's default Display settings.
The Remix Deck Layout section.
The available entries are:
• Show Volume Fader: This preference determines if the Slot Volume controls should be
visible or hidden in the Remix Deck. When unchecked, the Volume faders are hidden.
• Show Filter Fader: This preference determines if the Filter fader controls should be visible
or hidden in the Remix Deck. When unchecked, the Filter faders are hidden.
• Permanently Show Slot Indicators: This preference determines if the minimized Slot Pa-
rameter indicators will be visible or not in the Remix Deck. When checked, you will see
minimized Slot Parameter indicators when not hovering over the Remix Deck's Sample
Slots with the mouse pointer. When unchecked, the minimized Slot Parameter indicators
will be hidden. In both cases, the Slot Parameter buttons will always appear when hover-
ing over the Sample Slots with the mouse pointer.
• Set Auto-Gain When Loading Samples: This preference determines if TRAKTOR should
use the Auto-Gain value stored in a Sample when it is loaded into the Remix Deck. When
this option is unchecked, TRAKTOR will leave the Sample's gain at 0.0dB, thus, playing
TRAKTOR KONTROL F1 - Manual - 124
F1 Preferences
The Remix Decks Preferences Section
the Sample at its original level. When checked, TRAKTOR will adjust the gain level as
specified by the Auto-Gain level in the Sample so that it plays at an almost maximum vol-
ume (matching the level of other Samples that were loaded with Auto-Gain).
5.2.2
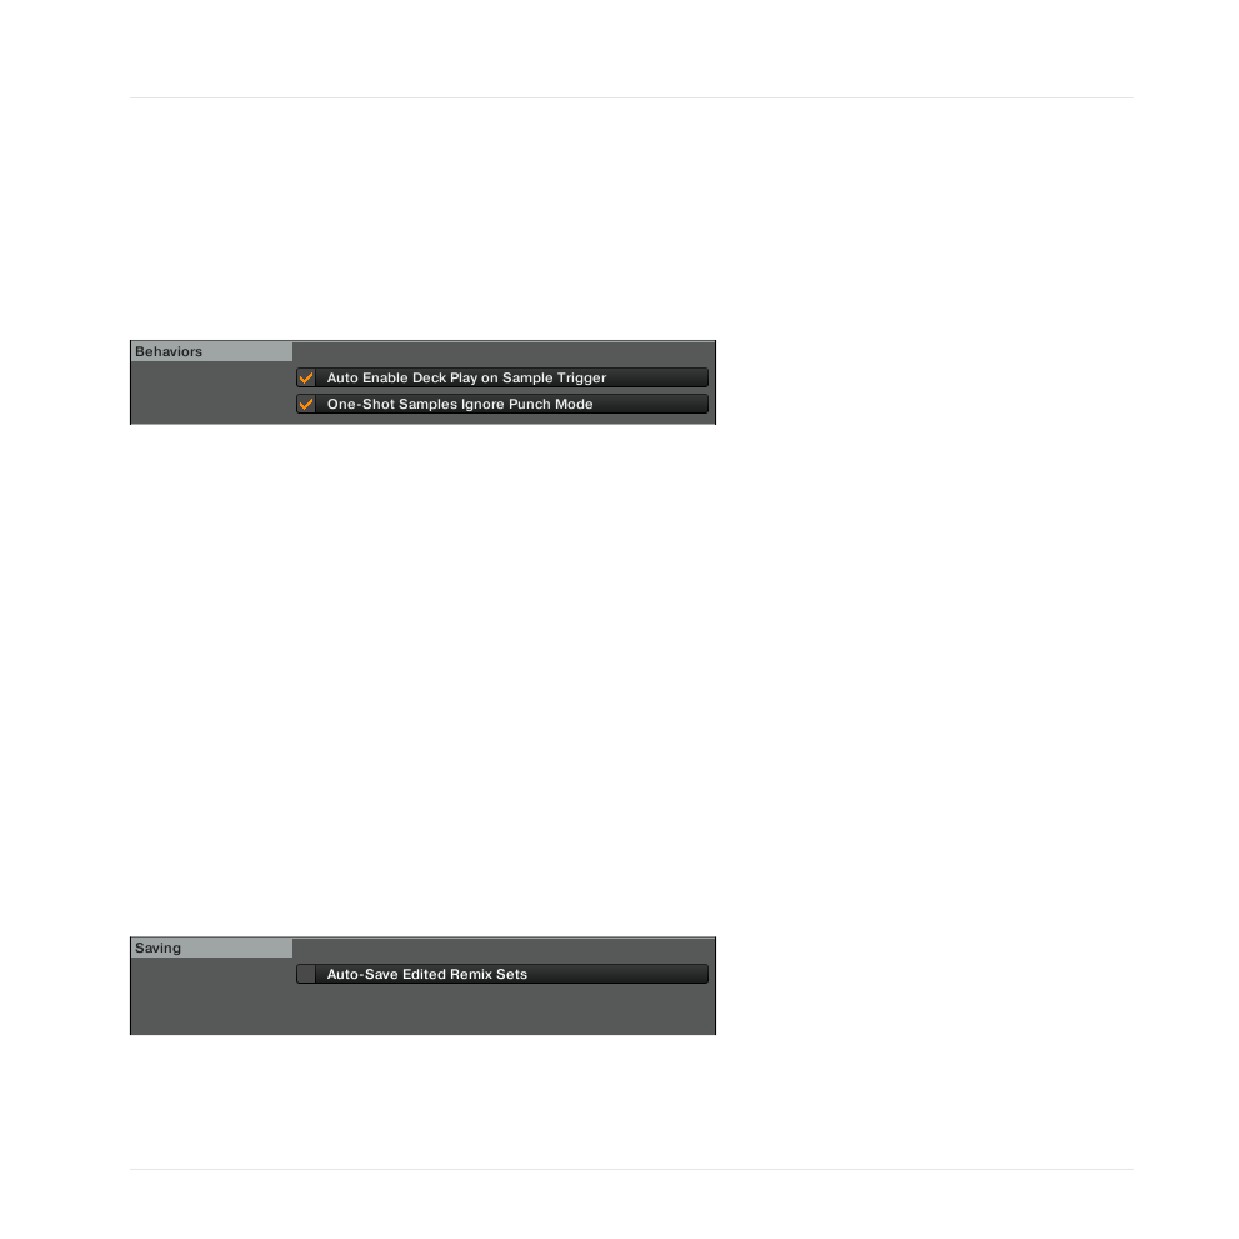
Behaviors
This section lets you influence the default behavior of the Remix Decks.
The Behaviors section.
The available entries are:
• Auto-Enable Deck Play on Sample Trigger: With this option enabled, TRAKTOR will force
the Remix Deck's Play button to the On state whenever you trigger a Sample, even if the
Deck had been previously stopped. When this option is unchecked, triggering Samples
will have no effect on the Remix Deck's Play button, allowing you to select the Sample
before starting the Deck as a whole.
• One-Shot Samples Ignore Punch Mode: When this option is checked, Samples in One-
shot mode will ignore the setting of Punch mode, they will always play starting from the
beginning. When the option is unchecked, Samples in One-shot mode will follow the rules
of Punch mode: they will start playing from a location corresponding to the phase/location
of the previously playing Sample.
5.2.3
Saving
When this option is enabled, TRAKTOR will automatically save the current Remix Set when
you initiate actions that will alter the current contents of the Remix Deck.
The Saving section.
This includes the following actions:
TRAKTOR KONTROL F1 - Manual - 125
F1 Preferences
The Remix Decks Preferences Section
• Switching the Deck Flavor from Remix Deck to a different type of Deck: the Remix Set will be
saved right before the Deck Flavor is switched.
• Loading a new Remix Set into the Remix Deck: the Remix Set will be saved right before the
new Remix Set is loaded.
• Triggering the "Delete All" action from the F1: the Remix Set will be saved right before the
contents of the Remix Deck are cleared.
• Quitting TRAKTOR: the Remix Set will be saved before the rest of the Collection is saved.
When initiating Auto-Save, you will not be presented with any dialogs. If the Remix Set al-
ready exists in the Collection, the older version will be automatically overwritten!
When this option is unchecked, TRAKTOR will not attempt to save edited Remix Sets in the
above conditions. Instead, TRAKTOR will simply discard all changes made. This can be the
preferred workflow if you want your Remix Sets to always start from the same state for each
performance, regardless of what you did to them during a previous performance.
TRAKTOR KONTROL F1 - Manual - 126