SANY Crawler Hydraulic Excavator SY365H-9, SY365BH-9. Shop Manual (2014) - page 3
 

  Index      Manuals     SANY Crawler Hydraulic Excavator SY365H-9, SY365BH-9. Shop Manual (2014)


Search            copyright infringement  


Content      ..     1      2      3      4      ..


SANY Crawler Hydraulic Excavator SY365H-9, SY365BH-9. Shop Manual (2014) - page 3


1-20

Introduction

SY365(B)H-9 Crawler Hydraulic Excavator

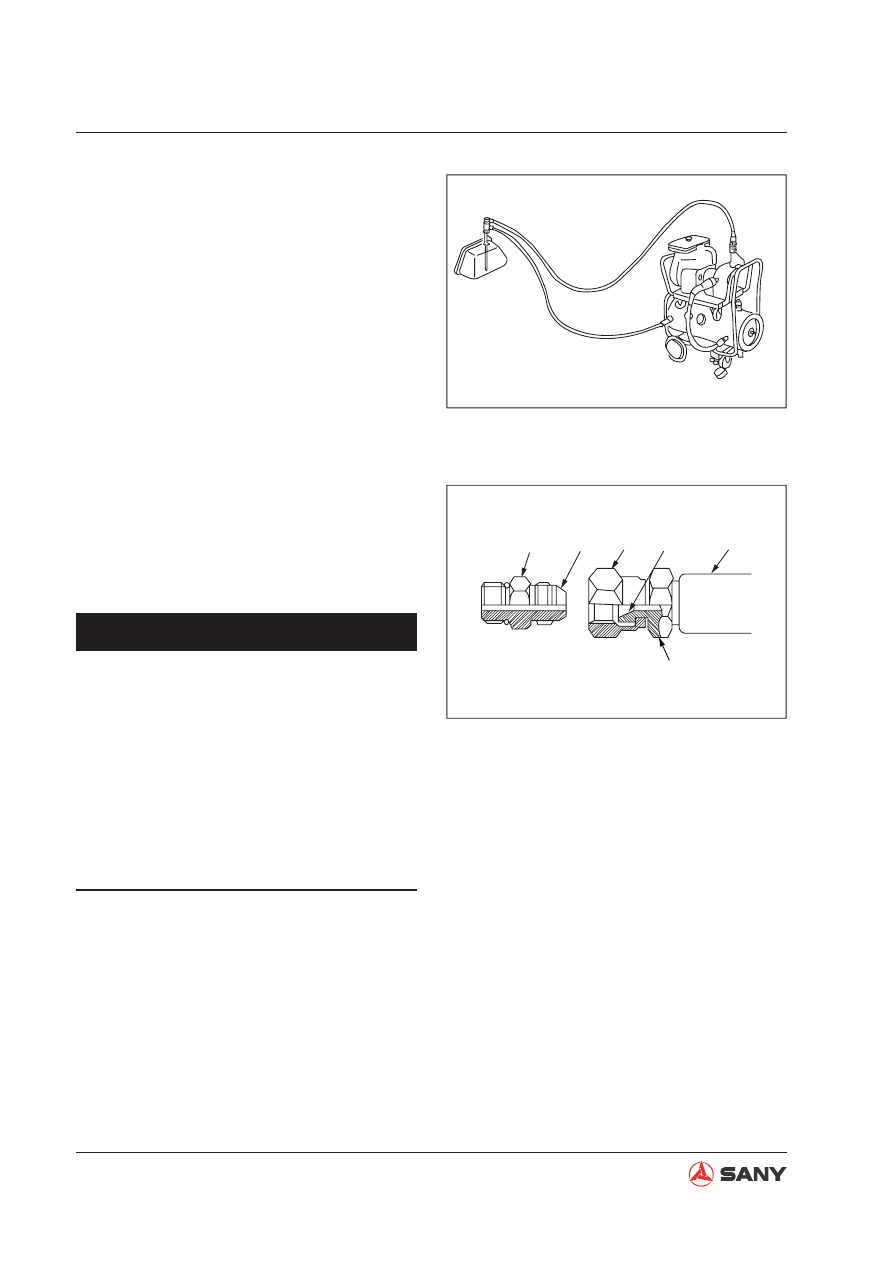
1.3.2.7 Cleaning operations

After repairing the hydraulic equipment 
(pump, control valve, etc.) or when run-
ning the machine, carry out oil cleaning to 
remove the sludge or contaminants in the 
hydraulic oil circuit. The oil cleaning equip-
ment is used to remove the ultra 

fi

 ne (about 

μ

) particles that the 

fi

 lter built in the hy-

draulic equipment cannot remove, so it is 
an extremely effective device.

1.4  Hose Connector

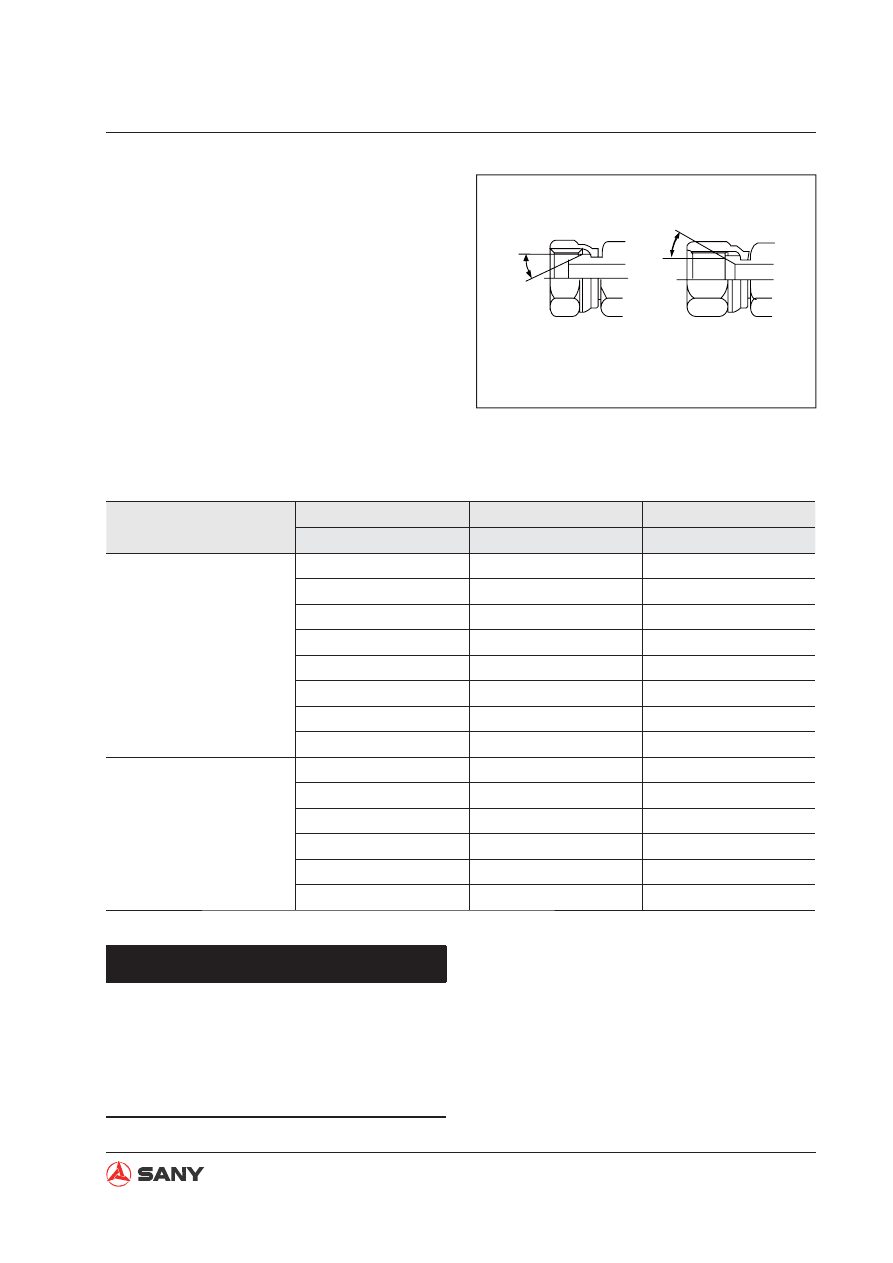
Hose connector is used to connect hoses with 
a small diameter. The metal sealing surface (4) 
of the joint (1) must be in close contact with 
the metal sealing surface (5) of the hose (2) to 
seal pressurized oil.

ZX215-1000027

Fig. 1-26 

ZX215-1000028

1

2

3

4

5

Connector

Fig. 1-27 

NOTICE


Do not over-tighten the nut (3). Exces-
sive force applied on the metal sealing 
surface (4) and (5) may cause the joint 
(1) to break. Be sure to tighten nut (3) 
according to technical speci

fi

 cations.  


Scratches or other damages on seal-
ing surface (4) and (5) may cause leaks 
at the joint. Be extremely careful not 
to damage the sealing surfaces during 
connecting and disconnecting work.
1-21

Introduction

SY365(B)H-9 Crawler Hydraulic Excavator

1.4.1  Type of hose connector

Type

Wrench size mm

Wrench size mm

Tightening torque

Connecting nut

Hose joint

N·m(kgf·m,Ibf·ft)

24

°

 Male

19

19

59(6,44)

22

22

98(10,72)

27

27

118(12,87)

36

36

235(24,173)

41

41

295(30,218)

50

50

490(50,361)

60

60

670(68,494)

70

70

980(100,723)

24

°

 Female

19

17

44(4.5,32)

22

19

59(6,44)

27

22

118(12,87)

36

30, 32

235(24,173)

41

36

295(30,218)

50

46

490(50,361)

1.4.2  Hose connector tightening torque table

ZX215-1000029

24

°

24

°

Female

Male

Fig. 1-28 

NOTICE


The torque values listed in the table are 
intended for general application.


Do not use torque values listed in this 
table when different torque values are 
speci

fi

 ed for a special purpose.  

1-22

Introduction

SY365(B)H-9 Crawler Hydraulic Excavator

Place O-ring (6) in contact with the contact 
surface of the joint (7) to seal the pressurized 
oil.

1.4.3  Connection of O-rings

Wrench size mm

Wrench size mm

Tightening torque

Connecting nut

Hose joint

N·m (kgf·m,Ibf·ft)

19

17

44(4.5,32)

22

19

59(6,44)

27

22

118(12,87)

36

30, 32

235(24,173)

41

36

295(30,218)

50

46

490(50,361)


Replace o-rings (6) with new ones 
when re-connecting hoses. 


Before tightening nut (9), make sure the 
o-ring (6) has been placed into the o-
ring seat (8).Displacement of the o-ring 
may have it damaged and cause leaks. 


Be careful not to damage the o-ring 
seat (8) or the sealing surface (10). 
Damaged o-ring (6) may cause oil leak-
age. 


If oil leakage due to loosened nut (9) is 
detected, do not try to stop the leakage 
by tightening nut (9). Instead, replace 
o-ring (6) with a new one and make 
sure it is well positioned, and tighten 
nut (9).

NOTICE

ZX215-1000030

Hose connector

6

7

8

9

10

Fig. 1-29 

1-23

Introduction

SY365(B)H-9 Crawler Hydraulic Excavator

1.5  Table of Standard Tightening Torques 

Bolt di-

ameter

Bolt 

grade

Wrench 

size

Hex wrench 

size

Hexagonal bolt

Hexagonal socket head bolt

N·m

kgf·m

lbf·ft

N·m

kgf·m

lbf·ft

M6

10.9

10

4

13.2

1.37

9.74

13.2

1.37

9.74

M8

10.9

13

6

31

3.16

22.87

31

3.16

22.87

M10

10.9

17

8

66

6.73

48.7

66

6.73

48.7

M12

10.9

19

10

113

11.53

83.39

113

11.53

83.39

M14

10.9

22

12

177

18.06

130.6

177

18.06

130.6

M16

10.9

24

14

279

28.47

205.9

279

28.47

205.9

M18

10.9

27

14

382

38.98

281.9

382

38.98

281.9

M20

10.9

30

17

549

56.02

405.16

549

56.02

405.16

M27

10.9

41

19

1320

134.7

974.16

1320

134.7

974.16

M10

12.9

17

6

78

7.96

57.76

78

7.96

57.76

M12

12.9

19

8

137

13.98

101.1

137

13.98

101.1

M16

12.9

24

14

339

34.6

250.18

339

34.6

250.18

M20

12.9

30

17

664

67.75

490

664

67.75

490

The following items apply to 

fi

 ne thread and coarse thread.


Apply grease (zinc white B dissolved in spindle oil) onto the nuts and bolts to reduce 
the friction coef

fi

 cient. Thrust bolts do not require greasing. 


Torque tolerance is 

±

10%.


Always use bolts of correct length. The tip of bolts with excessive length may contact 
the bottom of the bolt hole, resulting in under-tightening. Bolts with inadequate length 
may result in insuf

fi

 cient fastening. 


The torque values listed in the table are intended for general application. If different 
torque values are speci

fi

 ed for a special purpose, the torque values in this table are 

not applicable any more. 


Make sure the threads are free of dirt or rusts before installation of nuts and bolts. 

Table of tightening torques for bolts and nuts


Unless speci

fi

 ed otherwise, tighten metric nuts and bolts to the torque below. (When using 

torque wrench)

NOTICE

1-24

Introduction

SY365(B)H-9 Crawler Hydraulic Excavator

1.6  Type of Bolts

Tighten nuts and bolts properly to specified 
torque values. The type and grade of bolts are 
illustrated on the right.

Use correct bolts and tighten them properly 
when assembling machines or components. 

1.7  Tightening Sequence

When two or more bolts are being tightened, 
follow the tightening sequence shown on the 
right to ensure even tightening.

ZX215-1000031

Hex bolt

Socket head hex bolt

10.9

12.9

8.8

Fig. 1-30 

ZX215-1000032

1

2

3

4

5

6

1

2

3

4

5

6

7

8

9

10

11

12

13

14

1

2

3

4

Cross tightening

Diagonal tightening

Central and diagonal tightening

Fig. 1-31 

ZX215-1000033

Fig. 1-32 

  CAUTION


Always use suitable tools for specific 
work. Use of improper tools and meth-
ods may cause a hazardous situation.


Use tools of correct sizes when loosen-
ing or tightening the nuts or bolts. Oth-
erwise, the tools may slide and cause 
personal injury. 

1-25

Introduction

SY365(B)H-9 Crawler Hydraulic Excavator

1.8  Maintenance of Half Flanges

1.  Clean the sealing surface of the 

fl

 ange and 

check it carefully. Scratches and coarse-
ness cause leaks or abrasion of seals. 
Uneven surface may squeeze the seal out. 
If these faults are not corrected properly, 
parts may have to be replaced. 

2.  Always use specified O-rings. Check that 

the O-rings are not damaged. Do not file 
the surface of the O-ring. Apply grease 
onto the O-ring to locate it. 

3.  Tighten the half flanges carefully. Locate 

the opening at the center so that it is 
perpendicular to the oil opening. Tighten 
the bolt manually to maintain the location 
of the components. 

1.8.1  Table of tightening torques for half 

fl

 ange bolts


Unless speci

fi

 ed otherwise, tighten the half 

fl

 ange bolts to the torques below.

Thread diameter of bolt

Width across 

fl

 ats

Tightening torque

mm

mm

Nm

kgm

10

12

16

14

17

22

59~74

98~123

235~285

6.0~7.5

10.0~12.5

23.5~29.5

ZX215-1000034

Fig. 1-33 

Improper

ZX215-1000035

Fig. 1-34 

1-26

Introduction

SY365(B)H-9 Crawler Hydraulic Excavator

 Conversion Table

Method of using conversion table

The conversion table in this section is provided to enable simple conversion of 

fi

 gures. For details 

of the method of using the conversion table, see the example given below.

Example: 

Method of using the conversion table to convert from millimeters to inches

Convert 55 mm into inches

Locate the number 50 in the vertical column at the left side, take this as (A), and then draw a 
horizontal line from (A).

Locate the number 5 in the row across the top, take this as (B), then draw a perpendicular line 
down from (B).

Take the point where the two lines cross as (C). This point (C) gives the value when converting 
from millimeters to inches. Therefore, 55 mm = 2.165 inches.

Convert 550 mm into inches

The number 550 does not appear in the table, so divide it by 10 (move the decimal point one 
place to the left) to convert it to 55 mm.

Carry out the same procedure as above to convert 55 mm to 2.165 inches.

The original value (550 mm) was divided by 10, so multiply 2.165 inches by 10 (move the decimal 
point one place to the right) to return to the original value. This gives 550 mm = 21.65 inches.

Introduction

SY365(B)H-9 Crawler Hydraulic Excavator

1.8.2 Temperature

Fahrenheit-Centigrade conversion: A simple way to convert a Fahrenheit temperature reading 
into a Centigrade temperature reading or vice versa is to enter the accompanying table in the 
center (boldface column) of 

fi

 gures. These 

fi

 gures refer to the temperature in either Fahrenheit or 

Centigrade degrees.

If it is desired to convert from Fahrenheit to Centigrade degrees, consider the center column to 
be a table of Fahrenheit temperatures and read the corresponding Centigrade temperature in the 
column at the left.

If it is desired to convert from Centigrade to Fahrenheit degrees, consider the center column to 
be a table of Centigrade values, and read the corresponding Fahrenheit temperature on the right.

Shop Safety

Shop Safety

SY365(B)H-9 Crawler Hydraulic Excavator

2-1

2 Shop Safety

2.1 Hazard Alert Information .......................................................................................... 2-3
2.2  General Shop Safety ............................................................................................... 2-5

2.2.1  Rules and shop behavior ............................................................................... 2-6
2.2.2 Housekeeping ................................................................................................ 2-6
2.2.3  Shop Liquids Storage..................................................................................... 2-7
2.2.4  Cleaning the Parts ......................................................................................... 2-7
2.2.5  Cleaning the Machine .................................................................................... 2-8
2.2.6 Appropriate Working Apparel ......................................................................... 2-8
2.2.7  Personal Protective Equipment...................................................................... 2-8
2.2.8  Using the Correct Tools .................................................................................. 2-9
2.2.9  Fire Extinguisher and Emergency Exits ......................................................... 2-9
2.2.10 Electrical Dangers ...................................................................................... 2-10
2.2.11  Hoisting a Load .......................................................................................... 2-10

2.3 Before Repair..........................................................................................................2-11

2.3.1  Safe Work Preparations ................................................................................2-11
2.3.2 Preparing yourself ........................................................................................ 2-12
2.3.3 Lockout/Tagout............................................................................................. 2-13
2.3.4  Two people when engine running ................................................................ 2-15
2.3.5 Safety Partners ............................................................................................ 2-15

2.4 Repair Precautions ................................................................................................ 2-16

2.4.1  Running the Machine ................................................................................... 2-16
2.4.2  Mounting and Dismounting .......................................................................... 2-17
2.4.3 Removing Attachments ................................................................................ 2-18
2.4.4  Jacking Up the Machine............................................................................... 2-18
2.4.5  Adding Fluids to a System ........................................................................... 2-18

Shop Safety

2-2

SY365(B)H-9 Crawler Hydraulic Excavator

2.4.6  Aligning Parts or Components ..................................................................... 2-19
2.4.7 Driving Pins .................................................................................................. 2-19
2.4.8  When compressed air is used...................................................................... 2-19
2.4.9 Welding operation ........................................................................................ 2-20
2.4.10  Track Recoil Springs .................................................................................. 2-20
2.4.11  High-Pressure Fluid Lines .......................................................................... 2-21
2.4.12  Air-conditioning system maintenance ........................................................ 2-22
2.4.13  High voltage precautions ........................................................................... 2-22
2.4.14  Disconnecting the System Power .............................................................. 2-23
2.4.15 Accumulator ............................................................................................... 2-23
2.4.17 Battery Hazards ......................................................................................... 2-24
2.4.18 Jump-Start Safety ...................................................................................... 2-25
2.4.19 Avoiding 

fi

 re and explosion ........................................................................ 2-26

2.4.20 Chemical hazard ........................................................................................ 2-27
2.4.21  Material Safety Data Sheets (MSDS) ........................................................ 2-27
2.4.22  Proper disposal of wastes .......................................................................... 2-28

2.5 Other Precautions .................................................................................................. 2-29

2.5.1  Sling work and giving signals ....................................................................... 2-29
2.5.2  Using mobile crane ...................................................................................... 2-31
2.5.3  Using overhead hoist crane ......................................................................... 2-31
2.5.4  Selecting wire ropes..................................................................................... 2-33

2-3

Shop Safety

SY365(B)H-9 Crawler Hydraulic Excavator

2 SHOP SAFETY

2.1  Hazard Alert Information

Most accidents are usually caused by the failure to follow fundamental repair procedures and 
safety rules for the system under repair. To avoid accidents it is important to read and understand 
all information outlined in this manual before performing repairs on the machine system.

The following (ANSI/ISO) signal words are used to inform you that there is a potentially hazard-
ous situation that may lead to damage, personal injury or even death. In this manual, on the ma-
chine, part or component decals and different signal words are used to express the potential level 
of a hazard.

  DANGER


Indicates an imminent hazard which 
WILL result in serious injury or death if 
message is ignored.

  WARNING


Indicates a potentially hazardous situa-
tion which COULD result in serious in-
jury or death if message is ignored. 

  CAUTION


Indicates a potentially hazardous situ-
ation which COULD RESULT IN MINOR 
OR MAJOR INJURY if message is ig-
nored. 

NOTICE


Indicates THE MACHINE MAY BE DAM-
AGED if improperly operated or main-
tained.

This is to alert the user of a hazard. It is 
usually used in a graphic.

This symbol is used in a graphic to alert 
the user to not do something.

Besides the above signals words, the following words are also used to remind you of rules to be 
followed or to provide you with very useful information. 

Note: 

It is followed by measures that must be taken to prevent reduction of machine service life. 

Remark:

 It is followed by very useful information.

2-4

Shop Safety

SY365(B)H-9 Crawler Hydraulic Excavator

  WARNING

Improper repair procedures on this machine can be hazardous and could result in serious in-
jury or even death.

All personnel involved with the repair of this machine must read this manual thoroughly before
performing any procedures on this equipment.

Some actions involved in the operation or repair of this machine could cause a serious acci-
dent if they are not performed in the manner described in this manual.

All precautions outlined in this manual apply only to intended repair procedures of the ma-
chine or system. If you perform any repairs not speci

fi

 cally prohibited, you must be sure that it

is safe for you and others. In no event should you or others engage in prohibited uses or ac-
tions as described in this manual.

SANY delivers machines that comply with all applicable regulations and standards of
the country to which the machines have been shipped. If this machine has been pur-
chased in another country or purchased from someone in another country, it may lack
certain safety features and speci

fi

 cations that are necessary for use in your country. If

there is any question about whether your product complies with the applicable stan-
dards and regulations of your country, contact your SANY representative before per-
forming repairs on this machine.

2-5

Shop Safety

SY365(B)H-9 Crawler Hydraulic Excavator

2.2  General Shop Safety

It's important to establish good shop safety 
rules for everyone who enters or uses the 
shop area. Implementing shop safety rules 
will keep employees safe and provide the 
most productive environment for working or 
learning. Post rules where they can clearly be 
viewed at all times. If necessary, provide shop 
personnel with a written copy of the rules and 
discuss any questions or confusion with them.

Always keep in mind, shop safety is NOT 
something to be studied at the start of a proj-
ect and then forgotten; most accidents are 
caused by carelessness, being in a hurry or by 
simply disregarding safety rules. Remember 
this, if you are DILIGENT and follow instruc-
tions outlined in this shop manual with care, 
repair operations can be safe and enjoyable. 
Safe work practices, should become a force of 
habit.

  WARNING


Mistakes in operation are extremely 
hazardous. Read the Safety, Operation 
& Maintenance Manual that came with 
the machine carefully before operating 
the machine. Failure to follow this alert 
could result in serious injury or death.

2-6

Shop Safety

SY365(B)H-9 Crawler Hydraulic Excavator

2.2.1  Rules and shop behavior

Study all shop rules relating to the proce-
dure carefully and constantly apply them.
When in doubt about any task, get help!
DO NOT take chances.

Know your job. It is foolish, and often di-
sastrous, to make repairs to a machine
without first receiving proper instructions.
Always use the shop manual when per-
forming any repair tasks. Get additional
help if you are NOT sure what must be
done or how a task should be performed.

The shop is a place to work, not play. It is
NOT a place for 

horseplay

. A 

joker

in a repair shop is a 

walking hazard

 to

everyone. Daydreaming or socializing on
the job also increases your chances of in-
jury.

If you must smoke, smoke only in the area
provided for smoking. Never smoke while
on the shop 

fl

 oor or work area.

2.2.2 Housekeeping

Oils, grease, fuel, antifreeze or any fluid
spills should be mopped up immediately.
These items pose a serious slip hazard.
Regardless of who was responsible for the
spill, it is your job as a shop employee to
secure and clean up the spill area.

Keep the shop clean. Scrap or old parts
should be disposed of properly. Never al-
low them to remain on the bench or shop

fl

 oor.

All equipment and tools must be put back
in their proper storage areas after each
use. It's imperative that you do not let a
shop become cluttered and disorganized in
order to prevent accidents.

Always keep in mind, proper house clean-
ing is vital for a safe and pleasant work en-
vironment.

WX235R-1200001

Fig. 2-1 

Fig. 2-2 

2-7

Shop Safety

SY365(B)H-9 Crawler Hydraulic Excavator

2.2.3  Shop Liquids Storage


Liquids, cleaning solvents or machine flu-
ids should be properly stored in an area 
away from work locations. These storage 
areas should be ventilated to an outdoor 
location to avoid any vapor accumulation 
in a con

fi

 ned shop area. Follow all OSHA 

regulations regarding 

fl

 uid storage.


Never leave open containers of liquids sit-
ting around. These could spill or catch 

fi

 re. 

Always read the container label for infor-
mation on storage and handling of the liq-
uids.


Never store liquids in containers that are 
not properly labeled for that liquid. Confu-
sion could result in equipment damage, 

fi

 re 

or an unexpected explosion.


Never smoke or bring open 

fl

 ames around 

liquids, doing so could result in an unex-
pected 

fi

 re or explosion.


Never handle liquids without using person-
al protective equipment. Treat all liquids 
with caution.

2.2.4  Cleaning the Parts

Never use gasoline, diesel fuel or similar 

fl

 am-

mable liquids to clean parts. Always use ap-
proved non-

fl

 ammable solvents to clean parts. 

Failure to do so could result in explosion or 

fi

 re.

WX235R-1200002

Fig. 2-3 

WX235R-1200003

Fig. 2-4 

2-8

Shop Safety

SY365(B)H-9 Crawler Hydraulic Excavator

2.2.5  Cleaning the Machine


Always use high-pressure hot water and 
mild, nonflammable grease-cutting soaps 
or cleaning agents to clean the machine 
parts. Never use flammable or caustic 
cleaning agents.


Never use high-pressure steam cleaners 
to clean the machine. Steam cleaners will 
damage the paint, hoses or electrical sys-
tem.


Never pressure-wash or 

fl

 ood the inside of 

an operator cab. This will damage sensi-
tive electrical components.

2.2.6 Appropriate Working Apparel

Improper or loose clothing, casual dress cloth-
ing, jewelry, incorrect shoes or long hair can 
result in possible injury.

Make a list of the types of clothing that are not 
allowed in the shop area. Go over the list with 
personnel before they start a job.

2.2.7  Personal Protective Equipment

If your shop speci

fi

 es the use of safety equip-

ment, OSHA requires this equipment to be 
used when on the shop floor or in the area 
where this equipment is required.

Never allow personnel in the shop area with-
out the proper personnel protective equipment 
even for a moment.

Always keep personnel protective equipment 
in good condition and replace them as re-
quired.

WX235R-1200007

Fig. 2-5 

WX235R-1200005

Fig. 2-6 

CZ335-1102002

Fig. 2-7 


Content      ..     1      2      3      4      ..