New Holland Tractor T4.75F, T4.85F, T4.95F, T4.105F. OPERATOR’S MANUAL (2013) - page 1
ORIGINAL INSTRUCTIONS
OPERATOR’S MANUAL
T4.75F
T4.85F
T4.95F
T4.105F
Tractor
Part number 47593719
2nd edition English
October 2013
Replaces part number 47494640
Contents
1 GENERAL INFORMATION
Note to the Owner
1-1
Proposition 65
1-2
International symbols
1-3
Introduction
1-5
Tractor intended use
1-6
Ecology and the Environment
1-8
Identification plates
1-9
Component Identification
1-11
2 SAFETY INFORMATION
Safety rules and signal word definitions
2-1
Safety information
2-2
Air conditioning safety regulations
2-6
Cab guard
2-7
Roll over protective structure (ROPS)
2-9
Personal protective equipment (PPE)
2-10
Tractor jacking points
2-11
Hazardous chemicals
2-12
Burn prevention
2-13
Fire or explosion prevention
2-14
Getting in and out of the machine
2-15
Safety signs
2-16
3 CONTROLS/INSTRUMENTS
ACCESS TO OPERATOR'S PLATFORM
Cab
3-1
Heating system
3-4
Heating, ventilation or air-conditioning control
3-5
Cab air filter
3-7
OPERATOR'S SEAT
Operator seat
3-9
FORWARD CONTROLS
Analogue dashboard
3-11
Digital dashboard
3-15
Front controls
3-21
LEFT-HAND SIDE CONTROLS
Console Left-hand console - Control identification
3-25
Parking brake for hydraulic transmissions
3-26
RIGHT-HAND SIDE CONTROLS
Console Right-hand console - Control identification
3-27
REARWARD CONTROLS
Console - Control identification
3-29
EXTERIOR CONTROLS
Console - Control identification
3-29
DISPLAY SETTINGS
Instrument cluster - Program
3-30
TRANSMISSION
Transmission - Operating 4WD models
3-37
Transmission with gear reducer and mechanical reversing mechanism
3-38
Transmission with gear reducer and electrohydraulic reversing mechanism
3-41
Parking brake for hydraulic transmissions
3-44
Transmission with gear reducer, electrohydraulic reversing mechanism and HI-LO con-
trol
3-45
Transmission with gear reducer, electrohydraulic reversing mechanism, HI-LO control and
electrohydraulic clutch
3-48
4 OPERATING INSTRUCTIONS
COMMISSIONING THE UNIT
Basic operating safety rules
4-1
STARTING THE UNIT
Starting the engine
4-3
STOPPING THE UNIT
Stopping the engine
4-5
5 TRANSPORT OPERATIONS
ROAD TRANSPORT
Transporting the machine
5-1
RECOVERY TRANSPORT
Towing the tractor
5-2
6 WORKING OPERATIONS
FOUR WHEEL DRIVE (4WD)
Four-wheel drive with electro-hydraulic control
6-1
DIFFERENTIAL LOCK
Electrohydraulic differential lock
6-2
Mechanical differential lock
6-3
REMOTE VALVES
General safety rules
6-4
Rear remote control valve(s)
6-5
Electrohydraulically controlled side hydraulic valves
6-9
Electrohydraulically controlled rear remote control valves
6-11
Side hydraulic valves
6-12
REAR POWER TAKE-OFF (PTO)
Power take off (PTO)
6-13
FRONT POWER TAKE-OFF (PTO)
Front Power Take-Off (PTO) - Safety rules
6-15
Front Power Take-Off (PTO) - Operating
6-16
REAR HYDRAULIC LIFT
Hydraulic lift with mechanical control
6-17
Lift-O-Matic® control - Operating
6-18
Hydraulic lift with electronic control
6-20
FRONT HYDRAULIC LIFT
Hydraulic lift with mechanical control
6-25
Hydraulic lift with electronic control
6-27
REAR 3-POINT HITCH
Operating Instructions
6-29
Attach the implement
6-33
Additional equipment attachment points
6-35
FRONT 3-POINT HITCH
Operating Instructions
6-37
SWINGING DRAWBARS
Safety rules
6-40
Swinging drawbar
6-41
WHEELS AND TIRES
Wheels and tires
6-42
Tyre dimensions
6-46
WHEEL TRACK ADJUSTMENT
Wheel tread settings
6-48
Tire Combinations and Tread Positions
6-51
BALLAST
Ballast
6-54
7
MAINTENANCE
GENERAL INFORMATION
General safety before you service
7-1
Introduction
7-3
Various controls
7-4
Body maintenance
7-5
Break-in period
7-7
Fuel supply
7-8
General specification - Biodiesel Fuels
7-9
Opening the hood
7-10
Fluids and lubricants
7-11
MAINTENANCE CHART
Maintenance Chart
7-13
AS REQUIRED
Radiator expansion tank
7-15
Windscreen washer tank
7-15
Road light - Check
7-15
Clutch pedal adjustment
7-16
Parking brake or parking lock - Adjust
7-16
Radiator - Cleaning
7-16
Tyre pressure
7-17
Wheel nuts torque
7-18
Brake pedals
7-18
AT WARNING MESSAGE DISPLAY
Engine air filters
7-19
Fuel filter water drain
7-20
Brake fluid level
7-21
EVERY 10 HOURS OR EACH DAY
Engine oil level
7-22
EVERY 50 HOURS
Rear wheel hub
7-23
Lift and linkage
7-23
2WD steering cylinder
7-23
4WD steering cylinders
7-24
2WD front axle pivot
7-24
4WD front axle pivot
7-24
4WD transmission shaft
7-25
2WD right and left-hand stub axle
7-25
Front lift arms shaft
7-25
Front PTO coupling
7-26
EVERY 100 HOURS
Transmission oil cooler
7-27
Air conditioning condenser
7-27
Intercooler
7-27
Cab air filter
7-28
Cab recirculated air filter
7-28
EVERY 300 HOURS
Alternator belt
7-29
Transmission oil filter
7-29
Oil filter models with power shuttle/dual command
7-29
Engine air filters
7-30
Transmission oil level
7-30
4WD front axle housing
7-30
4WD front axle final drives
7-31
4WD front axles stub
7-31
2WD front wheels
7-31
EVERY 500 HOURS
Engine oil and filter
7-32
Fuel filter
7-33
Fuel pre-filter
7-34
EVERY 600 HOURS
Engine oil and filter
7-35
Fuel filter
7-36
Fuel pre-filter
7-37
EVERY 1200 HOURS OR ANNUALLY
Cab air filters
7-38
Cab recirculated air filter
7-38
Engine air filters
7-38
Fuel tank
7-39
EVERY 1200 HOURS OR EVERY 2 YEARS
4WD front axle housing
7-40
Engine valves
7-40
Change transmission oil
7-41
Washing cooling system
7-42
EVERY 1800 HOURS
Fuel injectors - Check
7-45
ELECTRICAL SYSTEM
Battery
7-46
Fuses and relays
7-48
Fuses and relays location
7-49
Fuses and relays location
7-51
Fuses and relays location Fuses and relays on cab right hand upright
7-53
Headlight - Adjust
7-53
Headlight - Replace
7-54
STORAGE
Tractor storage
7-55
CALIBRATIONS
Dual command calibration
7-56
8 TROUBLESHOOTING
FAULT CODE RESOLUTION
Display fault codes
8-1
TROUBLESHOOTING ENGINE
8-3
Electrical system - Troubleshooting ELECTRICAL SYSTEM
8-5
Hydraulic systems - Troubleshooting HYDRAULIC SYSTEM
8-6
Rear three-point hitch - Troubleshooting HYDRAULIC LIFT AND 3−POINT LINKAGE
8-7
Hydraulic service brakes - Troubleshooting
8-8
Cab climate control - Troubleshooting
8-9
ALARM(S)
Alarms
8-10
Alarms, cause, solutions
8-12
9 SPECIFICATIONS
Dimensions and weights
9-1
Maximum permitted loads on front and rear axle
9-6
Maximum permitted loads on drawbar
9-7
Technical data
9-8
10 ACCESSORIES
Radio
10-1
1 - GENERAL INFORMATION
1 - GENERAL INFORMATION###_1_###
Note to the Owner
This manual contains information concerning the adjustment and maintenance of your new equipment. You have
purchased a dependable machine, but only by proper care and operation can you expect to receive the performance
and long service built into this equipment. Please have all operators read this manual carefully and keep it available
for ready reference.
Your NEW HOLLAND dealer will instruct you in the general operation of your new equipment. Your dealer’s staff of
factory-trained service technicians will be glad to answer any questions that may arise regarding the operation of your
machine.
New Holland Top Service is also available. Call 1-866-NEWHLND (1-866-639-4563)
or email: na.topservice@cnh.com.
Your NEW HOLLAND dealer carries a complete line of genuine NEW HOLLAND service parts. These parts are
manufactured and carefully inspected to insure high quality and accurate fitting of any necessary replacement parts.
Be prepared to give your dealer the model and product identification number of your new equipment when ordering
parts. Locate these numbers now and record them below. Refer to the ’General Information’ section of this manual
for the location of the model and product identification numbers of your machine.
PLEASE RECORD THE FOLLOWING INFORMATION
Model:
Product Identification Number (PIN):
This is the safety alert symbol. It is used with and without signal words to alert you to potential
personal injury hazards. Obey all safety messages that follow this symbol to avoid possible
death or injury.
WARNING
Illustrations in this manual may show protective shielding open or removed to better illustrate a par-
ticular feature or adjustment.
Replace all shields before operating the machine.
Failure to comply could result in death or serious injury.
W0012A
Engine tampering statement:
NOTICE: The fuel system and engine on your machine are designed and built to government emissions standards.
Tampering by dealers, customers, operators and users is strictly prohibited by law. Failure to comply could result in
government fines, rework charges, invalid warranty, legal action and possible confiscation of the machine until rework
to original condition is completed. Engine service and/or repairs must be done by a certified technician only!
Improvements
CNH America LLC is continually striving to improve its products. We reserve the right to make improvements or
changes when it becomes practical and possible to do so, without incurring any obligation to make changes or addi-
tions to the equipment sold previously.
1-1
1 - GENERAL INFORMATION
Proposition 65
CALIFORNIA
Proposition 65 Warning
Diesel engine exhaust and some of its constituents are known to the State of California to cause cancer, birth
defects and other reproductive harm.
Battery posts, terminals and related accessories contain lead and lead compounds.
Wash hands after handling.
1-2

1 - GENERAL INFORMATION
International symbols
TYPICAL
RECOMMENDED SI (METRIC) UNITS
IMPERIAL UNIT
APPLICATIONS
NAME
SYMBOL
NAME
SYMBOL
AREA
hectare
ha
acre
ha
square meter
m²
square foot
ft²
square inch
in²
square millimetre
mm²
square inch
in²
ELECTRICITY
ampere
A
ampere
A
volt
V
volt
V
microfarad
µF
microfarad
µF
ohm
Ω
ohm
Ω
FORCE
kilonewton
kN
pound
lb
newton
N
pound
lb
FORCE PER LENGTH
Newton metres
Nm
pound inch
lb in
FREQUENCY
megahertz
MHz
megahertz
MHz
kilohertz
kHz
kilohertz
kHz
hertz
Hz
hertz
Hz
FREQUENCY - ROTATIONAL
revolution per minute
r/min
revolution per minute
r/min ª
rpm
rpm
LENGTH
kilometre
km
mile
mi
meter
m
foot
ft
centimetre
cm
inch
in
millimetre
mm
inch
in
micrometer
µm
MASS
kilogram
kg
pound
lb
gram
g
ounce
oz
milligram
mg
POWER
kilowatt
kW
horsepower
Hp
watt
W
Btu/hour
Btu/hr
Btu/minute
Btu/min
PRESSURE or STRESS (FORCE PER AREA)
kilopascal
kPa
pound per square inch
psi
inch of mercury
inHg
pascal
Pa
inch of water
inH2O
megapascal
MPa
pound per square inch
psi
1-3

1 - GENERAL INFORMATION
TYPICAL
RECOMMENDED SI (METRIC) UNITS
IMPERIAL UNIT
APPLICATIONS
NAME
SYMBOL
NAME
SYMBOL
TEMPERATURE (other than THERMODYNAMIC)
degrees Celsius
°C
degrees Fahrenheit
°F
TIME
hour
h
hour
h
minute
min
minute
min
second
s
second
s
TORQUE (includes BENDING MOMENT, MOMENT OF FORCE, and MOMENT OF A COUPLE)
newton meter
Nm
feet-pounds
Ib ft
inch-pound
Ib in
VELOCITY
kilometre per hour
km/h
mile per hour
mph
meter per second
m/s
foot per second
ft/s
millimetre per second
mm/s
inch per second
in/s
meter per minute
m/min
foot per minute
ft/min
VOLUME (includes CAPACITY)
cubic meter
m³
cubic yard
yd³ (cu yd)
litre
l
cubic inch
in³
litre
l
US gallon
US gal
U.K. gallon
UK gal
US quart
US qt
U.K. quart
UK qt
millilitre
ml
fluid ounce
fl oz
VOLUME PER TIME (includes DISCHARGE and FLOW RATE)
cubic meter per
m³/min
cubic foot per minute
ft³/min
minute
litre per minute
l/min
US gallon per minute
US gal/min
millilitre per minute
ml/min
UK gallon per minute
UK gal/min
SOUND POWER LEVEL and SOUND PRESSURE LEVEL
decibel
dB
decibel
dB
1-4
1 - GENERAL INFORMATION
Introduction
About this manual
DANGER
Improper operation or service of this machine can result in an accident.
Do not operate this machine or perform any lubrication, maintenance, or repair on it until you have
read and understood the operation, lubrication, maintenance, and repair information.
Failure to comply will result in death or serious injury.
D0010A
This manual gives information for use of your machine, as
partly specified by the manufacturer in this manual and
intended and under the conditions foreseen by the manu-
in other Company literature, in order to maintain the
facturer during normal operat ion and routine service and
expected life time of the tractor.
maintenance. Read and understand; keep it in good con-
• Converting means activities that must be done by
ditions and always safely store it in the provided pocket
professional service personnel familiar with the tractor
in the back of your seat for later easy retrieval. This man-
characteristics and complying with the information for
ual does not contain all the information related to period-
converting, as partly specified by the manufacturer in
ical service, converting and repairs to be carried out by
this manual, in assembly instructions or in other Com-
professional service personnel. The Table of Contents
pany literature, in order to fit the tractor to a specific
page(s) are proviced to have an overview of main man-
configuration.
ual’s topics. A detailed alphabetic index is available at the
end of this manual for locating specific items.
• Repair means activities that must be done by profes-
sional service personnel only familiar with the tractor
characteristics and complying with the information for
Normal operation
repair, as specified by the manufacturer in the dealer’s
workshop manual, in order to restore the proper func-
• Normal operation means the use of the tractor for the
tion of the tractor after a failure or degradation of per-
purpose intended by the manufacturer by an opera-
tor familiar with the tractor and the mounted or towed
formance.
equipment and complying with the information for op-
eration and safe practices, as specified by the manu-
Spare Parts
facturer in this manual and by the decals on the tractor
and the equipment.
“Non-original” spare parts have not been tested or autho-
rised by the Manufacturer. Installment and/or use of such
• Normal operation includes the preparation and storage
products may adversely affect the tractor's design spec-
of the tractor, swinging components into work position
ifications, thereby compromising operational safety. The
and vice versa, adding or removing ballast and picking
manufacturer cannot be held responsible for any damage
up and setting off attachments.
resulting from the use of “non-original” spare parts. No
• Normal operation includes the adjustment and setting
modifications may be made to the tractor without written
of the tractor and equipment, for the specific condition
authorisation from the Manufacturer.
of the field and/or the crop.
Warranty
Routine service
The tractor is guaranteed in accordance with current leg-
Routine service and maintenance means activities that
islation in your country and in line with contractual agree-
must be done daily by an operator familiar with the tractor
ments reached with the dealer at the time of sale. How-
characteristics and complying with the information for rou-
ever, the warranty is no longer valid if the rules and in-
tine service and safe practices, as specified by the man-
structions for the use and maintenance of the tractor, de-
ufacturer in this manual and by decals on the tractor, in
scribed in this Manual, are not observed.
order to maintain its proper function. Routine service in-
cludes activities such as fueling, cleaning, washing, top-
Cleaning the tractor
ping up fluid levels, greasing, replacing of consumable
articles such as lamp bulbs.
Your tractor is an advanced machine, fitted with an elec-
trohydraulic control system. Care must be taken when
Converting, periodical service and repair
cleaning the tractor, especially if a pressurized water
cleaner is used.
• Periodical service means activities that must be done at
Never stand too close to the tractor or direct the water jet
defined intervals by trained personnel familiar with the
on electrical components, seals or intake openings, etc.
tractor characteristics and which are complying with the
Never direct jets of cold water at the hot engine or ex-
information for periodical service and safe practices, as
haust.
1-5
1 - GENERAL INFORMATION
Tractor intended use
NOTE: Your tractor is designed according to European
•
Do not use the tractor in combination with equipment
directives related to health and safety risks; though it
without having consulted the specific Operator’s Man-
has been designed to minimize all the potential risks it is
ual provided with the equipment. The tractor is a uni-
mandatory to carefully read, understand and observe all
versal tool to carry, tow and drive a variety of equip-
the decals and labels and to always refer to information
ment. This manual alone cannot provide you with all
and prescriptions outlined in this manual to prevent all
the information required for the safe operation of the
residual potential risks . If you need further assistance
combination.
please do not hesitate to contact your dealer.
•
Do not use the tractor for pulling work, in cases where
you do not know whether the load will yield, for instance
Your tractor is designed and made to pull, carry and
when pulling stumps; the tractor may flip over when the
power a variety of mounted or towed equipment, al-
stump is not yielding.
though within some physical limits. The working speed
and performance may depend on various factors, such
•
Be cautious that the centre of gravity of the tractor may
as weather and terrain conditions. Though the tractor
increase when loads on the front-end loader or the
is designed to perform in combination with a variety of
three-point linkage are raised. In these conditions, the
equipment, there may be a number of combinations of the
tractor may roll over earlier than expected.
above parameters for which there is severe degradation
•
Do not step down from the tractor without shutting down
of performance of the tractor and/or its mounted or trailed
the PTO, shifting the transmission to park or neutral and
equipment. If you notice degradation of performance,
applying the park brake, unless continued PTO opera-
contact your dealer for assistance, he may have useful
tion is required for some equipment, such as pumps
information for improvements, or a kit may be available
or wood chippers. The latter equipment may have an
to enhance the performance.
emergency stop device on the equipment itself, as hu-
man intervention is needed during operation. But other
Please carefully read and consider the following
equipment, engaged and driven by the tractor will have
precautions:
no means to stop the power transmission, other than
•
Do not use the tractor for purposes other than those
the PTO clutch of the tractor.
intended by the manufacturer and outlined in this man-
•
You must take the necessary precautions (e.g. assis-
ual.
tance) to always be aware of the possible presence of
•
Do not use the tractor beyond its limits of terrain gradi-
bystanders, especially when manoeuvring in confined
ent and stability. Using the tractor beyond these limits
areas, such as the farm yard and sheds. Keep people
may result in roll-over or tip-over. Observe the recom-
away from the tractor during work. Ask bystanders to
mendations in this manual.
leave the field. There is not only the risk of being run
over by the tractor, but objects ejected by some equip-
•
Do not use the tractor at higher speeds than those al-
ment mounted on the tractor, such as a rotary mower,
lowed by the load and the environment. A wet surface
may cause harm. Stones may be thrown further than
or other low adherence conditions may increase the
the mowed crop. Pay the necessary attention while op-
braking distance or result in vehicle instability. Always
erating next to public roads or footpaths. Thrown ob-
adapt your travelling speed according to the load of the
jects can be projected outside the field and hit unpro-
vehicle and the characteristics of the road.
tected people such as cyclists or pedestrians. Wait to
•
Do not use the tractor near or on soft verges of canals
cut the edge of the field till it is clear of bystanders.
and brooks or banks and verges that are undermined
•
Do not allow riders on the tractor; do not allow people
by rodents. The tractor may sink sideways and roll over.
to stand on the access step to the cab when the tractor
•
Do not use the tractor on unstable crossings or bridges
is moving. Your view to the left will be obstructed and a
and/or on soft surfaces or ones that are not strong
rider risks falling from the tractor during unexpected or
enough. These constructions may collapse and cause
abrupt movements.
roll-over of the tractor. Always inspect the condition
•
Always stay clear from the implements operating area
and carrying capacity of bridges and ramps before
and especially do not stand between the tractor and
crossing.
the implement or the trailed vehicle when operating lift
•
Do not use equipment mounted on the tractor which is
controls; ensure no bystanders are near these operat-
not correctly matching and firmly fixed. The use of im-
ing areas.
plements or accessories that have not been approved
•
Certain functions of your tractor are controlled by soft-
or are not correctly connected may increase the risk of
ware and some of them are safety-related. Do not at-
roll-over of the tractor if they come loose. Ensure that
tempt to modify or download software not certified and
the dimensions of the three-point linkage interface of
distributed by the manufacturer. Electronic settings and
both the tractor and the equipment comply with the cat-
logics may be destroyed and seriously affect the func-
egories defined in ISO 730. Ensure that the dimensions
tioning of the tractor. This may result in unpredictable
and speed of the PTO shaft on the tractors match those
and unsafe behaviour of the tractor. Always refer to
of the equipment.
your dealer; he has the appropriate tools and data sets
1-6
1 - GENERAL INFORMATION
and owns the officially released software versions and
• The tractor has only one operator station and this is a
updates for your tractor.
one man operated vehicle. There is no need for other
people on or around the tractor during normal opera-
• Your tractor may be equipped with a number of sensors
tion. Do not allow riders on the tractor; do not allow
to control safety functions. Tripping these sensors will
people to stand near the access to the cab or on the
result in a safe operation mode. Do not attempt to by-
step when the tractor is moving. Your view to the left
pass any function on the tractor. You will be exposed
will be obstructed and a rider risks falling from the trac-
to serious hazards, and moreover, the behaviour of the
tor during unexpected or abrupt movements.
tractor may become unpredictable.
1-7
1 - GENERAL INFORMATION
Ecology and the Environment
Soil, air and water are essential elements for agriculture
suitable disposal can be arranged according to na-
and for life in general. If local legislation does not con-
tional legislation or local regulations.
trol the treatment of certain substances, the production
5. Modern anti-freeze liquids and solutions, e.g. anti-
of which is necessitated by advanced technologies, prod-
freeze and other additives, must be replaced every
ucts derived from chemical and petrochemical products
two years. They must not be left to be absorbed into
must be used and disposed of according to the rules of
the ground, but must be collected and disposed of in
common sense.
a suitable manner.
The following recommendations may be of help:
6. Do not open the air conditioning systems to carry out
work. These systems contain gas that must not be
• Find out what the relevant legislation in your country
released into the atmosphere. Contact your dealer
stipulates.
or specialised personnel, who are equipped with the
• Ask your suppliers of lubricants, oils, fuels, antifreeze,
appropriate equipment and are authorised to re-fill
detergents, etc. for information on the effects of these
the system.
products on humans and the environment and for in-
7. Any leakage or defect in the engine cooling or hy-
structions concerning their use, storage and disposal.
draulic systems must be repaired immediately.
In many cases, local agricultural consultants will be
able to provide assistance.
8. Do not increase the pressure in pressurised systems,
as this may cause component parts to burst.
Suggestions
9. When welding, make sure that hoses are properly
protected as sparks or molten material may puncture
1. Avoid using unsuitable, pressurised filling systems
or weaken the tubes and sleeves, resulting in leak-
or fuel cans when filling tanks, as these may cause
age of oil, cooling liquid, etc.
considerable spillage and leakage of liquids.
10. Do not adjust the setting of the fuel delivery system
2. As a general rule, do not allow liquid fuels, lubricants,
as this will alter the emission of exhaust fumes.
acids, solvents, etc., to come into contact with the
skin. The majority of these products contain sub-
NOTICE: The fuel system and engine on your machine
stances that are potential health hazards.
are designed and built to government emissions stan-
dards. Tampering by dealers, customers, operators and
3. Modern lubricants contain additives. Do not burn
users is strictly prohibited by law. Failure to comply could
contaminated fuel oils and/or oils used in conven-
result in government fines, rework charges, invalid war-
tional heating systems.
ranty, legal action and possible confiscation of the ma-
4. Avoid spillage when transferring used engine cooling
chine until rework to original condition is completed. En-
liquids, engine and transmission lubricants, hydraulic
gine service and/or repairs must be done by a certified
oils, brake fluids, etc. Never mix used brake oil with
technician only!
fuel oil, or fuel oil with lubricants. Store safely until
1-8
1 - GENERAL INFORMATION
Identification plates
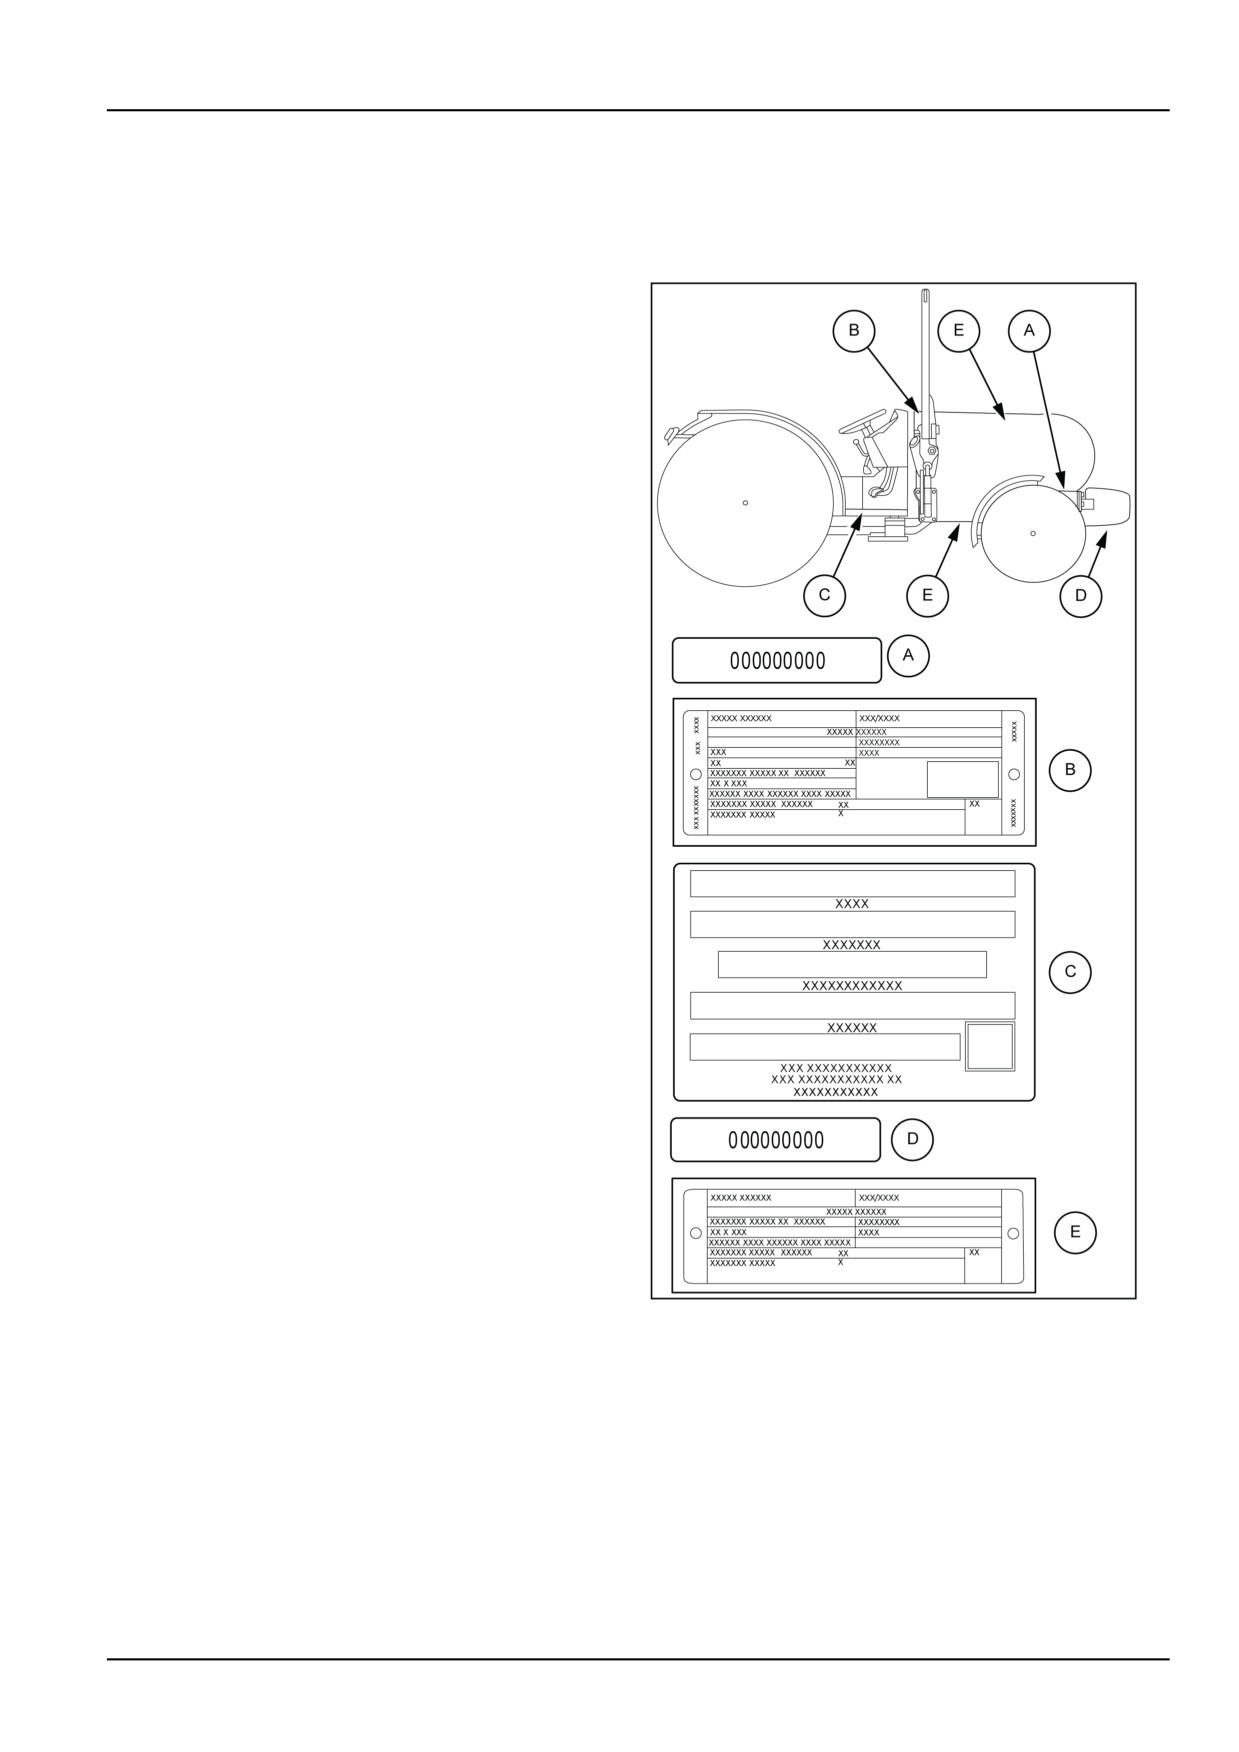
Serial numbers identify the tractor and its main components. The identification data must be supplied by the dealer
for requests for spare parts or service operations. Identification data is of fundamental importance in the event of theft
of the tractor. The location of the various identification data is shown below.
(A)
FRAME IDENTIFICATION DATA PLATE
The tractor’s frame number is stamped over the front sup-
port. It gives the safety frame identification data.
(B)
ROPS FRAME IDENTIFICATION DATA PLATE
The plate gives the identification data for the rops frame
fitted on the machine.
(C)
FRAME AND ENGINE TYPE IDENTIFICATION SUM-
MARY DATA PLATE
The plate groups the identification data with your ma-
chine’s frame number and engine number.
(D)
STANDARD FRONT AXLE IDENTIFICATION PLATE
The plate is located on the component and gives the iden-
tification data for the axle fitted on the machine.
(E)
ENGINE IDENTIFICATION DATA PLATE
The plate with the engine data installed on the tractor is
fitted on the right or left hand side of the engine (depend-
ing on the model).
MOIL13TR00766CA
1
1-9
1 - GENERAL INFORMATION
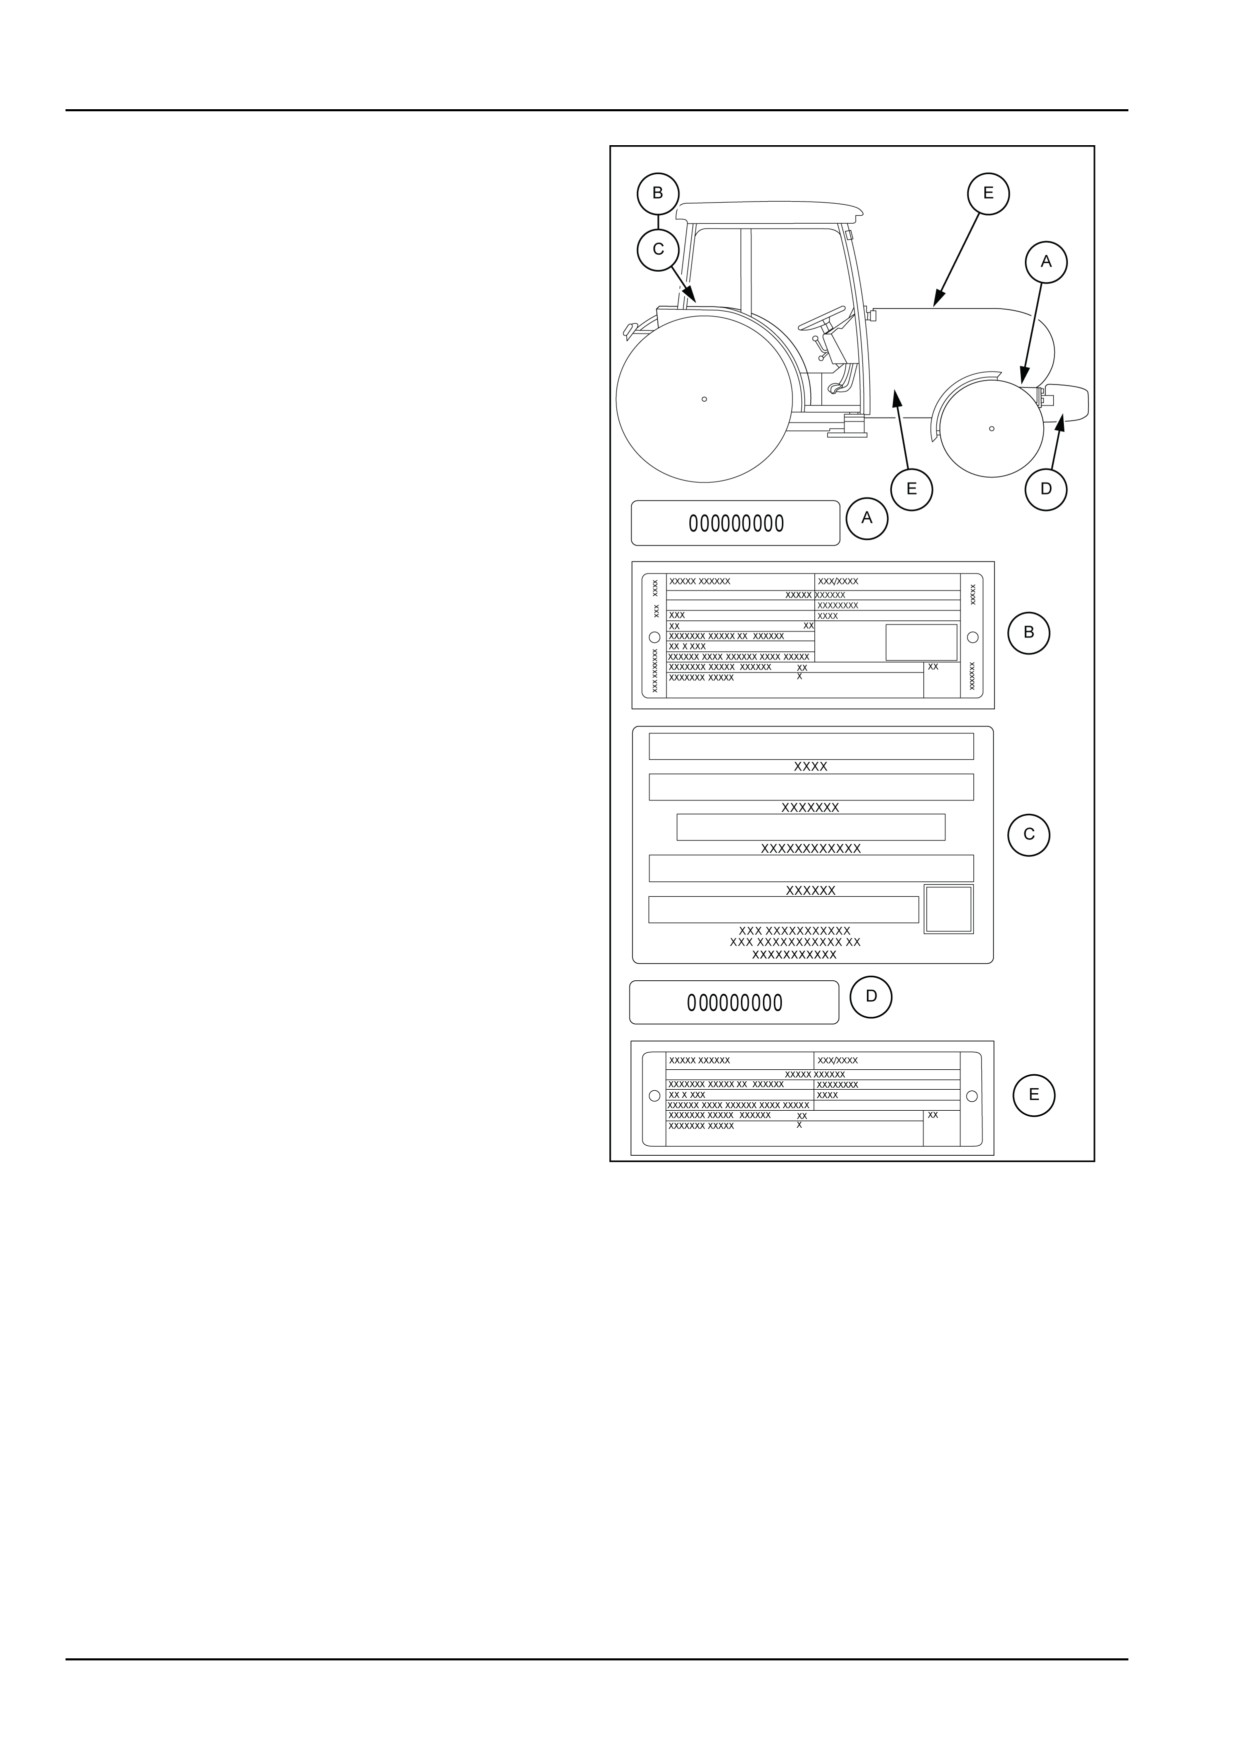
(A)
FRAME IDENTIFICATION DATA PLATE
The tractor’s frame number is stamped over the front sup-
port. It gives the safety frame identification data.
(B)
CAB IDENTIFICATION PLATE
The cab identification plate is located at the rear on the
left−hand side as shown in the figure.
(C)
FRAME AND ENGINE TYPE IDENTIFICATION SUM-
MARY DATA PLATE
The plate groups the identification data with your ma-
chine’s frame number and engine number.
(D)
STANDARD FRONT AXLE IDENTIFICATION PLATE
The plate is located on the component and gives the iden-
tification data for the axle fitted on the machine.
(E)
ENGINE IDENTIFICATION DATA PLATE
The plate with the engine data installed on the tractor is
fitted on the right or left hand side of the engine (depend-
ing on the model).
MOIL13TR00764CA
2
1-10
1 - GENERAL INFORMATION
Component Identification
MOIL13TR00772FA
1
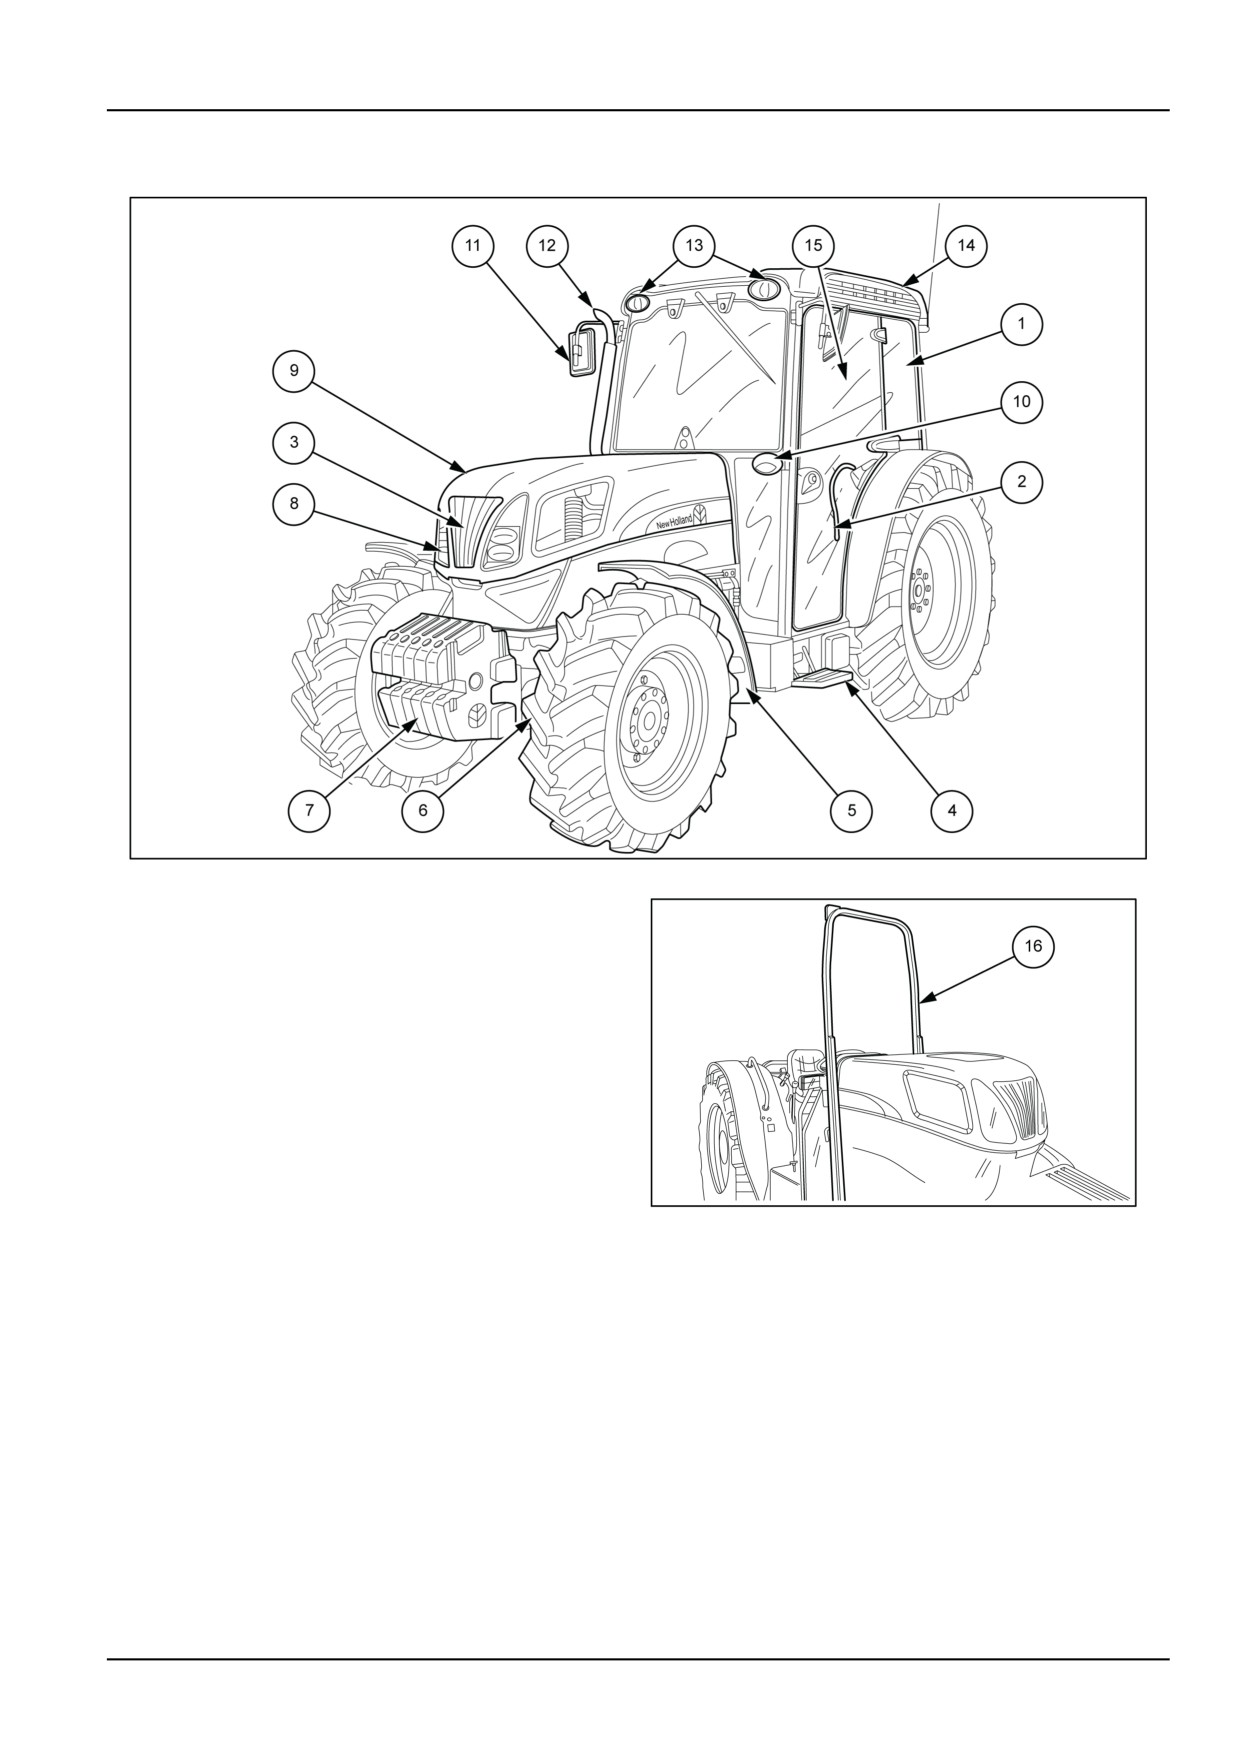
1. Cab
2. Hand rail
3. Fuel tank
4. Steps
5. Transmission
6. Front axle
7. Ballast
8. Front light
9. Hood/Engine
10. Indicator light
MOIL13TR00756AA
2
11. Rear view mirror
12. Exhaust stack
13. Front work lights
14. Rear work lights
15. Rear widow emergency exit
16. R.O.P.S. (Roll Over Protective Structure)
1-11
1 - GENERAL INFORMATION
MOIL13TR00771FA
3
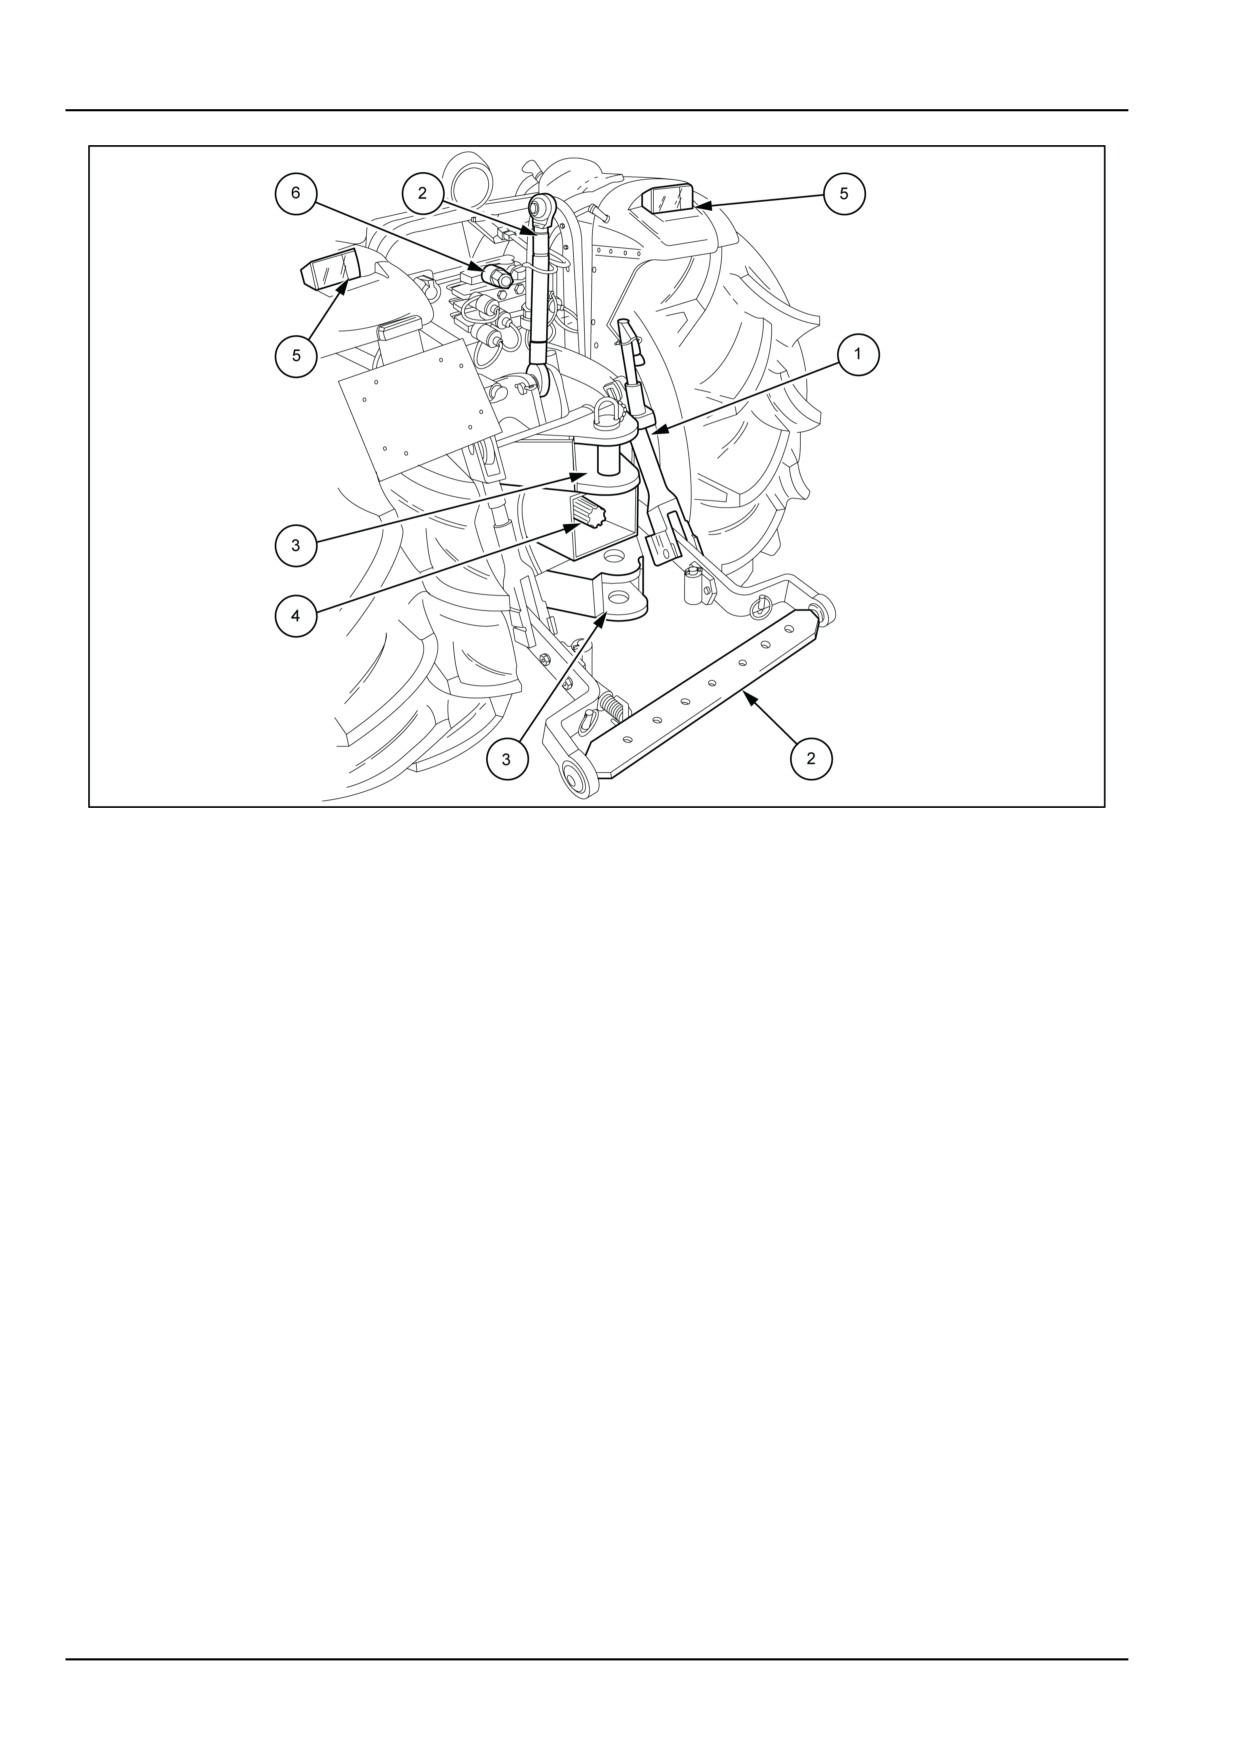
1. Rear axle
2. Three point linkage
3. Hitch
4. Power take off
5. Rear lights
6. Remote control valves
1-12
2 - SAFETY INFORMATION
2 - SAFETY INFORMATION###_2_###
Safety rules and signal word definitions
Personal safety
This is the safety alert symbol. It is used to alert you to potential personal injury hazards. Obey all
safety messages that follow this symbol to avoid possible death or injury.
Throughout this manual and on machine decals, you will find the signal words DANGER, WARNING, and CAUTION
followed by special instructions. These precautions are intended for the personal safety of you and those working
with you.
Read and understand all the safety messages in this manual before you operate or service the machine.
DANGER indicates a hazardous situation which, if not avoided, will result in death or serious injury. The
color associated with DANGER is RED.
WARNING indicates a hazardous situation which, if not avoided, could result in death or serious injury.
The color associated with WARNING is ORANGE.
CAUTION, used with the safety alert symbol, indicates a hazardous situation which, if not avoided, could result
in minor or moderate injury. The color associated with CAUTION is YELLOW.
FAILURE TO FOLLOW DANGER, WARNING, AND CAUTION MESSAGES COULD RESULT
IN DEATH OR SERIOUS INJURY.
Machine safety
NOTICE: Notice indicates a situation which, if not avoided, could result in machine or property damage. The color
associated with Notice is BLUE.
Throughout this manual you will find the signal word Notice followed by special instructions to prevent machine or
property damage. The word Notice is used to address practices not related to personal safety.
Information
NOTE: Note indicates additional information which clarifies steps, procedures, or other information in this manual.
Throughout this manual you will find the word Note followed by additional information about a step, procedure, or
other information in the manual. The word Note is not intended to address personal safety or property damage.
2-1
2 - SAFETY INFORMATION
Safety information
1.
During the manufacturing of this tractor, every step
13. Always operate with the cab or roll bar correctly and
has been taken to ensure safe operation. However,
securely fitted on the tractor: periodically check that
the best way to avoid accidents is to exercise caution
the fittings are not loose and that all parts of the struc-
at all times. Once the accident has already happened
ture are free from any damage and deformation. Do
it is too late to remember what steps should have
not modify the roll bar by welding parts, drilling holes,
been taken.
etc., as this could adversely affect the rigidity of the
structure.
2.
Read this manual carefully before starting, using,
carrying out maintenance, refuelling or performing
any other type of operation on the tractor.
Starting the tractor
3.
The time spent reading this manual will allow you to
1. Before starting the engine, check that the handbrake
get to know your tractor, thereby saving time and ef-
is on and that the gears and power take-off are disen-
fort. This will also help prevent accidents from taking
gaged, even if the tractor is fitted with a start-up safety
place.
device. Never disconnect the start-up safety switch. If
4.
Read all the safety decals on the machine and fol-
the switch does not work correctly, contact your local
low the instructions thereon before starting, operat-
dealer for eventual repair operations.
ing, refuelling or carrying out maintenance on the ma-
2. Before starting the engine, make sure that all attached
chine. Promptly replace any decals that are dam-
implements are lowered to the ground.
aged, lost or illegible. Clean the decals if they are
3. Before starting the engine, check that all covers and
covered by mud or debris.
guards are correctly in position (roll bar, bonnet side
5.
Remember that the tractor is exclusively designed
panels, power take-off guard, front axle transmission
for agricultural use. Any other use will require prior
shaft cover, etc.).
authorisation from NEW HOLLAND.
4. Never start or manoeuvre the tractor unless seated in
6.
It is advisable to keep a first aid kit on hand.
the driving position.
7.
The tractor must only be used by responsible person-
nel, trained in tractor use and authorised to operate
the machine.
8.
Do not alter the injection system calibration in an at-
tempt to increase maximum engine speed set by the
Manufacturer.
DCSFTNEGB002S1A
2
5. Before moving the tractor, always check that the area
is free of persons or obstacles.
DCSFTNEGB001S1A
1
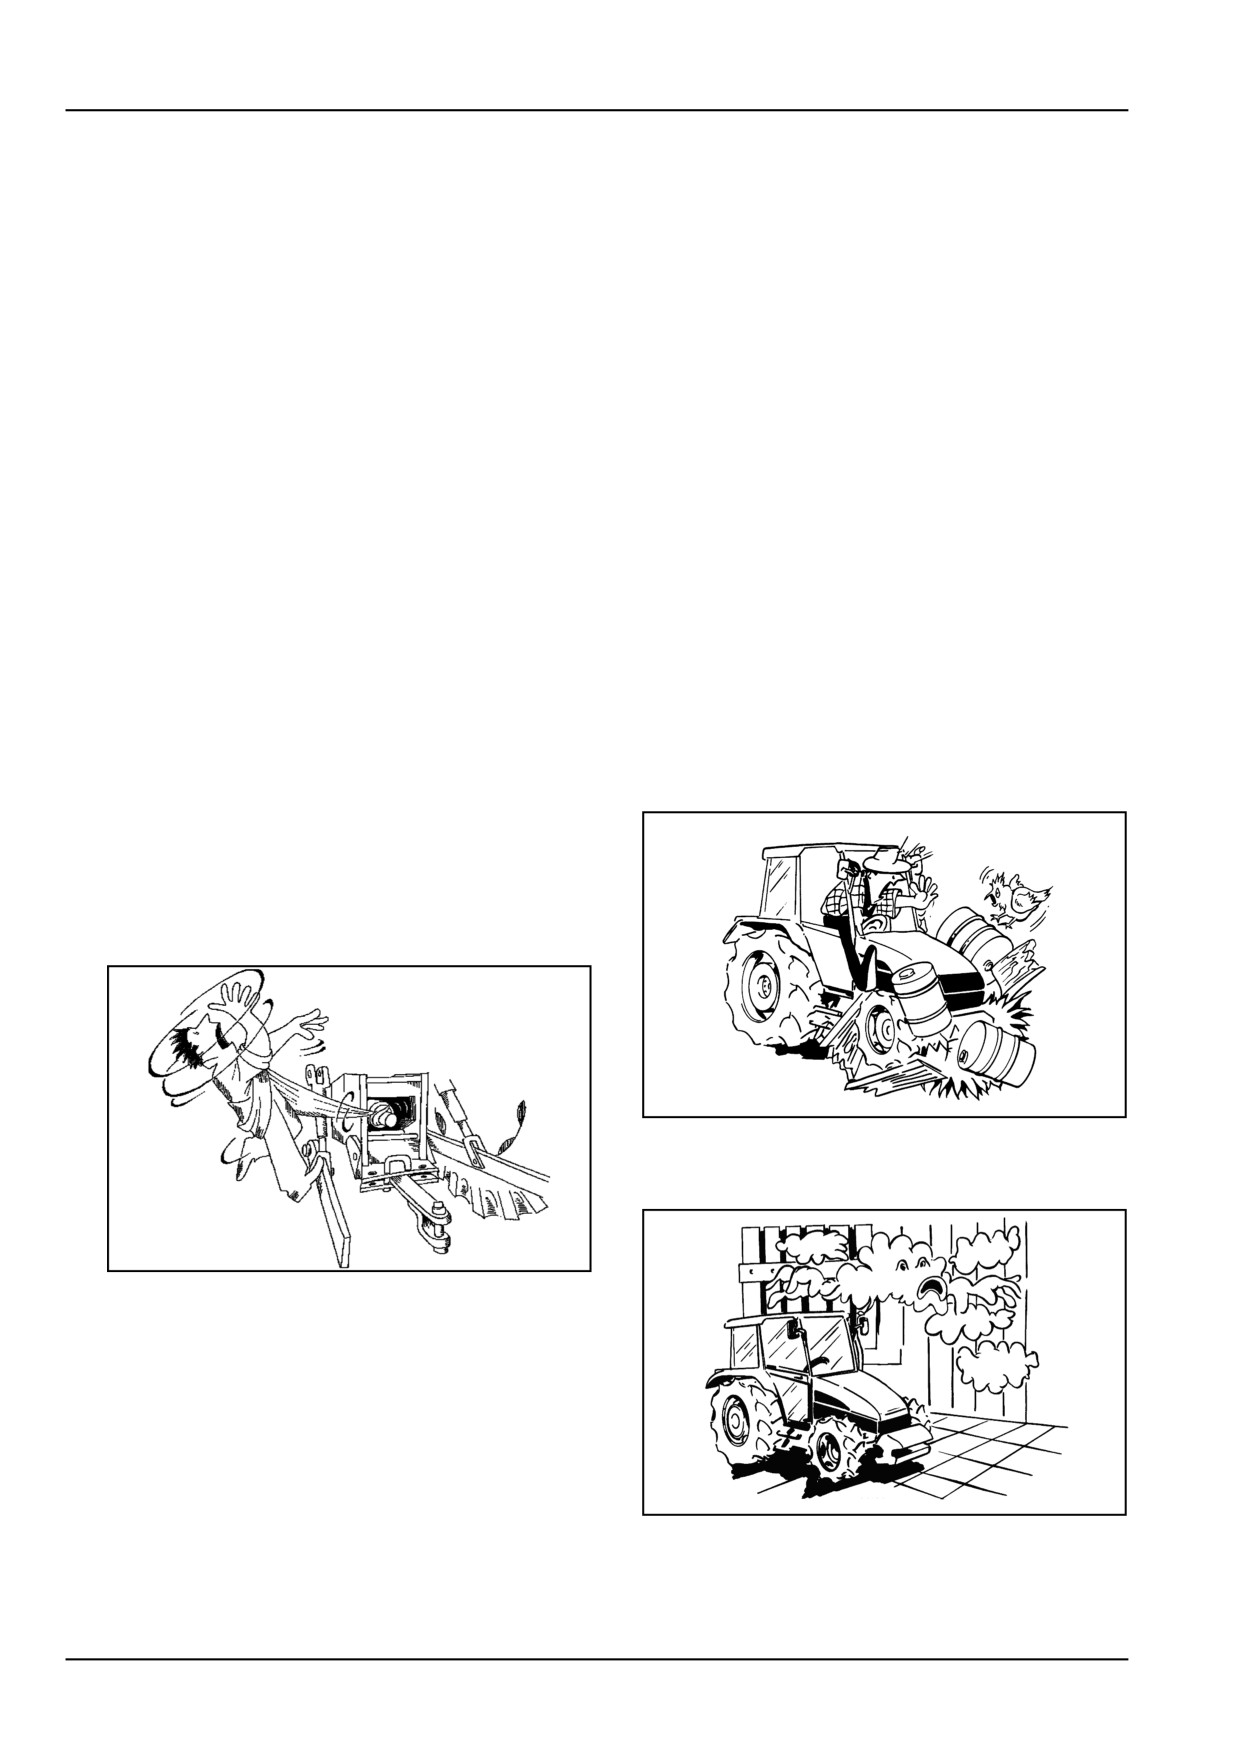
9. Do not wear loose clothing that may be trapped in
moving parts. Check that all rotating parts connected
to the power take-off are correctly protected.
10. Do not alter the calibration of the pressure relief
valves in the various hydraulic circuits (hydrostatic
steering, hydraulic lift, auxiliary distributors, etc.).
11. Avoid using the tractor in unsuitable physical condi-
tions, stop work instead.
3
DCSFTNEGB003S1A
12. Enter and leave the tractor using the steps and han-
dles provided. Keep these fittings free of mud and
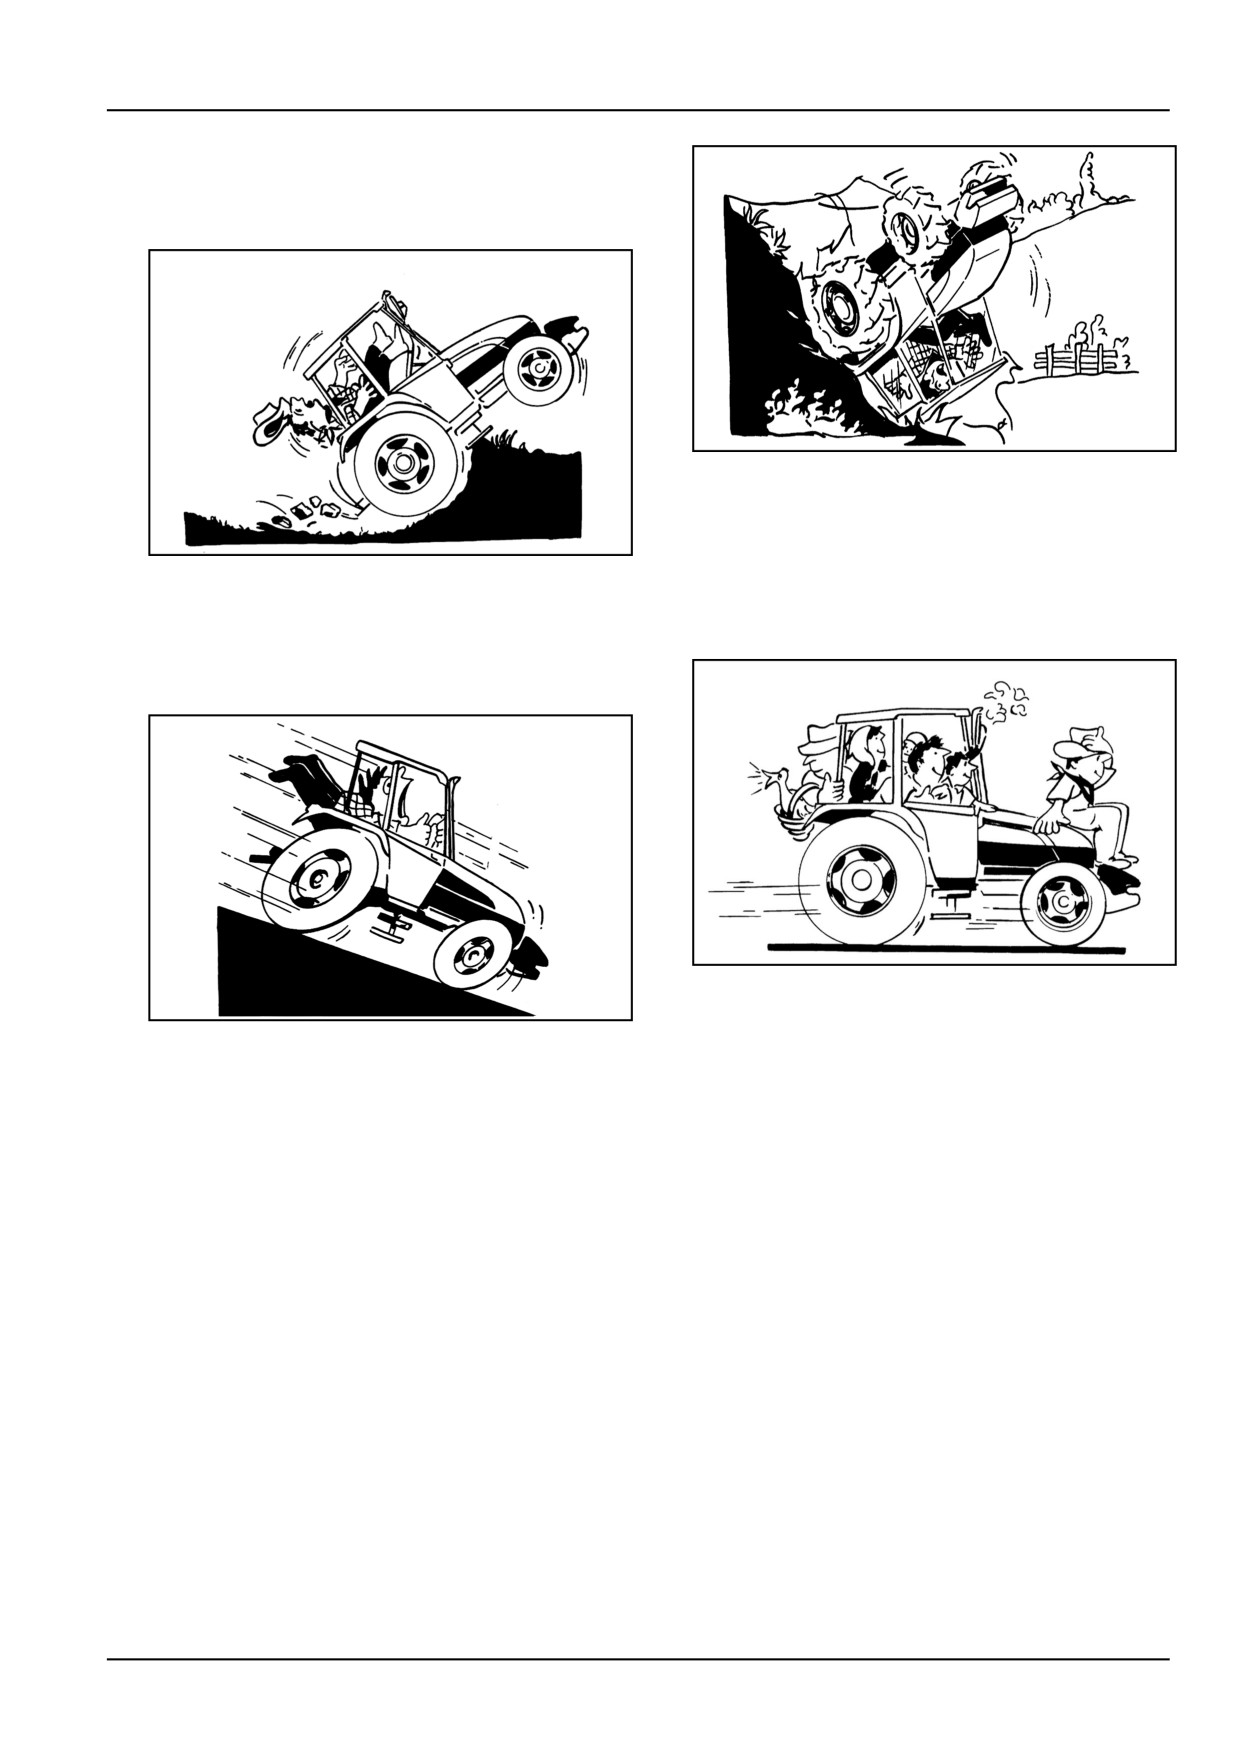
6. Never run the engine in a closed space without ensur-
debris.
ing adequate ventilation. Exhaust fumes are damag-
ing to the health and can be lethal.
2-2
2 - SAFETY INFORMATION
Use of the tractor
1. Select the most suitable wheel setting for the work in
hand, i.e.: the setting that provides the best stability.
DCSFTNEGB006S1A
6
10. Proceed with maximum caution when working with
the wheels near the edge of ditches or slopes.
11. When driving on public highways, observe the High-
DCSFTNEGB004S1A
4
way Code.
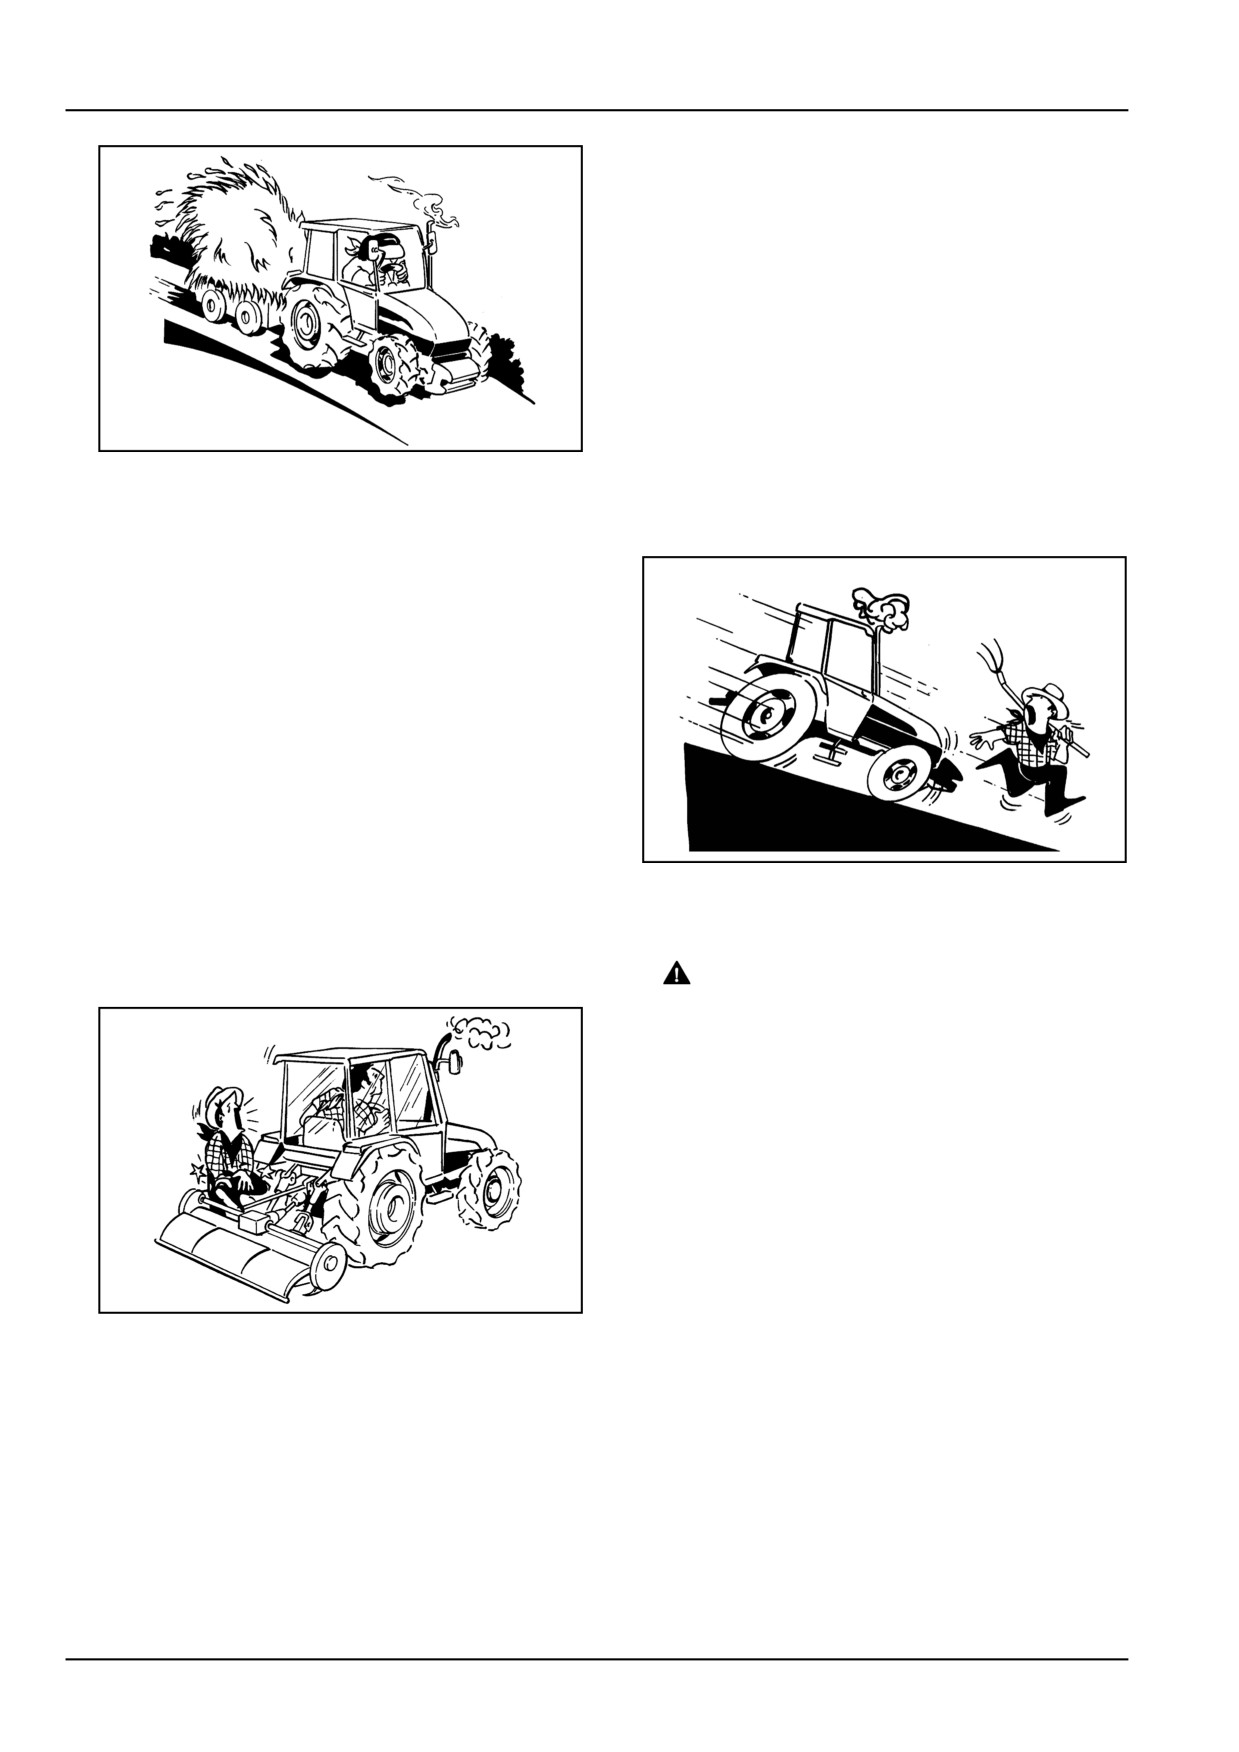
2. Engage the clutch slowly: if engaged too quickly, es-
12. When driving, do not rest your feet on the brake or
pecially when the tractor is getting out of a hole, ditch
clutch pedals.
or operating on muddy ground or steep slopes, the
tractor may overturn. Release the clutch immediately
if the front wheels start to lift.
DCSFTNEGB007S1A
7
13. Never carry passengers, not even inside the cab, un-
DCSFTNEGB005S1A
5
less the machine is fitted with an approved extra seat.
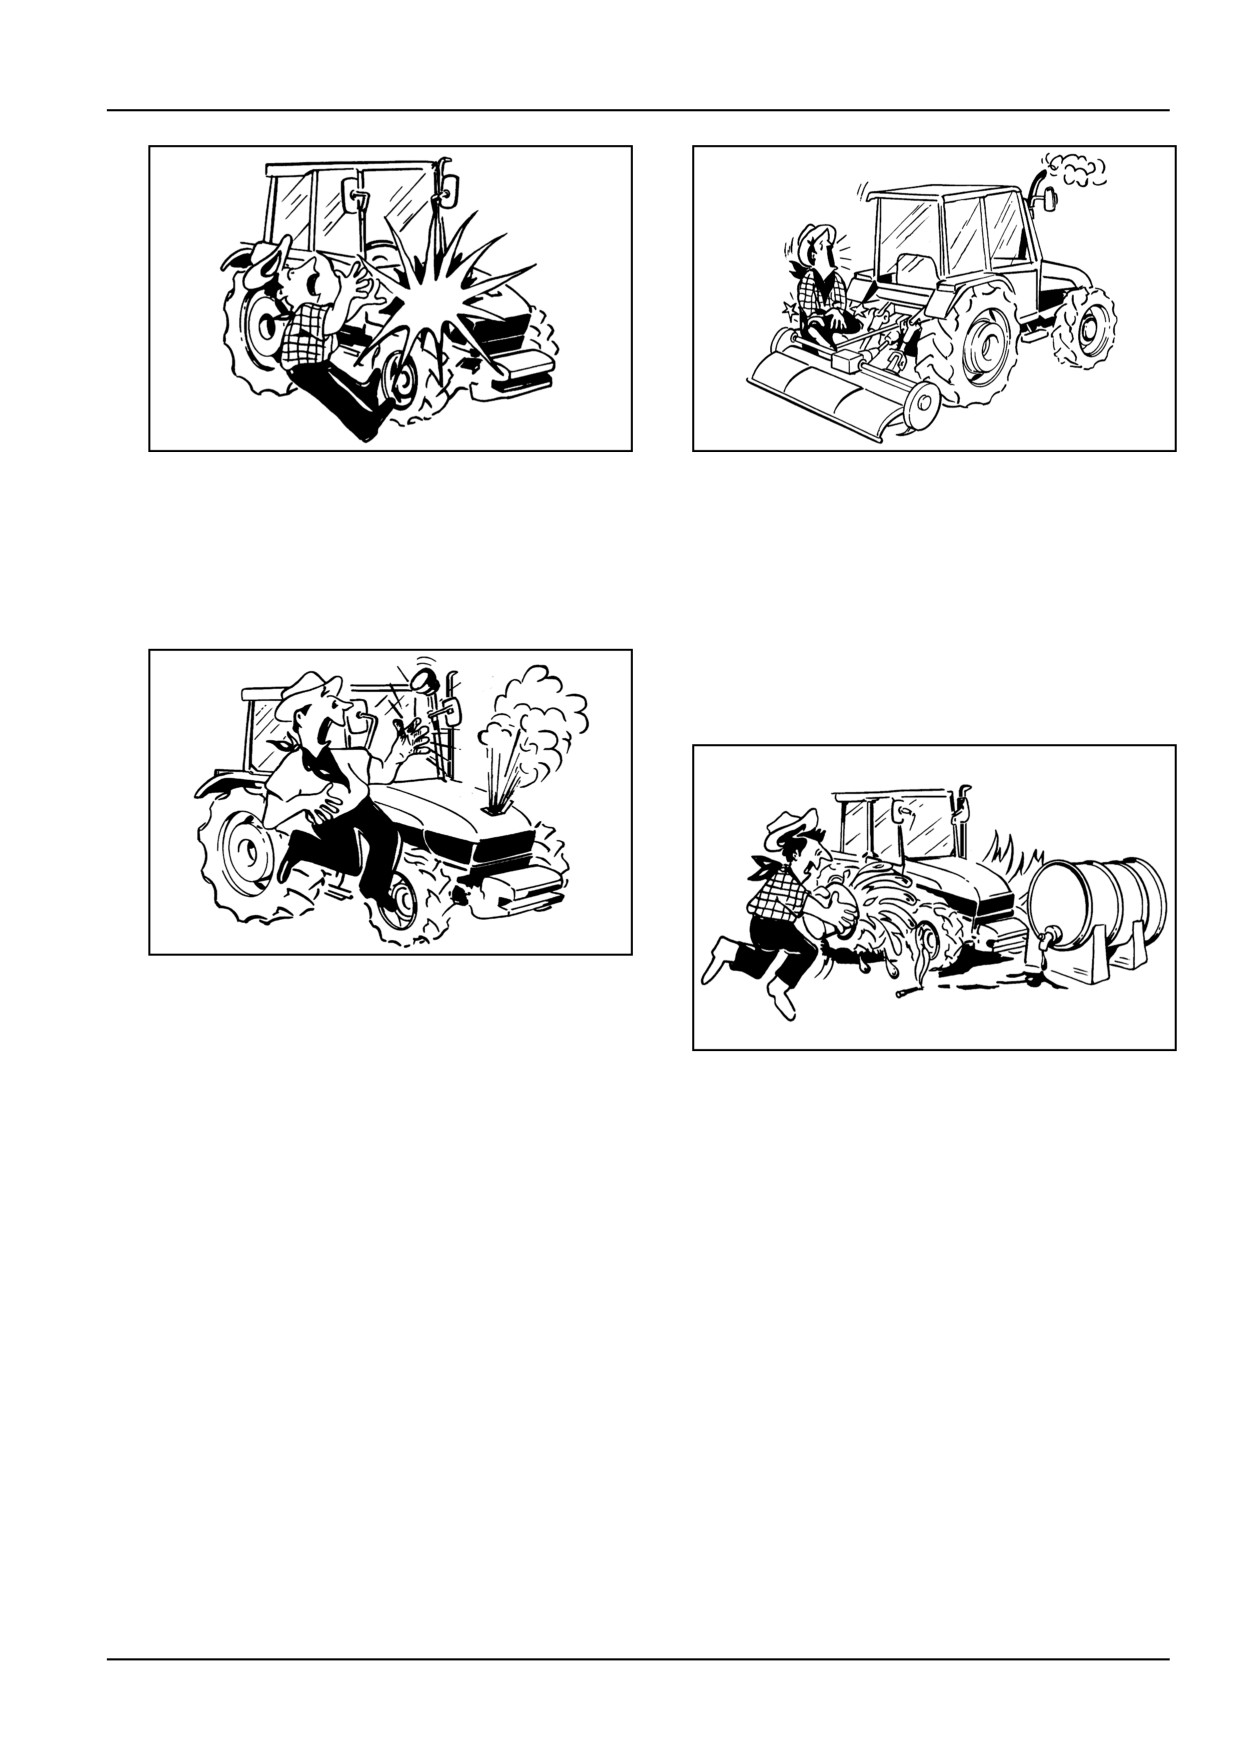
3. When travelling downhill, keep the tractor in gear.
14. When driving on roads, connect the brake pedals us-
Never release the clutch and never leave the gears
ing the plate provided. Braking when the pedals are
in neutral.
not connected could cause the tractor to skid. Avoid
excessive wear on the brakes by using engine brak-
4. When the tractor is moving, the operator must remain
ing.
correctly seated in the driving position.
5. Never get on or off the tractor while in movement.
Towing and transport
6. When using the brakes, press the pedal down slowly.
1. To guarantee tractor stability when moving, adjust the
7. Avoid taking bends at high speeds.
hitching device according to the trailer or implement to
8. Always use the tractor at a speed that will guarantee
be used.
safe operation on the type of land being worked.
2. Drive slowly when towing extremely heavy loads.
When working on uneven ground, use maximum
care to ensure proper stability.
3. For your own safety, do not tow trailers that are not
fitted with an independent braking system.
9. If you have to work with the tractor on a gradient,
for example on hillsides, drive at moderate speed
4. If the tractor is used to tow heavy loads, always use
especially when taking bends.
the hitching device and never hitch loads onto the
lower arms or the top link of the three-point linkage,
since in the latter case there is a danger of rearing up
or overturning.
2-3
2 - SAFETY INFORMATION
Stopping the tractor
1.
When the tractor is stationary, never leave connected
implements in the raised position. All implements
must be lowered before stopping the engine.
2.
Before leaving the driving position, move the gear
lever to the neutral position, disengage the power
take-off, apply the handbrake and stop the engine.
Always remove the ignition key from the dashboard
when leaving the tractor unattended.
3.
Park on flat surfaces, where possible, and apply the
handbrake before leaving the tractor. On sloping
DCSFTNEGB008S1A
8
ground, besides applying the hand brake, as an ad-
ditional safety measure, use wheel chocks (available
5. When towing, do not negotiate bends with the differen-
as an optional); this procedure is compulsory when
tial lock engaged as this may prevent you from steer-
parking with a trailer hitched.
ing the tractor.
Use of implements and agricultural machin-
ery
1.
Do not connect implements or machinery that require
more power than can be generated by your tractor
model.
2.
Never negotiate sharp bends with the power take-
off under a heavy load; this may damage the univer-
sal joints on the transmission shaft connected to the
power take-off.
3.
Never stand between the reversing tractor and the im-
DCSFTNEGB010S1A
10
plement when hitching.
4.
When using implements that require the tractor to be
Servicing the tractor
stationary with the engine running, keep the gear and
range levers in the neutral position, apply the hand-
1.
WARNING
brake and use suitable wheel chocks.
Illustrations in this manual may show pro-
tective shielding open or removed to bet-
ter illustrate a particular feature or adjust-
ment.
Replace all shields before operating the
machine.
Failure to comply could result in death or
serious injury.
W0012A
Do not work on the tyres with unsuitable equipment
or without the necessary experience. Incorrect tyre
fitting may put safety at risk. If in doubt, contact
skilled personnel.
DCSFTNEGB009S1A
9
2. When changing or storing tyres, make sure they are
5.
Do not operate machines connected to the power
stacked correctly and cannot roll or topple over caus-
take-off without first ensuring that the operating range
ing personal injury.
of the machine is free of bystanders. Also check that
3. Before removing any hydraulic tubing, check that the
all rotating parts connected to the power take-off shaft
system is not pressurised.
are correctly protected.
6.
Add rear ballast when using lifting equipment fitted to
the front of the tractor.
2-4
2 - SAFETY INFORMATION
DCSFTNEGB011S1A
11
DCSFTNEGB013S1A
13
4. Oil under pressure getting out can cause serious
7. Before inspecting, cleaning or carrying out mainte-
injuries. When looking for leaks use the appropri-
nance on the tractor (or any implement connected
ate safety equipment: screens, safety glasses and
to the tractor), always ensure that the engine is
gloves.
switched off, the gears are in neutral, the brakes
are on, the power take-off is disengaged and that all
5. Before touching any electrical components, discon-
moving parts are stationary.
nect the ground lead from the battery.
8. Do not fill up the fuel tank completely if the tractor
is to work in extremely sunny conditions, as the fuel
may expand and escape. If this occurs, dry up the
spillage immediately.
DCSFTNEGB012S1A
12
6. Only remove the radiator cap after the engine has
been allowed to cool. With the engine switched off,
use a cloth to slowly unscrew the cap and release the
DCSFTNEGB014S1A
14
pressure before completely removing the cap.
9. Always keep a fire extinguisher at hand.
2-5
2 - SAFETY INFORMATION
Air conditioning safety regulations
The air conditioning system is safe and can be used con-
3. The oil and coolant mixture is pressurised in the air-
tinuously without any risk. However, it is important to ob-
conditioning circuit. The loosening of any connections
serve a few simple precautions, listed below, to avoid any
or handling of tubing is therefore strictly forbidden. For
risk of accident.
the same reason, never unscrew the compressor oil
level inspection cap for any reason.
1. It is advised never to personally attempt to adjust the
4. Do not allow heat sources near the air-conditioning
system; any repair work should be carried out by the
system, as this may cause explosions.
experienced technicians of the NEW HOLLAND Ser-
vice Network.
DCSFTNEGB017S1A
3
DCSFTNEGB015S1A
1
5. Coolant can freeze the skin and, above all, the eyes.
If an accident should occur, proceed as follows:
2. Never allow open flames near the air conditioning sys-
tem, as if there is a leak of coolant, a lethal gas: phos-
• if coolant comes into contact with the eyes, wash them
gene.
immediately with a few drops of mineral oil, then con-
tinue washing thoroughly with a solution of boric acid
and water (one teaspoon of acid in 1/4 of a cup of wa-
ter) and consult a doctor at once;
• freezing caused by coolant can be treated by gradually
unfreezing the injured zone with cold water and then
applying a grease based cream. In any event, consult
a doctor as quickly as possible
DCSFTNEGB016S1A
2
2-6
2 - SAFETY INFORMATION
Cab guard
Comfort and safety inside the cab
•
Do not use the tractor beyond its limits of terrain gradi-
ent and stability. Using the tractor beyond these limits
Definition of Cab Category 1
may result in a roll over or a tip over. Observe the rec-
ommendations in this manual and pay particular atten-
Cab is meeting the requirements defined in EN 15695−1.
tion when going down steep hills in a loaded condition.
This means that the air delivery and filtration system does
•
Do not use the tractor near or on soft verges of canals
not provide a specified level of protection against haz-
and brooks or banks and verges that are undermined
ardous substances but only from external atmospheric
by rodents. The tractor may sink sideways and roll −
conditions (e.g. rain, wind, snow, etc).
over.
•
Do not use the tractor on unstable bridge - heads and
Definition of Cab Category 2
poor bridge floors. These constructions may collapse
and cause roll - over of the tractor. Always inspect the
Cab is meeting the requirements defined in EN 15695−1.
condition and carrying capacity of bridges and ramps
This means that the air delivery and filtration system pro-
prior to crossing.
vides protection against dust and that the minimum dif-
ferential pressure is ensured. Necessary filtered fresh air
•
Always fasten the seatbelt when using the tractor. The
flow rate can be obtained using the A/C system and set-
ROPS cab or ROPS structure will only be fully effective
ting the fan on maximum speed, provided that doors, win-
when the driver remains attached to his seat.
dows and hatches are closed.
•
Do not use the tractor beyond its limits of dynamic sta-
ATTENTION: The cab category 1 does not guarantee a
bility. High speed, abrupt maneuvers and fast and tight
full protection against dust, aerosols and vapours. The
cornering will increase the risk of roll over.
cab category 2 provides protection against dust. For
•
Do not use the tractor for pulling work, in cases where
application of plant protection products (e.g. pesticides,
you do not know whether the load will yield, for instance
fungicides, herbicides
), please refer to the instructions
when pulling stumps. The tractor may flip over back-
provided by the supplier of the chemical agent as well as
wards when the stump is not yielding.
instructions provided by the sprayer's manufacturer. Use
•
Be extremely cautious when working with the tractor on
the special devices and Personal Protective Equipment
forage silos without side concrete walls. To increase
(PPE) also when inside the cab and, particularly, on
the tractor's side stability, it is possible to mount twin
tractors without a cab. Although the air delivery system
wheels or increase its track setting.
cannot offer full protection, partial protection can be
achieved by following some basic rules:
Be cautious that the centre of gravity of the tractor may
•
increase when loads on the front - end loader or the
• Personal Protective Equipment (PPE) and clothing re-
three-point linkage are raised. In these conditions, the
quired.
tractor may roll - over earlier than expected.
• Keep doors, windows and hatches closed during the
spraying operation.
Falling Objects Protective Structure FOPS
• Keep the cab interior clean.
FOPS certified cab is providing protection against falling
• Do not enter the cab with contaminated shoes and/or
objects according to OECD code 10 standard; it is rec-
clothing.
ommended to use a certified FOPS structure when work-
ing with front- end loaders or in forestry applications; a
• Keep all used personal protective equipment outside
cab not FOPS certified is offering insufficient protection
the cab.
against falling rocks, bricks or pieces of concrete.
• Bring the wire harness of the remote sprayer control
box into the tractor cab.
FOPS level on your tractor cab is certified according to
OECD CODE 10.
• Use only genuine filters and ensure that the filter is cor-
rectly installed.
Installation and working with front loader on
• Check the condition of the sealing material and filters,
tractors equipped with cab
replacing them if damaged.
ATTENTION: Do not use the front- end loader without
Operator Protection
taking precautions against falling objects.
Please consider following precautions when working with
Roll Over Protective Structure (ROPS)
a front end loader:
This tractor is provided with either a ROPS structure or
• Do not lift the front - end loader to a height from which
a ROPS cab, offering protection against roll over related
objects may fall or roll on the driver.
hazards, all the same please consider the following pre-
cautions:
2-7
2 - SAFETY INFORMATION
• Always use the correct implement (grab forks, buckets,
bystanders to stand near or under the lifted bucket of a
etc) for the specific task to ensure that the load is se-
front - end loader.
curely kept in place.
• Do not use the front - end loader as a lift for persons
• It is recommended to install a front loader provided with
for activities that must be done at a certain height (for
a parallel guide system and to use it always; this system
example, cleaning eaves).
keeps the load in the bucket horizontal, irrespective of
• Do not use the front- end loader in an area with over-
the lift height of the arms.
head power lines. In case of contact with overhead
power lines, jump from the tractor without making in-
Installation and working with front loader on
stant contact between tractor and ground. When pos-
tractors without cab
sible, disconnect the power lines from the grounds.
ATTENTION: It is not recommended to install a front -
Operators Protection Structure OPS.
end loader on a tractor without cab, which cannot offer a
minimum protection against falling objects.
This tractor is not provided with an OPS certified struc-
Strictly observe the following precautionary warnings:
ture; please carefully read the following important infor-
mation especially when working in a forestry environment.
• Do not lift the front - end loader to a height from which
objects may fall or roll on the driver.
Forestry Applications
• Always use the correct implement (grab forks, buckets,
etc) for the specific task to ensure that the load is se-
ATTENTION: This tractor is not designed for heavy
curely kept in place.
forestry applications; usage is prohibited unless a certi-
fied FORESTRY KIT is installed; contact your dealer to
• It is recommended to install a front loader provided with
verify whether a forestry kit exists for this tractor model.
a parallel guide system and to use it always; this system
Only a forestry specific kit will provide necessary protec-
keeps the load in the bucket horizontal, irrespective of
tion against falling trees.
the lift height of the arms.
• If available install a FOPS structure or ask the supplier
Protection against penetrating objects (OPS) can be ob-
of the loader to install either a FOPS certified structure
tained only fitting a specific KIT, contact your dealer to
on main ROPS structure or at least a minimal structure
verify whether an OPS certified KIT is available for your
offering partial protection from falling objects (e.g. a
tractor.
“Suncanopy”).
General precautions to be followed when
working with a front - end - loader
• Do not allow bystanders in the manoeuvring zone of the
tractor equipped with a front−end loader. Do not allow
2-8

2 - SAFETY INFORMATION
Roll over protective structure (ROPS)
OPERATOR PROTECTIVE STRUCTURE
DANGER
Crushing hazard!
DO NOT operate the machine with the Roll-Over Protective Structure (ROPS) removed. Remove the
ROPS only for service or replacement.
Failure to comply will result in death or serious injury.
D0032A
DANGER
Crushing hazard!
Do not change the Roll Over Protective Structure (ROPS) in any way. Unauthorized changes such as
welding, drilling, or cutting will weaken the ROPS and decrease your protection. Have an authorized
dealer replace the ROPS if damage of any kind occurs. DO NOT TRY TO REPAIR THE ROPS.
Failure to comply will result in death or serious injury.
D0037A
WARNING
Roll-over hazard!
After an accident, fire, tip over, or roll over, a qualified technician MUST replace the Roll-Over Protec-
tive Structure (ROPS) before returning the machine to the field or job site operation.
Failure to comply could result in death or serious injury.
W0134A
Your machine is equipped with an operator Protective
components and wiring within the operator's protective
Structure, such as: a Rollover Protective Structure
system MUST be carefully inspected for damage.
(ROPS) or Falling Object Protective Structure (FOPS)
All damaged parts MUST be replaced.
or Cab with ROPS. A ROPS may be a cab frame or a
NOTICE: The ROPS can be folded down when working
two-posted or four-posted structure used for the protec-
in areas with limited headroom. Unless strictly necessary,
tion of the operator to minimize the possibility of serious
always work with the roll bar in the raised position, as
injury. The mounting structure and fasteners forming the
shown in the figure.
mounting connection with the machine are part of the
If used incorrectly, the tractor may tip over. When the
ROPS.
tractor is used with the roll bar in the lowered position,
The Protective Structure is a special safety component
the driver is UNPROTECTED. Always raise the roll bar
of your machine. The Protective Structure and intercon-
after terminating work in areas with low headroom.
necting components are a certified system.
The mounting or suspension for the Protective Structure,
operator seat and suspension, seat belts and mounting
2-9

2 - SAFETY INFORMATION
Personal protective equipment (PPE)
WARNING
Personal Protective Equipment (PPE) required.
When assembling, operating, or servicing the machine, wear protective clothing and PPE necessary
for the particular procedure. Some PPE that may be necessary includes protective shoes, eye and/or
face protection, hard hat, heavy gloves, filter mask, and hearing protection.
Failure to comply could result in death or serious injury.
W0353A
Personal protective equipment (PPE) is any equipment
intended to be put on and kept by the worker for protection
against one or more risks at work, liable to threaten safety
or health during work, as well as all the complements or
accessories intended for this purpose.
PPE must be used when, in spite of the risk being reduced
to a minimum at source, there are however risks that can-
not be eliminated and therefore it becomes necessary and
obligatory when there are so-called "residual" risks.
DCAPLT5NE020S2A
1
2-10
2 - SAFETY INFORMATION
Tractor jacking points
WARNING
Equipment failure could cause accident or injury!
Only use rigging equipment that has the capacity to lift the loads that you are moving. Always check
the rigging equipment each day for damaged or missing parts. Make sure other workers or bystanders
are not under the load while it is moving.
Failure to comply could result in death or serious injury.
W0205A
WARNING
Jack stands can slip or fall over. Dropping, tipping, or slipping of machine or its components is pos-
sible.
DO NOT work under a vehicle supported by jack stands only. Park machine on a level surface. Block
wheels. Support machine with safety stands.
Failure to comply could result in death or serious injury.
W0069A
DCAPLT5NE019S2E
1
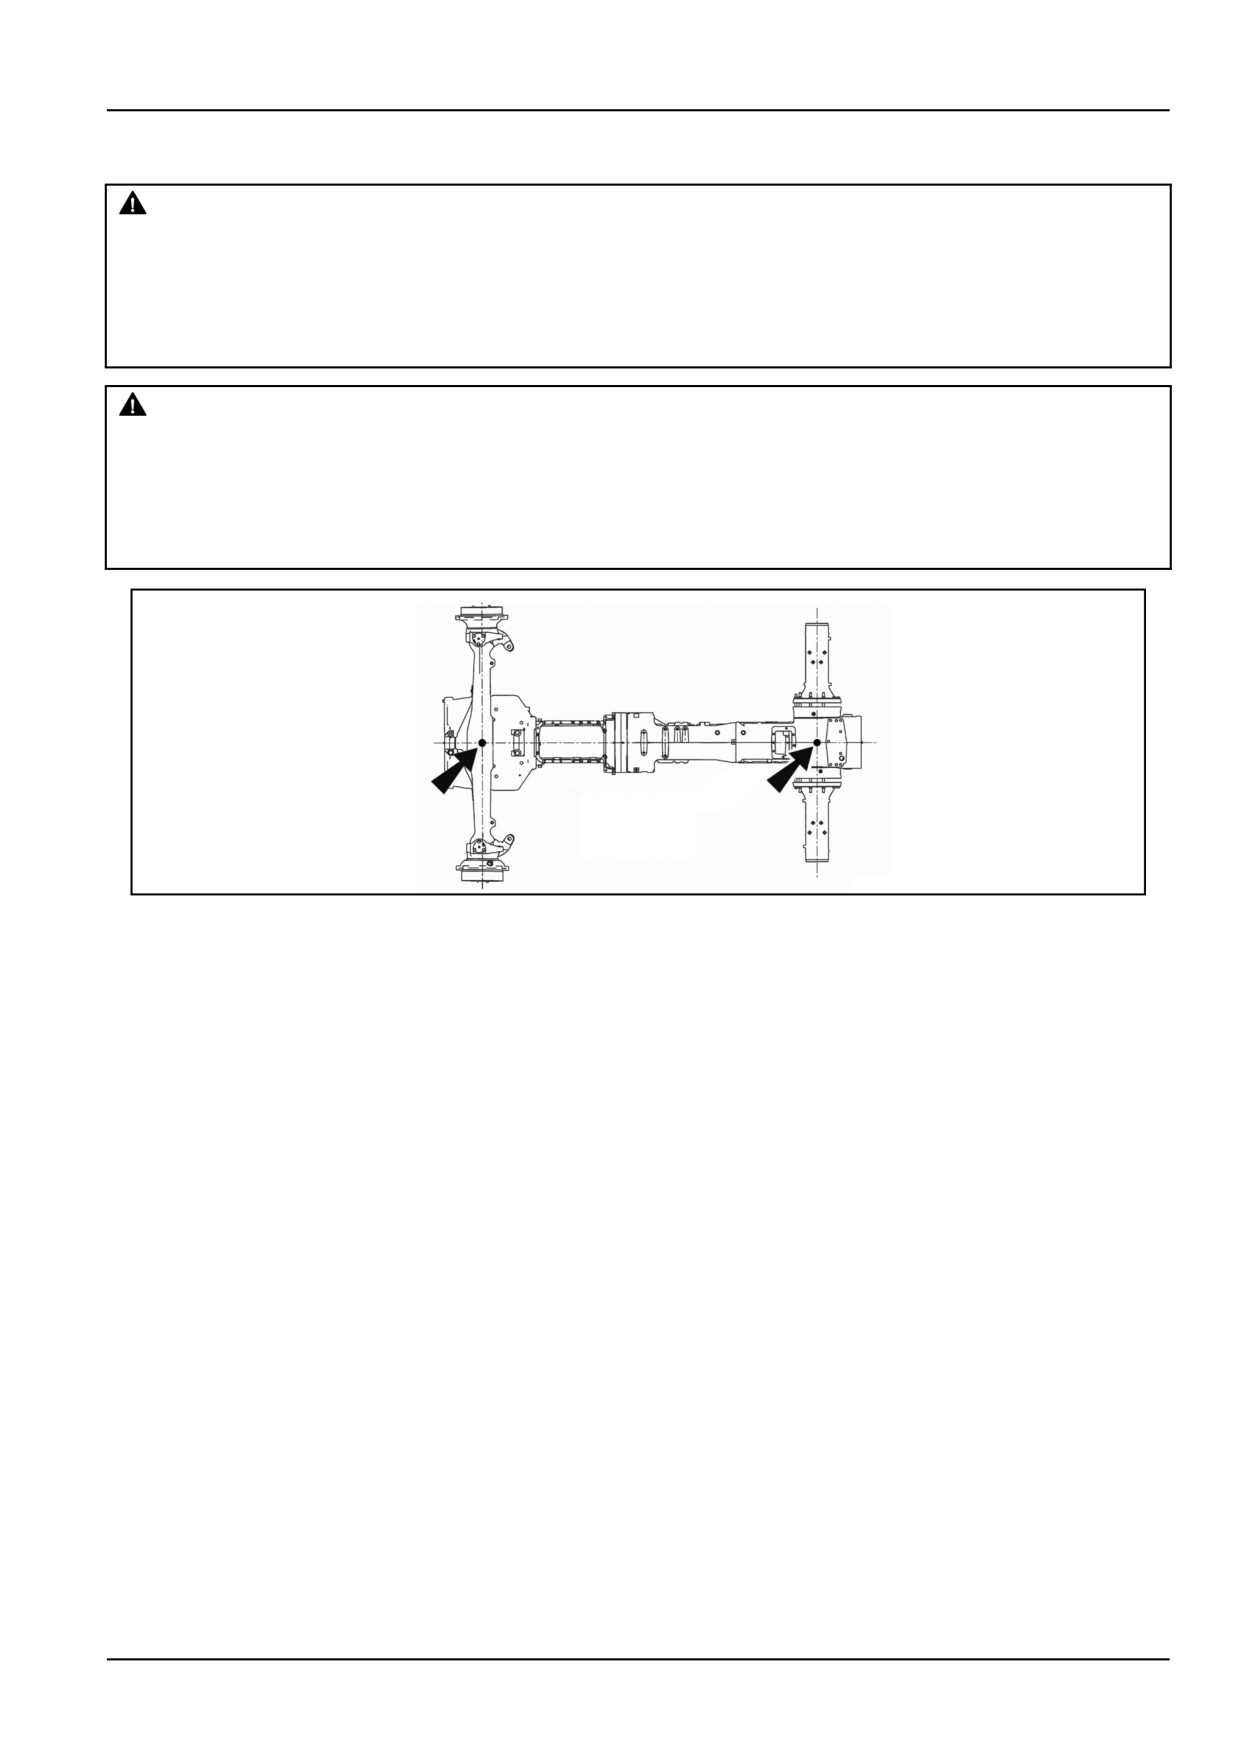
To lift the tractor use only the points shown in the figure.
ALWAYS raise only the back or the front, NEVER both together.
ALWAYS put chocks in front of or behind the wheels of the axle that is not to be lifted.
2-11
2 - SAFETY INFORMATION
Hazardous chemicals
Exposure to or contact with hazardous chemical substances can cause serious injuries. The fluids, lubricants, paints,
adhesives, coolants, etc. required for the machine's operation can be harmful. In addition, they can attract domestic
animals and people creating dangerous situations for health.
The materials safety data sheets (MSDS) provide information on the chemical substances contained in a product,
on the methods of safe storage and handling and on the first aid procedures to follow should such a product get
accidentally spilled.
Before doing any maintenance work, read the materials safety data sheets (MSDS) for each single lubricant, liquid,
etc. used on the machine. The information given on the sheets signals the associated risks and enables carrying out
the maintenance work safely. To perform maintenance work, follow the information given on the MSDS sheets, the
information provided by the manufacturer on the containers of the products and the information given in this manual.
Dispose of all the fluids, filters and containers in an environment friendly manner, respecting the current regulations
and laws on the subject of environmental protection. For correct information on disposal, contact your local differen-
tiated waste collection centre or your dealer.
Store fluids and filters according to the local regulations and laws. To store chemical or petrochemical substances,
use appropriate containers only.
Keep the batteries out of the reach of children or of other unauthorised people.
Further precautions are necessary for the applied chemical substances. Before using chemical substances, ask the
producer or retailer for detailed information.
2-12
2 - SAFETY INFORMATION
Burn prevention
WARNING
Hot surface possible!
Wait for all components to cool before performing any operation.
Failure to comply could result in death or serious injury.
W0251A
CAUTION
Hot area!
Use care when working near hot components. Wear protective gloves.
Failure to comply could result in minor or moderate injury.
C0034A
WARNING
Burn hazard!
Be very careful to avoid contact with hot fluids. If fluid is extremely hot, allow it to cool to a moderately
warm temperature before proceeding.
Failure to comply could result in death or serious injury.
W0362A
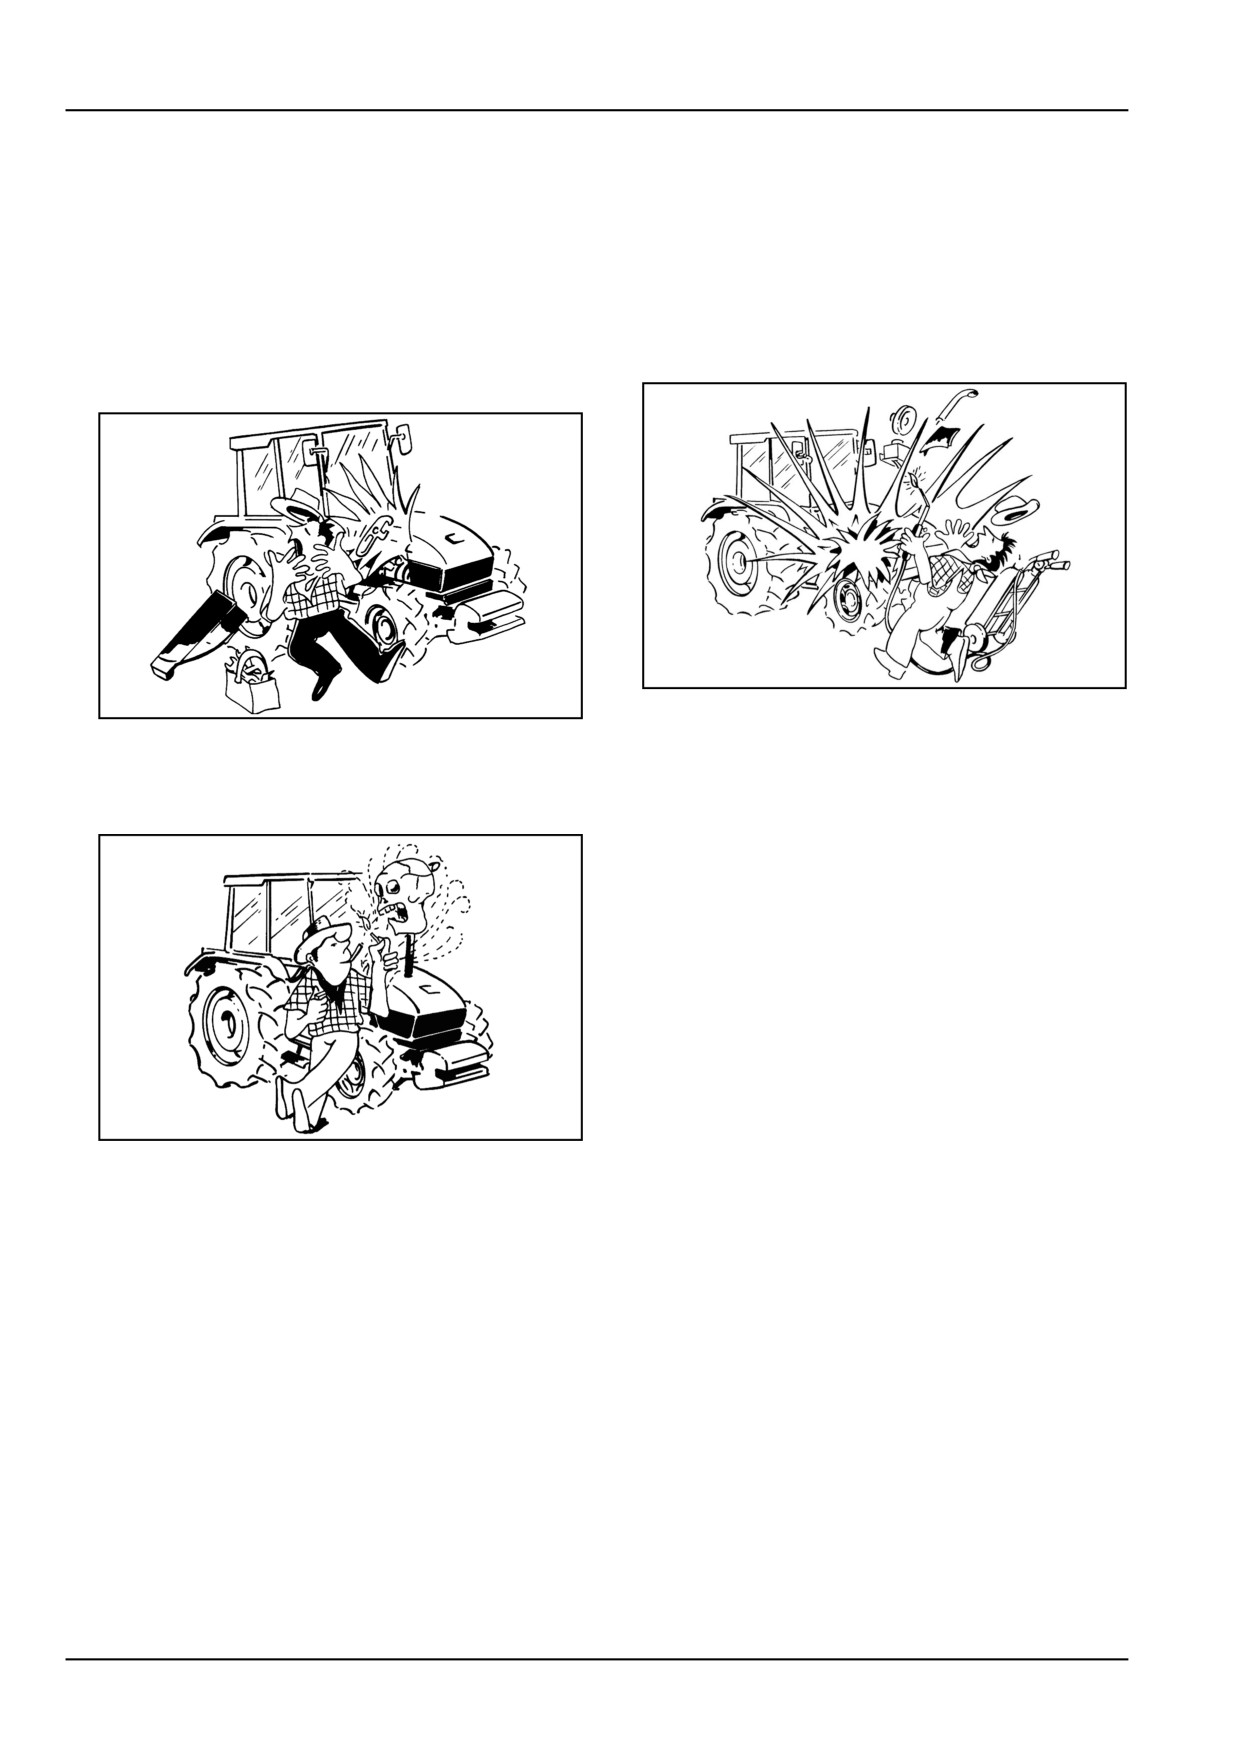
There are parts on the tractor whose outside surfaces reach high temperatures with the
consequent danger of burns by contact with the skin.
The hot parts of farm tractors that may pose a potential burn risk comprise:
1. The exhaust system (manifold, silencer, etc.).
2. Parts of the engine.
3. The gearbox and clutch housing.
4. The hydraulic distributors.
5. Pipes carrying hot fluids.
Wherever possible, guards have been installed to prevent direct contact between the operator and the hot areas. For
other parts that for reasons of construction and operation cannot be protected, it is necessary to take the due safety
precautions and use the appropriate personal protective equipment for the type of work to be carried out.
2-13

2 - SAFETY INFORMATION
Fire or explosion prevention
Remove all litter or debris from the machine each day;
Fire Extinguisher
especially check the engine area and exhaust system.
Only operate your tractor when an approved fire extin-
A spark or a naked light can cause the hydrogen in a
guisher is installed. The fire extinguisher designed loca-
battery to explode. To prevent an explosion carry out
tion is identified on your tractor with the decal shown in
the following: •
the accompanying image.
•
When disconnecting the battery cables, disconnect the
NOTICE: Please ensure to install an appropriate and cer-
negative (−) cable first; when connecting the battery
tified fire extinguisher.
cables, connect the negative (−) cable last.
Never alter its position or remove it.
Ensure to replace it or have it checked or refilled after
•
When connecting jumper cables to start the engine, use
every usage and/or date of expiry according to manufac-
the procedure shown in this manual (see Auxiliary Bat-
turer’s maintenance prescriptions.
tery connections in this manual).
It is not intended for use on an out−of−control fire, such
•
Do not weld, grind or smoke near a battery. Sparks
as one which has reached the ceiling, or the operator ; it
from the electrical system or engine exhuast can cause
is meant only to help you
an explosion and fire. Before you operate the machine
in an area with flammable dust or vapors, use good
To check if the extinguisher is still under pressure,proceed
ventilation to remove the flammable dust or vapors.
as follows:
•
Do not short circuit the battery posts with metal items.
1. Unscrew the pressure gauge from the valve.
•
Use nonflammable cleaning solvent to clean parts.
2. The needle will go from the green area to ”0” in the red
area.
•
Keep the cooling system clean and maintain the correct
coolant level.
3. Rescrew the pressure gauge on the valve. The needle
will go from ”0” in the red area to the green area.
•
Make sure that you DO NOT store oily rags or other
flammable materials on the machine.
• Operate the extinguisher from a safe distance.
•
Engine fuel can cause an explosion or fire. Do not fill
• Pull the Pin at the top of the extinguisher.
the fuel tank with the engine running, if you are near an
open fire, or if you are welding, smoking, etc.
• Aim at the base of the fire, not the flames.
•
If the machine has an oil, fuel or hydraulic leak, always
• Squeeze the lever slowly. This will release the extin-
repair the leak and clean the area before operating.
guishing agent; If the handle is released, the discharge
will stop.
•
Check the electrical system for loose connections or
frayed insulation.
• Sweep from side to side. Using a sweeping motion,
move the fire extinguisher back and forth until the fire
is completely out.
• Check for re-ignition of fire.
DCAPLNEGB125S2A
1
2-14
2 - SAFETY INFORMATION
Getting in and out of the machine
WARNING
Fall hazard!
Jumping on or off the machine could cause an injury. Always face the machine, use the handrails
and steps, and get on or off slowly. Maintain a three-point contact to avoid falling: both hands on the
handrails and one foot on the step, or one hand on the handrail and both feet on the steps.
Failure to comply could result in death or serious injury.
W0141A
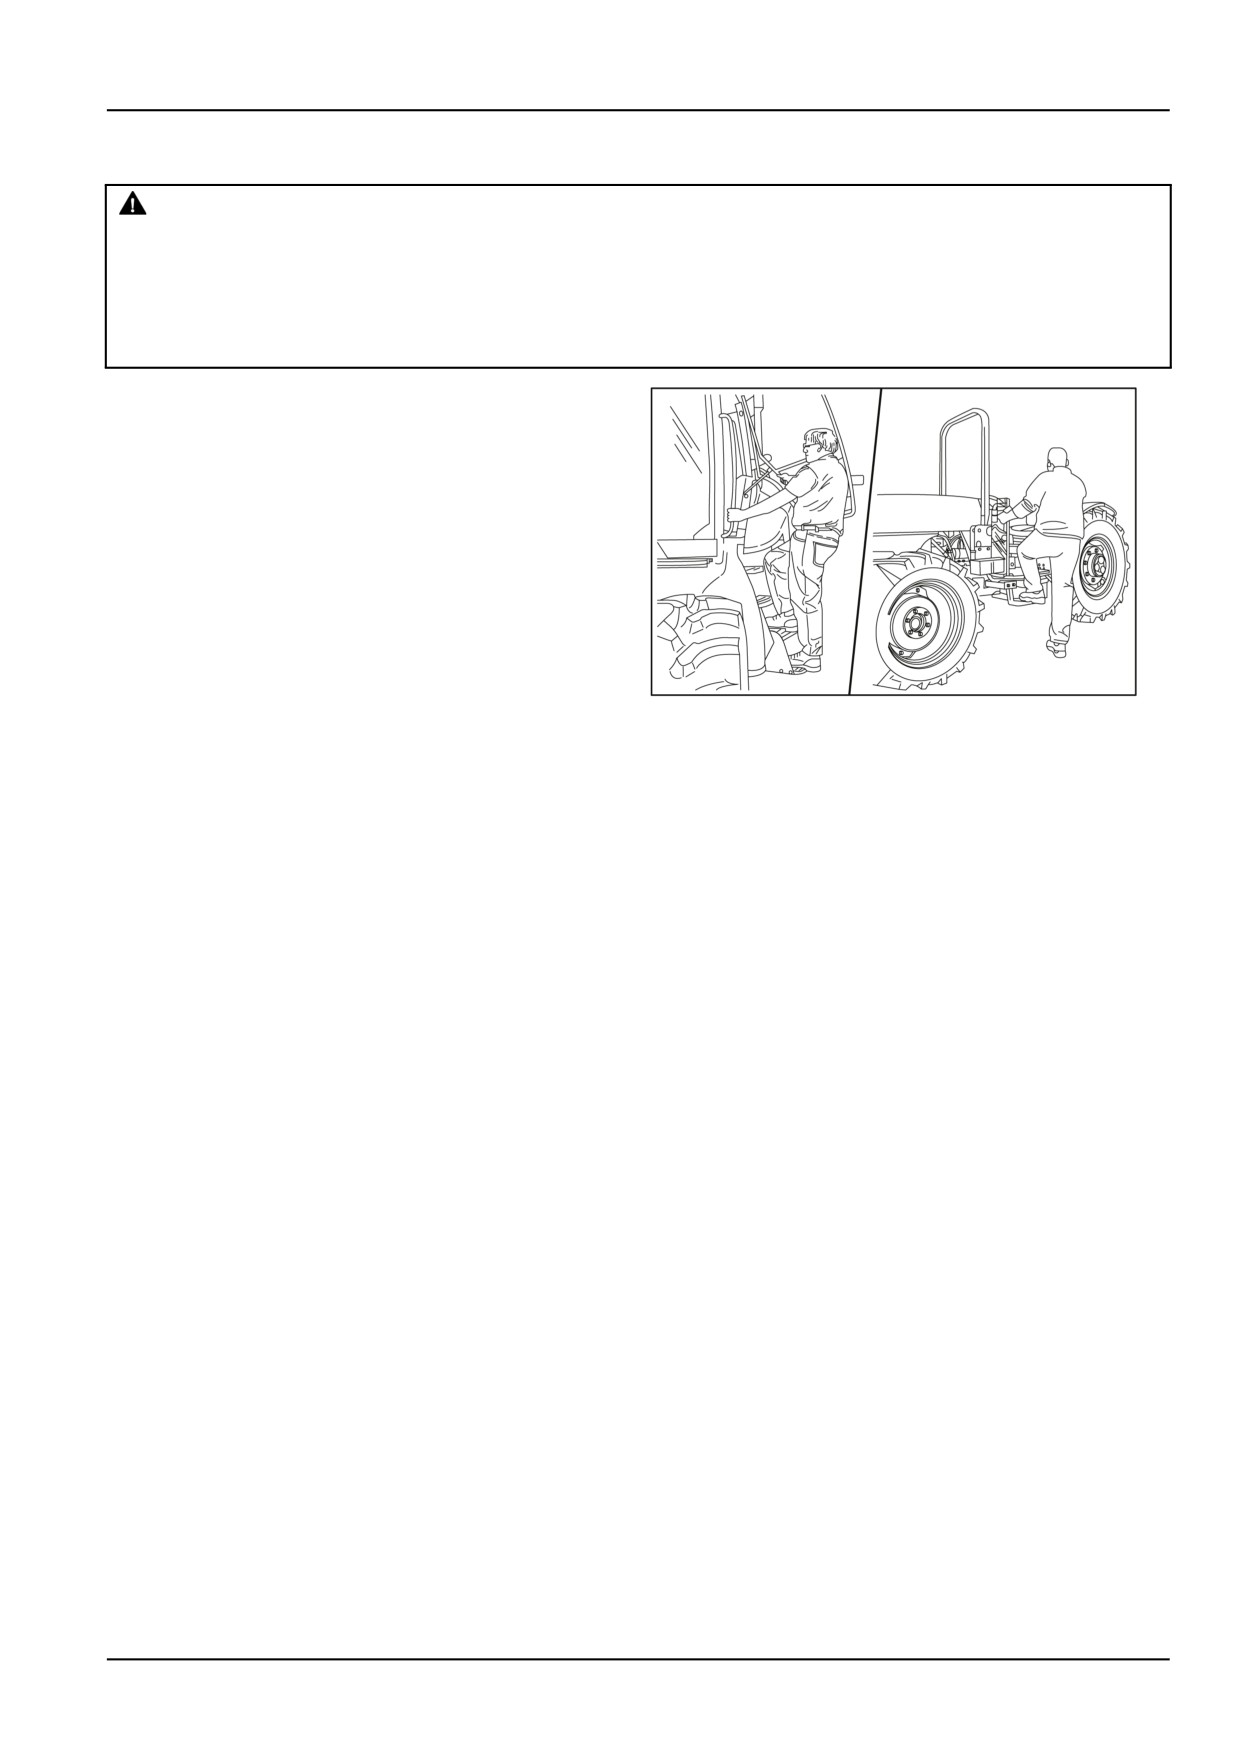
Get on and off the machine only by using the specific ac-
cesses equipped with a handrail, steps or ladder.
Do not jump off the machine.
Check that the steps, ladders and platforms remain clean
and clear of debris and foreign matter. Slippery areas can
be a cause of accidents.
Never get on or off the machine while in movement.
Do not use the steering wheel or any other controls or
accessories as a handrail when getting into or out of the
cab.
MOIL13TR00855AA
1
2-15
2 - SAFETY INFORMATION
Safety signs
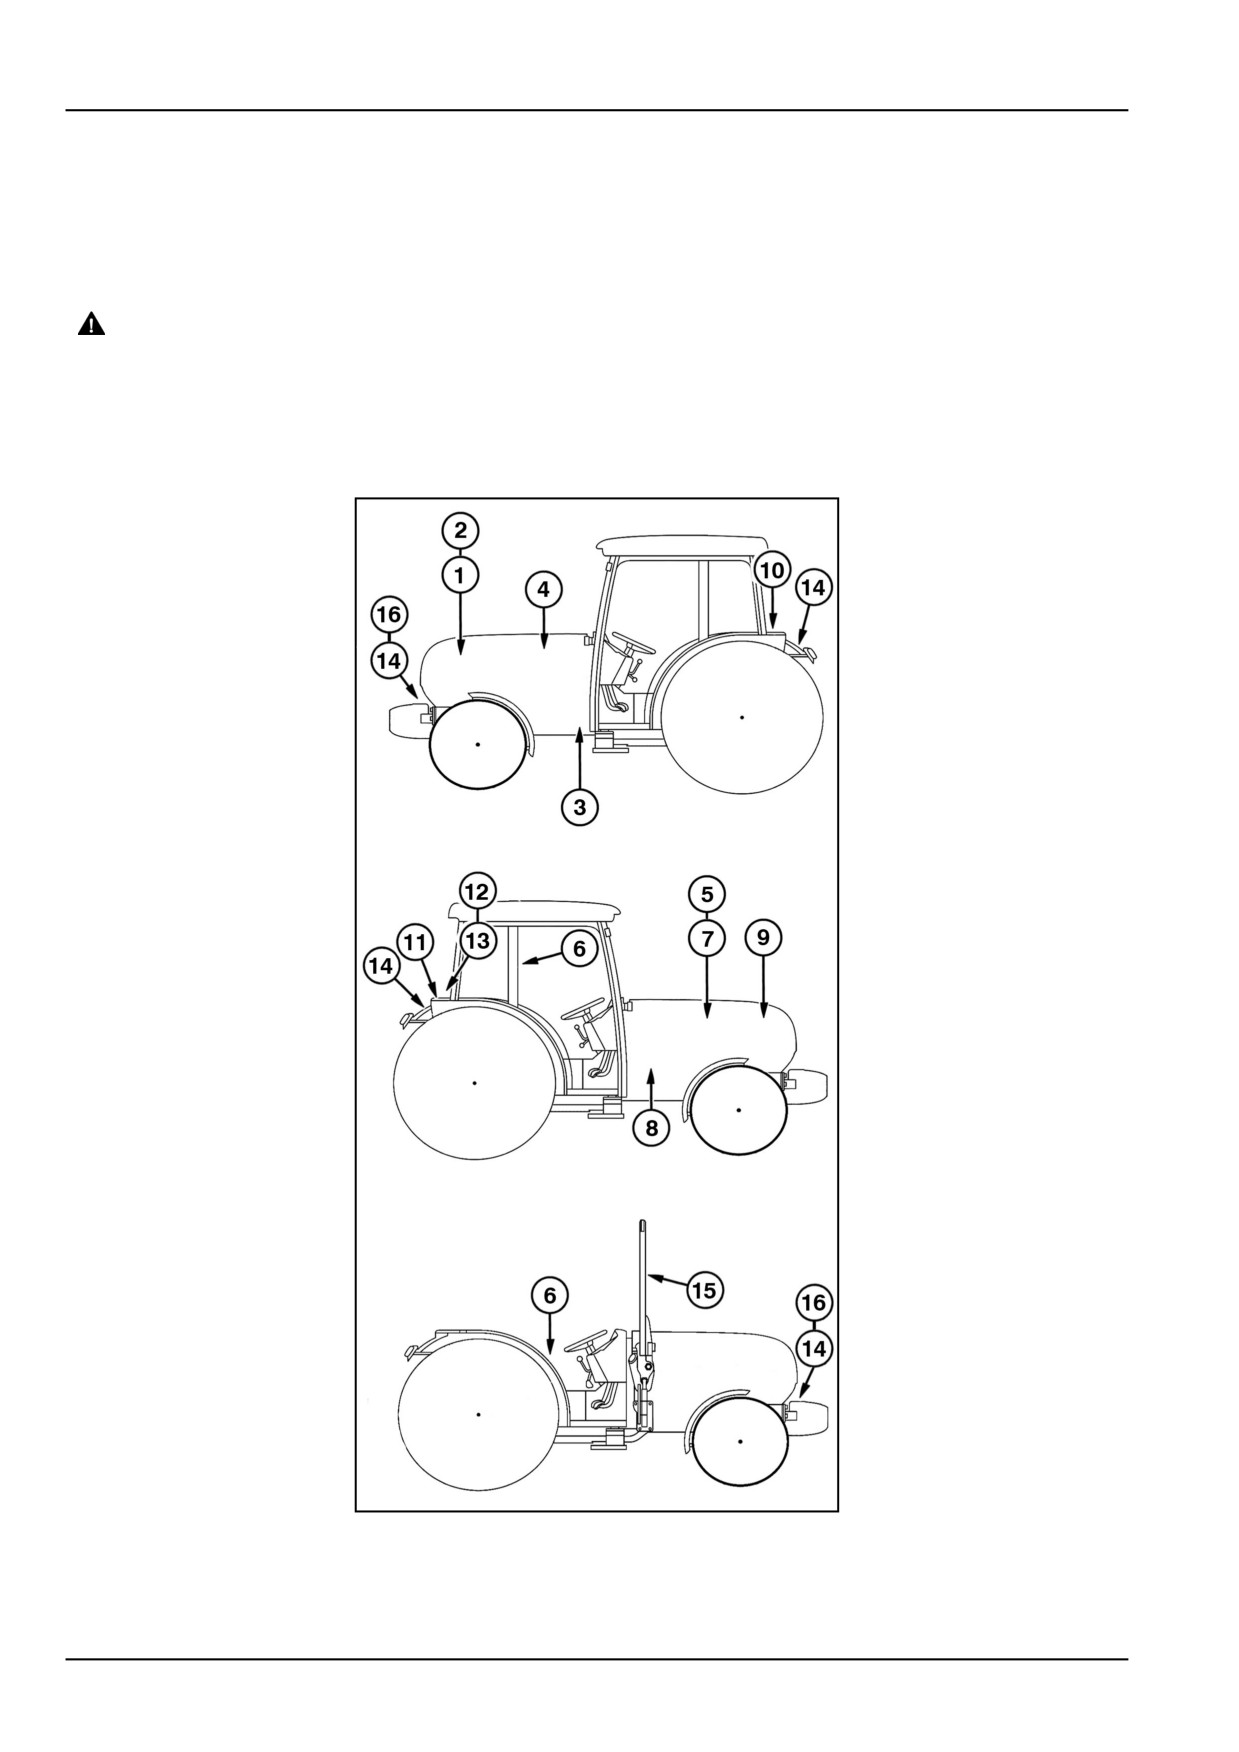
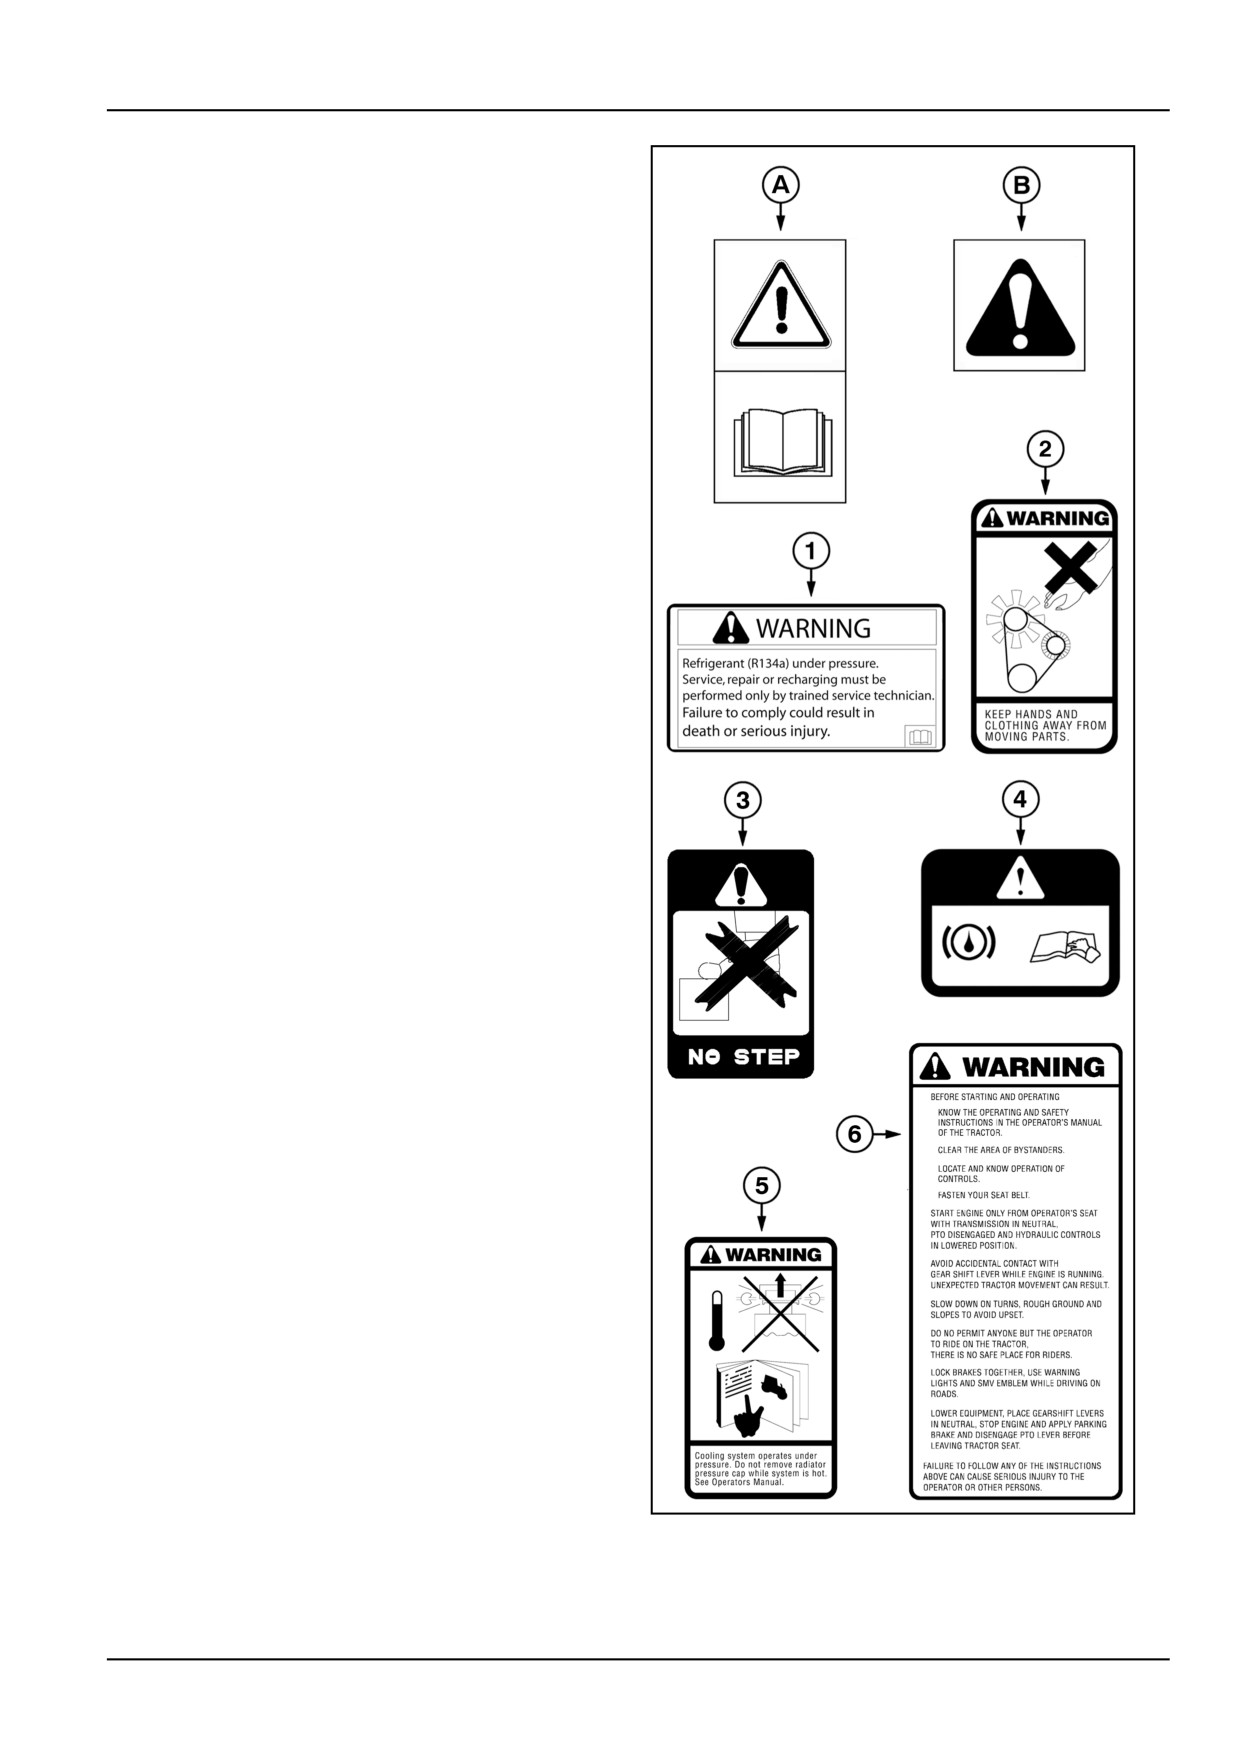
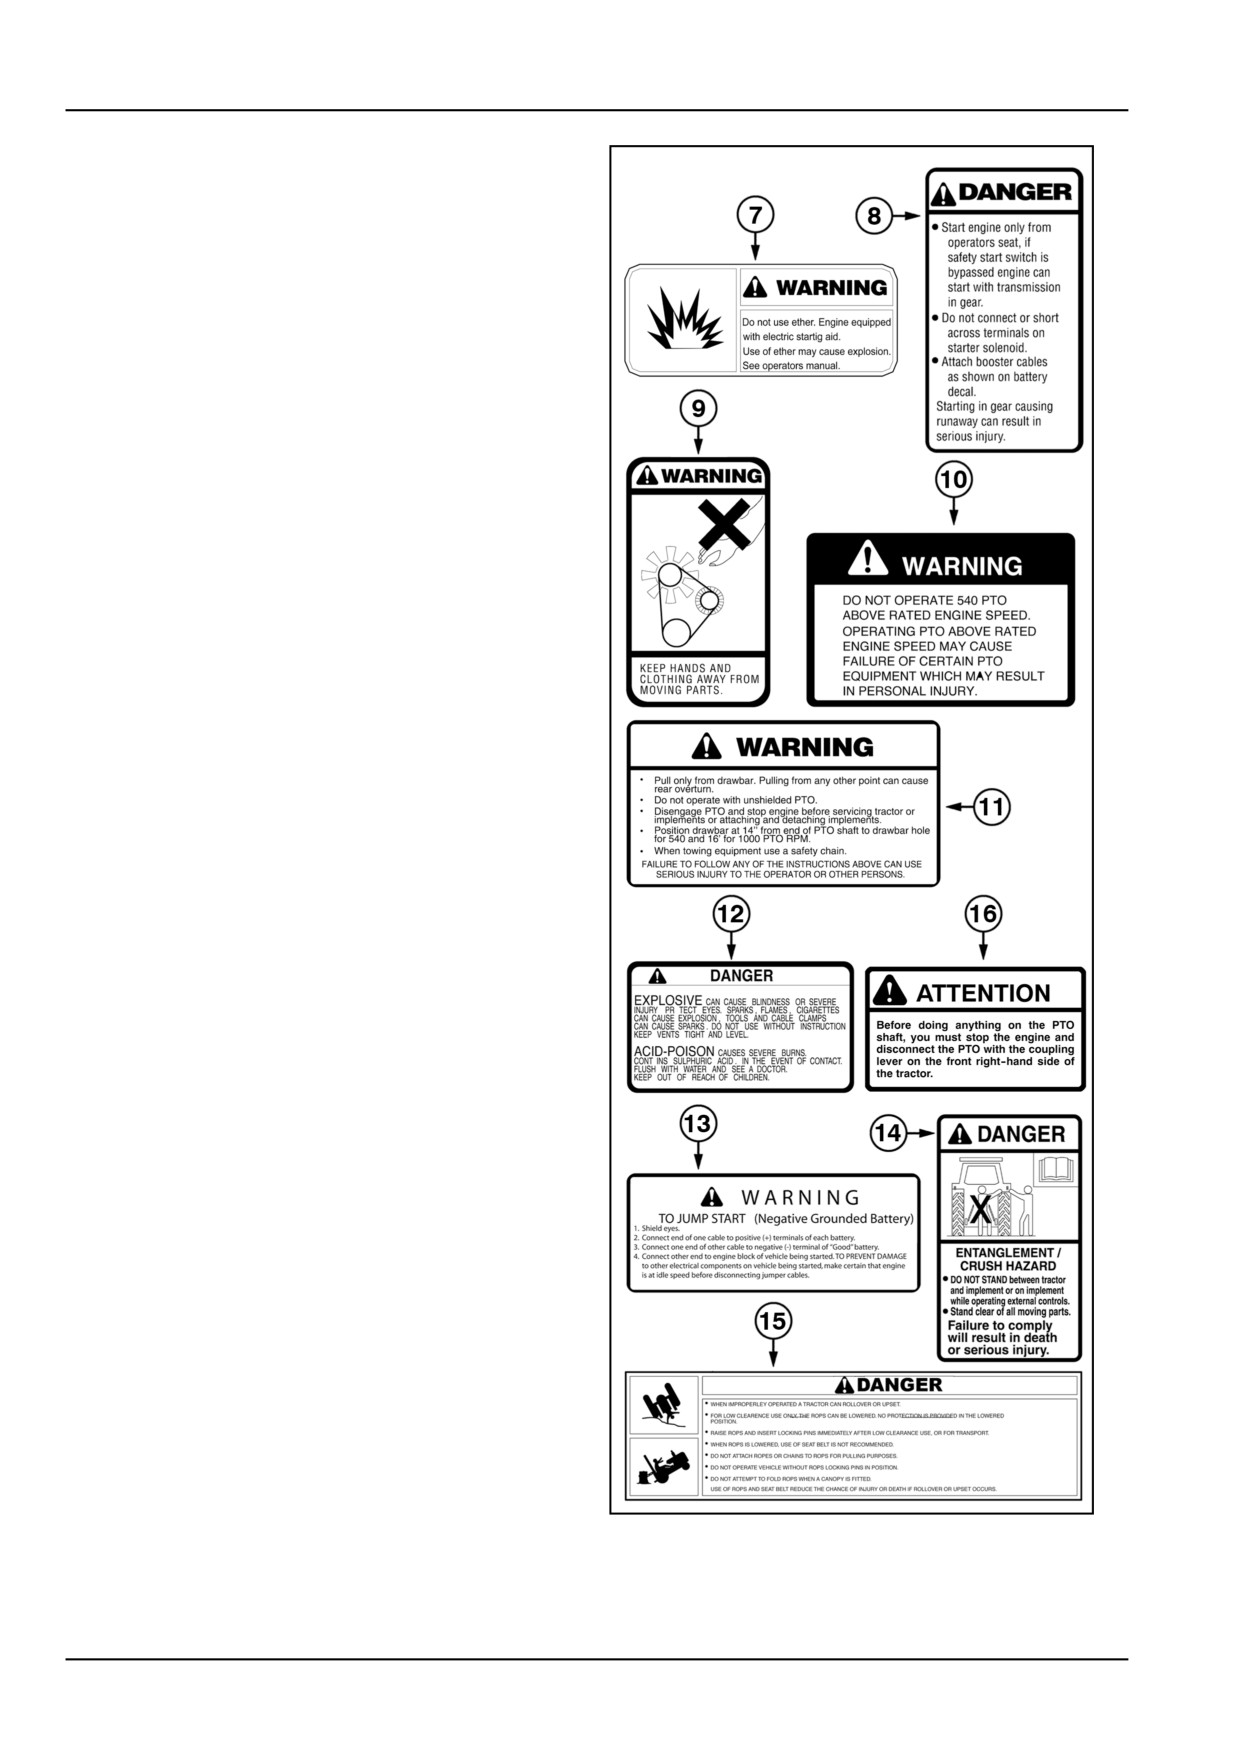
The safety decals on the following pages are positioned on your tractor in the locations shown in the drawings below.
These safety decals are important both for your safety and that of personnel working with you.
We recommend that you study these pages and find the positions of the safety decals on the tractor, checking that
their meanings are clear. Read the instructions below with the tractor drivers that will operate the machine.
WARNING
Avoid injury!
Make sure decals are perfectly legible. Clean decals regularly. Replace all damaged, missing, painted
over, or illegible decals. See your dealer for replacement decals. When replacing parts bearing decals,
be sure to put new decals on each new part.
Failure to comply could result in death or serious injury.
W0229A
DCSPFNAGB001S2D
1
2-16
2 - SAFETY INFORMATION
(A)
Positioned in several places on the tractor
General Warning: Read and understand all the warning
notes printed in this Operator's Manual with regards to the
relevant part where the decal is applied.
(B)
Positioned in several places on the tractor
General Warning: danger due to mechanical moving
parts.
(1)
Location: internal portion of the conveyor:
Air−conditioning system warning.
(2)
Location: left hand side on the fan shield.
To avoid serious injury, keep hands and clothing away
from the rotating fan, belts and any other rotating parts.
(3)
Location: lefthand side on the cab window.
Do not climb onto the tank or use it as a step, it is not
designed to sustain weight.
(4)
Location: right-hand side of brake system fluid container.
To keep the braking system in good working order, refer
to the Use and Maintenance Manual. If the red warning
light on the instrument panel illuminates, there is a fault in
the braking system.
(5)
Location: Front on the radiator.
Pressurised cooling system. Leave to cool and then care-
fully take off the cap. Use a cloth to slowly unscrew the
cap and release the pressure before completely removing
the cap..
(6)
Location: Inside cab on right-hand side window.
DCSPVNAGB006S2D
2
2-17
2 - SAFETY INFORMATION
(7)
Location: On the intake manifold.
Do not use ether on the cooling system.
(8)
Location: Right-hand side on the starter motor.
(9)
Location: right-hand side on the radiator.
To avoid serious injury, keep hands and clothing away
from the rotating fan, belts and any other rotating parts.
(10)
Location: On the internal part of the left−hand rear fender:
do not operate on the power take-off with the engine run-
ning.
(11)
Location: On the inside of the right−hand fender.
(12)
(13)
Location: Applied at the front on the battery.
(14)
Location: rear part on the mud flaps of the rightand left-
hand mudguard with electronic lift and on front part.
To prevent injury, do not stand on the implement or be-
tween the implement and the tractor while the external lift
controls are in use.
(15)
Location: under the upper upright of the roll bar.
(16)
Location: front part. Danger! To prevent injury, do not
stand close to rotating mechanical parts.
DCSPFNAGB002S2D
3
2-18
3 - CONTROLS/INSTRUMENTS
3 - CONTROLS/INSTRUMENTS###_3_###
ACCESS TO OPERATOR'S PLATFORM
Cab
WARNING
Misuse hazard!
The cab is an integral part of the machine's structure. DO NOT repair, weld, or straighten the cab.
Contact your Dealer and follow their instructions to avoid reducing the structural integrity of the ma-
chine.
Failure to comply could result in death or serious injury.
W0045B
The cab has been designed for operator comfort and convenience. Inside, the side trim panels, roof and floor are
insulated to reduce noise to a minimum. The cab is available in two versions:
- With heating and ventilation.
- With air conditioning.
The cab must be replaced in the event of overturning.
All the internal parts, such as the driver seat, including any seat belts supplied on request, must be carefully checked
and must show no sign of any damage whatsoever.
All damaged parts must be replaced.
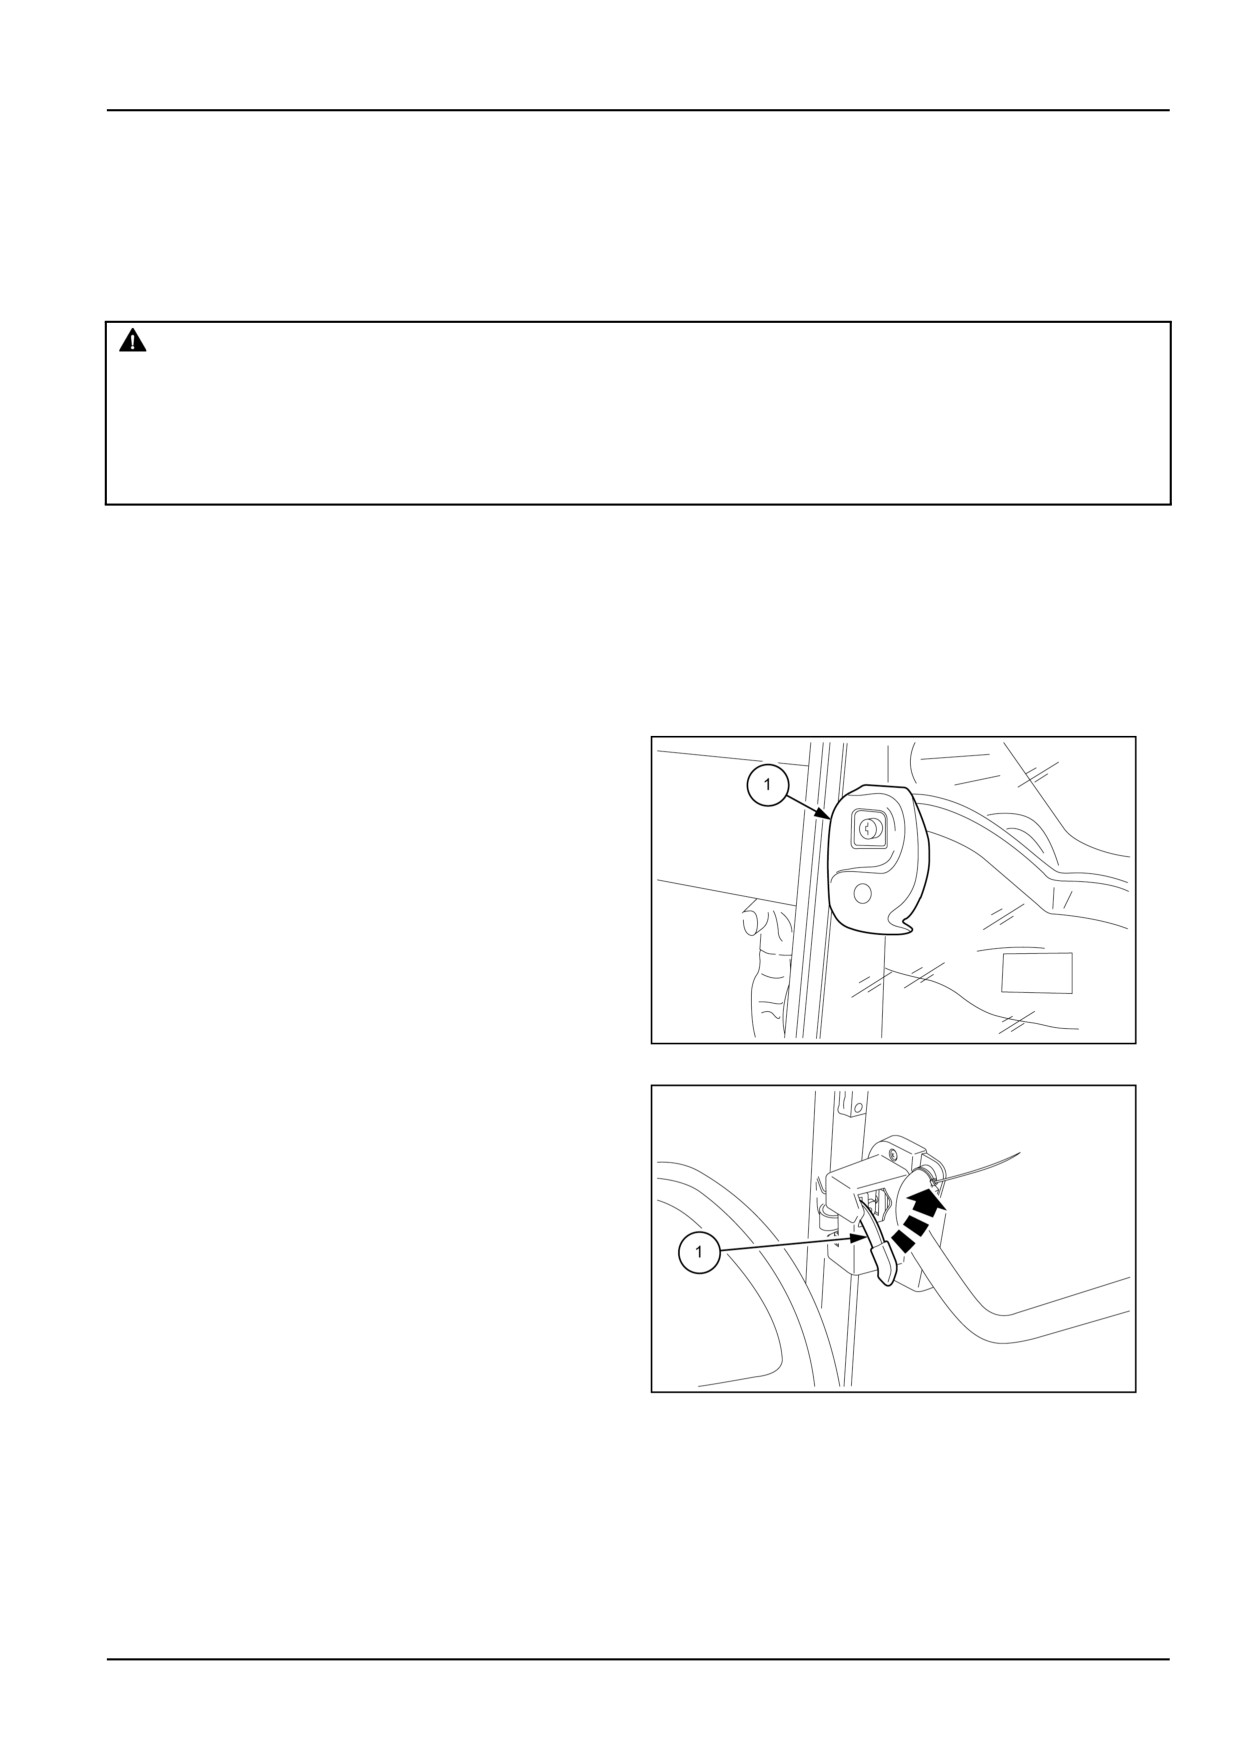
Opening doors from outside
With the door unlocked, press button (1) and pull the door
towards you.
Both opening buttons (1) are equipped with a lock for lock-
ing both cab doors.
MOIL13TR00490AA
1
Opening doors from inside
Pull the lever (1) towards yourself.
When pressed downwards, the lever is held by a mechan-
ical catch that prevents opening the door from the outside.
MOIL13TR00491AA
2
3-1
3 - CONTROLS/INSTRUMENTS
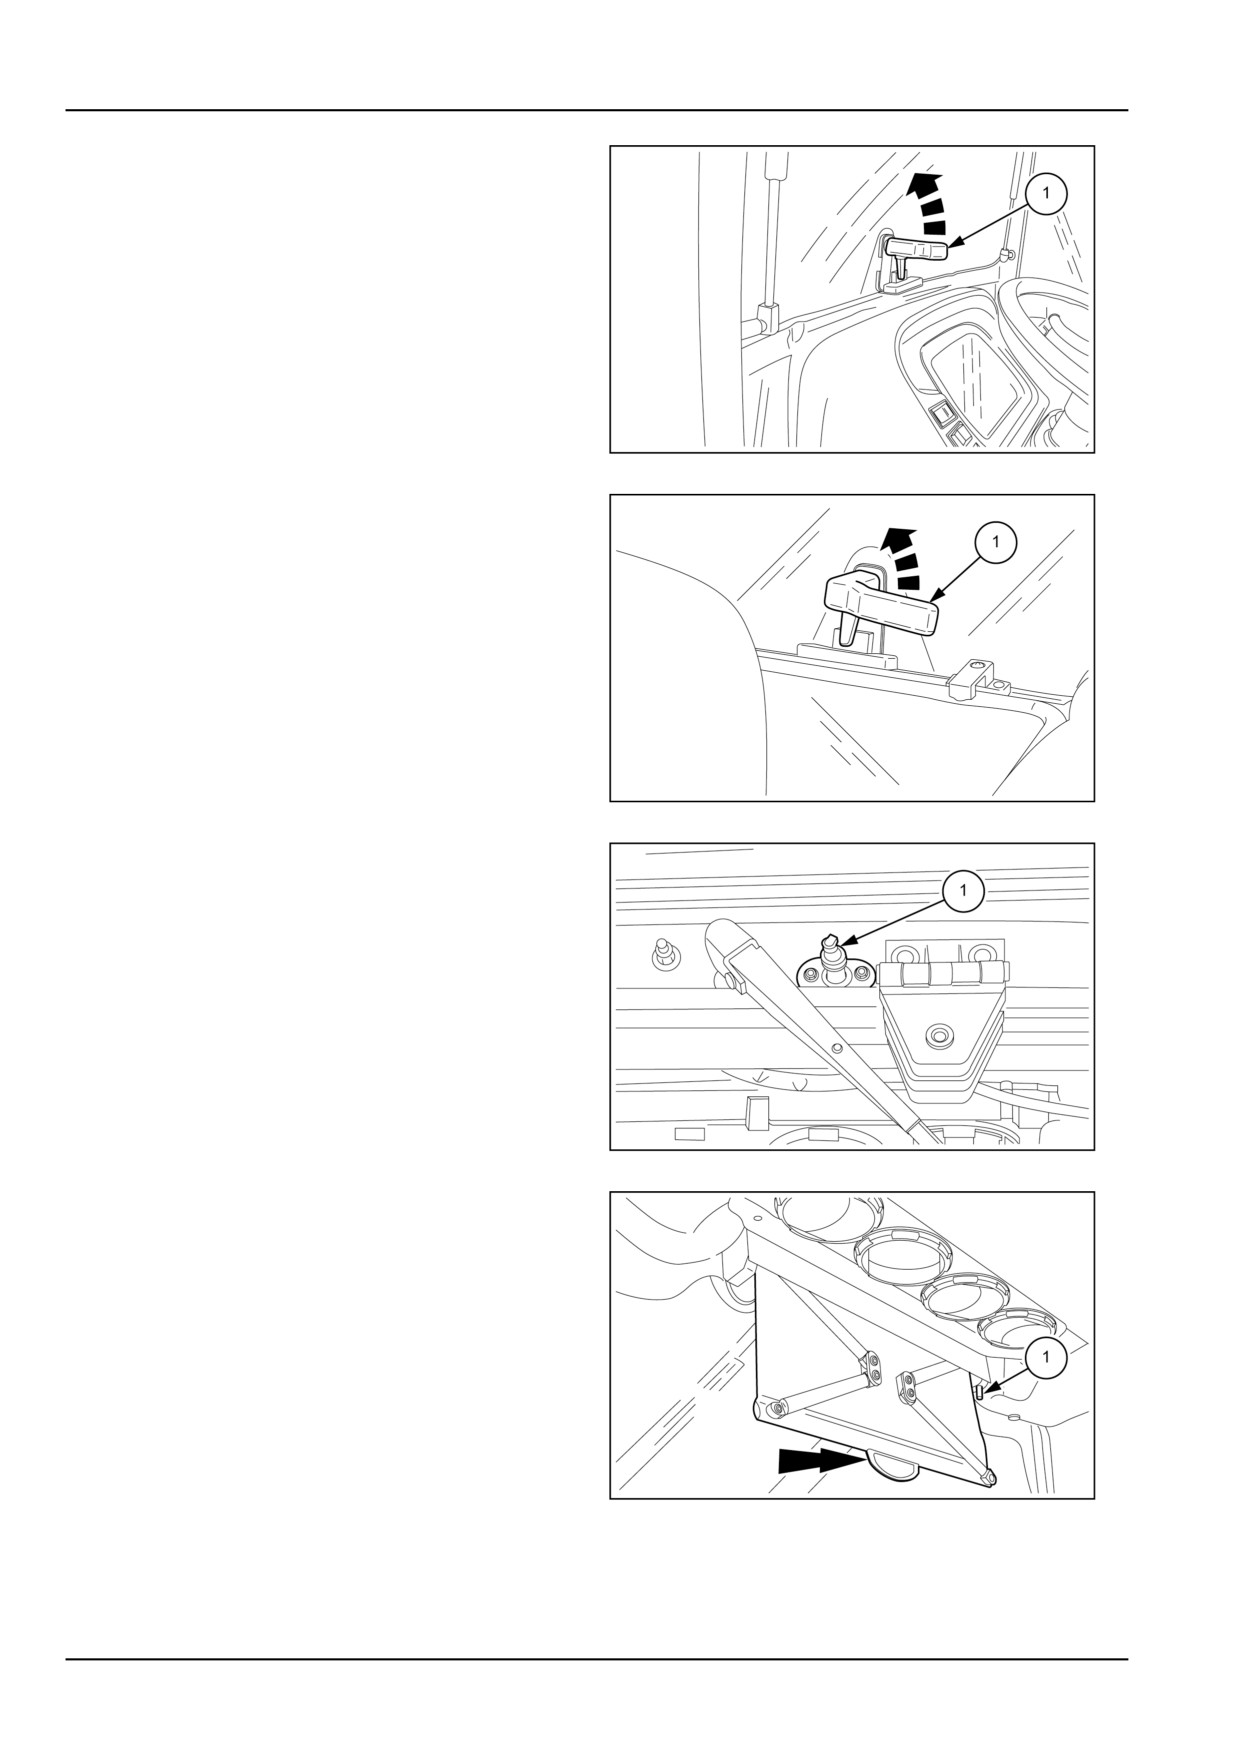
Opening Front Windscreen
To open, pull handle (1) upwards and push forward. The
window will be held in position by special struts.
MOIL13TR00492AA
3
Rear Window
To open, pull handle (1) upwards and push forward. The
window will be held in position by special struts.
MOIL13TR00493AA
4
Windscreen washer spray nozzle
For better windscreen cleaning, adjust the angle of the
spray nozzle (1) using a screwdriver. If the orifice of the
spray nozzle is obstructed, clear it with a pin.
MOIL13TR00495AA
5
Sun shade
Pull the tab of the sun blind down to open it, as indicated
by the arrow in the figure. To rewind the sun blind, press
button (1).
MOIL13TR00547AA
6
3-2
//////////////////////////////////////////