содержание .. 1 2 3 ..
Стиральная машина Primer LP-08 / LP-10. РУКОВОДСТВО ПОЛЬЗОВАТЕЛЯ - часть 2
•
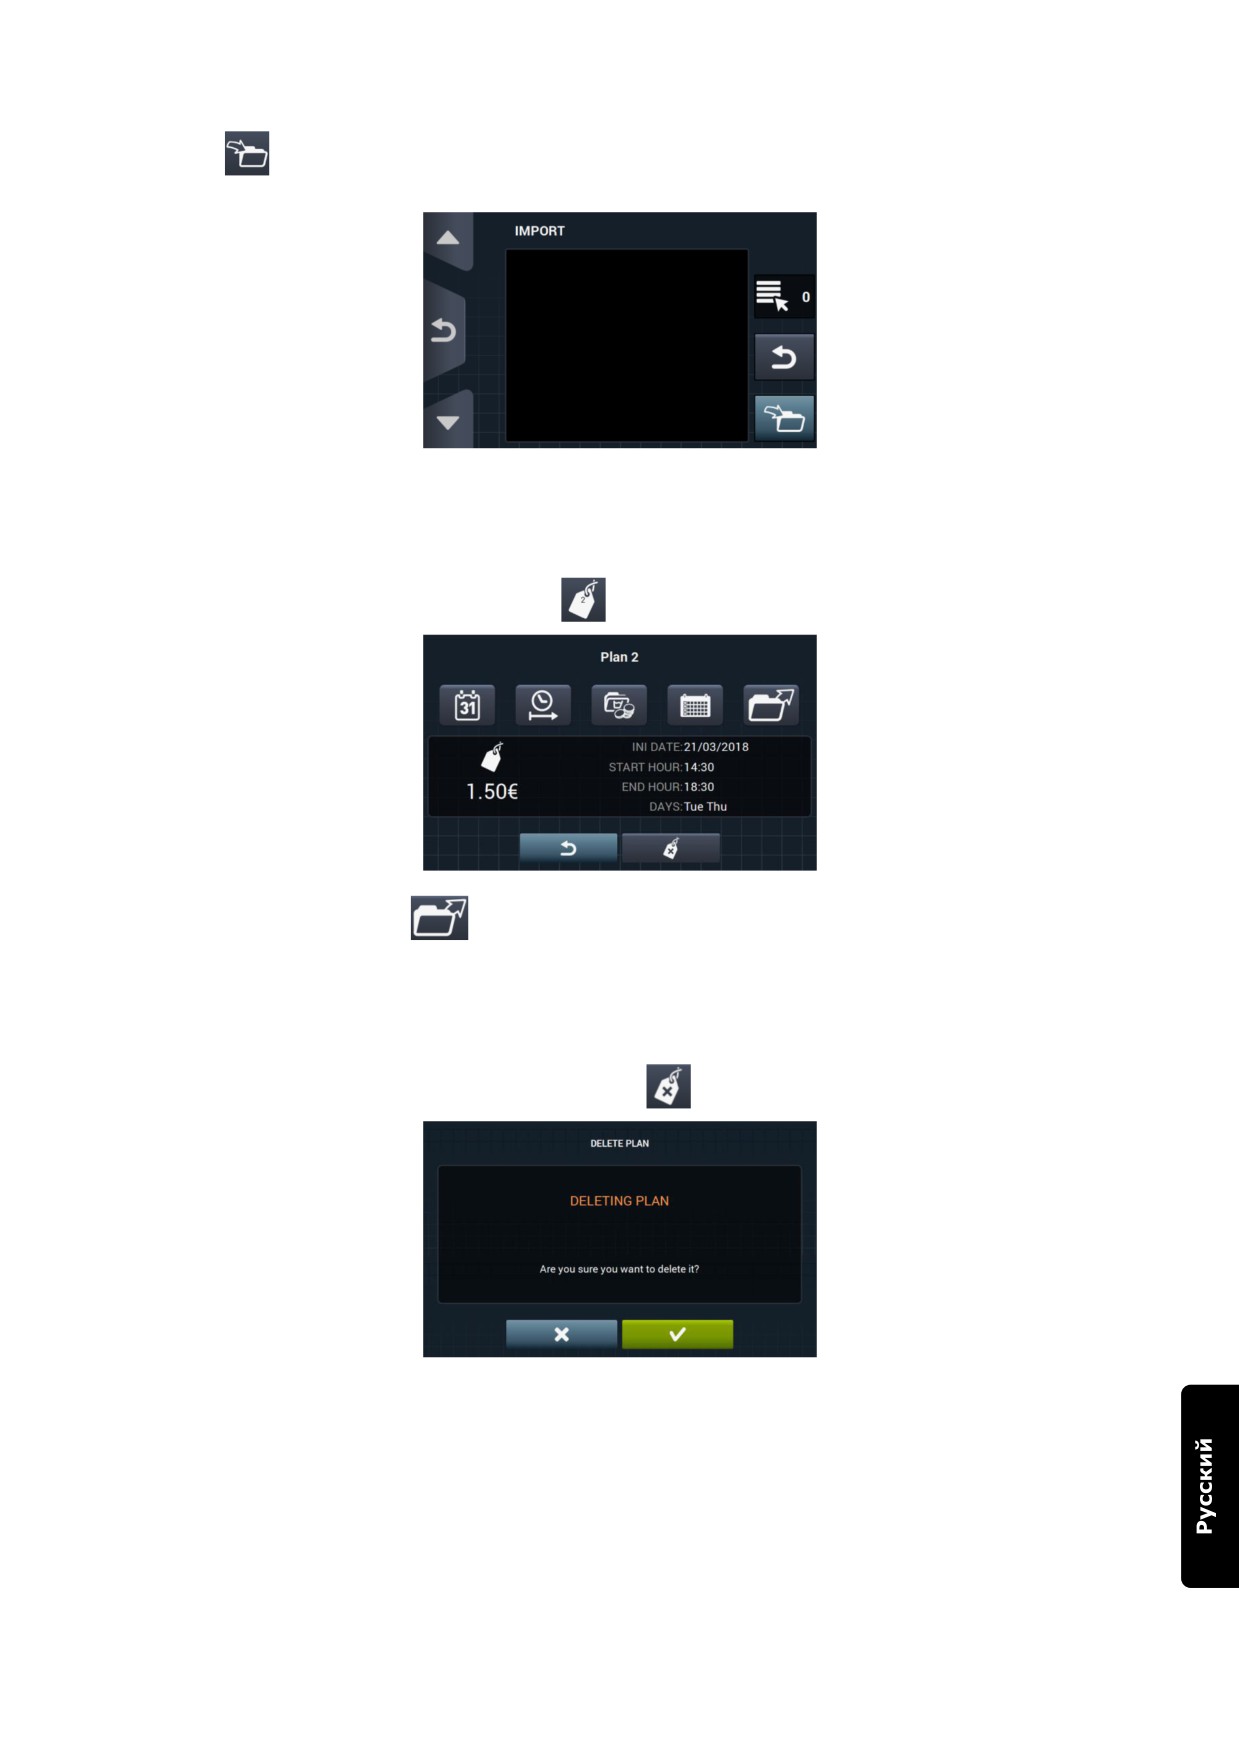
Импорт: Вместо заполнения полей, можно импортировать имеющийся план с USB -
устройства.
При выборе ИМПОРТА появится окно, аналогичное окну программитрования, через которое
можно просматривать содержимое USB-устройства, но выбрать можно тольуо файлы с планом
(расширение .plan). Можно импортировать только один файл единовременно.
При нажатии ОК после импорта, на дисплей возвращается главное окно с планами стоимости.
Нажатие кнопки в одном из активных планов
, отобразит итог всех настроенных параметров.
Вышеописанные параметры могут быть изменены при нажатии соответствующей кнопки. Помимо этого,
существует кнопка "Экспорт"
для экспортирования плана (файла с расширением .plan) в корневую
папку USB-носителя.
Файлы с планами стоимости будут сохраняться в папке под названием «PRICE PLANS» в корневой папке
USB носителя.
Каждому файлу планов цен будет присвоено название в следующем виде: PLAN_Nº_Дата_время.plan
(PLAN_3_20151029_112346, к примеру).
Вы можете удалить план при помощи кнопки удалить
44
9.2.2 Настройка HUD
•
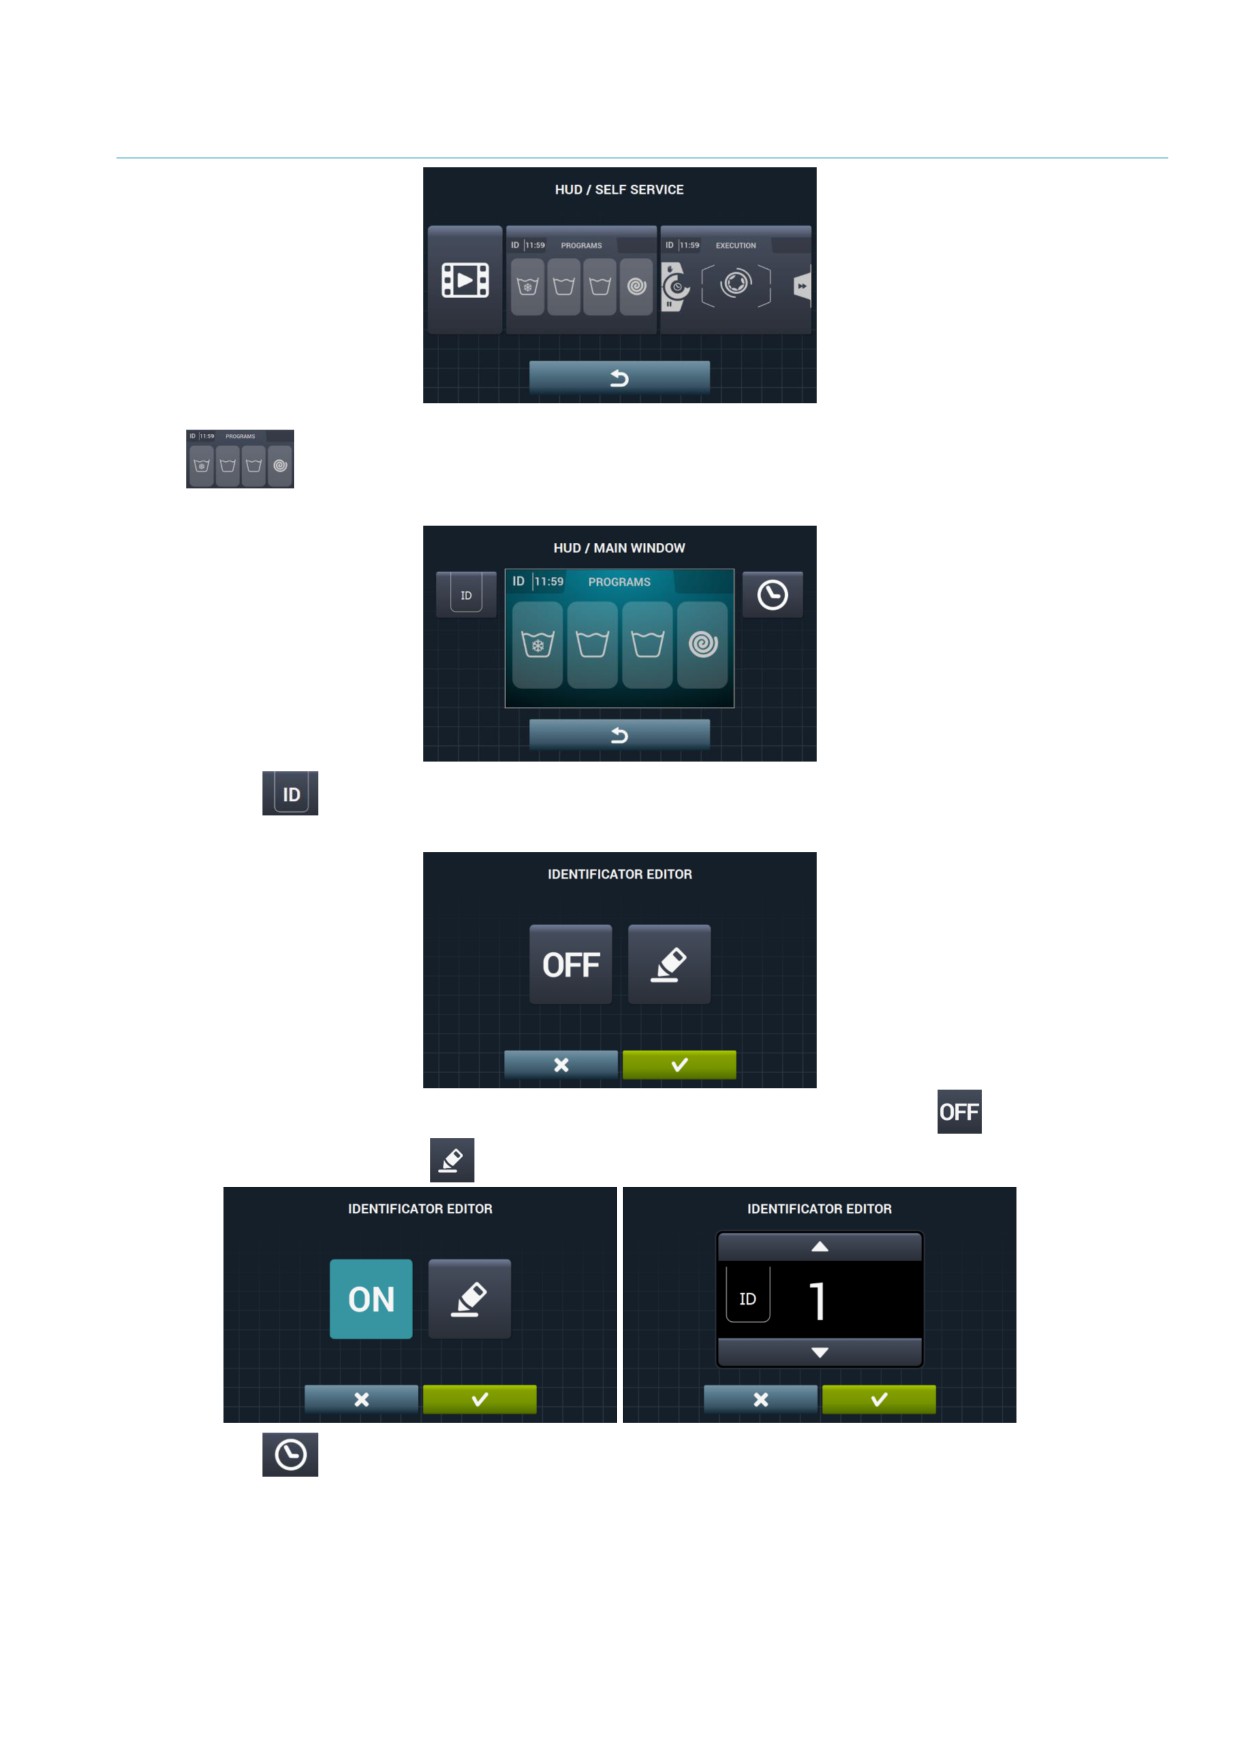
Главное окно: Применяется для обоих экранов: выбора программ и
самообслуживания. Возможна настройка следующих параметров:
•
Идентификация стиральной машины: Вы можете включить/отключить и настроить
идентификацию машины. По умолчанию эта опция отключена.
Получить такую идентификацию можно нажав на кнопку “OFF”
далее на кнопку
редактирования
•
Время: Отображение текущего времени. По умолчанию активно.
45
•
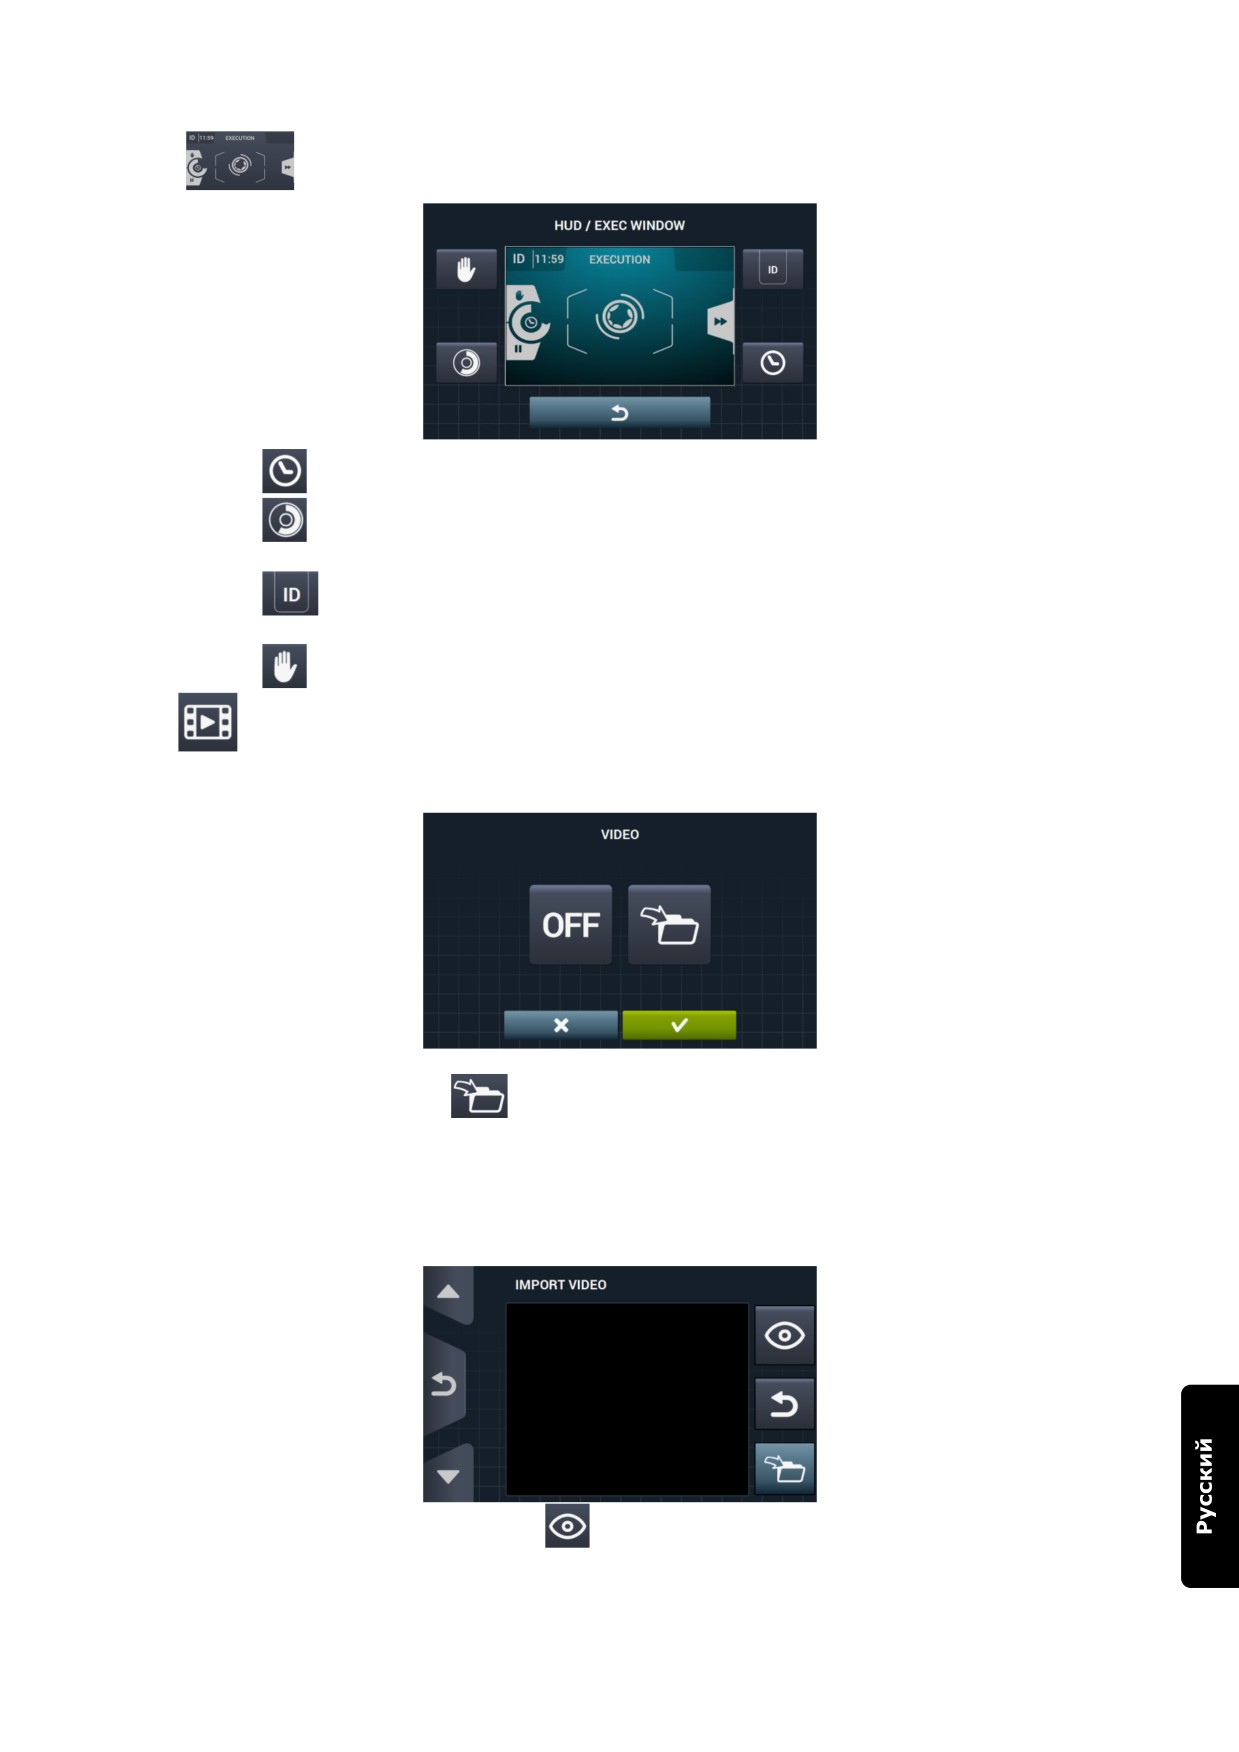
Рабочее окно: Ниже перечислены регулируемые параметры:
•
Время: Отображение/скрытие времени По умолчанию активно.
•
Оставшееся время: Отображение/скрытие общего оставшегося времени и
индикатора выполнения программы. По умолчанию активно.
•
Идентификатор машины: Активация/деактивация идентификатора машины. По
умолчанию отключен.
•
Останов: Отображение кнопки останова По умолчанию отключена.
•
Импорт видео: Эта опция позволяет воспроизводить видео на экране стиральной машины
после
10 минут ее неактивного состояния. В случае активации
«энергосбережения» опция
воспроизведения видео отключится автоматически.
Нажатие на кнопку импорт
, позволяет импортировать видео в стиральную машину с памяти
внешнего USB-накопителя. В этом случае можно импортировать только видео (в формате (avi,
mov,...), при этом можно иметь только одно видео в стиральной машине. Рекомендуемое
разрешение для видео для машин с экраном 4,3” составляет 480x272 пикселей, а для машин с
экраном
7”
— 800x480. Не рекомендуется превышать кадровую частоту размером
16.
Максимальный размер файла не должен превышать 25 Мб.
Кнопка предварительного просмотра
, позволяет удостовериться в правильности
воспроизведения видео.
46
9.2.3 Таблица валют
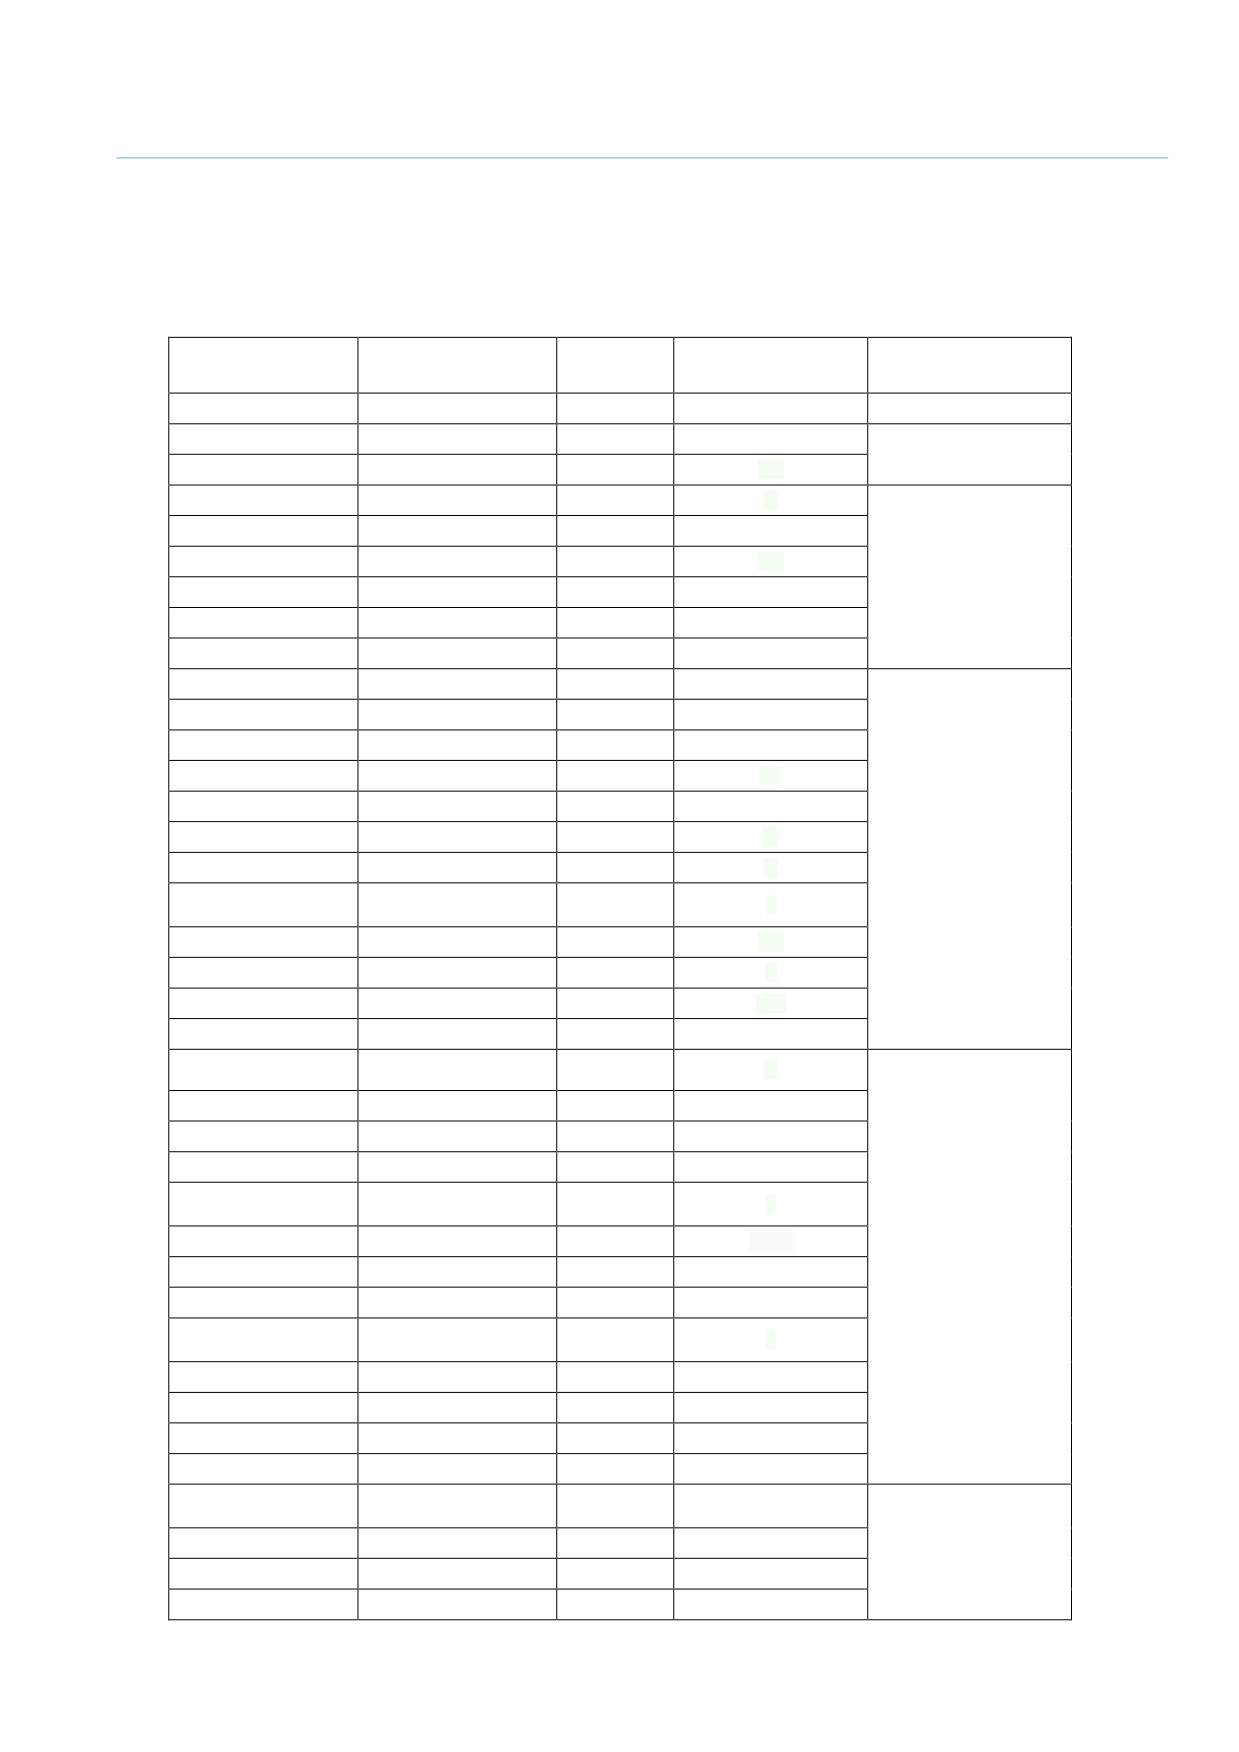
Ниже приводится таблица всех доступных валют с символом и коэффициентом (кратностью).
Если выбрать значение импульса, отличное от значения по умолчанию, вам придется настроить
монетоприемник в соответствии с выбранным значением. Это должен выполнить пользователь. По
умолчанию монетоприемники поставляются с этими значениями:
Значение
ГОСУДАРСТВО
ВАЛЮТА
СИМВОЛ
ОБОЗНАЧЕНИЕ
/КОЭФФИЦИЕНТ
Символ
Символ
TOK
$
1
Кувейт
Кувейтский динар
KWD
د.ك
0,05
Оман
Оманский риал
OMR
ع.ر.
Азербайджан
Манат
AZN
m
Болгария
Лев
BGN
лв
Бахрейн
Бахрейнский динар
BHD
.د.ب
0,1
Китай
Китайский юань
CNY
¥
Малайзия
Малайзийский ринггит
MYR1
RM
Панама
Панамский бальбоа
PAB
B
Аргентина
Аргентинский песо
ARS
$
Бермуды
Бермудский доллар
BMD
BD$
Барзилия
Реал
BRL
R$
Канада
Канадский доллар
CAD
C$
Египет
Египетский фунт
EGP
ج.م
Эфиопия
Эфиопский быр
ETB
Br
0,25
Гватемала
Кетсаль
GTQ
Q
Доллар каймановых
Каймановы острова
KYD
$
островов
Саудовская Аравия
Саудовский риал
SAR
ر.س
Эль Сальвадор
Сальвадорский колон
SVC
₡
Турция
Турецкая лира
TRY
YTL
США
Доллар США
USD
$
Объединенные
AED
د.ا
Арабские Эмираты
Дирхам ОАЭ
Боливия
Боливиано
BOB
Bs
Эстония
Эстонская крона
EEK
EEK
Страны Еврозоны
Евро
EUR
€
Соединенное
Фунт стерлингов
GBP
£
Королевство
Грузия
Лари
GEL
ლარი
GHS
GHS
0,5
Гана
Ганский седи
Хорватия
Хорватская куна
HRK
kn
Новозеландский
Новая Зеландия
NZD
$
доллар
Катар
Катарский риал
QAR
ر.ق
Украина
Украинская гривна
UAH
$
Сингапур
Сингапурский доллар
SGD
S$
Малайзия
Малайзийский ринггит
MYR2
RM
Босния и
Конвертируемая
BAM
KM
Герцеговина
марка
Бангладеш
Бангладешская така
BDT
Tk
1
Швейцария
Швейцарский франк
CHF
CHF
Доминиканская
Доминиканский песо
DOP
RD$
47
Республика
Гонконг
Гонконгский доллар
HKD
HK$
Израиль
Израильский шекель
ILS
₪
Индия
Индийская рупия
INR
Rs.
Шри-Ланка
Шри-ланкийская рупия
LKR
ர
Марокко
Марроканский дирхам
MAD
م.د.
Македония
Македонский денар
MKD
MKD
Перуанский новый
Перу
PEN
S/.
соль
Польша
Польский злотый
PLN
zł
Российская
Российский рубль
RUB
руб
Ферерация
Швеция
Шведская крона
SEK
kr
Тайланд
Тайский бат
THB
฿
Тунис
Тунисский динар
TND
د.ت
Уругвай
Уругвайский песо
UYU
$
Сербия
Сербский динар
RSD
дин.
Южноафриканский
ЮАР
ZAR
R
рэнд
Австралия
Австралийский доллар
AUD
$
Чешская Республика
Чешская крона
CZK
Kc
Дания
Датская крона
DKK
kr
Кения
Кенийский шиллинг
KES
KSh
Мексика
Мексиканский песо
MXN
$
5
Норвегия
Норвежская крона
NOK
kr
Румыния
Румынский лей
RON
L
Филиппины
Филиппинский песо
PHP
$
Алжир
Алжирский динар
DZD
دج
Гайана
Гайанский доллар
GYD
GY$
Венгрия
Венгерский форинт
HUF
Ft
10
Исландия
Исландская крона
ISK
kr
Казахстан
Казахский тенге
KZT
T
Тайвань
Тайваньский доллар
TWD
NT$
Чили
Чилийский песо
CLP
$
Коста Рика
Костариканский колон
CRC
₡
Иран
Иранский риал
IRR
50
Парагвай
Парагвайский гуарани
PYG
$
Французская
Французский
XPF
F
Полинезия
Тихоокеанский франк
Колумбия
Колумбийский песо
COP
$
Индонезия
Индонезийская рупия
IDR
Rp
Япония
Японская йена
JPY
¥
100
Южная Корея
Корейская вона
KRW
₩
Уганда
Угандийский шиллинг
UGX
USh
Венесуэльский
Венесуэла
VEF
Bs.
боливар
48
10 ОБСЛУЖИВАНИЕ
10.1 Ошибки
Ниже приведен список ошибок, возникающих в режиме самообслуживания, и действий по их
устранению. Остальные неполадки аналогичны возникающим в нормальном режиме эксплуатации.
ОШИБКА
ОПИСАНИЕ
ПРИЧИНА И УСТРАНЕНИЕ
Датчик получит информацию, несмотря на активацию выхода из режима
нагревания, что температура воды не повышается в течение 30 минут.
Данную ошибку можно пропустить. В этом случае, вместо вывода сообщения
об ошибке, машина продолжит работать, как если бы заданная температура
E6
ОШИБКА НАГРЕВА
была достигнута.
На дисплей выводится предупреждение, но машина не останавливается.
Работа машины продолжается, но предупредительное сообщение остается
на дисплее до завершения программы и разблокировки люка.
В ходе распределения перед финальным отжимом вход "Датчик дисбаланса"
активируется 5 раз.
E9
ДИСБАЛАНС
Ошибка не срабатывает, и отжим продолжается при низкой скорости.
Программа завершается в нормальном режиме, без вывода предупреждений
49
P1
40
90
1
2
3
6
15
3
3
2
3
6
40
90
1
1
3
3
3
3
3
3
3
3
3
4
1
1
0
0
0
15;05
15;05
15;05
15;05
15;05
✓
✓
✓
✓
✓
✓
✓
✓
✓
✓
✓
✓
✓
✓
✓
✓
✓
✓
✓
D
D1
D2, D3
D4, D5
P2
30
60
1
2
3
6
15
3
3
2
3
6
30
60
1
1
3
3
3
3
3
3
3
3
3
4
1
1
0
0
0
15;05
15;05
15;05
15;05
15;05
✓
✓
✓
✓
✓
✓
✓
✓
✓
✓
✓
✓
✓
✓
✓
✓
✓
✓
✓
D
D1
D2, D3
D4, D5
P3
30
1
2
3
6
15
3
3
2
3
6
30
1
1
3
3
3
3
3
3
3
3
3
4
0
1
0
0
0
15;05
15;05
15;05
15;05
15;05
✓
✓
✓
✓
✓
✓
✓
✓
✓
✓
✓
✓
✓
✓
✓
✓
✓
✓
✓
D
D1
D2, D3
D4, D5
P4
1
2
3
6
15
3
3
2
3
6
1
1
3
3
3
3
3
3
3
3
3
4
0
0
0
0
0
15;05
15;05
15;05
15;05
15;05
✓
✓
✓
✓
✓
✓
✓
✓
✓
✓
✓
✓
✓
✓
✓
✓
✓
✓
D
D1
D2, D3
D4, D5
P5
30
60
1
2
3
6
15
3
3
2
3
6
30
60
2
2
4
4
4
3
3
3
3
3
3
4
1
1
0
0
0
15;05
15;05
15;05
15;05
15;05
✓
✓
✓
✓
✓
✓
✓
✓
✓
✓
✓
✓
✓
✓
✓
✓
✓
✓
✓
D
D1
D2, D3
D4, D5
P6
30
1
2
3
6
15
3
3
2
3
6
30
2
2
4
4
4
3
3
3
3
3
3
4
0
1
0
0
0
15;05
15;05
15;05
15;05
15;05
✓
✓
✓
✓
✓
✓
✓
✓
✓
✓
✓
✓
✓
✓
✓
✓
✓
✓
✓
D
D1
D2, D3
D4, D5
P7
1
2
3
6
15
3
3
2
3
6
2
2
4
4
4
3
3
3
3
3
3
4
0
0
0
0
0
15;05
15;05
15;05
15;05
15;05
✓
✓
✓
✓
✓
✓
✓
✓
✓
✓
✓
✓
✓
✓
✓
✓
✓
✓
D
D1
D2, D3
D4, D5
P8
40
1
2
3
6
12
3
3
3
6
40
2
2
4
4
4
2
2
2
2
2
3
0
1
0
0
0
15;08
15;08
15;08
15;08
15;08
✓
✓
✓
✓
✓
✓
✓
✓
D
D1
D2
D4, D5
P9
1
2
3
6
10
3
3
3
4
3
3
4
4
4
2
2
2
2
2
3
0
0
0
0
0
15;08
15;08
15;08
15;08
15;08
✓
✓
✓
✓
✓
✓
✓
D
D1
D2
D4, D5
P10
1
2
3
P11
90
1
2
12
3
3
3
3
15
3
2
3
6
90
1
4
4
4
1
3
3
2
2
2
2
2
3
3
3
3
4
0
0
0
0
1
0
0
05;15
05;15
05;15
05;15
15;05
15;05
15;05
✓
✓
✓
✓
✓
✓
✓
✓
✓
✓
✓
✓
✓
✓
✓
✓
✓
✓
✓
D
D2
D4, D5
D
D2, D3
D4, D5
P12
60
1
2
P13
30
1
2
15
3
2
3
6
15
3
2
3
6
60
30
1
3
3
1
3
3
3
3
3
3
4
3
3
3
3
4
1
0
0
1
0
0
15;05
15;05
15;05
15;05
15;05
15;05
✓
✓
✓
✓
✓
✓
✓
✓
✓
✓
✓
✓
✓
✓
✓
✓
✓
✓
✓
✓
✓
✓
✓
✓
✓
✓
D
D2, D3
D4, D5
D
D2, D3
D4, D5
P14
1
2
15
3
2
3
6
1
3
3
3
3
3
3
4
0
0
0
15;05
15;05
15;05
✓
✓
✓
✓
✓
✓
✓
✓
✓
✓
✓
✓
D
D2, D3
D4, D5
P15
65
71
1
2
3
3
6
15
3
2
3
2
3
6
65
71
3
1
1
3
3
3
3
3
3
3
3
3
3
3
4
0
1
1
0
0
0
15;05
15;05
15;05
15;05
15;05
15;05
✓
✓
✓
✓
✓
✓
✓
✓
✓
✓
✓
✓
✓
✓
✓
✓
✓
✓
✓
✓
✓
✓
✓
D
D1
D2, D3
D4, D5
P16
P17
6
2
4
2
✓
✓
✓
✓
INSTRUCTION MANUAL
MANUAL DE INSTRUCCIONES
MANUEL D’UTILISATION
BEDIENUNGSANLEITUNG
MANUALE DI ISTRUZIONI
MANUAL DE INSTRUÇÕES
РУКОВОДСТВО ПОЛЬЗОВАТЕЛЯ
LP-08 / LP-10
LS-11 / LS-14 / LS-19 / LS-26 / LS-36
MACHINES
LS-45 / LS-62 / LS-125
LAVADORAS
TS-11 / TS-14 / TS-19 / TS-26 / TS-36
LAVA-LINGE
RS-11 / RS-14 / RS-19 / RS-26 /RS-36 / RS-62
WASCHMASCHINEN
LP-0820 / LP-1025
LAVATRICI
LSW-25 / LSW-30 / LSW-40 / LSW-60 / LSW-80
MÁQUINAS DE LAVAR ROUPA
LSW-100 / LSW-135 / LSW-275
СТИРАЛЬНЫЕ МАШИНЫ
TSW-25 / TSW-30 / TSW-40 / TSW-60 / TSW-80
RSW-25 / RSW-30 / RSW-40 / RSW-60 /RSW-80 / RSW-135
12212916_00
INTRODUCTION
Dear customer,
Thank you for the confidence you have placed in our product. We hope it meets your needs.
The guarantee does not cover damage to glass components, or consumables (seals, bulbs, etc.) nor damage to
insulation material or damage due to the incorrect installation of the appliance, or to inappropriate use,
inadequate maintenance or poor repair processes.
This appliance is subject to changes and modifications for its technical progress.
INTRODUCCIÓN
Estimado cliente:
Gracias por haber depositado su confianza en nuestro producto. Deseamos que responda a sus necesidades.
Las condiciones de garantía no cubren daños de componentes de cristal, ni repuestos consumibles (juntas,
bombillas, etc.) como tampoco el deterioro del material aislante o daños imputables a una instalación incorrecta
del aparato, a su utilización en una aplicación indebida, a un mantenimiento inadecuado o a procesos de
reparación deficientes.
Este aparato está sujeto a cambios y modificaciones que apoyen su progreso técnico.
INTRODUCTION
Cher client,
Merci d'avoir fait confiance à notre produit. Nous espérons qu’il répondra à vos besoins.
Les conditions de garantie ne couvrent pas les dégâts de composants en verre, ni le remplacement de
consommables (joints, ampoules, etc.), de même que les détériorations sur le matériau isolant ou les dégâts
imputables à une installation incorrecte de l’appareil, à son utilisation incorrecte, à un entretien inadapté ou à
des réparations erronées.
Cet appareil est soumis à des modifications visant son amélioration technique.
EINLEITUNG
Sehr geehrter Kunde,
vielen Dank für das in unser Produkt gesetzte Vertrauen. Wir hoffen, dass dieses Ihren Vorstellungen voll und
ganz gerecht wird.
Die Garantiebestimmungen decken keine Schäden an Bauteilen aus Glas oder an Verschleißteilen
(Dichtungen, Glühbirnen, usw.) oder Beschädigungen des Isoliermaterials, sowie auf eine nicht
ordnungsgemäße Installation des Gerätes, unsachgemäßen Gebrauch oder mangelhafte Reparaturen
zurückzuführende Schäden.
Das Gerät unterliegt Änderungen und Modifizierungen im Sinne des technischen Fortschritts.
INTRODUZIONE
Gentile Cliente,
La ringraziamo per aver scelto il nostro prodotto. Ci auguriamo che risponda alle sue esigenze.
Le condizioni di garanzia non coprono i danni ai componenti di vetro, i ricambi consumabili (guarnizioni,
lampadine, ecc.) così come l’usura del materiale isolante o i danni provocati da un montaggio scorretto
dell’apparecchio, dall’uso in un’applicazione erronea, dalla manutenzione inadeguata o da procedure di
riparazione insufficienti.
Il presente apparecchio, è soggetto a cambi e modifiche che permettono il progresso tecnico.
INTRODUÇÃO
Caro cliente:
Obrigado por ter depositado a sua confiança no nosso produto. Desejamos que corresponda às suas
necessidades.
As condições de garantia não cobrem danos de componentes de vidro, nem consumíveis (juntas, bombas,
etc.), tal como não cobrem o desgaste do material isolante nem os danos devidos a uma instalação incorrecta
do aparelho, à sua utilização numa aplicação indevida, a uma manutenção inadequada ou a processos de
reparação deficientes.
Este aparelho está sujeito a alterações e modificações que suportem o seu progresso técnico.
Введение
Уважаемый Клиент:
Благодарим вас за оказанное доверие нашему оборудованию. Надеемся, что оно удовлетворит все
ваши требования.
Условия гарантии не распространяются на стеклянные элементы и расходные запасные части, а также
на изолирующие компоненты и на повреждения, вызванные неправильной установкой, обслуживанием
или использованием.
Данный аппарат будет подвергаться дальнейшим изменениям и улучшениям для развития модельного
ряда.
SAFETY INSTRUCTIONS
2
1 USE
5
1.1
Recommendations for use
5
1.2
Using the dispenser
5
1.3
Machine features
5
2 INTERFACE
6
2.1
Screen OFF OPL
6
2.2
Main Screen OPL
6
2.3
Run screen OPL
7
3 PROGRAMMES
10
3.1
Cycle parameters
10
3.1.1
Parameters for soak, prewash, wash or rinse cycles:
10
3.1.2
Parameters for spin cycles:
12
3.2
Cycle library
13
3.3
Programme library
15
4 CONFIGURATION
16
4.1
Programme management
17
4.1.1
My programmes (favourites)
17
4.1.2
Programme library
18
4.1.3
Cycle library
21
4.2
Configure System
22
4.2.1
HUD configuration
26
5 MAINTENANCE
30
5.1
Electrical and mechanical irregularities
30
5.2
Warnings
30
1
SAFETY INSTRUCTIONS
In order to reduce the risk of electrical shocks or injury when using the appliance, the basic precautions should be
observed, including the following:
• READ all the instructions prior to using the appliance
and KEEP THEM in an easily accessible place for
reference in the event of doubt.
• Do NOT wash clothes which have been previously
treated, washed, soaked or stained with petrol, dry
cleaning solvents, or other inflammable or explosive
substances, as these give off vapours which may catch
fire or explode.
• Do NOT add petrol, dry cleaning solvents or other
inflammable substances to the washing water. These
substances give off vapours which could catch fire or
explode.
• In some conditions, hydrogen gas may be produced in
a hot water system which has not been used for more
than two weeks. Hydrogen gas is explosive. If the hot
water system has not been used for a while, before using
the washing machine turn on all the hot water taps and
let the water run for a few minutes. This will release any
accumulated hydrogen gas. As the gas is inflammable,
do not smoke or use naked flames during this operation.
• This appliance can be used by children aged 8 years
or over and persons with reduced physical, sensory or
mental capacities or lack of experience or knowledge,
provided they have received appropriate supervision or
training on the safe use of the appliance and they
understand the risks involved. Unsupervised children
should not perform the cleaning or maintenance tasks.
2
• Do NOT allow children to play in or on the appliance.
Children should be strictly supervised when in the vicinity
of a machine which is operating. Children under the age
of
3 years should be kept away from the appliance
unless under continuous supervision.
• Remove the door from the appliance before disposal
or before leaving it out of service.
• DO NOT TRY TO OPEN THE DOOR if the drum is
moving.
• Do NOT install or store the appliance in the open.
• Do NOT try to force the controls.
• The new hoses supplied with the appliance should be
used. Do not reuse old hoses.
• Do not repair or replace parts of the appliance or carry
out any servicing unless recommended to do so in the
User Instruction Manual. Make sure that you fully
understand the instructions and have the necessary skills
to carry out the operations described.
• Do NOT remove any safety device or modify any
components in the washing machine. DO NOT INSTALL
components not belonging to the machine in the
appliance.
• Failure to comply with any of the instructions given in
the Instruction Manual may result in personal injury to the
user. It is no possible to provide for all possible situations
and contingencies with warnings about risk and hazards.
Therefore, any person involved in the transportation,
installation, use or maintenance of the machine should
always employ common sense, caution and care.
3
• Do NOT use the machine unless all the covers and
guards are correctly fitted and secured.
• The distributor (vendor) MUST correctly instruct the
user during commissioning.
• Pour the correct doses of detergent, fabric softener
and lay into the dispenser drawer, as indicated by the
manufacturer. Heed tips concerning the treatment of
different materials given by the manufacturers.
• Daily remove any traces of detergent or liquids from
the dispenser drawer. Never use powdered or abrasive
detergents for cleaning; use only water and soap.
• Clean the water inlet filters and the external dispenser
conducts once a month.
• Never clean the exterior by water injection; functional
parts of the machine could damage.
• If the washing machine is to be idle for long periods,
apply a coat of Vaseline oil to all its stainless steel
surfaces.
• An annual general revision is recommended.
4
1 USE
1.1 Recommendations for use
This machine has been designed to wash or treat most materials. Its use for other purposes than those given is
considered as undue and dangerous.
The machine should be loaded with the nominal load, smaller or bigger loads should be avoided.
Clothes should not be washed in sacks or cloth bags. If this is absolutely necessary, make sure the machine is
loaded to the nominal load to avoid possible unbalanced loads.
Canvas, waterproof items, mops, carpets or rugs should not be spun.
When a programme ends, before allowing the door to be opened, the clothes are untangled during 30 seconds.
An acoustic signal when the door can be opened after this process.
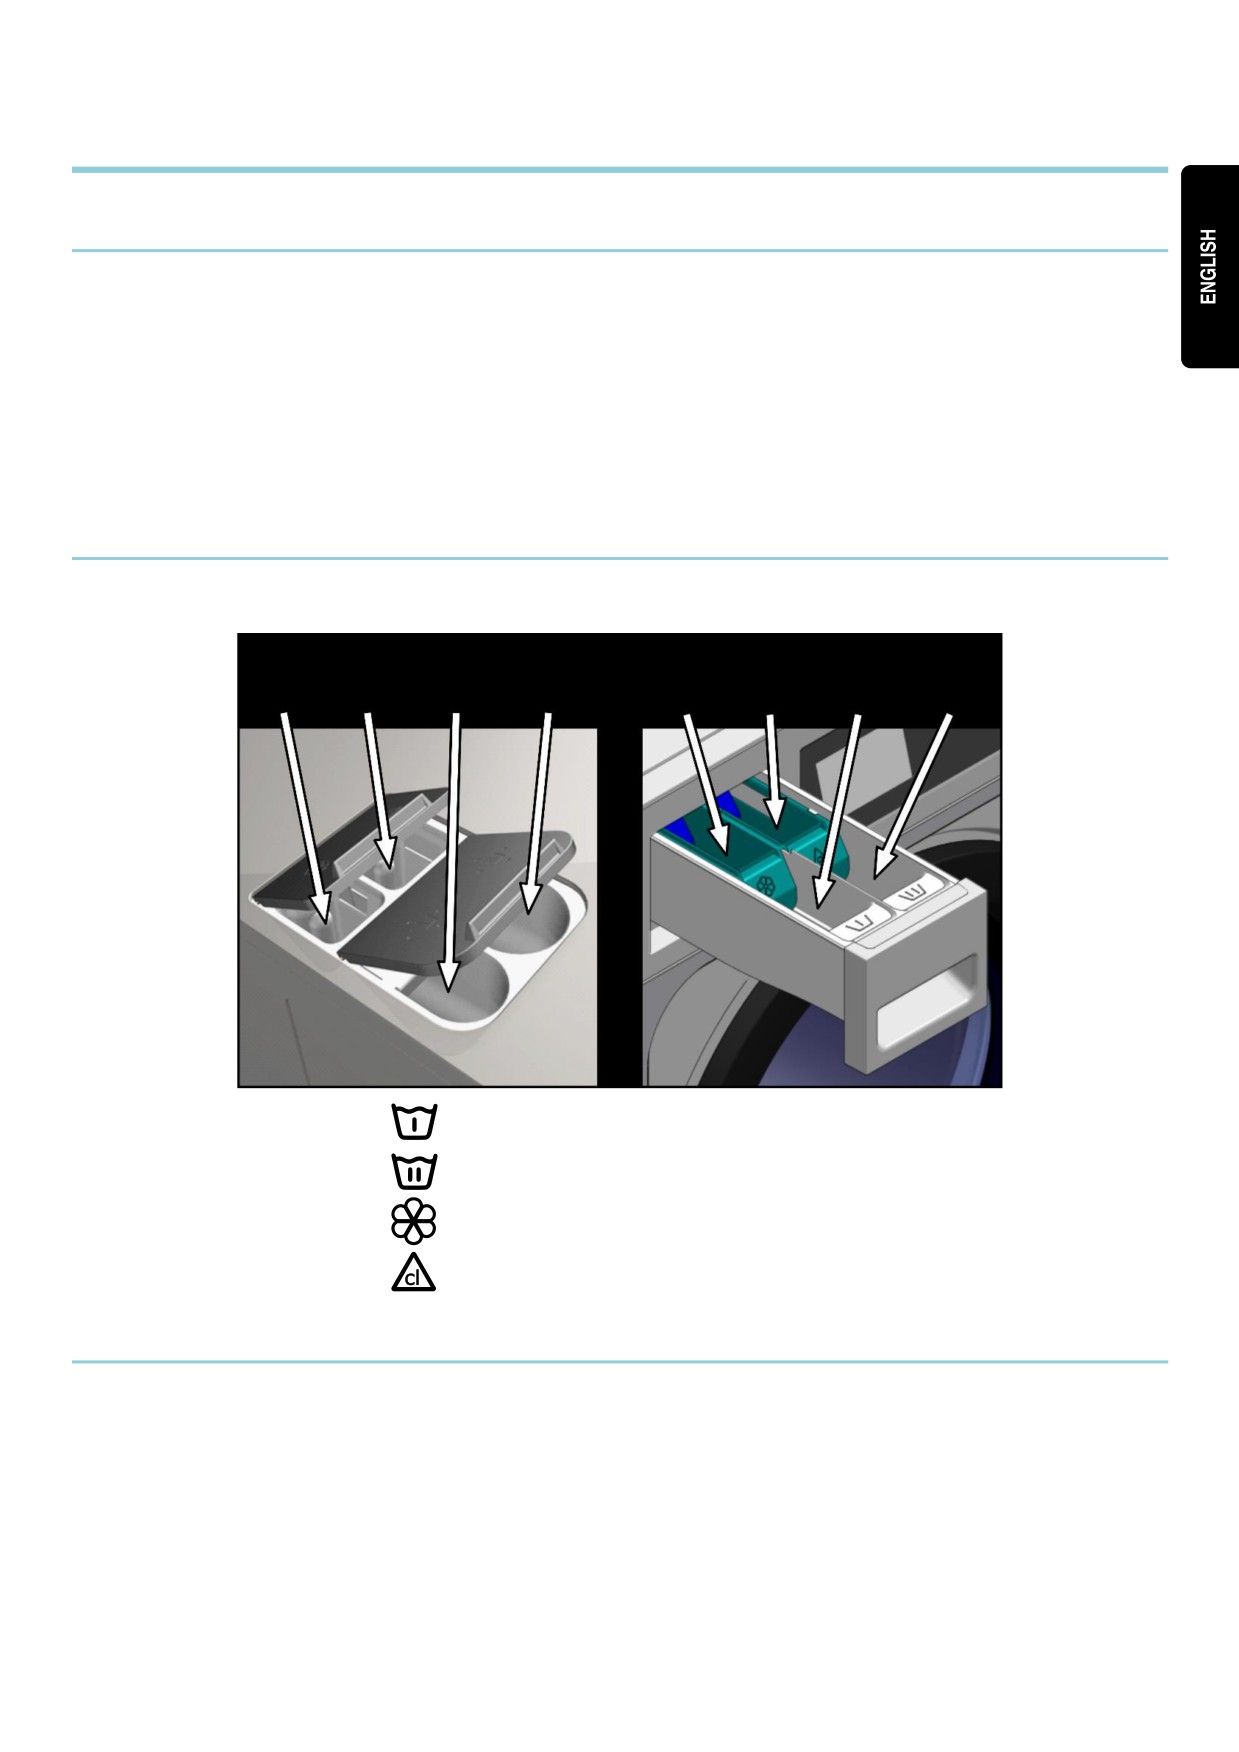
1.2 Using the dispenser
Add washing products to each compartment and close dispenser cover.
Powdered detergent for prewash
Powdered detergent for wash
Liquid softener
Liquid whitener (bleach)
1.3 Machine features
The machine is controlled using a microprocessor able to adapt to the needs of each user.
The machine has an intelligent control to control the water temperature; if hot water is available, it should be
connected. The machine adjusts the different water inputs to maintain the programmed temperature.
It has intelligent control for spin cycle management. The washing machine controls any unbalanced loads and
manages the spin to ensure a good spin, reducing noise and extending the useful life of wearable components,
thus significantly reducing fatigue in the mechanic components.
5
2 INTERFACE
All the washing machines have a touch screen displaying all the information and from where it is possible to
select all the controls shown on the screen.
When the machine is switched on, Screen Off is displayed. The ON/OFF button takes the user to the Main
screen, from where it is possible to run a programme or go to the main menu. Press START to go to the Run
screen, which displays all the relevant information about the screen.
Press ON/OFF to return to Screen Off from the current screen.
The information displayed on each of the screens can be omitted or enabled from the HUD menu (See section
4.2.1).
2.1 Screen OFF OPL
This screen is displayed when the washing machine is switched off, showing the parameters configured by the
user.
1.
Machine identifier: Label identifying the machine (if enabled).
2.
Laundrette message: Message configured by the user (if enabled).
3.
Logo: The logo is displayed (if enabled).
4.
Time: Time and minutes in the selected format.
5.
Date: Date in the selected format (if enabled in HUD).
If the option “energy saving” is active, 10 minutes after switching off the washing machine, the screen backlight
will go off. If any part of the screen is touched, the backlight will light up again.
2.2 Main Screen OPL
The Main screen of the washing machine is as follows, and displays each of the available options. Some of the
options may be omitted from the HUD menu.
6
1. Machine identifier: Label identifying the machine.
2. Time: Time and minutes in the selected format.
3. Weight of clothes: The weight of the clothes in the machine is displayed (if the weighing kit is active) or
the nominal load for the selected model (if the kit is not active), and the weight of the load entered can be
edited. Option to enable/omit in HUD. Once the programme has ended or been aborted, the nominal load
of the machine is selected again.
4.
Main menu: Access to washing machine main menu, where the different machine parameters can
be configured.
5. Programme name: Name configured for the selected programme.
6. Programme temperature: Maximum temperature of the different cycles of the programme.
7. Programme number and length: Position of the programme in the list of programmes (My Programmes),
and the estimated length in minutes for the programme selected.
8. Increase/decrease programme number: Permits user to scroll up or down the list of selected
programmes. As well as using the buttons, the programme can be increased/decreased by pressing
directly on the programme information (just above the button).
9. Start: Button to start running the selected programme from the cycle indicated.
10. Programme cycles: Press the selected programme icon to display the programme cycles and select the
cycle you wish to start with.
In addition, it is possible to configure a programme instantly, that is, change the parameters of a cycle
(time, temperature, level and dosage) for the current programme. These values are not saved for future
programme runs.
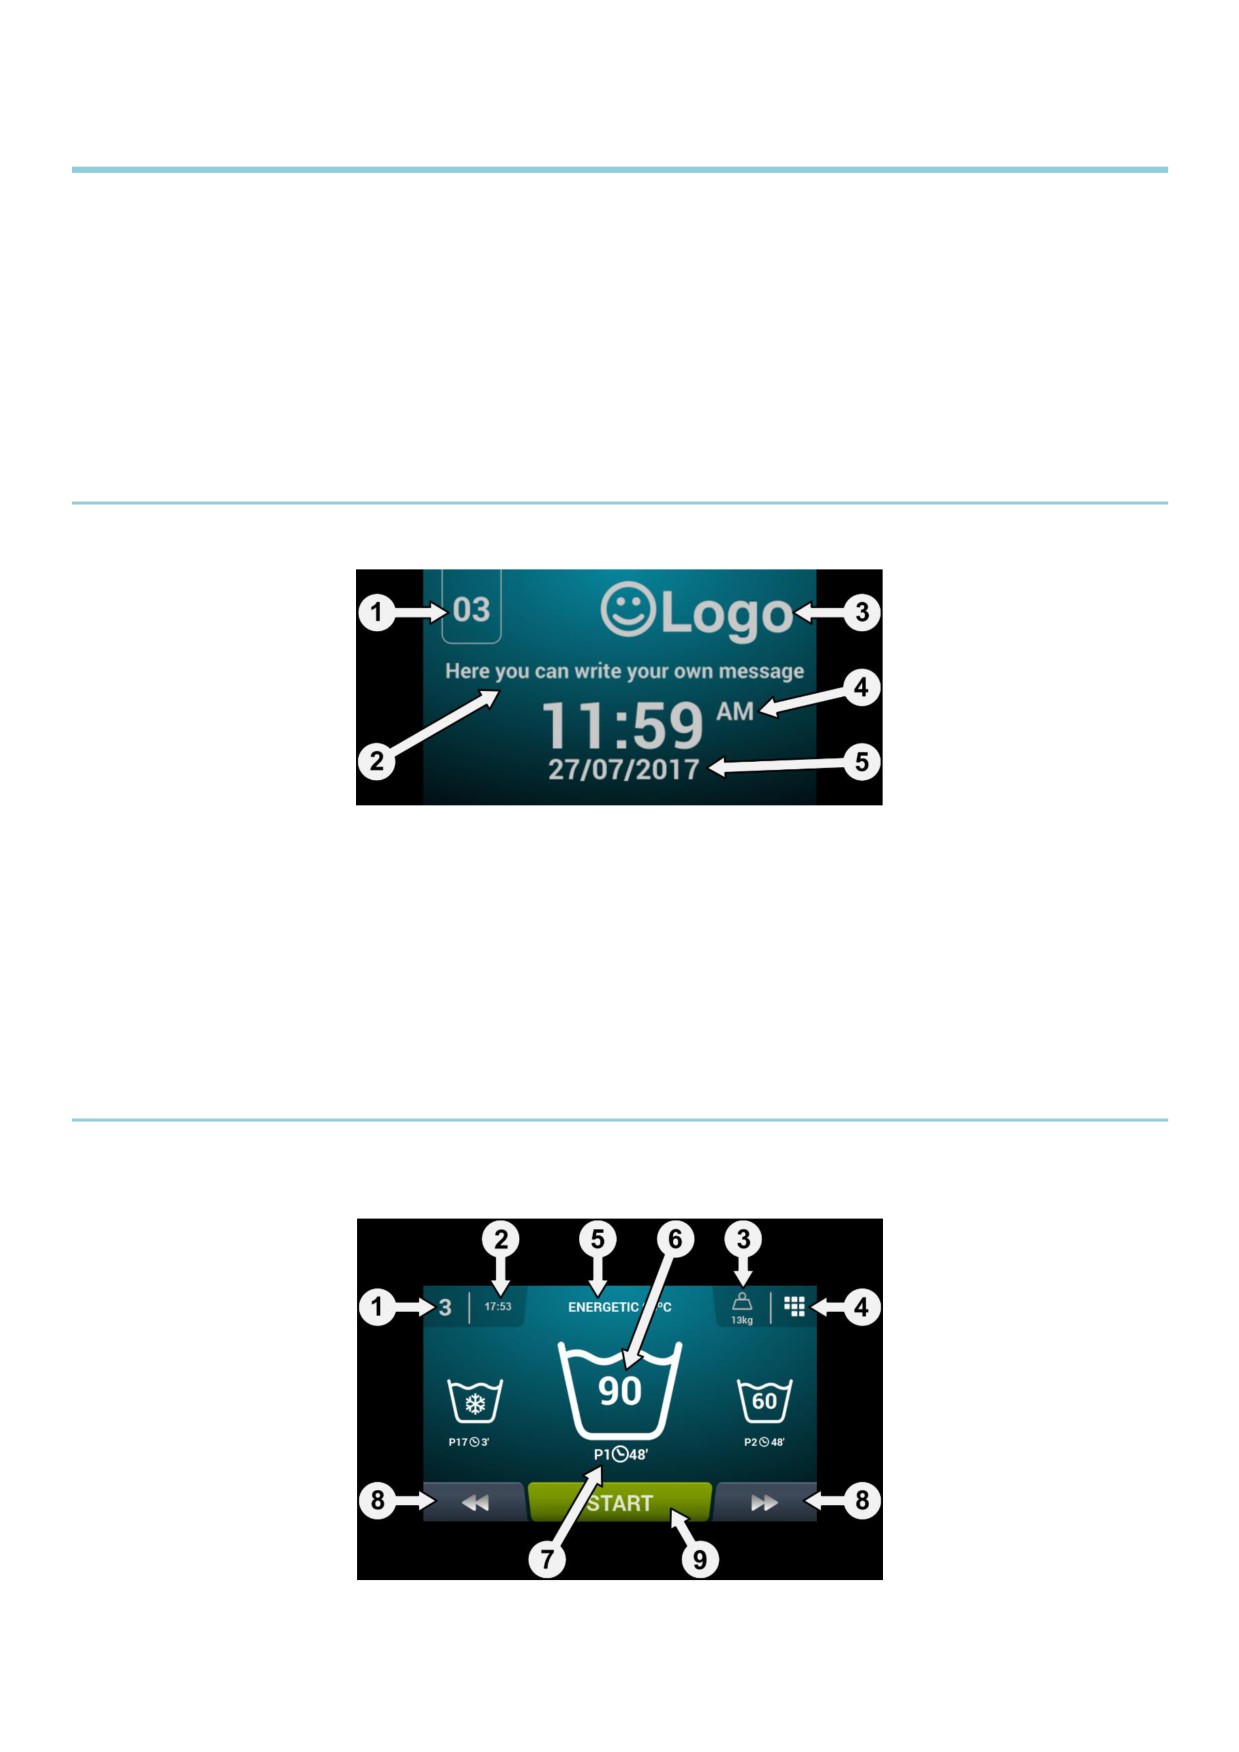
2.3 Run screen OPL
When START is pressed, the programme begins and all the relevant programme information is displayed on
this screen. Some of the options may be omitted from the HUD menu.
1.
Machine identifier: Label identifying the machine.
2.
Time: Time and minutes in the selected format.
3.
Programme running: Programme name, Programme number, Programme length.
7
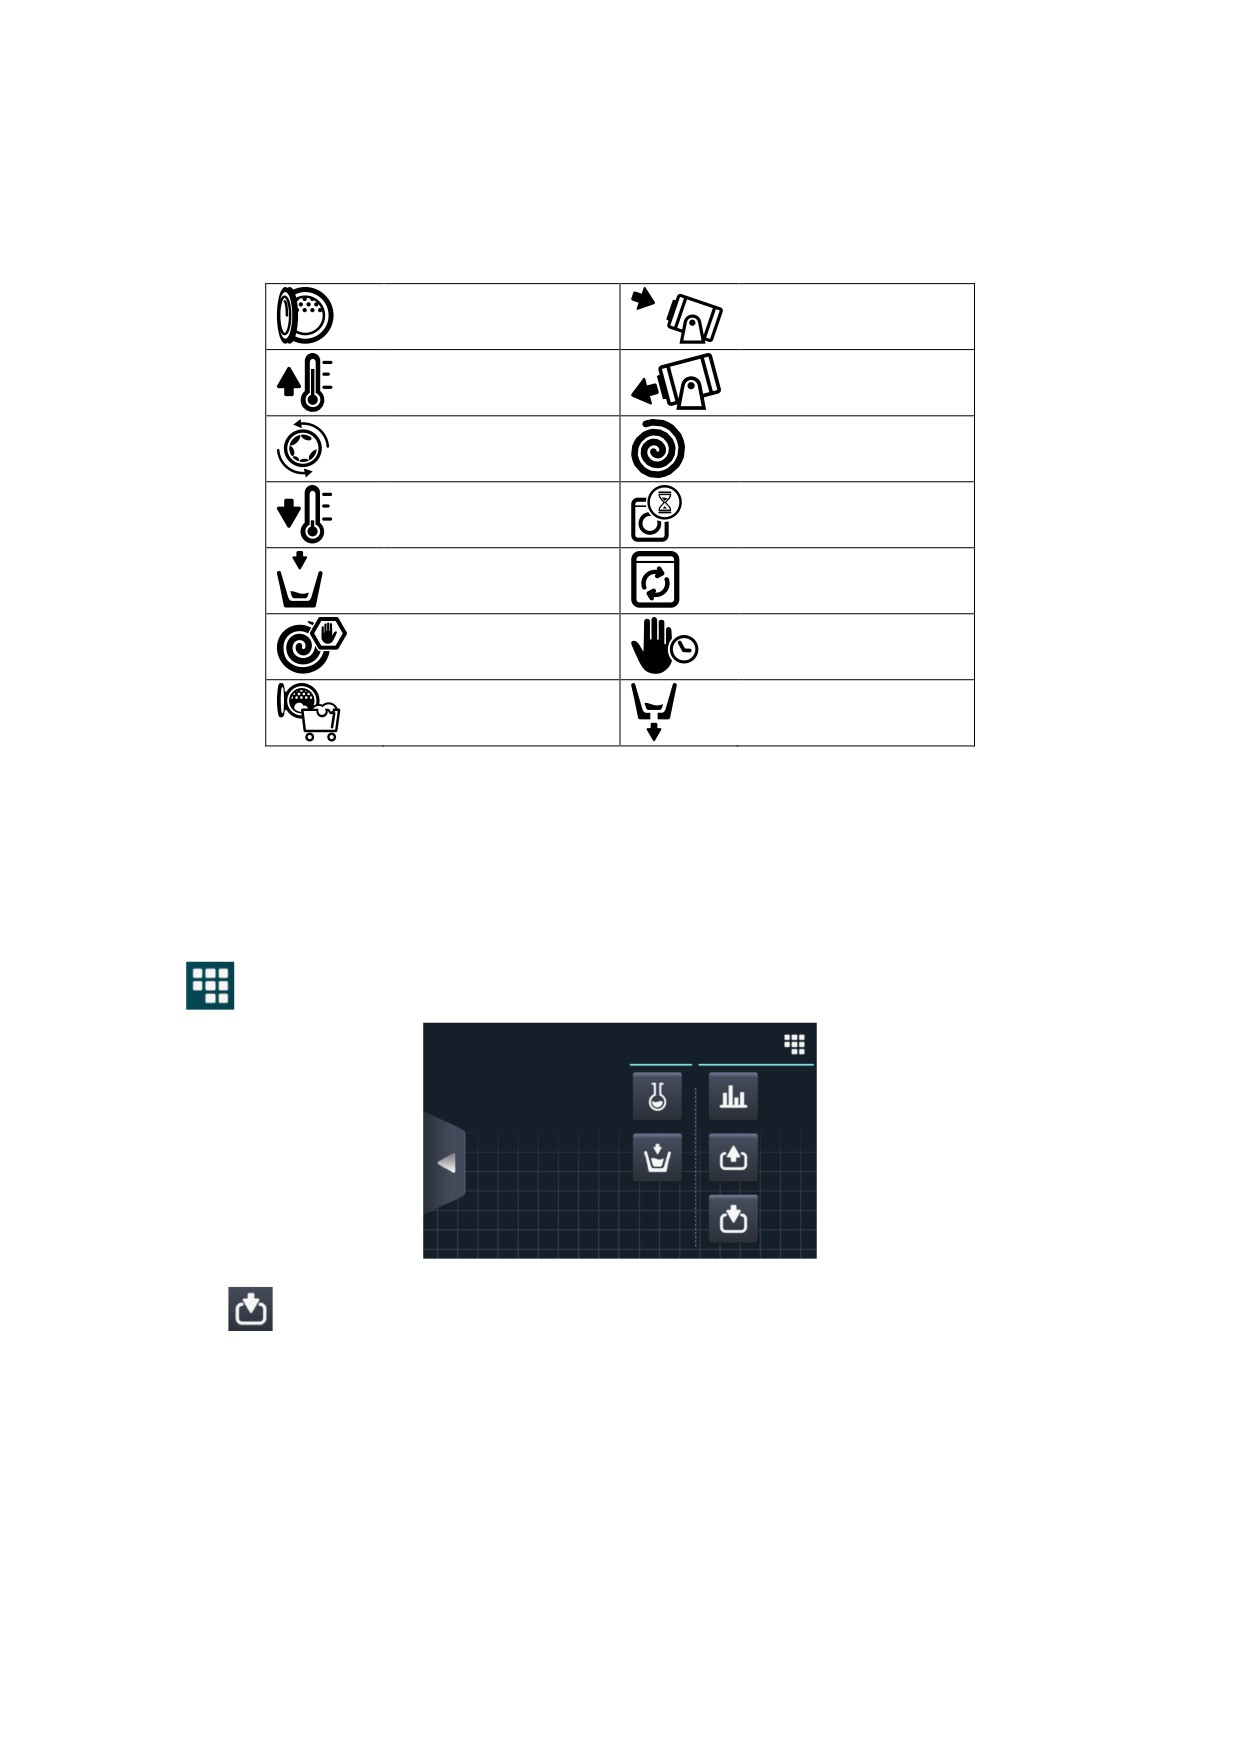
4.
Programme progress indicator: Status of programme progress, relation between total time and time
remaining for programme.
5.
Programme number and length: Position of the programme in the list of programmes (My Programmes),
and the estimated length in minutes for the programme selected.
6.
Status (drawing): Animated drawing showing the current cycle of the washing machine (filling, draining,
washing, rinsing, spinning or untangling).
Opening door.
Forward tilting.
Heating
Backward tilting.
Untangling.
Spinning.
Cooling.
Finalising.
Filling.
Washing.
Stopping.
Programmed stop.
Drying clothes.
Draining.
7.
Currently running cycle: Identifier and name of currently running cycle.
8.
Next cycle: Identifier, name and drawing of next cycle (if the current cycle is the last cycle, nothing is
displayed).
9.
Advance cycle: Button to go to next cycle (if the current cycle is the last cycle, nothing is displayed). As
well as using the button, the cycle can be advanced by pressing directly on the information for the next
cycle (just above the button).
10.
Pause: Button to pause the current programme. If the programme is paused, the pause icon will change
to the play icon. The programme can be restarted from where it was interrupted.
11.
Stop: Button to stop and cancel the programme. A confirmation message will be requested.
12.
Run menu: Access to the current parameters.
•
Inputs: The status of each of the inputs is displayed. The inputs which are available in all the
machines are always displayed. The inputs which are exclusive to a particular feature (for example,
Self-service, Sanitary, Extra dispensers, Tanks (T1, T2, T3), Tilting…) will only be available if this
feature is activated.
8
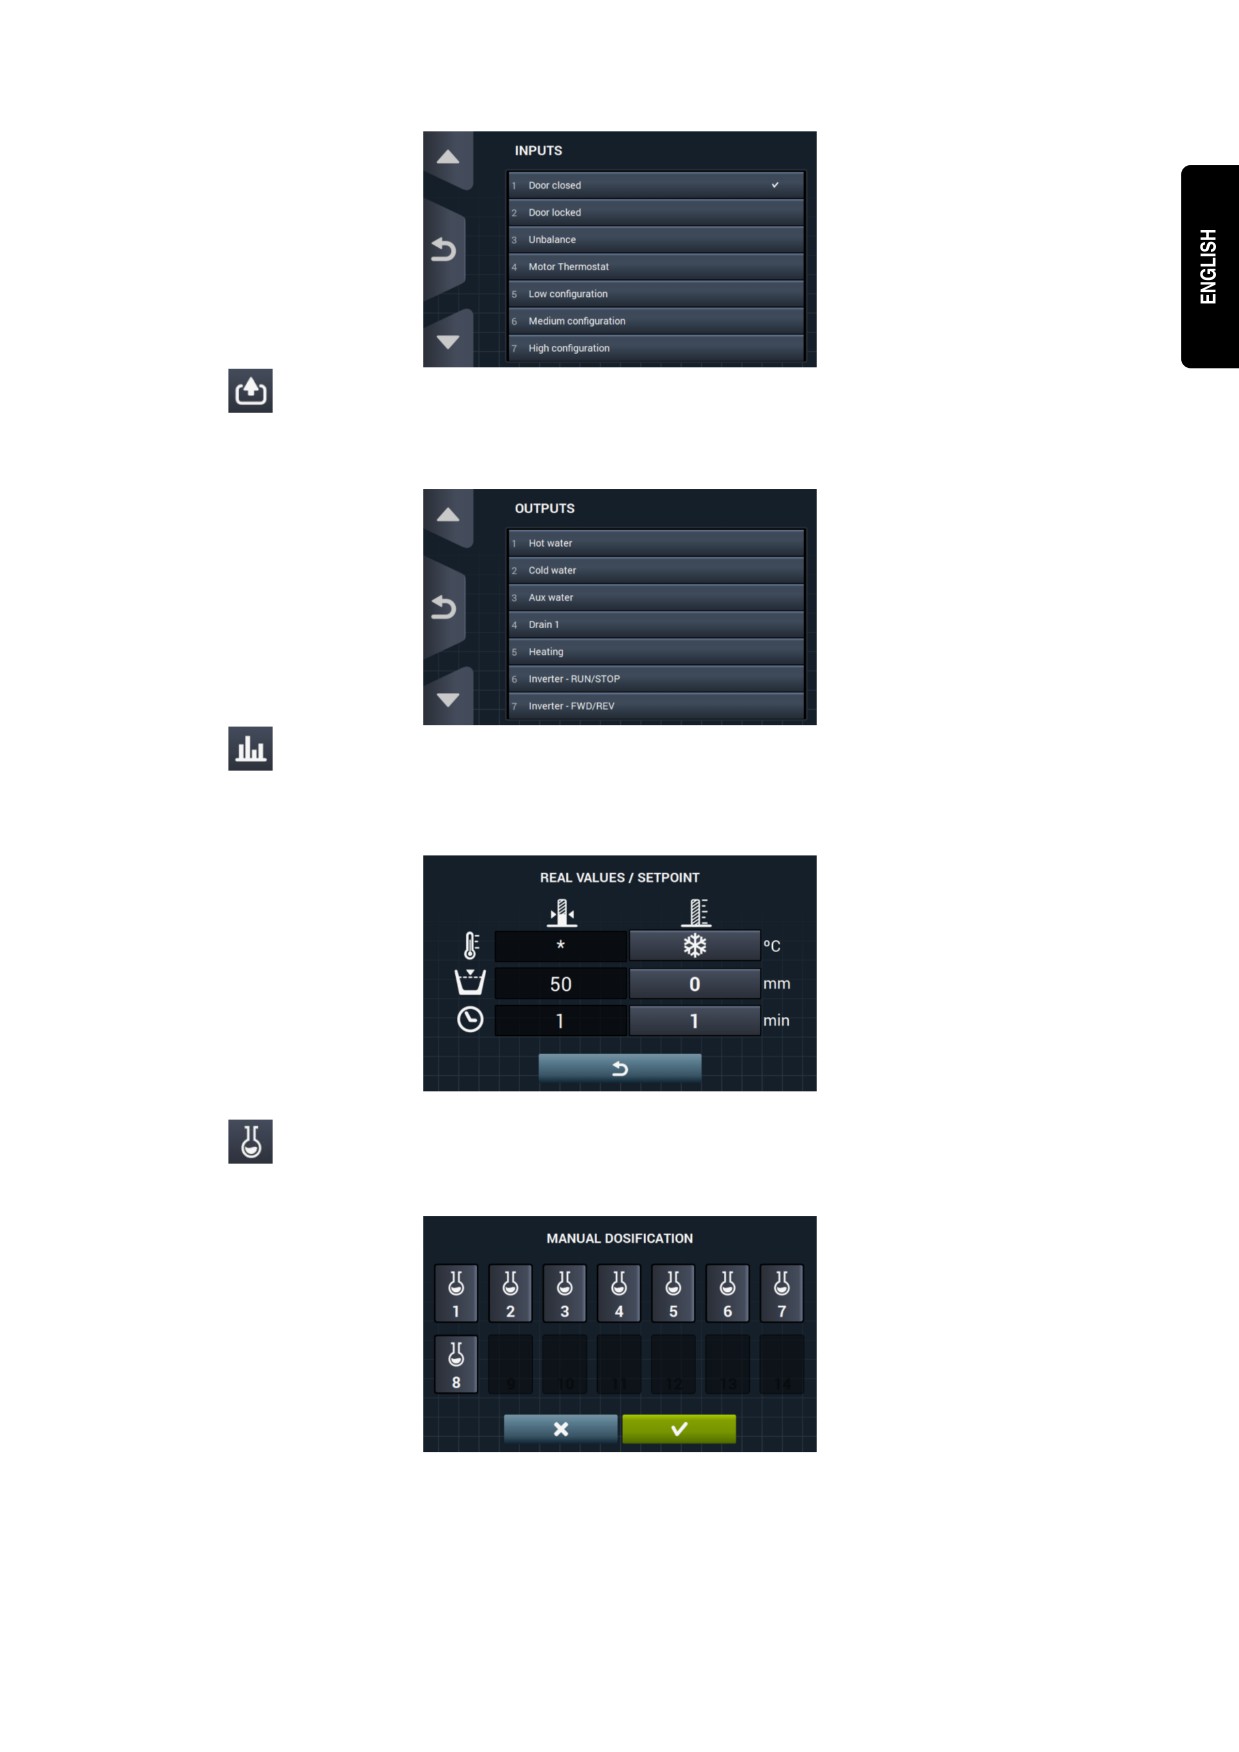
•
Outputs: The status of each of the outputs is displayed. The outputs which are available in all
the machines are always displayed. The outputs which are exclusive to a particular feature (for
example, Self-service, Sanitary, Extra dispensers, Tanks (T1, T2, T3), Tilting…) will only be available
if this feature is activated.
•
Settings/values: Display of settings and true values for the current cycle (Temperature, Level,
Time remaining).
Press the buttons on the right column to edit the settings. The changes will only affect the current
wash.
•
Manual dosing: This section can be accessed, the state of each dispenser (ON /OFF) is
displayed, and the required dose can be activated/deactivated. The available options will be based on
the configuration of existing kits. On exiting the dosing window, all the dispensers are deactivated.
9
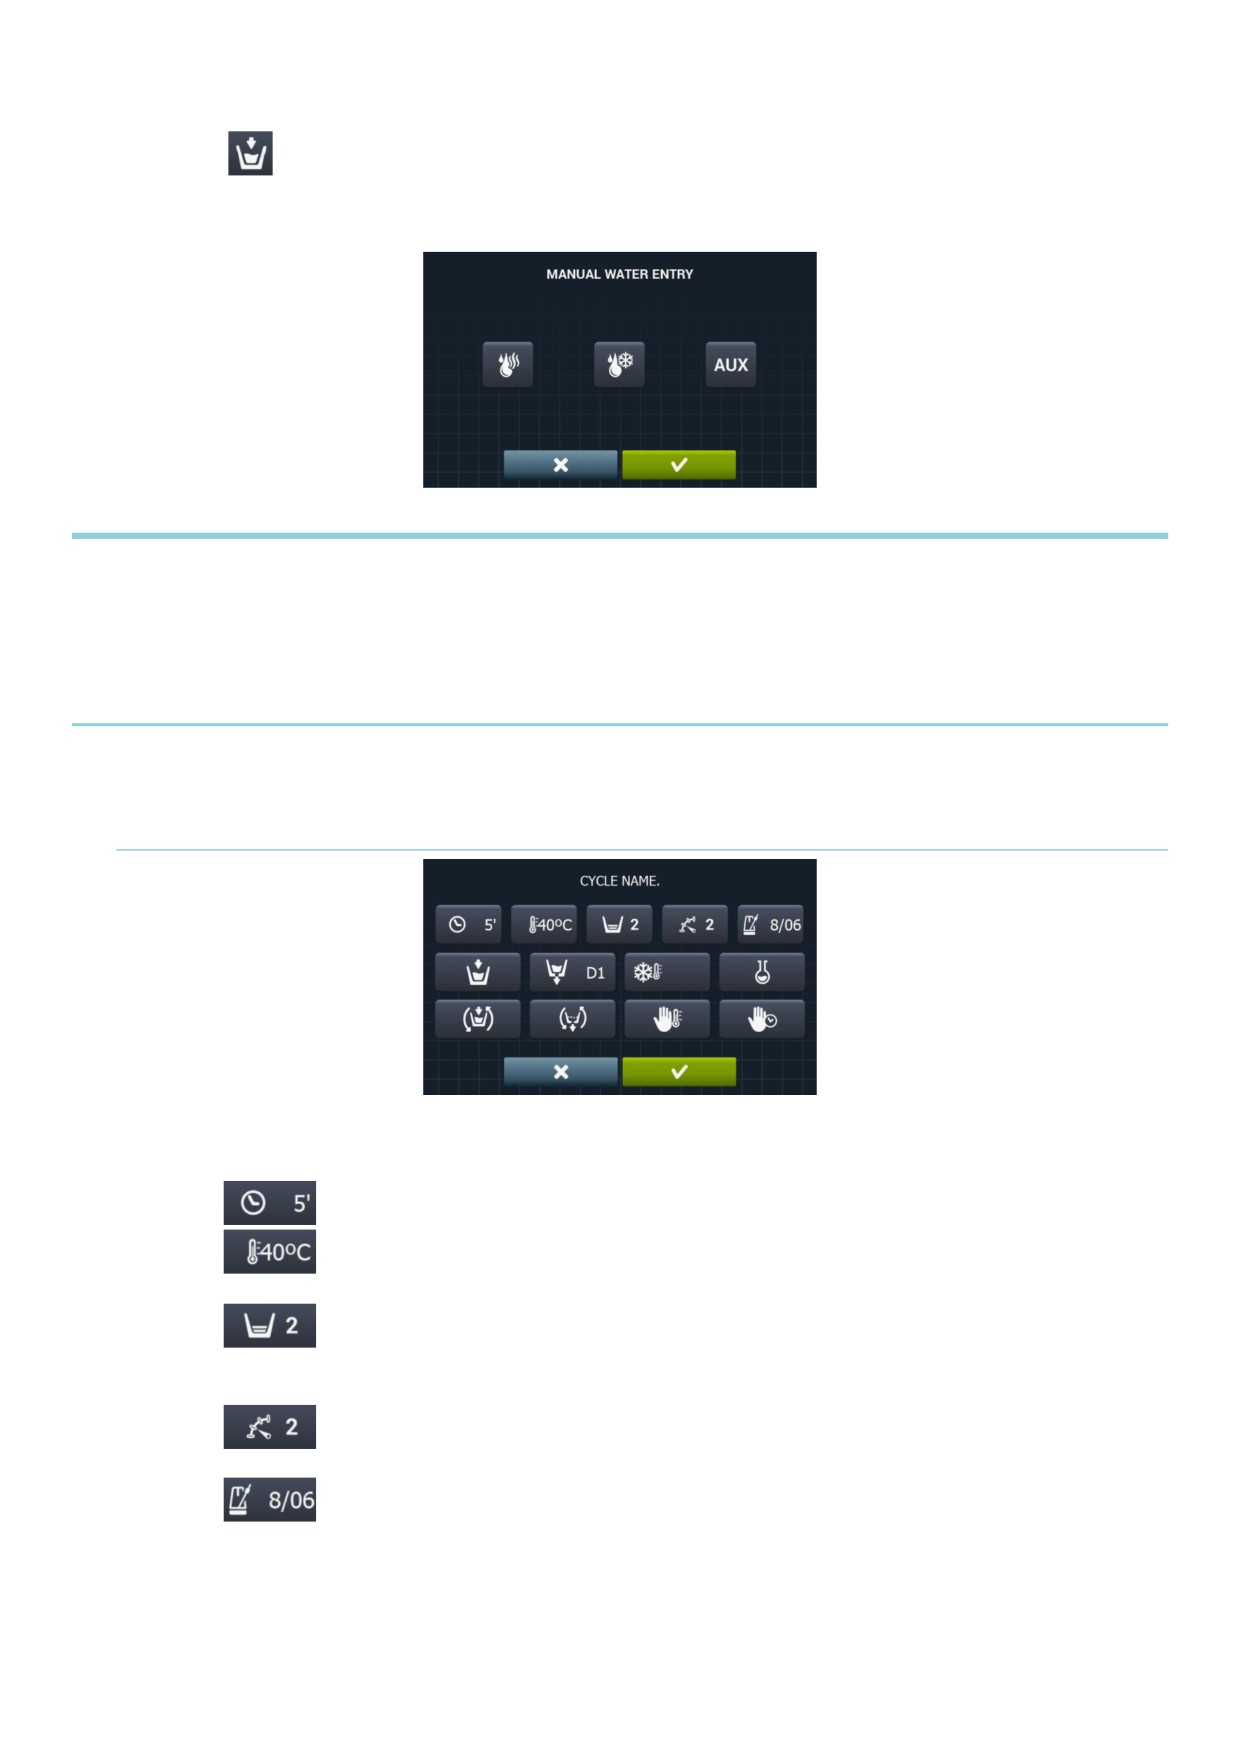
•
Manual water inlet: This section can be accessed, the state of each water inlet (ON /OFF) is
displayed, and the required inlet can be activated/deactivated. The water inlet that has been activated
by the fill logarithm cannot be deactivated. On exiting the water inlet window, all the manually
activated water inlets will be deactivated.
3 PROGRAMMES
There is a programme library consisting of all the programmes installed by default, together with the programmes
created by the user.
Before explaining the programme management (see section 4.1), details are given of their parameters and of the
standard programmes found in the library.
3.1 Cycle parameters
Each programme is made up of a series of cycles, consisting of a set of parameters which can be configured,
depending on the cycle type in question.
3.1.1 Parameters for soak, prewash, wash or rinse cycles:
• Cycle name: Name identifying the cycle. This is not the text displayed on the Run screen, but the text
which identifies a created cycle.
•
Time: Value, in minutes, of the cycle length. Range can be configured from 1 to 99.
•
Temperature: Temperature, ºC or ºF, of current cycle.
• Range can be configured from 20ºC (68ºF) to 90ºC (194ºF).
Level: Water level at which cycle should be run. Ranges which can be configured (see
section 4.2). There are 5 types of level: Minimum (1), Low (2), Medium (3), High (4), Maximum (5)
• Please refer to table of levels by model (see section 4.4.). Range can be configured.
•
Speed: Speed of current cycle Ranges which can be configured (see section 4.2). There
are 4 different speeds to select from: Minimum (1), Low (2), Normal (3), High (4).
•
Wash rate: Sequence of movement that washing machine must follow (run time (seconds)
/ stop time (seconds)). Range can be configured from 1 to 99.
The drum alternately turns to the left and to the right..
10
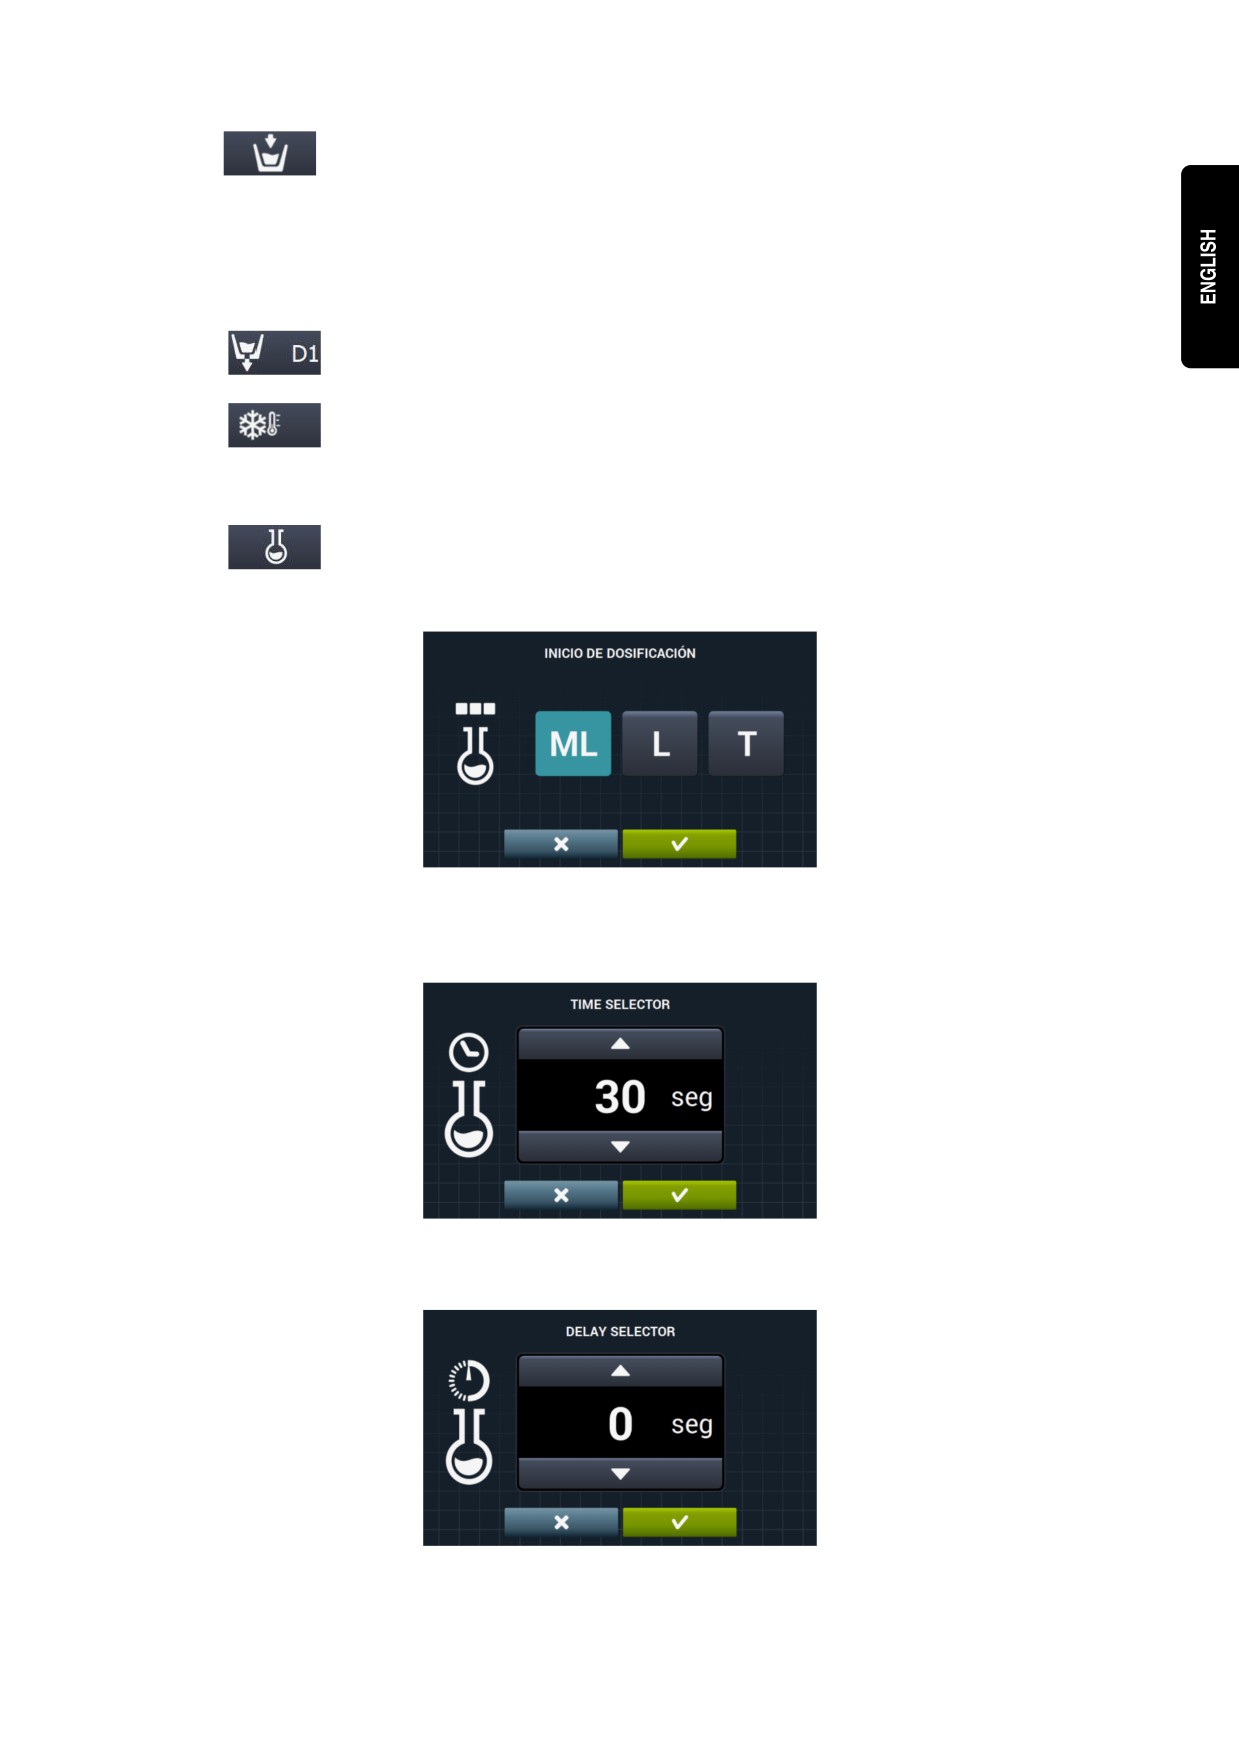
•
Water inlet: This indicates the selection of the required water inlet.
•
Hot water: Load water from the hot water inlet (Yes/No).
•
Cold water: Load water from the cold water inlet (Yes/No).
•
Auxiliary: Load water from the auxiliary water inlet (Yes/No).
•
Water adjustment: Load water from one or other inlet depending on the temperature
(Yes/No).
• T1, T2, T3: Load water from any of the tanks if recovery KIT is fitted.
•
Drainage: This displays whether the water should be drained at the end of the cycle,
indicating which outlet should be used if the recovery kit is active.
•
Cooling: Option that permits the temperature in a cycle to be lowered before drainage or
going to the next cycle. Configurable parameter only if the cycle temperature is equal to or higher
than 40ºC (104ºF). Range can be configured from 30ºC (86ºF) to cycle setting.
• In addition to selecting the cooling value, there is a button to enable or disable this option.
•
Dispenser 1.8: Each dispenser can be activated independently, and the following
parameters must be configured if it is activated:
• Start: If dispenser X is active, indicate when this dispenser should start dosing.
o Safety level (ML): Start dosing when the safety level is reached.
o Level (L): Start dosing when the defined level is reached.
o Temperature (T): Start dosing when the defined temperature is reached.
• Time: Time, in seconds, of dispenser X. Range can be configured from 0 to 99.
• Delay: Delay, in seconds, of dispenser X. From the moment the programme reaches the
start point indicated, the dosing will be delayed for the time indicated. Range can be
configured from 0 to (cycle time-dosing time).
11
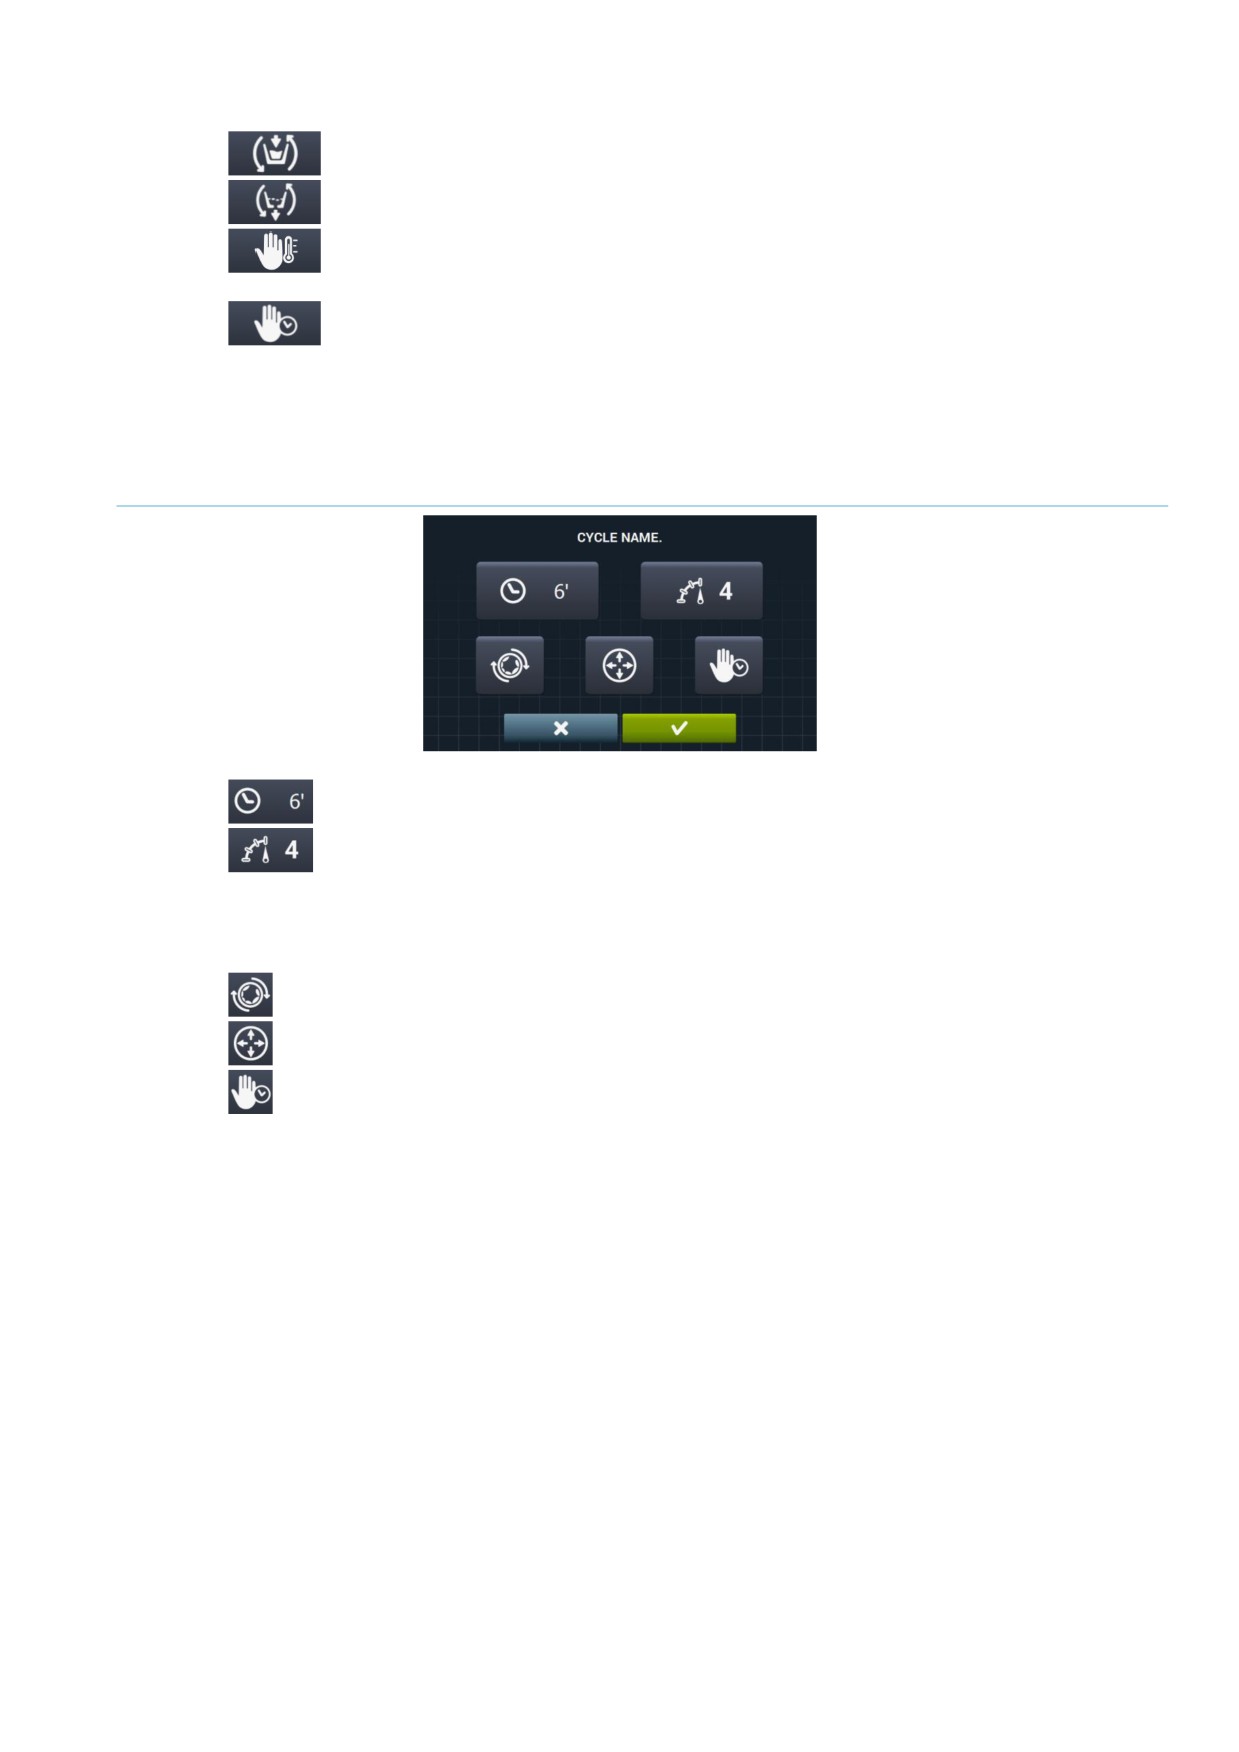
•
Move while filling: Rotate drum while machine is filling (Yes/No).
•
Movement while draining: Rotate drum while machine is draining (Yes/No).
•
Thermal stop: Indicate the moment from which the time stipulated for the cycle is counted
(Yes/No).
•
Pause programme: This allows you to pause the programme before the cycle in question
starts running. The pause will be indicated on the screen and an acoustic signal is emitted (Yes/No).
• If this parameter is active, before starting the cycle, the machine will go to pause status, and the
message “Pause programmed” is displayed on the screen. To continue running the programme,
press the PLAY button.
3.1.2 Parameters for spin cycles:
•
Time: Value, in minutes, of the spin length. Range can be configured from 1 to 99.
•
Speed: Spin speed. There are 4 different speeds to select from: Minimum (1), Normal (2),
Medium (3), Maximum (4).
The Medium (3) and Maximum (4) values are only available in high- and medium-speed machines
respectively.
Range can be configured.
•
Untangling: Untangle at the end of the spin cycle (Yes/No).
•
Optimum distribution: If this option is active, the machine does not drain in the previous cycle.
•
Pause programme: This allows you to pause the programme before the cycle in question starts
running. The pause will be indicated on the screen and an acoustic signal is emitted. (Yes/No).
12
3.2
Cycle library
These are the cycles found by default in the cycle library. These cycles can be used to form new programmes.
•
Soak cycles
• F1: Soak
•
Prewash cycles
• F2: Normal Prewash Cold
• F3: Normal Prewash 40ºC (104ºF)
• F4: Delicate Prewash Cold
• F5: Delicate Prewash 40ºC (104ºF)
• F6: Very Delicate Prewash Cold
• F7: Very Delicate Prewash 40ºC (104ºF)
• F8: Wet Prewash
•
Wash cycles
• F9: Normal Wash Cold
• F10: Normal Wash 60ºC (140ºF)
• F11: Normal Wash 90ºC (194ºF)
• F12: Delicate Wash Cold
• F13: Delicate Wash 40ºC (104ºF)
• F14: Very Delicate Wash Cold
• F15: Very Delicate Wash 40ºC (104ºF)
• F16: Wet Wash Cold
• F17: Wet Wash 40ºC (104ºF)
•
Rinse cycles
• F18: Normal Rinse
• F19: Normal Final Rinse
• F20: Delicate Rinse
• F21: Delicate Final Rinse
• F22: Very Delicate Rinse
• F23: Very Delicate Final Rinse
• F24: Wet Rinse
• F25: Wet Final Rinse
•
Spin cycles
• F26: Short Spin
• F27: Long Spin
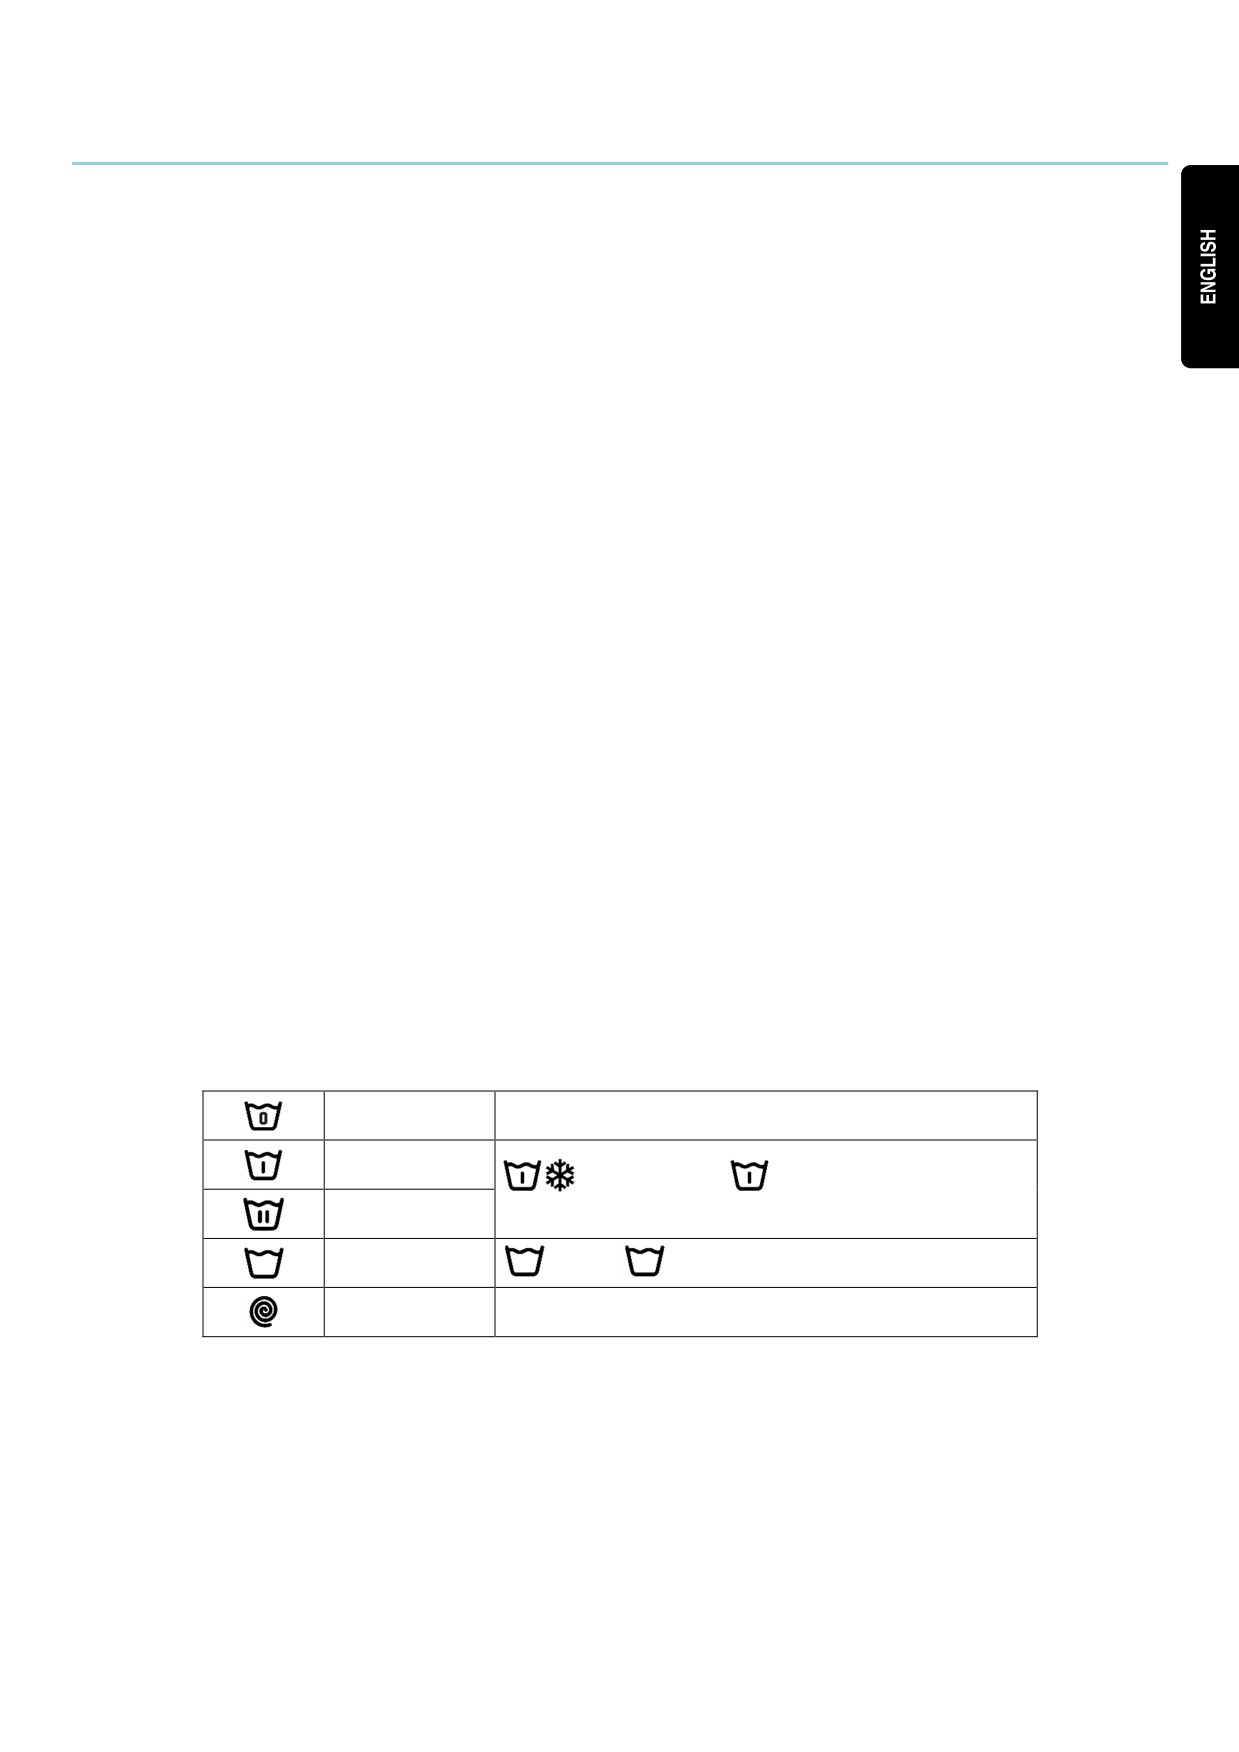
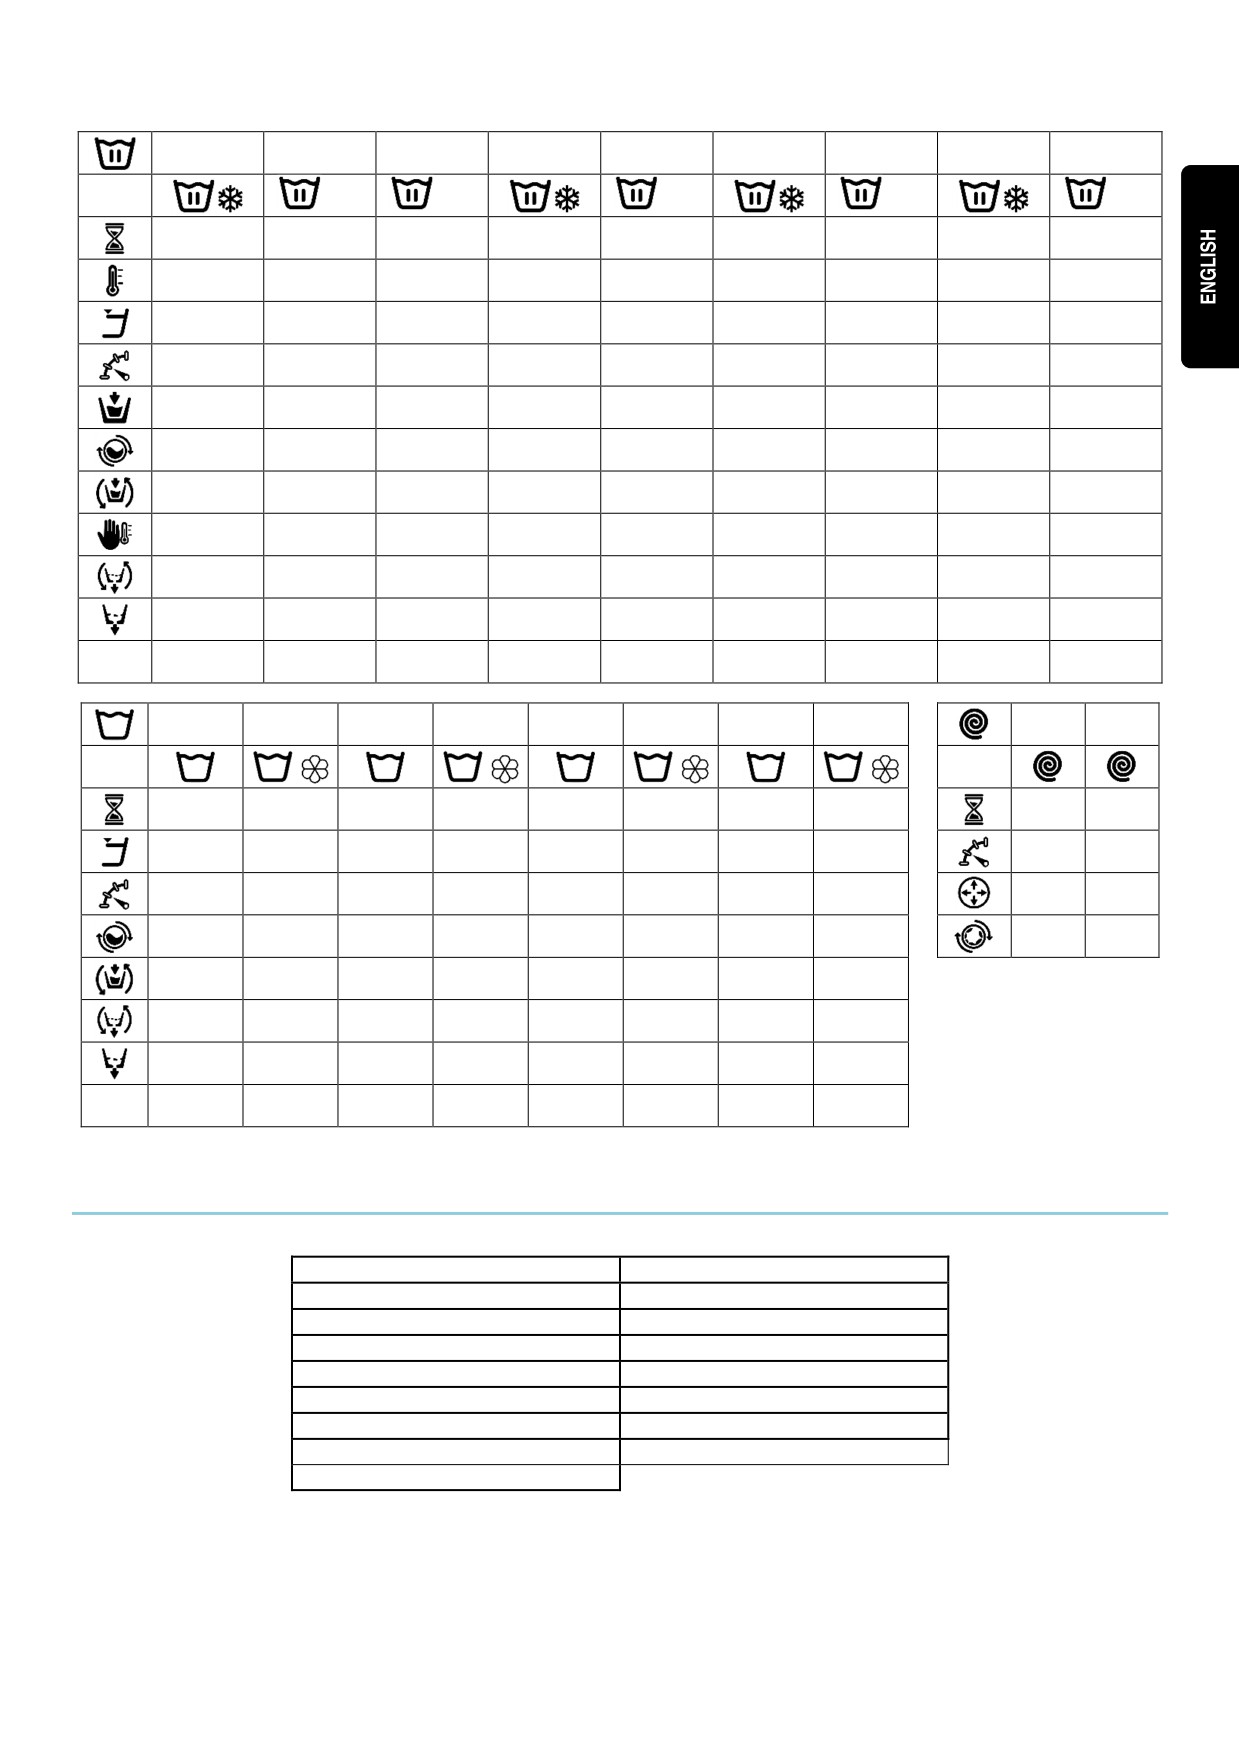
Cycle symbols:
Soak cycles
Prewash cycles
: Prewash cold,
40: Pre-wash 40 ºC (104ºF)
Wash cycles
Rinse cycles
: Rinse,
: Final rinse with softener
Spin cycles
13
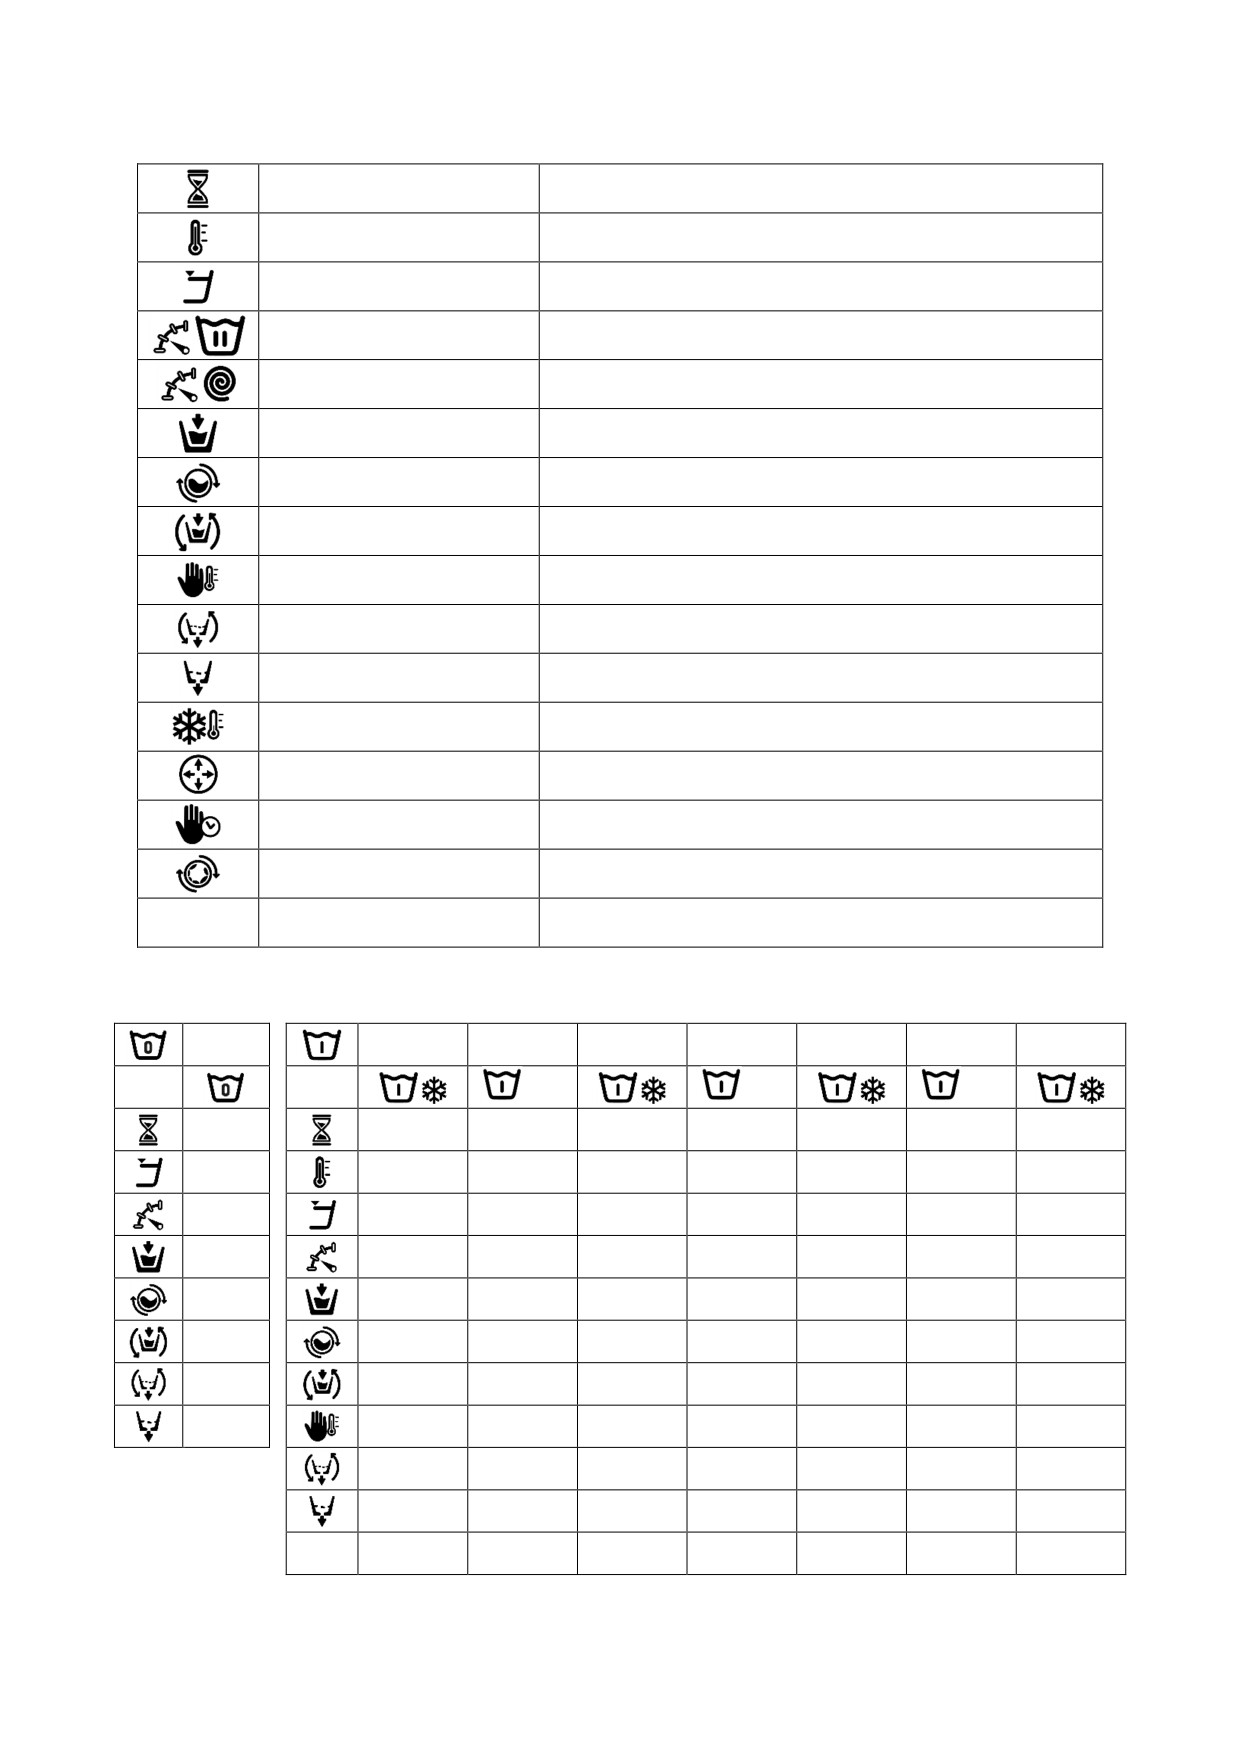
Symbols and values of the parameters:
Time
Value in minutes
Temperature
Value in ºC (ºF)
Level
1:Minimum, 2:Low, 3: Medium, 4:High, 5:Maximum
Wash speed
1:Minimum, 2:Low, 3:Normal, 4:High
Spin speed
2:Normal, 3:Rapid, 4:Maximum
Water inlet
0:Cold, 1:Cold/Hot according to adjustment
Wash rate
Run time (seconds) Stop time (seconds)
Move while filling
✓ : Yes
Thermal stop
✓ : Yes
Movement in drainage
✓ : Yes
Drainage
✓ : Yes
Cooling
✓ : Yes
Optimum distribution
✓ : Yes
Stop programme
✓ : Yes
Untangling
✓ : Yes
Input through which dose enters (D1:Dispenser 1, …)
D
Dispenser
with the START/TIME/DELAY programmed at ML/0/30
Tables of cycles with their parameters:
F1
F2
F3
F4
F5
F6
F7
F8
40
40
40
3
5
5
6
6
6
6
5
3
40
40
40
3
1
1
3
3
3
3
3
0
3
3
2
2
2
2
1
15;05
0
1
0
1
0
1
0
✓
15;05
15;05
10;08
08;06
5;15
5;15
02;02
✓
✓
✓
✓
✓
✓
✓
✓
✓
✓
✓
✓
✓
✓
✓
✓
✓
✓
D
D1
D1
D1
D1
D1
D1
D1
14
F9
F10
F11
F12
F13
F14
F15
F16
F17
60
90
40
40
40
10
10
10
12
12
12
12
10
10
60
90
40
40
40
1
1
1
1
1
1
1
2
2
3
3
3
2
2
2
2
1
1
0
1
1
0
1
0
1
0
1
15;05
15;05
15;05
10;08
10;08
05;15
05;15
02;02
02;02
✓
✓
✓
✓
✓
✓
✓
✓
✓
✓
✓
✓
✓
✓
✓
✓
✓
✓
✓
✓
✓
✓
✓
✓
D
D2, D3
D2, D3
D2, D3
D2
D2
D2
D2
D2
D2
F18
F19
F20
F21
F22
F23
F24
F25
F26
F27
2
2
3
3
3
3
2
2
2
6
4
4
4
4
4
4
4
4
2
4
3
3
2
2
2
2
1
1
✓
✓
15;05
15;05
10;08
10;08
05;15
05;15
02;02
02;02
✓
✓
✓
✓
✓
✓
✓
✓
✓
✓
✓
✓
✓
✓
✓
✓
✓
✓
D
D4
D4
D4
D4
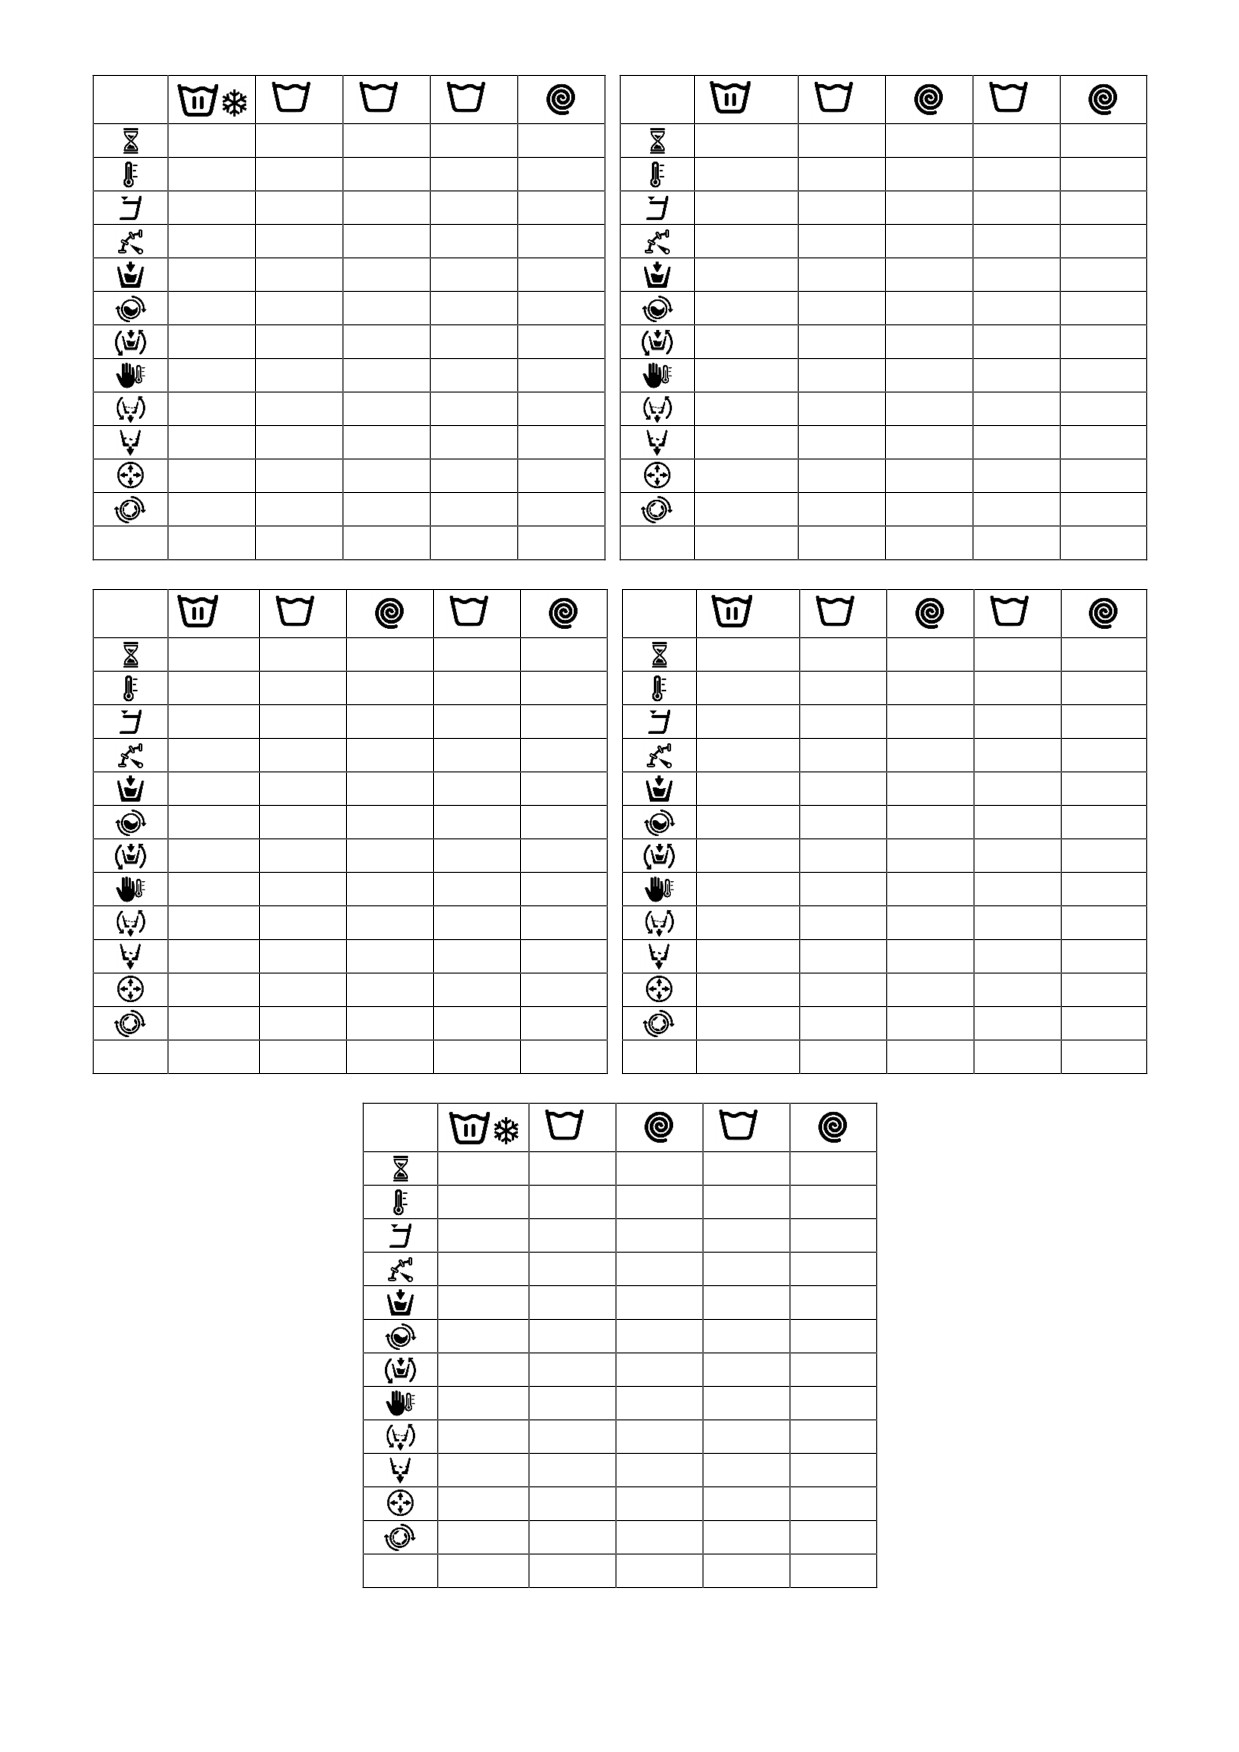
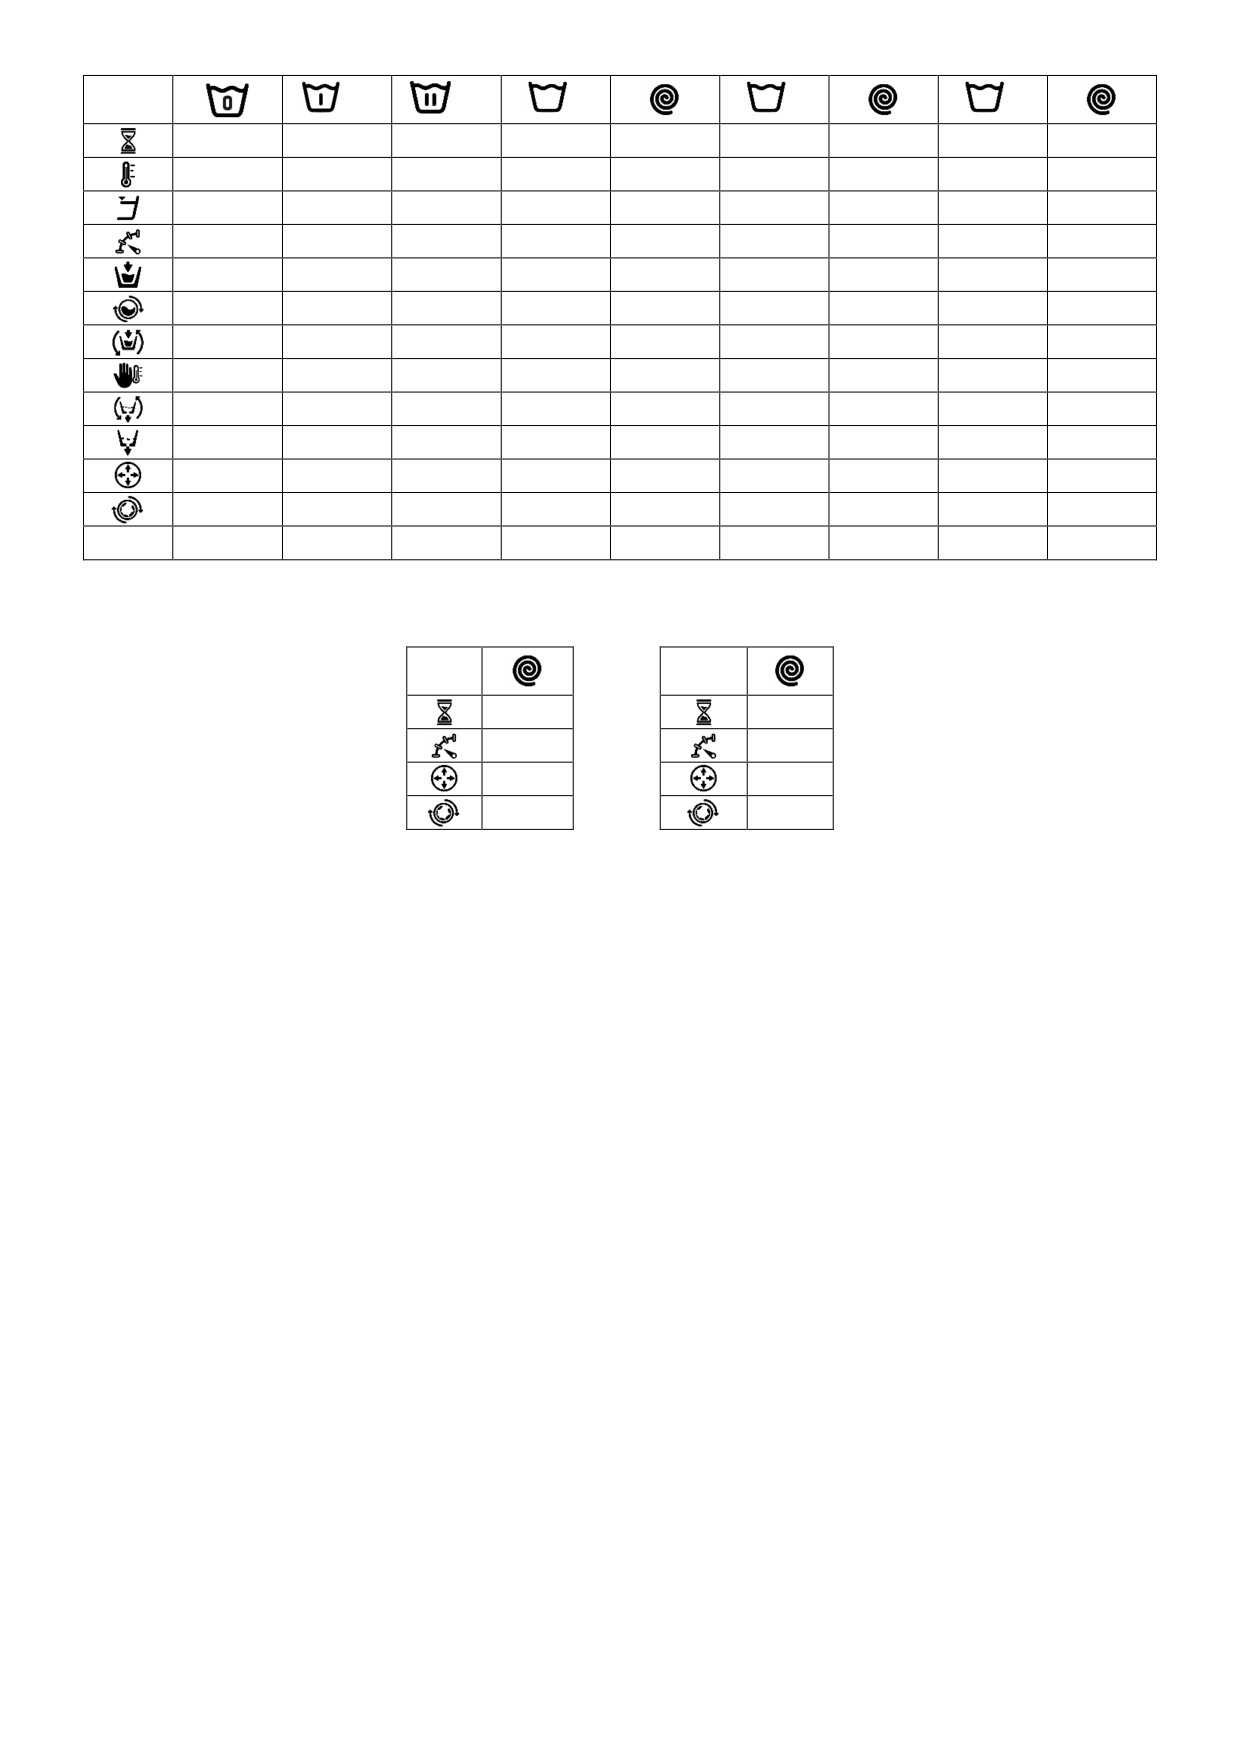
3.3 Programme library
These are the programmes that are found by default in the programme library:
P1: Energetic 90ºC (194ºF)
P10: Extra delicates Cold
P2: Energetic 60ºC (140ºF)
P11: Economy 90ºC (194ºF)
P3: Energetic 30ºC (86ºF)
P12: Economy 60ºC (140ºF)
P4: Energetic cold
P13: Economy 30ºC (86ºF)
P5: Normal 60ºC (140ºF)
P14: Economy cold
P6: Normal 30ºC (86ºF)
P15: Sluice
P7: Normal cold
P16: Long spin
P8: Delicates 40ºC (104ºF)
P17: Short spin
P9: Delicates cold
The table of all the programmes with their parameters can be found at the end of the manual.
15
4 CONFIGURATION
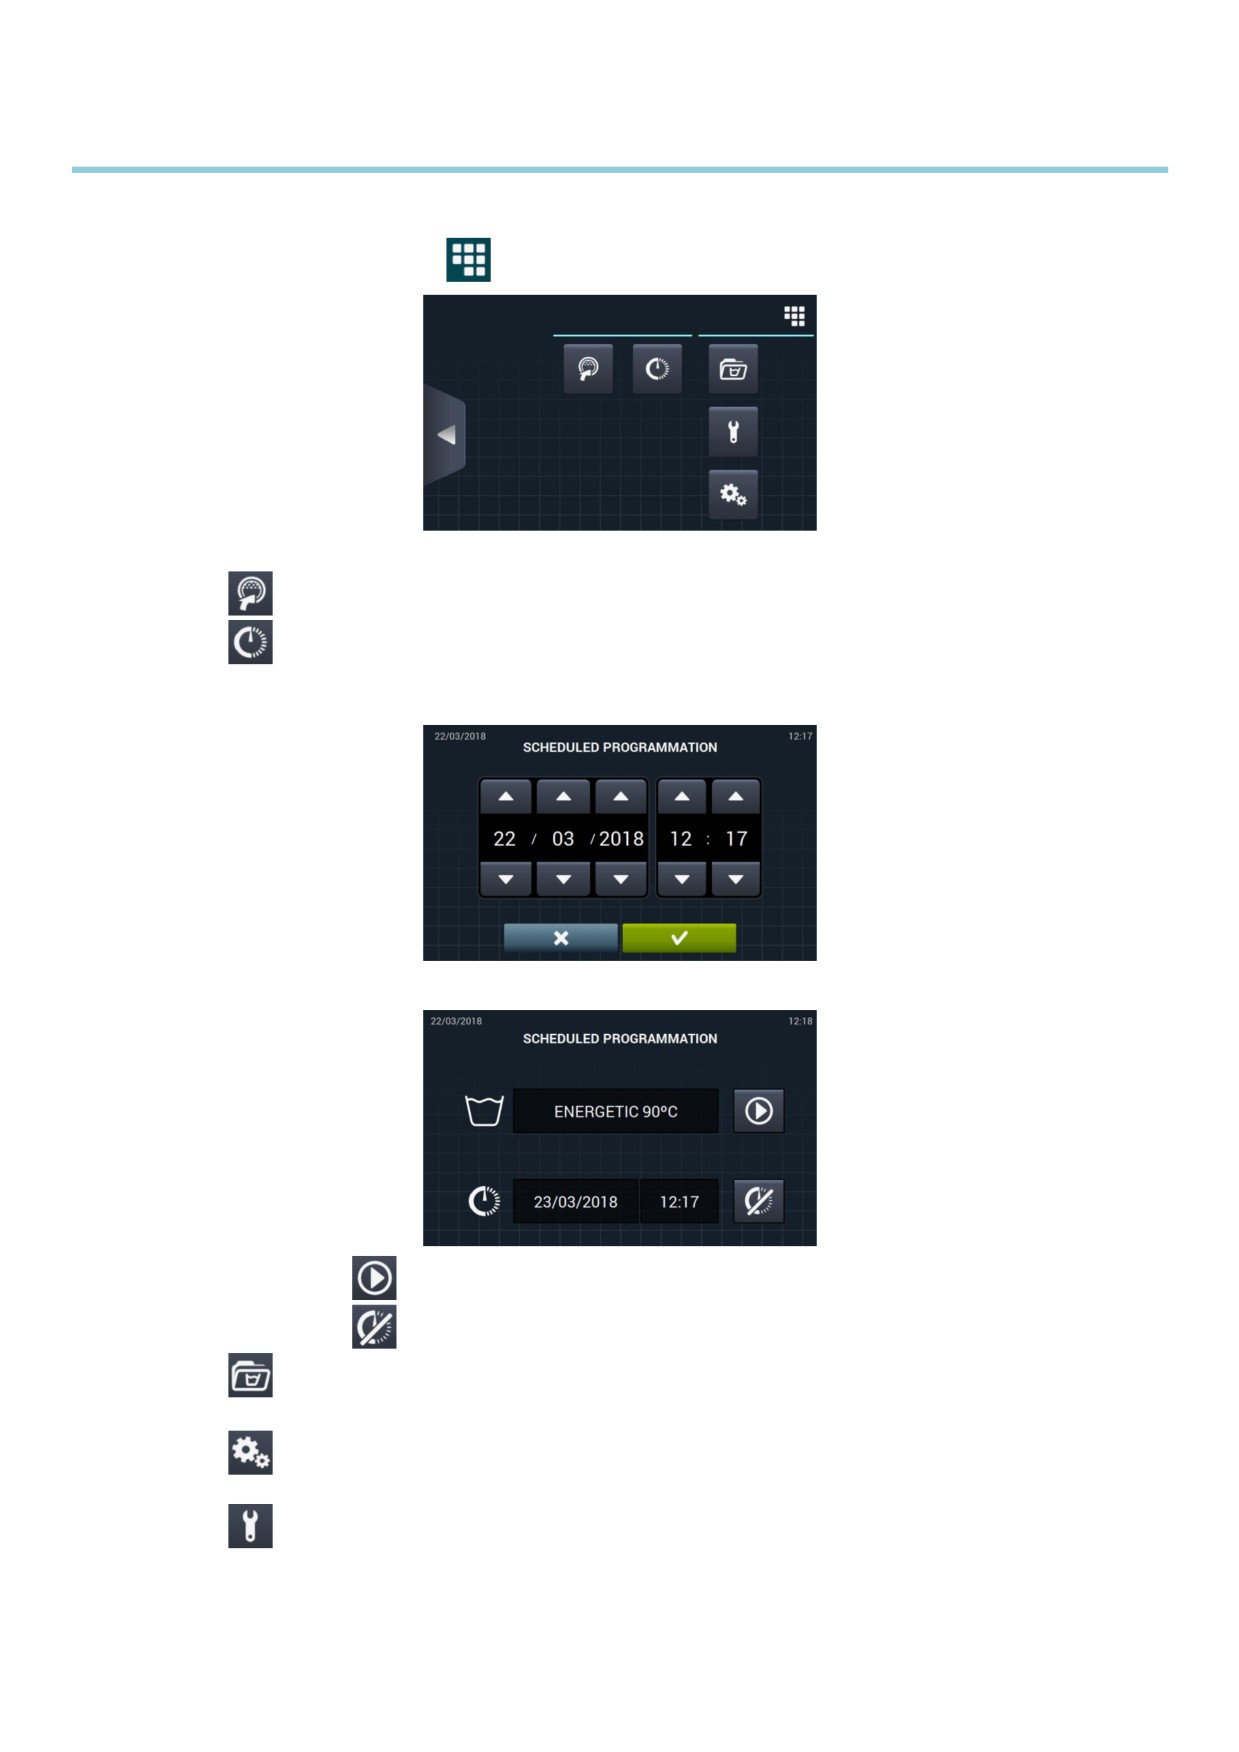
The main configuration menu of the washing machine is shown below. Here, it is possible to configure different
washing machine parameters, and display or download stored data.
This menu is entered from the icon
in the Main screen (see section 2.2)
•
Easy load: Option which helps load the laundry.
•
Delayed programming: This allows a wash to be delayed so that it runs on the date/at the time
required. After pressing the “delayed programming” button, you are asked to enter the required
date/time.
A screen is displayed which indicates the date/time of the programme, together with the programme
name and number.
•
Run the programme before the scheduled time.
•
Cancel the programming.
•
Programme management: Management of all the stored programmes, and all the currently
active programmes. (See section 4.1)
•
Configure system: Configuration of different sections of the washing machine. (See section
4.2)
•
Maintenance: Various password-protected options for the technician.
16
4.1 Programme management
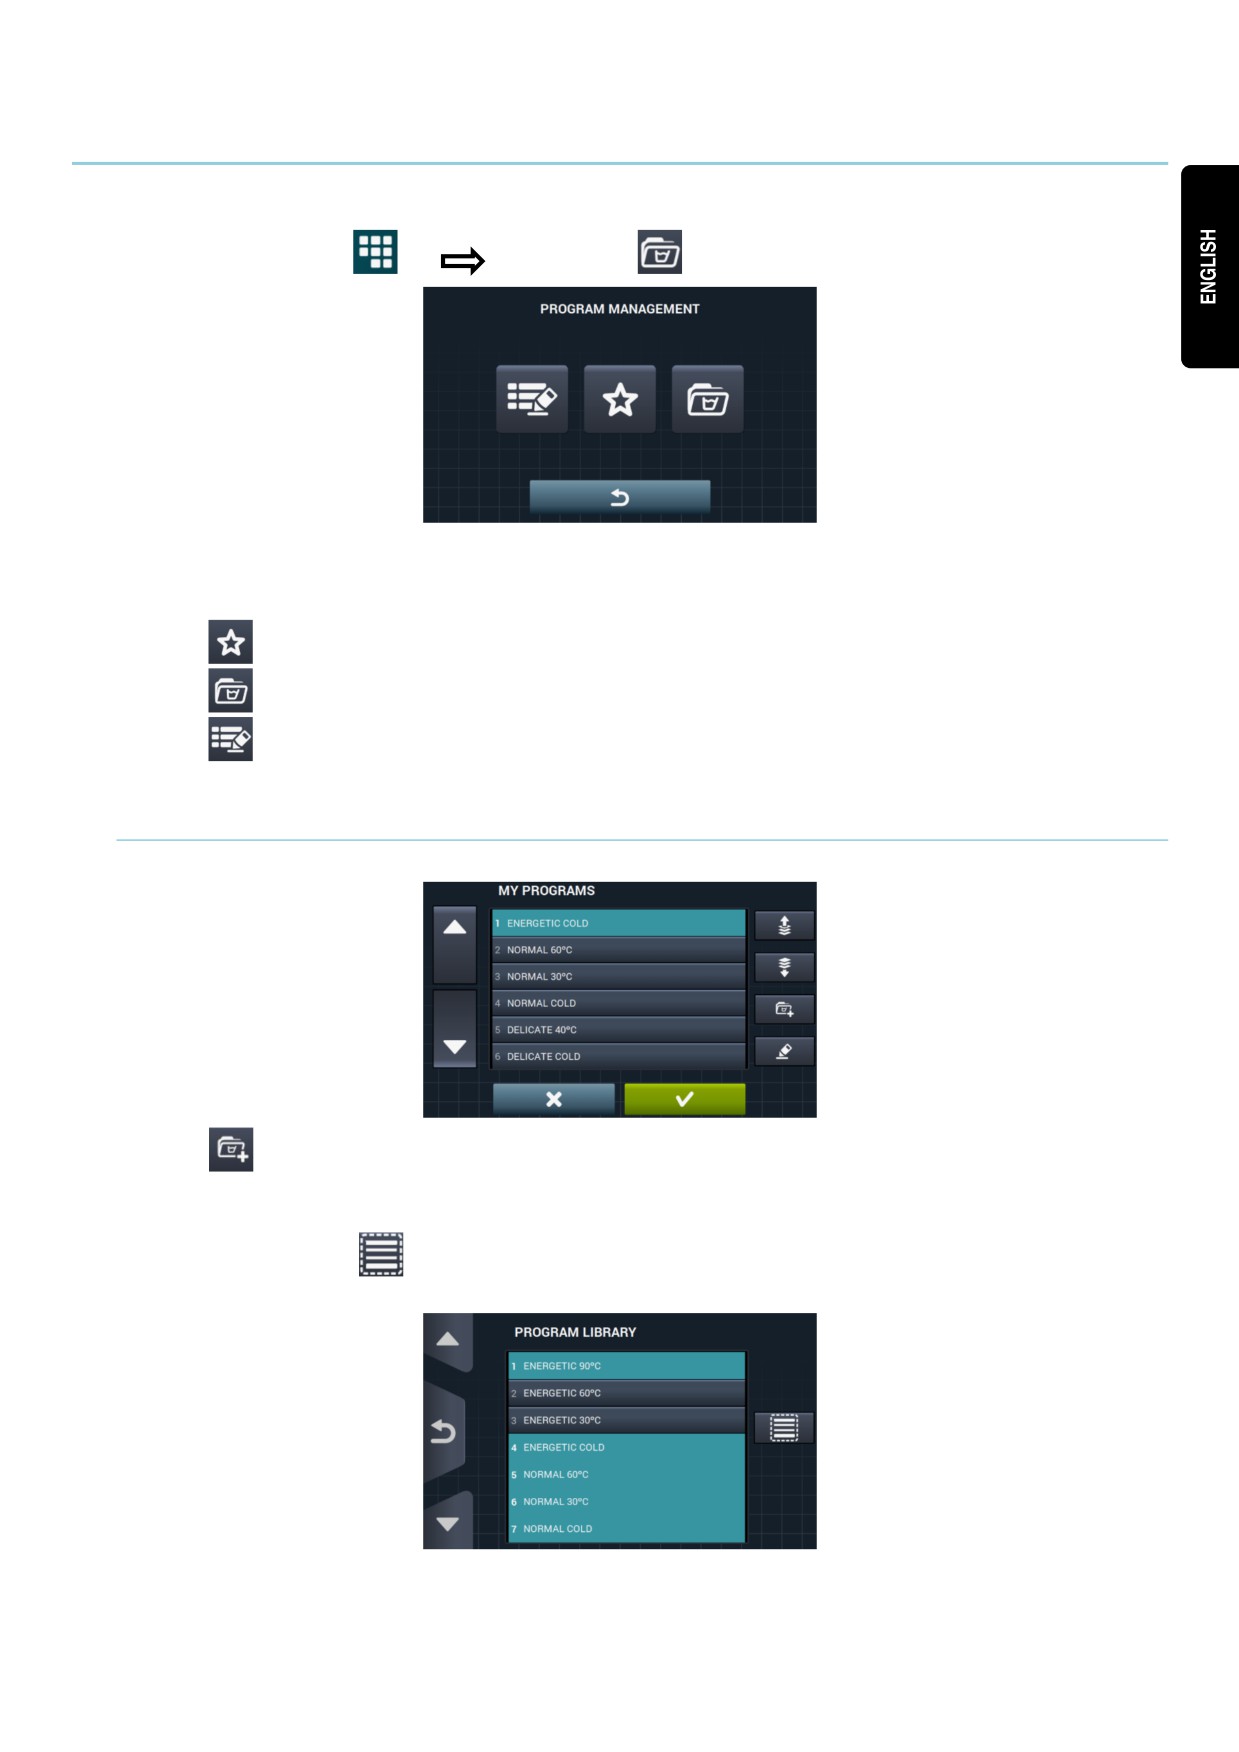
From this submenu it is possible to manage all the programmes, both those selected by the user and those that
are in the library. To do so, select between “Cycle library”, “My programmes”, and “Programme library”.
Access: [Main screen]
[Main Menu]
There is a library in which all the programmes and cycles are stored, including programmes stored by default
and programmes created/imported by the user.
•
My programmes: Available in the OPL main screen. (See section 4.1.1)
•
Programme library: (See section 4.1.2)
•
Cycle library: (See section 4.1.3)
4.1.1 My programmes (favourites).
The programmes in the folder “My programmes” are those which are available on the OPL Main Screen.
•
Add/remove programmes: Press this to go to the programme library. Here, the programmes
which are currently included in “My programmes” are highlighted, and it is possible to select/deselect
each of the programmes to be added to/removed from the list of favourites.
▪
Select/deselect all: Select or deselect all the programmes in the programme
library.
17
•
“up arrow” and
“down arrow”: Use these buttons to change the position of any
programme in the list of favourites, which can be placed in any order as required.
•
Edit button: Press this to modify the selected programme as if editing it from the programme
library.
Press OK or Cancel to return to My Programmes.
4.1.2 Programme library
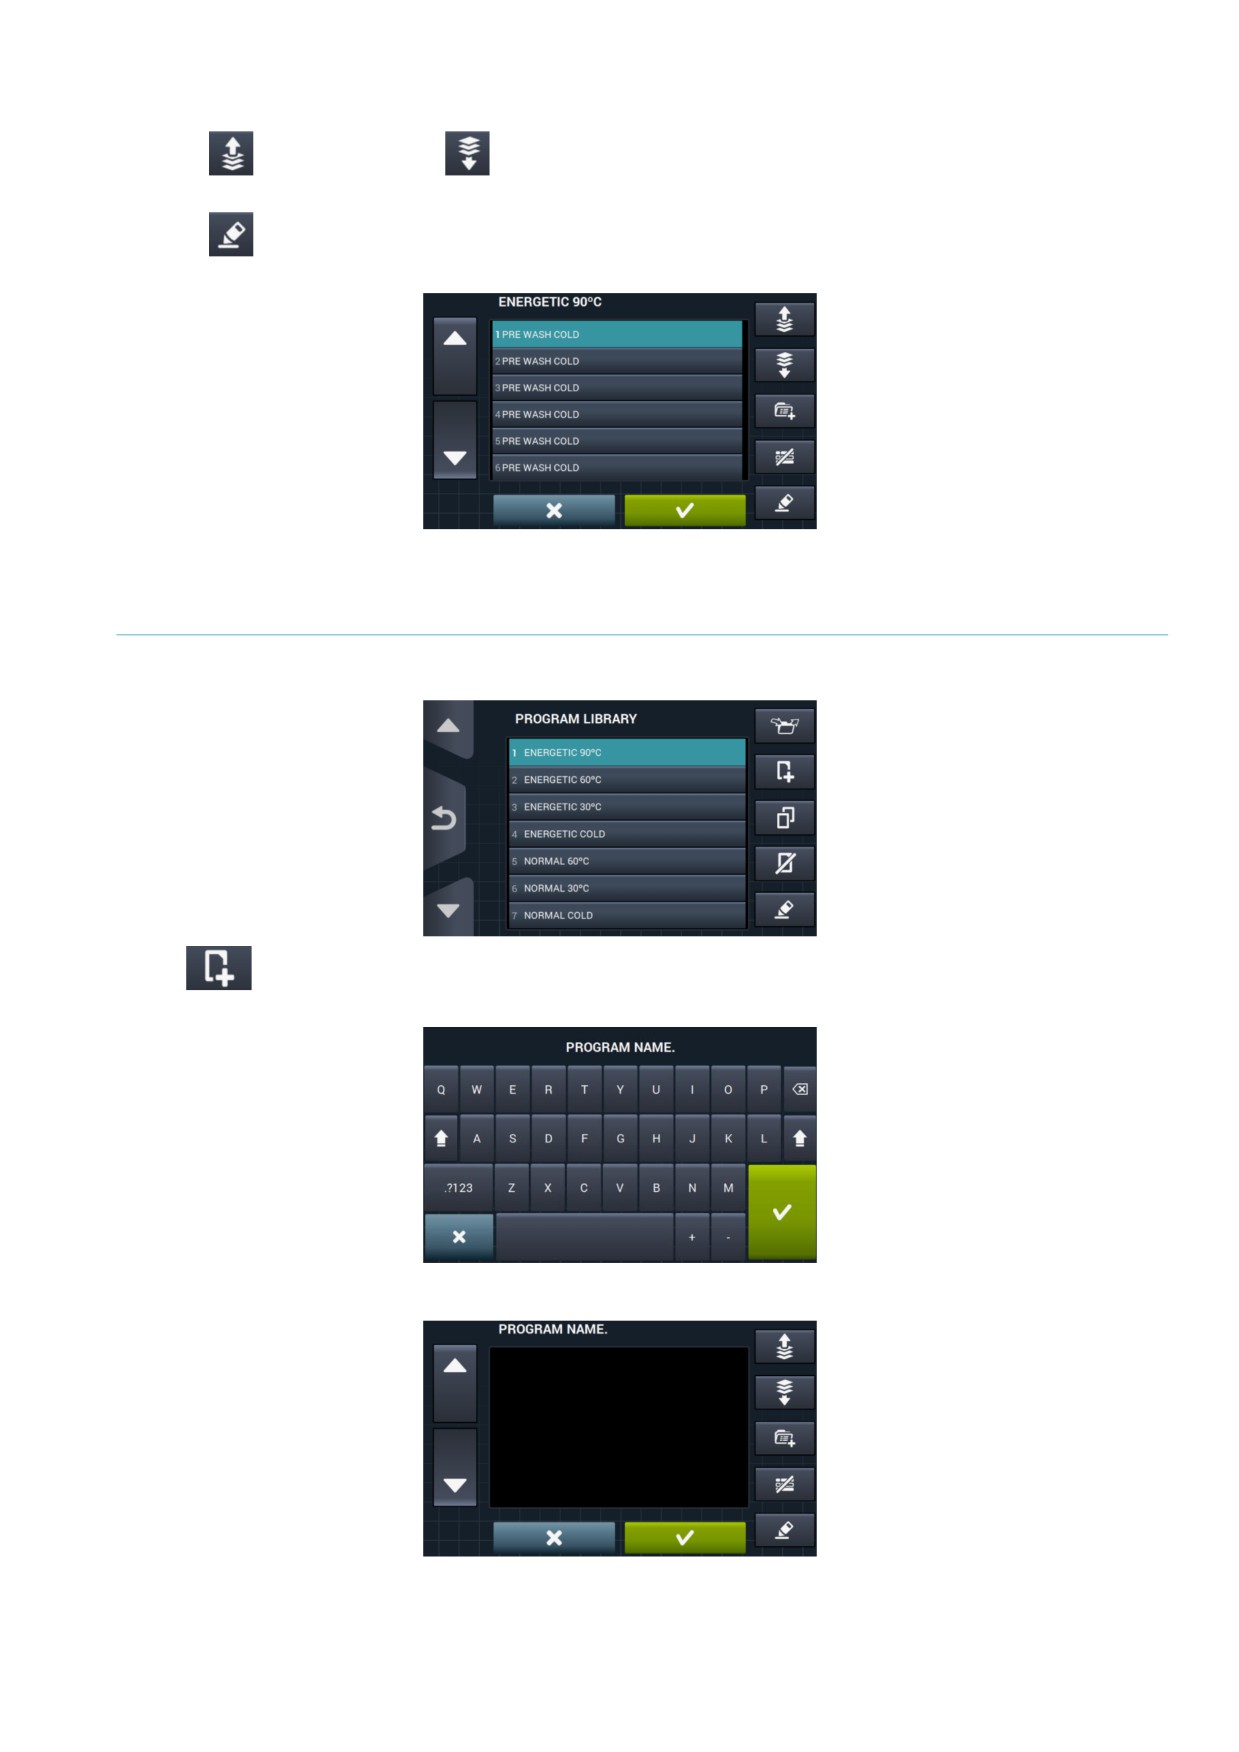
Programmes can be added, copied, modified or deleted, new programmes can be imported or programmes can
be exported to a USB flash drive.
•
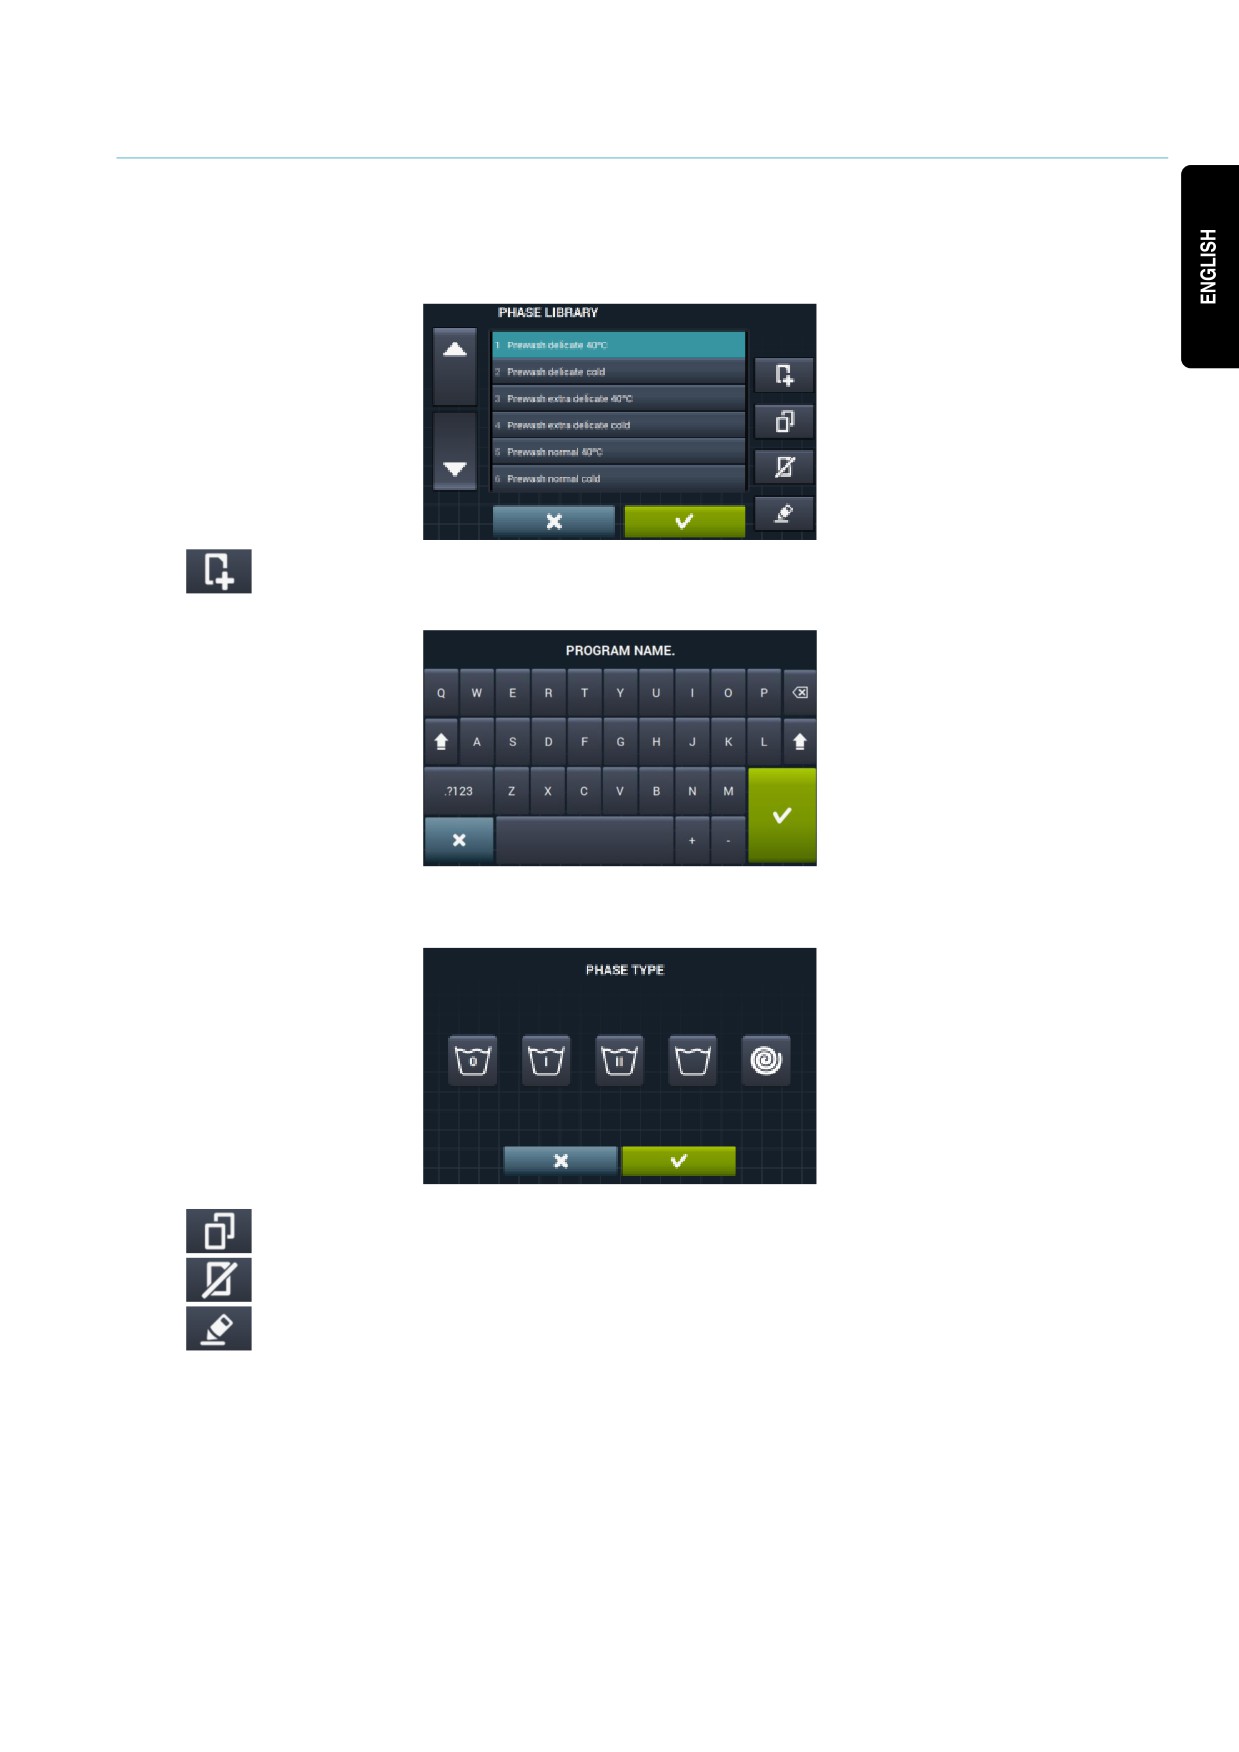
Create programme: Creation of new wash programmes using cycles existing in the library. When
this button is pressed, the user is asked to enter the name of the new programme.
Next the following screen is displayed (without any cycles) in order to include cycles from the cycle library.
18
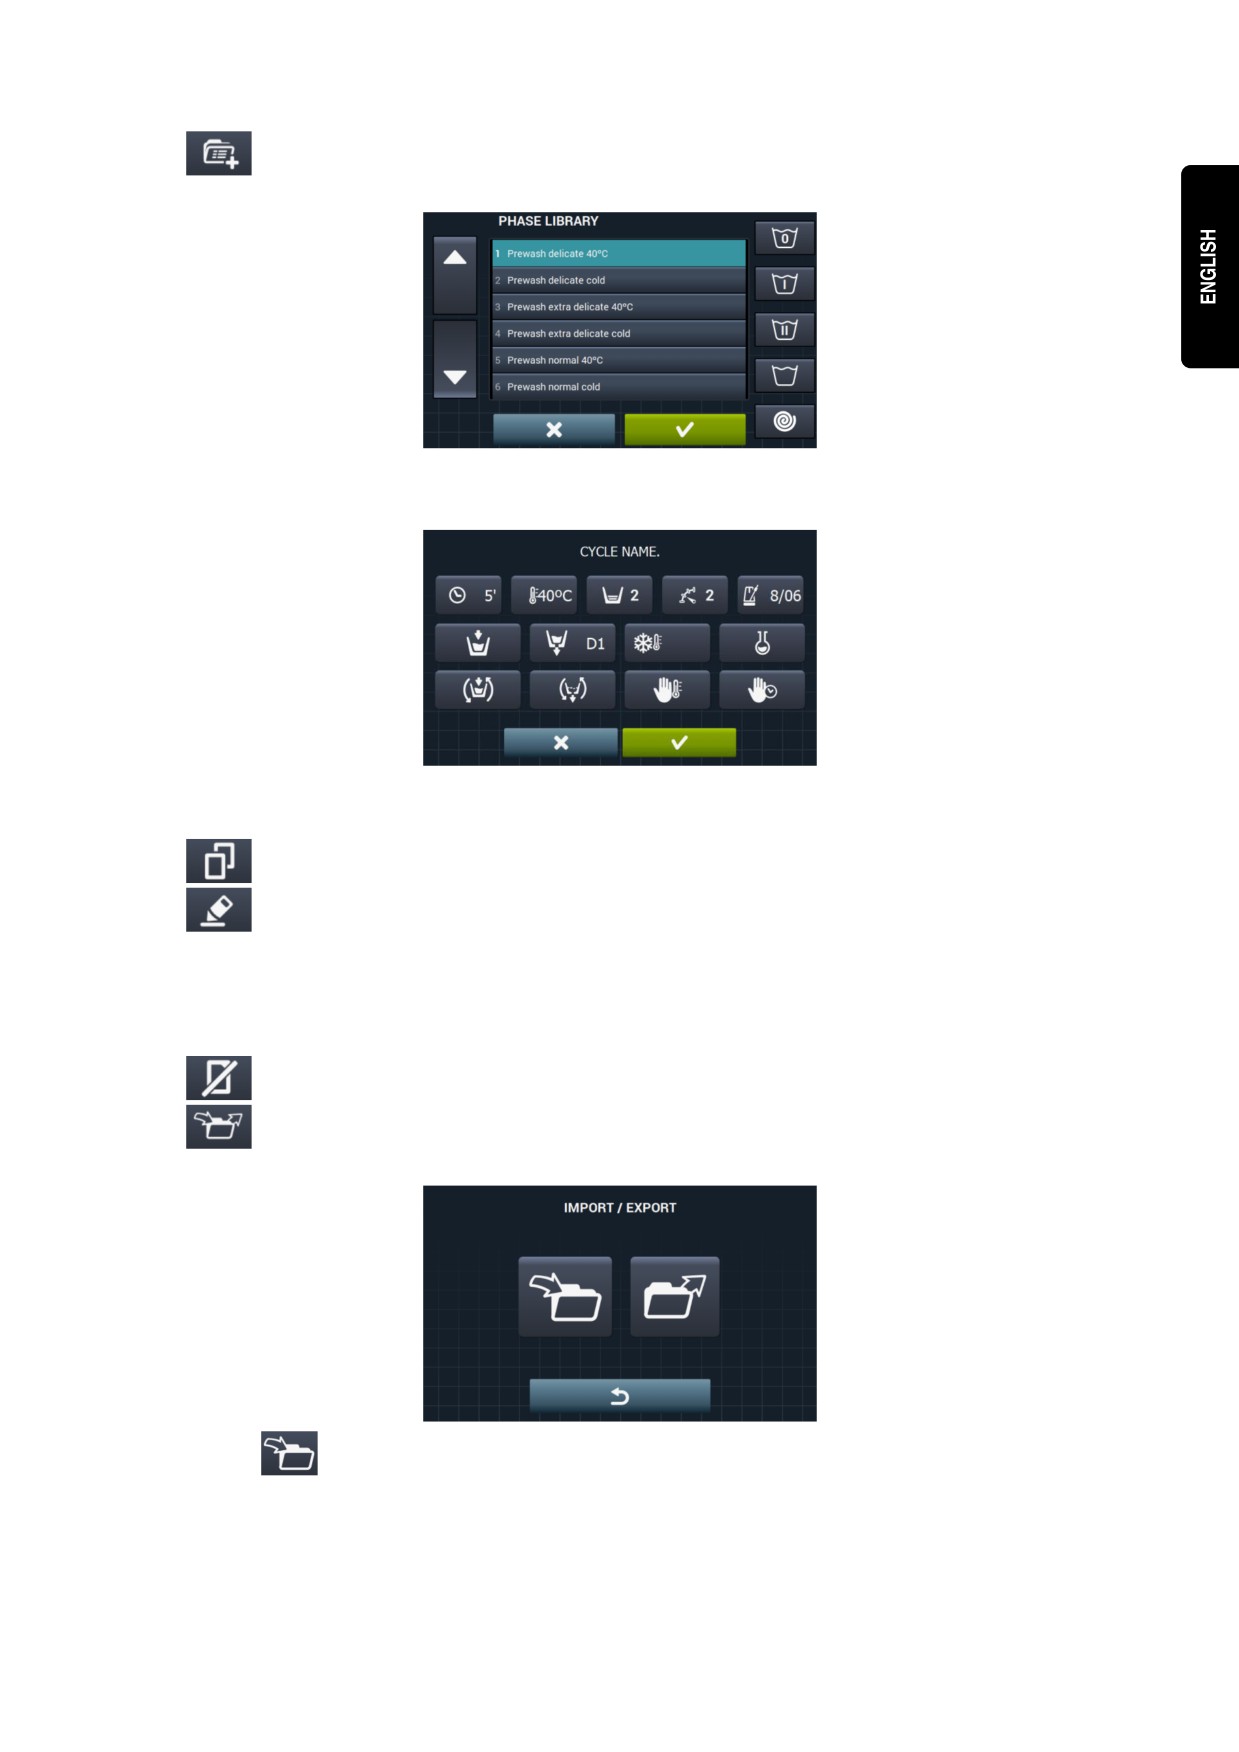
Cycles can be added from the cycle library. The cycles you wish to view can be filtered by cycle
type.
After selecting the cycle, the library cycle parameters can be consulted before including them in the
programme you are creating.
Each programme is a set of parameters grouped by cycles that are not linked to any of the cycles found in
the library.
•
Copy programme: Copy of a programme found in the library, giving it a new name.
•
Modify programme: Modification of the name of the programme and the cycles in the
programme. It is possible to add, modify, delete or change the order of existing cycles.
Just as when a new programme is created, when it is modified it is possible to add/delete cycles from the
cycle library.
When creating programmes, the cycle parameters can only be consulted. The cycles already in the
programme can only be modified when modifying the programmes.
•
Delete programme: Delete programmes stored in the library.
•
Import/export programme: This permits programmes to be imported/exported from an external
USB flash drive.
•
Import programme: Permits new programmes to be imported from a USB flash drive.
On opening the USB folder, only the files with “. prg” extension and the folders are displayed.
19
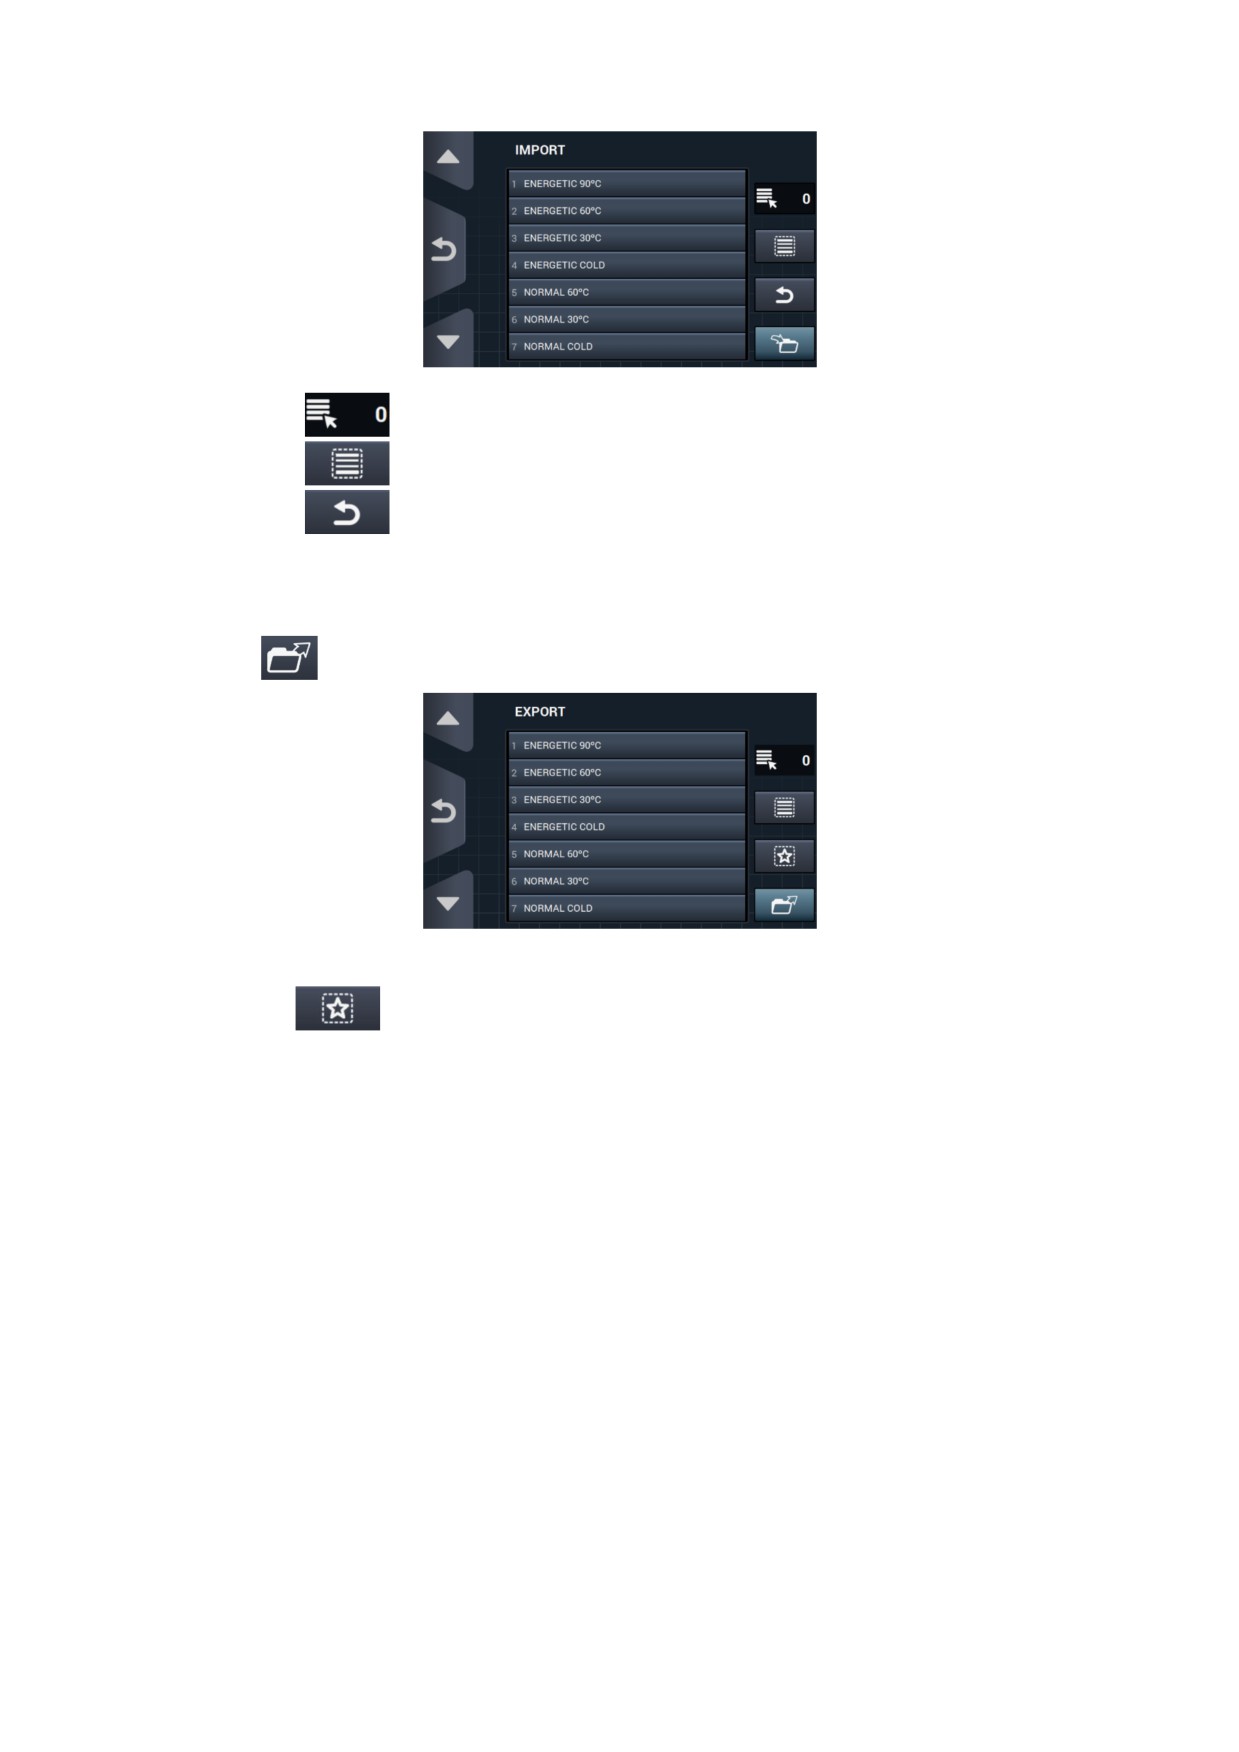
•
Marker: Indicates the number of programmes selected.
•
Select/deselect all: Select or deselect all the programmes in the current folder.
•
Return: This allows you to exit the current folder.
• If a programme is imported with the same name as an existing programme, you will be asked
whether you wish to replace the programme in question or cancel the operation. As there
may be many programmes in this situation, there is a box to select “do the same in all
cases”.
•
Export programme: Export programmes existing in the library to a USB flash drive.
It is possible to select the programmes you wish to export.
•
Select/deselect favourites: This allows you to select all the programmes or the
programmes which are saved in favourites, indicating the number of programmes selected at
all times.
The set of programmes selected will be saved in a folder “PROGRAMMES” in the USB root directory and
each programme will be a file.
20
4.1.3 Cycle library
The name of each cycle can be modified from the cycle library. Once included in a programme, when displaying
the cycle information, the name displayed for the cycle will be different. It will be a dynamic name consisting of
the phase type and a parameter (Tº, rpm)
The cycle library will be editable, and the existing cycles can be created, modified, copied or deleted (See
section 3.1).
•
Create cycle: Creation of new wash cycles. When this button is pressed, the user is asked to
enter the name of the new programme.
Next, the following screen is displayed to select the cycle type to be created: soak. prewash, wash, rinse
or spin.
•
Copy cycle: Copy an existing cycle from the library, giving it a new name.
•
Delete cycle: Delete cycles stored in the library.
•
Change cycle: Modification of the selected cycle parameters.
21
4.2 Configure System
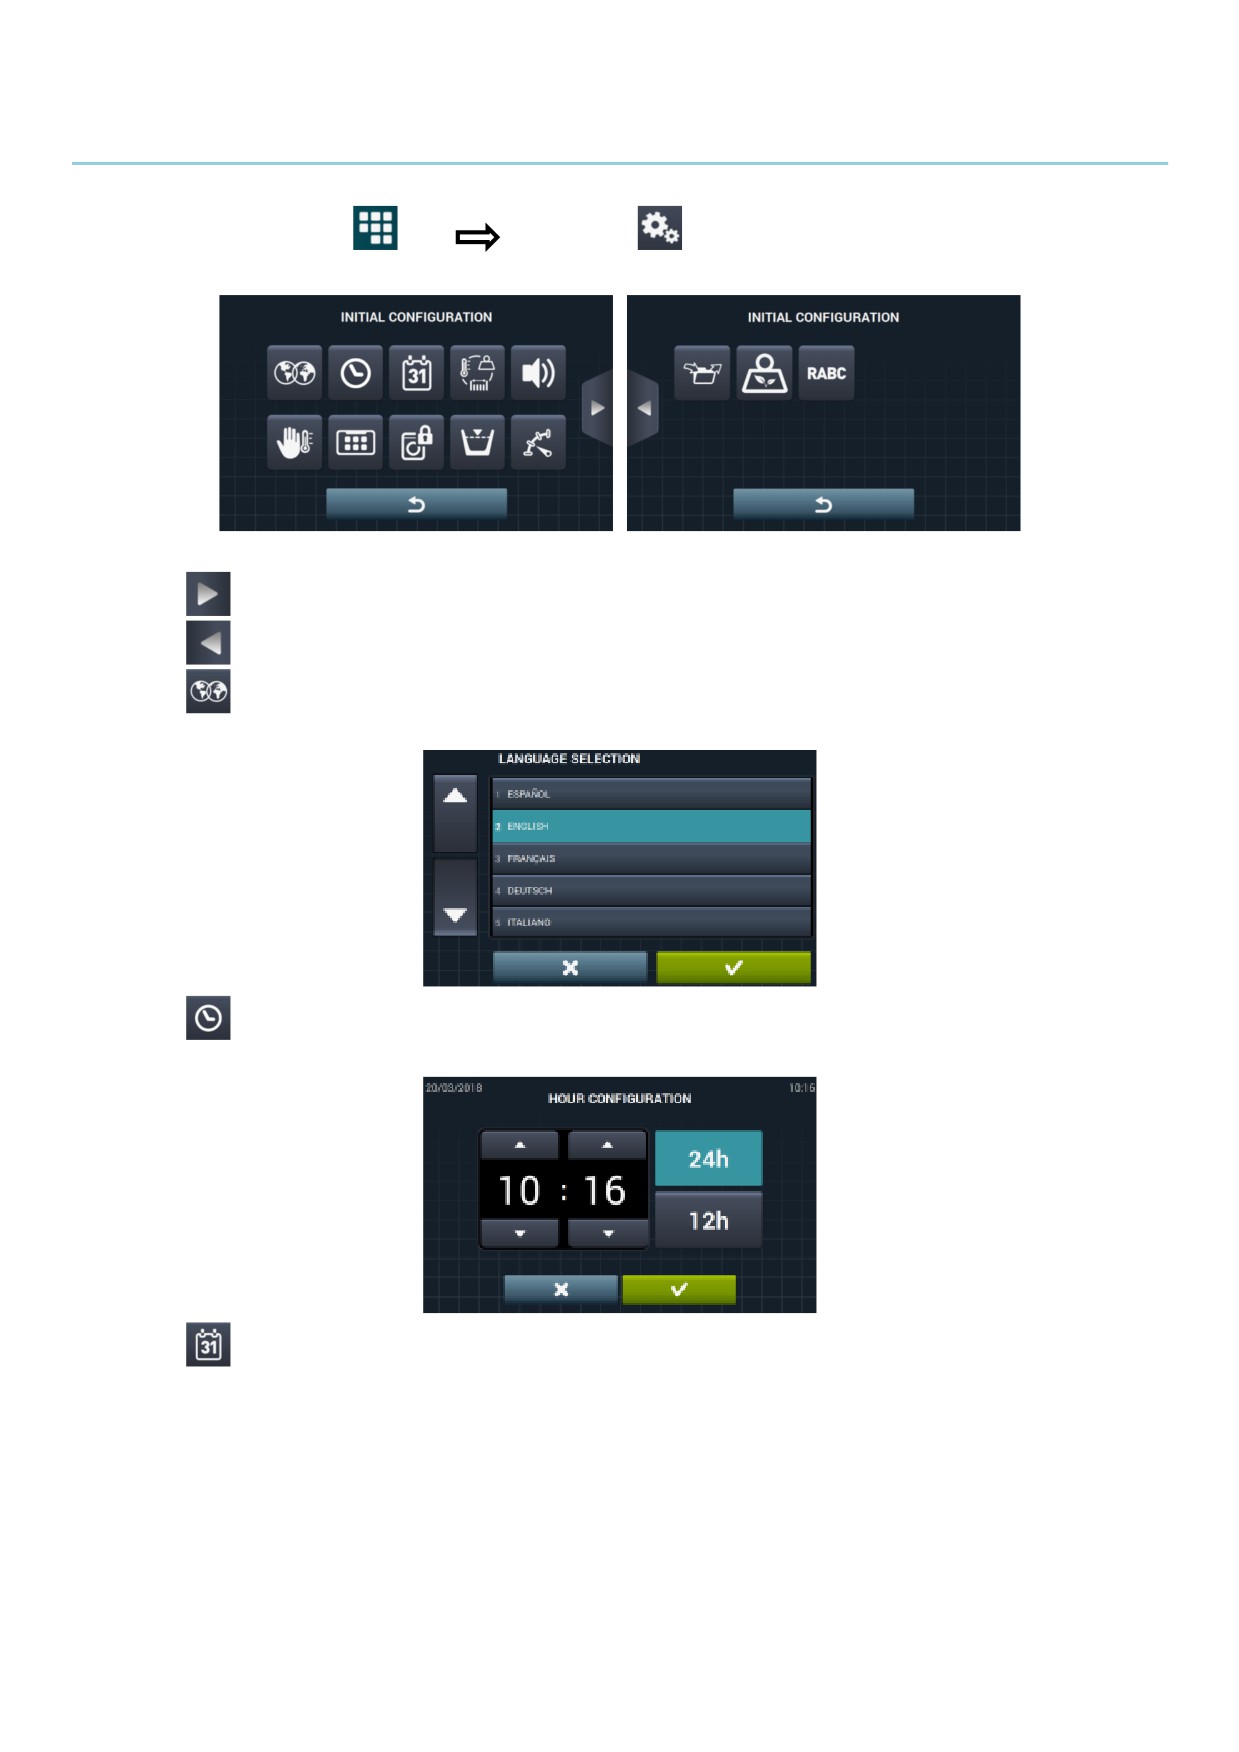
Access: [Main screen]
[Main Menu]
The following sections can be modified in the system configuration:
•
Next screen.
•
Previous screen.
•
Language: The washing machine texts can be displayed in 34 different languages, although the
texts can only be edited using Western character sets.
•
Time: Configuration of the current time. The display format (12 hour / 24 hour (default setting)) can
be selected.
•
Date: Configuration of the current date. The display format
(dd/mm/yyyy
(default setting)
/
yyyy/mm/dd / mm/dd/yyyy) can be selected.
22
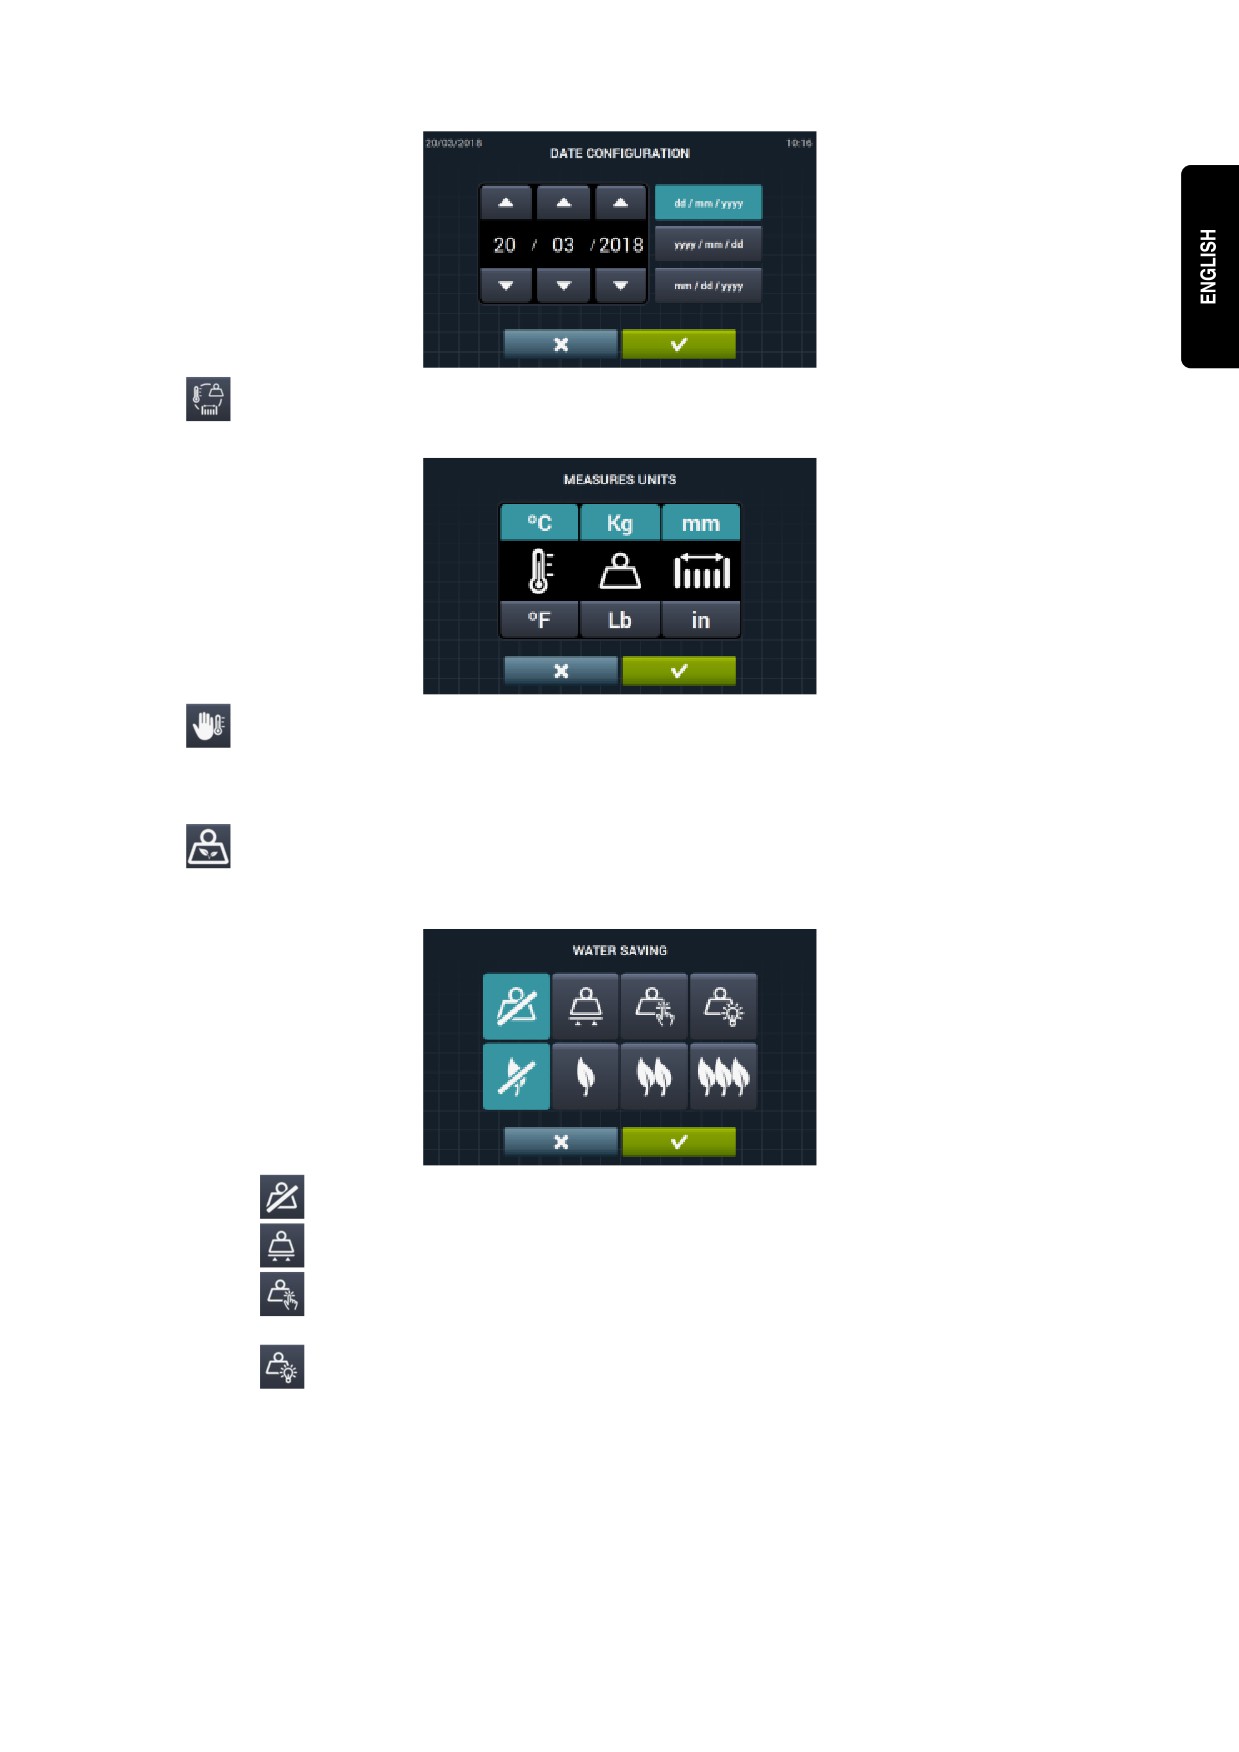
•
Units of measurement: The unit of measurement in which the temperature (ºC (default setting) or
ºF), the weight (Kg (default setting) or lb) and the size (mm (default setting) or in) can be selected.
•
Thermal stop: General configuration of the thermal stop. If this is disabled, the thermal stop does
not take place even if this parameter is active in the currently running cycle. If, however, it is enabled, the
configuration of each cycle is respected and the consequent action is taken. By default it is active In
machines without heating, (HW) is always deactivated.
•
Water saving by weight: The required water saving for the weight can be configured. Three
different weight options and three levels of saving can be selected.
Depending on the load, there will be a reduction in the water level and detergent dose.
•
Weight option off.
•
Automatic weight option. This is available depending on the configuration of existing kits.
•
Manual weight option. Enter the weight of the clothing manually by pressing the weight icon
on the main screen. (See section 2.2, point 3).
•
Smart weight option. This option estimates the load weight at the start of each programme.
The message “LOAD DETECTION” is displayed while it is running. This option may last several
minutes. The time required for this is not included in the programme duration.
23
•
Savings option off.
•
Low savings option.
•
Medium savings option.
•
High savings option.
•
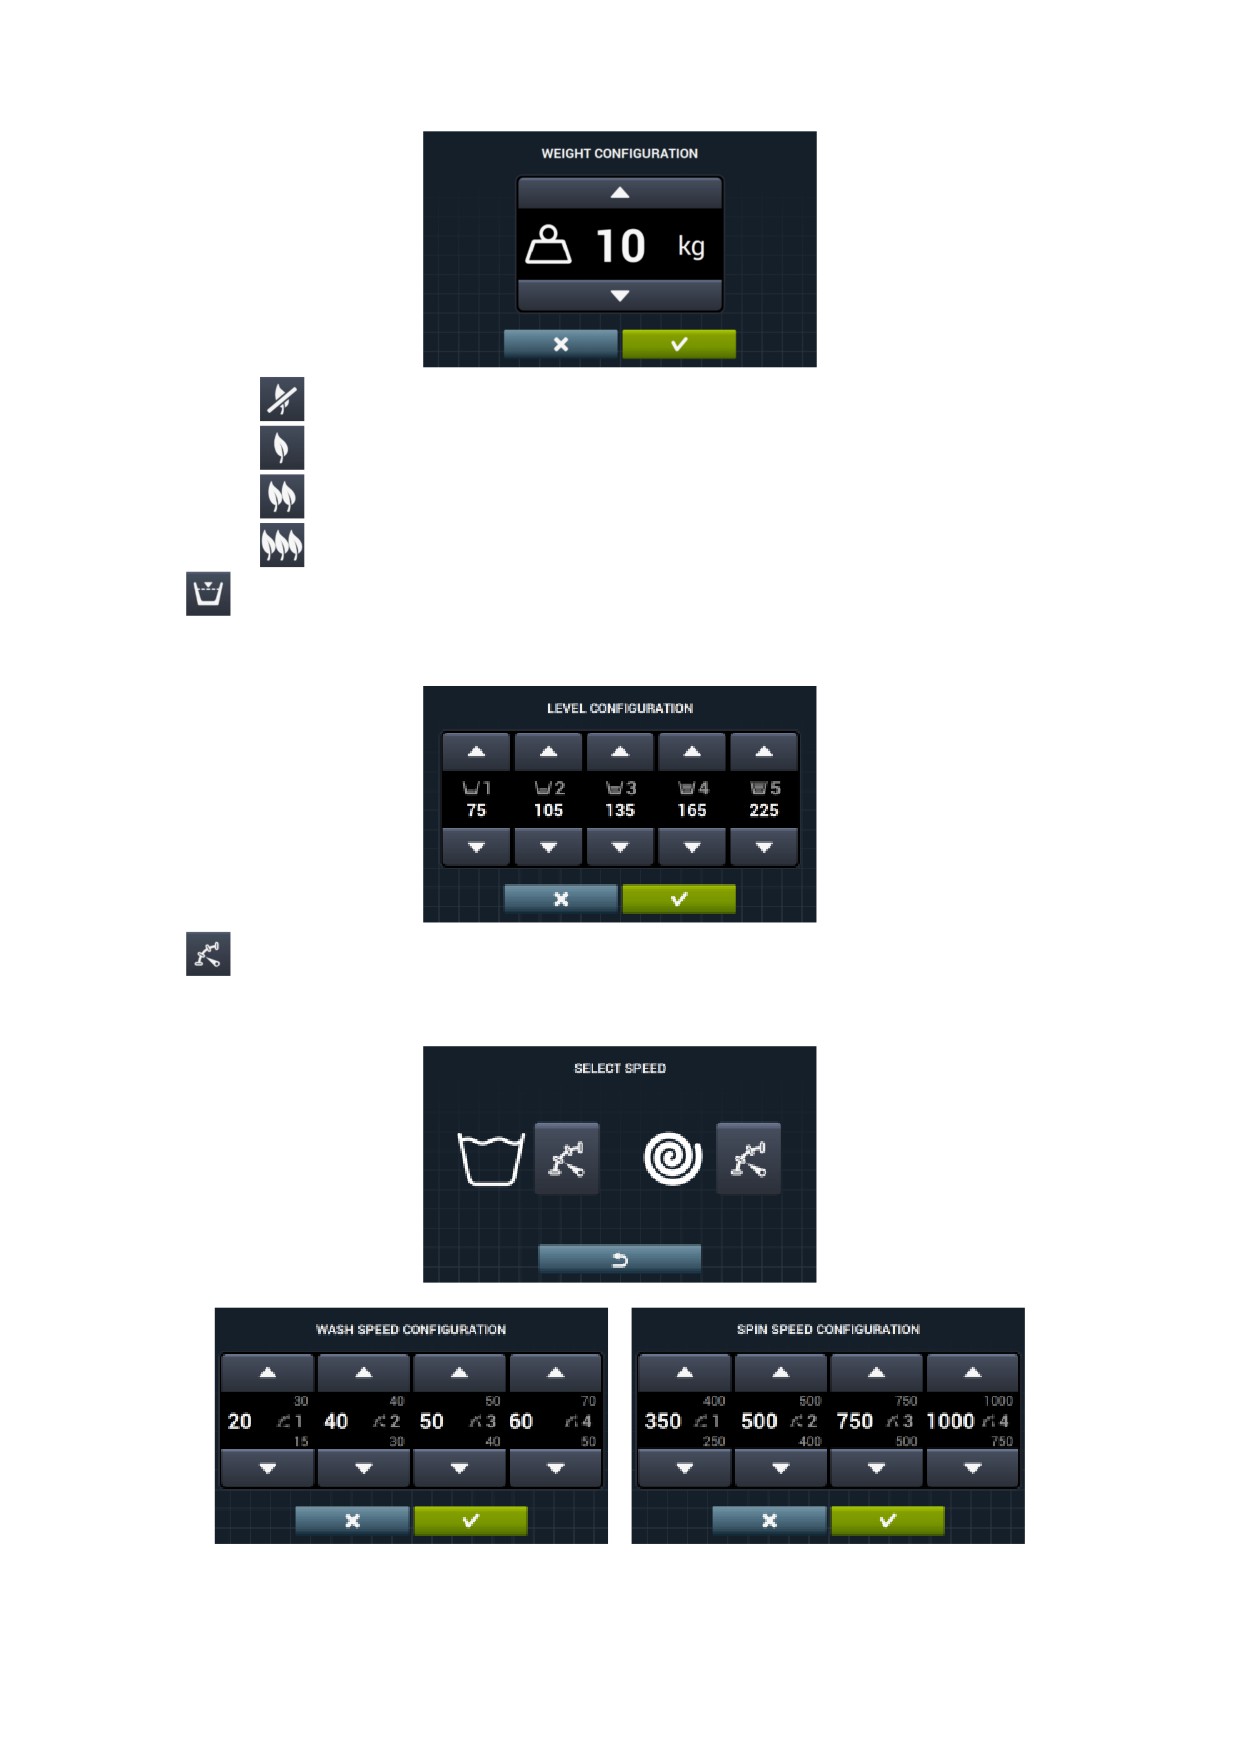
Levels:This enables the configuration in mm of the 5 configurable levels. Each level type will have a
default value and configuration range. These values will depend on the model selected. (See table of
levels by model).
•
Speed: This enables the configuration in RPM of the different types of speed existing, in both the
wash and spin cycles. Each speed type has a minimum and maximum configuration value. (See table
of RPM/V equivalences by model).
24
•
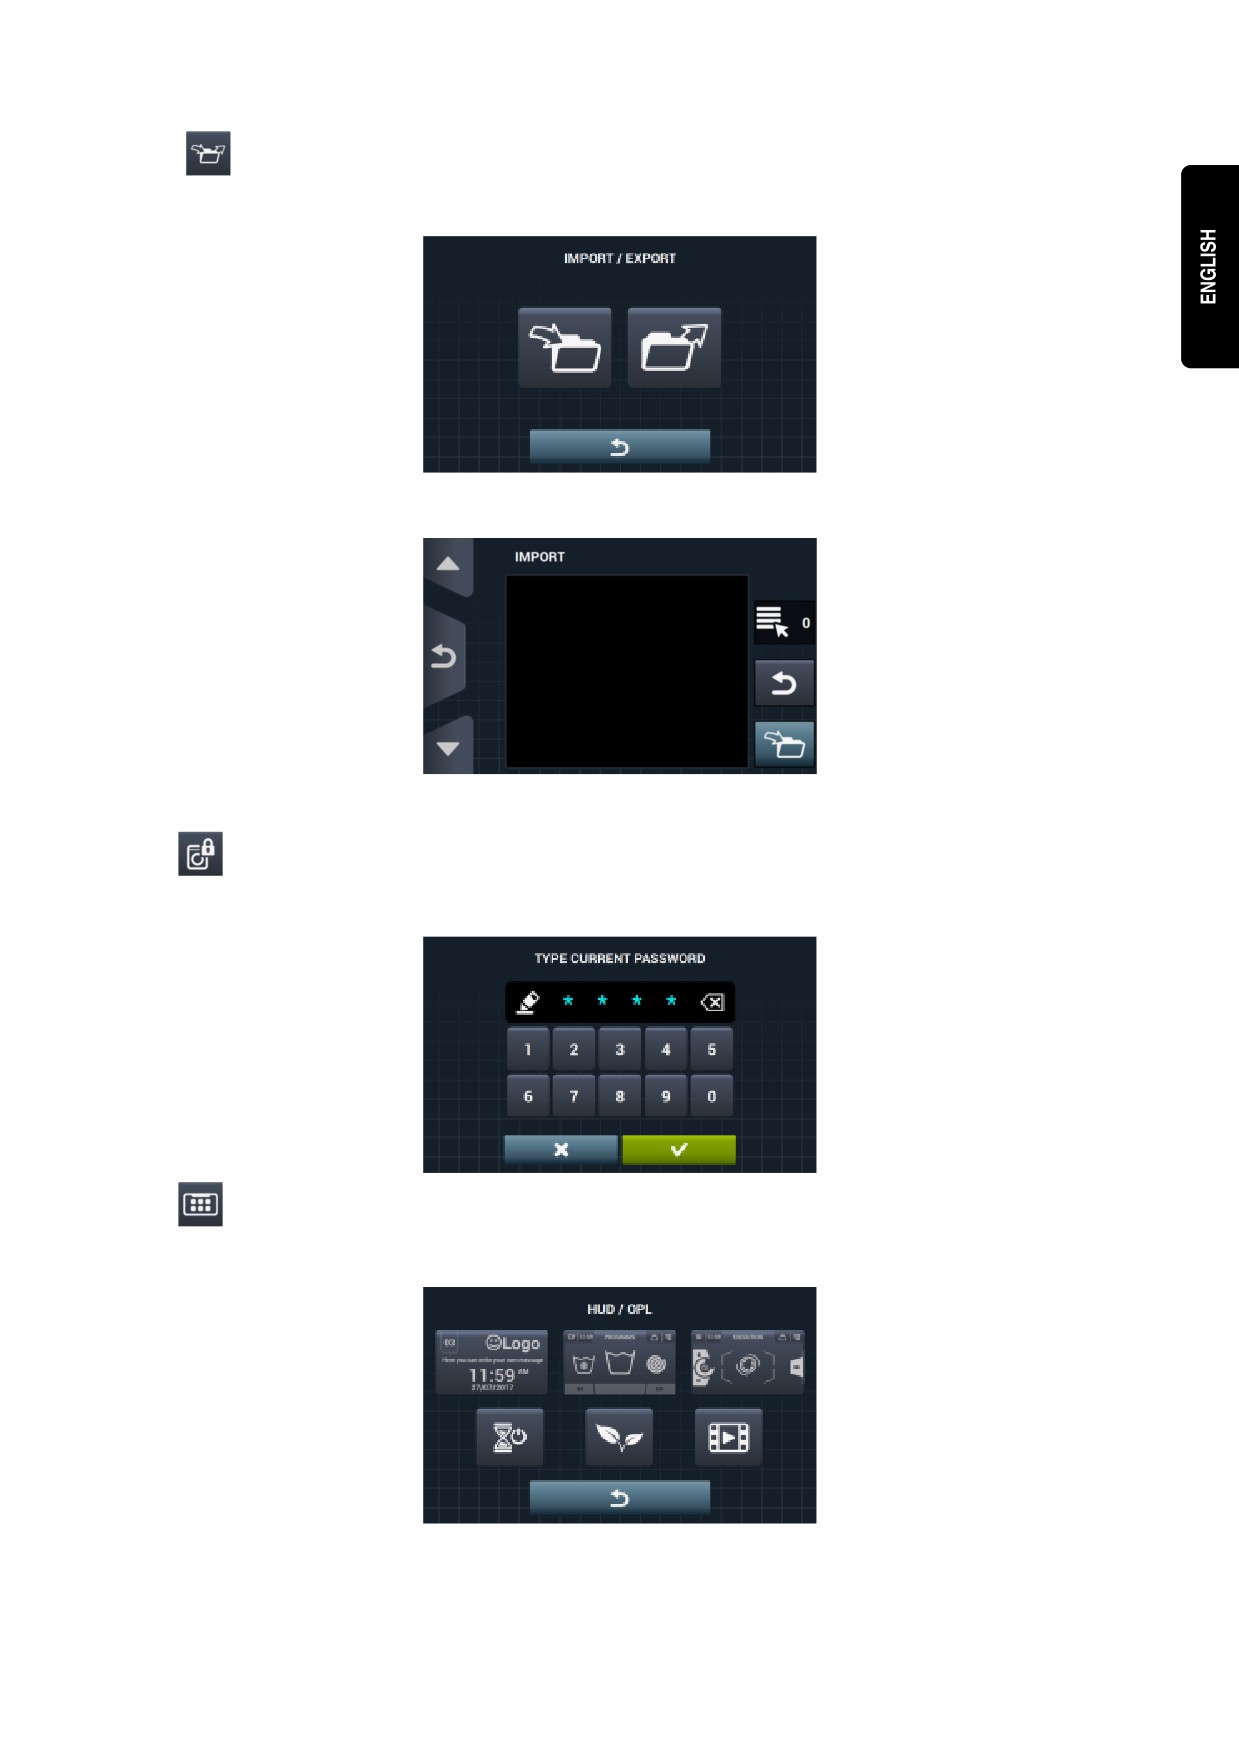
Import/Export Configuration: It is possible to import a machine configuration from a USB memory
stick or to export the current machine configuration to a memory stick. When this button is pressed, an
intermediate window is displayed where we select whether to import or export.
If IMPORT is selected, a screen is displayed to permit browsing through the USB. But only configuration
files (with extension .cfg) can be selected.
If EXPORT is selected, the current machine configuration is saved to the USB root directory in the folder
“CONFIGS”. Each configuration file name will take the following format: CONFIG_Model_Date_time.cfg.
•
Restricted access: This allows the washing machine configuration to be restricted, by establishing a
password to enter the main menu. The default setting is deactivated.
The required password (1234 by default) for entering the main menu can be configured.
•
HUD: The HUD configuration activates/deactivates the display of the parameters on the different
screens (See section 4.2.1).
25
•
Beep: Option permitting the buzzer to be disabled. By default it is enabled.
•
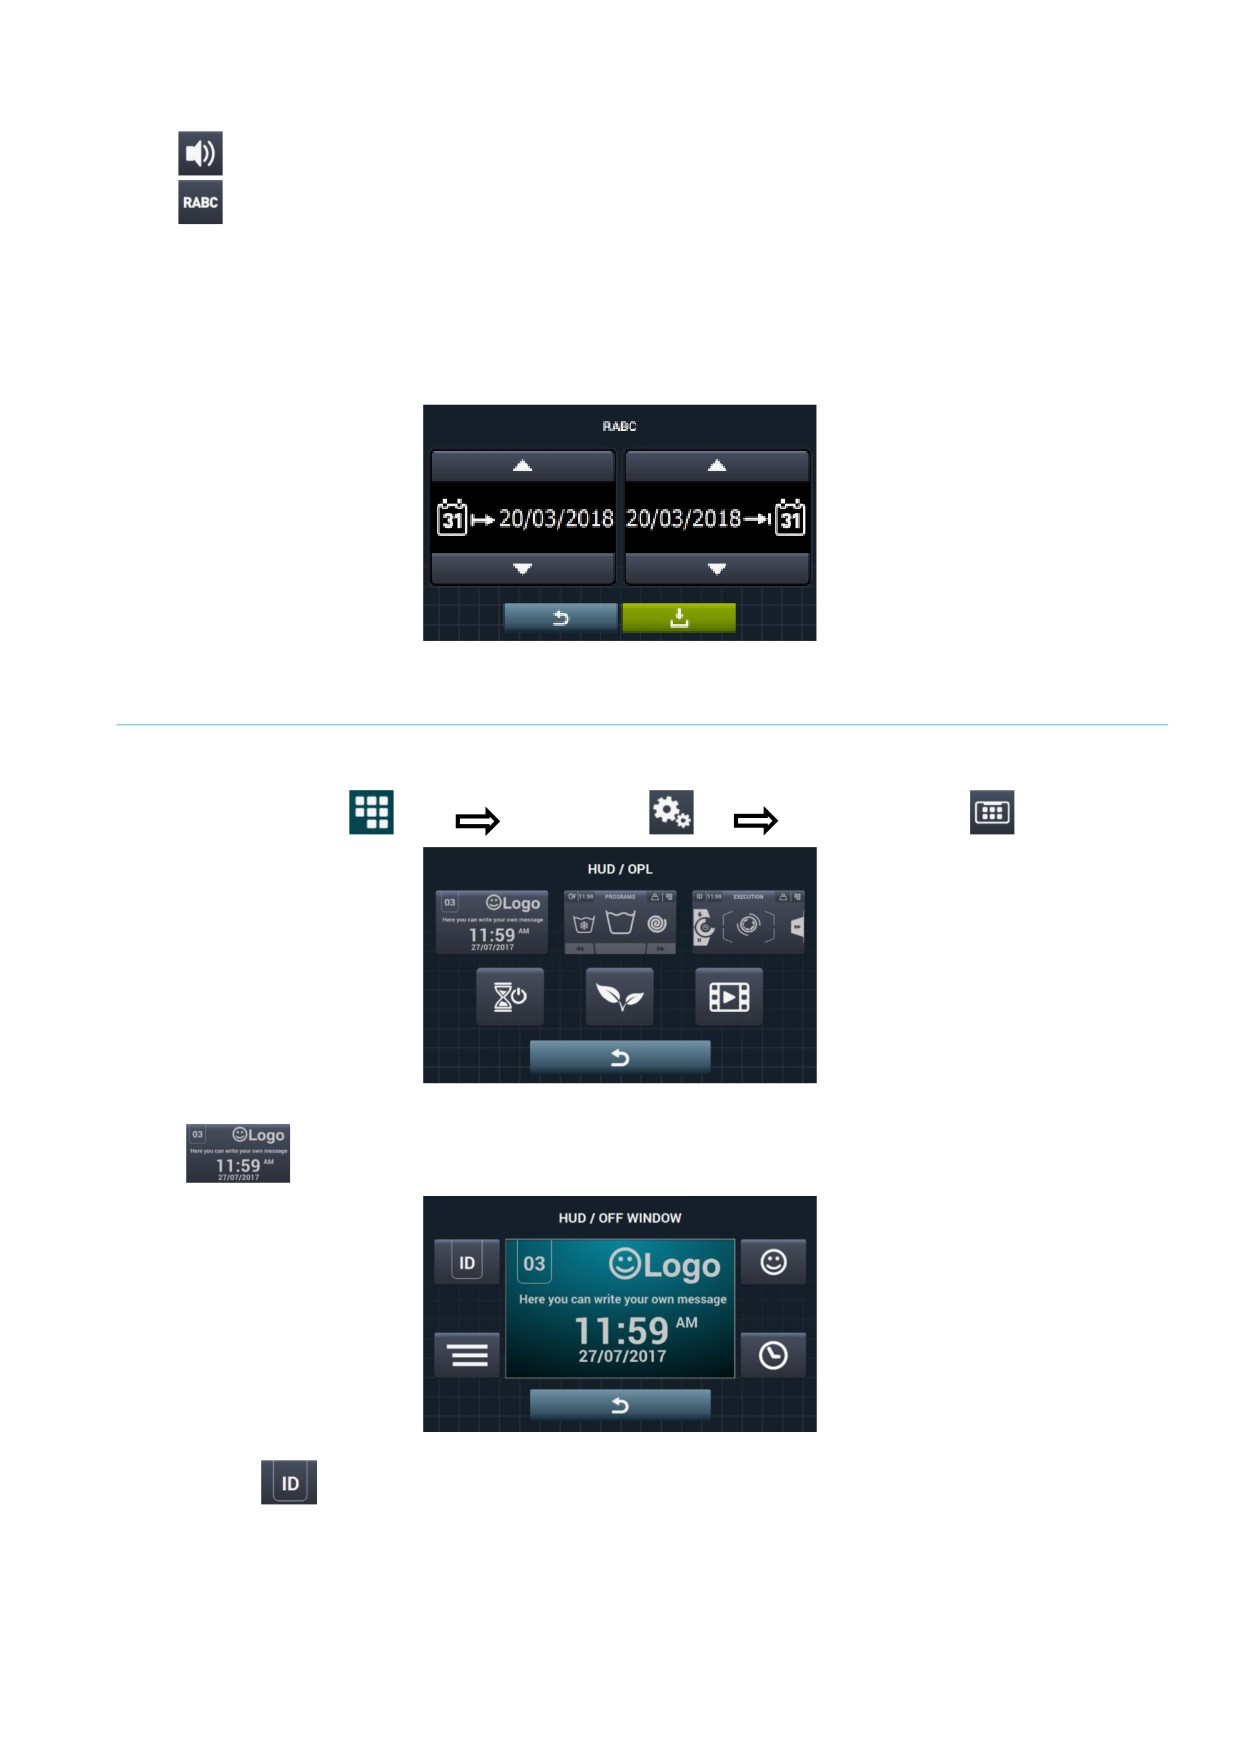
RABC/Traceability: The information for each wash is registered, and the following information
saved:
At the start of each cycle: Programme, start time, weight (where applicable). During the programme, every
15 seconds: Level, temperature and error (where applicable). When downloading the data, the required
period must be selected (by default, start date and end date, today's date).
The data will be saved for a minimum of 15 days.
Each time there is a download, an “RABC” will be created in the USB root directory. Each RABC file name
will take the following format: RABC_Model_Date_time.rabc..
4.2.1 HUD configuration
Configuration of the parameters to be displayed on the OFF screen, main screen and run screen, in addition to
configuration of the automatic shutdown and energy saving.
Access: [Main screen]
[Main Menu]
[Configure system]
•
OFF screen: These are the parameters that can be configured:
•
Machine identifier: The machine identifier can be enabled/disabled, and the number to be
allocated to the identifier can be edited (between 1 and 99). By default it is disabled. This identifier
is obligatory if remote communication is used.
26
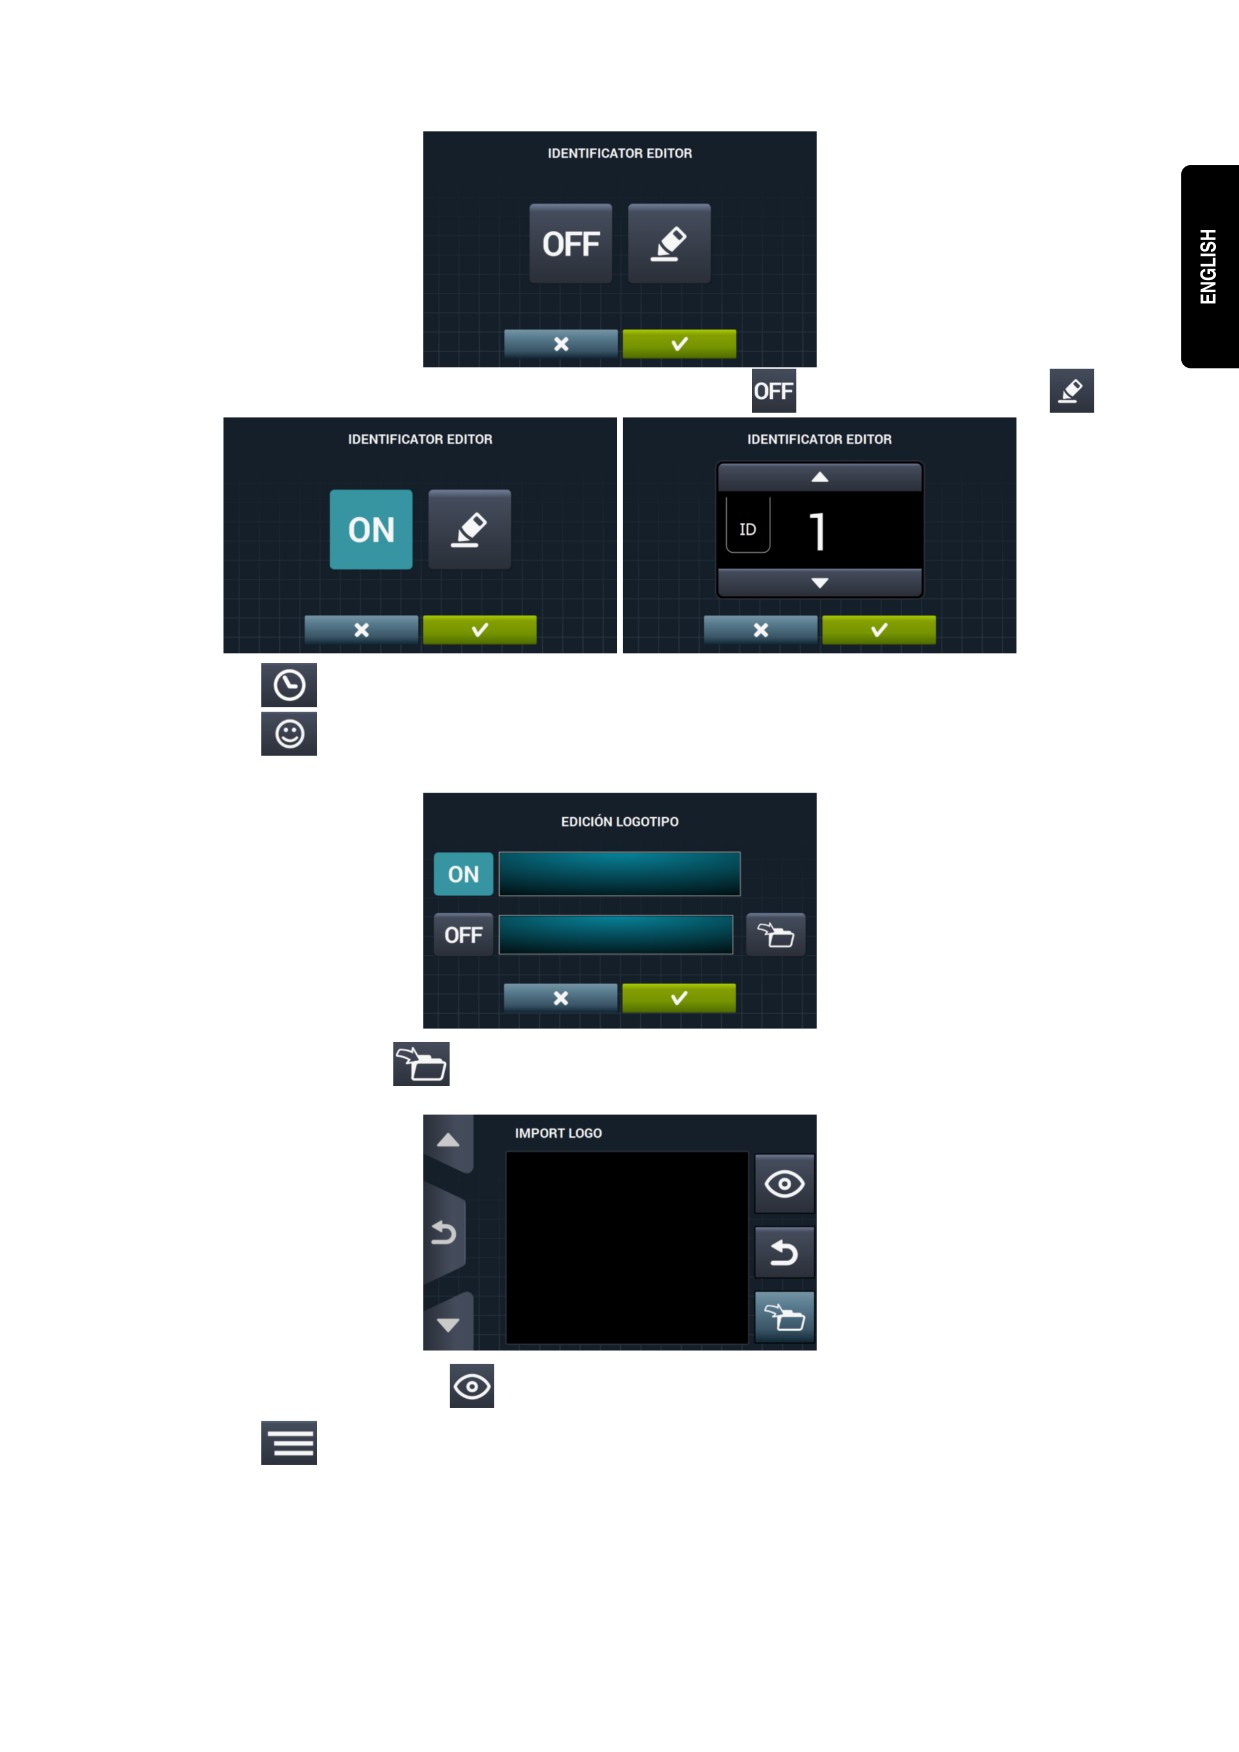
The machine identifier is enabled by pressing “OFF”
followed by the edit button
•
Date: Option that can be enabled/disabled. By default it is enabled.
•
Logo: This allows the user to select whether or not to display the logo. By default it is
enabled.
Press import
, to import a logotype to the machine from an external USB flash drive. The
logotype file must be a .png type with a resolution of 290 x 80 pixels.
The preview button
, allows you to confirm that the logotype is correctly displayed.
•
Laundrette message: Start message that can be edited by the user (max. 40 characters).
By default it is disabled.
27
•
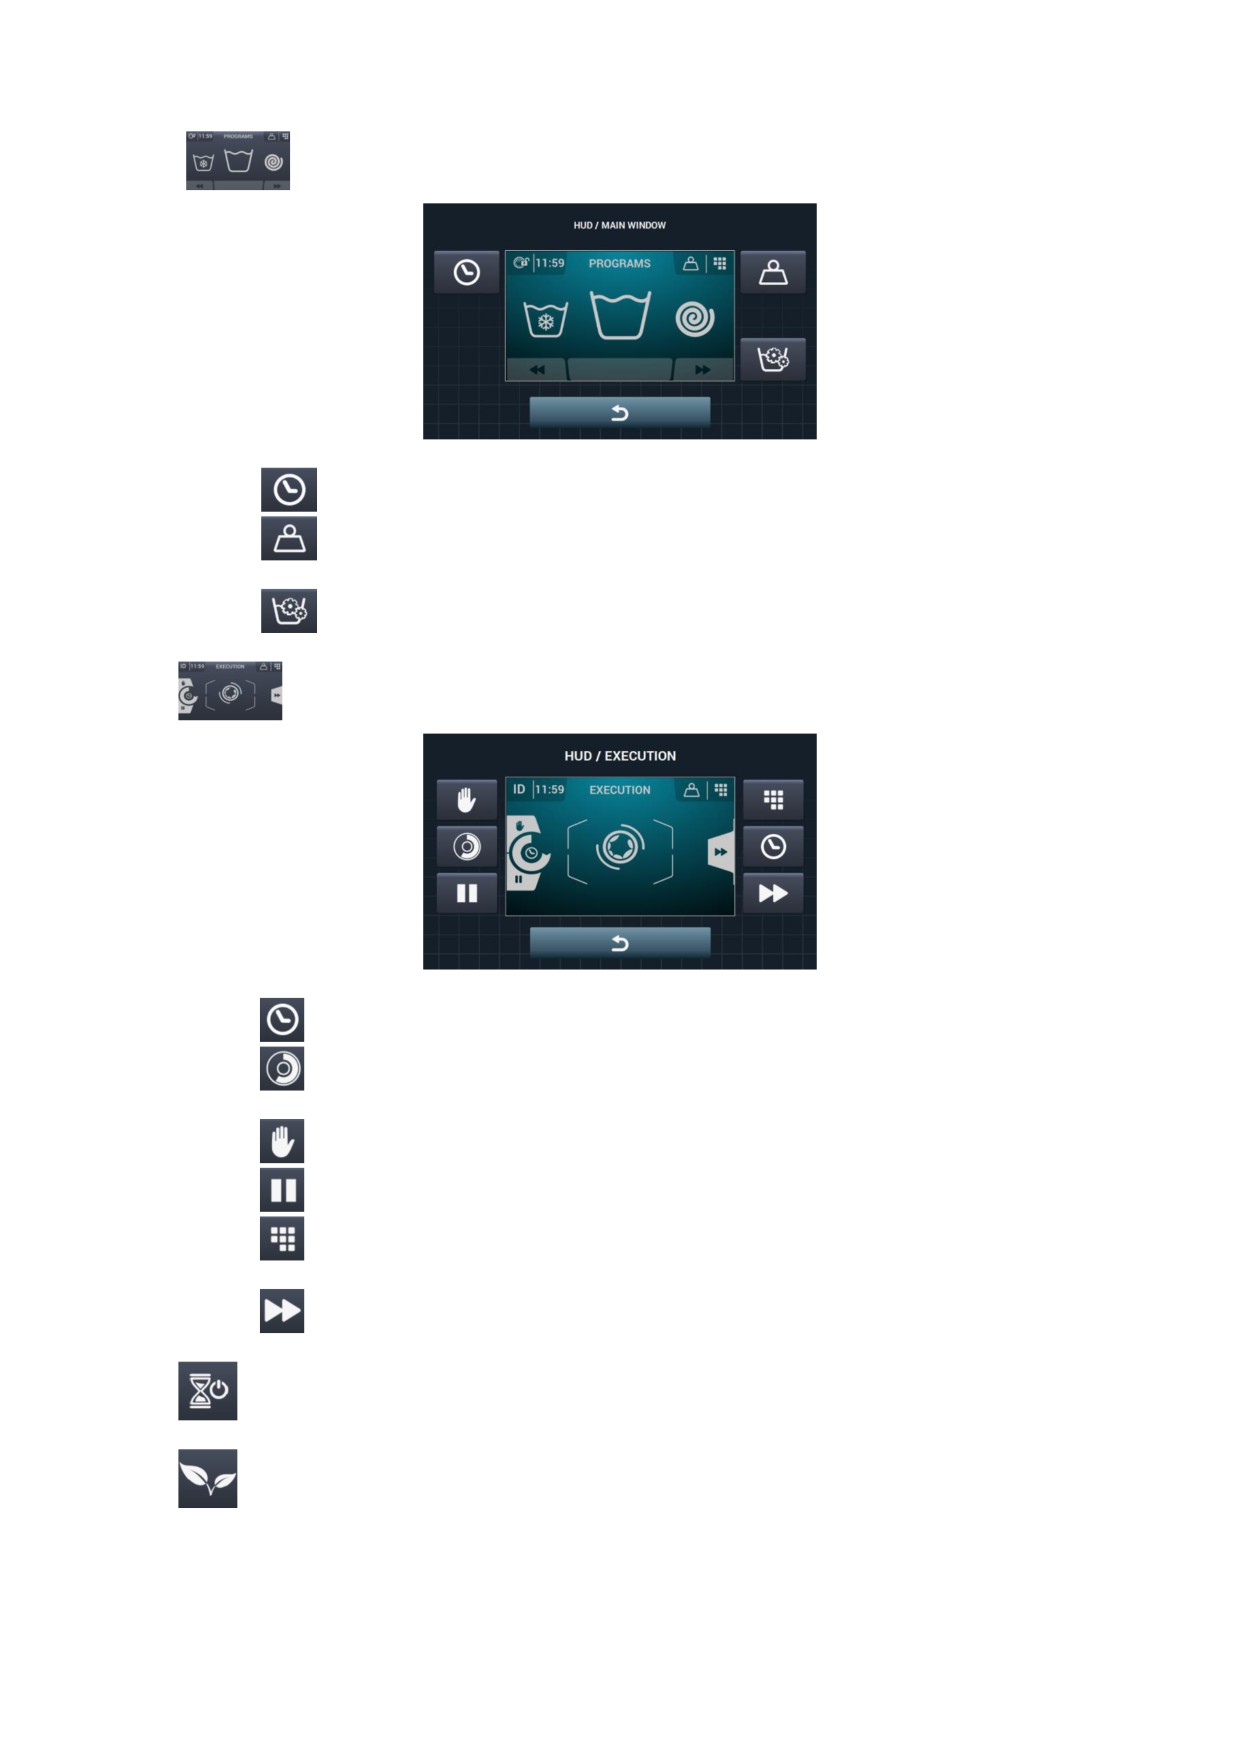
Main screen: The configurable parameters are listed below:
•
Time: Option permitting time to be displayed/hidden. By default it is enabled.
•
Weight of clothes: If this option is disabled, the weight icon is not displayed. By default it
is disabled.
•
Instant programming: If instant programming is disabled, the parameters for each cycle
can be viewed but cannot be edited. By default it is enabled.
•
Run screen: These are the options permitted on the run screen:
•
Time: Option permitting time to be displayed/hidden. By default it is enabled.
•
Remaining time: Option to display/hide the total time remaining and the programme
progress indicator on the run screen. By default it is enabled.
•
Stop button, STOP: This allows the stop button to be hidden. By default it is enabled.
•
PAUSE button: This allows the pause button to be hidden. By default it is enabled.
•
Menu button: Option that permits the run menu icon to be displayed/hidden, by default it is
enabled.
•
Advance button: This permits the advance button and the information referring to the next
cycle to be hidden. By default it is enabled.
•
Automatic shutdown: If this option is activated and the main screen is open, the machine will
switch to Screen Off after 30 minutes of inactivity. By default it is enabled.
•
Energy savings: Option that enables energy savings by switching off the screen backlight 10
minutes after switching off the washing machine. If any part of the screen is touched, the backlight will light
up again, and the main Screen is opened. By default it is enabled.
28
•
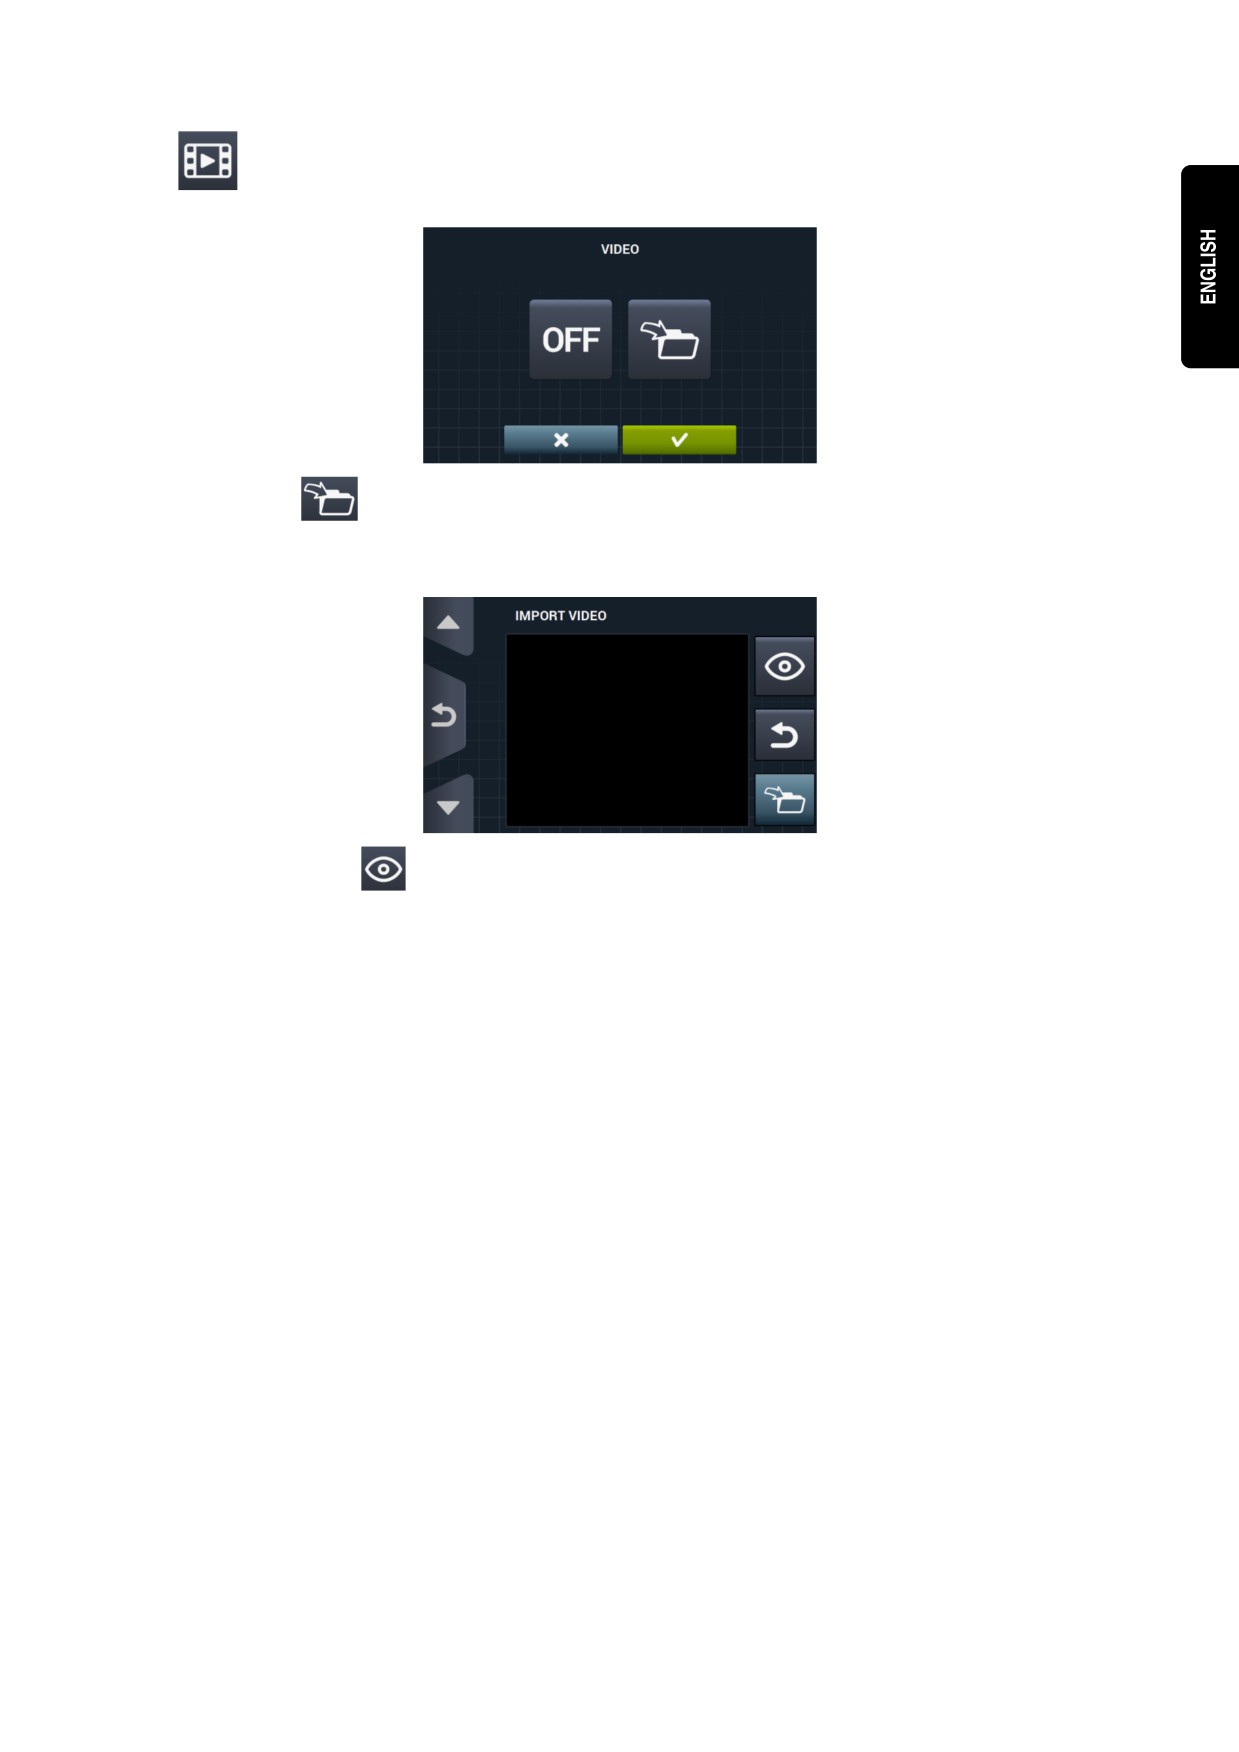
Import video: This permits a video to be played on the machine screen after 10 minutes of
inactivity. If “Energy saving” is activated, the video is automatically stopped.
Press import
to import a video to the machine from an external USB flash drive. Only video files (avi,
mov...) can be imported, and only one video file can be installed on the machine. The recommended
resolution of the videos is 480x272 pixels for machines with a 4.3” screen, and 800x480 pixels for 7”
screens. The 16 Fps should not be exceeded. The maximum file size must not be more than 25 Mb.
The preview button
, allows you to check the video file plays correctly.
29
5 MAINTENANCE
5.1 Electrical and mechanical irregularities
Before calling the Technical Service Centre, check the following:
• That power is supplied to the machine.
• The condition of the fuses.
• That the voltage is correct for the machine.
If the washing machine fails to get the required level of water, check:
• The water mains tap is open.
• The water inlet filter is not blocked.
• That the water pressure is between 2 and 4 kg/cm 28 (28 and 56 psi).
If the washing machine vibrates excessively, check that none of the panel screws is loose.
If a power cut occurs, check that the tub is drained and the door is blocked. If you want to take the clothes out of
the washing machine, unlock the door by pulling down the belt located behind the front panel.
5.2 Warnings
All warnings and errors are reported on screen together with an acoustic alarm. In the event of an error, the cycle
and status information is maintained in order to determine exactly where the error has occurred.
The following warnings may be found in a washing machine:
DESCRIPTION
CAUSE AND ACTION
If the door is open at the start of a programme, the message “DOOR OPEN” is displayed on
OPEN DOOR
screen and the buzzer will buzz for 30 seconds and no more.
Only the option "OK" is given. The programme will not start and the user can try again.
At the end of a programme, if the water level is not 0 mm, the message “WATER IN TUB” is
displayed on screen.
WATER IN TUB
The 2 options "continue" or "end" are displayed. If we press “continue” the machine checks
again for a level of 0 mm. If this is the case, the door is unlocked, if not the error is reported
again. If we press “end”, the programme will end and the door unlocks.
In the SAT menu, in the Extra Kit section, on activating a kit, if no communication is detected
NO COMMUNICATION
between the principal control card and the auxiliary card, this warning is displayed.
BETWEEN CARDS
Active kits without communication between cards can be deactivated, but they cannot be
activated.
This warning is displayed when Tank Tx is active in a drainage cycle and the input “Max level
FULL TANKS (T1/T2/T3)
Tank x” is found to be activated.
The machine stops draining to Tx and switches to normal drainage D1. Buzzer is activated
for 10 seconds. The warning disappears on pressing OK or after a certain time interval.
This warning is displayed when Tank Tx is active in a fill cycle and the input “Min level Tank
x" has been activated.
EMPTY TANKS
The machine stops filling from Tx and switches to filling normally with cold water. Buzzer is
(T1/T2/T3)
activated for 10 seconds. The warning disappears on pressing OK or after a certain time
interval.
This warning is displayed if, on activating the weighing kit or making a calibration, the
NO COMMUNICATION
auxiliary card is connected and operating correctly, but it is not possible to communicate with
WITH WEIGHING KIT
the weighing appliance.
It is not possible to activate the kit or make the calibration.
30
CALIBRATION OF
This warning is displayed on launching a calibration of the weighing kit, in order to inform the
WEIGHING KIT -
user that the machine must be empty, with no additional weights on top, etc., before
ENSURE MACHINE IS
launching a calibration.
EMPTY
None. Warning is for information only. “OK” button to hide warning and launch calibration.
CALIBRATION OF
This warning is displayed while the weighing kit calibration is in process.
WEIGHING KIT -
None. Warning is for information only. There is no button and the text is displayed for 5
PROCESS UNDER
seconds while the calibration is in process.
WAY
CALIBRATION OF
This warning is displayed when, on completion of the calibration process, it has not been
WEIGHING KIT -
possible to set the weighing system to zero correctly.
CALIBRATION ERROR
None. Warning is for information only. “OK” button to hide warning.
CALIBRATION OF
This warning is displayed when, on pressing “Start” to run a wash programme, a weight 3 Kg
WEIGHING KIT -
less or 10 Kg more than the nominal weight is measured.
CALIBRATION
The 2 options "Cancel" or "OK" are displayed. Press “OK” to continue with the programme
REQUIRED
with the nominal weight. Press “Cancel” to abort the programme.
This warning is displayed on pressing the Easy Load button on the main screen. The user will
be told to insert the laundry and close the door and then asked if they wish to launch the
EASY LOAD - LAUNCH
Easy Load cycle.
PROCESS
The 2 options "Cancel" or "OK" are displayed. Press “Cancel” to abort the Easy Load cycle
and return to the selection screen. Press “OK” to launch the Easy Load cycle.
This warning is displayed while the Easy Load cycle is running, advising the user that it is in
EASY LOAD - CYCLE
process.
RUNNING
No buttons are available. Message is solely for information; the user can do nothing except
wait for the cycle to end.
This message is displayed at the start of the wash programme when the “smart weight”
option is on.
LOAD DETECTION
No buttons are available. Message is for information only. This operation may last several
minutes.
31
содержание ..
1
2
3 ..