Shantui SE210 Hydraulic Excavator. Operation & Maintenance Manual - page 2
System
Temperature
Flow
Voltage
Pressure
Speed
Vehicle number
Edit
Back
In the above figure, engine coolant temperature, main pump flow, charging voltage, engine oil
pressure, engine speed and license plate number are displayed.
Press [Esc] key to exit.
5. Restore Factory Settings
In System Help interface, press Options key to move the black box up/down to select “06” and
press [OK] key to enter the following frame:
System
Restore to factory settings?
OK
Back
Pressing OK key can restore system status to the factory settings.
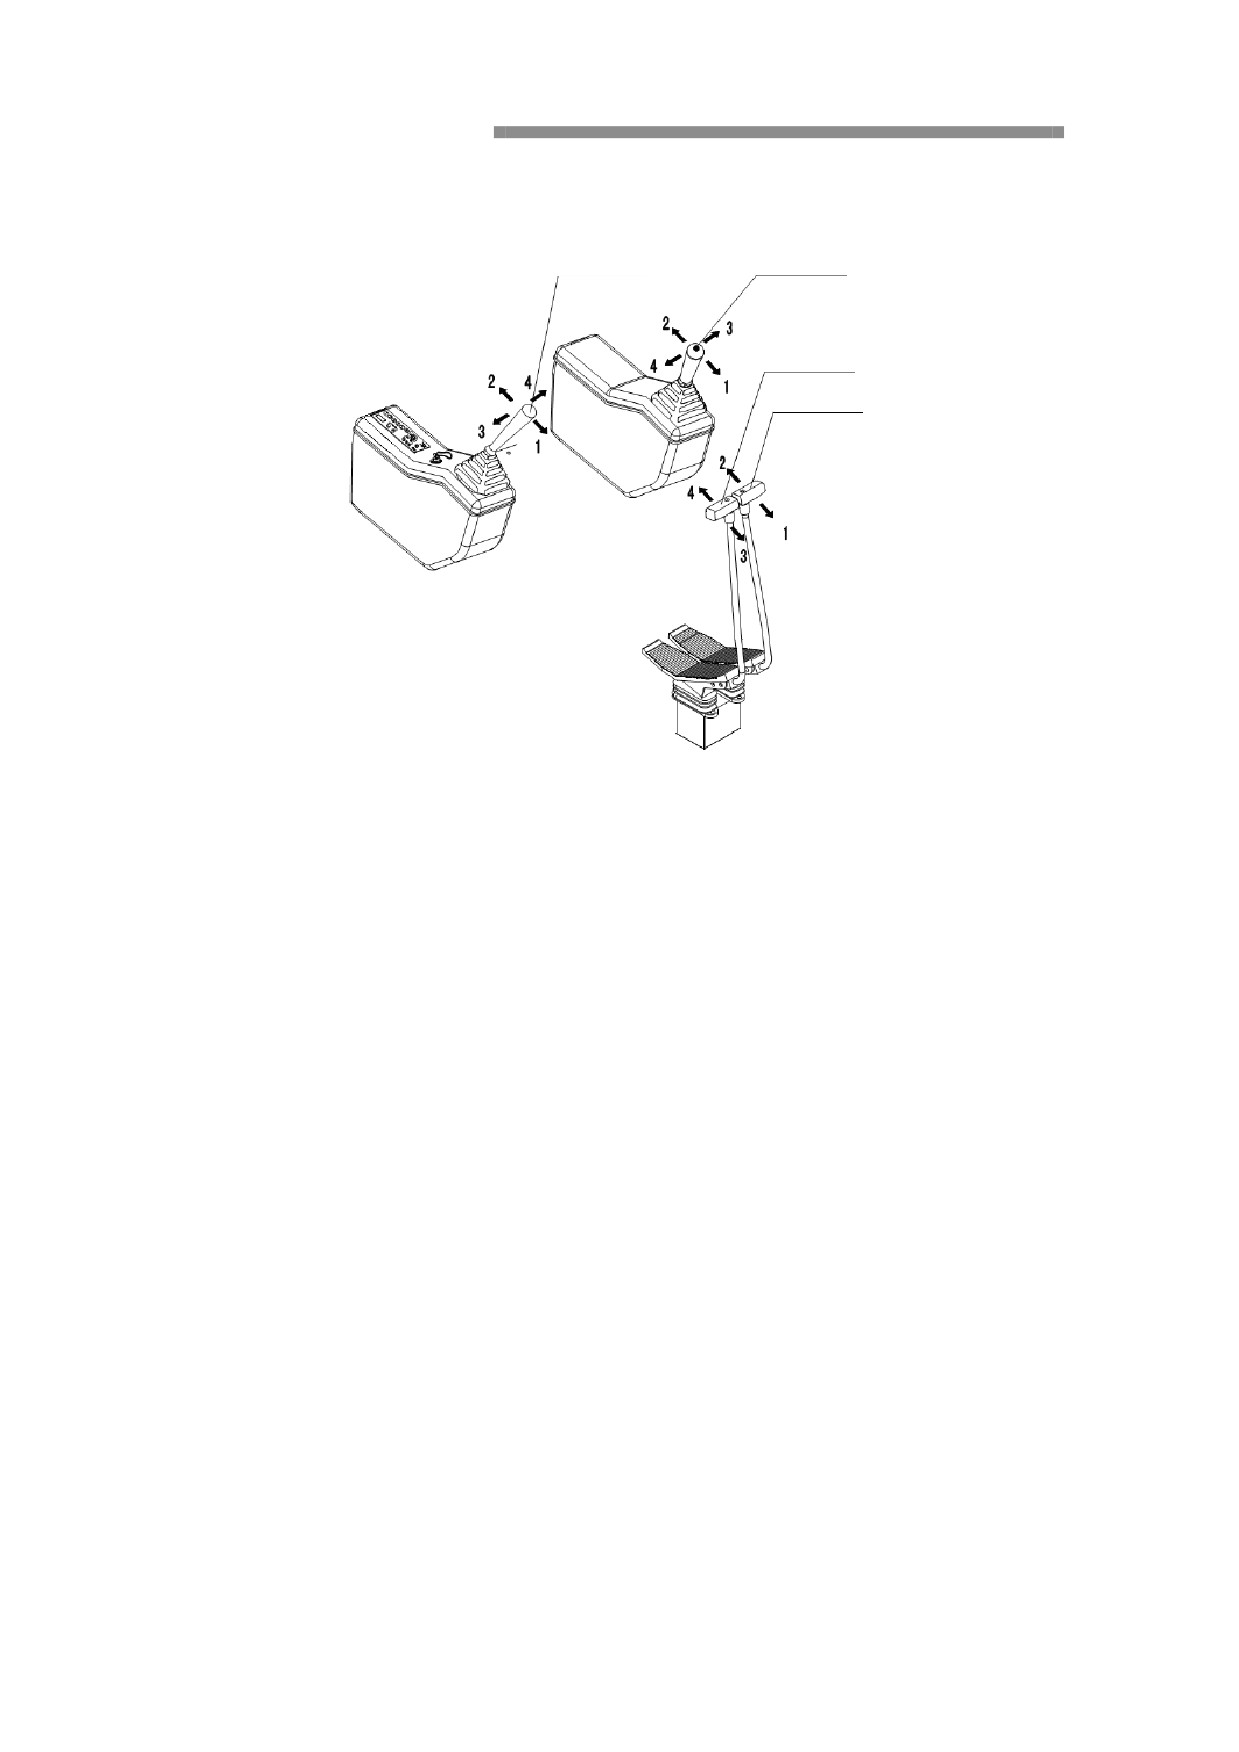
Controls
Control lever (RH)
Control lever (LH)
Travel lever (RH)
Travel lever (LH)
1.
Control lever (LH): This lever is used for swing and
dipper operation.
1 Dipper extension
2 Dipper retraction
3 Swing left
4 Swing right
2.
Control lever (RH): This lever is used for boom and
bucket operations.
1 Boom down
2 Boom up
3 Bucket rollover
4 Bucket rollback
3.
Travel lever/pedal
Warning
When operating, do not put your foot on the travel pedal.
When operating the travel lever/pedal, make sure that driving operation is in the reverse
order when the drive sprocket in the travel direction of the tracks is in front.
1 3 Forward
2 4 Backward
1 Turn right
3 Turn left
Operating 14 or 23 at the same time allows pivot turn.
Pedal (optional)
It is available when attachments such as breaking hammer and hydraulic shear are equipped.
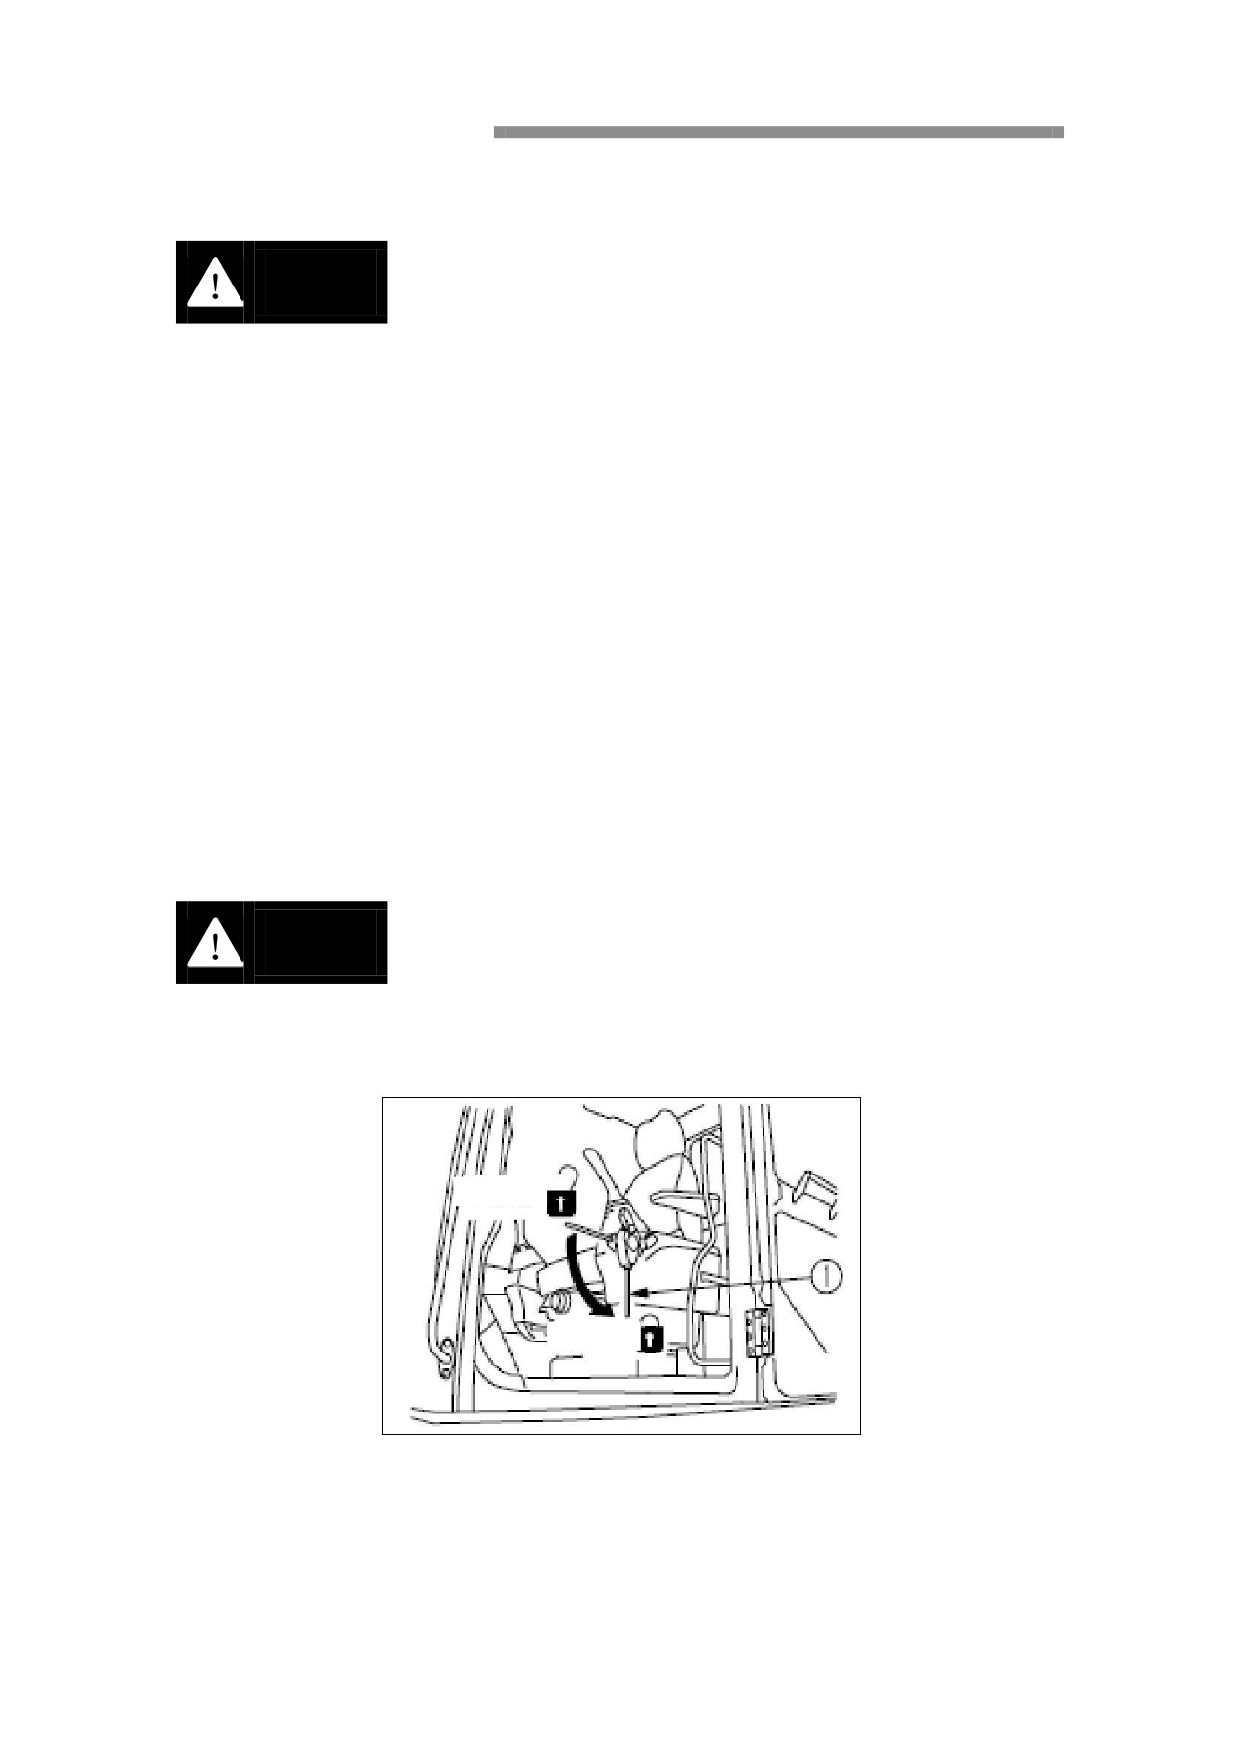
Safety lock system
Warning
Remember to rise up the safety lock lever before starting operation. When the safety lock
lever is not in position A (locked), the machine will move if any control lever is touched
inadvertently and thus serious injury may result.
B (Open)
A( Lock)
Safety lock system
A- Lock position (When the safety lock lever① is set to thi s position, you can start the
engine.)
B- Unlock position (When the safety lock lever① is set to thi s position, you can not start the
engine.)
This system is used to lock work equipment and swing and travel units.
CAUTION: When the safety lock lever is in position A (locked), all control levers are
inoperative. You can start the engine only when the lever is in this position.
Operator seat
Warning!
Only for a people sit
When the excavator working , we don’t adjust seat.
Avoid move parts
Installation and maintenance work should by authorized, qualified
personnel.
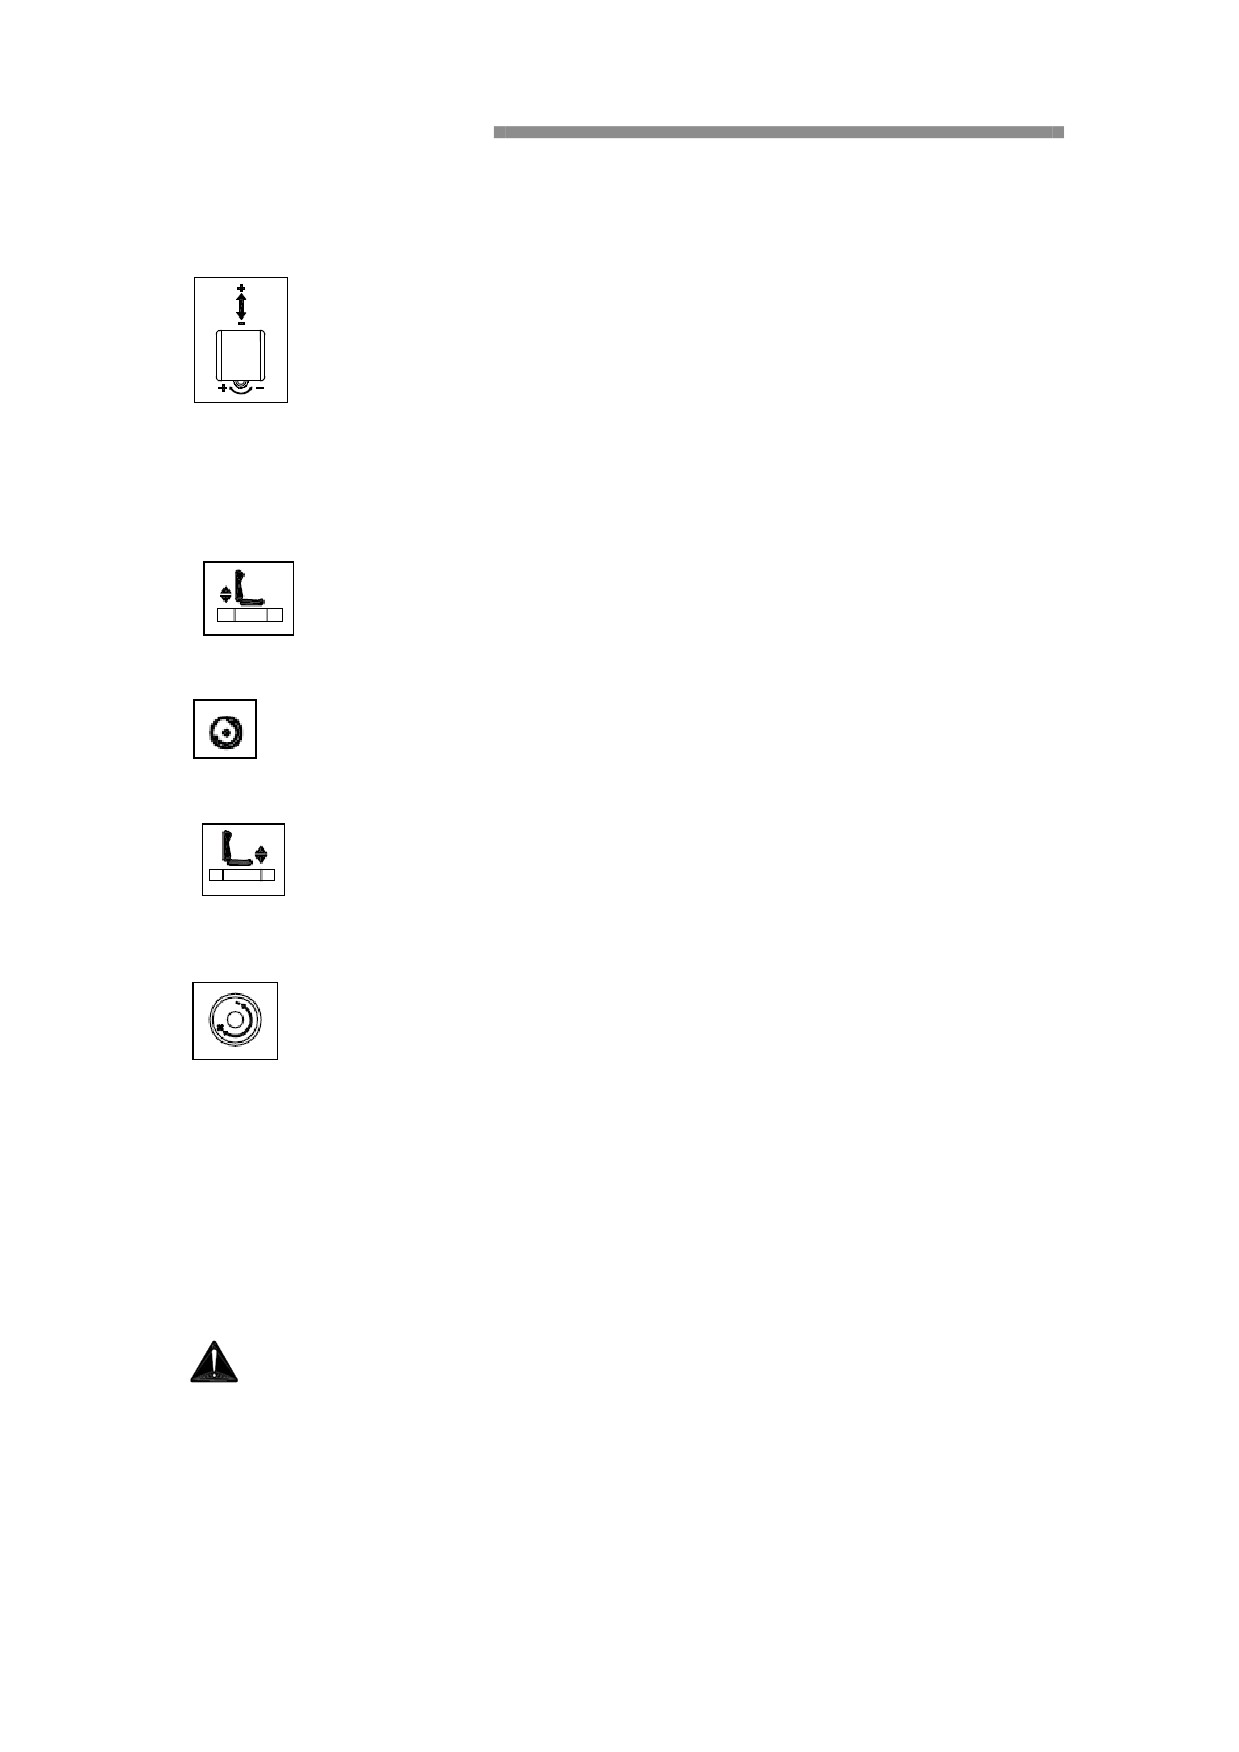
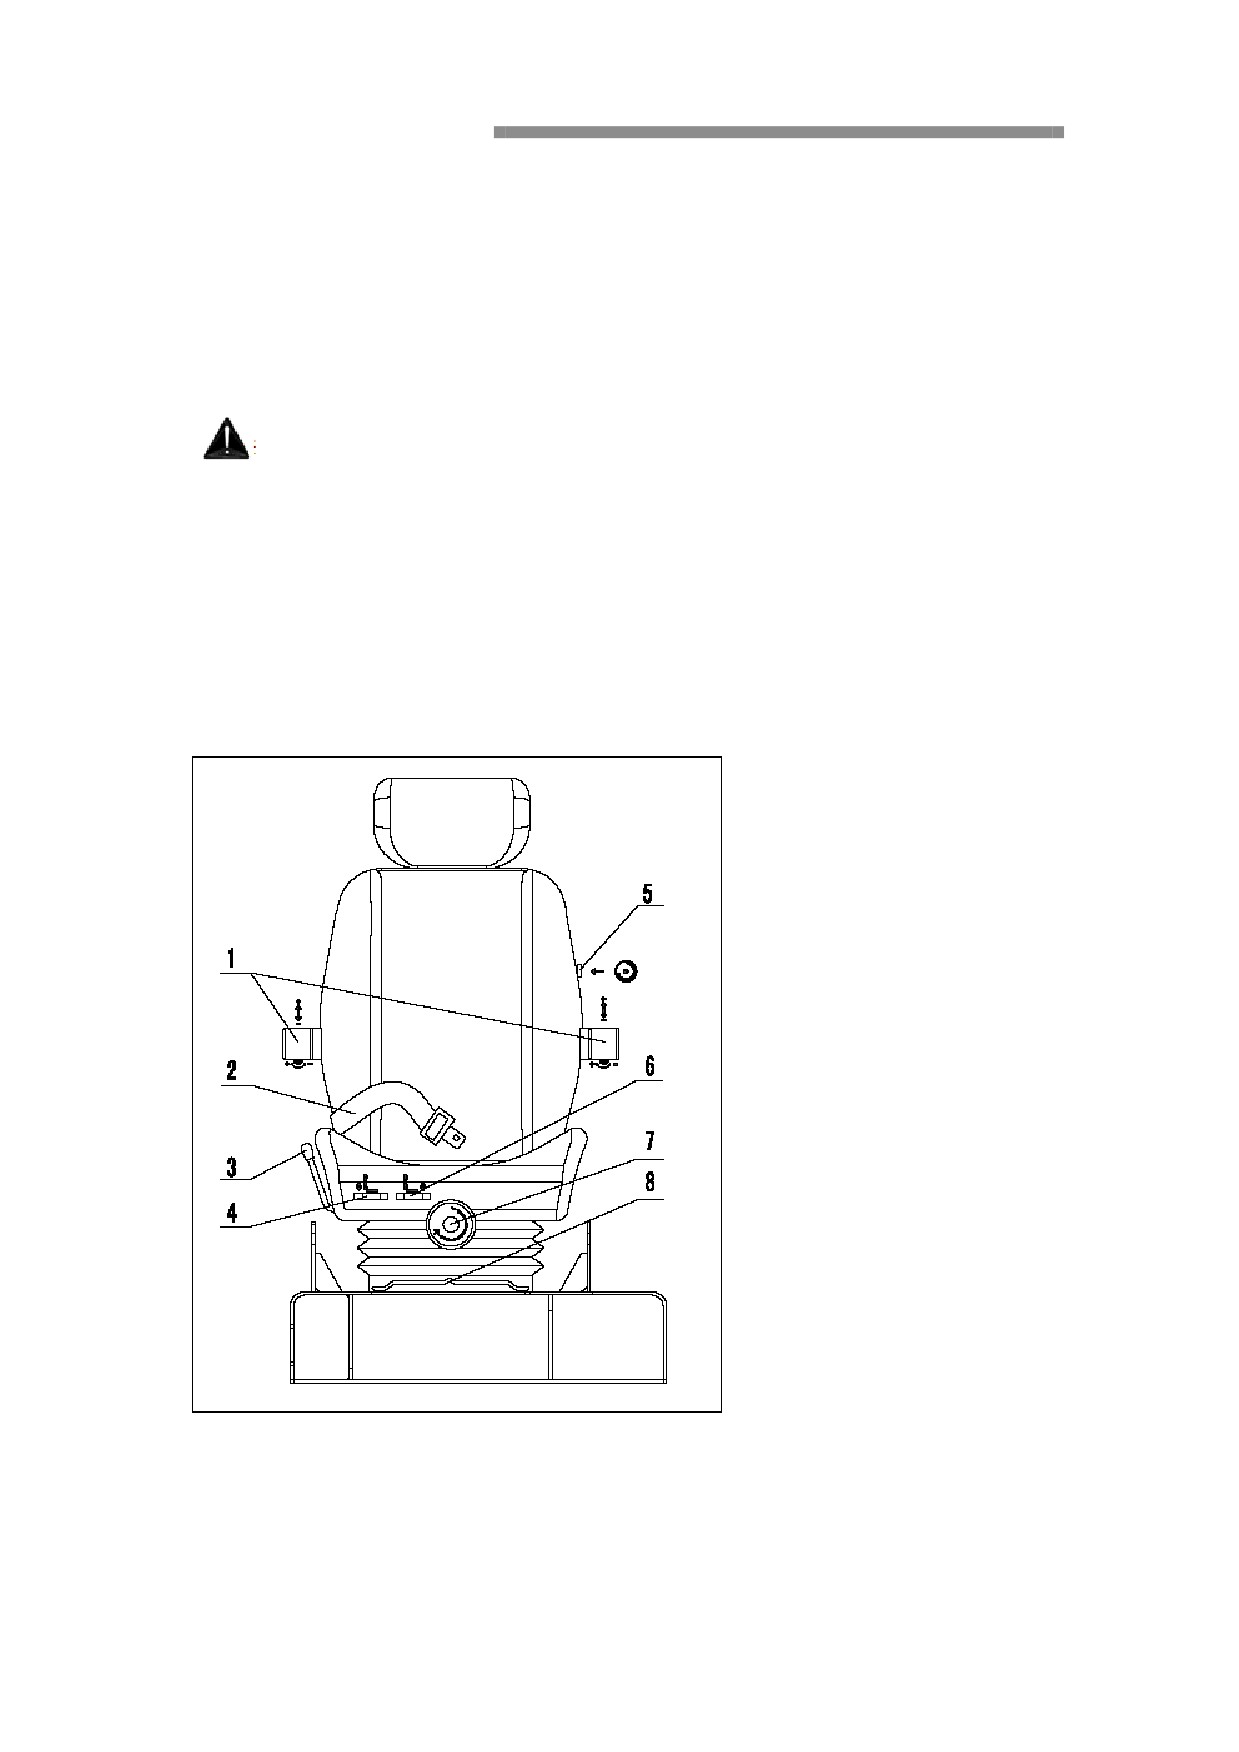
1. Armrest height adjust
Rotating below the roller, the armrest corresponding up and falling.
2. Safety belt
3. According to Back Angle adjustment
Backward push handle, the back seat adjustable to need Angle
4. Seat level to adjust
Upward uplift this handle, the back height seat can adjust up and down
4.
Waist support adjust
Rotating this handle , the back seat operator position can be bumps or indenting.
5.
Seat level adjust
Upward this handle, the front height seat can adjust up and down.
7. Weight adjust
+ sign rotating operator the heavier the weight, - sign rotating the more
light.
In order to get the best comfort, we should use right way to adjust the operator seat ,
because it is important.
8. Seat position front and back adjustment
Upward draw this handle , the seat can move front and back.
Safety belt
Warning
--If safety belt wear、 damage or have an accident lead to the seat
belt deformation, should be replaced immediately your seat belt.
If safety belt need clean, it must be:
Use neuter soap fluid
Before roll up the seat belts, let it fully dry in the case of Fully stretched
Ensure safety belt with correct installation method
-- Do not allow to seat belts and stent for any modification
--Safety belt is limited to use for a adult.
-- No matter whether the seat belt use, must be replaced once every two years.
Cab and window
Open the front window
1. put work device on the ground
2. With both hands before holding two handle above at the same time use forefinger
pull loosen front window above two window switch
3. Stay at the bottom of the front Windows and below the window arris contact
before pushing the window window location to switch the window switch can be
stuck.
Notice: There is no need to use a hand to turn front window switch.
Open and close the transom window of cab
Loosen the front two clips of the transom window, and then push up light can open the window
cab, close the transom window just hold his hand down a little hard to buckle the lock .
Cab door glass
Cab for two pieces of glass door of push-pull type with lock glass, can according to need to
open or lock
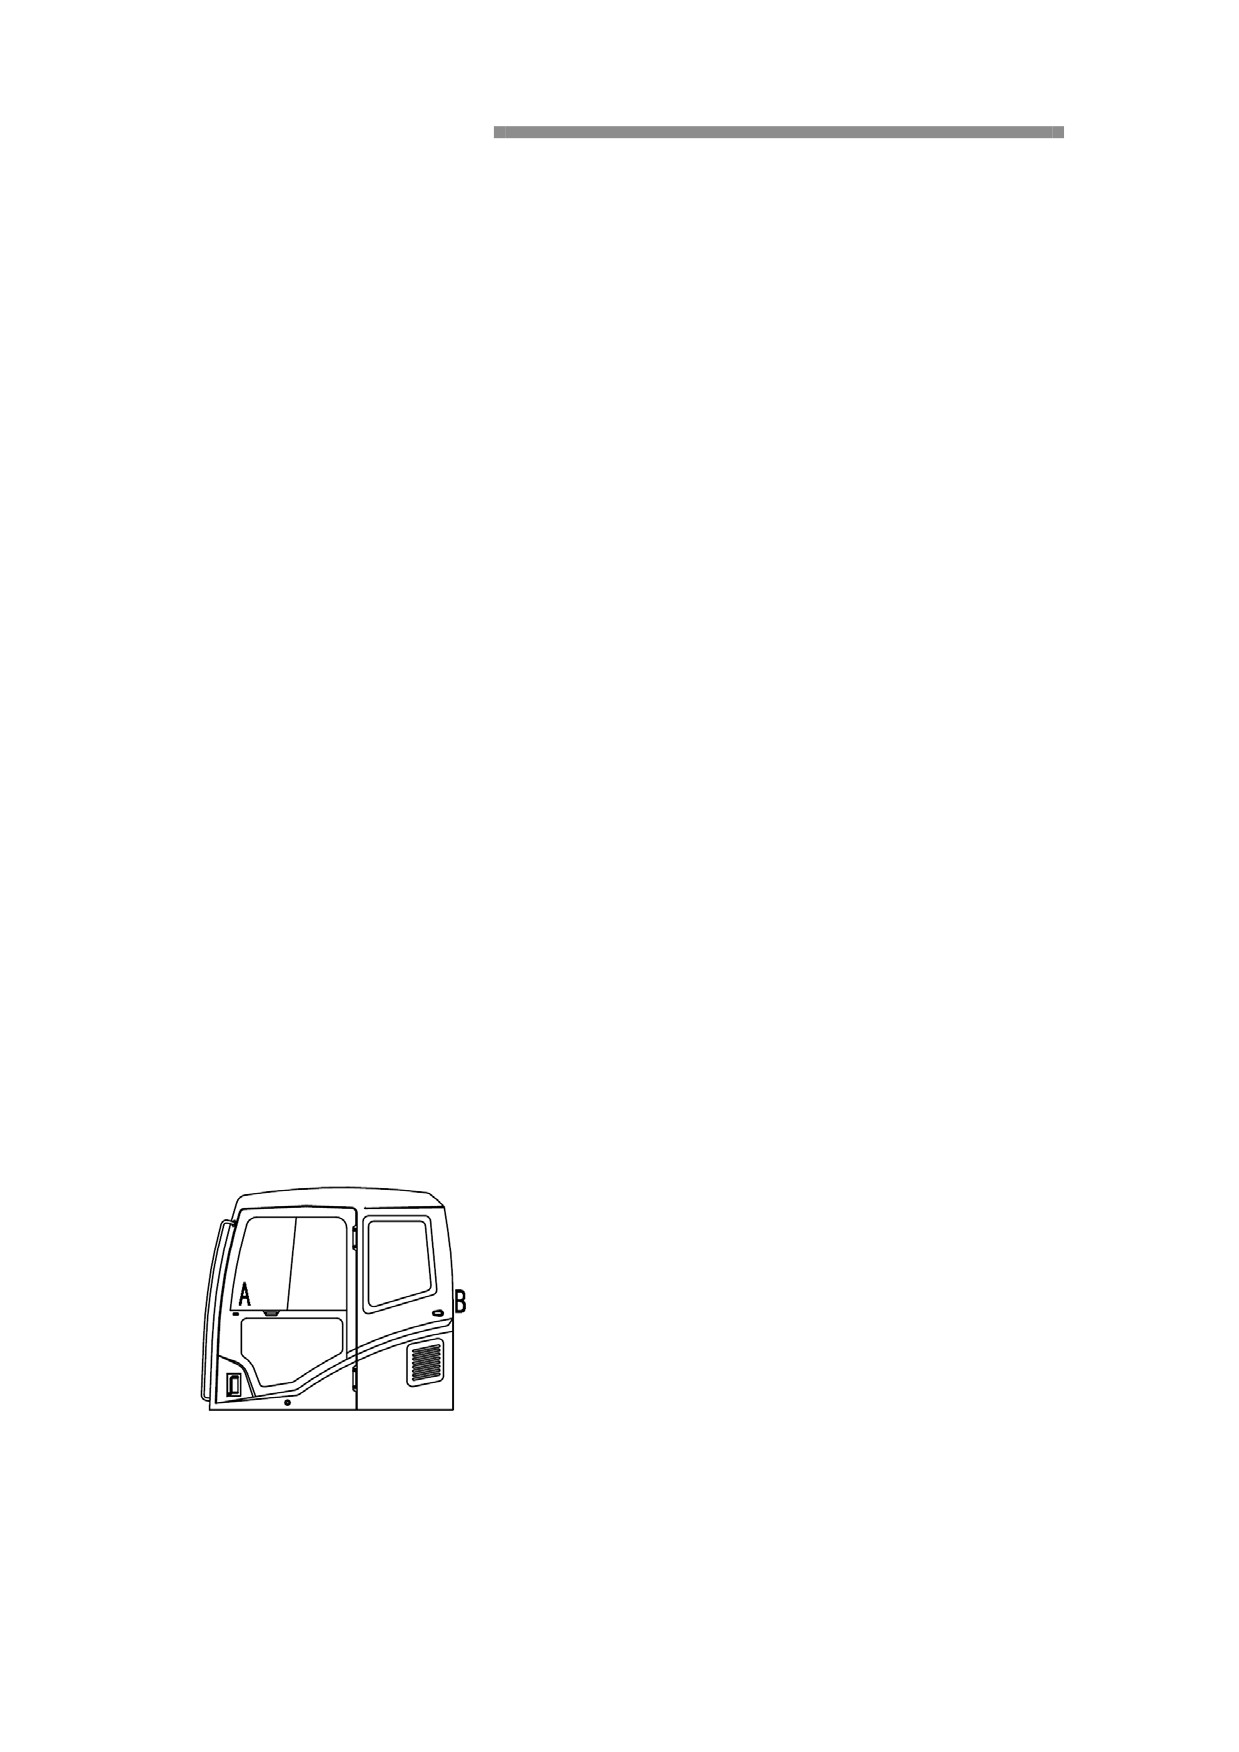
Cabin door lock tight system
The system use for cab door to keep opening state
1. push the cab door to outboard
2. Ensure cab door card buckle (A) firmly card into (B)
Press close to the cab door below the pivotal point position black rubber handle can loosen the
cab door
Fire extinguisher and emergency exits
Fire extinguisher (optional)
According to the following method, install fire extinguishers
Withdrawing the left column of indoor driving position two bolts, and then install a
fire extinguisher
emergency exits
Cab have two exits, respectively is door and rear window, if an emergency can't
escape from cab door smoothly, can pull the edge of glass after hard steel ring, and
then push hard pressure glass edge horn position, glass can be whole fall off, and then
the escape from the rear window.
Cab lighting
Cab indoor reat near side pillar position have a cabin lights
OFF-close ON-open
Cigarette lighter
Press the cigarette lighter, A few seconds of its core activities upspring to its
original position, can use at this time, A cigarette lighter as emergency power socket
to use, working voltage 24 V, allow maximum current 5 A.
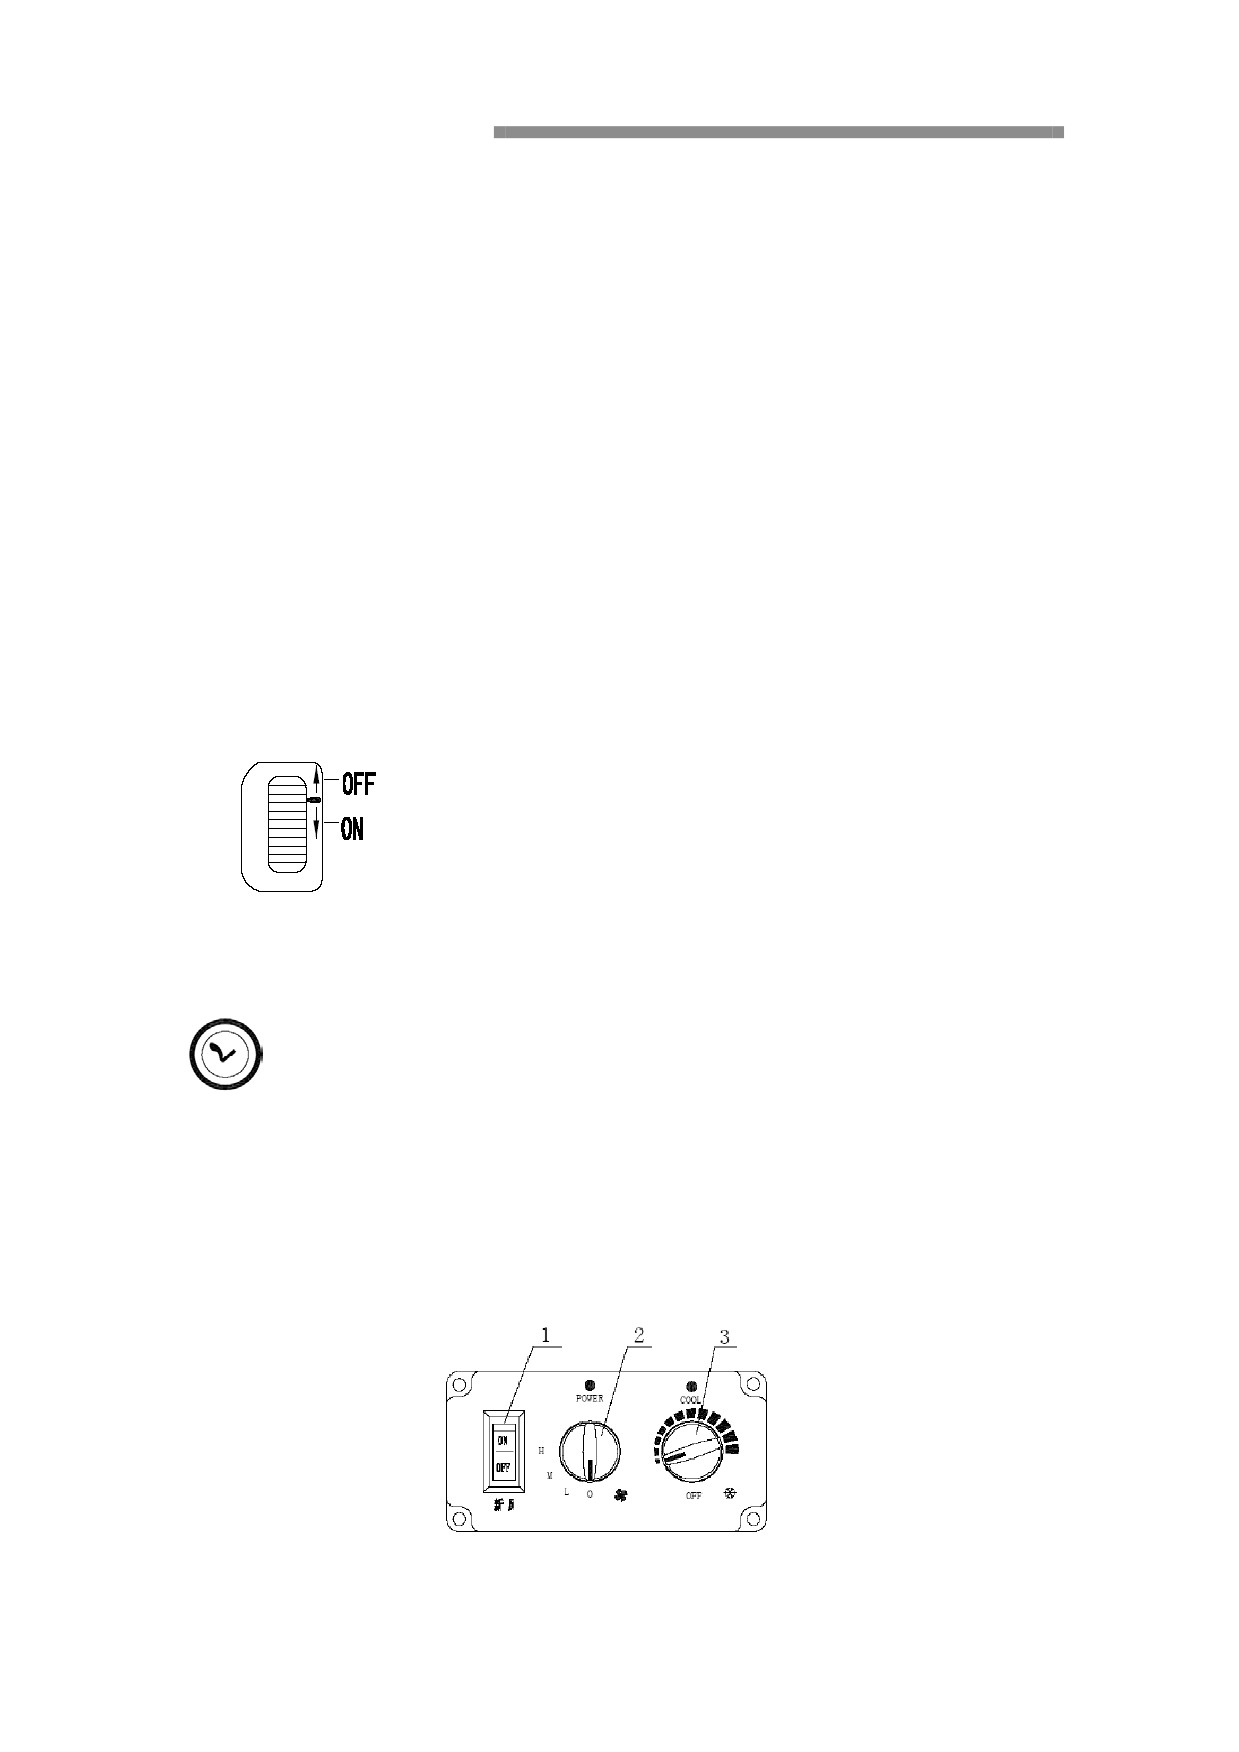
A/C system
Fresh air
First open air-condition power, see buttons that twelfth item
1. Fresh air switch
·ON Air conditioning into fresh air
·OFF Air conditioning into fresh air close
2. Refrigeration switch
·O evaporator fan close
·L evaporator fan weak wind
·M evaporator fan middle wind
·H evaporator fan strong wind
3. Temperature adjustment switch
Clockwise rotation target temperature decrease
Warning!
When only open the evaporator fan switch to, so that can open refrigeration switch,
after use of air conditioning heating should open the engine hot water valve body side
then open the evaporator fan, at this time, do not open the refrigeration switch!
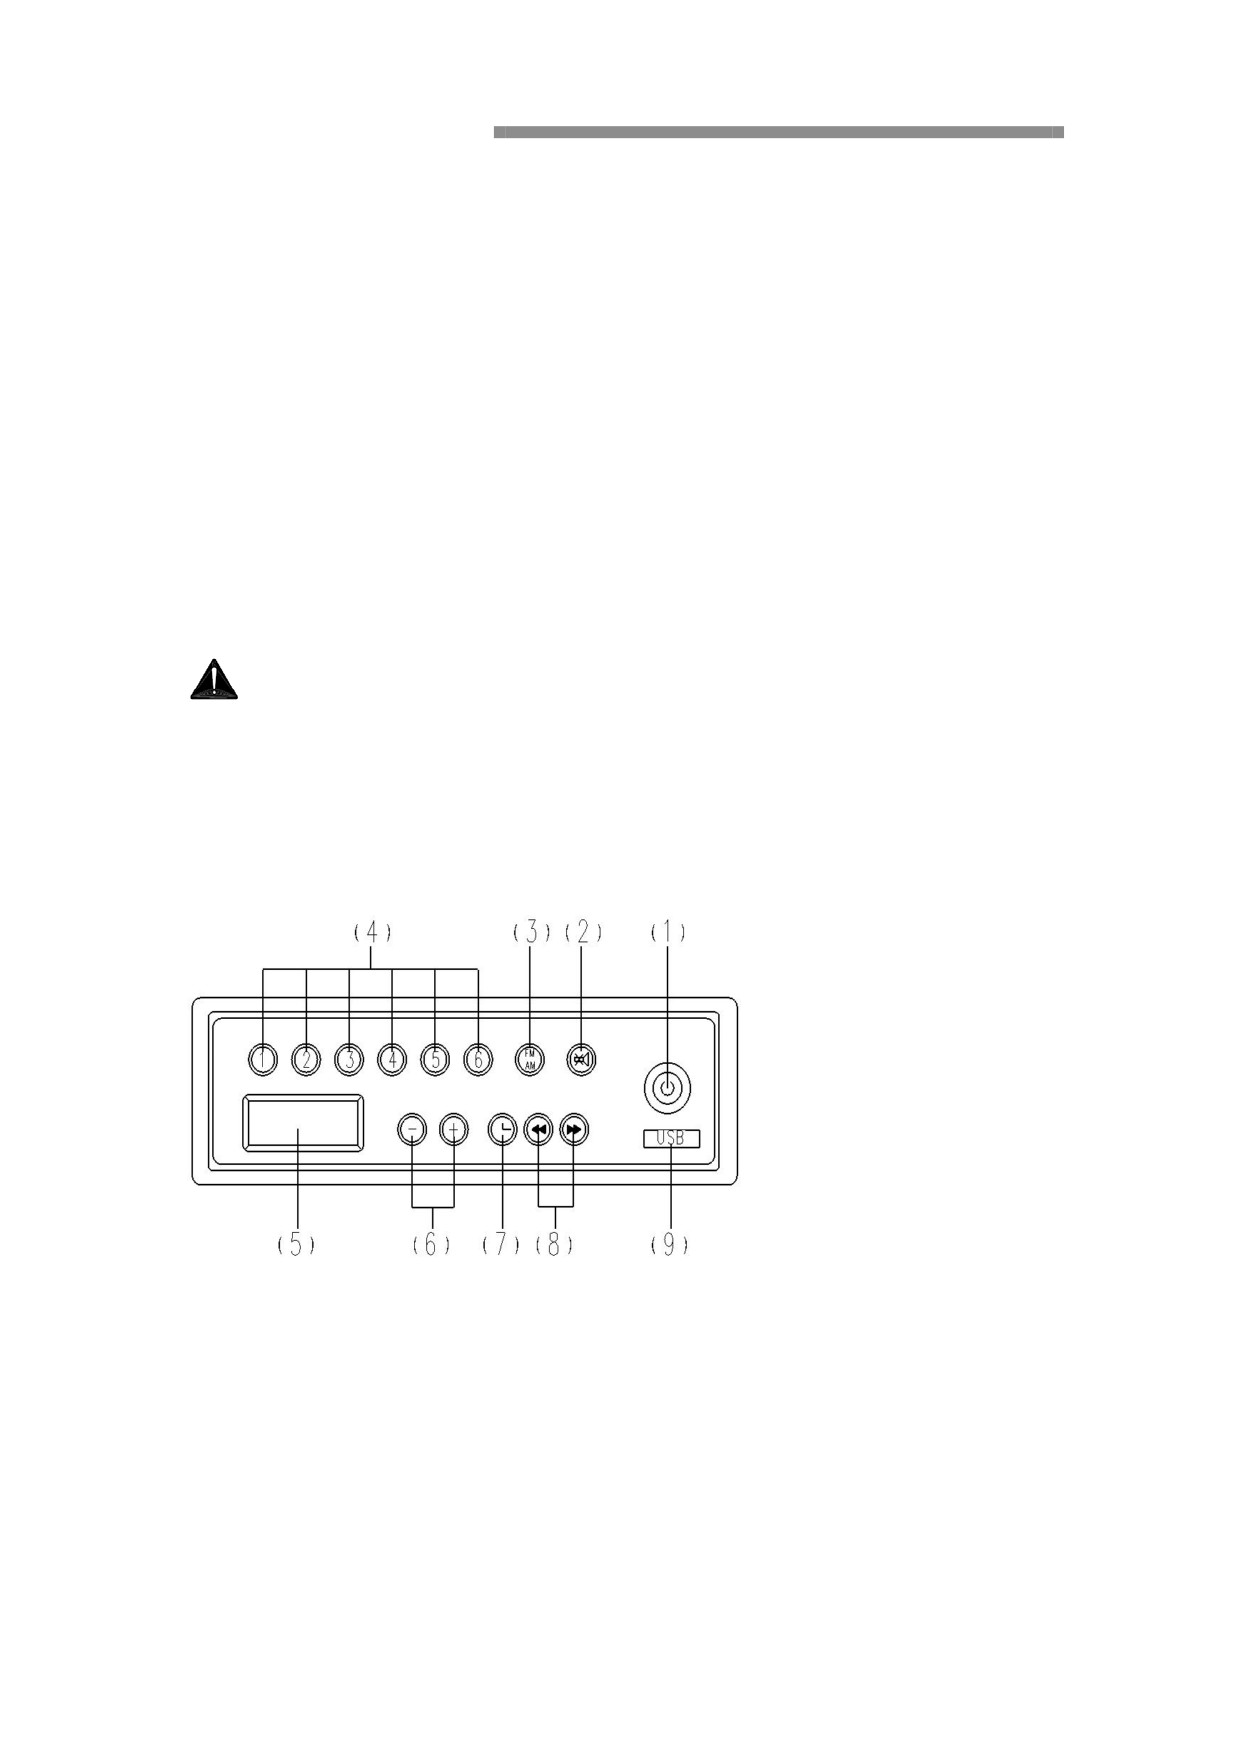
Radio/MP3 player
1. Power / Model
i. Power switch, short press to poen, and long press in working
to power off.
ii.
Model shift, short press in working to shift redio and MP3
2. Silence/Loudness
i. short press, silence is on/off
ii.
long press, loudness is on/off
3. APS automaticly save channel/band
i. short press, shift in FM1/FM2/AM1/AM2
ii.
long press, search channel from low frequency in present band,
and save in radio in order
4.
Preset radio
i. In aural reception, short press to select preseted radio, long
press to save.
ii. When the MP3 is playing,
⑴pause/play
⑵SCN/play
⑶RPT/play
⑷RDM/play
⑸DISP/play
5.
LED screen
6.
VOL+/-
7.
SEL sound effect/clock set
i. short press to show clock, short press in 5 seconds to enter
into sound effect setting
ii.
when the clock is showing, long press to set clock.
iii.
without press in 5 seconds to show play information.
8.
radio search/chapter select
i. search channel when the radio is on
ii. select chapter in MP3
9. USB connector
Operating instruction
Introduce
The chaper contains information about the operation and safety regulations, to ensure
that the machines are correct, running safely and operation, must abide by these
regulations.
But, abide by these regulations does not mean that the operator can not abide by the
national, provincial and municipal transportation safety, traffic safety, industry safety
and welfare and laws and regulations of the responsibilities and obligations
Grinding-in instruction
Overview
Important!
Always check the hydraulic oil pressure and temperature.
In the first 50 hours only, should be careful to operate the machine, it will
improve the bearing surface hardness and all the smoothness, which greatly
improve its life.
The following is relevant in the Grinding-in period of Grinding-in and interval
for description.
Engine
Every 500 (or 250) hours should be replaced a lubricating oil and lubrication oil filter.
In 500 (or 250) hours oil changing and lube oil filter premise is:
--Every time it oil filter must be replaced;
--Lubricating oil filter must comply with the specifications of the Cummins engine
company and quality requirements
--Engine fuel shall not exceed the sulphur in 0.3% of the weight computation;
--Lubricating oil quality level must conform to the specifications of the lubricant
recommended requirements; If you can't meet any one of the above conditions, or
machine in acid and dust under the environment of the big special work, every 500
hours should be replaced lubricating oil and filter
Hydraulic system
Hydraulic oil filter back to filter, hydraulic oil oil absorption filter core and guide oil
filter core must in the first 250 hours after the replacement.
Later, return oil filter core and oil absorption filter core every 500 hours change once,
guide oil filter every 1000 hours change once.
Rotary motor reducer and walk motor reducer the lubricating oil should in the first
500 hours after replacement.
After, rotary motor reducer of oil every 1000 hours should be replaced, walk motor
reducer of oil every 2000 hours should be replaced.
Safety and Responsibility
Operator responsibility
Operators have a responsibility to understand the operation of the potential danger of
field, as well as to the mechanical operation and personnel to the specific requirement
of the security. This is to avoid serious personnel, property damage and deadly
accident happened necessary conditions.
Other personnel's responsibility
--Operate the machine, must avoid any damage and accidents. Operators have the
obligation to have a responsibility to prevent such accidents.
--When the machine to work, such as did not inform the operator, no one can get into
the machine work area. If someone must enter the machine to work area in some work,
must be careful, don't reason go behind from the machine or appear in danger area.
--If someone in the machine to work area, the operator must be extra careful, and only
in determine its position after they operate the machine.
Damage
When there is a endanger the safety of the operation damage and wear, the operator's
responsibility to report.
Operator qualification
Warning
Only trained personnel can operate machine.
Warning
Don’t stop in the working machine that will obstruct operator correct and safety
operate machine.
Machinery common sense
During the machine in the check, maintenance and repair work period , only
understand machine operation and instrumentation control personnel to can be in cab
indoor.
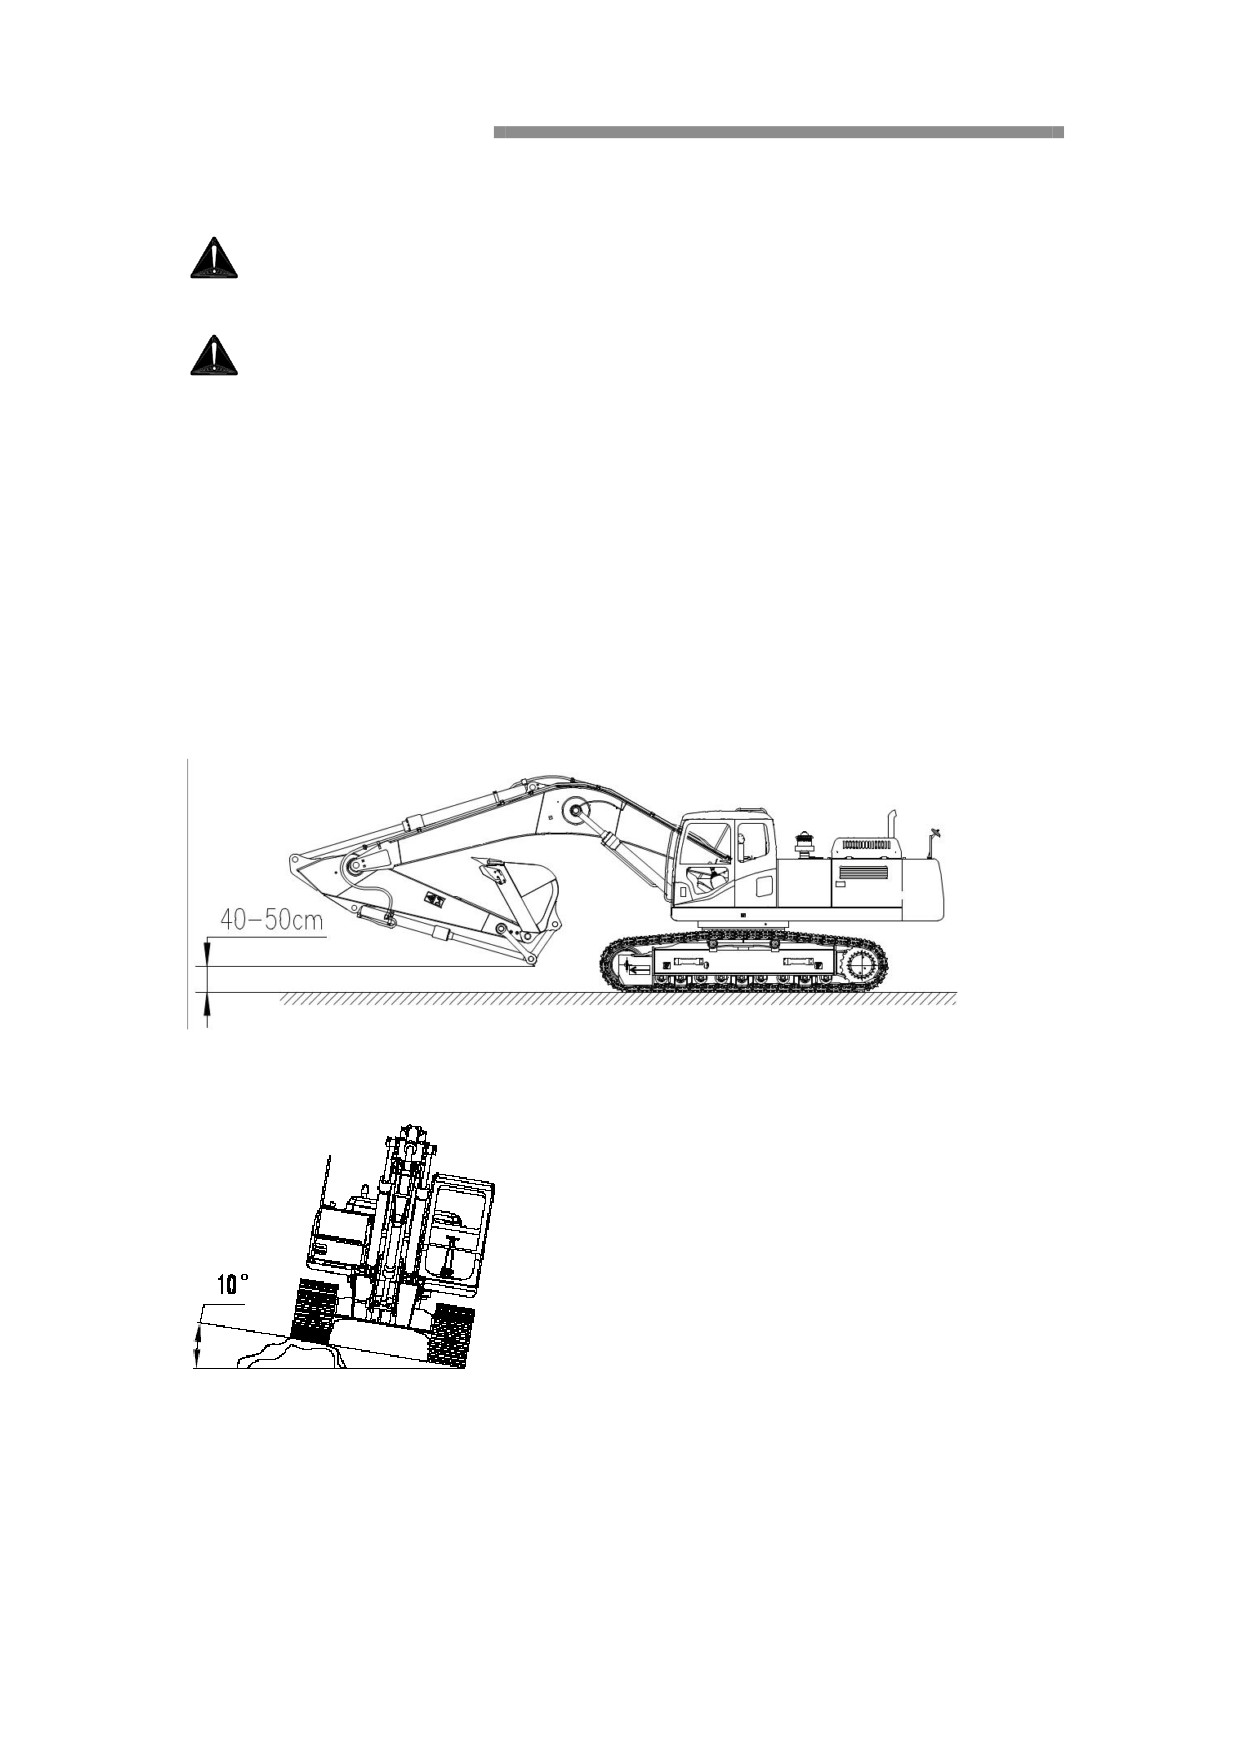
When walking the matters needing attention
As in a flat floor walk, must will withdraw working device, and the raise, make it
from ground 40 to 50 CM.
As in the rough ground to walk, when operating Angle don't is more than 10 degrees.
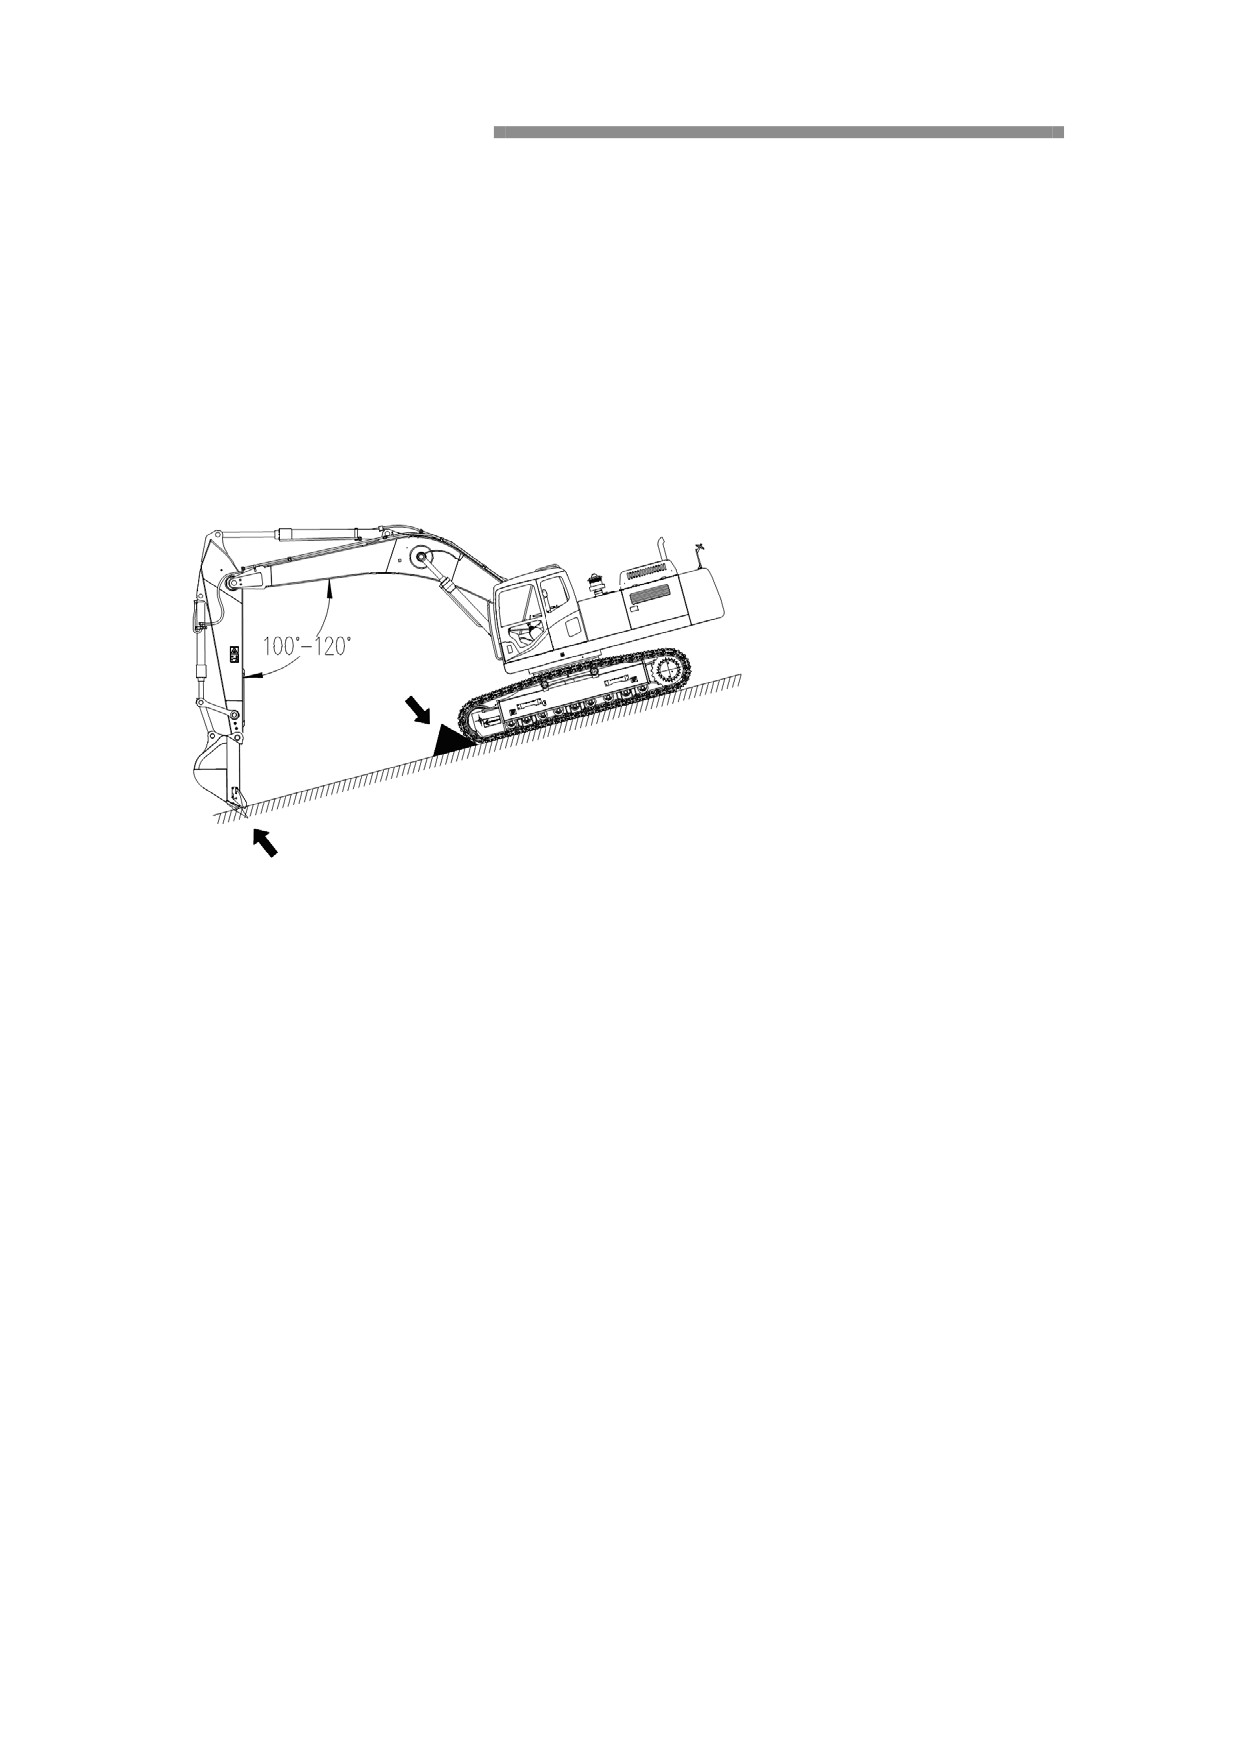
As in 15 degrees or more on the slopes of the walk up, should make the machine as
shown in figure. If the crawler sliding, but will push the bucket into the soil, To help
propel machines up traveling mechanism.
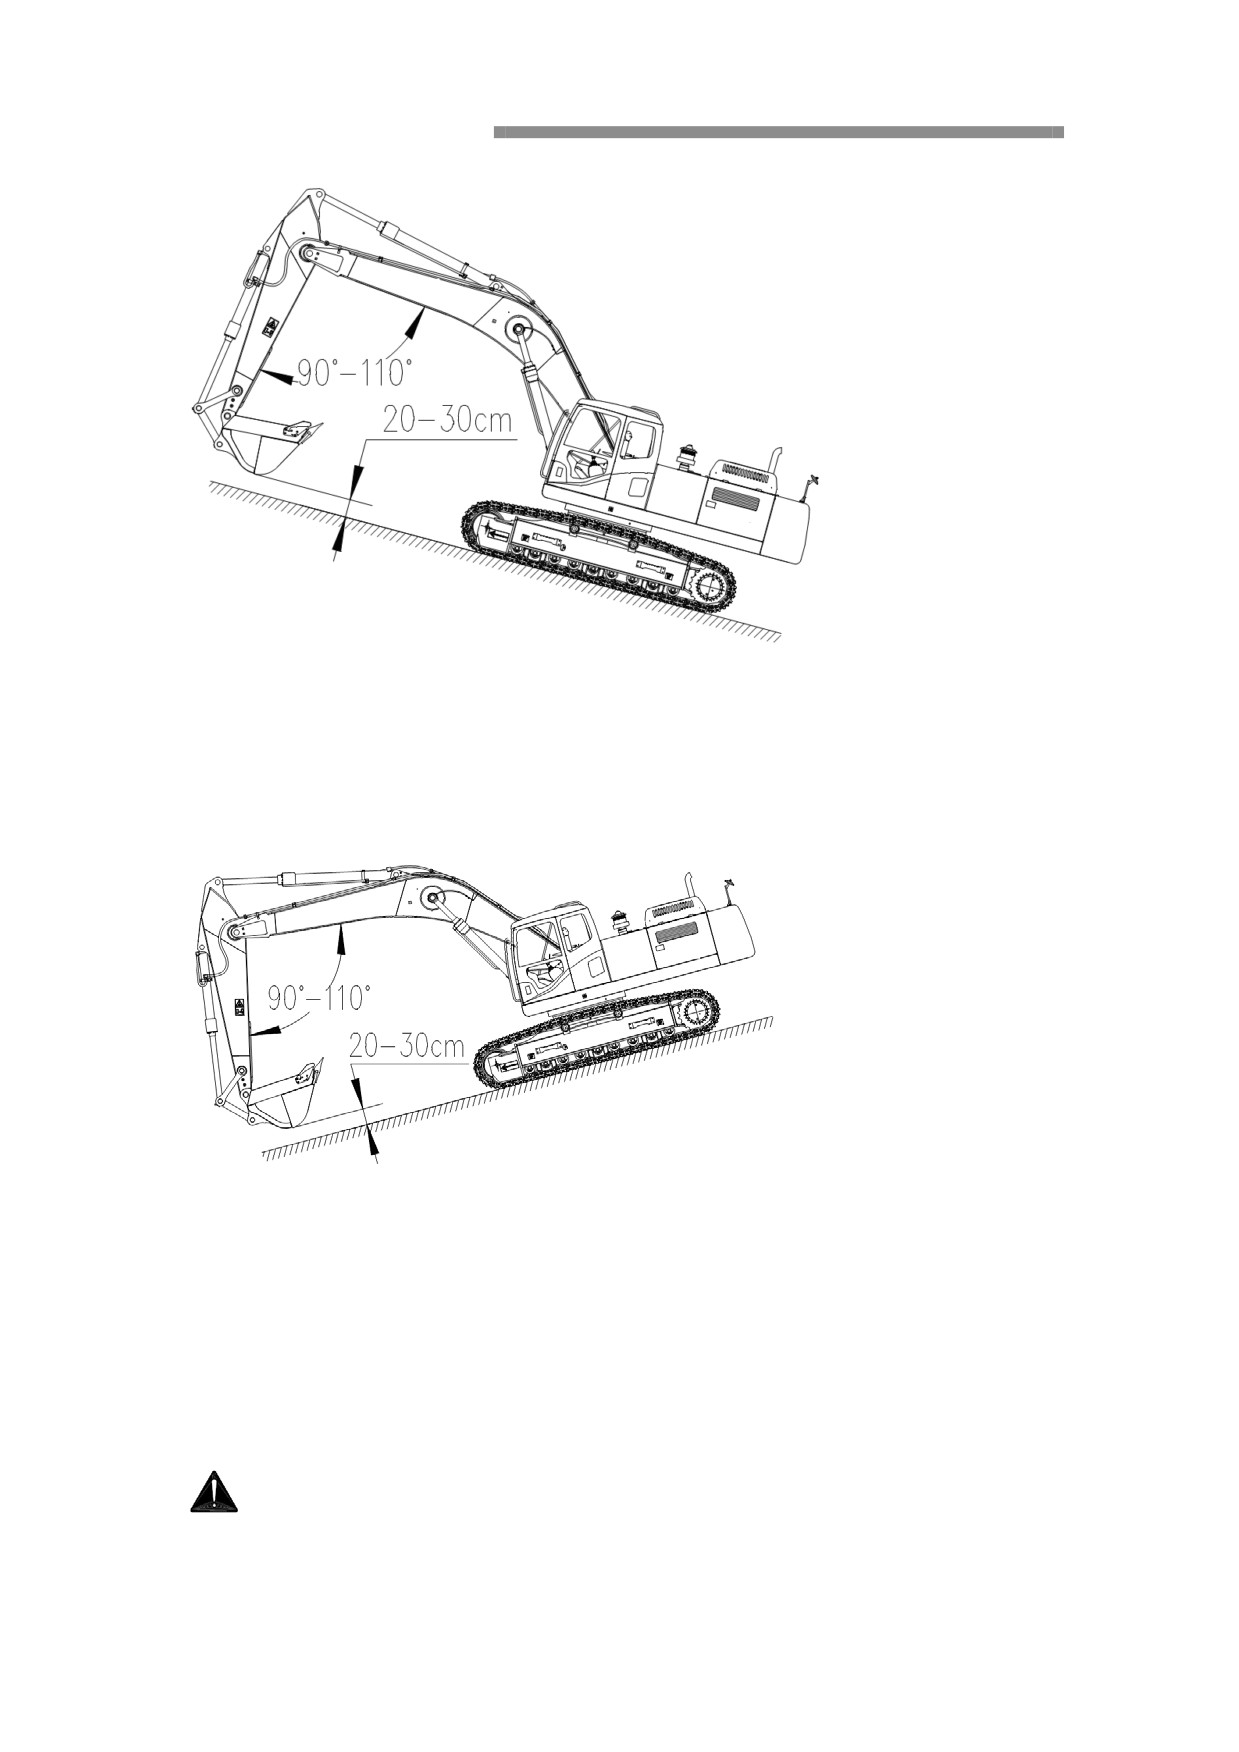
As in 15 degrees or more on the slopes of the walk down, should make the machine as
shown in figure. And walk at low speed.
Don't close to the high tension line
If the machine close to the high tension line, personnel maybe shock. Although
not sure touch directly, still will have danger. If work near the high tension line ,
prohibit all personnel close to machine. Before work close to the high tension
line, first contact electric power company. In order to safety, the machine and
the high tension line must be kept below minimum distance.
Allow the depth of water
Warning!
When from the water out, if the upper body back in the water, the engine fan may be
damage. Meet the situation should be especially careful.
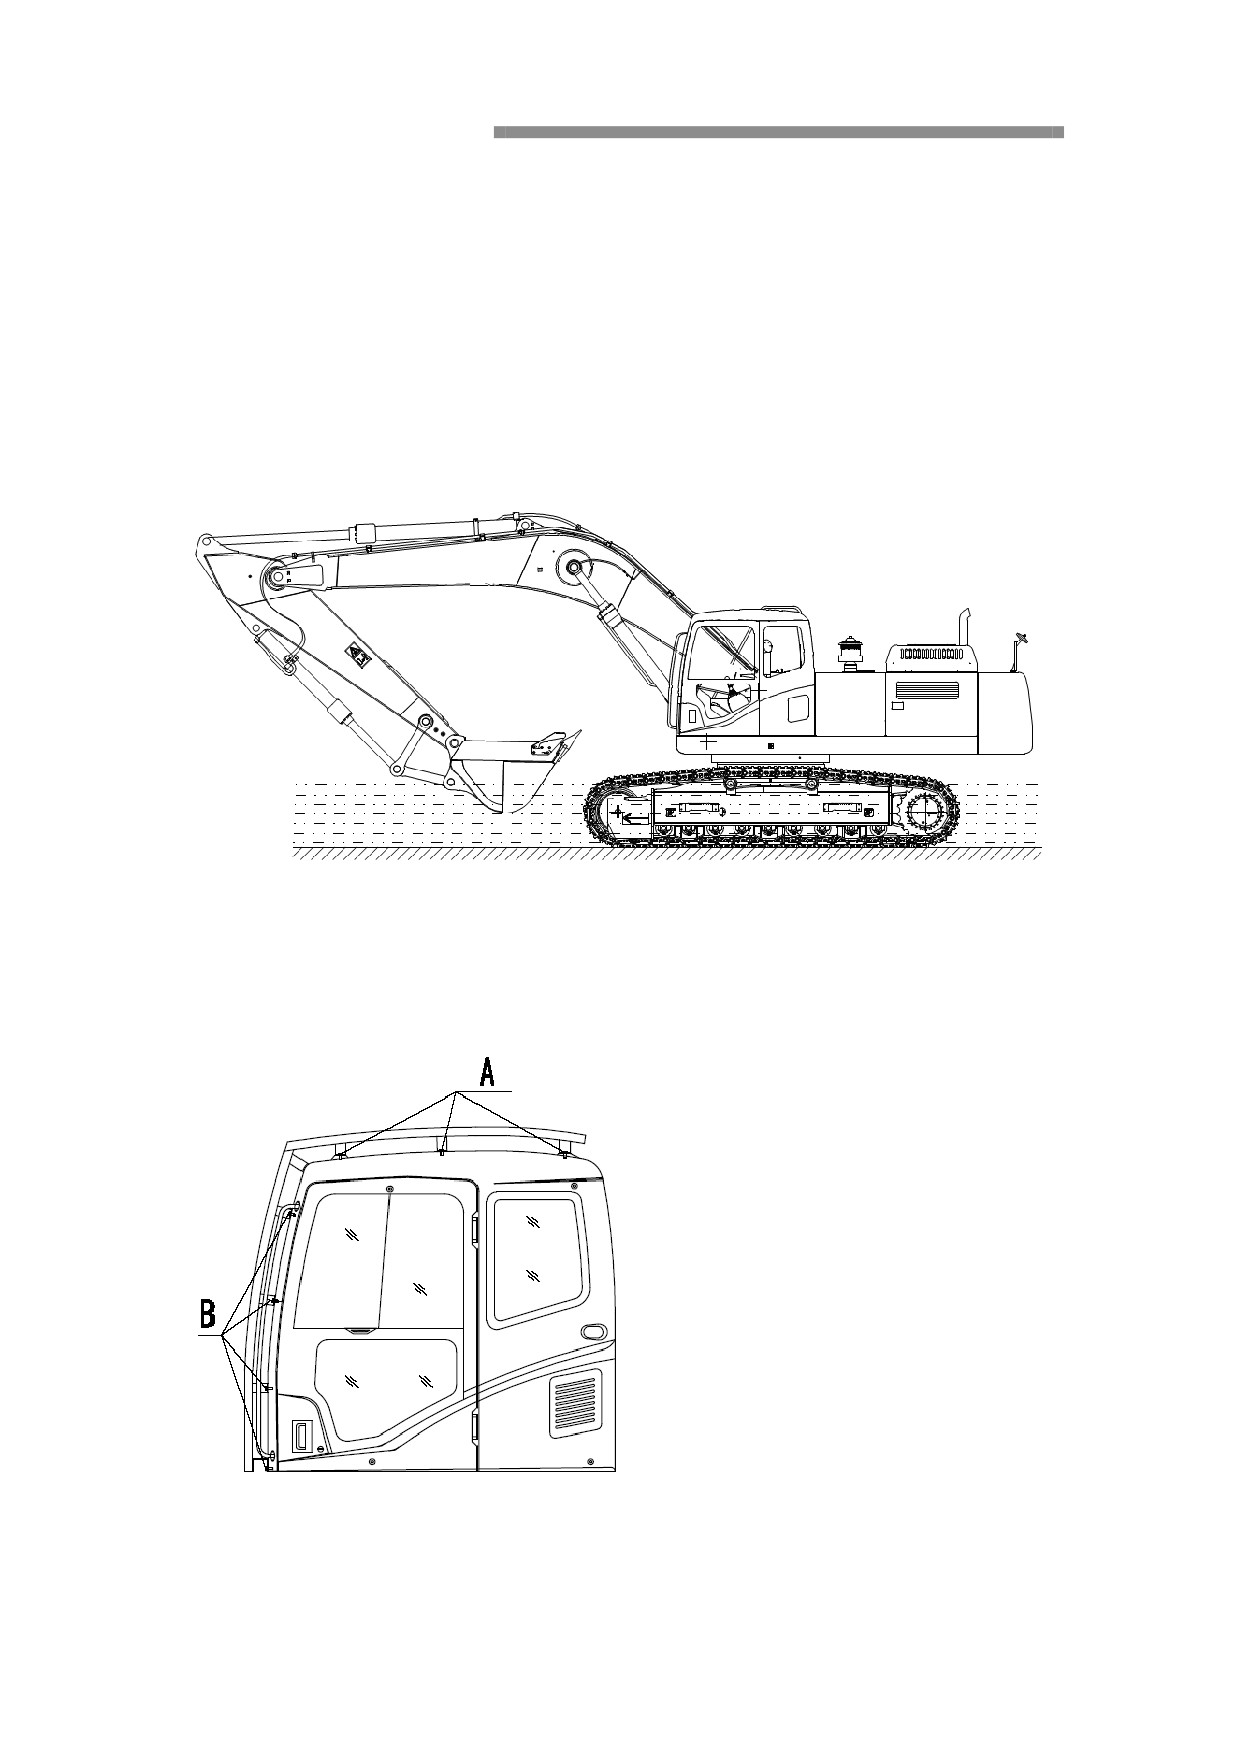
Allow the depth for the sprocket center line
Don't completely submerged chain
In the left waters, whether in maintenance cycle in time and again by filling water
submerged parts of the grease
As in water stay time work more than eight hours, also check motor reducer of
lubricating oil walk it has already been pollution, if necessary, to be replaced
immediately.
Cab Prevent falling objects protection device
According to the working conditions, in the presence of a drop and splash and could
harm the driver's work environment, must be installed the corresponding cockpit
protection device, if machines installed protective equipment defect, please do not
continue to use, contact nearby authorized agent services for help and replace it.
In broken work should be installed front protection device.
In mining operations must be used in things fall protection device.
In other assignments to fall or in the scattered materials may enter the roof of the cab
parts should be installed protection device;
To ensure the personnel that has nothing to do with drop between has a safe distance.
. A place for mounting bolts or removes the guard board
. B bolts used to install or dismantled before the board
Bolt: M12 provisions torque 120 + 12 N.M
Front protection device impact absorption power 5800 J
The top protection device impact absorption power 11600 J
The previous on top and protection structure accord with ISO 10262:1998 standard
requirements, the protection device meets EMC0502.1 C6 standard requirements.
Warning!
When things fall protection device defect in the above-mentioned circumstances do
use, don't use other accessory device without permission, without the company strong
construction machinery co. ltd agreed to use other accessory device cause accident or
damaged by the machine, the user must bear the responsibility.
Machine transportation
Loading and unloading
Warning!
The machine transportation, shall abide by relevant load weight, height, the length of
the related laws and regulations.
Choose a solid and level ground, and to the curb and road with sufficient distance.
Remove the debris such as the oil may cause machine sliding.
Choose low speed operation
Loading machine
1. Trailer reliable brake;
2. In trailer tires below placed prevent slippery triangle pad;
3. Ensure that pulled a load platform inclined ladder steady, strength, and width size
enough security;
4. Pulled a load of inclined ladder platform to 15 ° maximum horizontal Angle, should
be as small as possible, and or so highly consistent;
5. Work with a low speed;
6. Cancel the automatic idle;
7. Direction, slowly moving to check on the platform;
-don't will bucket oil cylinder stem met on a trailer
-the machine at the trailer platform, try not to walk outside the operation for any
handles.
8. Firmly fixed on a trailer in the machine.
See 19 hoisting or a fixed position, and another frame under the X board place round
hole can also be used to fixed machine
Fixed machine
1. Raise safety lock handle;
2. Shut down engine, remove the start-up key;
3. Close battery switch;
4. Lock the accumulator switch;
5. Using a triangle pad is fixed crawler ends;
Use wire rope fixed in a fixed position, make the machine can't move.
Dismantlement fot transportation
Note: transportation, to abide by local, provincial and national relevant load weight,
width, height and length and so on the related regulations. In the choice of transport
routes, want to consider all sorts of bridge and road traffic and limitations of time.
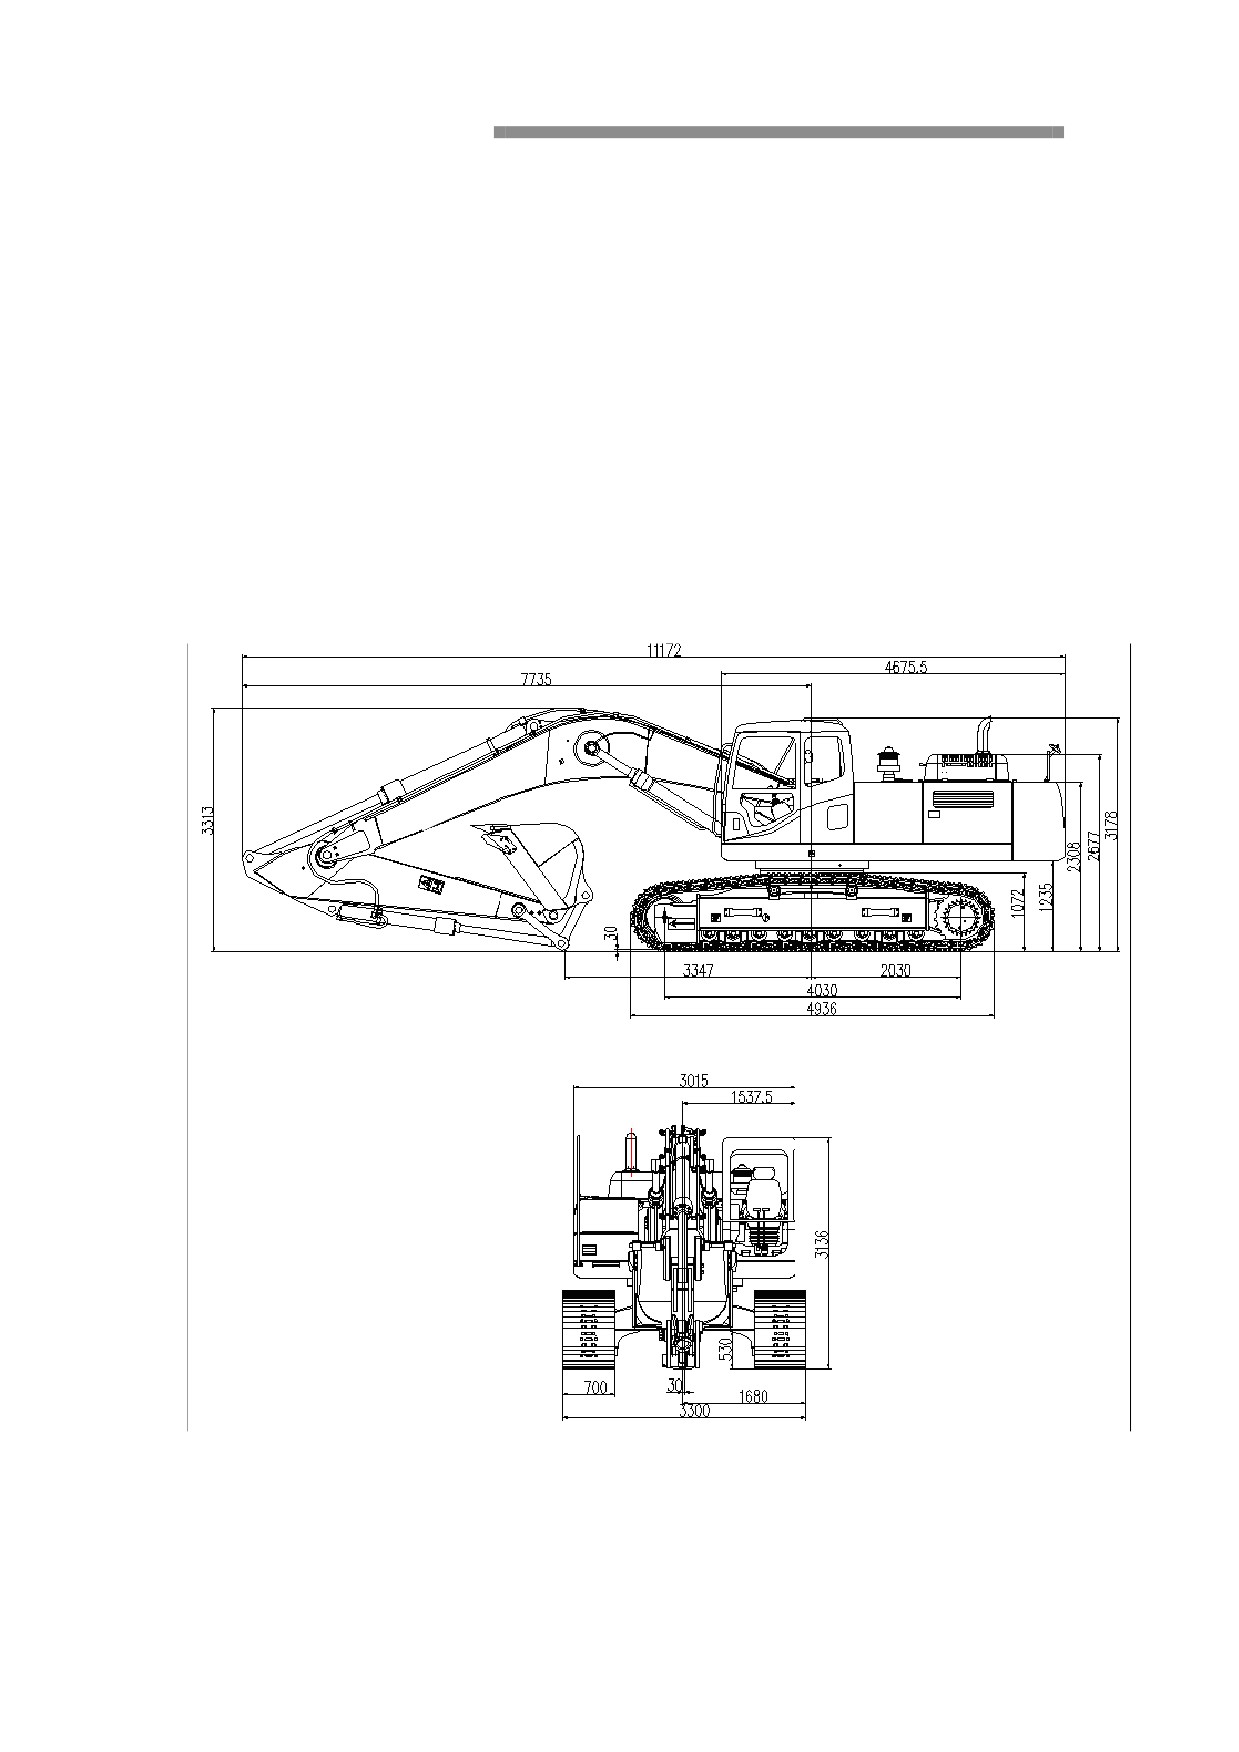
Overall dimensions:
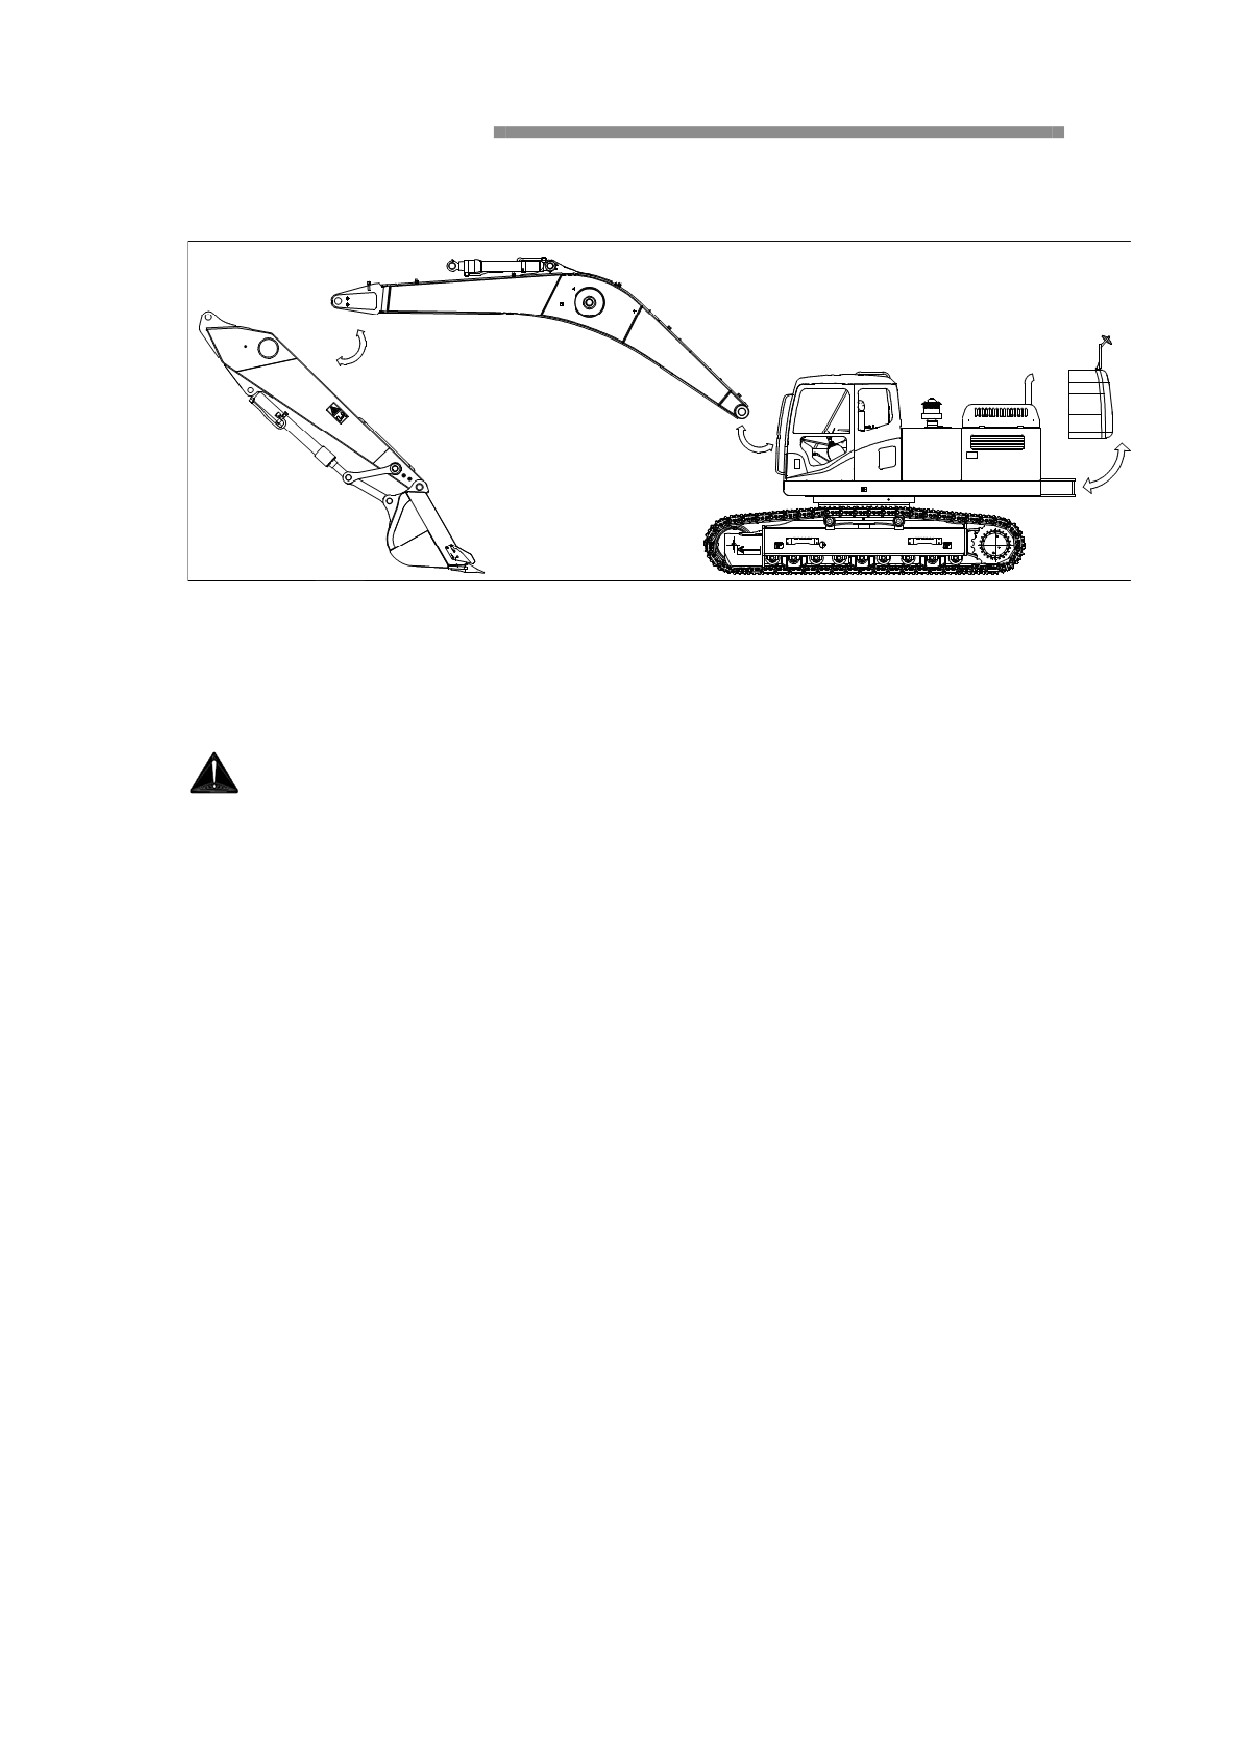
Detachable parts for easier transport:
Dismounted and lifted in the process, must pay attention to oil cylinder, fixed mobile
parts, and at the same time are fishing cable and parts contact edges location using
coated to prevent damage to the edges that fishing cable cause dangerous.
Apart hydraulic pipeline
Warning!
The machine work just end, hydraulic oil temperature is very high, will serious burns
without protection of the skin. And hydraulic system existing residual stress, so in the
liquid pressure system for any repair work before, must be residual stress release.
To avoid personal injury.
1. The machine will be put in plat and solid ground,
2. Will the bucket oil cylinder completely stretched out;
3. Will arm oil cylinder completely retract;
4. Will boom oil cylinder goes back to work device to let bucket touchdown;
5. Shut down engine;
6. Make safety lock handle in open;
7. Make the engine start-up key switch them to be in on state but don't start the
engine;
8. In each direction completely mobile several times handles to release the hydraulic
system of residual pressure;
9. Shut down engine start-up key switch and raise safety lock handle;
10. Through hydraulic cover release the pressure;
11. Apart to the corresponding apart piping.
Note: processing hydraulic oil pay attention to protecting our environment.
12. Remove parts such as: boom , arm , bucket, counterweight.
Hoisting machine
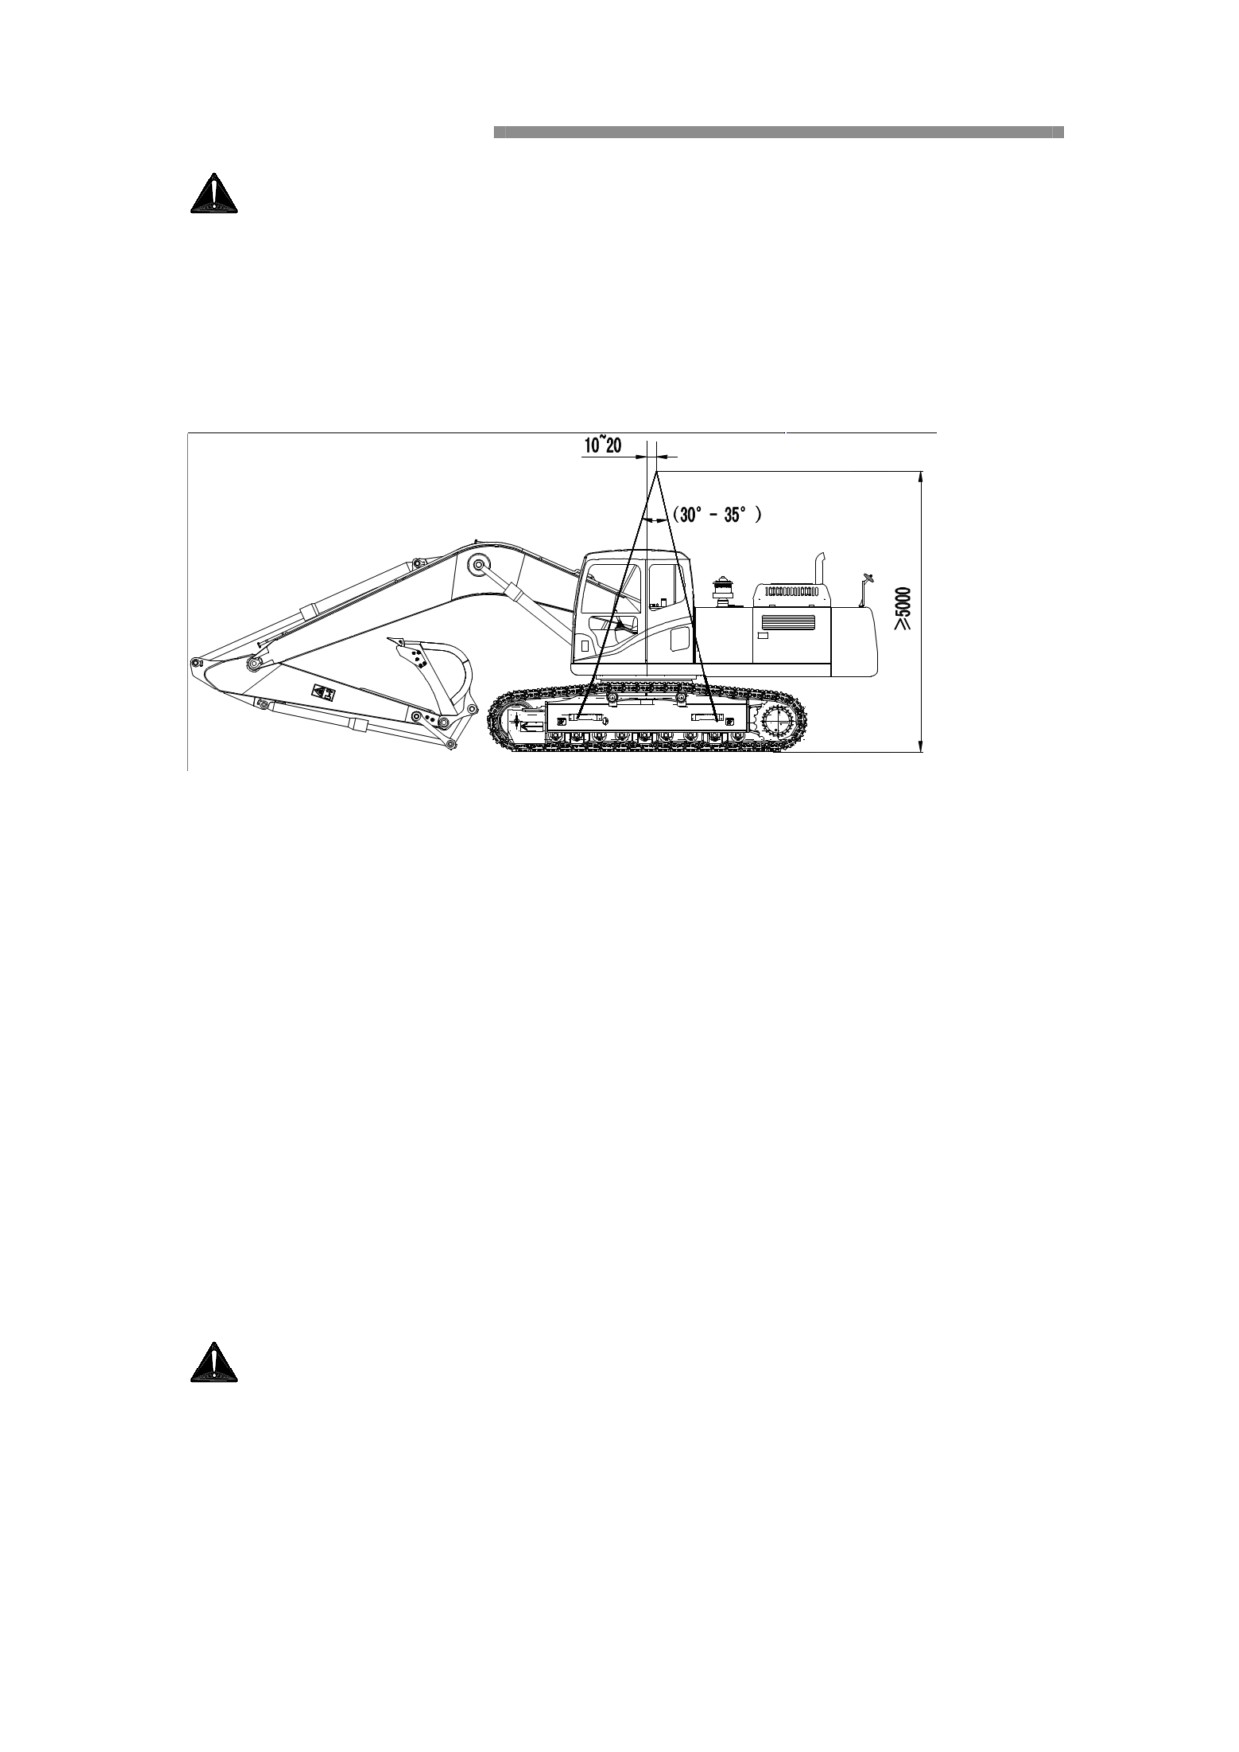
Warning!
If cab or machine has someone, don't lift machine.
Should use the approved has enough load ability fishing tackle.
Always pictured way according to the pictured way to lift machine, not the right way
to lift the machine will be skewed, and may have dangerous, causing the machine to
damage.
On flat, real ground hoisting machine;
1. Start engine, will drive wheels machine work device in the bucket cylinders and
arm oil cylinder out completely, and fall to the ground. Pictured below
2. Up the safety lock handle;
3. Shut down engine, lock cab door, a side door and glass, engine mask.
4. According to the picture, relative to the weight of the machine with enough safe
wire rope, separately from before and after the first and the second a heavy round wire
rope between put on, reliable connect, for this position has guard board machine,
should be put on the wire rope from crawler below;
5. Adjust the Angle of wire rope is not more than 30 ° (hoisting height more than 4.2
m) and then slowly slight lift machine, check the balance;
6. Slowly lift machine.
Counterweight installation
Standard counterweight is 5600 Kg
Warning!
Raise the safety lock, shut off the engine.
Installation counterweight, prohibited personnel in and around counterweight stay
below.
Before install bolt the personnel must both enter from sides, do not enter from the
rear.
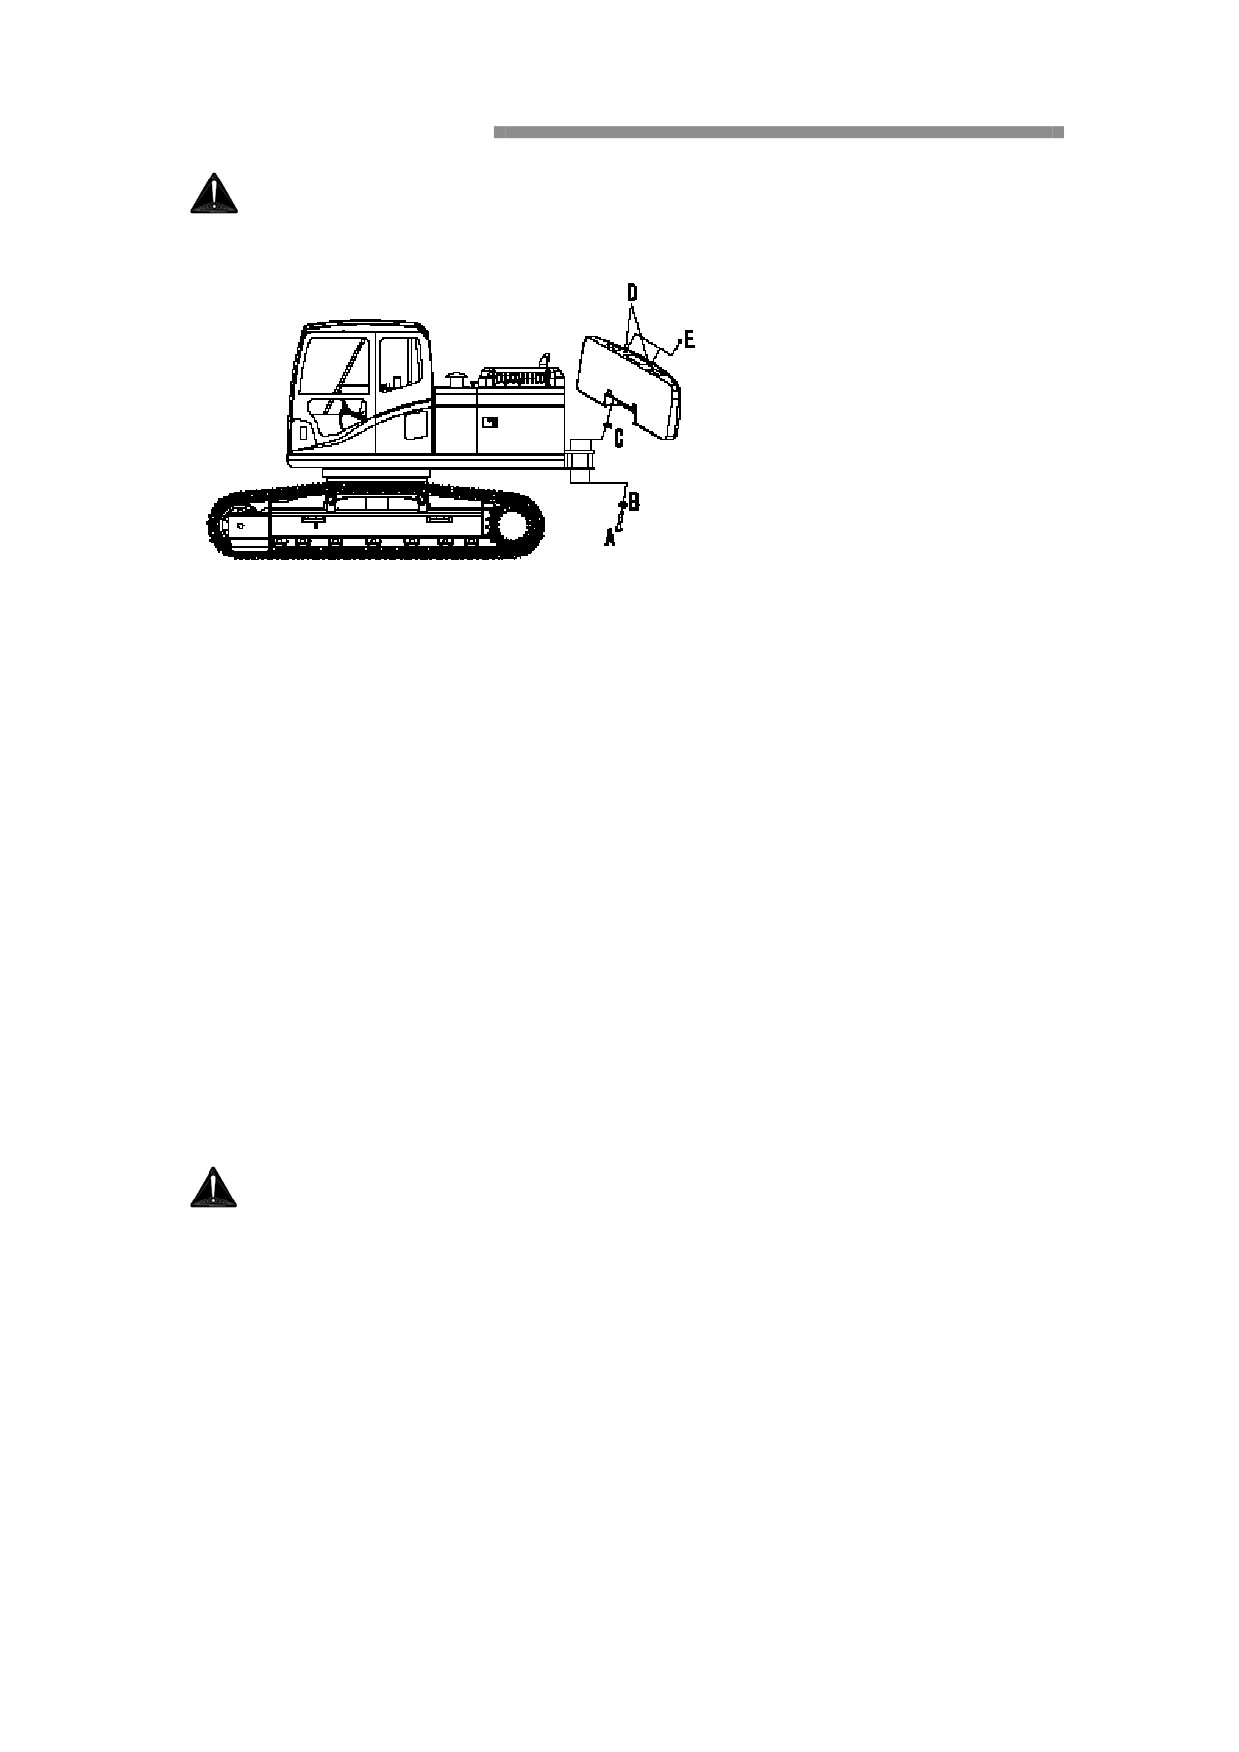
Warning!
Counterweight drop will lead to casualties.
1. The machine placed in a solid no obstacle level the ground
2. Fall work device;
3. Up the safety lock handle, shut down engine;
4. In part D installation thread rings (M30 × 3) and use enough fishing tackle strength
lift counterweight slowly, move to install position, don't jump down, and keep 3 ~ 5
mm distance;
5. The four groups are A and B gasket bolt connection screwing in about 15 mm;
6. Fall and check whether counterweight smoothly, if should be adjust, a little bit lift
counterweight in low insertion position adjustment gaskets C;
7. After the check to tighten bolts (are × 3);
Tighten bolts torque: 1900 + 50 n. M
Unloading sling, buckle rubber plug E
Changing bucket
Removing bucket
warning!
When you knock bucket pin, it maybe bring some metal fragments flying, so
you have to wear goggles, helmet and gloves. The bucket which had been
removed must be placed steadily.
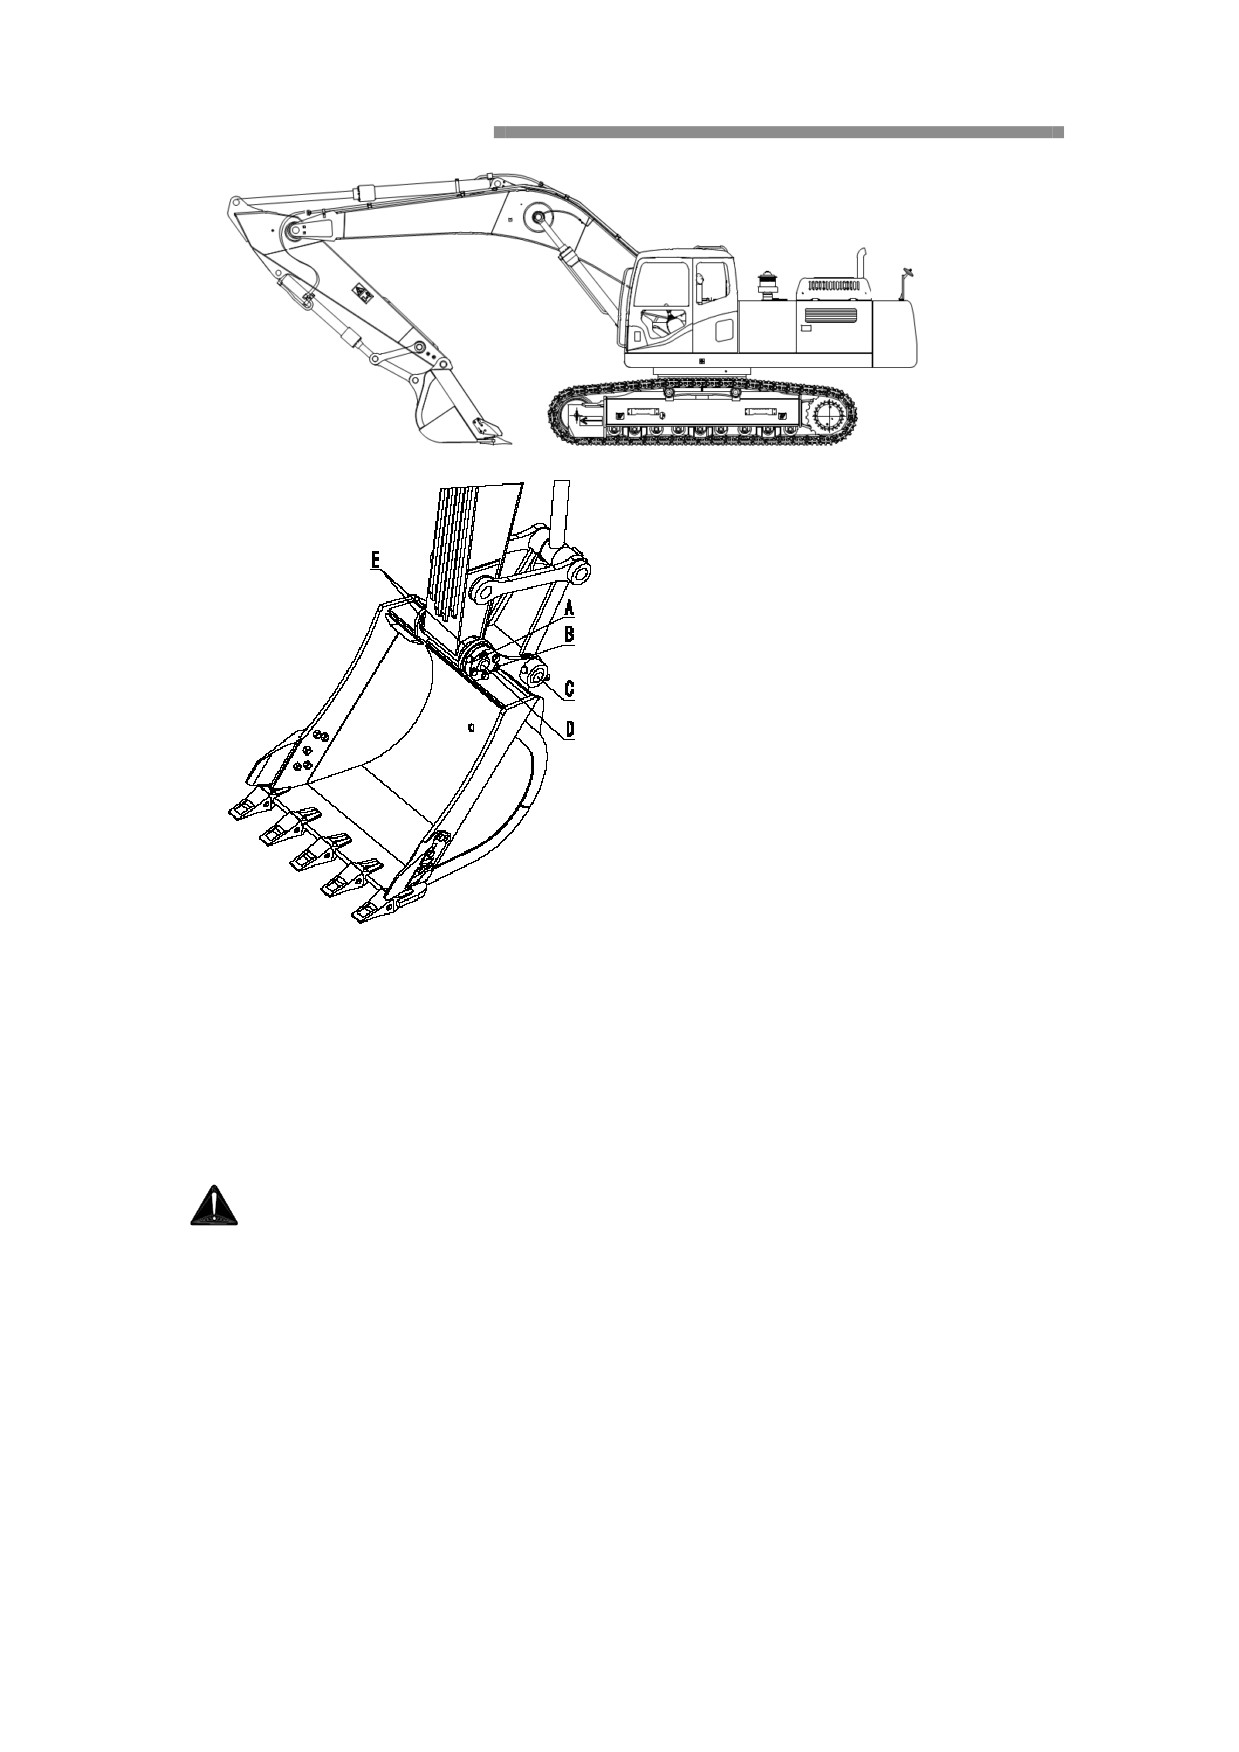
1. Reduce working device, the bucket contact with the ground. as shown above;
2. Remove bolt A and bolt B (2 bolts);
3. Remove the bucket pin C and D.
Notes: Don’t damage O-ring E. (2 O-rings)
Installing Bucket
Warning!
Don’t insert your fingers into the pin hole to check whether the pin is in right
position, or may be cause serious crush accident.
1. Align the arm with the bucket connection hole;
2. Apply grease in the hole properly;
3. Install O-ring in the external duct of bucket installation base inside bushing;
4. Install the bucket pin C and D separately;
5. Install bolt A and bolt B (2 bolts, fasten 2 nuts)
Important!
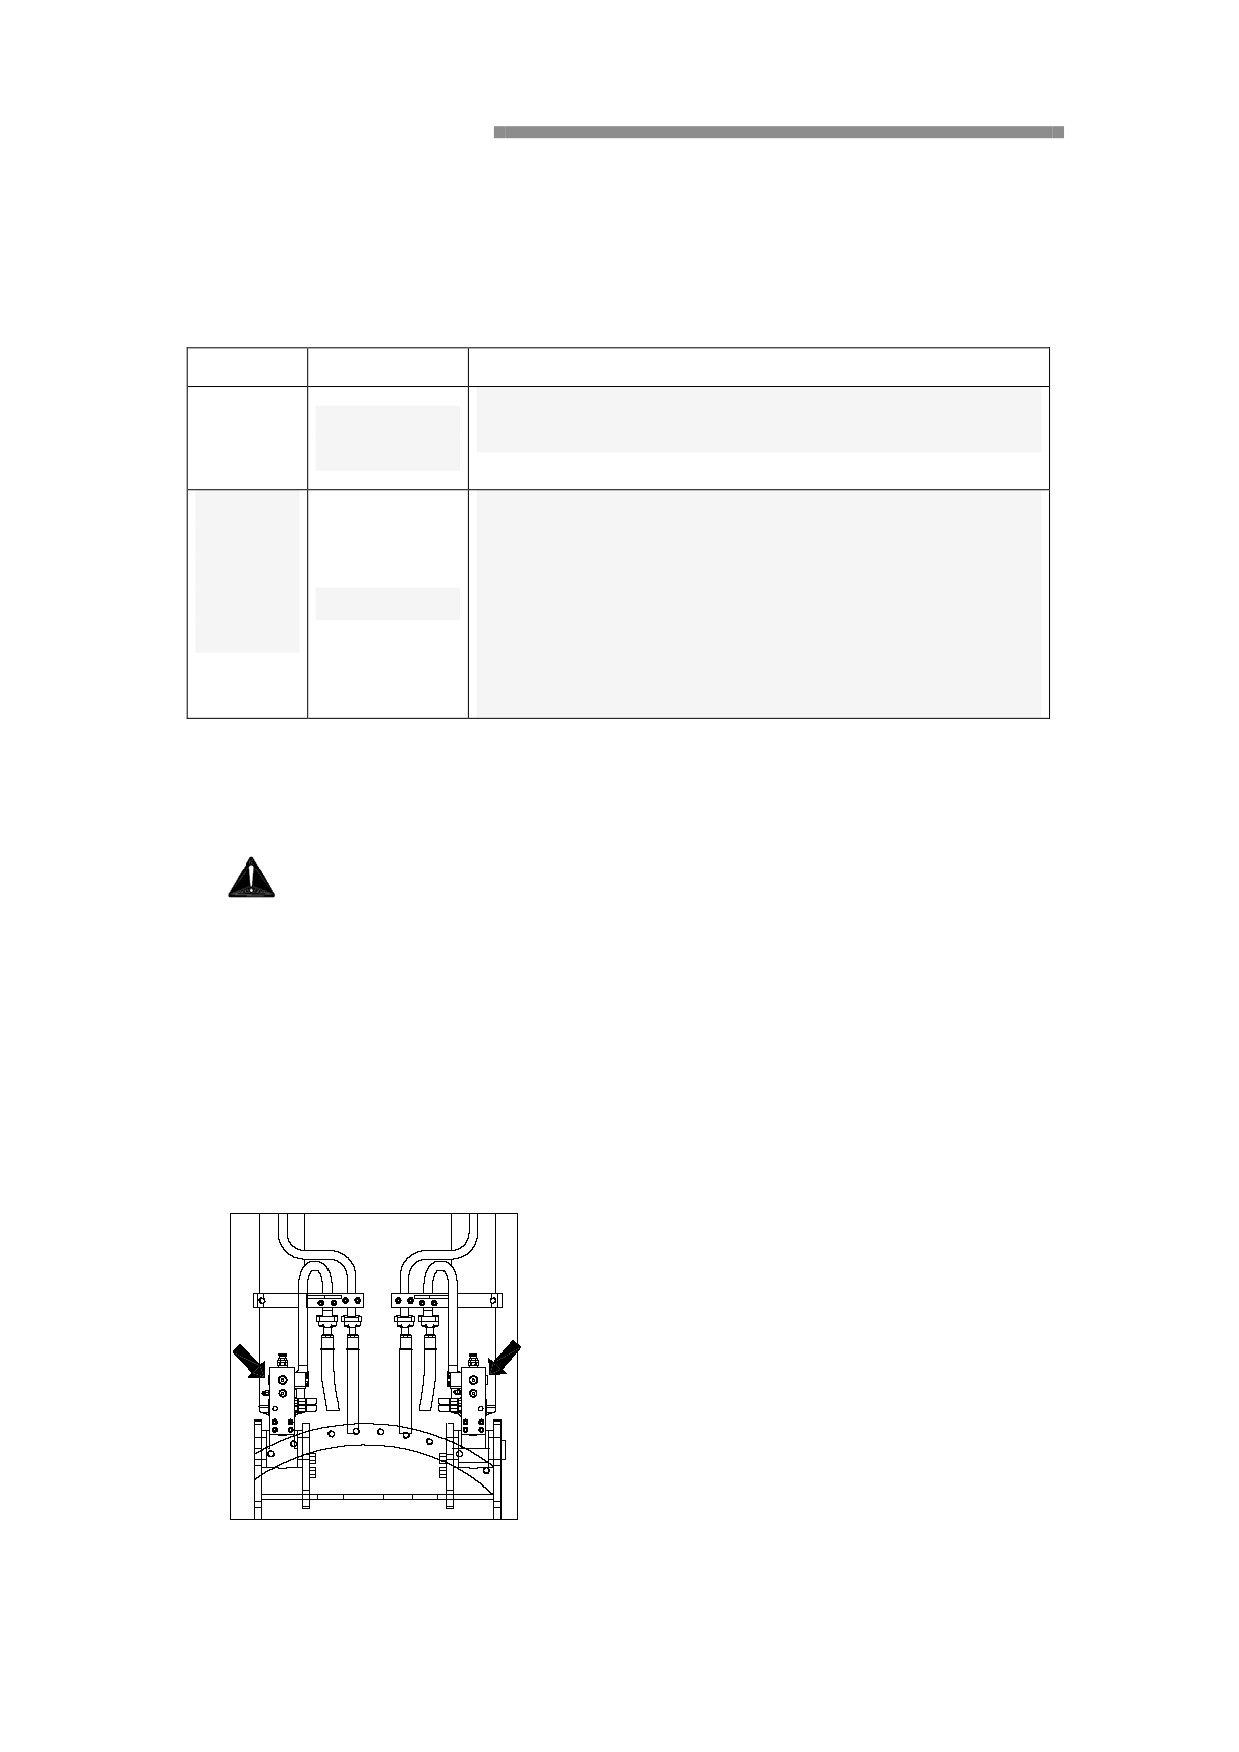
The distance from inside lock nuts to abutting surfaces should be 1-2mm; the
pins must be applied by grease.
Selection of track shoes
Track shoe Application
Precaution for use
A
Keep slow when there are barriers (e.g. boulder and
Stony
600mm
falling tree) and driving in rough ground.
ground
B
Only driving in flat ground can be driven in high
700mm
speed.
For crossing barriers, it is necessary to reduce
C
Soft Ground
driving speed to about half of the low speed.
800mm
This track shoes cann’t be used when there are
large-sized barriers (e.g. boulder and falling tree)
and driving in rough ground.
Explosion-proof valve(Optional part)
Summary
Warning!
Don’t try to remove the boom explosion-proof valve, or under the action of
spring tension, the internal components will pop up with great force and cause
injury. If meet any problems, please contact with authorized service center of
STRONG CONSTRUCTION MACHINERY CO., LTD.
In working state, the hydraulic oil is hot and poisonous. Under the action of
high pressure, the hydraulic oil maybe be splashed in the skin and thus serious
injury. If had been injured by the hydraulic oil, should be treated immediately.
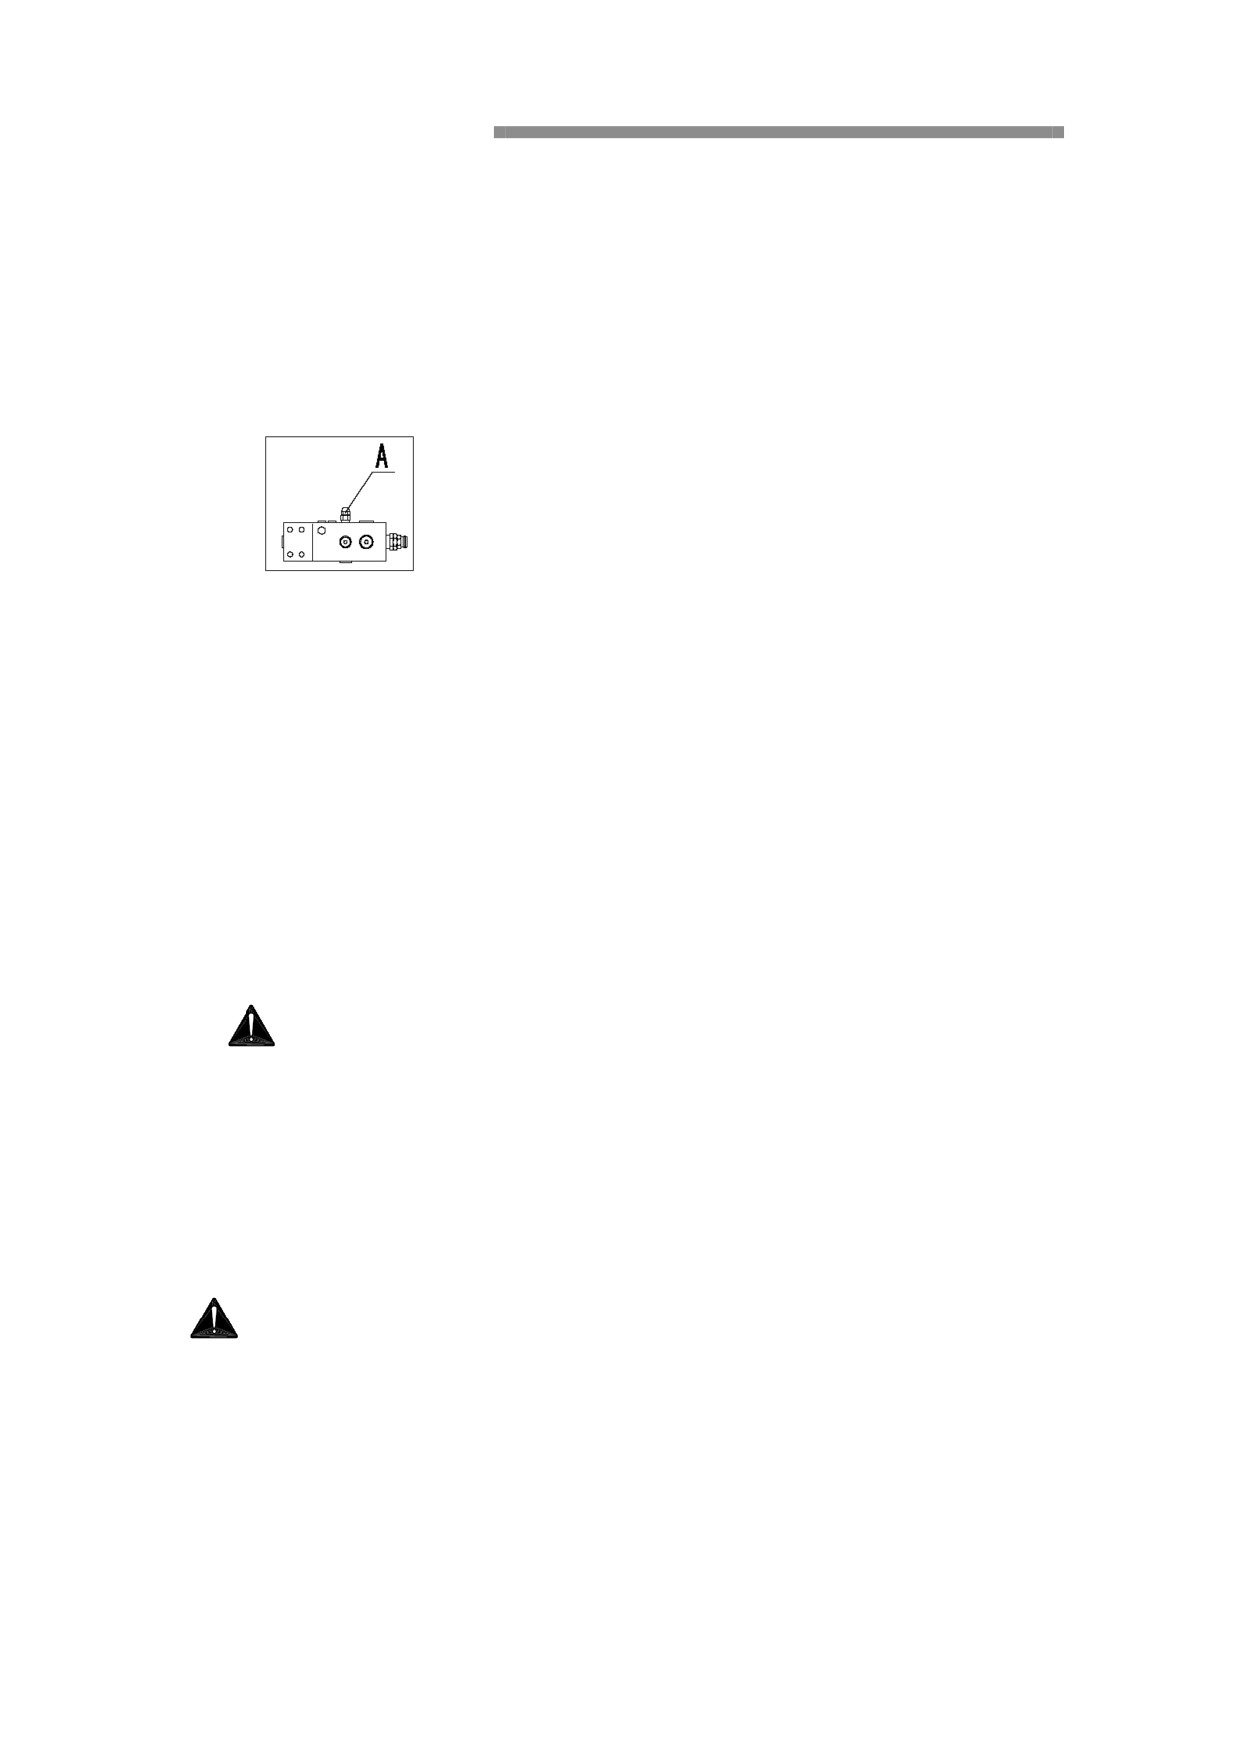
Boom explosion-proof valves are installed in the input interface of back of the boom
cylinders.
Boom fall when boom explosion-proof valves are used.
Notes: Don’t stand under the raised boom!
There are three situations
1. The engine is running.
The boom is reduced in the normal way.
2. The engine has been stopped.
There is the accumulator in this excavator. The servo pressure still exists within a
few minutes after shutdown, so the boom can be reduced in the normal way.
3. The engine has been stopped and without the servo pressure.
In this case, should be operated as follows:
·Remove the lock nut A; 拆开 A 处锁紧螺母;
·Remove the adjustment bolt using 6mm inside-hexagonal spanner
Notes: Before removing the adjustment bolt, must make position marks, so that
confirm position for assembly.
·Reduce the boom slowly;
·Tighten the adjustment bolt to original position;
·Tighten the lock nut;
·Contact with authorized service center of STRONG CONSTRUCTION
MACHINERY CO., LTD.
Notes: In above operation, should collect leaking hydraulic oil in a suitable
container.
Warning!
Under the action of hydraulic oil pressure, if remove the adjustment bolt
completely, personal injury may occur and the boom will fall out of control
causing serious accidents.
Before operation
General provisions
Warning!
Any violations for the provisions may result in serious disability incidents, even
the death.
- Read the following text carefully for comprehension.
·Before operating the machine, please read and understand the Operation Manual.
·Before operating the machine or beginning repair work, please read and understand
the marks and the nameplates in the machine.
- Before start up the machine, the security faults or defects must be excluded.
Notes: During inspection, the machine should be parked in the maintenance
position, please refer to the "maintenance position".
- Start the engine indoors, should make sure the ventilation system capacity is
adequate.
- When start the engine, must always sit in the seat.
- The cab doors must be closed.
- Don’t operate the machine in the case of absence air.
- In operation, seat belts should be used.
- Don’t operate the machine under the affection of alcohol, drugs or other drugs.
- To avoid pinching hands or fingers, please keep your hands away from these places
which maybe pinch your hands. (covers, doors, windows, etc.).
- When enter and exit the machine, should face to it and use the stairs and handrails.
Always adopt the three-points way which means two hands and one foot or one hand
and two feet. Don’t jump!
- Don’t climb and trample these surfaces which don’t adapt for climbing, only use
these surfaces which were paved with non-slip materials.
- Wear clothes which are suitable for safe operation.
- Wear a hard hat, in order to strengthen head protection.
- There are two escape routes in the cab: the door and the back window. Please refer
to the "emergency exit".
- When the machine is travelling, don’t use communications equipments, such as
mobile phone with improper installation. Communications equipment may interfere
with the signal of the important electronic devices inside the machine.
Mobile phones must be connected to the machine's electrical system and still must
connect to the permanent external antenna according to the manufacturer's
provisions.
- Don’t overload, otherwise it will endanger safety.
Operation steps before starting
Important!
Must make sure no one near the machine before starting.
1.Park the machine in the maintenance position, please refer to the "maintenance
position".
2. Execute routine maintenance, please refer to the “lubricating and maintenance
chart”.
3. Adjust the seat, so that you can operate the controller and the pedals comfortably
and safely.
4. Check meters and controller.
5. Check whether headlights, windshield wiper / washer, mirrors and so on are
available.
6. Check and make sure no leaks.
7. Check and make sure no lost or loose parts, these parts maybe cause damage or
even destroy another parts.
8. Check and make sure fuel quantity in the fuel tank.
9. Check and make sure the engine hood is closed and locked.
If the fuel was used up or the air come into the system as some reasons, the air must
be discharged before starting the engine. Please refer to the “Air emission of Fuel
system”
Before starting
1. Clean windows/ defrost.
2. Sit in the operator seat when start the engine/ machine, please refer to “Starting
engine”.
3. Fasten seat belt before operation.
4. Start operation after displaying “waiting for starting”.
5. Check and make sure that all controllers and meters are available.
6. Check and make sure no one near the machine before starting.
7. honk the horn.
8. Put down the safety lock handle, start the machine.
Finally, to put down the safety lock lever up, started.
Start Switch
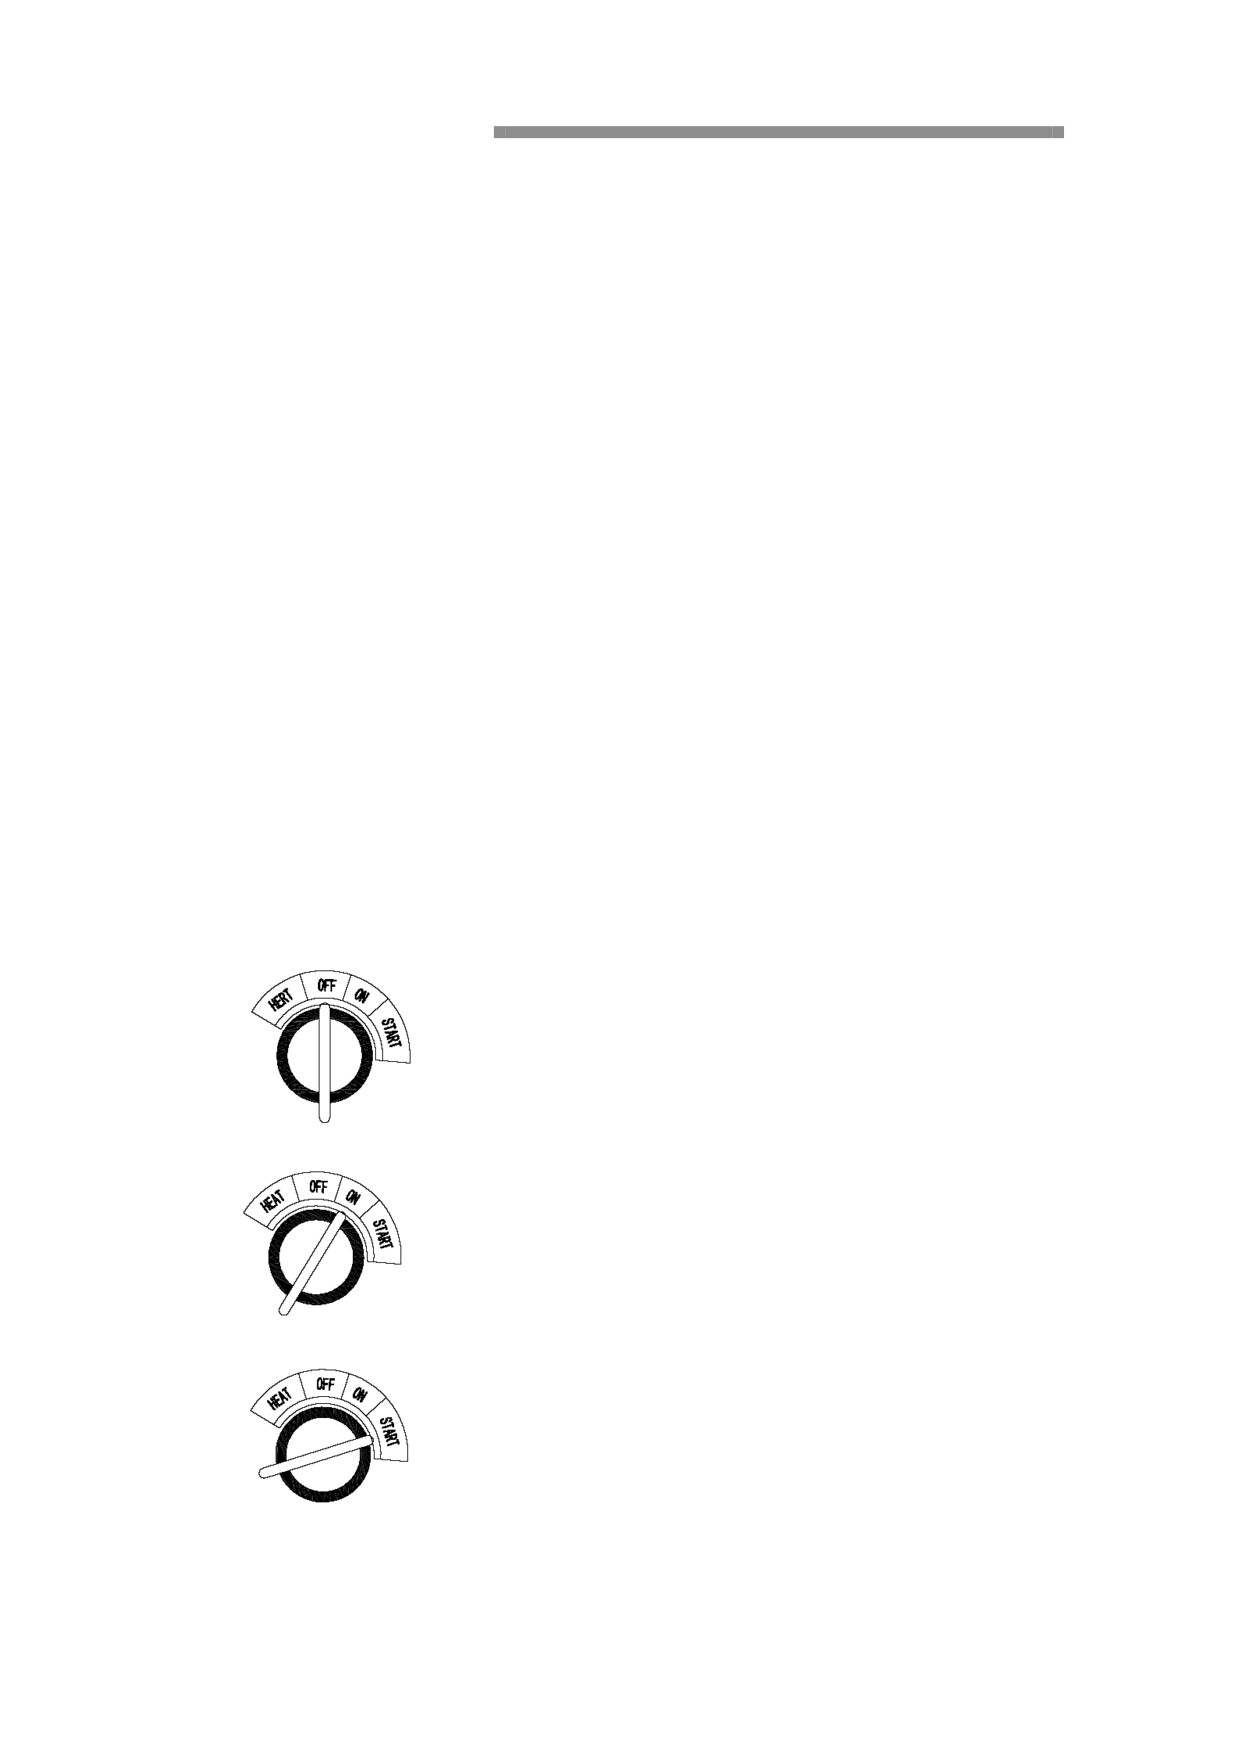
There are four positions in the start switch, the initial state is “OFF”.
·0FF: Stop the engine immediately.
·ON: Start, self-check and initialize the electronic equipments.
·START:Unite the starting motor gear and start the engine.
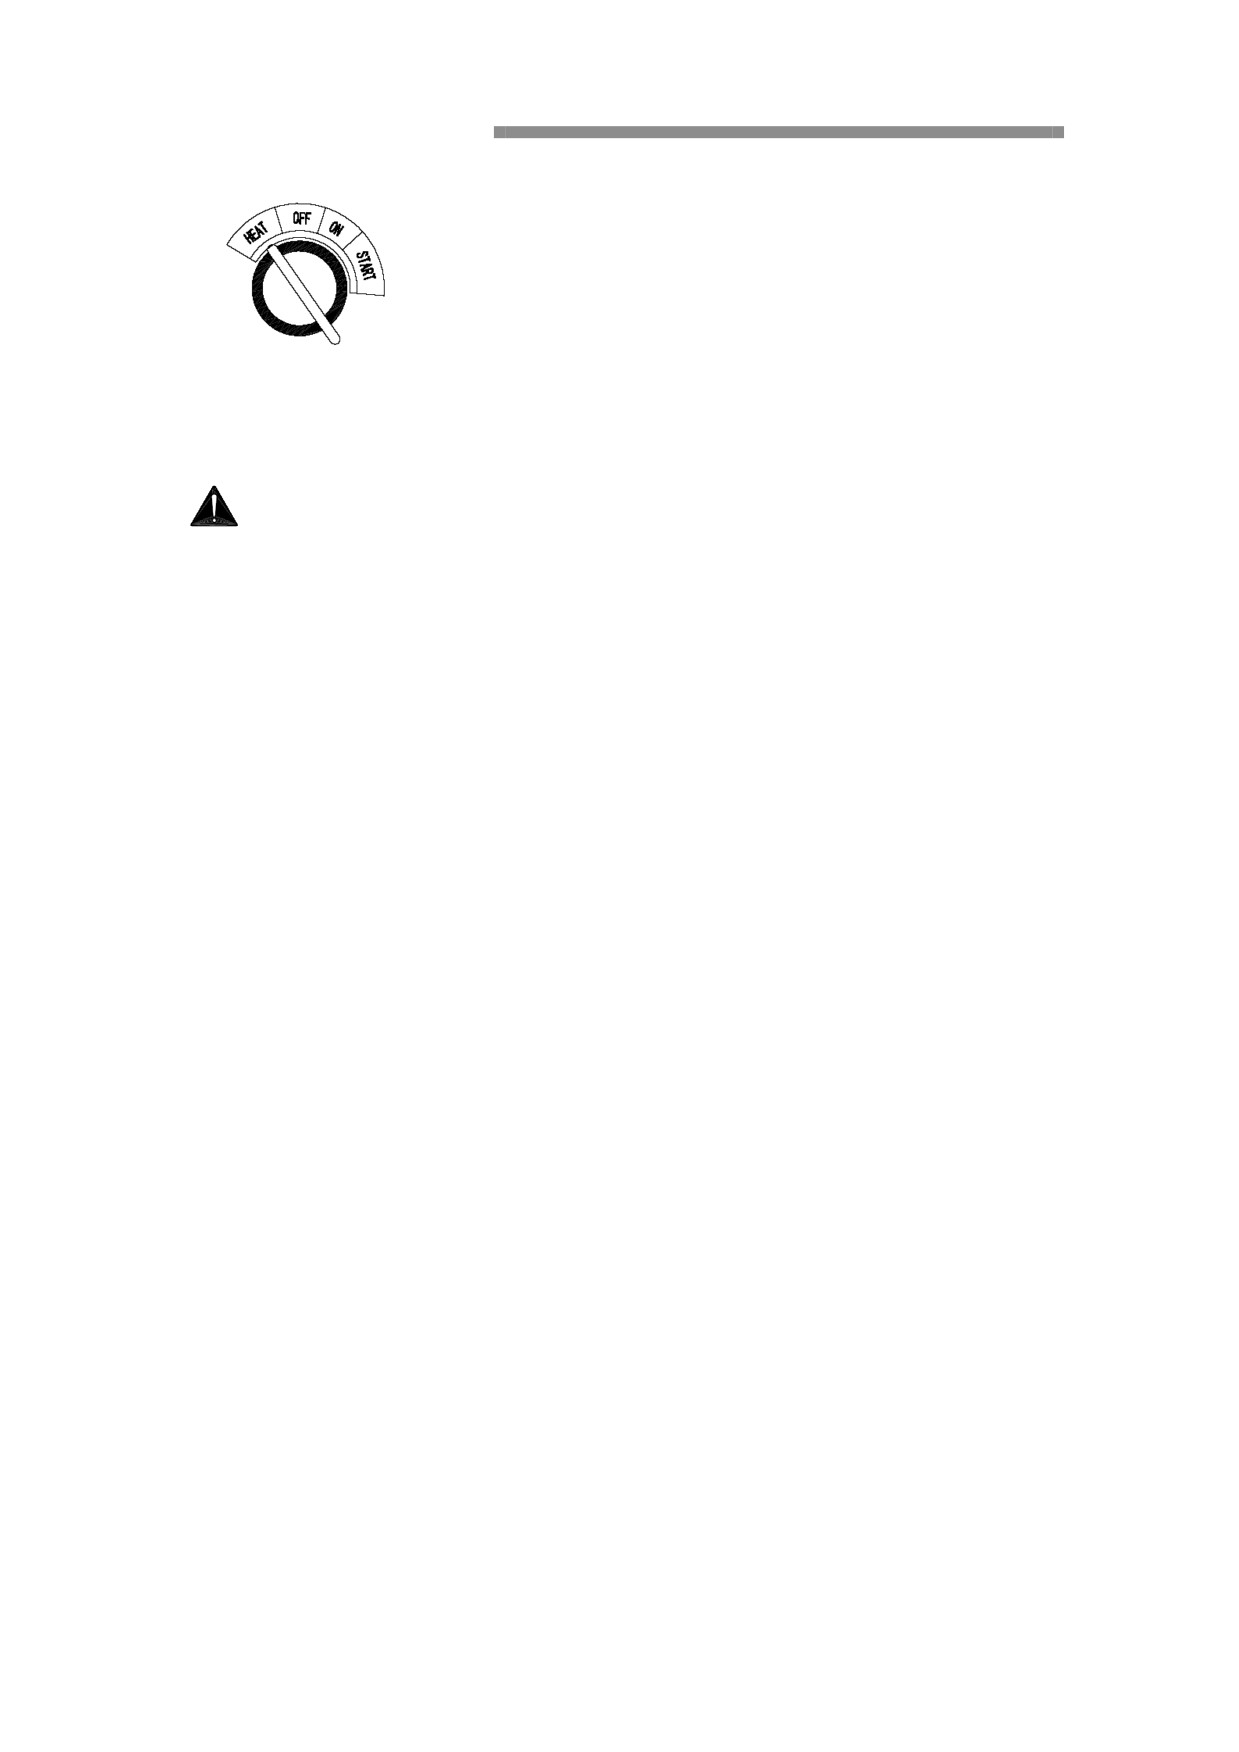
·HEAT: Preheat the engine(Optional).
Notes: Operation time cann’t exceed 15 seconds and the interval between two
operations shouldn’t less than 5 minutes.
Start the engine
WARNING!
After checking the mechanical staff and around obstacles, start the engine,
while sounding speakers.
Do not touch any of the operating handle and trigger switch.
Important!
Do not keep the key at (start) position for more than 20 seconds. This will
seriously damage your system. After 2 minutes, then try to start the engine.
If there is abnormal noise, excessive vibration or unusual circumstances
immediately turn the key to stop (stop) position, turn off the engine and check.
At temperatures above 0 ℃
1. Put the key to start position.
2. The engine starts, release the key.
Measures taken in cold weather
In the cold season or when the temperature is below 0 ℃, note the following points:
.Make sure the coolant freezing point adapt to climate conditions.
.Use the recommended oil in winter, see the recommended lubricant.
.After work, the fuel tank filled to prevent the formation of condensation water in
the fuel tank.
.After the engine is started, let it operate at low speed and light load operation, until
the engine and hydraulic system oil is hot, more liquidity. This is also easier to adapt
to the lubrication.
Important!
Very cold below -15 ℃, the engine starts, and not immediately put into
high-intensity work. Let the engine idle for 10-15 minutes.
Note: Use the auxiliary battery to launch, see the "auxiliary battery start."
Operation
Working device operation
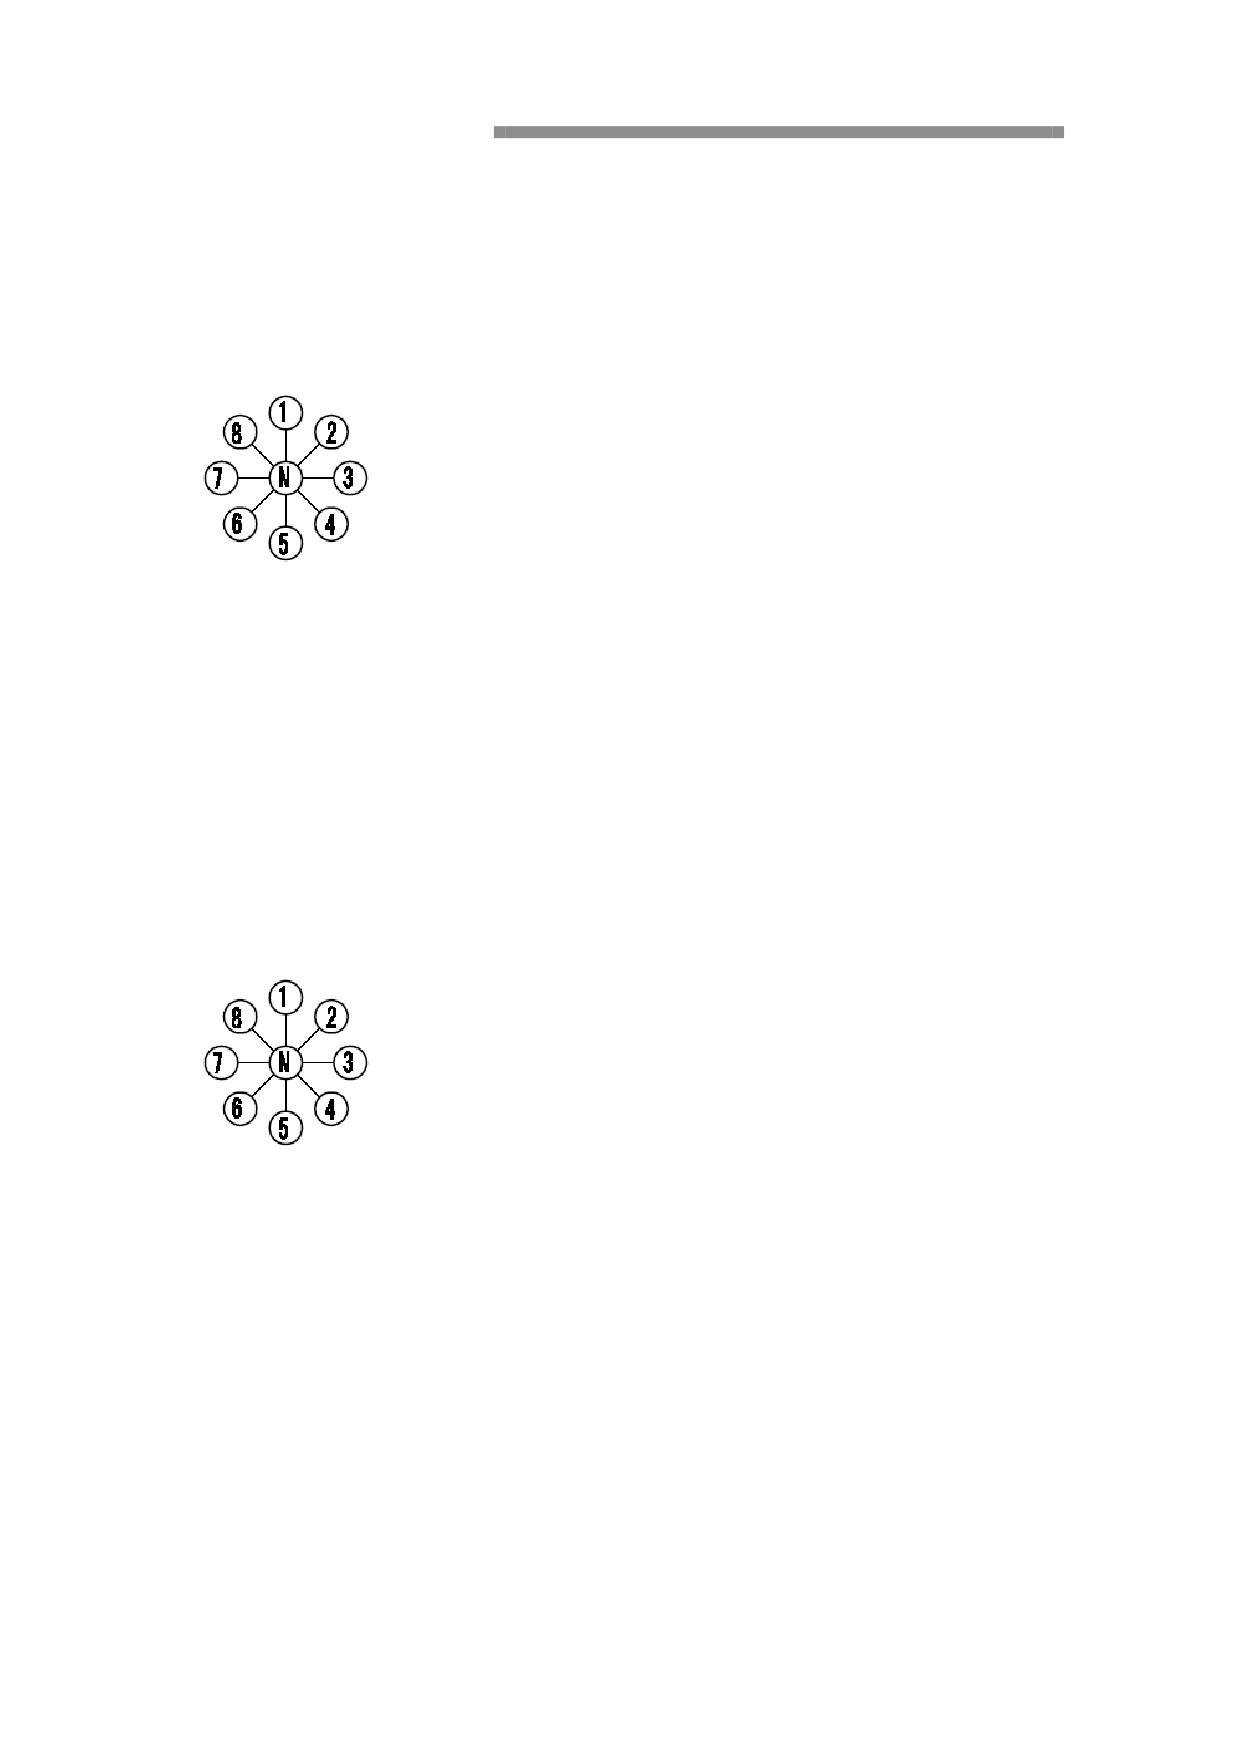
Left joystick
This handle controls rotation and arm.
N Neutral position
1. Stick out
2. Stick out and right rotation
3. Right rotation
4. Stick close and right rotation into the
5. Stick close
6. Stick close and left rotation
7. Left rotation
8. Stick out and left rotation
Right Joystick
This handle controls Boom and bucket
N Neutral position
1. Boom fall
2. Boom fall and Bucket turned outward
3. Bucket turned outward
4. Boom Lift and Bucket turned outward
5. Boom Lift
6. Boom Lift and Bucket adduction
7. Bucket adduction
8. Boom fall and Bucket adduction
Walking direction control
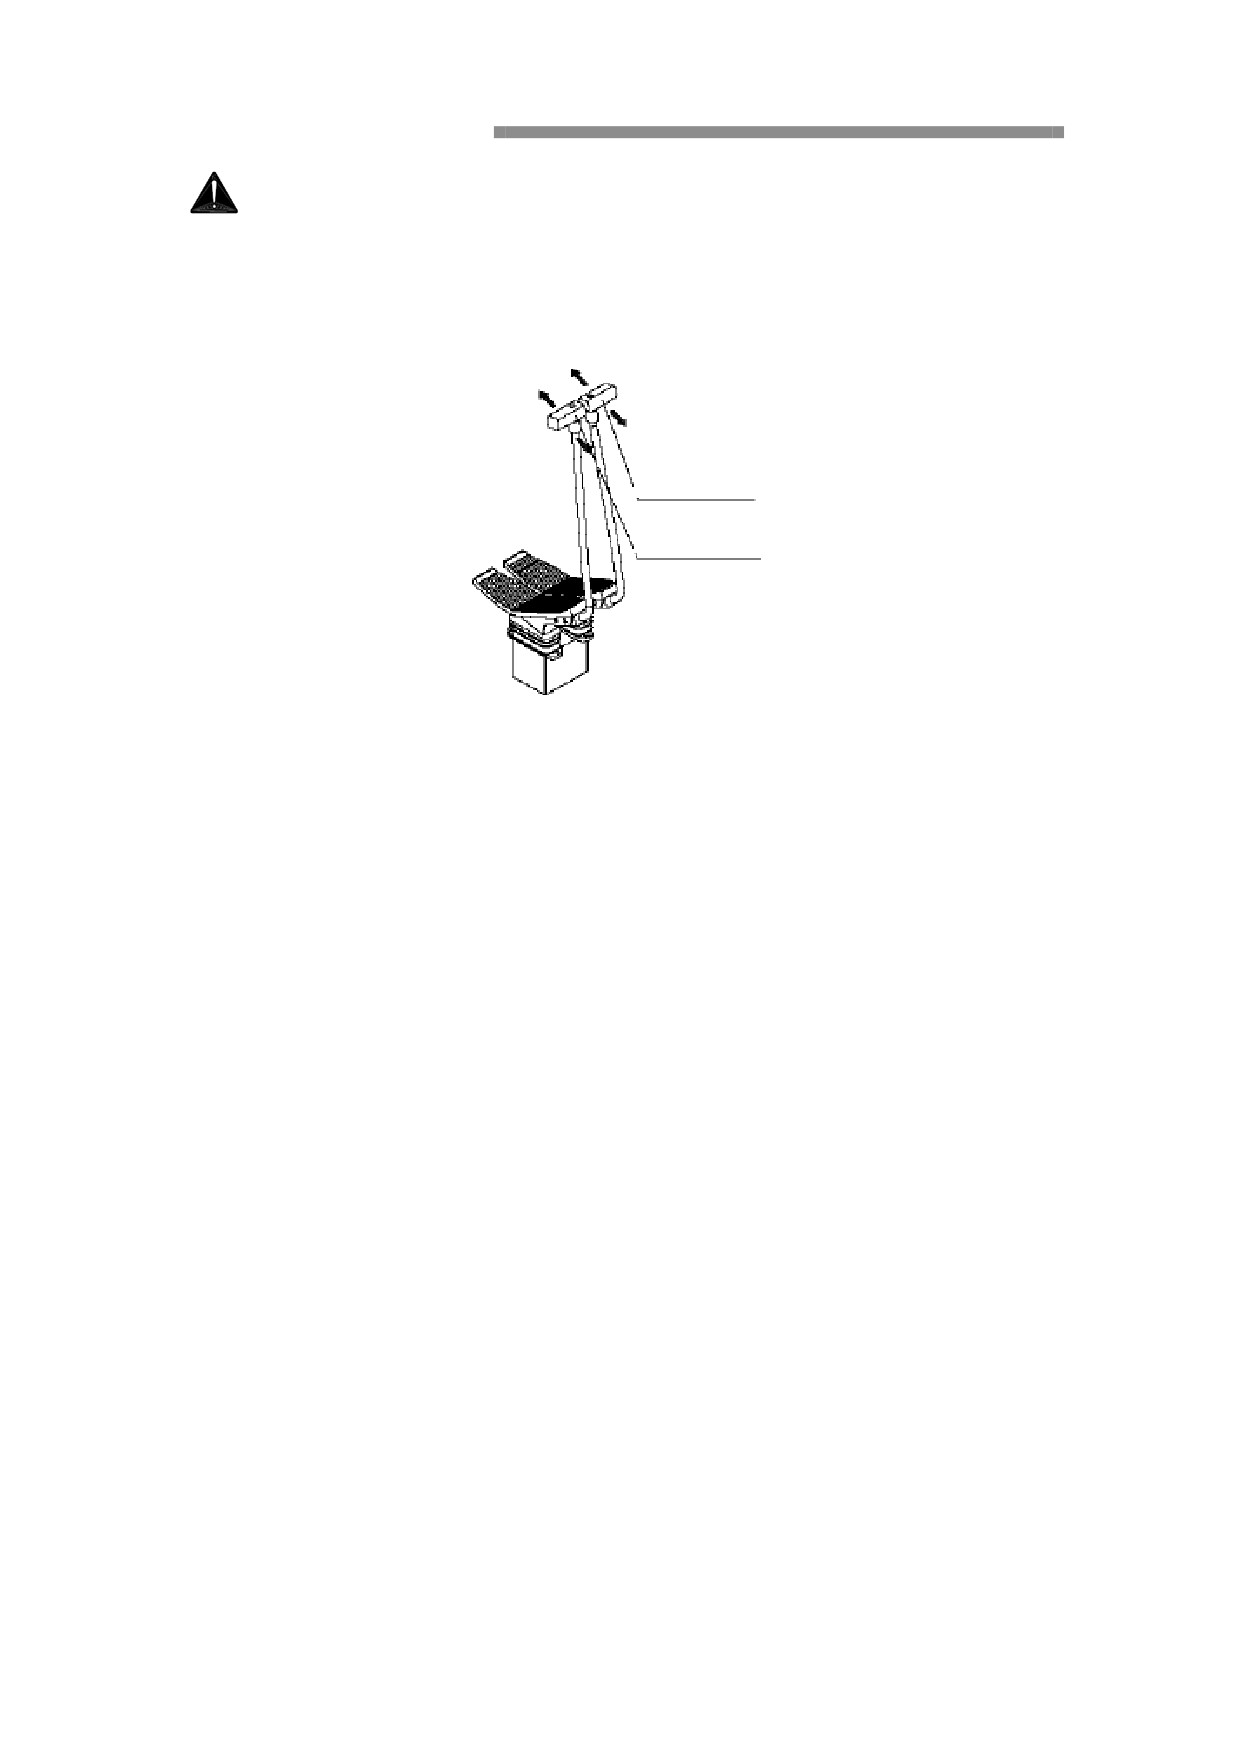
WARNING!
Before controlling travel handle or pedal, you must check the direction of track.
If the sprocket at the front of the machine, you must operate in the opposite
direction of the operating handle (pedal). Do not change direction quickly,
especially in the situation of stationary.
A. Travel lever (LH)
B. Travel lever (RH)
• Walking forward
1. Increase engine speed.
2. If the sprocket at the end of the machine, put the joystick A B forward slowly, or
step the front of pedal slowly.
If the sprocket at the front of the machine, put the joystick A B backward slowly, or
step the end of pedal slowly.
• Reverse Walking
1. Increase engine speed.
2. If the sprocket at the end of the machine, put the joystick A B backward slowly, or
step the end of pedal slowly.
If the sprocket at the front of the machine, put the joystick A B forward slowly, or
step the front of pedal slowly.
• Left turn
If the sprocket at the end of the machine:
Put the right joystick B to move forward, Track will turn to the forward direction,
Mechanical forward left turn.
Put the left joystick A to move backward, Track will turn to the backward direction,
Mechanical backward left turn.
If the sprocket at the front of the machine:
Operate the handle with the opposite direction.
• Right turn
If the sprocket at the end of the machine:
Put the left joystick A to move forward, Track will turn to the forward direction,
Mechanical forward right turn.
Put the right joystick B to move backward, Track will turn to the backward direction,
Mechanical backward right turn.
If the sprocket at the front of the machine:
Operate the handle with the opposite direction.
Notes: Even if the operating handle moves in the same direction, but also have
turned to a different range of motion effects, If the sprocket at the end of the
machine, Machine will move to the side of a small magnitude, If the sprocket at
the front of the machine, Machine will move to the side of a small magnitude.
• Turning on the spot
Put the left joystick A to move forward while put the right joystick B to move
backward, the machine will turn on the spot at clockwise.
Put the right joystick B to move forward while put the right joystick A to move
backward, the machine will turn on the spot at counterclockwise.
Operation completed
WARNING!
Getting in or Out of the machine, you should face to the machinery all the time,
and use the pedal and the handrails to avoid slipping. Climbing up and down
the machine, you should always use the three-point, That is, two hands and one
foot or one hand and two feet. Do not jump!
Shutdown
Important!
Park the machine on level ground.
•Put the left and right joystick into the neutral position.
•Put the engine speed control switch into the low idle position.
•Put the bucket to fall to the ground, and keep the bottom of the bucket in level.
•Lift the safety locking handle, Lock hydraulic system. See "Security Lock
System."
Stop the engine
Important!
•Before stop the engine, keep the engines running at idle speed a few minutes to
protect the turbocharger.
• Put the start switch to stop position.
Note: If you want to stay the machines for some time (no matter how long),
disconnect the battery switch.
Parking machine
Overview
Important! Park the machine on level ground, if you must stop on the slope,
plug wedge pads in under each track, and keep the bucket teeth into the
ground.
•Pay attention to weather conditions and take appropriate measures,
•Do not let the machine to freeze on the ground, subsidence, or suffer any other
adverse consequences.
• Put the handle and switch into turn off / neutral position.
•Lift the safety locking handle, Lock hydraulic system. See "Security Lock System."
•Close windows; lock the cab and all the doors and cover.
• Close the battery switch.
Long-term parking machines
In addition to comply with the parking requirements above, it also must be done as
following:
• Check whether the machine is oil leakage or water leakage, and the working device
and track is for failure.
• Clear the soil and debris attached to the track and rollers.
• Take the measure of anti-rust treatment to the exposed components, and thorough
lubrication of machinery.
• Pour fuel and hydraulic oil, until a sign at the maximum capacity.
Hauling method
WARNING!
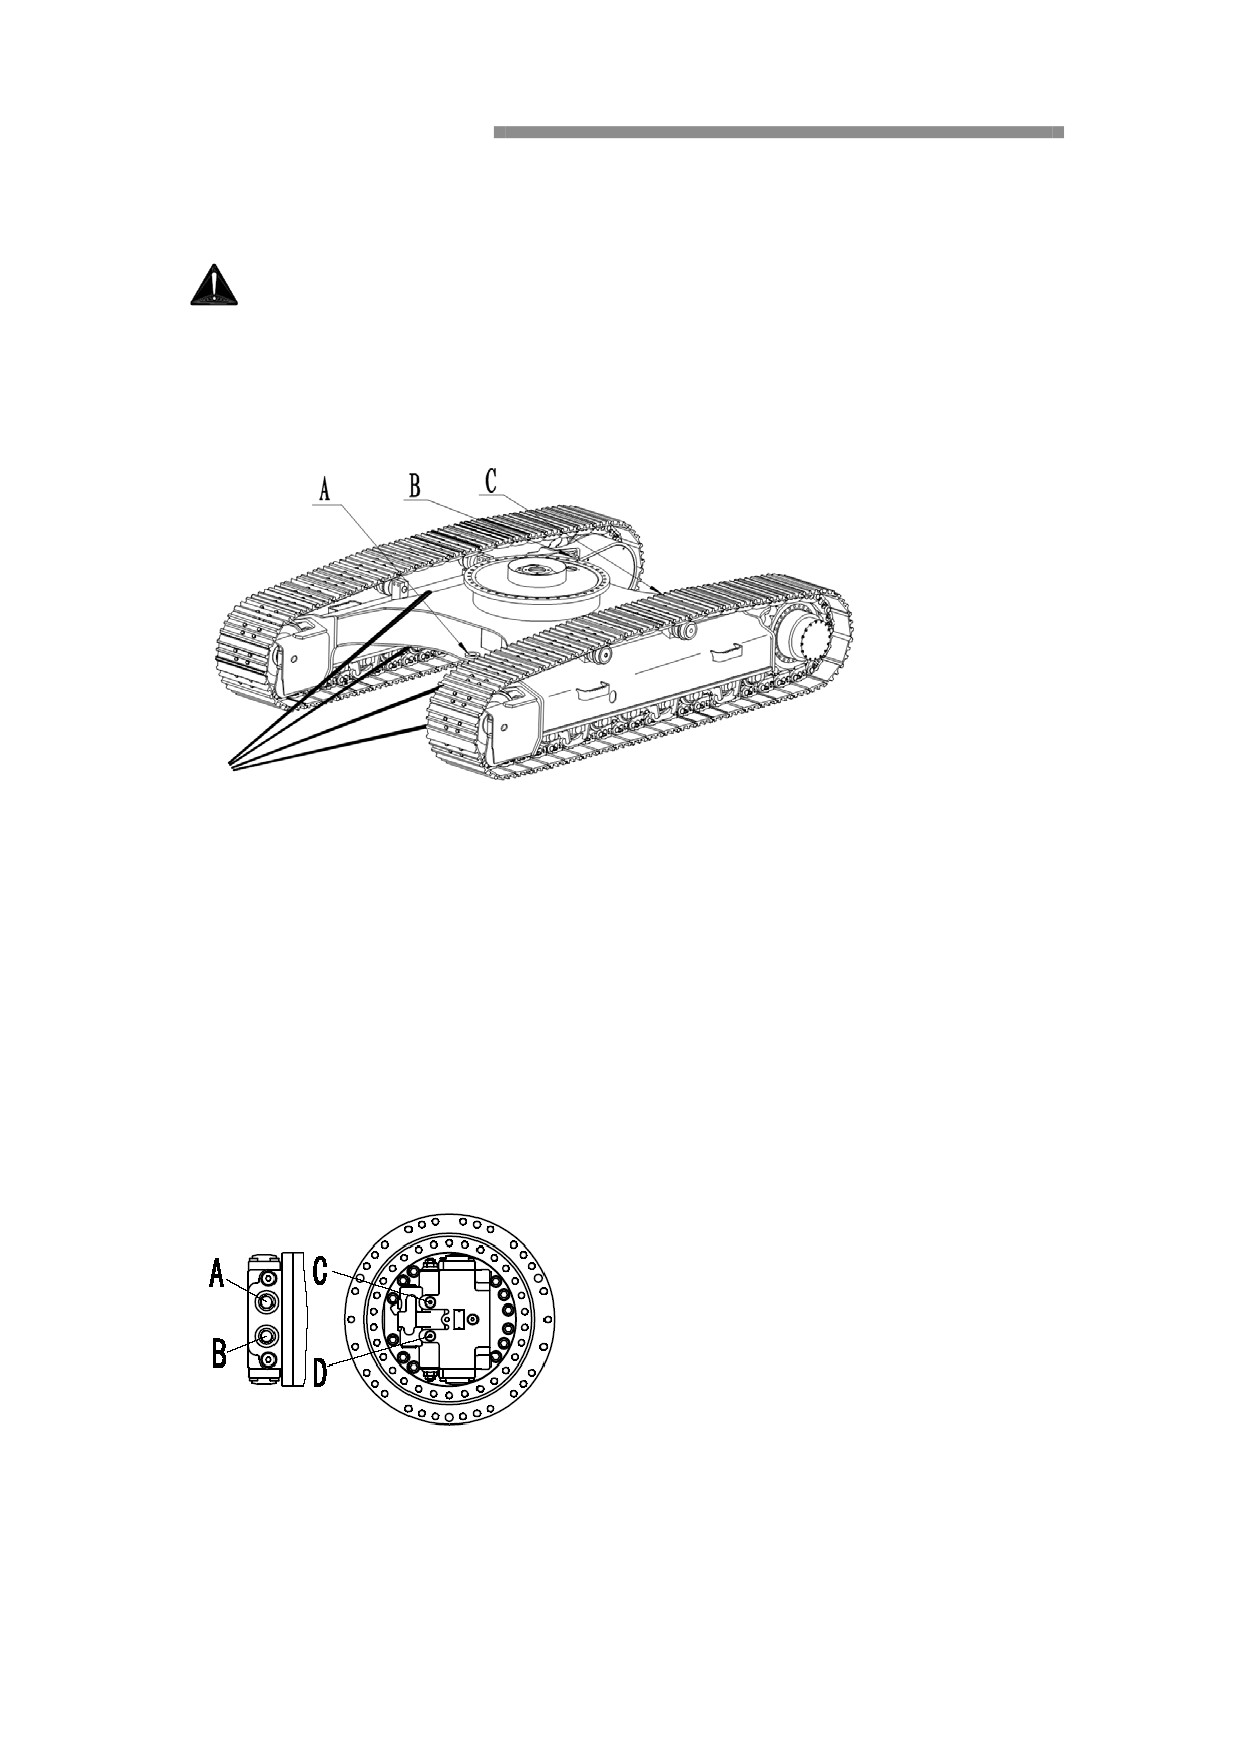
Use the strength of wire rope with sufficient traction.
Once slide into the muddy ground or pulling heavy objects, Use wire rope to
pull the machinery, as shown.
Place the wood between the steel wire rope and machine in order to protect the
machinery and steel wire rope from being damaged.
Notes: do not tract machine with loop holes A, B and C. These holes are used to
fix the excavator machine when transported.
Method of releasing walking brake
When problems occur to running motor and reducer, before drawing the machine,
walking brake should be released.
1.add 40 kg / square centimeter of hydraulic pressure to A or B in the mouth of the
running motor.
2.after released the gas plug at C and D, connect them with hydraulic hose.
Work with the bucket
Excavator is a Multi-functional machine, you can install a variety of ancillary
equipment to complete a variety of types of work. Here only introduce the simple
operations.
Excavation
Work on the ground with smaller slope around the machine. When the degree of
bucket cylinder and arm is 90 °, efficiency of the fuel tank is the maximum.
If operating the excavating work, the angle should be used to improve efficiency.
The excavating scope of stick is about between 30 °forward and 45 °back. From the
view of digging depth, the difference may be small. When using the cylinder, do not
make it to the end of travel, so you can play the role of protecting the fuel tank.
Trenching work
Install a proper bucket to conduct the trenching work. Adjust the track well
according the directing of the trenching work, so that it can work effectively. When
digging a wide ditch, mining the both sides of the ditch firstly, and then dug the
central region.
Loading work
when parking dump truck, the operator should have good visibility in order to work
effectively. In addition, you can also load at rear of the dump truck instead of the
sides, which makes the operator's work easier and improve efficiency.
The prohibitions in operation projects
• You can not rake the soil with the put power on the ground, demolish the
buildings or put the bucket teeth into ground turning. Such operation may
damage the machinery and fixtures.
• Do not work using walking force. These actions may lead to mechanical
overload and damage the track drive mechanism.
• Do not stretch the cylinder to its stroke end. This may make the fuel tank and
stop buffer overload, and shorten its life. Maintain the distance at the end of
travel 5CM.
• Do not work using the power of dropping bucket and the boom. You should
use the hammer operation, rather than falling boom or bucket. This will make
the work of mechanical overload or damage to the device. This is very
dangerous.
• Do not conduct lifting operation directly. Basically, working as a crane is
prohibited. However, if necessary, need to install the push-styled top hook and
certified spreader properly.
Contact your authorized Shandong Joyo company or authorized service center.
Exit from the muddy ground
When working on the soft muddy ground, to be very careful.
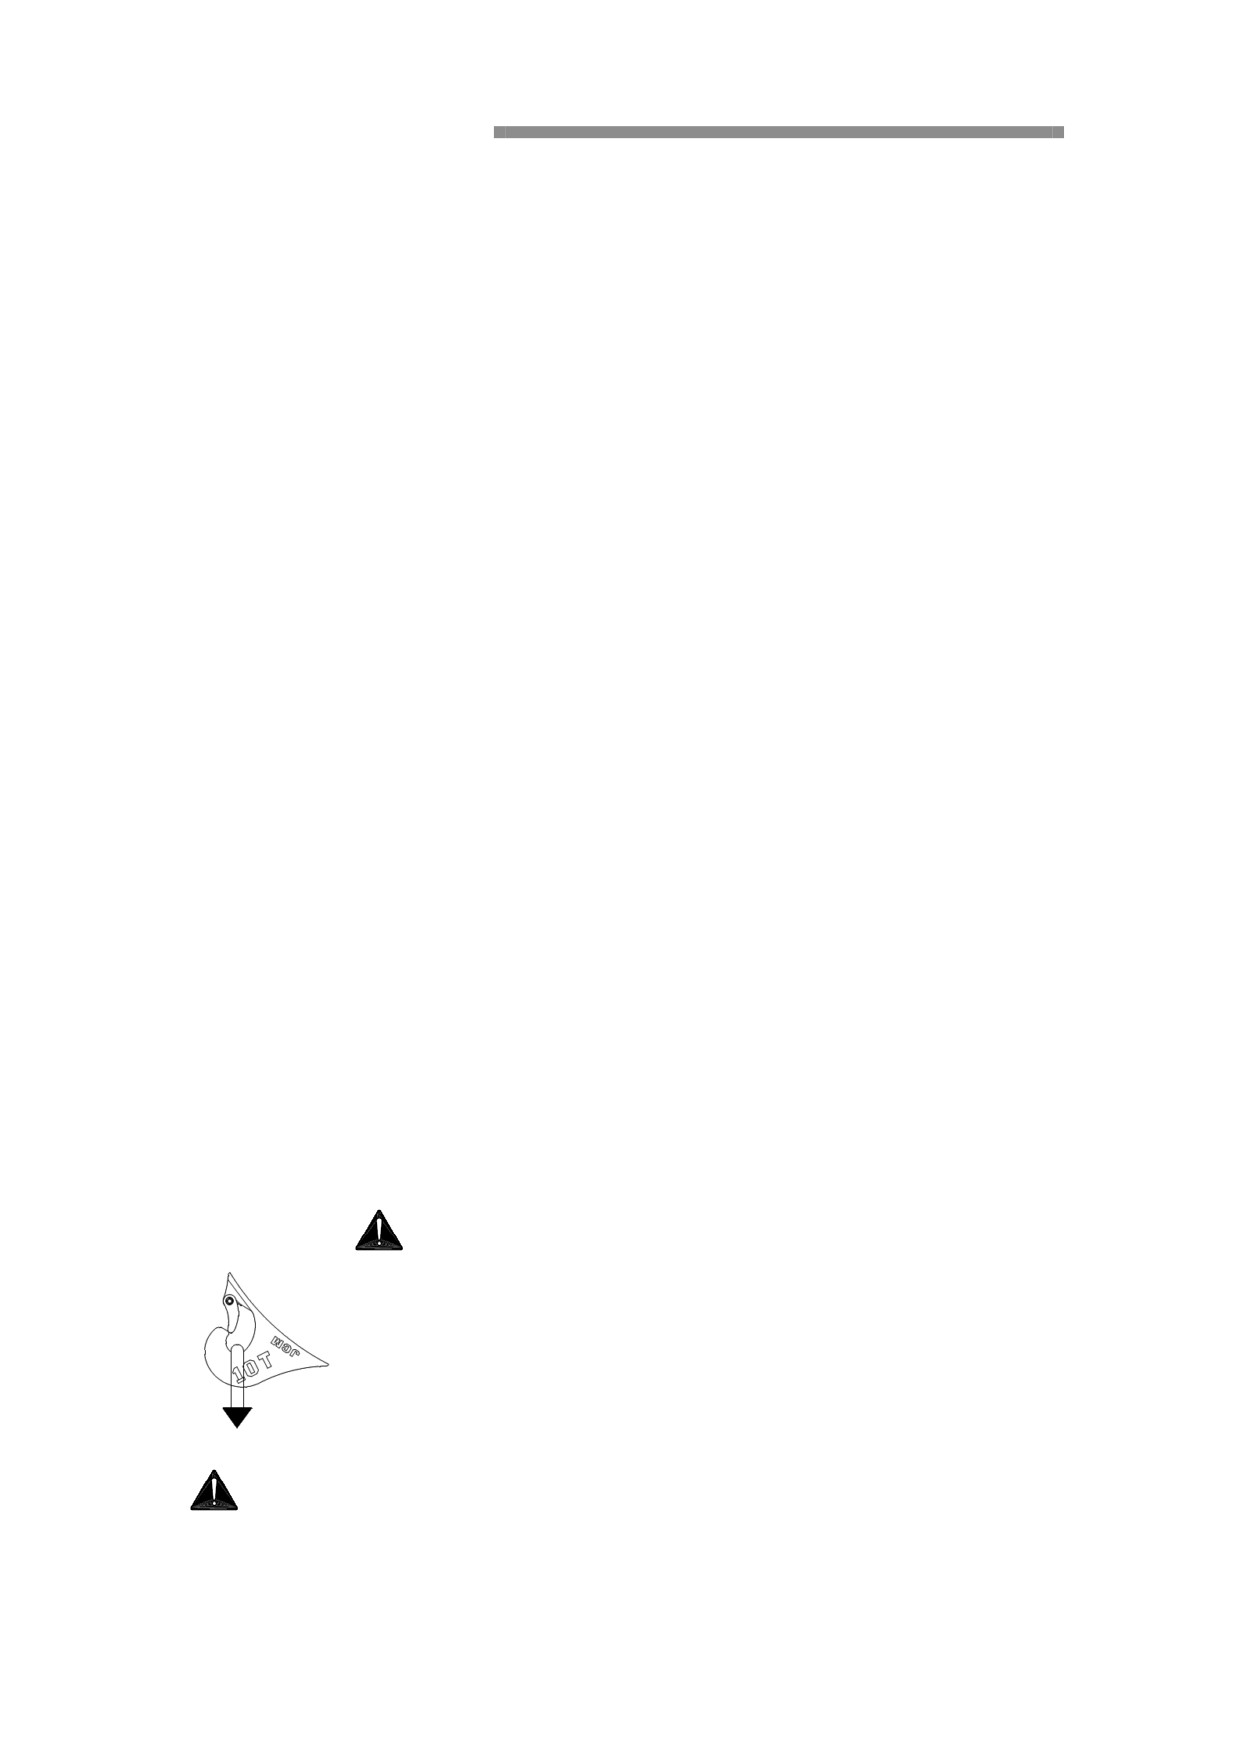
• When a track fall into the mud, shore the track using the bucket, place a wood
under the track.
• When both tracks are into the mud, place the wood the under track. Push bucket
teeth into the ground, recycling the stick as the excavating work, and push the
walking handle forward, then make the machine to be out of the marsh.
Important! When supporting the machine from the ground using a boom or
stick, use the bottom bucket (instead of the bucket teeth).
The angle between the arm and the stick is among the 90 ° - 100 °.
Operating in the water, or after the withdrawal from the muddy ground, add
the grease to pin of the work unit. To check the oil of guide wheel, wheel and
track drive boxes, if oil has been contaminated, replace the oil.
Hoisting equipment
Important! There maybe some roles for excavator to hoist in some
country and region. Please check these rules and contact with dealer
to get more information. Some like loose sand and water condition
would make hoisting work (close to maximum) dangerous. Make
sure the ground is solid and safe. There maybe dangerous under
centrifugal force when the machine turning and swinging in
hoisting.
Caution!
To avoid accident and damage, do not hoist more than
degigned value. The value shoud be change according to
condition if the machine is noe working in lever ground.
Caution!