Manitou MRT 1440 ST3B (400°), MRT 1640 ST3B (400°), MRT 1840 ST3B (400°-360°). MANUALE D’ISTRUZIONI - 4
 

  Index      Manuals     Manitou MRT 1440 ST3B (400°), MRT 1640 ST3B (400°), MRT 1840 ST3B (400°-360°). MANUALE D’ISTRUZIONI


Search            copyright infringement  


Content      ..     2      3      4      5     ..


Manitou MRT 1440 ST3B (400°), MRT 1640 ST3B (400°), MRT 1840 ST3B (400°-360°). MANUALE D’ISTRUZIONI - 4


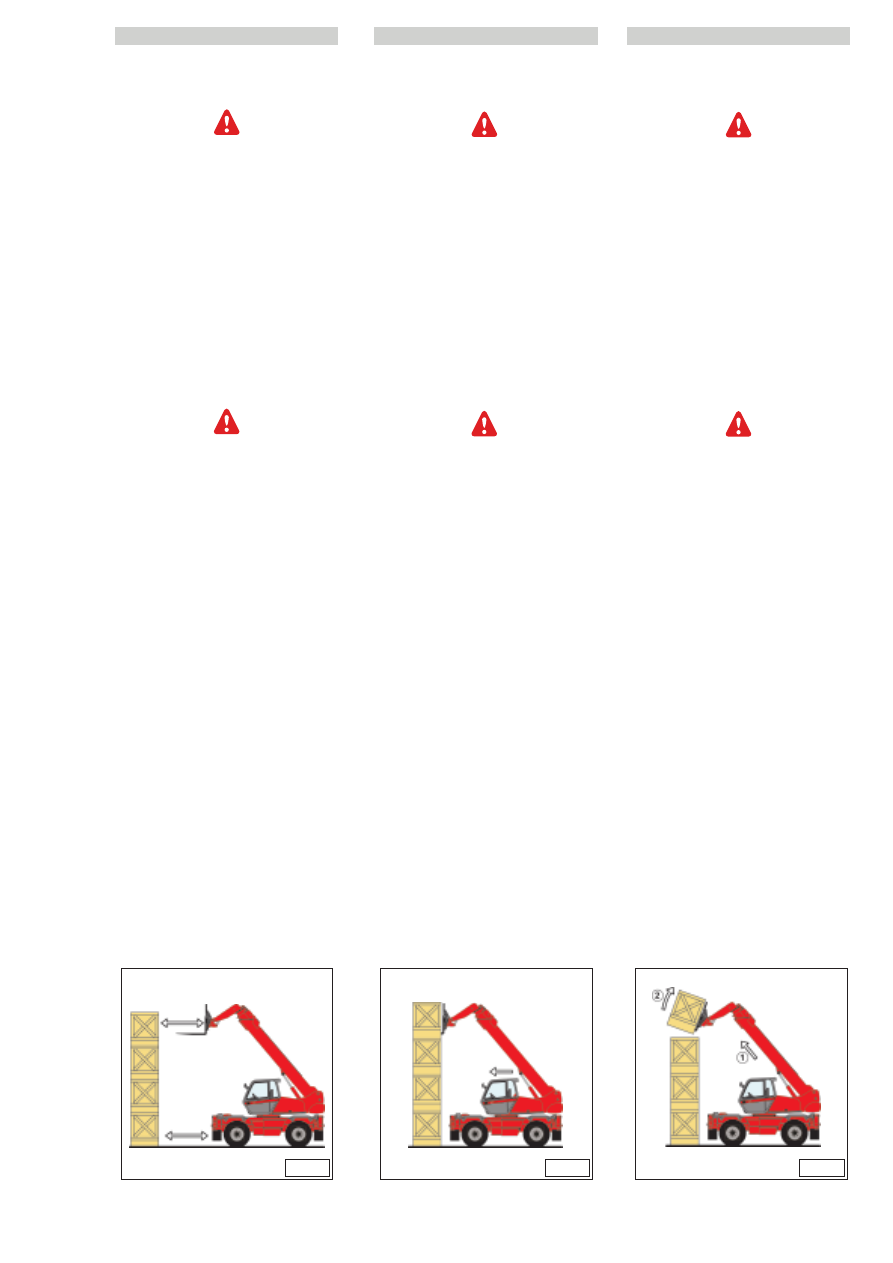
C - Taking up a high load on tyres.

Under no circumstances should you pick up

a load if the lift truck is not in a horizontal

position. (See paragraph : G - HORIZONTAL

POSITION OF THE LIFT TRUCK in the chapter :

LOAD HANDLING).

- Ensure that the forks will easily pass

under the load.

- Position the lift truck perpendicular to the

load  with the forks in a horizontal
position (Fig. G) manoeuvring gently and
carefully (See paragraph : E - VISIBILITY in
the chapter : HANDLING INSTRUCTIONS
for visibility of the road).

Always think about keeping the distance

necessary to fit the forks under the load,

between the pile and the lift truck (Fig. G)

and use the shortest possible 

length of jib.

- Stop with the forks  in front of the load

(Fig. H). Apply the parking brake and
place the forward/reverse lever in neutral.

- Slightly lift the load (1) and incline the

forks carriage (2) backwards to stabilize
the load (Fig. I).

C - Een last hoog oppakken met de
heftruck op banden.

Het is ten strengste verboden een lading op te

pakken als de heftruck niet vlak staat (zie

paragraaf: G - HORIZONTALE STAND VAN DE

HEFTRUCK in hoofdstuk: VERPLAATSEN VAN

EEN LADING).

- Controleren of de vork makkelijk onder de
lading geschoven kan worden.
- De heftruck loodrecht op de lading
zetten, met de vorken horizontaal (Fig. G),
voorzichtig en langzaam te werk gaan (zie
paragraaf: E - ZICHT in hoofdstuk:
AANWIJZINGEN VOOR DE VERPLAATSING
met betrekking tot de zichtbaarheid op het
traject).

Niet vergeten dat er een bepaalde afstand

nodig is tussen de stapel en de heftruck om

de vork onder de lading te kunnen schuiven

(Fig. G), en de arm zo min mogelijk

uitschuiven.

- Zet de vorken tegen de lading aan (Fig.
H). Trek de handrem aan en zet de hendel
van de omkeerinrichting in zijn vrij.
- Til de last iets op (1) en hel het
vorkenbord (2) achterover om de lading te
stabiliseren (Fig. I).

C - Prelevare un carico in alto su 

pneumatici.

È tassativamente vietato prelevare un carico

se il carrello elevatore non è in piano (Vedi

paragrafo : G - ORIZZONTALITÀ DEL
CARRELLO ELEVATORE nel capitolo :

MOVIMENTAZIONE DI UN CARICO).

- Verificare che le forche passino facilmente

sotto il carico.

- Avvicinare il carrello elevatore

perpendicolarmente al carico con le
forche orizzontali (Fig. G), manovrando
dolcemente e con prudenza (Vedi
paragrafo : E - VISIBILITÀ nel capitolo :
ISTRUZIONI PER LA MOVIMENTAZIONE
relativo alla visibilità sul percorso).

Ricordandosi di

mantenere sempre la distanza necessaria

per inserire le forche sotto il carico, tra la pila

e il carrello elevatore (Fig. G), utilizzando la

lunghezza minima possibile del braccio.

- Portare le forche contro il carico (Fig. H).

Tirare il freno di stazionamento e mettere
la leva dell'invertitore di marcia in folle.

- Sollevare leggermente il carico (1) e

inclinare il portaforche (2) indietro per
stabilizzare il carico (Fig. I).

1-25

648747 

IT

-EN-NL 

(29/08/2013)

IT

EN

NL

G

H

I

Inclinare sufficientemente il carico

all’indietro per assicurarne la stabilità
(perdita del carico durante la frenata)

facendo però attenzione a non modificarne

l’equilibrio.

- Se possibile (Fig. J), abbassare il carico

senza spostare il carrello elevatore. Alzare
il braccio (1) per allontanare il carico, far
rientrare (2) e abbassare il braccio (3) per
portare il carico in posizione di trasporto
(Fig. L).

- Se ciò non fosse possibile, arretrare il

carrello elevatore (Fig. K). Manovrando
molto dolcemente e con estrema
prudenza (Vedi paragrafo : E - VISIBILITÀ
nel capitolo : ISTRUZIONI PER LA
MOVIMENTAZIONE relativo alla visibilità
sul percorso), arretrare il carrello elevatore
(1) per allontanare il carico, far rientrare
(2) e abbassare il braccio (3) per portare il
carico in posizione di trasporto (Fig. L).

D - Posare un carico in alto su 

pneumatici.

È tassativamente vietato depositare un

carico se il carrello elevatore non è in piano

(Vedi paragrafo : G - ORIZZONTALITÀ DEL

CARRELLO ELEVATORE, nel capitolo :

MOVIMENTAZIONE DI UN CARICO).

Tilt the load sufficiently backwards to ensure

its stability (loss of load on braking) without

upsetting the balance of the load in so doing.

- If possible (Fig. J) lower the load without

shifting the lift truck. Lift the jib (1) to
release the load, retract (2) and lower the
jib (3) to bring the load into the transport
position (Fig. L).

- If this is not possible, back the lift truck up.

(Fig. K) Manoeuvring very gently and
carefully (See paragraph : E - VISIBILITY in
the chapter : HANDLING INSTRUCTIONS
for visibility of the road), back up the lift
truck (1) to release the load, retract (2) and
lower the jib (3) to bring the load into the
transport position (Fig. L).

D - Laying a high load on tyres

Under no circumstances should you lay down

a load if the lift truck is not a horizontal

position. (See paragraph : G - HORIZONTAL

POSITION OF THE LIFT TRUCK in the chapter :

LOAD HANDLING).

Hel de last voldoende achterover om de

stabiliteit ervan te garanderen (verlies van de

lading bij het remmen) let er wel op het

evenwicht ervan niet te veranderen.

- Indien mogelijk (Fig. J), de lading laten
zakken zonder de heftruck te verplaatsen.
De arm (1) optillen om de lading van de
stapel af te halen, dan de arm intrekken (2)
en laten zakken (3) om de lading in de
transportstand te zetten (Fig. L).
- Als dit niet mogelijk is, de heftruck iets
achteruit rijden (Fig. K). Uiterst voorzichtig
en langzaam te werk gaan (zie paragraaf: E
- ZICHT in hoofdstuk: AANWIJZINGEN
VOOR DE VERPLAATSING met betrekking
tot het zicht op het traject), rijd de heftruck
achteruit (1) om de lading te verwijderen,
trek de arm in (2) en zet hem omlaag (3)
om de lading in de transportstand te
brengen (Fig. L).

D - Een last hoog neerzetten met de
heftruck op banden.

Het is ten strengste verboden een lading neer

te zetten als de heftruck niet vlak staat (zie

paragraaf: G - HORIZONTALE STAND VAN DE

HEFTRUCK in hoofdstuk: VERPLAATSEN VAN

EEN LADING).

1-26

IT

EN

NL

648747 

IT

-EN-NL 

(29/08/2013)

J

K

L

- Approach the load in the transport

position in front of the pile (Fig. L).

- Lift and extend the jib (1) (2) until the

load is above the pile, if necessary move
the lift truck forward (3) (Fig. M)
manoeuvring very gently and carefully
(See paragraph : E - VISIBILITY in the
chapter : HANDLING INSTRUCTIONS for
visibility of the road). Apply  the parking
brake and place the forward/reverse lever
in neutral.

- Place the load in a horizontal position and

lay it down on the pile by lowering and
retracting the jib (1) (2) in order to
position the load correctly (Fig. N).

- Free the forks by alternately retracting

and lifting the jib (3) (Fig. N) or, if possible,
by reversing the lift truck (3) (See
paragraph : E - VISIBILITY in the chapter :
HANDLING INSTRUCTIONS for visibility of
the road). Then bring the jib into the
transport position.

E - Taking up a load without pallet

- Tilt the carriage (1) forwards and extend

the jib (2) while simultaneously crowding
the carriage backwards to slip the forks
under the load (Fig. O). If necessary,
wedge the load.

F - Load status indicator.

- Always watch the load status indicator 

while handling a load.

- De lading in de transportstand tot voor
de stapel brengen (Fig. L).
- De arm optillen en uitschuiven (1) (2)
totdat de lading zich boven de stapel
bevindt, zo nodig de heftruck iets naar
voren rijden (3) (Fig. M), voorzichtig en
langzaam te werk gaan (zie paragraaf: E -
ZICHT in hoofdstuk: AANWIJZINGEN VOOR
DE VERPLAATSING met betrekking tot het
zicht op het traject). Trek de handrem aan
en zet de hendel van de omkeerinrichting
in zijn vrij.
- Zet de last horizontaal en zet hem op de
stapel door de arm omlaag te brengen en
in te trekken (1) (2) om de last correct neer
te zetten (Fig. N).
- De vorken vrij maken door de arm (3)
beurtelings in te trekken en op te tillen (3)
(Fig. N), of indien mogelijk door de heftruck
achteruit te rijden (3) (zie paragraaf: E -
ZICHT in hoofdstuk: AANWIJZINGEN VOOR
DE VERPLAATSING met betrekking tot het
zich op het traject). Dan de arm in de
transportstand zetten.

E - Een last zonder pallet oppakken

- De vorken naar voren hellen (1), de arm
uittrekken (2) en tegelijkertijd de vorken
achterover hellen (3) om ze onder de
lading te steken (Fig. O). Indien nodig de
lading stutten.

F - Instrument voor de staat van de
lading.

- Hou altijd de indicator van de staat van
de lading in het oog bij het verplaatsen
van lading.

- Avvicinare il carico in posizione di 

trasporto davanti alla pila (Fig. L).

- Alzare e allungare il braccio (1) (2) fino a

quando il carico è al disopra della pila, se

occorre far avanzare il carrello elevatore

(3) (Fig. M) manovrando dolcemente e

con prudenza (Vedi paragrafo : E -

VISIBILITÀ nel capitolo : ISTRUZIONI PER

LA MOVIMENTAZIONE relativo alla

visibilità sul percorso). Azionare il freno di

stazionamento e mettere la leva

dell'invertitore di marcia in folle.

- Posizionare il carico orizzontalmente e

posarlo sulla pila, abbassando e

rientrando il braccio (1) (2) per

posizionare correttamente il carico (Fig.

N).

- Liberare le forche, facendo

alternativamente rientrare e alzare il

braccio (3) (Fig. N), o se possibile, facendo

indietreggiare il carrello elevatore (3)

(Vedi paragrafo : E - VISIBILITÀ nel

capitolo : ISTRUZIONI PER LA

MOVIMENTAZIONE relativo alla visibilità

sul percorso). Quindi portare il braccio in

posizione di trasporto.

E - Prelevare un carico senza pallet

- Inclinare le forche (1) in avanti e allungare

il braccio (2) inclinando

contemporaneamente le forche (3)

indietro per inserire le forche sotto il

carico (Fig.O). Se necessario zeppare il

carico.

F - Dispositivo indicatore di stato di 

carico.

- Osservare sempre l'indicatore di stato 

di carico durante la movimentazione.

1-27

648747 

IT

-EN-NL 

(29/08/2013)

IT

EN

NL

M

N

O

1-28

If the load status indicator alarm is actived,

do not carry out the movements said to be

"WORSENING", which are the following :

A - Extend the jib.
B - Lower the jib.

- If the load status indicator alarm is 

actived, carry out in all security move 
ments in the following order (Fig. P) :

1 - Fully retract the jib.
2  - If  it’s necessary lift the jib
3 - Lower the jib in order to lay the load.

Lift truck with level corrector

- Correct the slope using the hydraulic

control and check the horizontal position
on the level before lifting the boom(See
chapter : INSTRUMENTS AND CONTROLS
in paragraph : 2 - DESCRIPTION).

Apart from the transverse slope of the
ground, several parameters can upset the
horizontal position of the lift truck.
• The tyre pressures.
• The stability of the ground.
• The balance of the load.
• Strong wind or stormy conditions.

Before any handling work, check the points

above and ensure that the lift truck is

completely horizontal

.

(See bubble level)

Als deze in alarm is mag u in geen geval:

A - De arm uittrekken.
B - De arm omlaag halen.

- Als het instrument voor de staat van de
last in alarm is, de volgende verlichtende
manoeuvres verrichten, in deze volgorde
(Fig. P) :
1 - De arm zover mogelijk intrekken.
2 - Indien nodig de arm omhoog zetten
3 - De arm omlaag zetten om de last neer
te zetten.

Heftruck met hellingsregelaar.

- De hellingshoek corrigeren met behulp
van het hydraulische bedieningselement
en de horizontale stand op de waterpas
controleren voor de arm op te heffen (zie
hoofdstuk: CONTROLE- EN
BEDIENINGSORGANEN) in deel: 2 -
BESCHRIJVING).
Niet alleen de dwarse helling van het
terrein beïnvloedt de horizontale positie
van de heftruck, maar ook bijvoorbeeld:
• De staat van de banden en de
bandenspanning.
• De stabiliteit van de grond.
• Het evenwicht van de lading.
• Harde wind of storm.

Voor iedere willekeurige beweging, de

bovengenoemde situaties checken en

controleren of de heftruck 

goed horizontaal

staat

.

(Controleren op de waterpas)

Quando l'indicatore di stato di carico è in

allarme, non bisogna in alcun caso: 

A - Far uscire il braccio.

B - Abbassare il braccio.

- Se l'indicatore di stato di carico è in

allarme, effettuare i movimenti sgravanti,

nel seguente ordine (Fig. P) :

1  - Rientrare il braccio al massimo.

2  -Se necesario alzare il braccio

3  - Abbassare il braccio in modo da 

posare il carico.

Carrello elevatore con correttore
d’inclinazione.

- Correggere l’inclinazione, agendo sul

comando idraulico e verificare
l’orizzontalità sulla livella prima di sollevar
il bracio(Vedi capitolo : STRUMENTI DI
CONTROLLO E DI COMANDO, nella parte :
2 - DESCRIZIONE).

Oltre alla pendenza trasversale del terreno,
altri parametri possono incidere
sull’orizzontalità del carrello elevatore.
• Lo stato e la pressione dei pneumatici.
• La stabilità del terreno.
• L’equilibrio del carico.
• Il vento forte o la tempesta.

Prima di ogni movimentazione, controllare

le condizioni sopraelencate e verificare che il

carrello elevatore sia 

perfettamente

orizzontale

.

(Controllare sulla livella a bolla)

IT

EN

NL

648747 

IT

-EN-NL 

(29/08/2013)

P

1-29

648747 

IT

-EN-NL 

(29/08/2013)

GEBRUIKSAANWIJZING VAN DE
RADIOBESTURING

Gebruik 

van 

de 

radiobesturing,

veiligheidsvoorschriften

De 

radiobesturing 

is 

een 

digitaal

afstandbesturingssysteem  gebaseerd  op
microprocessor-technologie.
Het  systeem  is  in  staat  in  de  moeilijkste
omgevingen  te  werken  en  is  beschermd
tegen  elektromagnetische  storingen  en
radiostoringen.

De 

radiobesturing 

bestaat 

uit 

een

draagbare 

besturingseenheid

(knoppenbord) met stuurknuppels voor de
proportionele  besturing    en  schakelaars
voor de ON/OFF functies

De  besturingsinformatie  wordt  digitaal
gecodeerd  en  wordt  via  radio  van  het
knoppenbord  naar  de  centrale  eenheid
gezonden.  De  centrale  eenheid  zet  de  van
het knoppenbord ontvangen gegevens om
en  activeert  de  bijbehorende  functie  en
regelt zodoende de snelheid, de richting en
dus de bewegingen van de machine. 

Keuze van de radiokanalen

Het systeem beheert automatisch de
radiofrequenties.
Het automatische systeem voor de frequenties
garandeert  een  doeltreffender  transmissie
beter bestand tegen de radiointerferenties.
De  bediener  hoeft  de  werkfrequentie  niet
meer met de hand te veranderen en het risico
op  het  verbreken  van  de  verbinding  door
radiointerferenties  wordt  tot  een  minimum
beperkt.

In  geval  van  misbruik  of  onjuist  gebruik
bestaat er risico voor:
- De lichamelijke en psychische
gezondheid van de gebruiker of andere
personen.
- De heftruck en andere apparatuur in de
nabijheid.

Alle personen die met deze radiobesturing
werken:
- Moeten in het bezit zijn van de
beroepsbekwaamheid in
overeenstemming met de geldende
normen en daarvoor zijn opgeleid.
- Moeten zich strikt aan deze handleiding
houden.

- Het systeem maakt het mogelijk de
heftruck op afstand te bedienen middels
radiogolven. De overbrenging van de
opdrachten komt eveneens tot stand als de
heftruck buiten het gezichtsveld is (achter
een hindernis of een gebouw
bijvoorbeeld).

De  heftruck  niet  besturen  als  hij  niet
constant  door  de  bediener  visueel  onder
controle kan worden gehouden!

- Alvorens de zender achter te laten, moet
de bediener controleren dat hij niet door
een andere niet gekwalificeerde gebruiker
gebruikt kan worden:
hij  moet  dus  de  zender  opbergen  op  een
niet toegankelijke plaats.

ISTRUZIONI D'UTILIZZO DEL 
RADIOCOMANDO 

Utilizzo  del  radiocomando  ,  consegne  di
sicurezza

Il  radiocomando  è  un  sistema  di  controllo
remoto  digitale,  basato  su  tecnologia  a
microprocessore. 
Il  sistema  è  in  grado  di  funzionare  negli
ambienti  più  difficili  ed  è  protetto  contro  i
disturbi elettromagnetici ed i disturbi radio.

Il radiocomando è composto da una unità di
controllo 

portatile 

(pulsantiera) 

con

manipolatori  per  il  controllo  proporzionale
e interruttori per le funzioni ON/OFF

Le  informazioni  di  controllo  vengono
codificate  digitalmente  e  vengono  inviate
dalla pulsantiera all'unità centrale via radio.
L'unità centrale converte i dati ricevuti dalla
pulsantiera 

attiva 

la 

funzione

corrispondente,  regolando  la  velocità,  la
direzione  e  quindi  i  movimenti  della
machina.

Selezione dei canali radio

Il sistema gestisce automaticamente le 
frequenze radio .
La  gestione  automatica  della  frequenza
garantisce  una  trasmissione  più  efficiente
con  maggiore  resistenza  alle  interferenze
radio.
L'operatore  non  dovrà  più  cambiare  la
frequenza  di  lavoro  manualmente  e  il
rischio  di  disconnessioni  dovuto  alle
interferenze radio sarà ridotto al minimo.

In caso d’abuso o d’errato utilizzo, esistono
rischi per:
- L’incolumità fisica e psichica dell’utente o 

di altre persone.

- Il carrello elevatore e altre apparecchia-

ture circostanti.

Tutte  le  persone  che  lavorano  con  questo
radiocomando:
- Devono essere in possesso delle qualifi-

che in conformità con le normative in-  
vigore e istruite di conseguenza.

- Devono attenersi scrupolosamente al 

presente manuale di istruzioni.

- Il sistema permette il comando a distanza 

del carrello elevatore via onde radio. La 
trasmissione degli ordini di comando 
avviene anche se il carrello elevatore non 
è visibile (se si trova dietro un ostacolo o 
un edificio per esempio). 

Non  pilotare  mai  il  carrello  elevatore  se
non è costantemente nella perfetta visuale
dell’operatore!

- Prima di lasciare la trasmiittente, 

l’operatore deve accertarsi che i terzi non 
autorizzati non possano utilizzare 
l’apparecchio:
quindi dovrà custodire l’apparecchio in un
luogo inaccessibile.

IT

EN

NL

INSTRUCTIONS  FOR  USING  THE  RADIO
CONTROL

Using the radio control, with safety signs

The radio control is a digital remote control
system 

based 

on 

microprocessor

technology.
The  system  is  capable  of  working  in  the
most  difficult  environments  and  is
protected 

against 

electromagnetic

disturbances and radio disturbances.

The  radio  control  consists  of  a  portable
control  unit  (pushbutton  panel)  with
manipulators  for  proportional  control  and
switches for the ON/OFF functions

The  control  information  is  coded  digitally
and  sent  by  the  pushbutton  panel  to  the
central  unit  via  radio.  The  control  unit
converts  the  data  received  by  the
pushbutton  panel  and  activates  the
corresponding  function,  adjusting  the
speed,  the  direction  and  therefore  the
vehicle movements.

Selection of radio channels

The  system  controls  the  radio  frequencies
automatically.
The  automatic  control  of  the  frequency
guarantees  a  more  efficient  transmission
with 

greater 

resistance 

to 

radio

interferences.
The operator no longer needs to change the
operating  frequency  manually  and  the  risk
of  disconnections  due  to  the  radio
interferences  shall  be  reduced  to  the
minimum.

In case of misuse or incorrect use, there are
risks for:
- The physical and psychological safety of 

the user or of other persons.

- The forklift truck and other surrounding 

equipment.

All those working with this radio control:
- Must have the qualifications in 

conformity with the regulations in force 
and must be accordingly trained.

- Must strictly follow this instruction 

manual.

-  The  system  allows  remote  control  of  the
forklift  truck  by  radio.  The  transmission  of
the control orders occurs even if the forklift
truck  is  not  visible  (for  example,  if  it  is
behind an obstacle or a building).

Never  pilot  the  forklift  truck  if  it  is  not
constantly  perfectly  within  the  operator’s
vision!

-  Before  leaving  the  transmitter,  the
operator must make sure that unauthorised
third parties cannot use the equipment:
and  therefore  keep  the  equipment  safe  in
an inaccessible place.

1-30

IT

EN

NL

648747 

IT

-EN-NL 

(29/08/2013)

- De gebruiker moet ervoor zorgen dat de
handleiding voor gebruik en onderhoud
op ieder willekeurig moment binnen
handbereik is en controleren of de
bedieners de inhoud hiervan hebben
gelezen en begrepen.

Aanwijzingen

- Zoek een stabiele plaats waar er geen
risico bestaat voor uitglijden.
- Controleren voor ieder gebruik van de
radiobesturing of er zich niemand in het
werkgebied bevindt.
- De radiobesturing alleen gebruiken met
zijn draaginrichting of naar behoren op het
platform geïnstalleerd.

Als u de radiobesturing verwijdert, moet u
de batterij verwijderen, op deze manier
kan hij niet per ongeluk (of gewild) in
werking gesteld worden door derden.

Bescherminrichtingen

-  De  heftruck  zal  tot  stilstand  gebracht
worden  in  maximaal  450  milliseconden
(ongeveer 0,5 seconde):
- Door een druk op de noodknop van de
zender (in dit geval 50 milliseconden) of
van de heftruck.
- Als men buiten het bereik komt van de
overbrengingsafstand van de radiogolven.
- Door een storing in het
ontvangstapparaat.
- Door een storend radiosignaal afkomstig
van derden.
- Door verwijdering van de batterij uit het
batterijenvak in de radiobesturing.
- Als de batterij leeg is.
- Deze beveiligingen zijn aanwezig voor de
veiligheid van personen en goederen.
Daarom mogen ze nooit gewijzigd,
opgeheven of overbrugd worden hoe ze
ook gebruikt worden!

In geval van nood, onmiddellijk op de
noodknop van de zender drukken; daarna
de instructies in de handleiding opvolgen
(zie: 2 - BESCHRIJVING: CONTROLE- EN
BEDIENINGSORGANEN).

- L’utente deve garantire che il manuale 

d’uso e manutenzione sia accessibile in 
qualsiasi momento e accertarsi che gli 
operatori abbiano letto e compreso il suo 
contenuto.

Istruzioni

- Cercate un luogo e una posizione stabili 

senza rischio di scivolare.

- Prima d’ogni utilizzo del radiocomando 

accertatevi che nessuno si trovi nella zona 
di lavoro.

- Utilizzare il radiocomando solo con il suo 

dispositivo di trasporto oppure previa 
corretta installazione nel cestello.

Quando rimuovete il radiocomando, 
togliere la batteria, onde impedire 
attivamente qualsiasi utilizzo
involontario (o abuso) da parte di
persone estranee.

Dispositivi di protezione

- Il carrello elevatore sarà immobilizzato al 

massimo entro 450 millisecondi (circa 0,5 
secondi):

- Mediante pressione sul pulsante d’arresto 

d’emergenza dell’emittente (qui 50 milli
secondi), o quello del carrello elevatore.

- Mediante superamento della distanza di 

trasmissione delle onde radio.

- Mediante un disturbo dell’apparecchio 

ricevente.

- Mediante un segnale radio perturbatore 

proveniente da terzi.

- Mediante rimozione della batteria dal 

suo alloggiamento nel radiocomando.

- Mediante raggiunta fine d’autonomia 

della batteria.

- Questi dispositivi di protezione sono pre

visti per la sicurezza delle persone e dei 
beni. 
Pertanto non vanno mai modificati, 
soppressi o aggirati qualunque sia la 
maniera impiegata!

In caso d’emergenza, premere
immediatamente il bottone d’arresto
d’emergenza dell’emittente ; seguite poi le
istruzioni del manuale (vedi: 2 -
DESCRIZIONE: STRUMENTI DI CONTROLLO
E DI COMANDO).

-  The  User  must  ensure  that  the  Use  and
Maintenance  Manual  is  accessible  at  any
moment  and  that  the  operators  have  read
and understood its contents.

Instructions

- Find a stable place and position without 

risk of slipping.

- Before using the radio control make sure 

no one is present within the work area.

- Use the radio control only with its tran

sport device or after correct installation in 
the platform.

When  you  remove  the  radio  control,
remove  the  battery,  in  order  to  actively
prevent all involuntary use (or misuse) by
outsiders.

Protection devices

- The forklift truck will be immobilised 

within a maximum of 450 milliseconds 
(approx. 0.5 seconds):

- By pressing the emergency stop button of 

the emitter (here 50 milliseconds), or that 
of the forklift truck.

- By exceeding the transmission distance of 

the radio waves.

- By means of a disturbance of the receiver 

apparatus.

- By means of a disruptive radio signal 

coming from third parties.

- By removing the battery from its housing 

in the radio control.

- When the batteries reach their end of 

autonomy.

- These protection devices are provided for 

the safety of persons and goods.

These must therefore never be modified, 

suppressed or bypassed whatever the
manner used!

In  case  of  emerhency,  immediately  press
the emergency stop button of the emitter;
then follow the instructions in the Manual
(see: 2 – DESCRIPTION: INSTRUMENTS AND
CONTROLS).

1-31

648747 

IT

-EN-NL 

(29/08/2013)

MAINTENANCE INSTRUCTIONS OF THE

LIFT TRUCK

Maintenance instructions.

A - General.

- Read the operator's manual carefully and

ensure you understand it.

- Stop the I.C. engine, when an 

intervention is necessary.

- Wear clothes suitable for the maintenance

of the lift truck, avoid wearing jewellery
and loose clothes. Tie and protect your
hair, if necessary.

- Ensure the area is sufficiently ventilated

before starting the lift truck.

Make sure that the disposal of process

materials and of spare parts is 

carried out in total safety

and in a ecological way.

- Carry out all repairs immediately, even if

the repairs concerned are minor.

- Repair all leaks immediately, even if 

the leak concerned is minor.

- Do not attempt to loosen unions, hoses or

any hydraulic component with the circuit
under pressure.

The handling and removal of the balancing

valves or safety valves which may be fitted to

the cylinders of your lift truck can be

dangerous. A balancing valve must only be

removed when the cylinder concerned is at

rest and the hydraulic circuit is

depressurised.

This operation can only be carried out by

authorised staff.

- Do not smoke or approach the lift truck

with a flame, when the fuel tank is open
or is being filled.

- Take care not to burn yourself  

(Exhaust, radiator, I.C. engine, etc.).

- Disconnect the negative cable terminal (-)

from the top of the battery before
working on the electrical circuit or on the
lift truck (e.g. : Welding).

- Do not drop metallic items on the battery.
- When carrying out electric welding work

on the lift truck, connect the negative
cable from the equipment directly to the
part being welded, so as to avoid high
tension current passing through the
alternator.

ONDERHOUDSINSTRUCTIES VAN DE
HEFTRUCK

Onderhoudsinstructies. 

A - Algemene aanwijzingen.

- Deze handleiding aandachtig lezen en
begrijpen.
- De verbrandingsmotor uitzetten voor iets
aan de heftruck te doen.
- Geschikte kleding dragen voor de
onderhoudswerkzaamheden aan de
heftruck, draag geen sieraden en wijde
kleren. Indien nodig het haar vastbinden
en beschermen.
- Controleren of de ruimte voldoende
geventileerd is voor de heftruck te starten.

Het verbruiksmateriaal en de gebruikte

onderdelen op veilige en milieuvriendelijke

manier afvoeren.

- De nodige reparaties, zelfs van
ondergeschikt belang, altijd onmiddellijk
uitvoeren.
- Alle (ook kleine) eventuele lekkages
onmiddellijk verhelpen.
- Probeer geen verbindingsstukken,
slangen of hydraulische componenten los
te maken met het circuit onder druk.

Het wijzigen van de afstelling en het

demonteren van de stabiliseerkleppen of van

de veiligheidskleppen die mogelijk op de

cilinders van de heftruck zijn aangebracht

kan gevaarlijk zijn. Een stabiliseerklep mag

alleen gedemonteerd worden als de

betreffende cilinder niet in werking is en als er

geen druk staat op het hydraulische circuit.

Deze handeling mag alleen door bevoegd

personeel worden uitgevoerd.

- Niet roken of een vlam in de buurt van de
heftruck brengen als de brandstoftank
open staat of gevuld wordt.
- Let op het gevaar voor brandwonden
(uitlaat, radiateur, verbrandingsmotor,
enz.).
- De negatieve kabelklem (-) van de accu
losschakelen alvorens werkzaamheden te
verrichten op het elektrische circuit of op
de heftruck (bijv. : lassen).
- Geen metalen onderdelen op de accu
leggen.
- Als men een elektrische las op de heftruck
uit wil voeren, moet men de tang van de
negatieve kabel van het lasapparaat
rechtstreeks op het te lassen werkstuk
plaatsen om te voorkomen dat de uiterst
sterke stroom door de
wisselstroomdynamo gevoerd kan worden.

ISTRUZIONI DI MANUTENZIONE DEL
CARRELLO ELEVATORE

Istruzioni per la manutenzione.

A - Istruzioni generali.

- Leggere con attenzione e comprendere il

manuale d'istruzioni.

- Spegnere il motore termico prima di ogni

intervento sul carrello elevatore.

- Indossare abbigliamento adeguato alle

operazioni di manutenzione del carrello
elevatore, evitando i gioielli e gli
indumenti troppo larghi. Se occorre,
legare e proteggere i capelli.

- Assicurarsi che il locale sia 

sufficientemente ventilato prima di 
mettere in moto il carrello elevatore.

Porre particolare attenzione allo

smaltimento dei materiali di consumo e dei

pezzi usati, verificando che venga effettuato

nella massima sicurezza 

e in modo ecologico.

- Effettuare le riparazioni necessarie, anche

le minori, immediatamente.

- Riparare ogni perdita, anche minima, 

immediatamente.

- Non cercare di allentare i raccordi, i 

flessibili o un componente idraulico, 
con il circuito in pressione.

La modifica della regolazione e lo

smontaggio delle valvole di equilibratura

che o delle valvole di sicurezza che, a volte,

equipaggiano i martinetti del carrello

elevatore, possono rivelarsi pericolosi. Una

valvola di equilibratura può essere smontata

solo con il martinetto interessato a riposo e

con il circuito idraulico senzapressione.

Tale operazione può essere effettuata

solo da personale autorizzato.

- Non fumare o avvicinarsi al carrello

elevatore con fiamme libere quando il
serbatoio del combustibile è aperto o in
fase di riempimento.

- Attenzione ai rischi di ustioni 

(Scappamento, radiatore, motore 
termico, ecc.).

- Scollegare il capocorda negativo (-) dalla

batteria prima di lavorare sull'impianto
elettrico o sul carrello elevatore (Es. :
Saldatura).

- Non posare pezzi metallici sulla 

batteria.

- Per effettuare una saldatura elettrica sul

carrello elevatore, porre la pinza del cavo
negativo della saldatrice direttamente sul
pezzo da saldare, onde evitare che la
corrente molto forte attraversi
l'alternatore.

IT

EN

NL

IT

EN

NL

1-32

INSERTING THE BOOM SAFETY BLOCK

The forklift truck is equipped with a
safety wedge: INSTRUMENTS AND
CONTROLS) which must be installed on
the lift cylinder rod in case of operation
on the boom.

FITTING THE WEDGE

- Raise the boom to the maximum 

possible extent.

- Place the safety wedge 1 on the lift 

cylinder block and block by means of
shaft 2 and split pin 3.

- Lower the boom gently then suspend 

the hydraulic movements before it 
knocks against the wedge.

REMOVING THE WEDGE

- Raise the boom to the maximum 

possible extent.

- Remove the split pin and shaft.
- Refit the safety wedge in its 

compartment provided on the forklift

truck.

Use only the safety wedge supplied
with the forklift truck.

AANBRENGEN VAN DE
VEILIGHEIDSBLOKKERING VAN DE ARM

De 

heftruck 

is 

voorzien 

van 

een

veiligheidswig: 

CONTROLE- 

EN

BEDIENINGSORGANEN) die op de stang van
de hefcilinder gemonteerd moet worden als
er iets aan de arm gedaan moet worden.

MONTAGE VAN DE WIG

-  De  telescopische  arm  zover  mogelijk
opheffen.
-  De  veiligheidswig  1  op  de  stang  van  de
hefcilinder  plaatsen  en  blokkeren  met  de
pen 2 en de splitpen 3.
-  De  telescopische  arm  langzaam  laten
zakken en dan de hydraulische bewegingen
onderbreken voor tegen de wig te stoten.

DEMONTAGE VAN DE WIG

-  De  telescopische  arm  zover  mogelijk
opheffen.
- De splitpen en de pen verwijderen.
-  Plaats  de  veiligheidswig  weer  in  de
daarvoor bestemde ruimte op de heftruck.

Gebruik uitsluitend de bij de heftruck

geleverde veiligheidswig.

EINLEGEN  DER  SICHERHEITSKEILE  DES
TELESKOPARMS

Der Stapler ist mit einem Sicherheitskeil:
BEDIENELEMENTE UND
KONTROLLINSTRUMENTE) ausgestattet, der
auf dem Schaft des Hubzylinders installiert
werden muss, wenn man Eingriffe auf dem
Ausleger ausführt.

MONTAGE DES KEILS

- Den Arm so weit wie möglich heben.
- Den Sicherheitskeil 1 auf dem Schaft des
Hubzylinders anordnen und mit dem
Zapfen 2 und dem Splint 3 blockieren.
- Den Arm langsam senken und dann die
hydraulischen Bewegungen unterbrechen,
bevor man gegen den Keil stößt.

AUSBAU DES KEILS
-

Den Arm so weit wie möglich heben.

- Den Splint und den Zapfen herausziehen.
- Den Sicherheitskeil wieder im
vorgesehenen Stauraum im Stapler
unterbringen.

Nur den Sicherheitssperrkeil benutzen,

der zum Lieferumfang des Staplers

gehört.

IT

EN

NL

648747 

IT

-EN-NL 

(29/08/2013)

2

3

1

3

2


Content      ..     2      3      4      5     ..