D200 Semi Integrated Pinpad (v1.00.00). GUIDE MANUAL - part 2
Chapter 5
PAX D200 Menu Options
“Auto Batch” is not supported by Host.
NO AUTOBATCH
6.
7.
Stop.
5.4.6 Additional Prompts
This menu contains different functions that can be enabled or disabled.
They are:
CashBack Prompt
MENU
Tax Prompt
DESCRIPTION
Order No. Prompt
Table Mode(RESTAURANT)
Guest No. Mode(RESTAURANT)
5.4.6.1
CashBack Prompt
Note
This feature enables or disables a prompt on screen that will ask if the
user desires Cash Back when processing using a Debit Card.
STEP
ACTION
DISPLAY
MERCHANT PARAMS:
3. Merchant Fee
From the Merchant Settings menu, press [6] to set
4. Credit Surcharge
1.
5. Set Batch Time
the Additional Prompts.
6. Additional Prompts
ENTER PASSWORD:
Input the Password and press [ENTER]
2.
Additional Prmpt
The display represents a retail setup.
1. CashBack Prompt
2. Tax Prompt
3.
3. Order No. Prompt
Press [1] to select CashBack Prompt.
63
Chapter 5
PAX D200 Menu Options
CashBack Prompt, Continued
STEP
ACTION
DISPLAY
The default setting is OFF.
CashBack Prompt: 1
Press [1] to disable CashBack Prompt.
1. OFF
4.
2. ON
OR
Press [2] to enable CashBack Prompt.
5.
Stop.
5.4.6.2
Tax Prompt
Note
Tax Prompt is used to request the amount of tax that was applied to a
transaction. If the prompt is enabled it will request that the tax amount
be entered for every transaction. You can bypass entering the amount
by pressing [O] when prompted.
STEP
ACTION
DISPLAY
MERCHANT PARAMS:
3. Merchant Fee
From the Merchant Settings menu, press [6] to set
4. Credit Surcharge
1.
5. Set Batch Time
the Additional Prompts.
6. Additional Prompts
ENTER PASSWORD:
Input the Password and press [ENTER].
2.
Additional Prmpt
1. CashBack Prompt
3.
Press [2] for Tax Prompt.
2. Tax Prompt
3. Order No. Prompt
64
Chapter 5
PAX D200 Menu Options
Tax Prompt, Continued
STEP
ACTION
DISPLAY
The defaulting setting is OFF.
Tax Prompt:1
1. OFF
2. ON
4.
Press [1] to disable Tax Prompt
OR
Press [2] to enable Tax Prompt
5.
Stop.
5.4.6.3
Order No. Prompt
Note
Order number can be set to On, Off or Manual. If set to manual the
terminal will prompt for the order number, if set to on the terminal will
auto increment an order number.
STEP
ACTION
DISPLAY
MERCHANT PARAMS:
3. Merchant Fee
From the Merchant Settings menu press [6] for
4. Credit Surcharge
1.
5. Set Batch Time
Additional Prompts.
6. Additional Prompts
ENTER PASSWORD:
2.
Input the Password and press [ENTER].
Additional Prompts
From the Additional Prompts Menu press [3] to
1. CashBack Prompt
3.
2. Tax Prompt
select Order No. Prompt
3. Order No. Prompt
4. Table Number
65
Chapter 5
PAX D200 Menu Options
The defaulting setting is OFF.
Press [1] to disable Order Number Prompt.
Order No. Prompt:1
1. OFF
OR
2. ON
4.
3. ON and MANUAL
Press [2] to enable Order Number Prompt.
OR
Press [3] to enable Manual Order Number input.
5.
Stop.
5.4.6.4
Table Mode
Note
Table mode can be disabled, enabled (terminal prompts for table
number). This option is only applicable for Restaurant versions of the
software.
STEP
ACTION
DISPLAY
MERCHANT PARAMS:
3. Merchant Fee
From the Merchant Settings menu press [6] for
4. Credit Surcharge
6.
5. Set Batch Time
Additional Prompts.
6. Additional Prompts
ENTER PASSWORD:
Input the Password and press [ENTER].
7.
Additional Prompts
1. CashBack Prompt
If there is no transaction in the terminal database,
2. Tax Prompt
8.
press [4] for Table Number.
3. Order No. Prompt
4. Table Number
66
Chapter 5
PAX D200 Menu Options
The default setting is OFF.
Table Mode:1
1. OFF
Press [1] to disable Table Mode.
2. ON
9.
OR
Press [2] to enable Table Mode.
10.
Stop.
5.4.6.5
Guest No. Mode
Note
Guest No. Mode can be disabled, enabled (terminal prompts for guest
number). This option is only applicable for Restaurant versions of the
software.
STEP
ACTION
DISPLAY
MERCHANT PARAMS:
3. Merchant Fee
From the Merchant Settings menu press [7] for
4. Credit Surcharge
11.
5. Set Batch Time
Additional Prompts.
6. Additional Prompts
ENTER PASSWORD:
Input the Password and press [ENTER].
12.
Additional Prompts
1. CashBack Prompt
If there is no transaction in the terminal database,
13.
2. Tax Prompt
press [6] for Guest No. Mode
3. Order No. Prompt
4. Table Number
The defaulting setting is OFF.
Guest No. Mode:1
1. OFF
Press [1] to disable Guest No. Mode.
2. ON
14.
OR
Press [2] to enable Guest No. Mode.
15.
Stop.
67
Chapter 5
PAX D200 Menu Options
5.5
Operation Settings
This Menu has six options that can be enabled or disabled, manually through
the terminal.
They are:
Buzzer Setup
Operation Mode
Battery Saver
MENU
Halo Setup
DESCRIPTION
Peripherals
Language Setting
5.5.1 Buzzer Setup
Note
This feature enables and disables the terminal’s built-in buzzer, which
sounds a tone when specific functions are performed or buttons are
pressed.
STEP
ACTION
DISPLAY
OPER. SETTINGS:
1. Buzzer Setup
From the Operation Settings menu, press [1] to
2. Operation Mode
1.
3. Battery Saver
access No Paper mode.
4. Halo Setup
ENTER PASSWORD:
Input the Password and press [ENTER]
2.
Use the [F1] & [F2] keys to your selection and then
BUZZER SETUP: 2
press [ENTER].
1. OFF
3.
2. ON
OR, Press the number corresponding with your
selection.
4.
Stop.
68
Chapter 5
PAX D200 Menu Options
5.5.2 Operation Mode
Note
This feature sets the terminal to one of two modes: Normal Mode,
which is used for real transactions and Demo Mode, which is used for
training.
After working in Demo Mode, make sure to return to Normal Mode in
order to perform real transactions
STEP
ACTION
DISPLAY
OPER. SETTINGS:
1. Buzzer Setup
From the Operation Settings menu, press [2] for
2. Operation Mode
1.
3. Battery Saver
Operation Mode.
4. Halo Setup
ENTER PASSWORD:
2.
Input the password and press [O].
Default setting is Normal Mode.
Press [1] to enable Normal Mode.
Operation Mode: 1
OR
1. Normal Mode
3.
2. Demo Mode
Press [2] to enable Demo Mode.
Note: Switching modes will require you to
batch the terminal.
4.
Stop.
69
Chapter 5
PAX D200 Menu Options
5.5.3 Operation Mode
Note
This menu option controls the Battery Saver function. In Off mode the
Battery Saver Function is disabled. In the Radio + Auto Off mode the
Radio will be powered off after an idle time you set when choosing
that mode of operation.
STEP
ACTION
DISPLAY
OPER. SETTINGS:
1. Buzzer Setup
From the Operation Settings menu, press [3] for
2. Operation Mode
1.
3. Battery Saver
Operation Mode.
4. Halo Setup
ENTER PASSWORD:
Input the Password and press [ENTER]
2.
The defaulting setting is Radio+Auto Off.
Operation Mode:1
1. OFF
Use the [F1] & [F2] keys to make your selection
2. Radio+Auto Off
3.
and then press [ENTER].
OR, Press the number corresponding with your
selection
Press [ENTER] to accept the change.
ARE YOU SURE?
ENTR=YES, CANC=NO
4.
OR
Press [CANCEL] to cancel.
5.
Stop.
70
Chapter 5
PAX D200 Menu Options
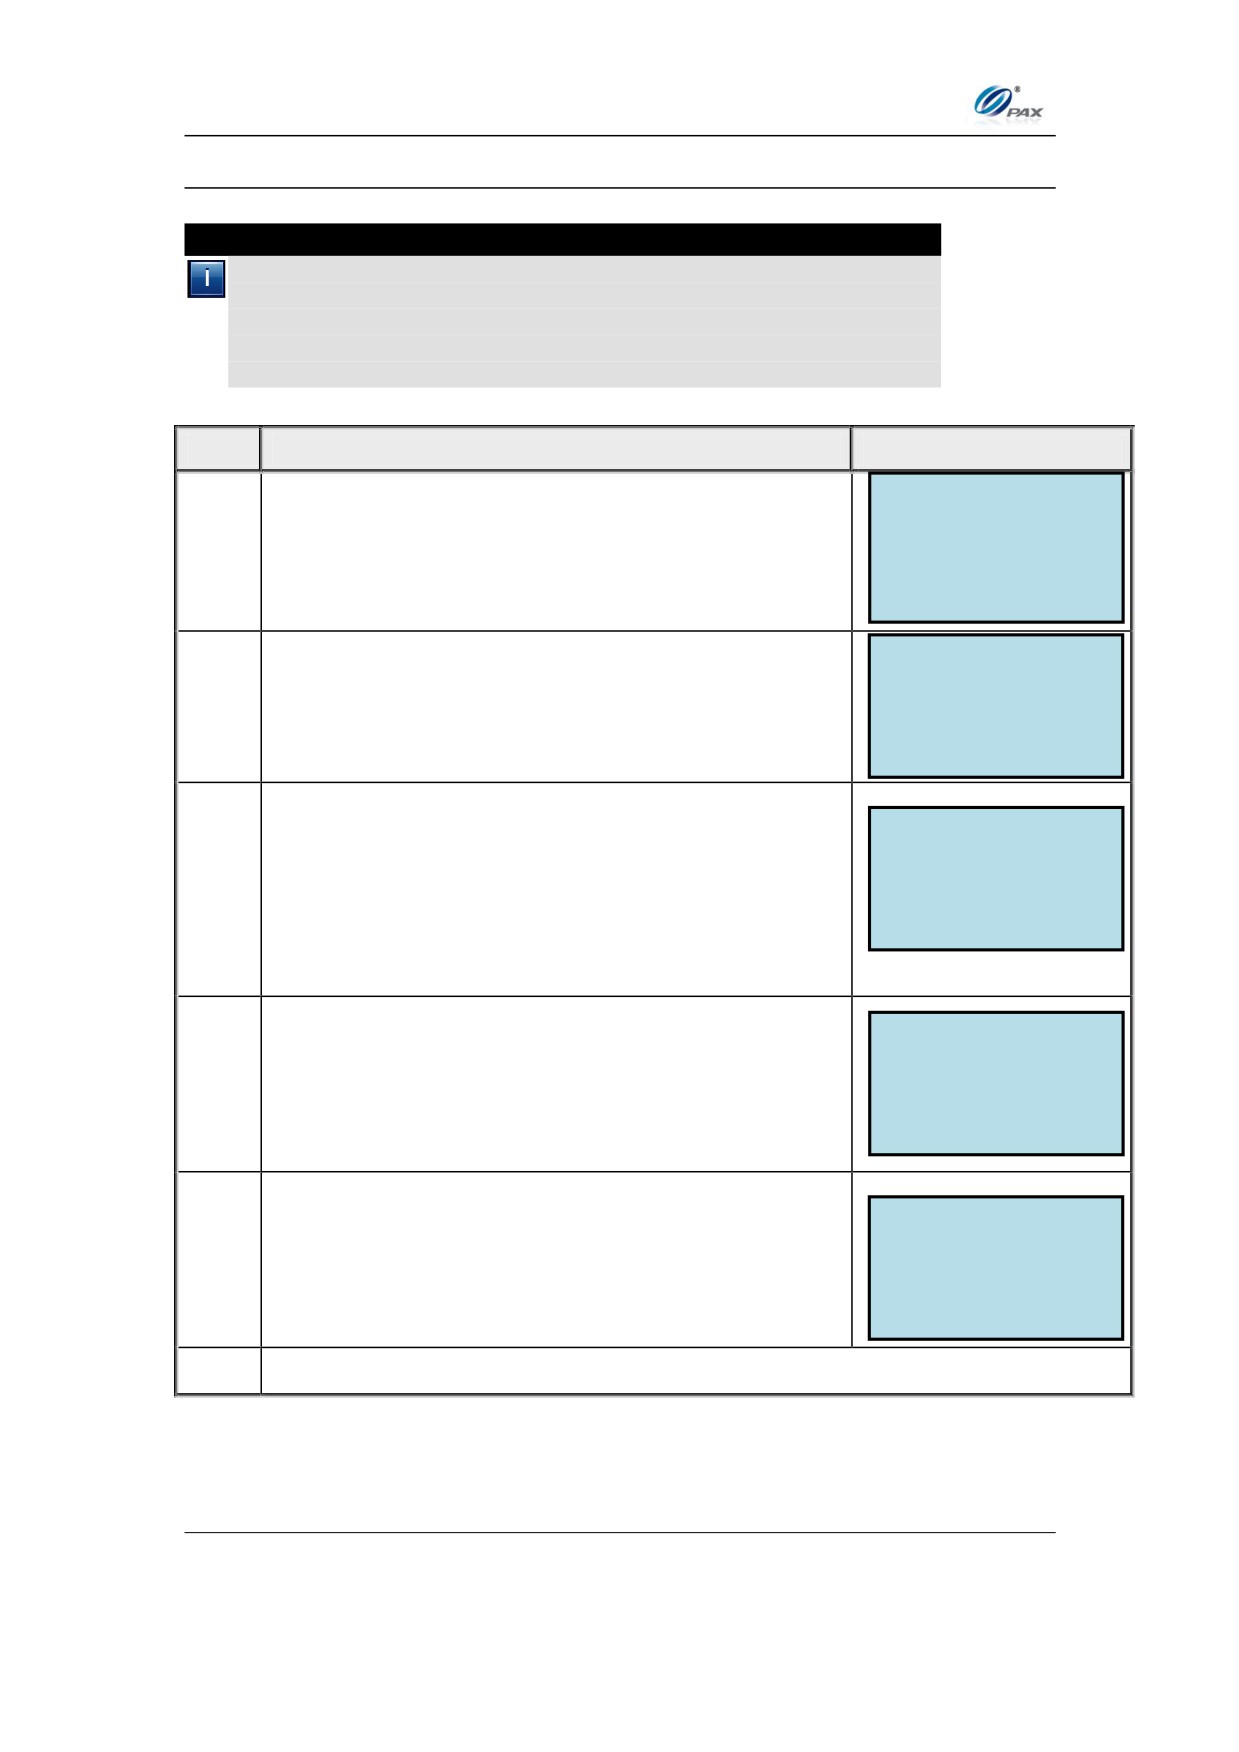
5.5.4 Halo Setup
Note
HALO refers to High Amount Lock Out. This function sets an upper
limit on the dollar amount certain types of transactions can be. The
transactions that can be limited are: Sale, Return, and Cash Back. All
are configured by enabling Halo for sale, if you only desire a Halo for
Returns just set the Sale and Cash Back Halo to 0.00
STEP
ACTION
DISPLAY
OPER. SETTINGS:
1. Buzzer Setup
From the Operation Settings menu, press [4] for
2. Operation Mode
1.
3. Battery Saver
HALO Setup.
4. Halo Setup
ENTER PASSWORD:
Input the Password and press [O]
2.
The defaulting setting is Off.
Operation Mode:1
1. OFF
Use the [F1] & [F2] keys to make your selection
2. ON
3.
and then press [O].
OR, Press the number corresponding with your
selection
HALO For Sale:
Input the amount you want as your HALO, and then
press the [O] button. The system will also ask you
New Rate
0.00
4.
for HALO amounts for the other transactions types,
Old Rate
0.00
just press the [O] button to skip.
Press [ENTER] to accept the change.
ARE YOU SURE?
ENTR=YES, CANC=NO
5.
OR
Press [CANCEL] to cancel.
6.
Stop.
71
Chapter 5
PAX D200 Menu Options
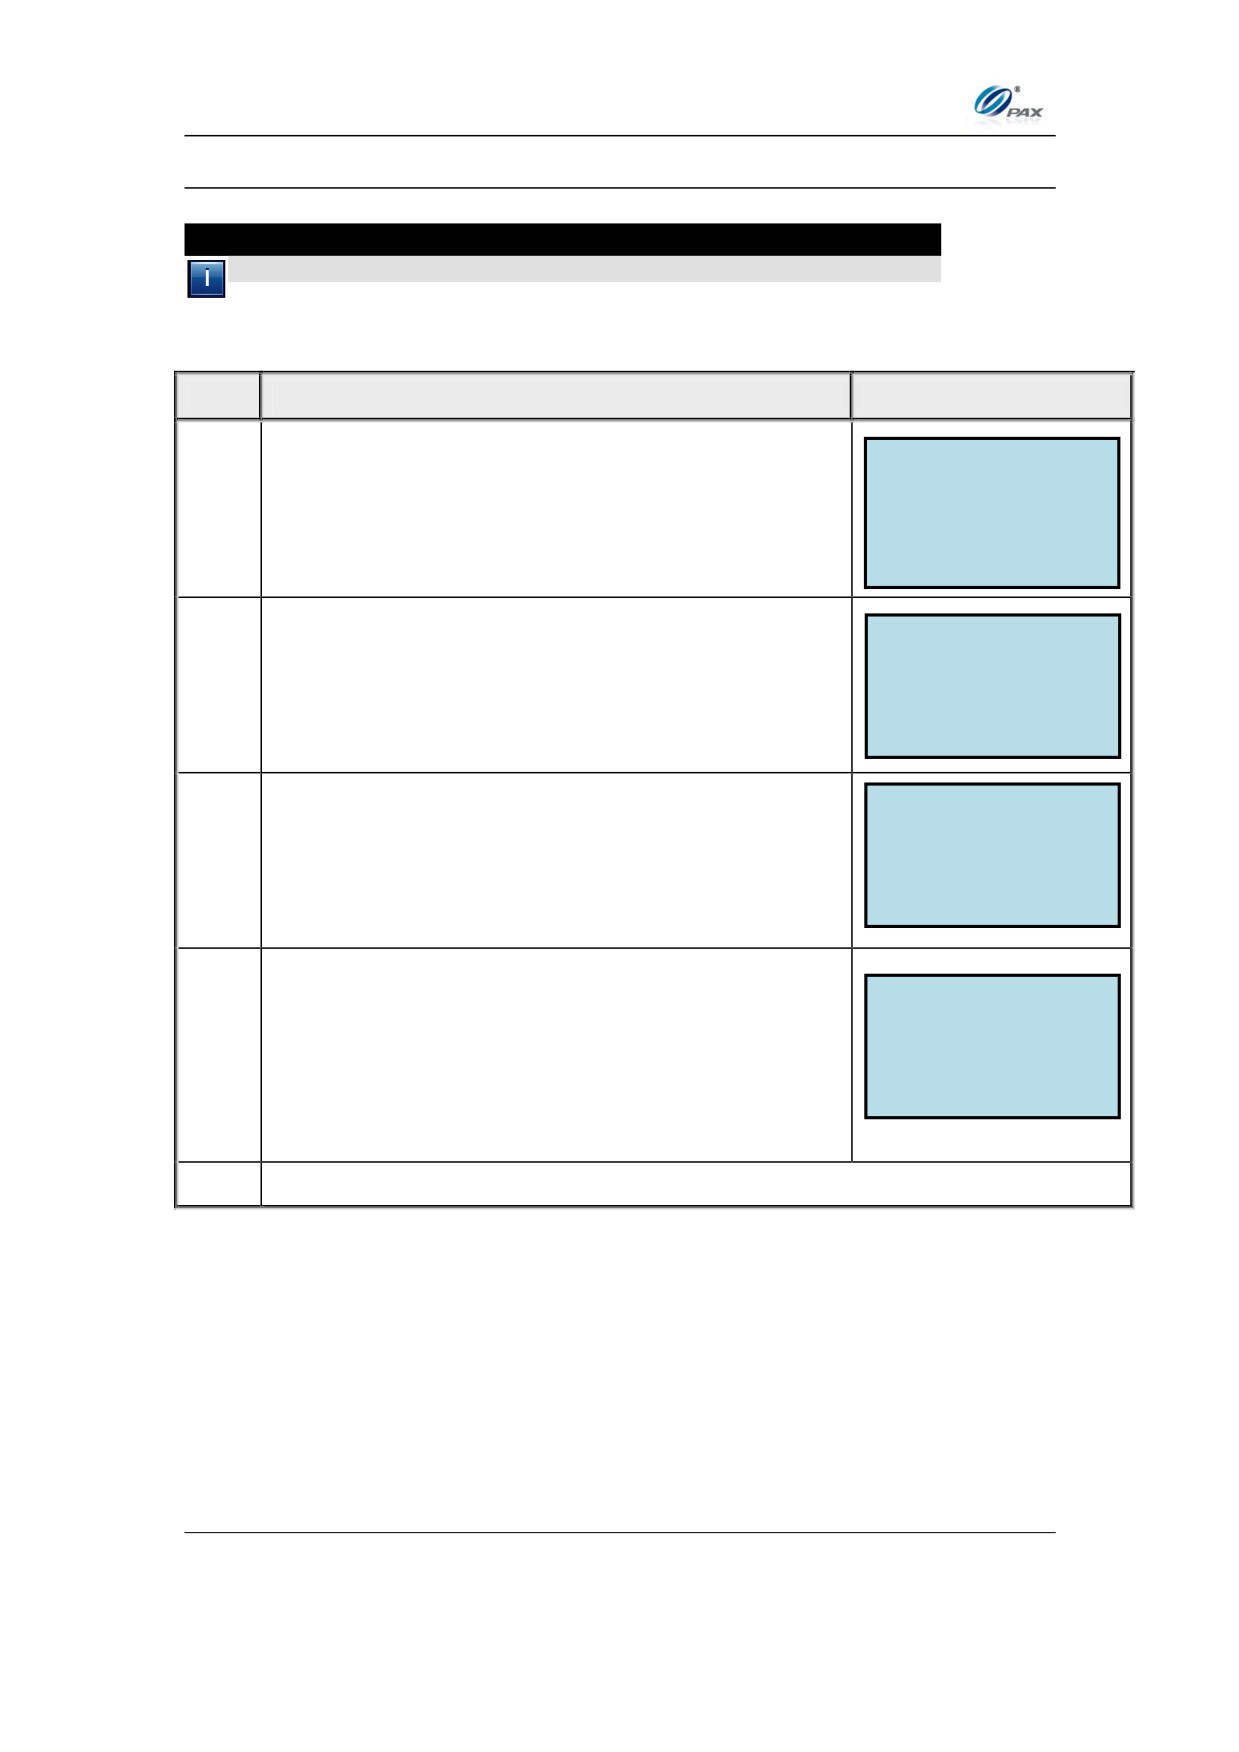
5.5.5 Peripherals
Note
This Menu Option allows you to enable or disable the NFC Reader.
STEP
ACTION
DISPLAY
OPER. SETTINGS:
2. Operation Mode
From the Operation Settings menu, press [5] for
3. Battery Saver
1.
Peripheral.
4. Halo Setup
5. Peripherals
ENTER PASSWORD:
2.
Input the Password and press [O]
PERIPHERALS:
1. Contactless Card Reader
3.
Press 1 to choose Contactless Card Reader.
The defaulting setting is Internal.
CTLSS CRDRDR: 2
1. OFF
Use the [F1] & [F2] keys to make your selection
2. Internal
4.
and then press [O].
OR, Press the number corresponding with your
selection
5.
Stop.
72
Chapter 5
PAX D200 Menu Options
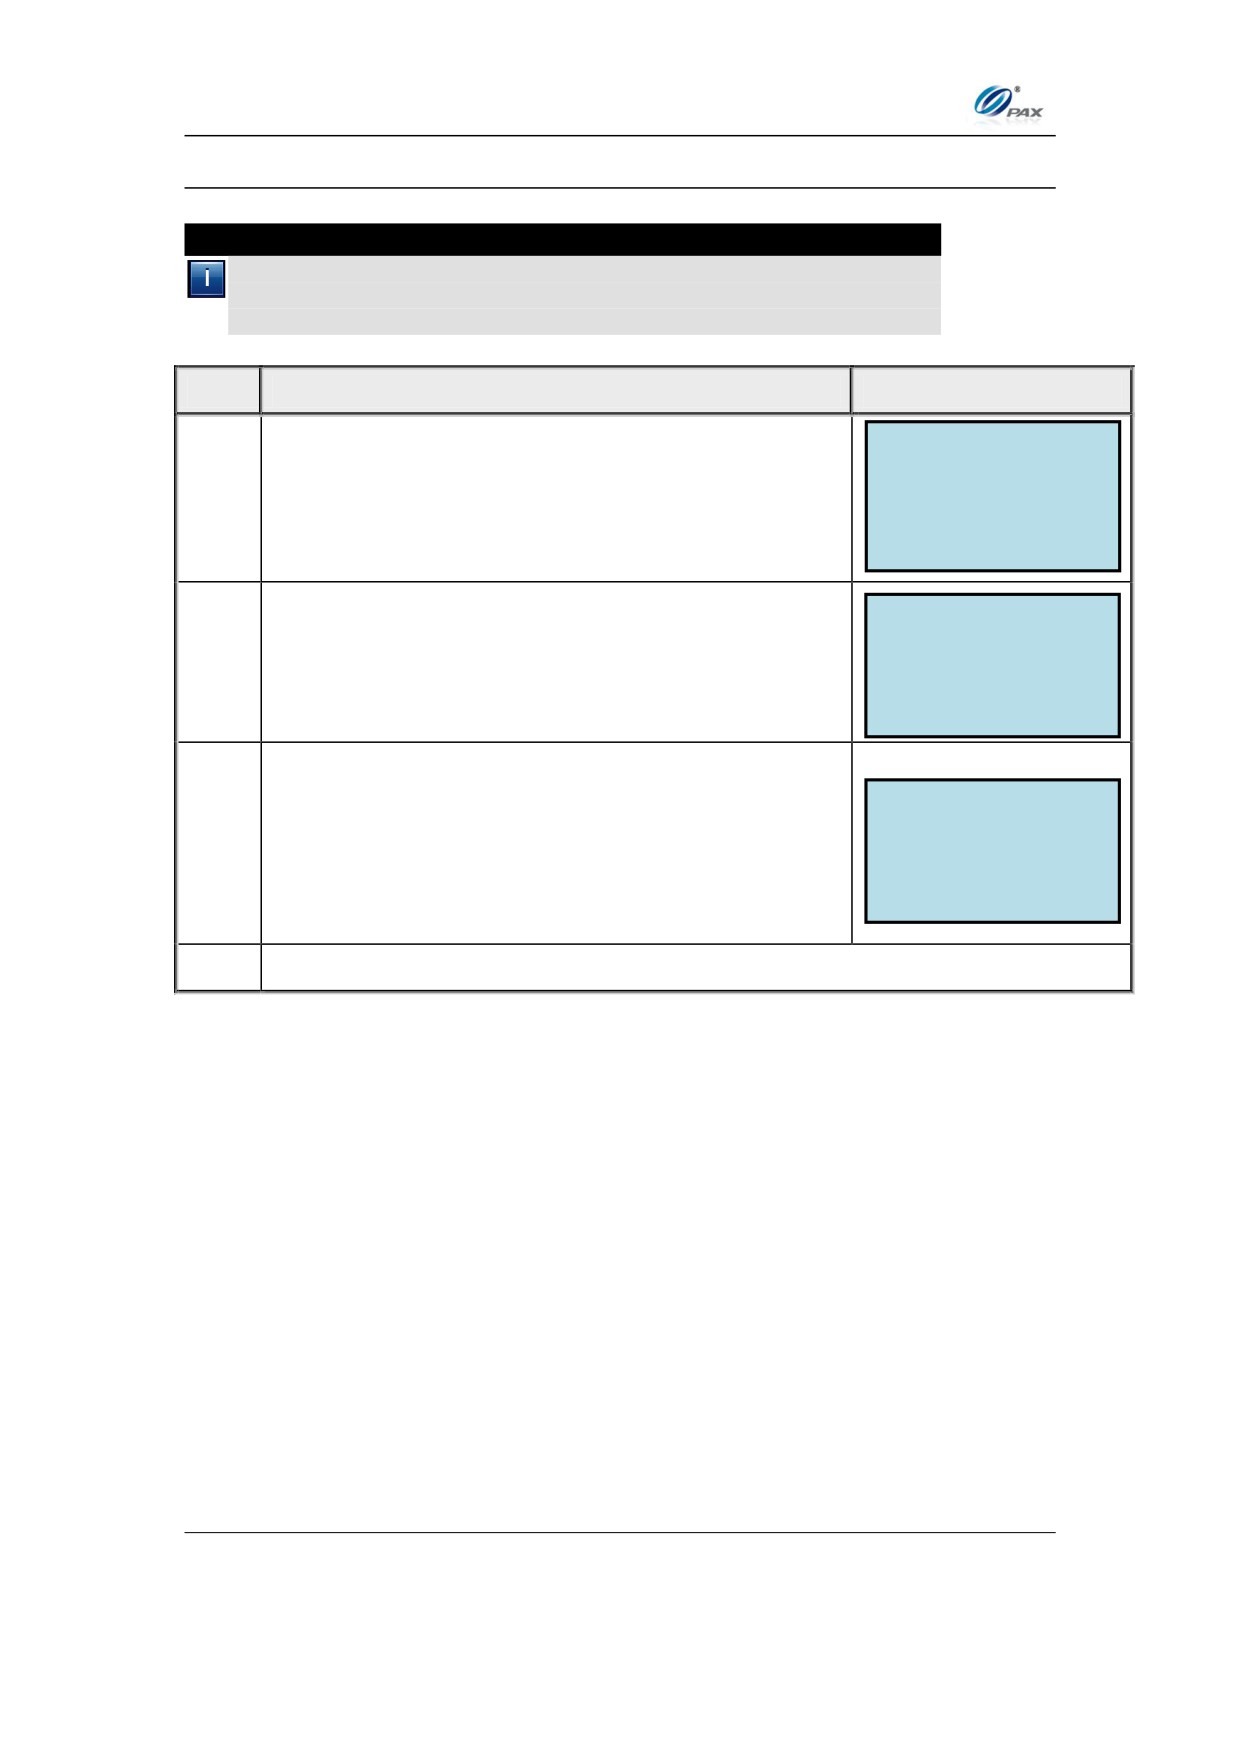
5.5.6 Language Setup
Note
This Menu Option allows you to change the language that is displayed
on the terminal, provided you have also installed the appropriate font
files for that language.
STEP
ACTION
DISPLAY
OPER. SETTINGS:
3. Battery Saver
From the Operation Settings menu, press [6] to
4. Halo Setup
1.
5. Peripherals
select Language Setup.
6. Language Setup
ENTER PASSWORD:
Input the Password and press [O]
2.
LANGUAGE: 1
The default setting is English.
3.
Press the number corresponding with your
1. English
2. Chinese Simplified
selection.
4.
Stop.
73
Chapter 5
PAX D200 Menu Options
5.6
Host Settings
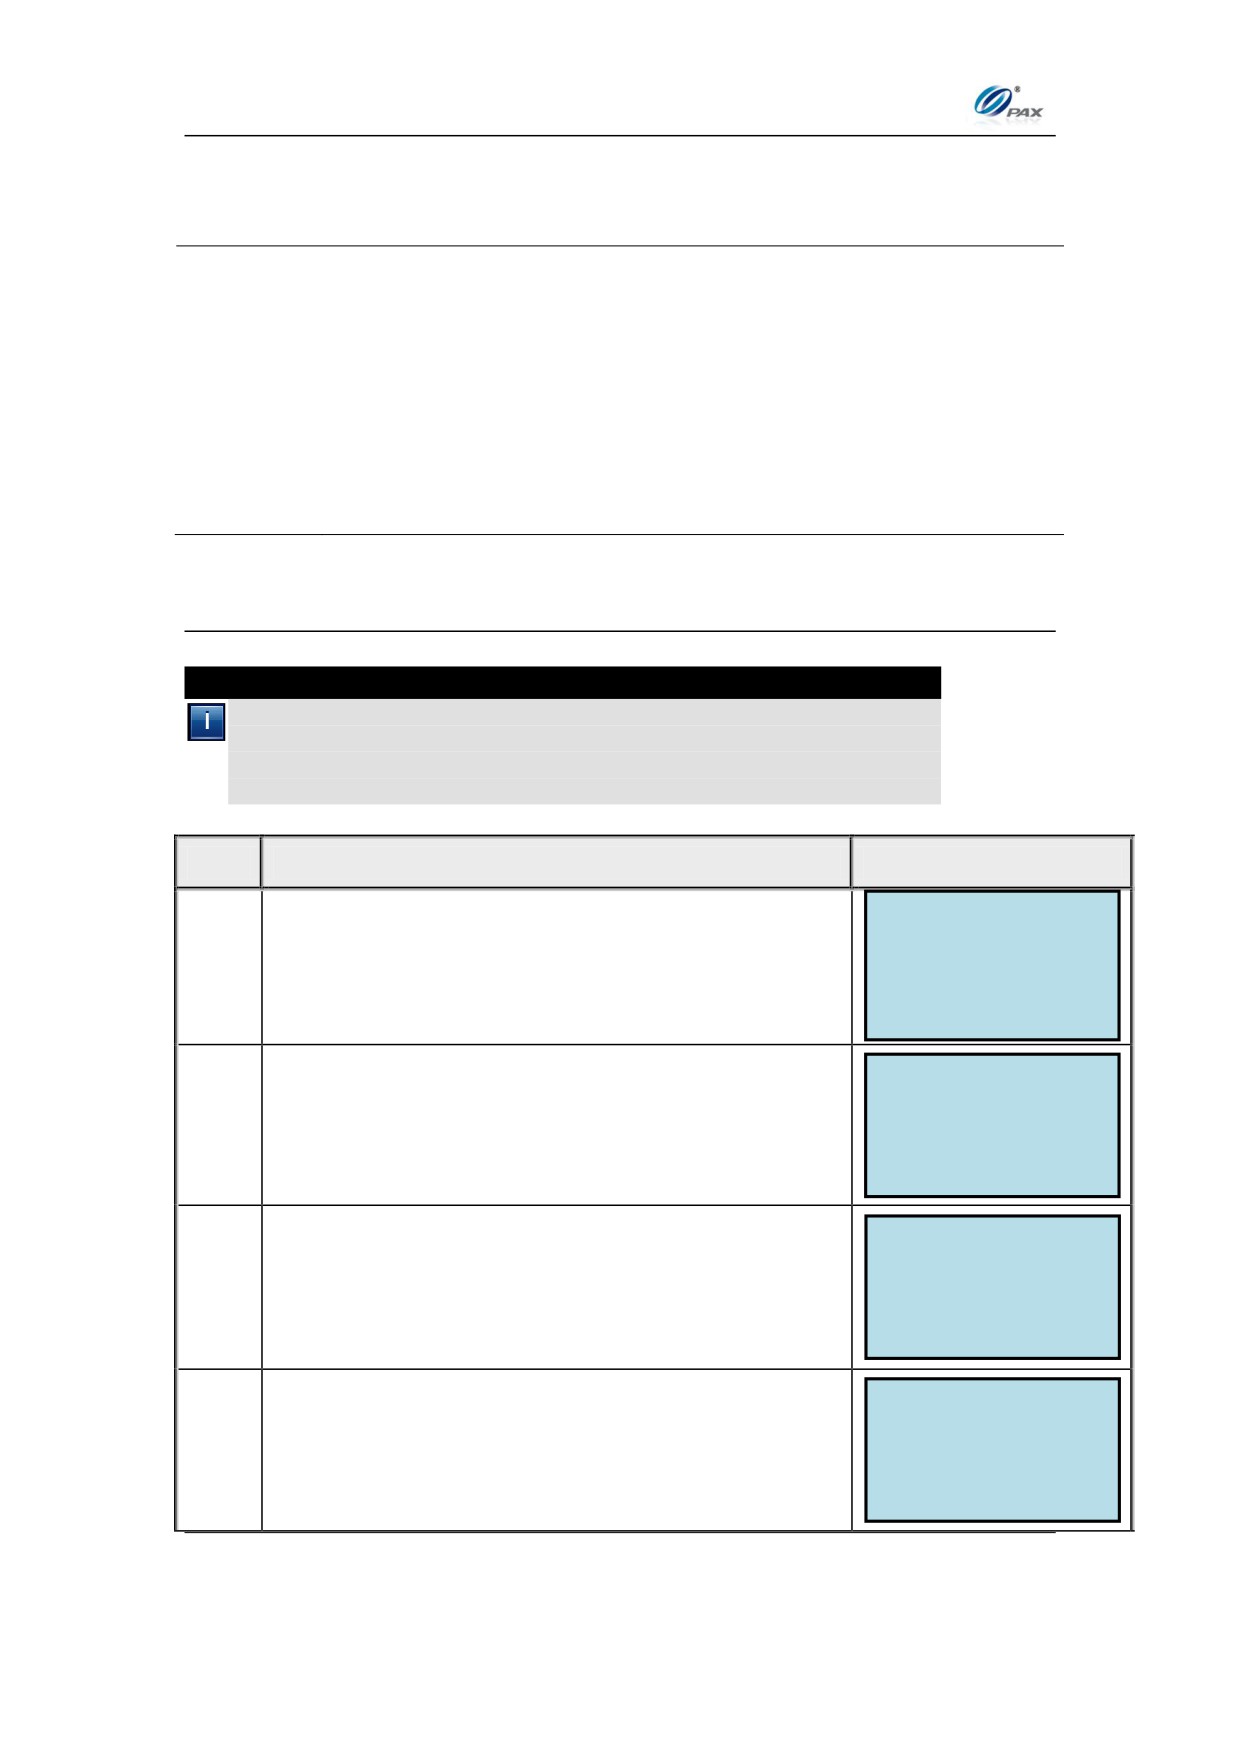
This menu allows you to view/edit the Host Parameters; to include the Host
URL’s, and ports, as well as set the Auto Dial Parameters. You can also Batch
the terminal from the Host Settings Menu.
Hosts Parameters
Hosts URL Params
AutoDial Setup
MENU
Host Register
DESCRIPTION
Batch Close
5.6.1 Host Parameters
Note
This function is used for editing host parameters. The Different Host
Parameters vary widely depending on what application/host you are
using for processing as a result, your options may not match the
examples seen below.
STEP
ACTION
DISPLAY
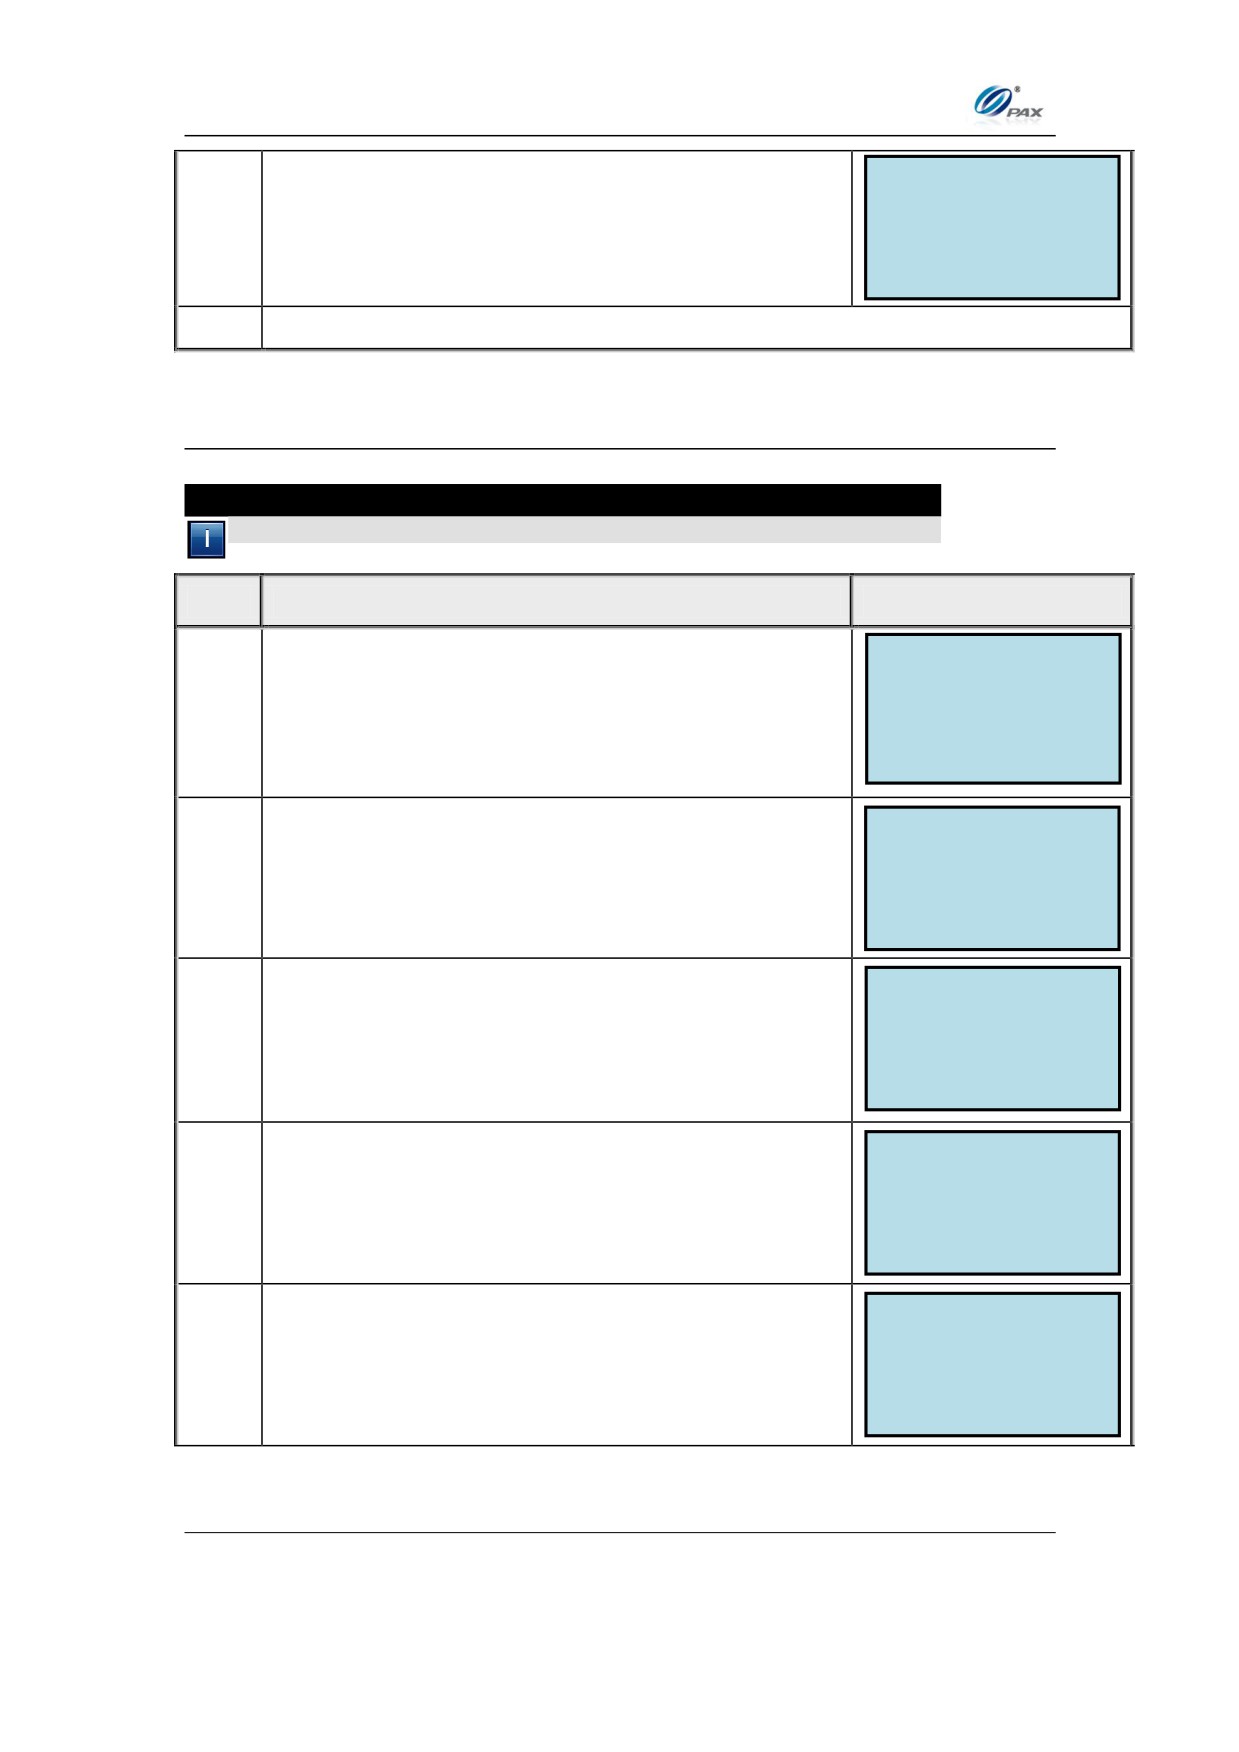
HOST PARAMS:
1. Host Parameters
From the Hosts Settings menu press [1] to enter
2. Host URL Parameters
1.
3. AutoDial Setup
Host parameters.
4. Host Register
5. Batch Close
ENTER PASSWORD:
2.
Input the Password and press [O].
Scroll to select the host then press [ENTER].
SELECT HOST
1. FDRCNV
2. Valuelink
3.
Note: Only Dual Host applications will have to choose a Host
to modify.
HOST PARAMS:
Use the [F1] & [F2] keys to find your selection and
1. Merchant ID
2. Bank ID
4.
then press [O]. Or Press the number corresponding
3. Terminal Type
with your selection.
74
Chapter 5
PAX D200 Menu Options
Merchant ID
5.
Input the Parameter you selected.
6.
Stop.
5.6.2 Host URL Parameters
Note
This function is used for editing host URL Parameters.
STEP
ACTION
DISPLAY
HOST PARAMS:
1. Host Parameters
From the Hosts Settings menu press [2] to enter
2. Host URL Parameters
1.
3. AutoDial Setup
Host URL Parameters.
4. Host Register
5. Batch Close
ENTER PASSWORD:
2.
Input the Password and press [O].
Scroll to select the host then press [O].
SELECT HOST
1. FDRCNV
2. Valuelink
3.
Note: Only Dual Host applications will have to choose a Host
to modify.
URL TYPE:
Use the [F1] & [F2] keys to find your selection and
1. Auth. URLs.
2. Batch URLs.
4.
then press [O]. Or Press the number corresponding
with your selection.
AUTH URL:
Use the [F1] & [F2] keys to find your selection and
1. URL #1
2. URL #2
5.
then press [O]. Or Press the number corresponding
with your selection.
75
Chapter 5
PAX D200 Menu Options
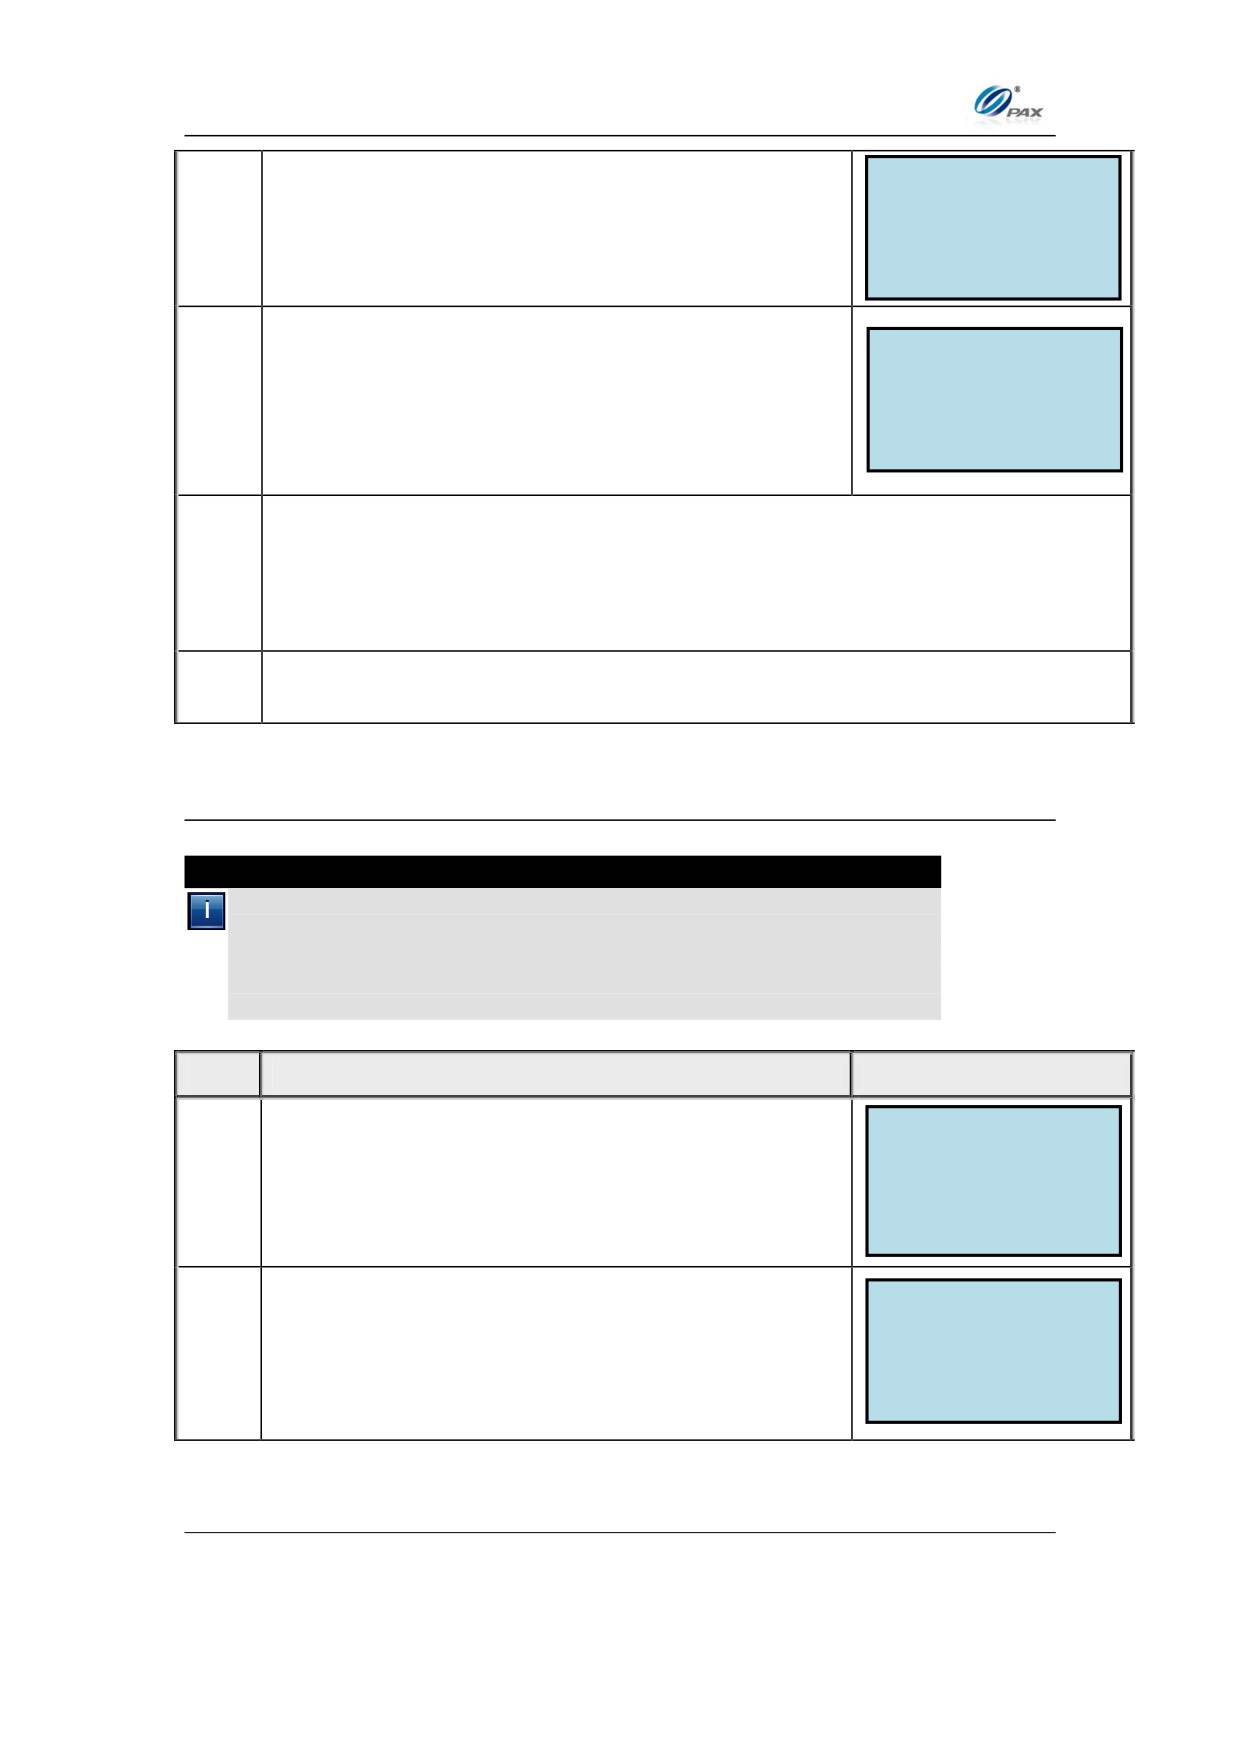
URL SETTINGS:
Use the [F1] & [F2] keys to find your selection and
1. Host URL
2. Host Port
6.
then press [O]. Or Press the number corresponding
with your selection.
Use the [<] key to remove one character at a time,
EDIT URL:
or the [X] key to remove all the characters. Input
support.datawire.net/nocporta
7.
the correct characters by depressing the
associated number keys until the correct character
cycles on to the screen.
8.
If necessary repeat steps 6 and 7 above for the Host Port information.
9.
Stop.
5.6.3 AutoDial Setup
Note
The AutoDial function is the automatic execution of the manual batch
process. If the terminal capture type is Host Manual or Terminal
Capture, the AutoDial feature will automatically perform the manual
batch function. AutoDial is not applicable if the terminal capture type is
Host Capture.
STEP
ACTION
DISPLAY
HOST PARAMS:
1. Host Parameters
From the Hosts Settings menu press [3] to access
2. Host URL Parameters
1.
3. AutoDial Setup
AutoDial Setup.
4. Host Register
5. Batch Close
ENTER PASSWORD:
2.
Input the Password and press [ENTER].
76
Chapter 5
PAX D200 Menu Options
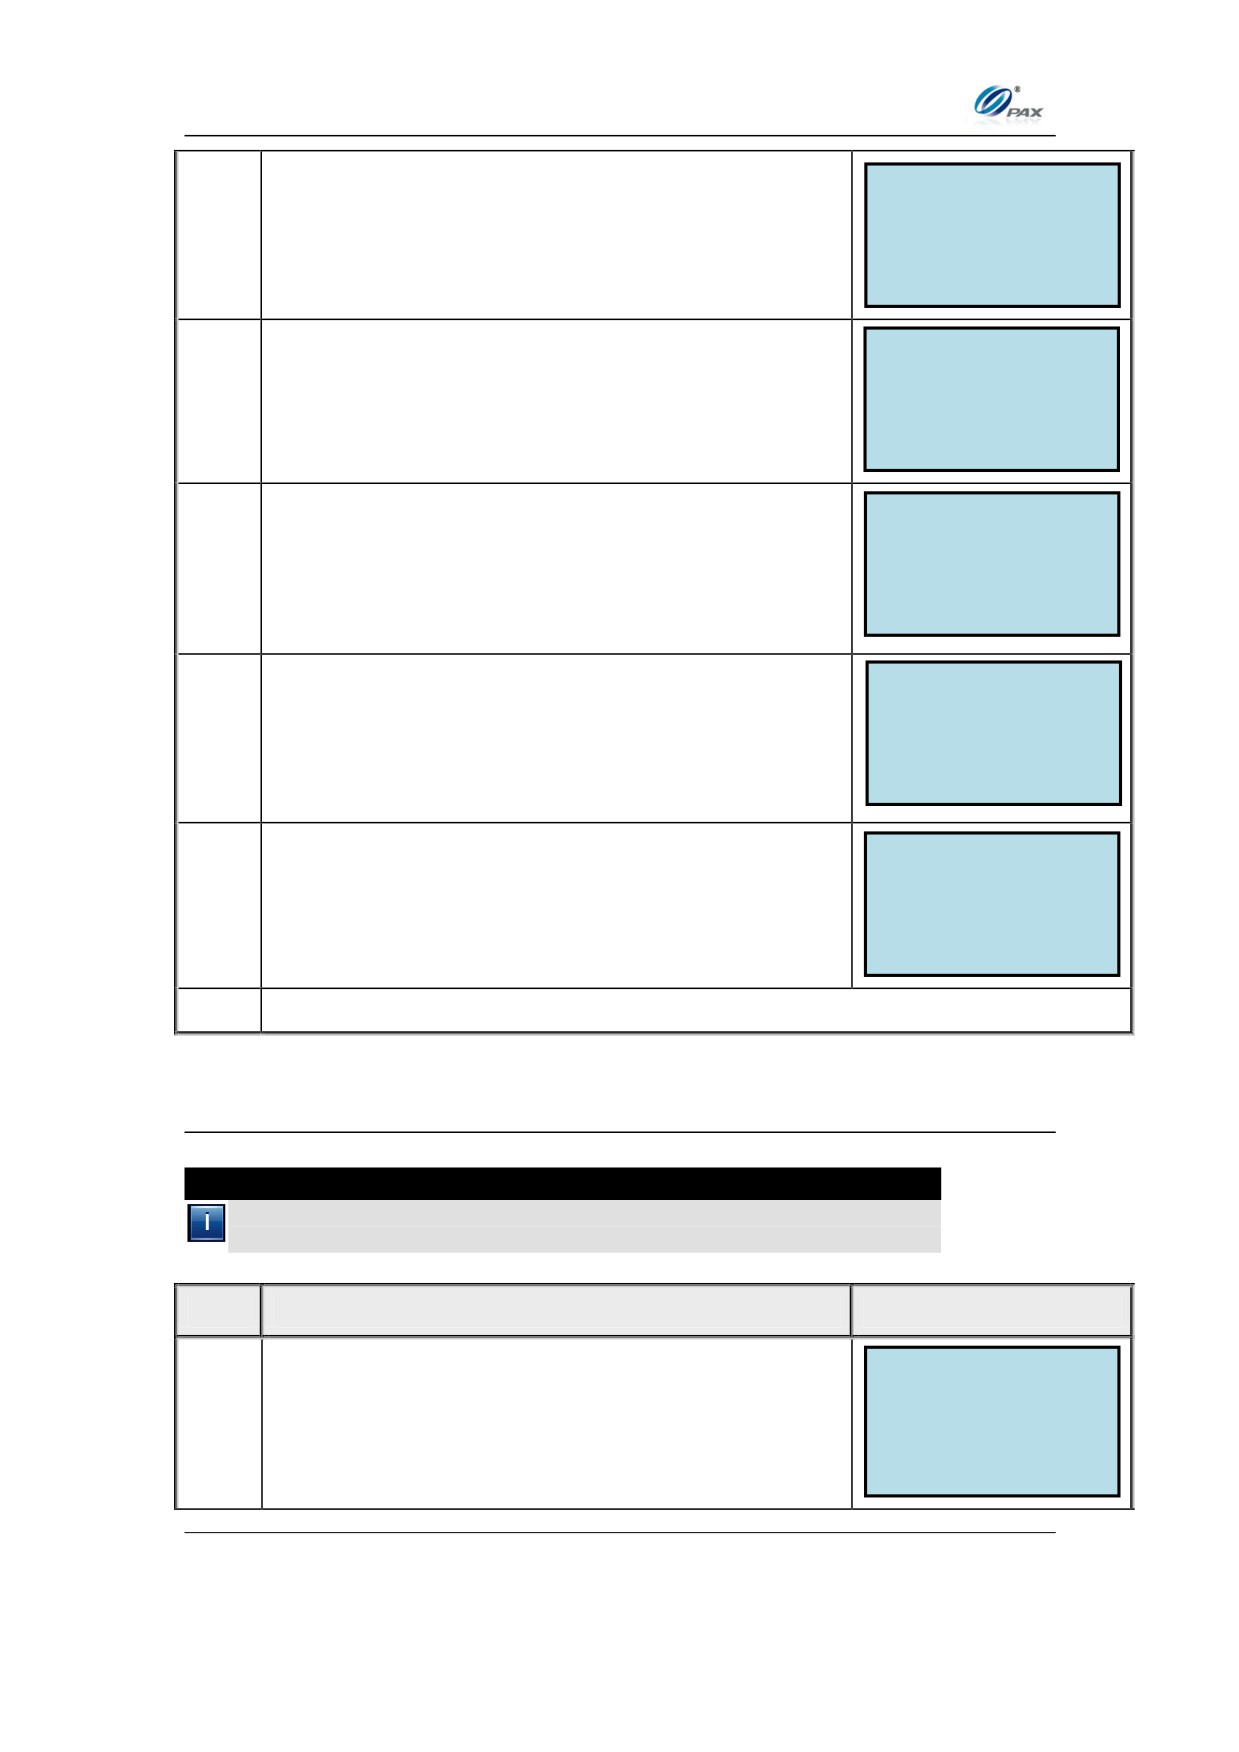
Scroll to select the host then press [O].
SELECT HOST
1. FDRCNV
2. Valuelink
3.
Note: Only Dual Host applications will have to choose a Host
to modify.
AUTODIAL SETUP: 2
Use the [F1] & [F2] keys to find your selection and
1. ON
2. OFF
4.
then press [O]. Or Press the number corresponding
with your selection.
_____________________
START AD AT:
If [1] is selected in step 4, enter the start time and
5.
HH:MM
then press [O].
_____________________
_____________________
STOP AD AT:
Enter the stop time then press [O]. Stop time is
6.
HH:MM
usually one hour after start time.
_____________________
_____________________
AD INTERVAL:
Enter the AutoDial time interval then press [O]. The
7.
interval is usually 5 minutes.
_____________________
8.
Stop.
5.6.4 Host Register
Note
This function is used in First Data applications only. It’s used to allow
the terminal to connect to Datawire.
STEP
ACTION
DISPLAY
HOST PARAMS:
1. Host Parameters
From the Hosts Settings menu press [4] to access
2. Host URL Parameters
1.
3. AutoDial Setup
Host Register.
4. Host Register
5. Batch Close
77
Chapter 5
PAX D200 Menu Options
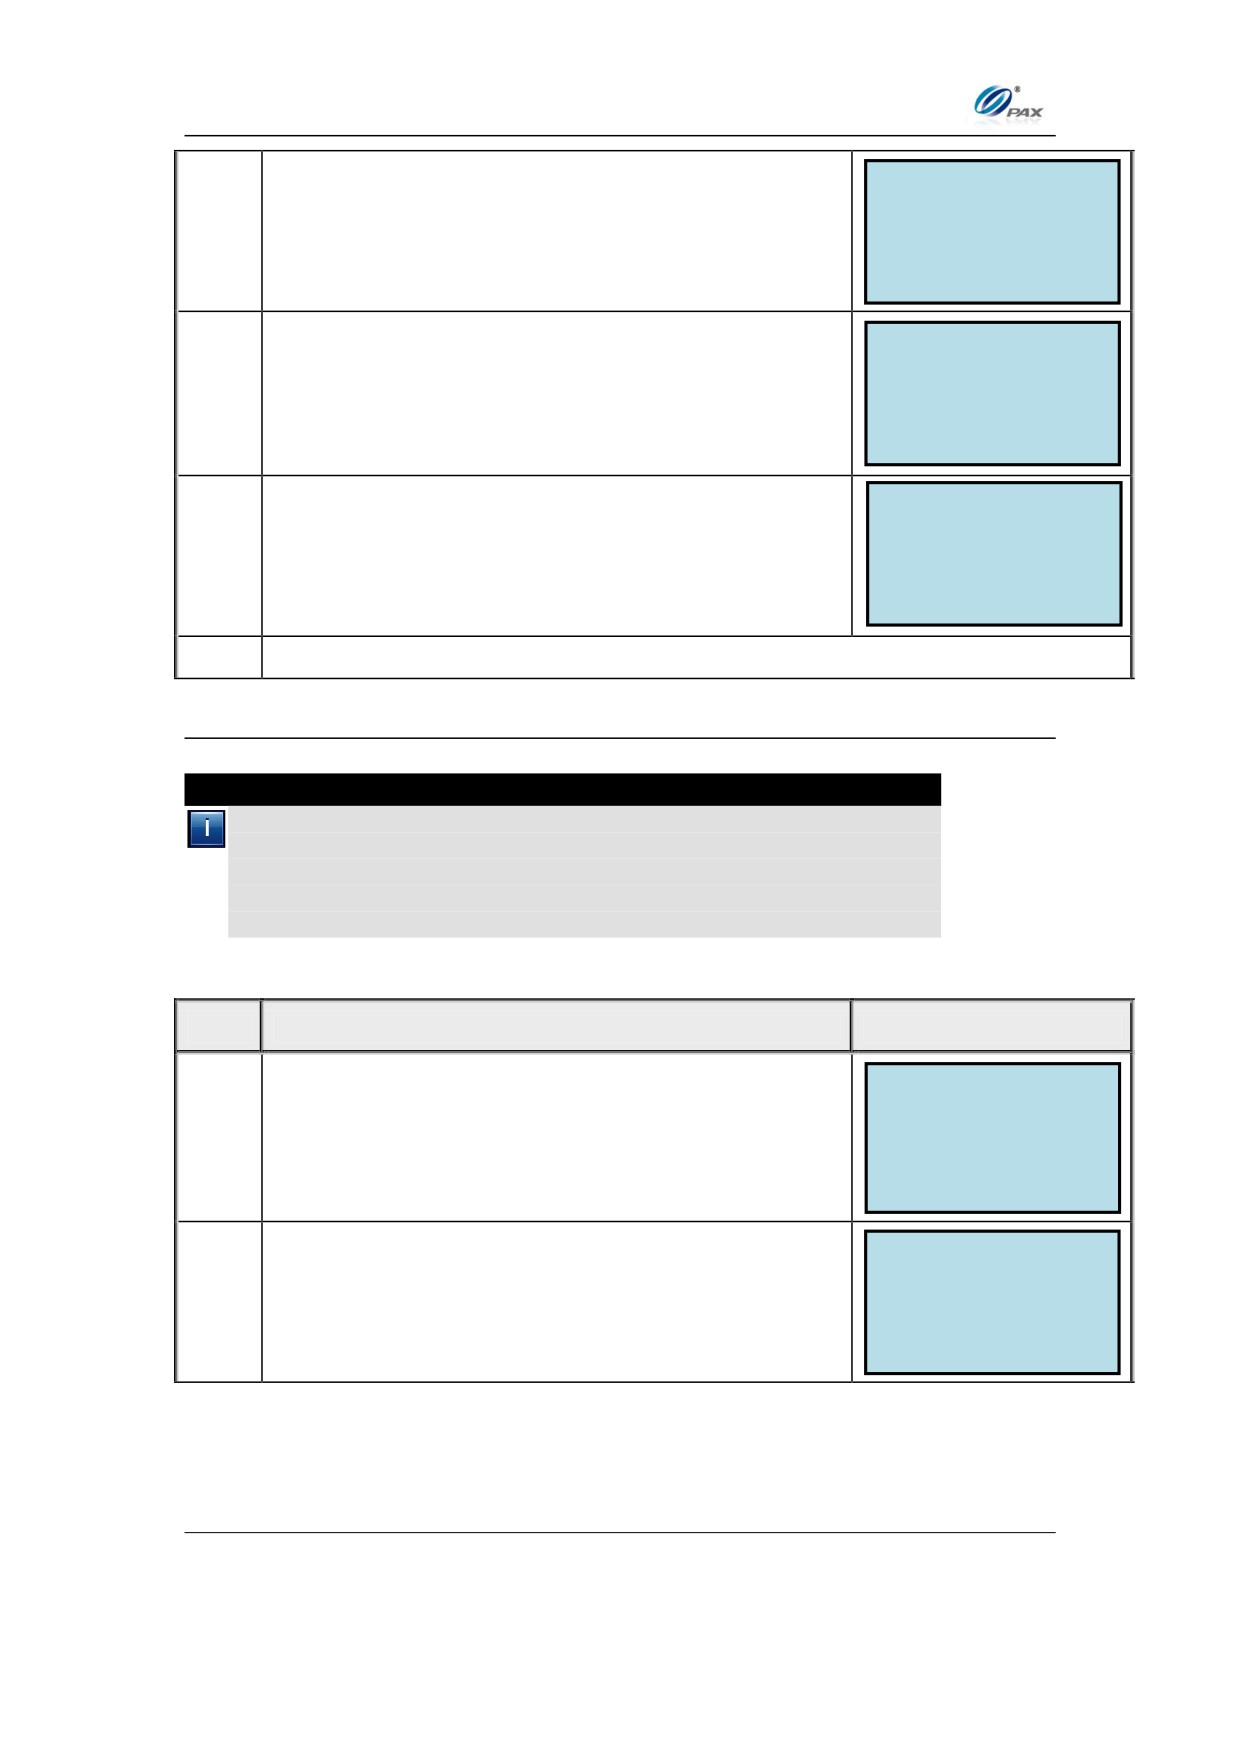
ENTER PASSWORD:
2.
Input the Password and press [O].
HOST REGISTER:
Press the [1] key to select Provision and press [O].
1. Provision
2. Service Discovery
3.
The terminal will display Provisioning. And then
Provision Successful.
HOST REGISTER:
Press the [2] key to select Service Discovery and
1. Provision
2. Service Discovery
4.
press [O]. The terminal will display Programming
Successful upon completion.
5.
Stop.
5.6.5 Batch Close
Note
The Batch Close function allows you to manually submit the
transactions for funding, without the need for the POS system to send
the command. This is particularly useful if you need to download an
update and your POS system does not contain a method to batch the
terminal.
STEP
ACTION
DISPLAY
HOST PARAMS:
1. Host Parameters
From the Hosts Settings menu press [5] to enter
2. Host URL Parameters
1.
Close the Batch.
3. AutoDial Setup
4. Host Register
5. Batch Close
ENTER PASSWORD:
2.
Input the Password and press [O].
78

Chapter 5
PAX D200 Menu Options
Scroll to select the host then press [O].
SELECT HOST
1. FDRCNV
2. Valuelink
3.
Note: Only Dual Host applications will have to choose a Host
to modify.
The terminal will batch the terminal. It will display Batch Successful upon
4.
completion.
5.
Stop.
79
Chapter 5
PAX D200 Menu Options
5.7
System Settings
This menu consists of different functions that can be changed manually.
Date/Time Setup
Batch Number
Working Mode
Database
MENU
Key Injection
DESCRIPTION
App Management
TDES Keys Injection
POS Register
5.7.1 Date/Time Setup
Note
All POS Terminals include an internal clock that keeps the time and
date. The clock keeps time in a 24-hour or military format. This
function sets the internal clock.
STEP
ACTION
DISPLAY
MAIN MENU:
2. Merchant Settings
From the Main Menu press [5] to access
3. Operation Settings
1.
System Settings
4. Hosts Settings
5. System Settings
SYSTEM OPTIONS:
1. Date/Time Setup
2.
Select option 1 Date/Time Setup, and Press [O].
2. Batch Number
3. Working Mode
4. Database
Verify that the current Date and/or Time are
07/31/06
incorrect. Input the correct date using
MM/DD/YYYY
MM/DD/YYYY format. Input the correct hour and
3.
minutes and seconds using Military (24-hour)
10:02:49
HH:MM:SS
Format. Press [O] to save the modified settings.
4.
Stop
80
Chapter 5
PAX D200 Menu Options
5.7.2 Batch Number
Note
This menu option allows the batch number to be changed. Not all Host
processors use batch numbers so this option may not be available.
Verify the current or last closed batch number with the Host Processor
before changing.
STEP
ACTION
DISPLAY
SYSTEM OPTIONS:
1. Date/Time Setup
From the System Settings menu press [2] to set
2. Batch Number
1.
3. Working Mode
batch number.
4. Database
ENTER PASSWORD:
Input the Password and press [O]
2.
SELECT HOST
Scroll to select the host then press [O].
1. FDRCNV
2. Valuelink
3.
Note: Only Dual Host applications will have to choose a Host
to modify.
_____________________
The Terminal will display the current batch No.
New Batch No:
4.
1
Input the New Batch # and press [O]
Press [O] to complete
ARE YOU SURE?
ENTR=YES, CANC=NO
5.
OR
Press [X] to cancel
6.
Stop.
81
Chapter 5
PAX D200 Menu Options
5.7.3 Working Mode
This sub-menu has three options. Not all options are available on all
application types.
EDC Tip
MENU
Fraud Control
DESCRIPTION
MOTO
5.7.3.1
EDC Tip
Note
EDC Tip allows the user to enable/disable the active tips for individual
EDC types.
STEP
ACTION
DISPLAY
SYSTEM OPTIONS:
1. Date/Time Setup
From the System Settings menu, press [3] for
2. Batch Number
1.
Working Mode.
3. Working Mode
4. Database
WORKING MODE:
1. EDC Tip
Press 1 for EDC Tip or use the [F1] & [F2] keys to
2. Fraud Control
2.
move to the option you want and press [O].
3. MOTO
ENTER PASSWORD:
Input the Password and press [O]
3.
SELECT PMT TYPE:
Press the number next to the EDC type you want to
1. CREDIT
2. DEBIT
4.
modify, or use the [F1] & [F2] keys to move to the
3. EBT
option you want and press [O].
4. GIFT
82
Chapter 5
PAX D200 Menu Options
Current setting is displayed in the first line.
EDC Tip: 2
Press [1] to disable tips for the selected EDC type.
1. OFF
5.
2. ON
OR
Press [2] to enable tips for the selected EDC type.
6.
Stop.
5.7.3.2
Fraud Control Option
Note
These features, (listed below) provide the user with multiple options
when setting the Fraud Control Option parameters for individual card
types.
The following sub menu options can be found in the Fraud Control menu.
AVS On Swipe
AVS On Card Present
AVS on Card Not Present
MENU
Card Present
DESCRIPTION
V-Code
5.7.3.2.1 AVS on Swipe
Note
AVS on Swipe enables AVS prompts on all swiped transactions for
individual Credit Card types or for all card types. This option may not
be available on all applications.
OPTION
DEFINITION
None
There will be no AVS prompts(default)
Address
AVS will prompt for address only
Zip
AVS will prompt for zip code only
Address & Zip
AVS will prompt for address and zip code
83
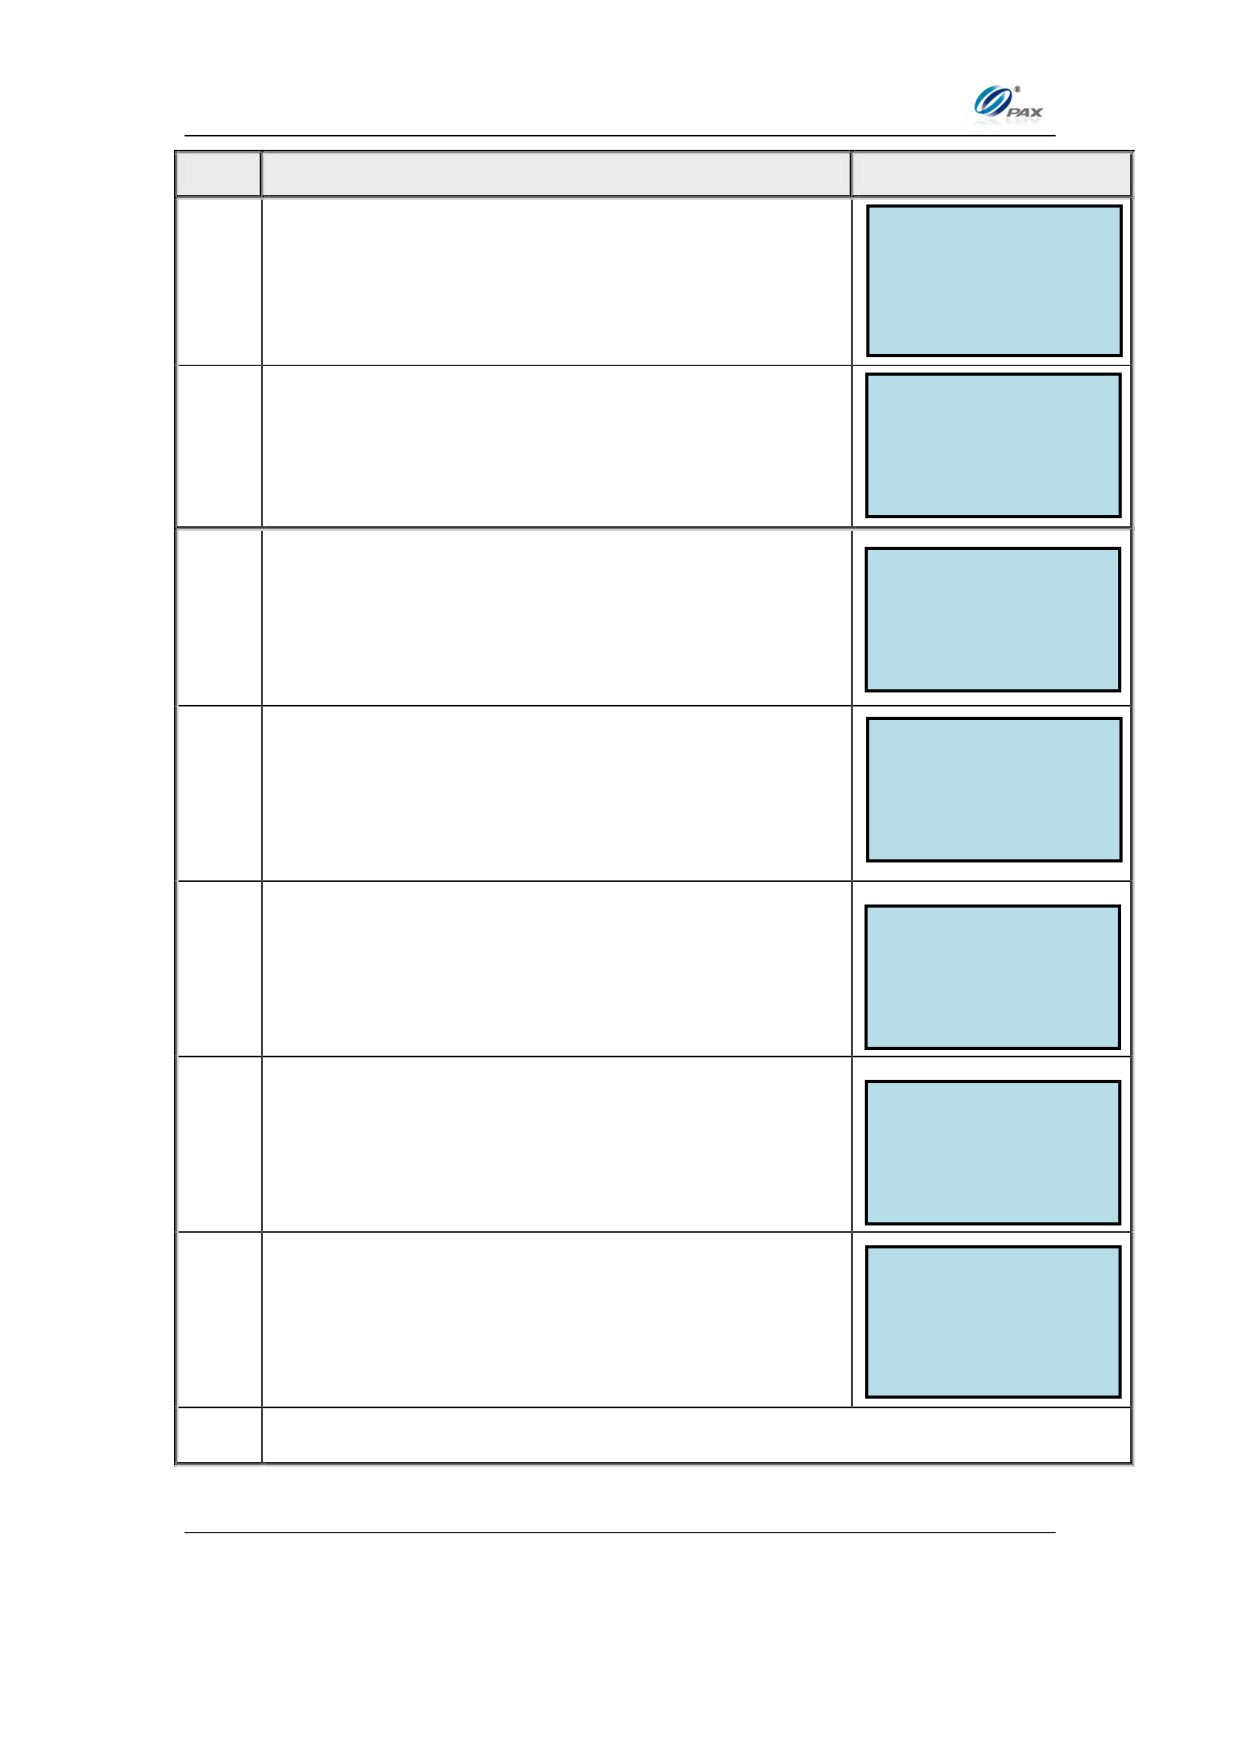
Chapter 5
PAX D200 Menu Options
STEP
ACTION
DISPLAY
MAIN MENU:
2. Merchant Settings
3. Operation Settings
1.
From the Main Menu, press [5] for System Settings
4. Hosts Settings
5. System Settings
SYSTEM OPTIONS:
1. Date/Time Setup
2. Batch Number
2.
Press [3] for Working Mode.
3. Working Mode
4. Database
WORKING MODE:
1. EDC Tip
3.
Press [2] for Fraud Control.
2. Fraud Control
3. MOTO.
ENTER PASSWORD:
Input the Password and press [ENTER].
4.
Fraud Control
1. AVS On Swipe
5.
Press [1] to set the AVS On Swipe.
2. AVS On CardPrsnt
3. AVS OnCardNotPrsnt
4. Card Present
Select Card Type
1. ALL
Select the card type you wish to modify or press [1]
6.
2. Visa
for all card types.
3. MasterCard
4. AMEX
AVS on Swipe
1. None
Press the number that corresponds to the desired
2. Address
7.
AVS Prompt.
3. Zip
4. Address & Zip
8.
Stop.
84
Chapter 5
PAX D200 Menu Options
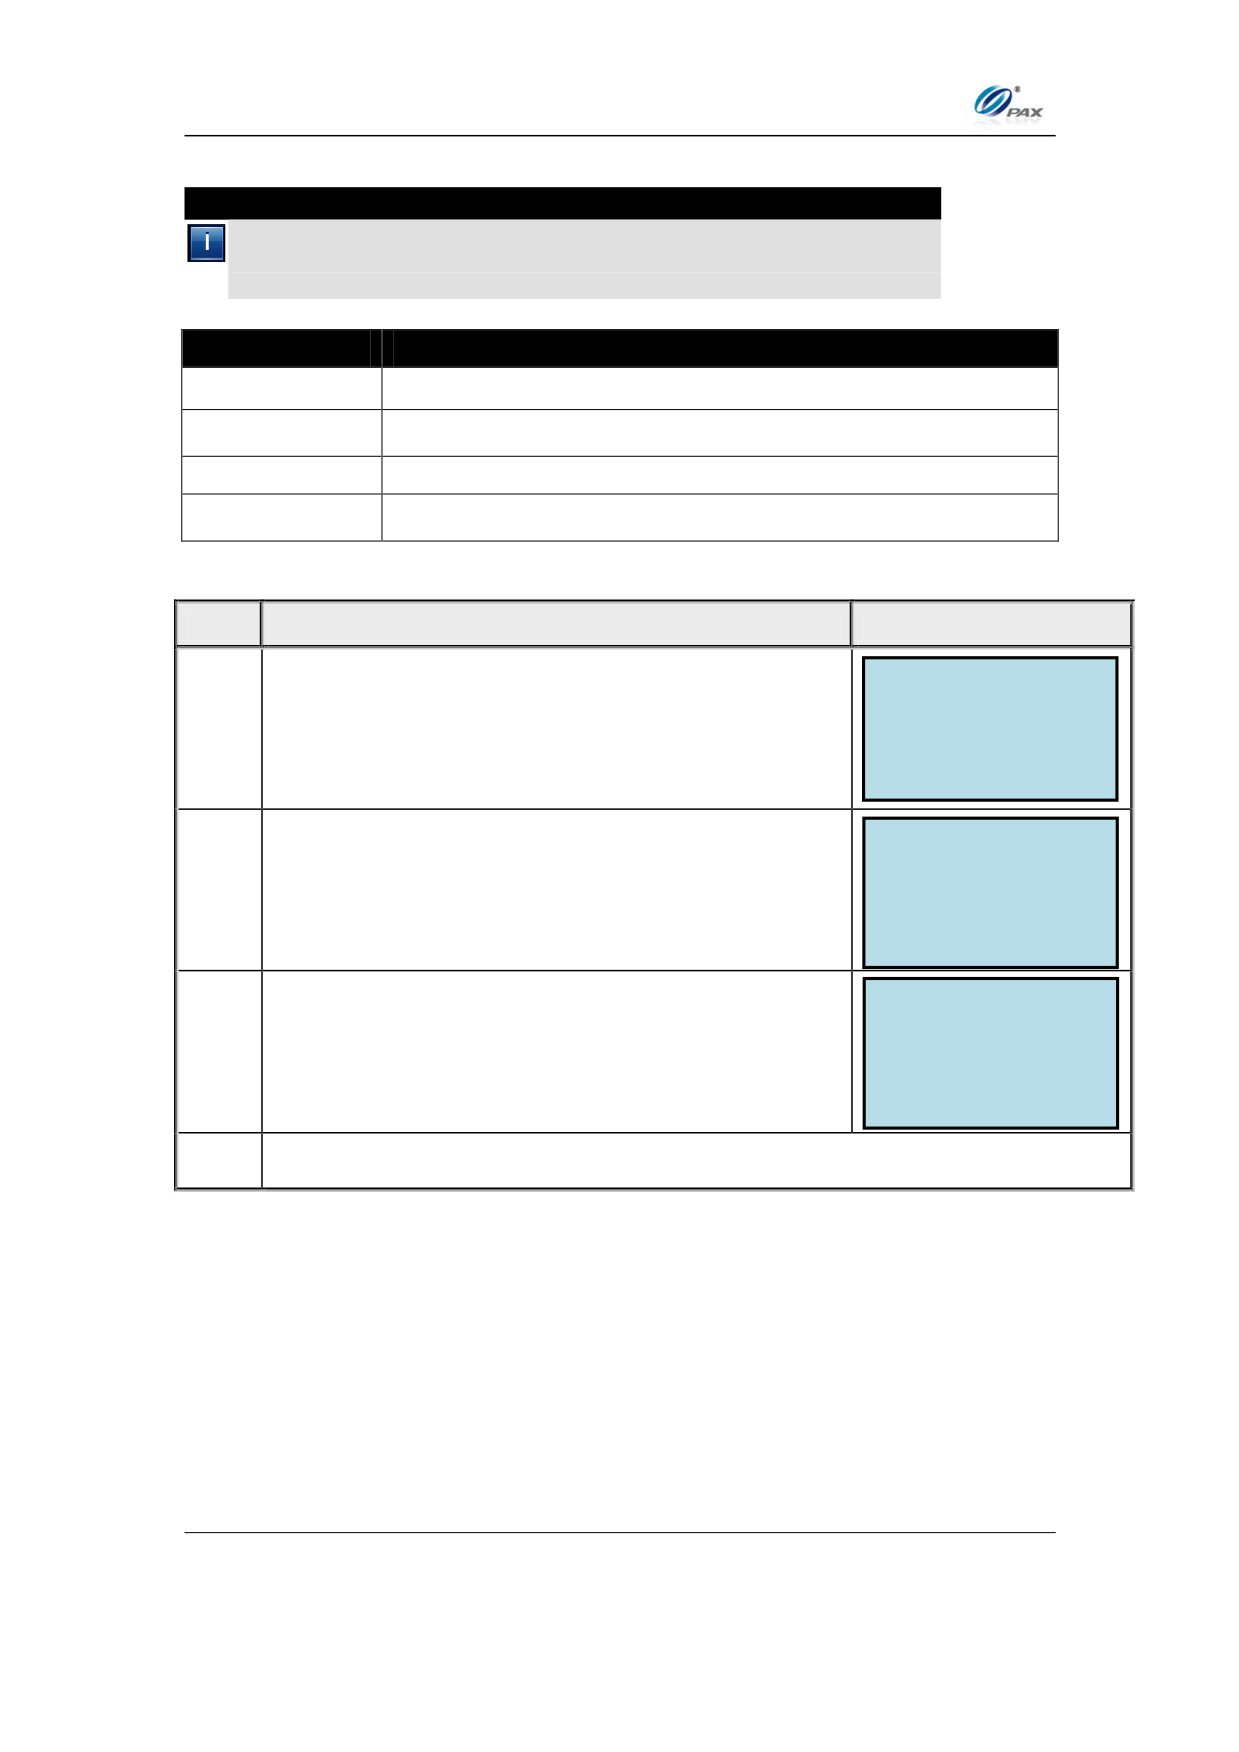
5.7.3.2.2 AVS on Card Present
Note
AVS on Card Present is a feature that enables AVS prompts on all
manual transactions where the card is present for individual Credit
Card types or for all card types.
OPTION
DEFINITION
None
There will be no AVS prompts
Address
AVS will prompt for address only
Zip
AVS will prompt for zip code only(default)
Address & Zip
AVS will prompt for address and zip code
STEP
ACTION
DISPLAY
Fraud Control
1. AVS On Swipe
From the Fraud Control menu press [2] to set AVS
2. AVS On CardPrsnt
1.
On Card Present.
3. AVS OnCardNotPrsnt
4. Card Present
Select Card Type
1. ALL
Select the card type you wish to modify or press [1]
2. Visa
2.
for all card types.
3. MasterCard
4. AMEX
AVS on CardPr
1. None
Press the number that corresponds to the desired
2. Address
3.
AVS Prompt.
3. Zip
4. Address&Zip
4.
Stop.
85
Chapter 5
PAX D200 Menu Options
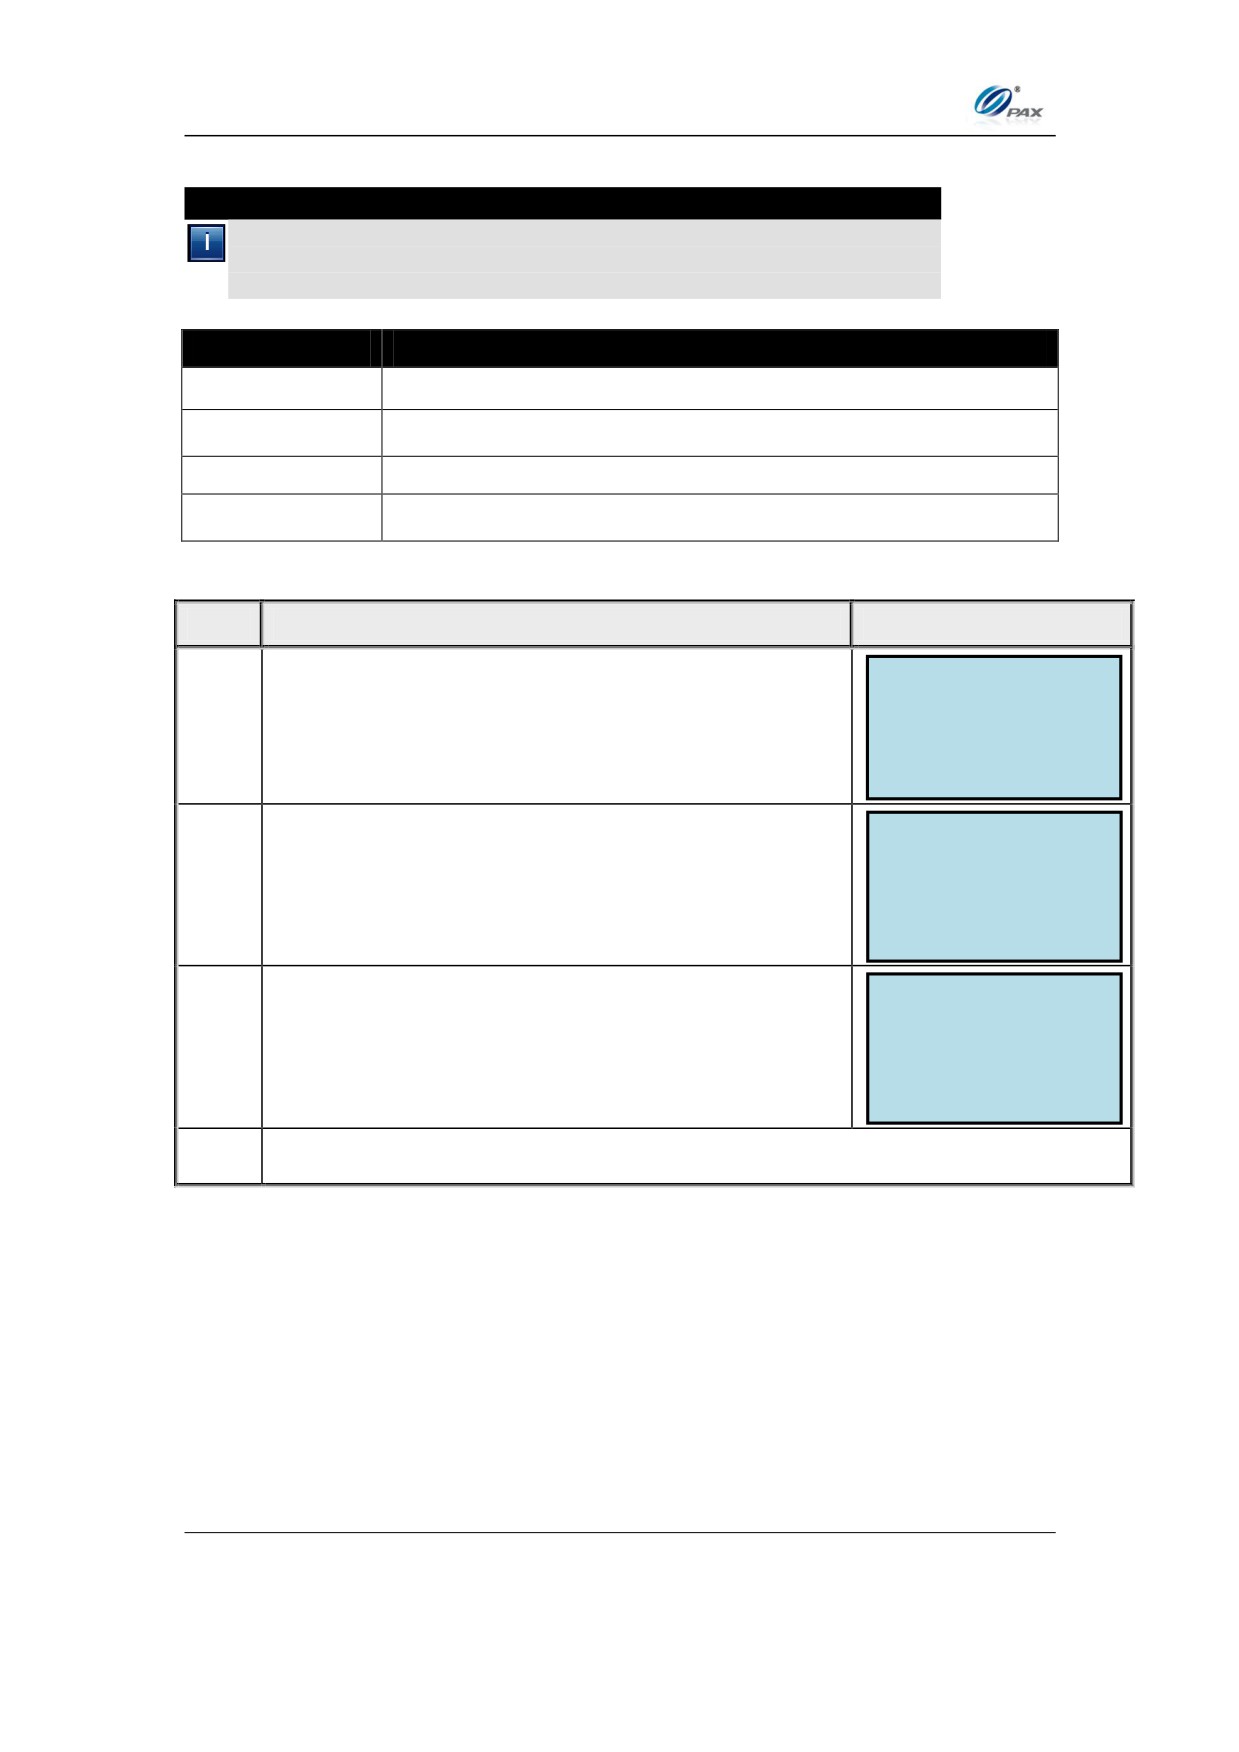
5.7.3.2.3 AVS on Card Not Present
Note
AVS on Card Not Present is a feature that enables AVS prompts on all
manual transactions where the card is not present for individual
Credit Card types or for all card types.
OPTION
DEFINITION
None
There will be no AVS prompts
Address
AVS will prompt for address only
Zip
AVS will prompt for zip code only
Address & Zip
AVS will prompt for address and zip code(default)
STEP
ACTION
DISPLAY
Fraud Control
1. AVS On Swipe
From the Fraud Control menu press [3] to set AVS
2. AVS On CardPrsnt
1.
On Card Not Present.
3. AVS OnCardNotPrsnt
4. Card Present
Select Card Type
1. ALL
Select the card type you wish to modify or press [1]
2. Visa
2.
for all card types.
3. MasterCard
4. AMEX
AVS on CardNPr
1. None
Press the number that corresponds to the desired
2. Address
3.
AVS Prompt.
3. Zip
4. Address&Zip
4.
Stop.
86
Chapter 5
PAX D200 Menu Options
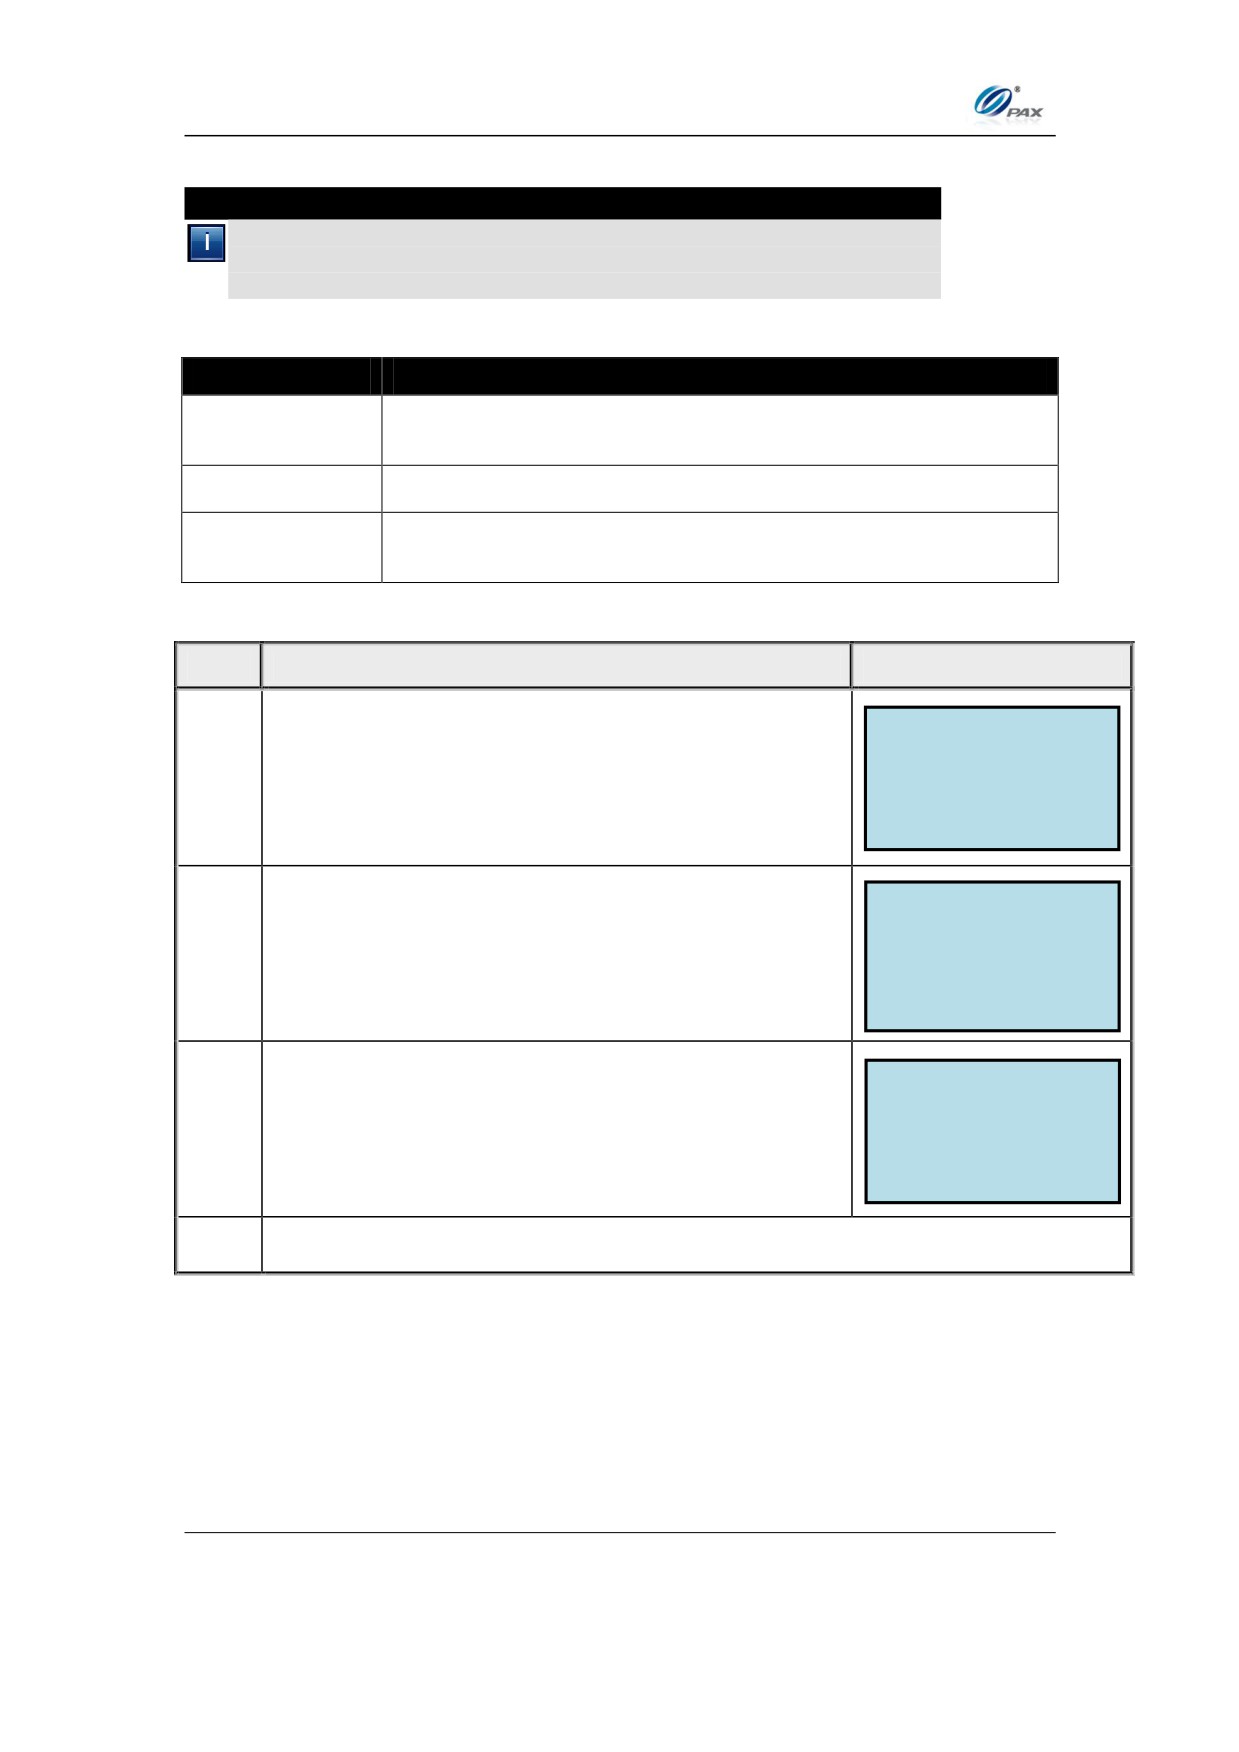
5.7.3.2.4 Card Present
Note
On manual transactions, different data is required depending upon
whether or not the card is present. This feature sets the option to
assume the card is or is not present or to ask if the card is present.
OPTION
DEFINITION
It is assumed that the card is NOT present on all manual
No, If manual
entry transactions.
Always Yes
It is assumed that the card is always present.
The terminal will ask if the card is present on all manual
Ask, If manual
entry transactions.(default)
STEP
ACTION
DISPLAY
Fraud Control
1. AVS On Swipe
From the Fraud Control menu press [4] to set the
2. AVS On CardPrsnt
1.
Card Present options.
3. AVS OnCardNotPrsnt
4. Card Present
Select Card Type
1. ALL
Select the card type you wish to modify or press [1]
2. Visa
2.
for all card types.
3. MasterCard
4. AMEX
Card Present
1. No, if manual
Press the number that corresponds to the desired
3.
2. Always Yes
Card Present option.
3. Ask, if manual
4.
Stop.
87
Chapter 5
PAX D200 Menu Options
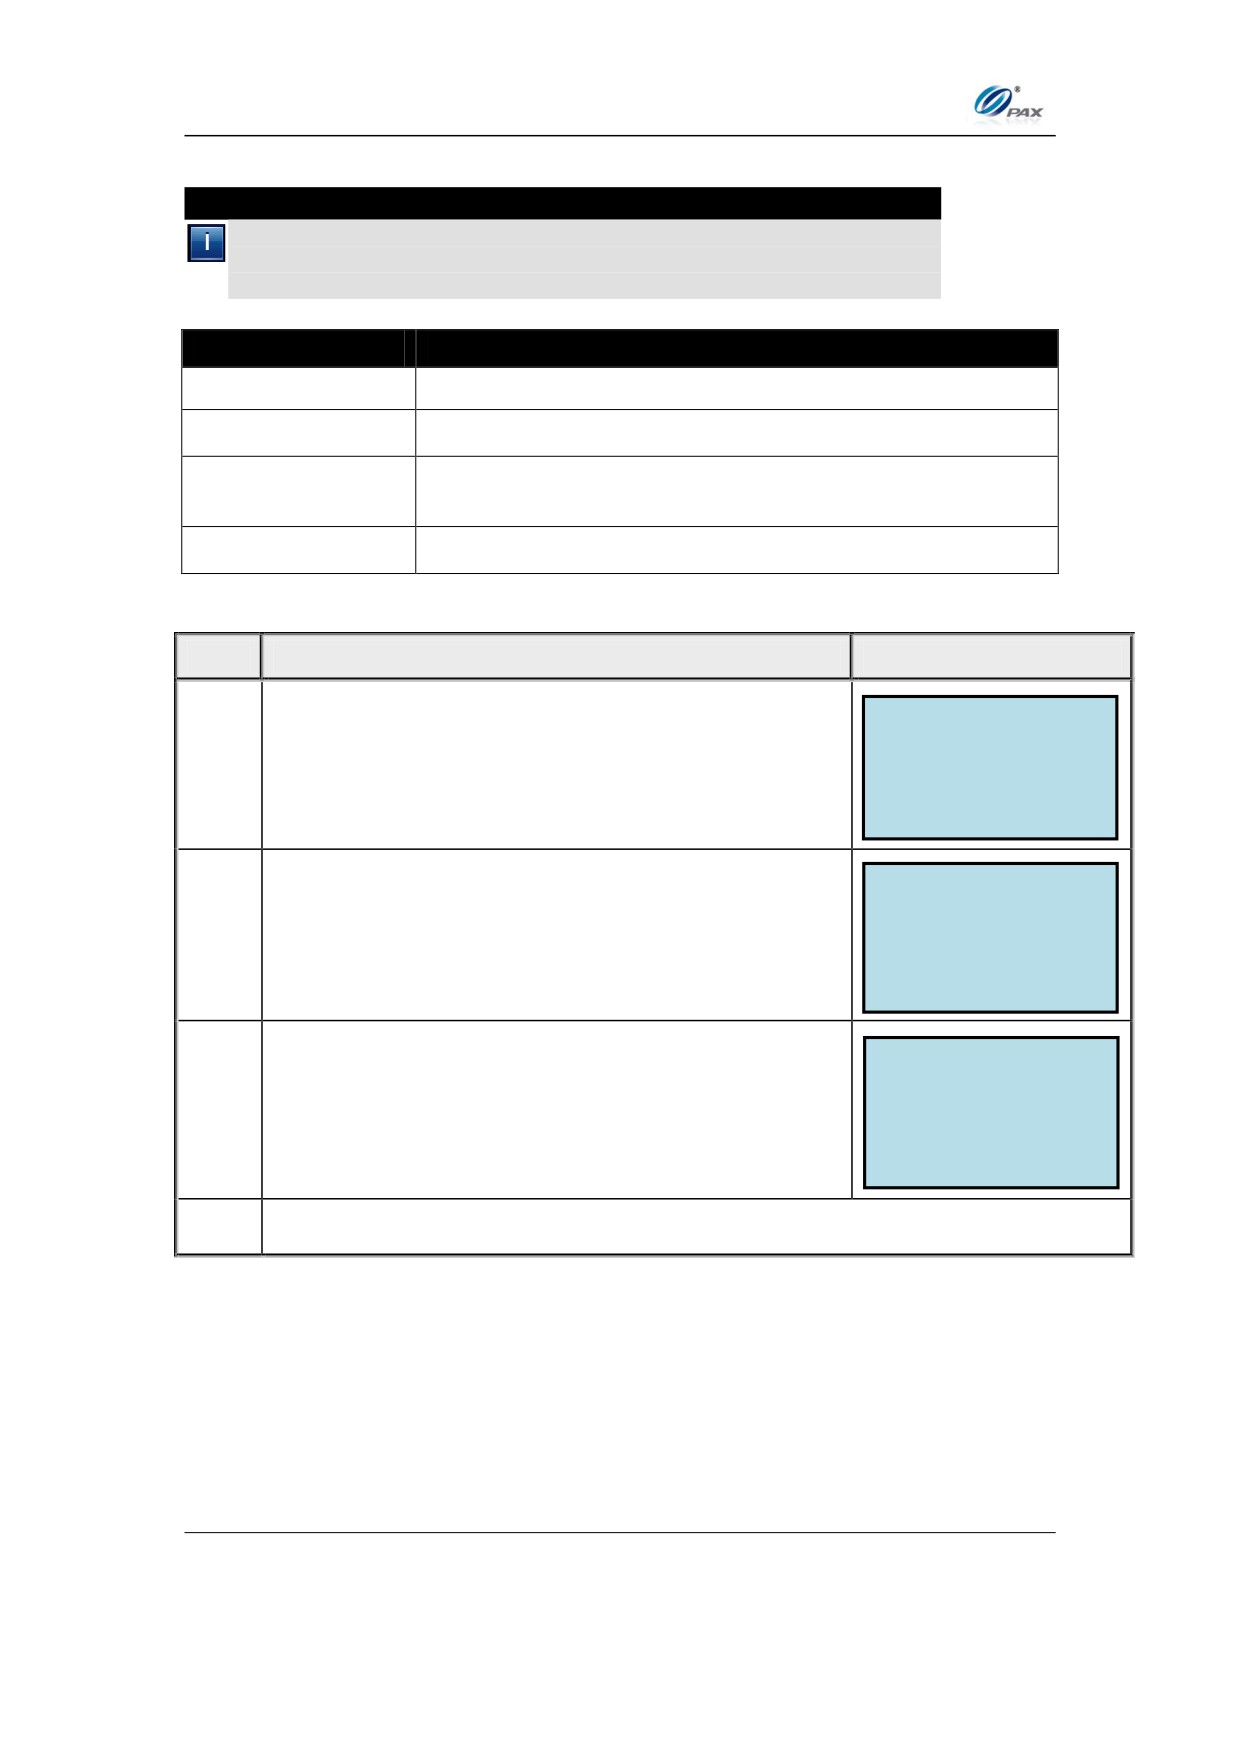
5.7.3.2.5 V-Code
Note
This feature enables the user to determine how to set up the CVV,
CVC and CID security feature for individual card types or for all card
types.
OPTION
DEFINITION
Off
Will not prompt for Code
On if Manual
Will prompt for Code on manual entry transactions(default)
On if Manual, Card
Will prompt for Code if card is not present
not Present
On Always
Will always prompt for Code
STEP
ACTION
DISPLAY
Fraud Control
2. AVS On CardPrsnt
From the Fraud Control menu press [5] for
1.
3. AVS OnCardNotPrsnt
V-Code.
4. Card Present
5. V-Code
Select Card Type
1. ALL
Select the card type you wish to modify or press [1]
2. Visa
2.
for all card types.
3. MasterCard
4. AMEX
V-Code
1. OFF
Press the number that corresponds to the desired
2. On if manual
3.
CVV Mode.
3. OnIfMan.CrdNotPrsnt
4. On always
4.
Stop.
88
Chapter 5
PAX D200 Menu Options
5.7.3.3
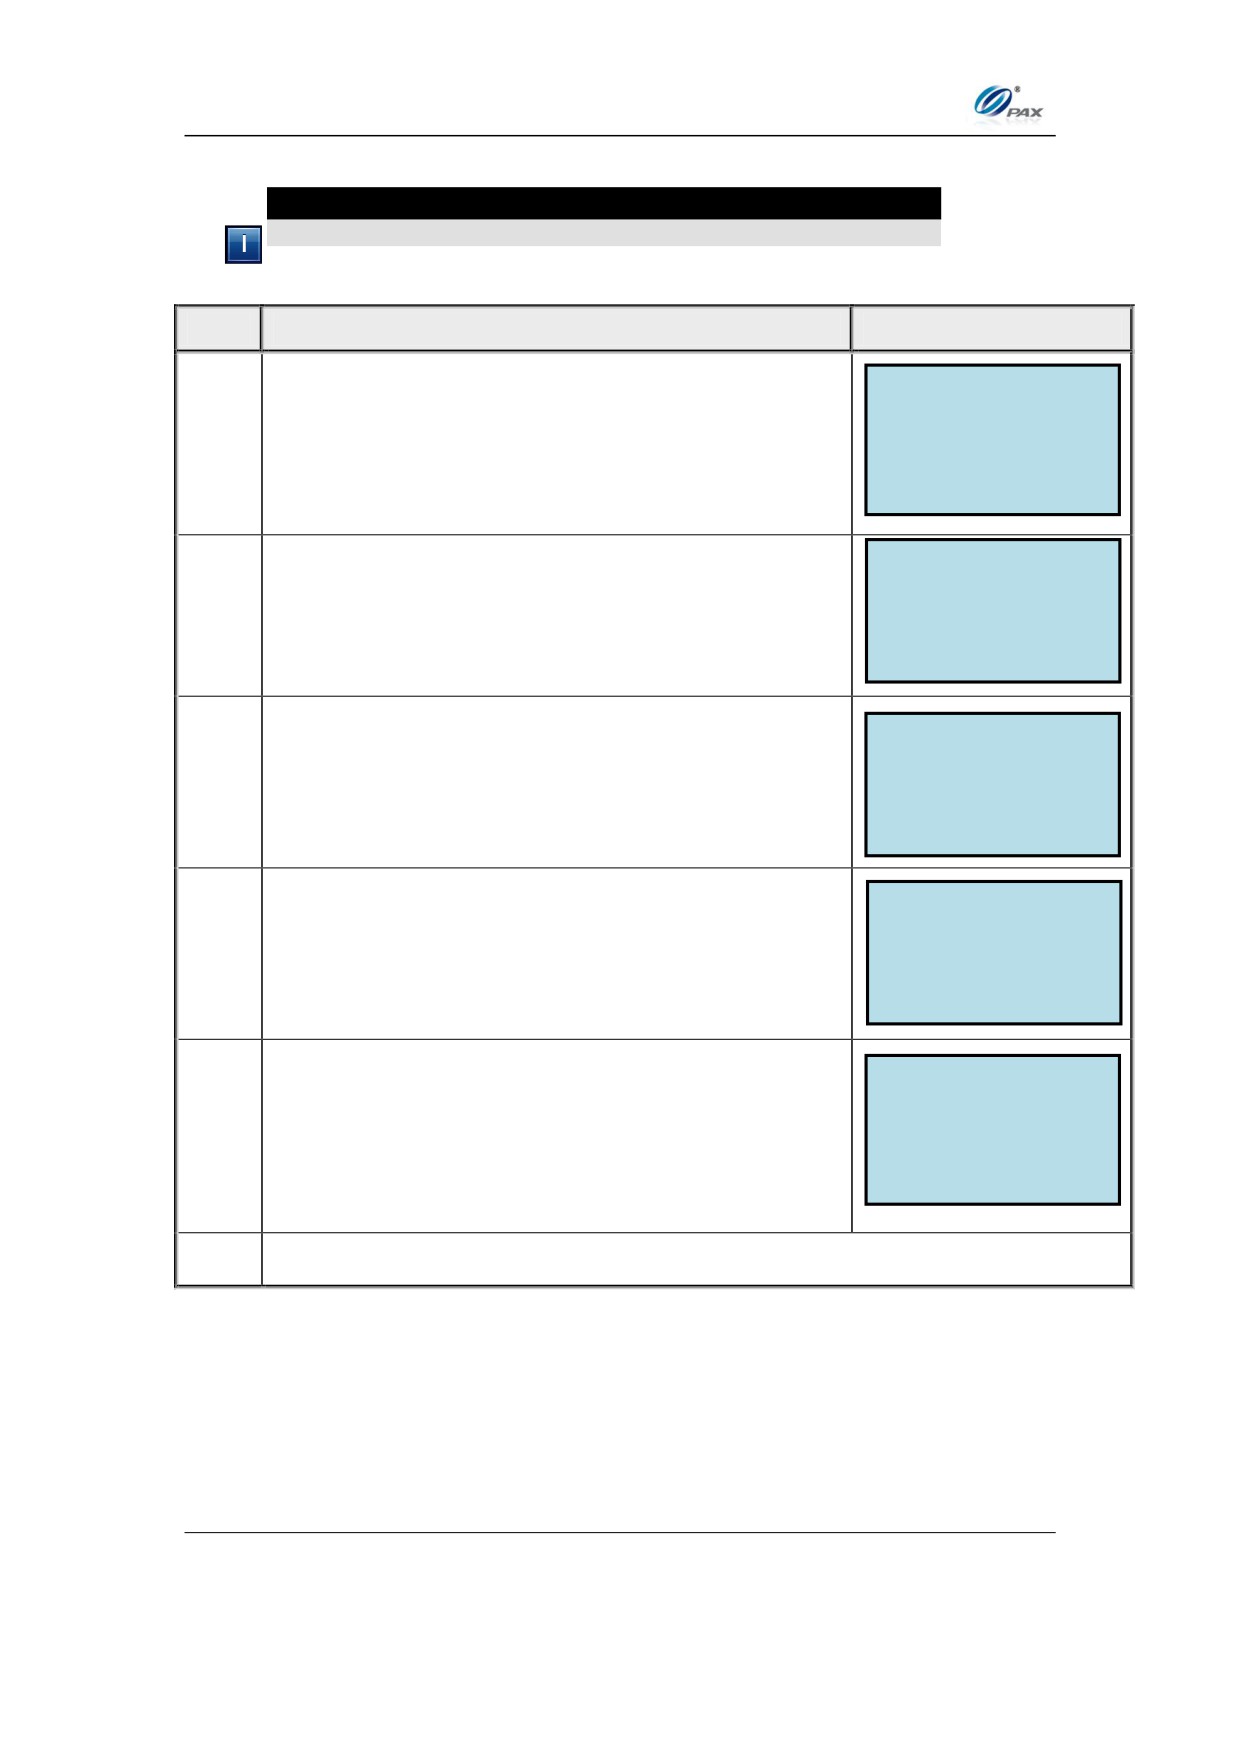
MOTO
Note
This feature controls the enabling and disabling of MOTO.
STEP
ACTION
DISPLAY
MAIN MENU:
2. Merchant Settings
3. Operation Settings
1.
From the Main Menu, press [5] for System Settings
4. Hosts Settings
5. System Settings
SYSTEM OPTIONS:
1. Date/Time Setup
2. Batch Number
2.
Press [3] for Working Mode.
3. Working Mode
4. Database
ENTER PASSWORD:
3.
Input the password and press [O].
WORKING MODE:
1. EDC Tip
2. Fraud Control
4.
Press [3] for MOTO.
3. MOTO.
The default setting is OFF.
MOTO : 1
1. OFF
Press [1] to disable MOTO.
2. ON
5.
OR
Press [2] to enable MOTO.
6.
STOP.
89
Chapter 5
PAX D200 Menu Options
5.7.4 Database
This sub-menu has two options:
Clear Database
Clear Reversal
MENU
Care must be taken when making changes in the
DESCRIPTION Database! This should only be done with the assistance of
PAX Support personnel.
5.7.4.1
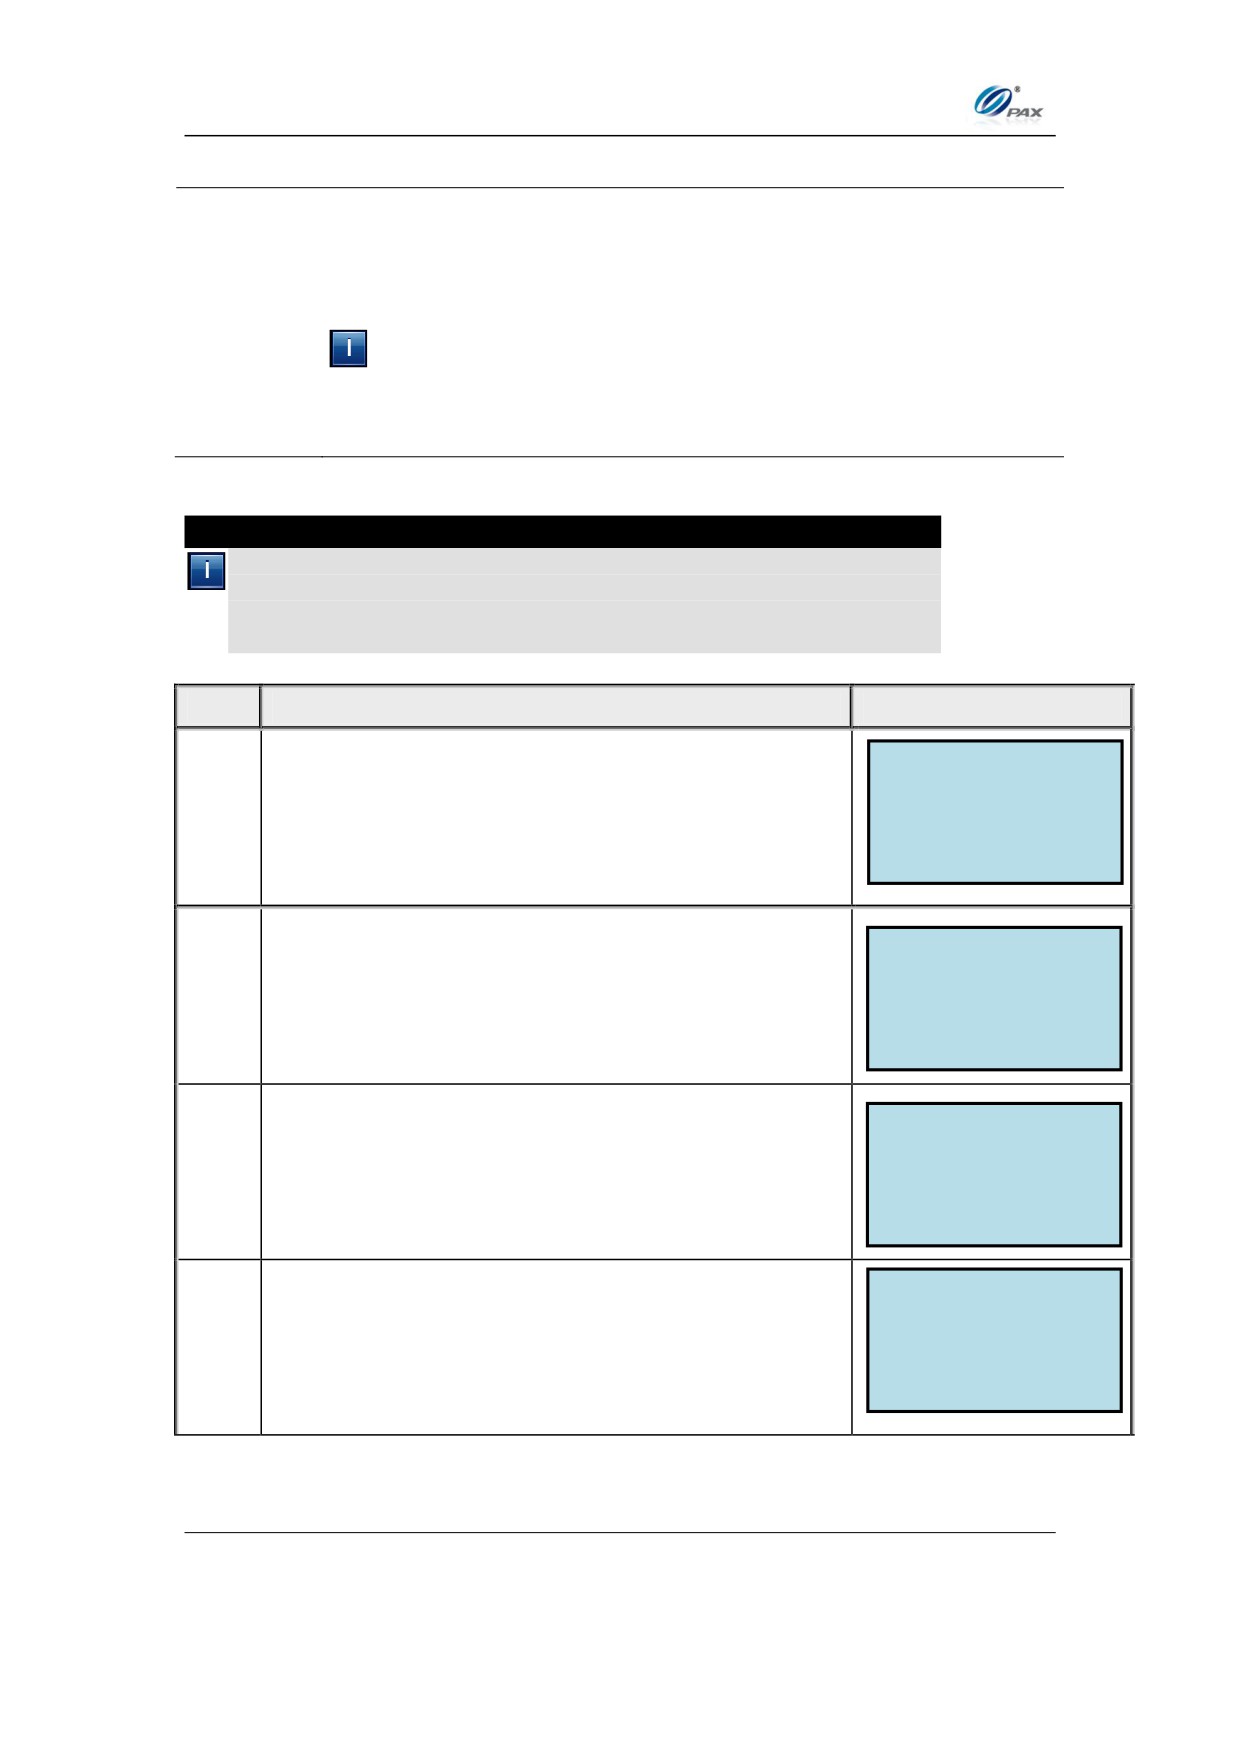
Clear Database
Note
It is possible the clear the database for each EDC type individually or
all of them together. Before clearing the database, make sure there
are receipts with the full account number for all of the transactions. If
necessary, run a Journal Report.
STEP
ACTION
DISPLAY
SYSTEM OPTIONS:
1. Date/Time Setup
From the System Settings menu, press [4] for Edit
2. Batch Number
1.
3. Working Mode
Database.
4. Database
ENTER PASSWORD:
2.
Input the Password and press [ENTER]
EDIT DATABASE:
1. Clear Database
2. Clear Reversal
3.
Press [1] for Clear Database
ARE YOU SURE?
Press [ENTER] to continue
4.
OR
ENTER = YES CANCEL = NO
Press [CANCEL] to cancel
90
Chapter 5
PAX D200 Menu Options
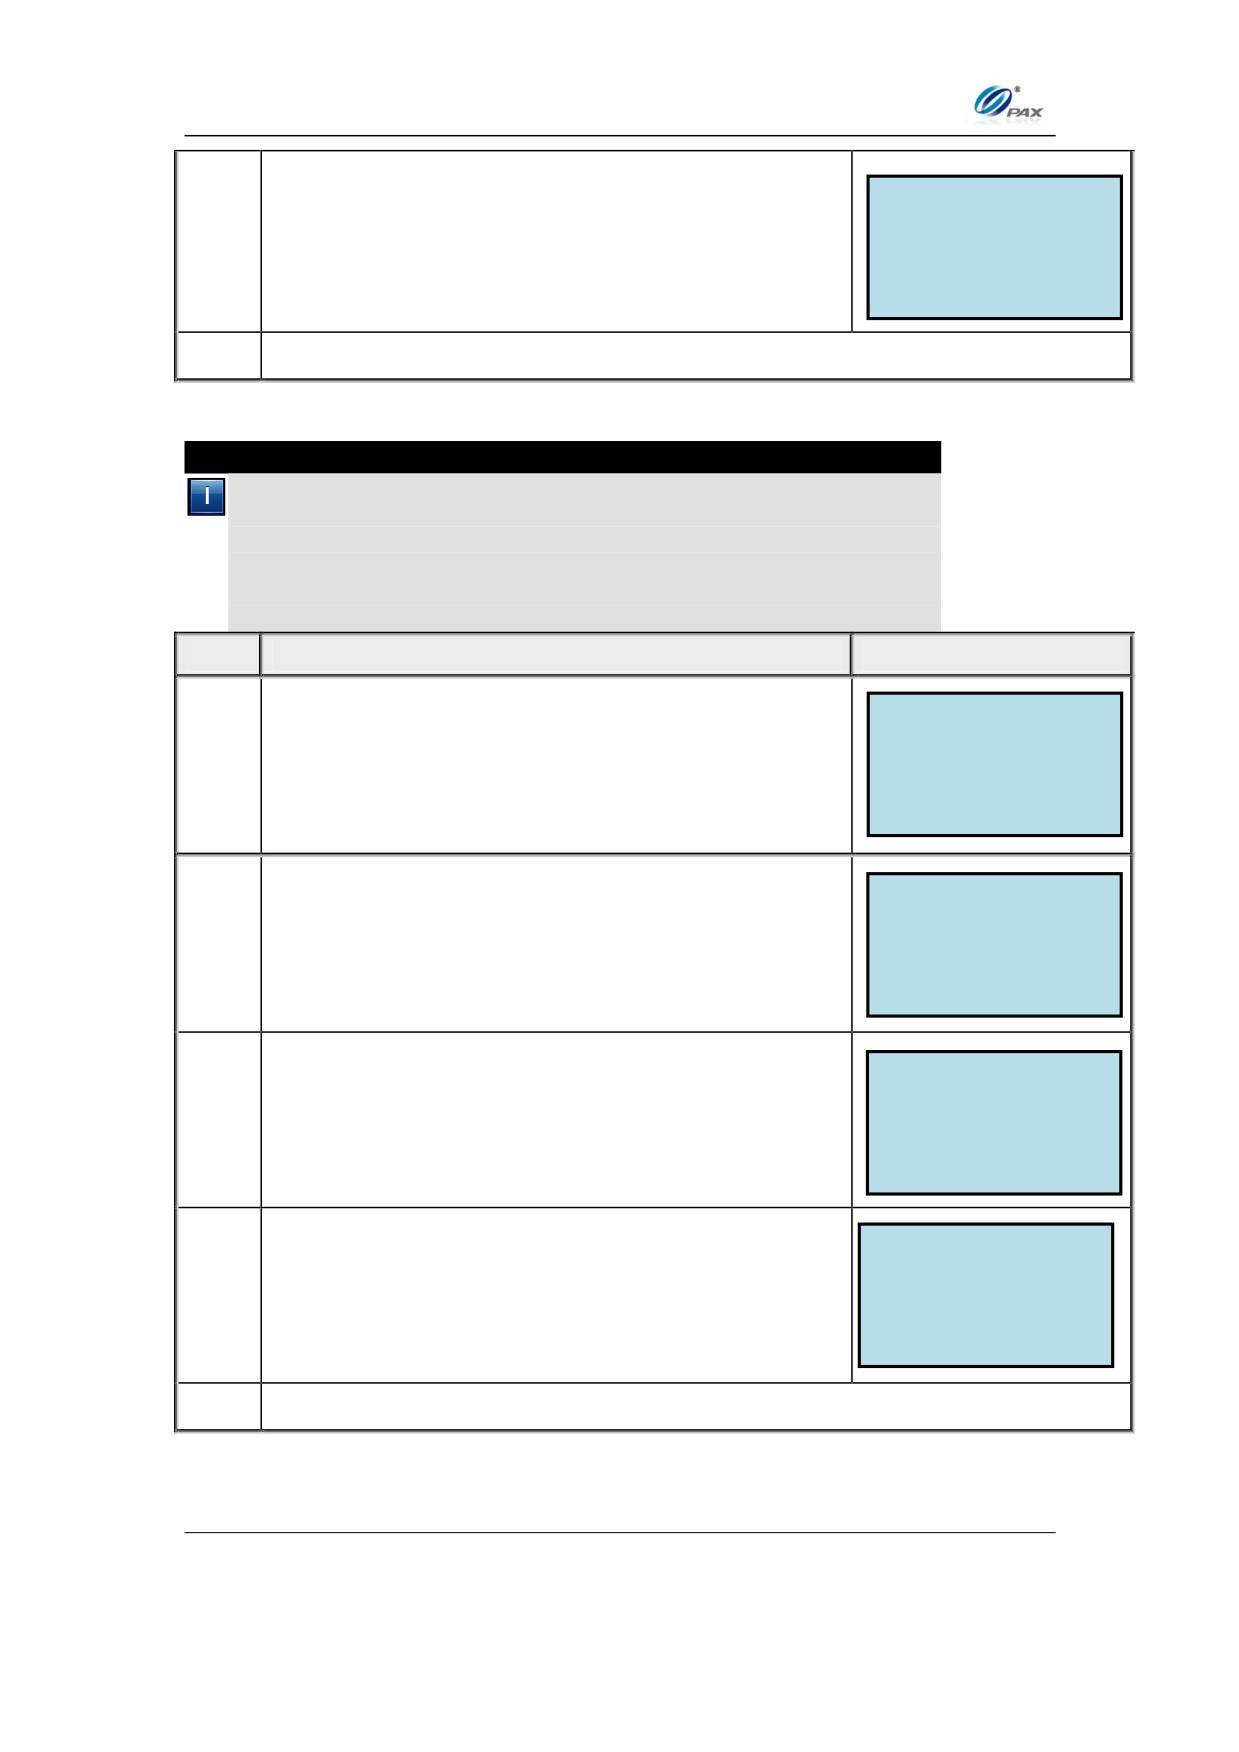
Select EDC type you wish to clear the database for
SELECT PMT TYPE:
then press [ENTER].
1. ALL
5.
2. CREDIT
OR
3. DEBIT
4. EBT
Press [ENTER] to clear all databases.
6.
Stop.
5.7.4.2 Clear Reversal
Note
If an authorization request is sent to host, but there is no response
received, the terminal will try to reverse that transaction to avoid
mistake. But sometimes it may happen that the reversal will never
succeed. This will make the terminal unable to process anymore
transactions. To avoid this situation, you can clear the reversal flag in
this menu, so that the terminal will not try the reversal anymore.
STEP
ACTION
DISPLAY
SYSTEM OPTIONS:
1. Date/Time Setup
From the System Settings menu, press [4] for Edit
2. Batch Number
1.
Database.
3. Working Mode
4. Database
ENTER PASSWORD:
2.
Input the Password and press [ENTER]
EDIT DATABASE:
1. Clear Database
3.
Press [2] for Clear Reversal
2. Clear Reversal
Press [ENTER] to continue
ARE YOU SURE?
4.
OR
ENTER = YES CANCEL = NO
Press [CANCEL] to cancel
5.
Stop.
91
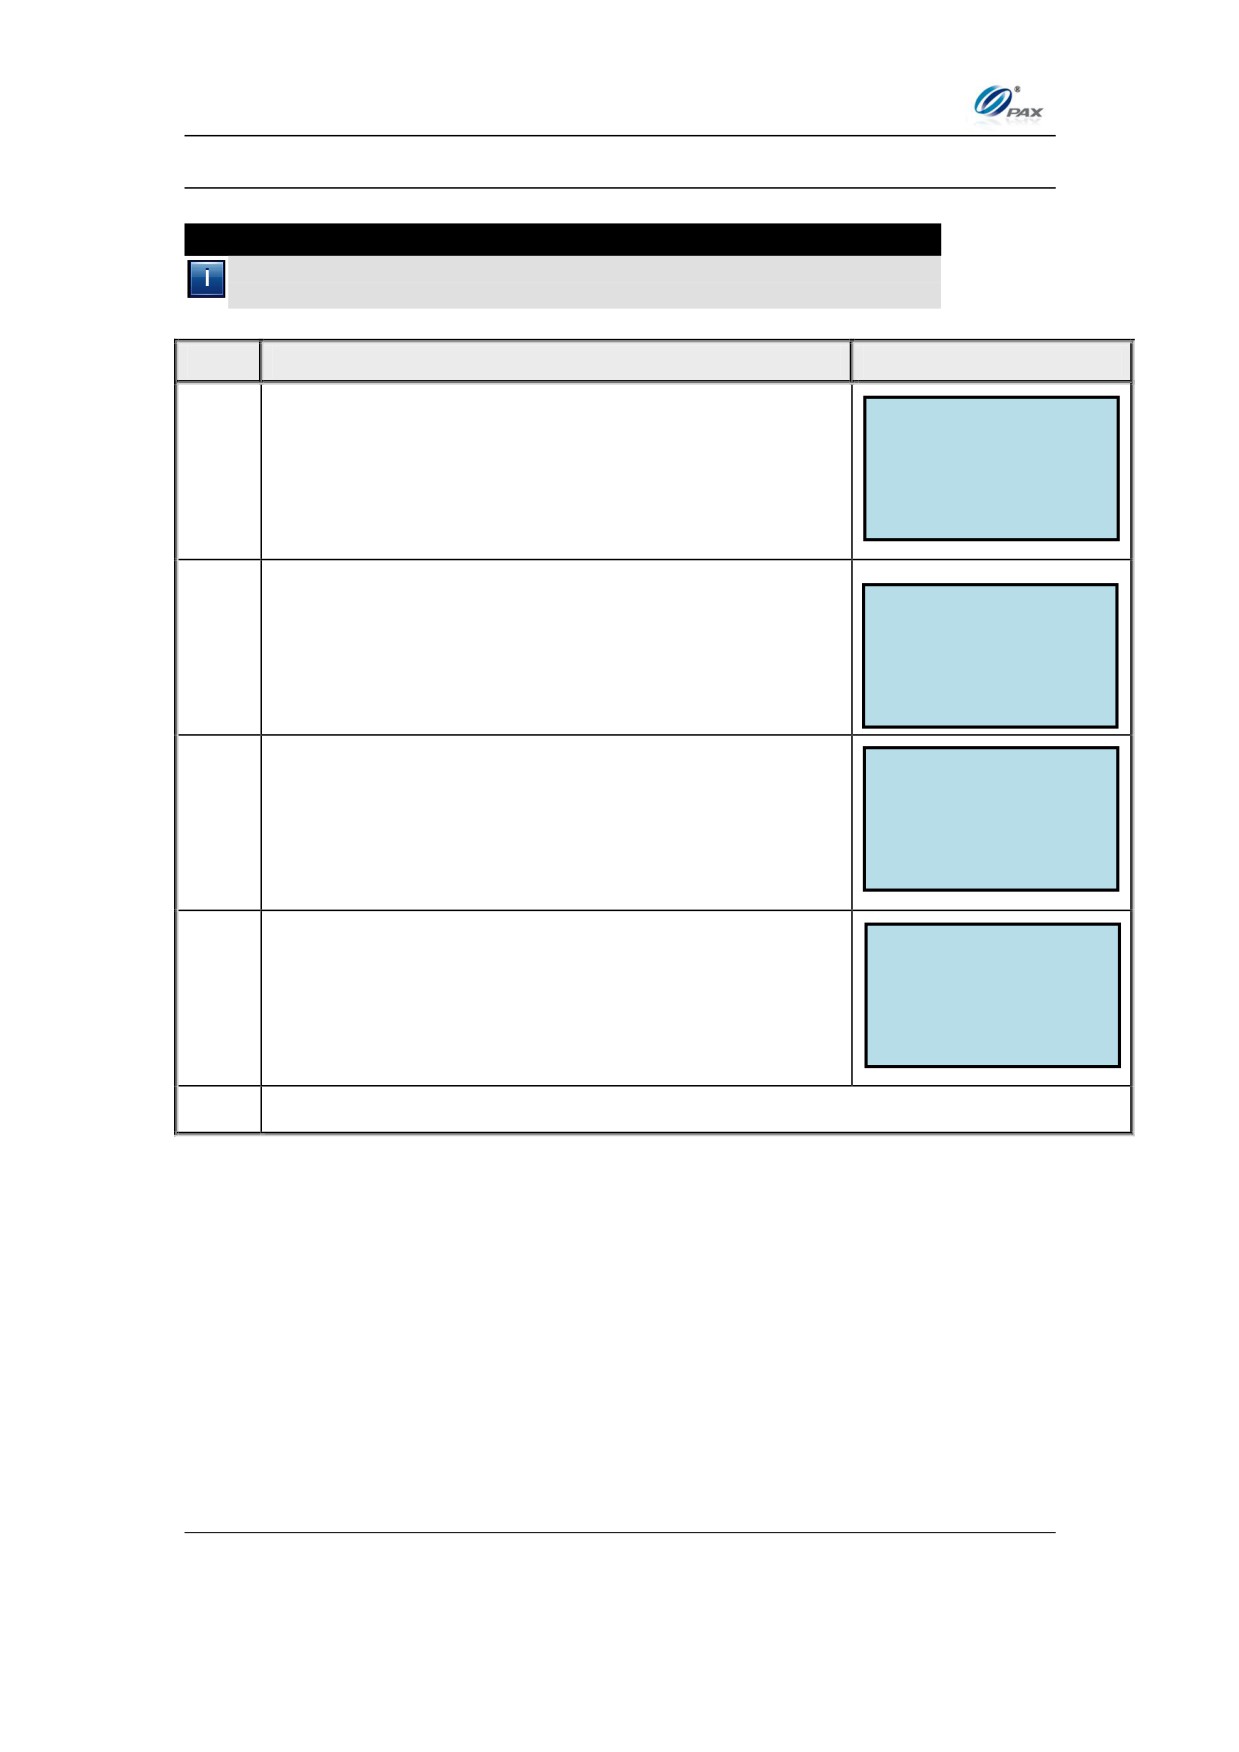
Chapter 5
PAX D200 Menu Options
5.7.5 Key Injection
Note
This function allows you to inject encryption key(s) into the terminal to
enable Debit or EBT.
STEP
ACTION
DISPLAY
SYSTEM OPTIONS:
2. Batch Number
From the System Settings menu, press [5] to
3. Working Mode
1.
access the Key Injection function.
4. Database
5. Key Injection
ENTER PASSWORD:
Input the Password and press [O]
2.
If you are ready to begin the injection, press the [1]
Key Injection:
key, the [O] key and go to step 5. If you need to set
1. Start
2. Set Baudrate
3.
the Terminal Baud rate press the [2] and then the
[O].
Baudrate 1200
Select the appropriate Baudrate from the options by
1. Set to 1200
pressing the key corresponding with the Baudrate
2. Set to 2400
4.
3. Set to 4800
required. Then return to step 3.
4. Set to 9600
5.
Stop.
92
Chapter 5
PAX D200 Menu Options
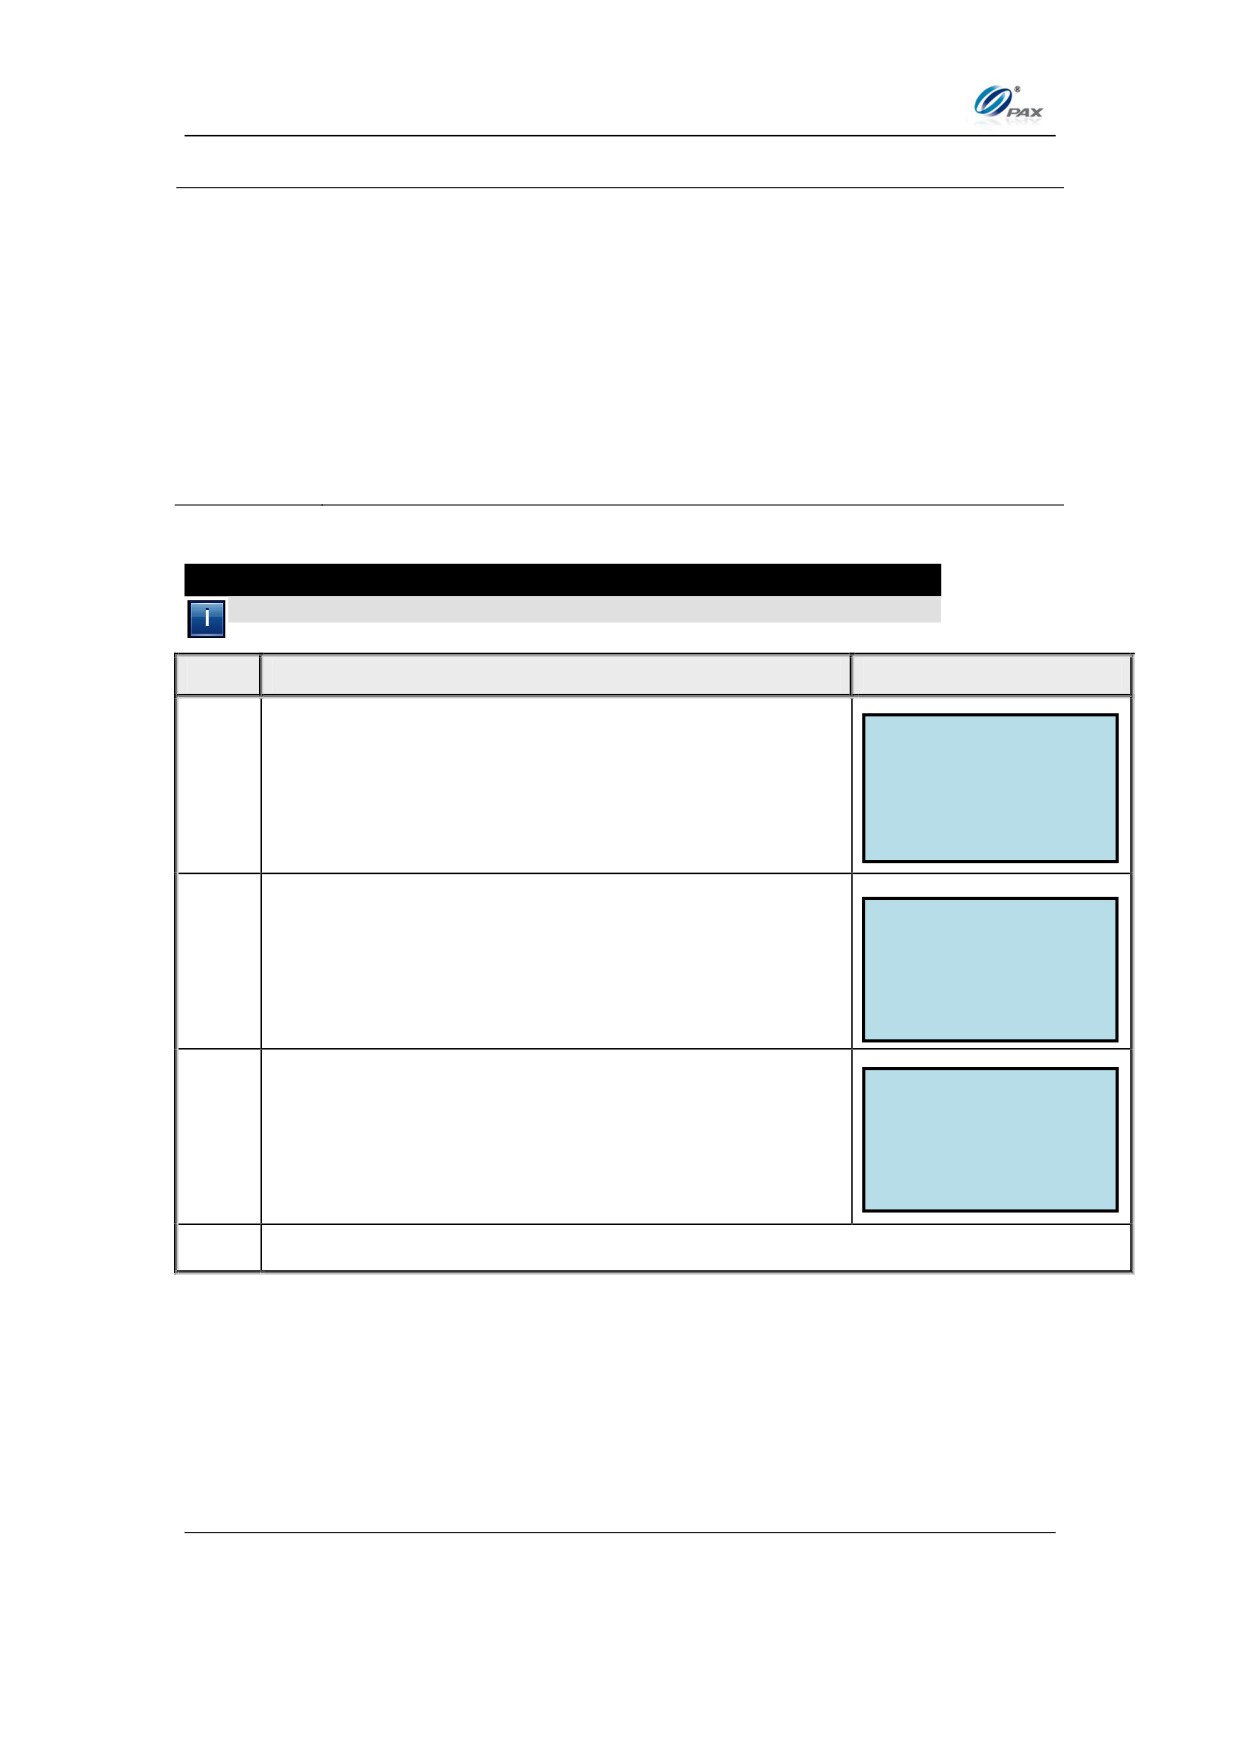
5.7.6 Application Management
This Sub Menu deals with the loading of Applications and Parameters onto the
terminal. Below is a list of the various options and functions covered under this
section:
Activate
App Update
Configuration
MENU
Terminal SN
DESCRIPTION
APP Info
Note
Use this function to access the App Management functions.
STEP
ACTION
DISPLAY
SYSTEM OPTIONS:
4. Database
From the System Settings menu, press [6] to
5. Key Injection
1.
Select App Management.
6. App Management
7. TDES Key Injection
ENTER PASSWORD:
2.
Input the Password and press [ENTER]
Use the [F1] & [F2] keys to find your selection and
APP LOAD
1. Activate
then press [O]. Or Press the number corresponding
3.
2. App Update
3. Configuration
with your selection.
4. Terminal SN
4.
Stop.
93
Chapter 5
PAX D200 Menu Options
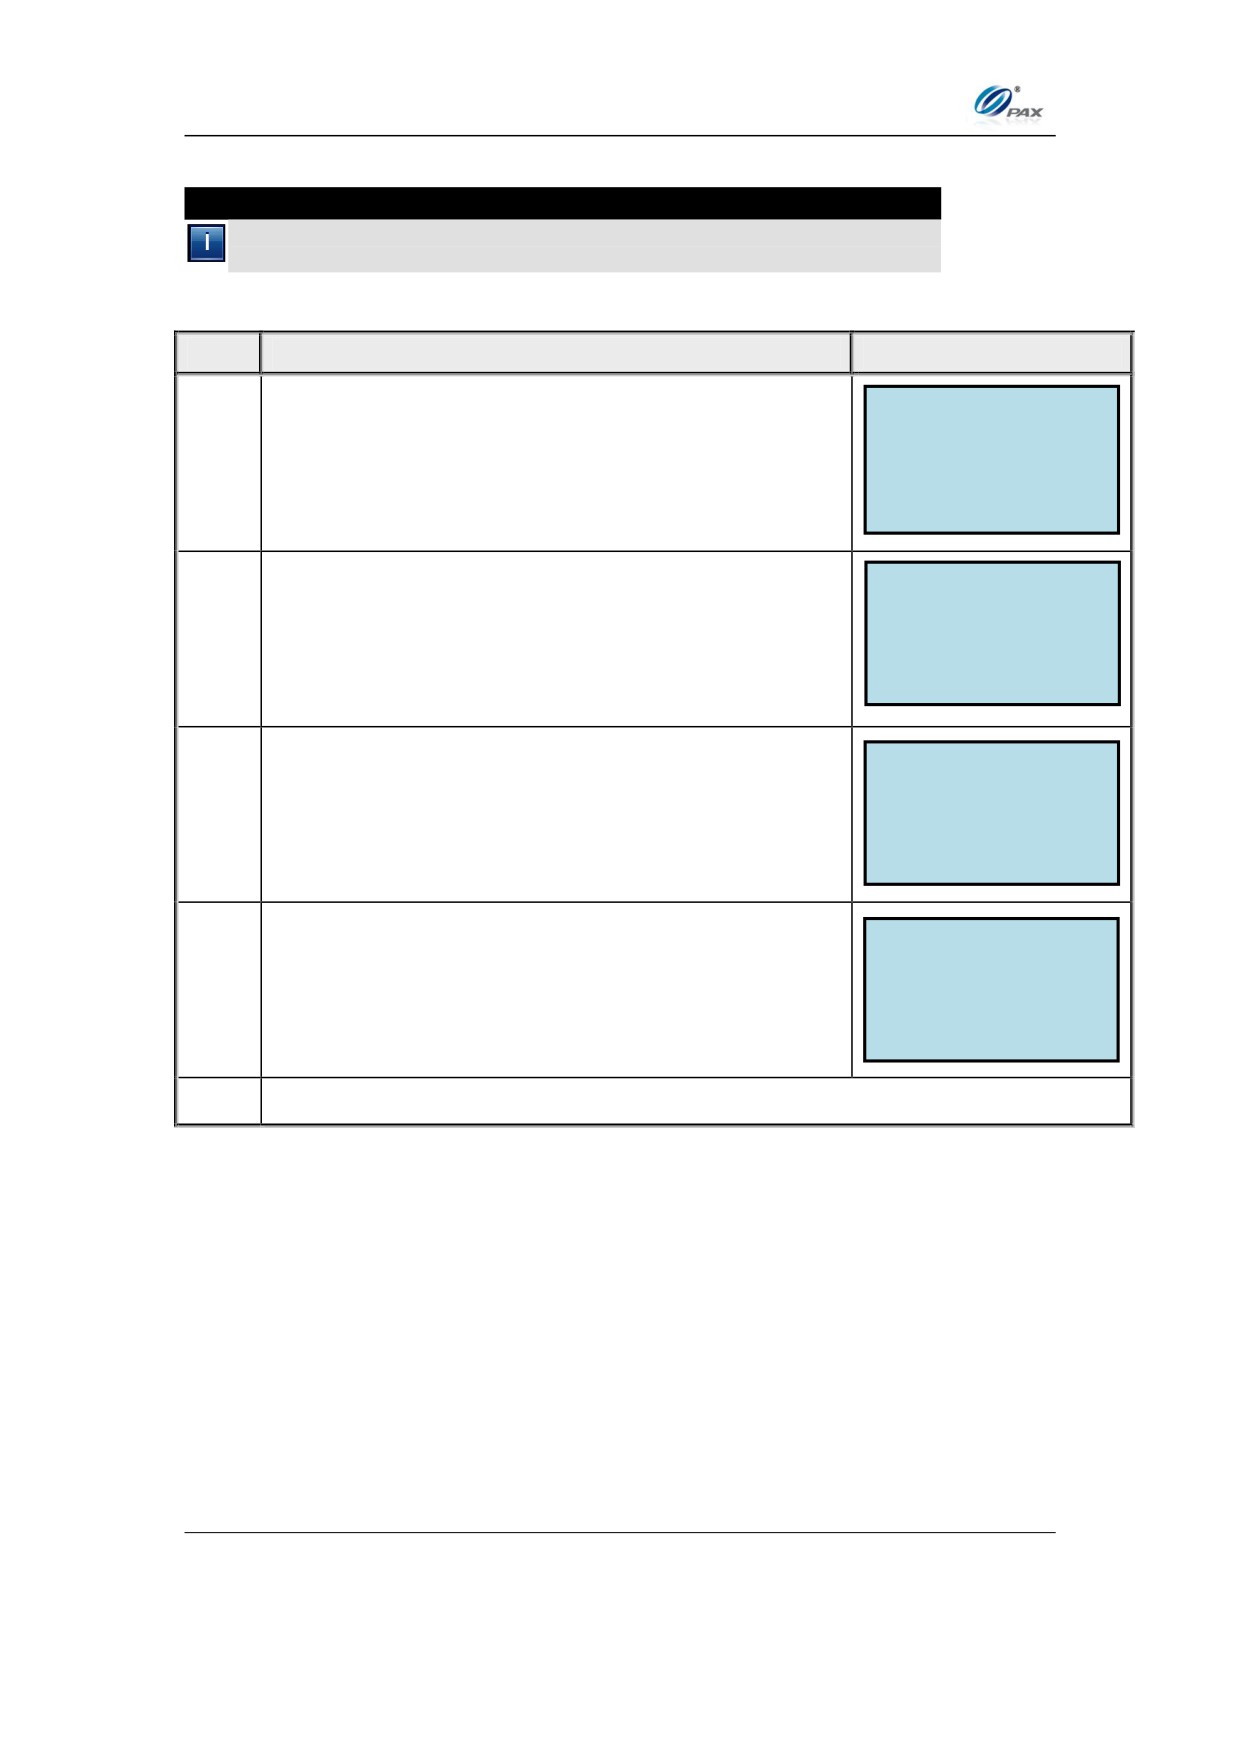
5.7.6.1 Activate
Note
Use this function to activate the terminal in preparation for a
download.
STEP
ACTION
DISPLAY
SYSTEM OPTIONS:
4. Database
From the System Settings menu, press [6] to
5. Key Injection
1.
6. App Management
Select App Management.
7. TDES Key Injection
ENTER PASSWORD:
Input the Password and press [O]
2.
APP LOAD
1. Activate
Press [1] to select Activate.
2. App Update
3.
3. Configuration
4. Terminal SN
Press [1] for online activation. The terminal will
ACTIVATE
1. Online
connect to the specified TMS (BroadPOS or
4.
PAXTMS) and authenticate.
5.
Stop.
94
Chapter 5
PAX D200 Menu Options
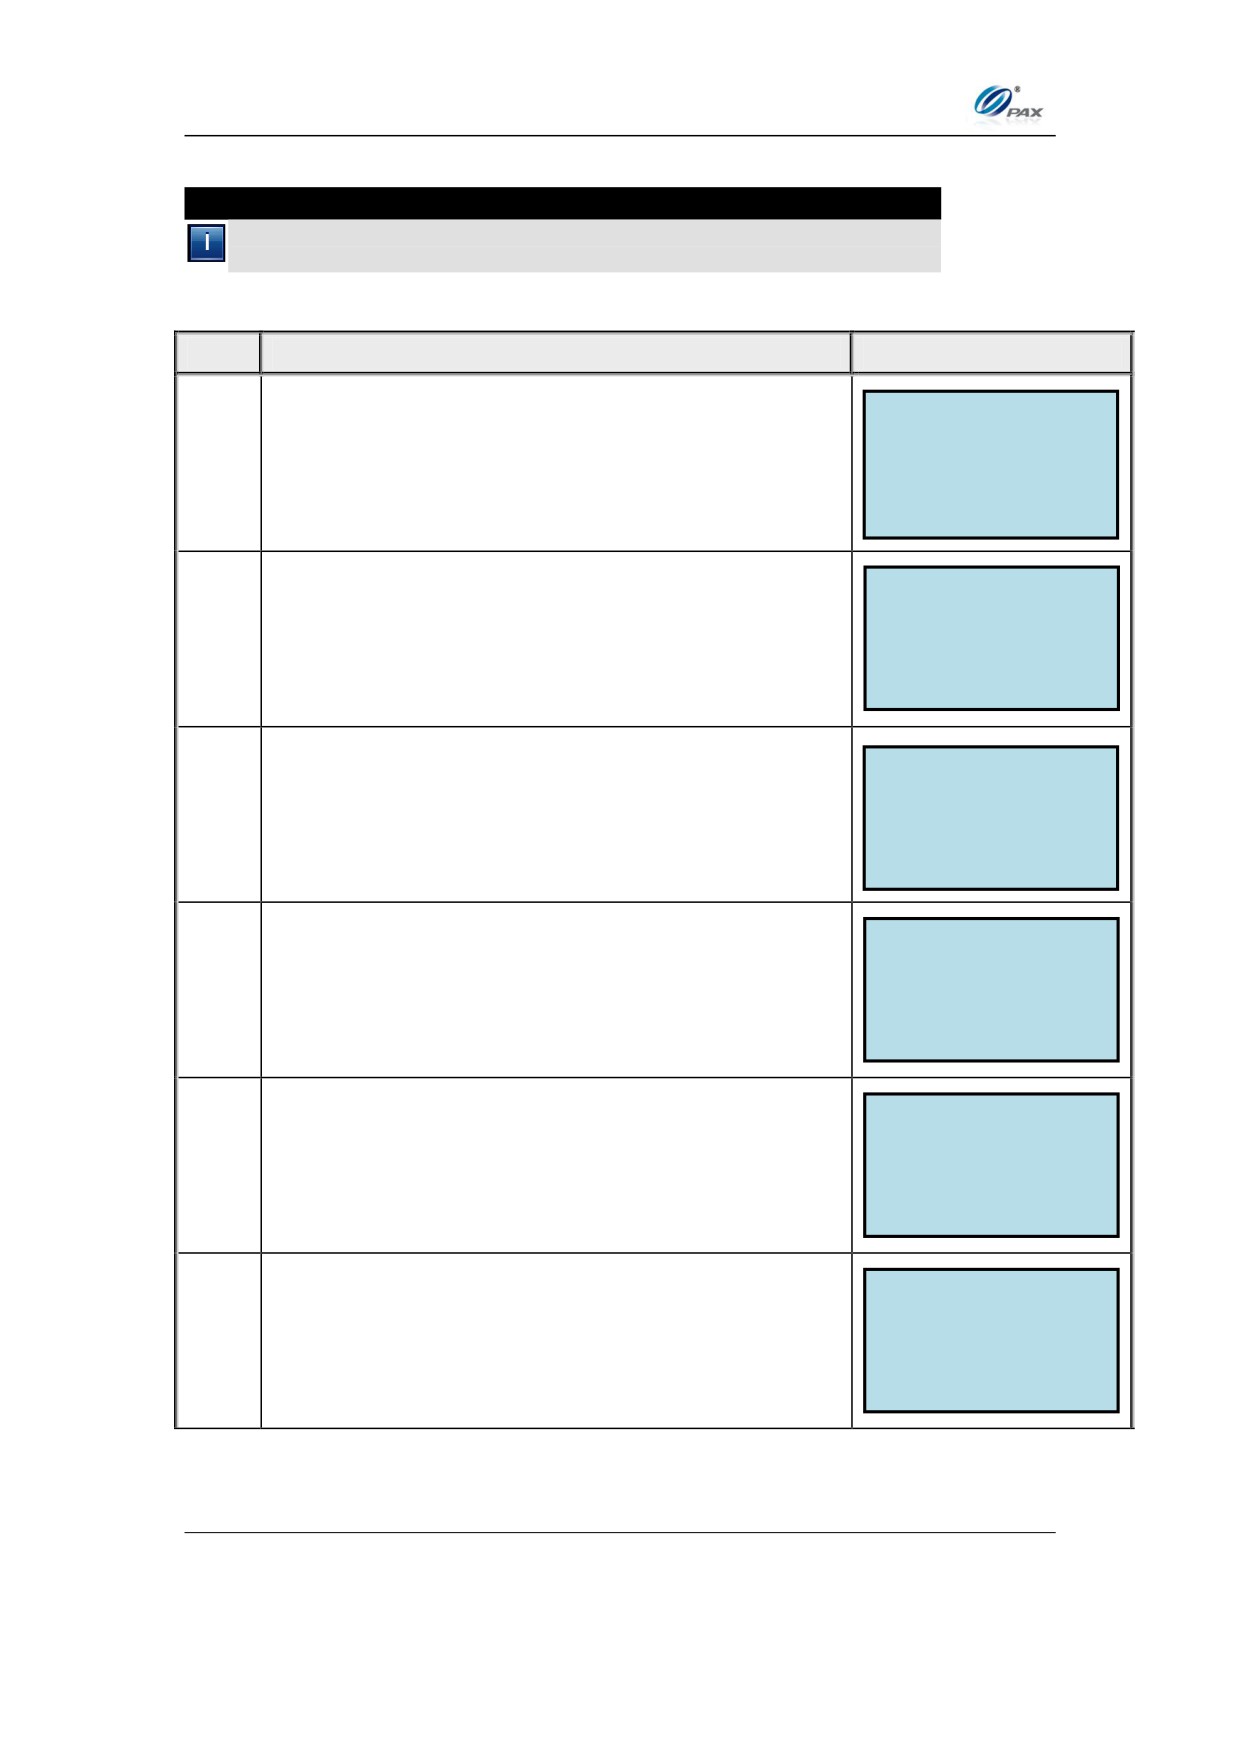
5.7.6.2 App Update
Note
Use this function to download new applications and parameters from
BroadPOS and/or the PAXTMS.
STEP
ACTION
DISPLAY
SYSTEM OPTIONS:
4. Database
From the System Settings menu, press [6] to
5. Key Injection
1.
Select the App Management.
6. App Management
7. TDES Key Injection
ENTER PASSWORD:
Input the Password and press [O]
2.
APP LOAD
1. Activate
Press [2] for App Update.
3.
2. App Update
3. Configuration
4. Terminal SN
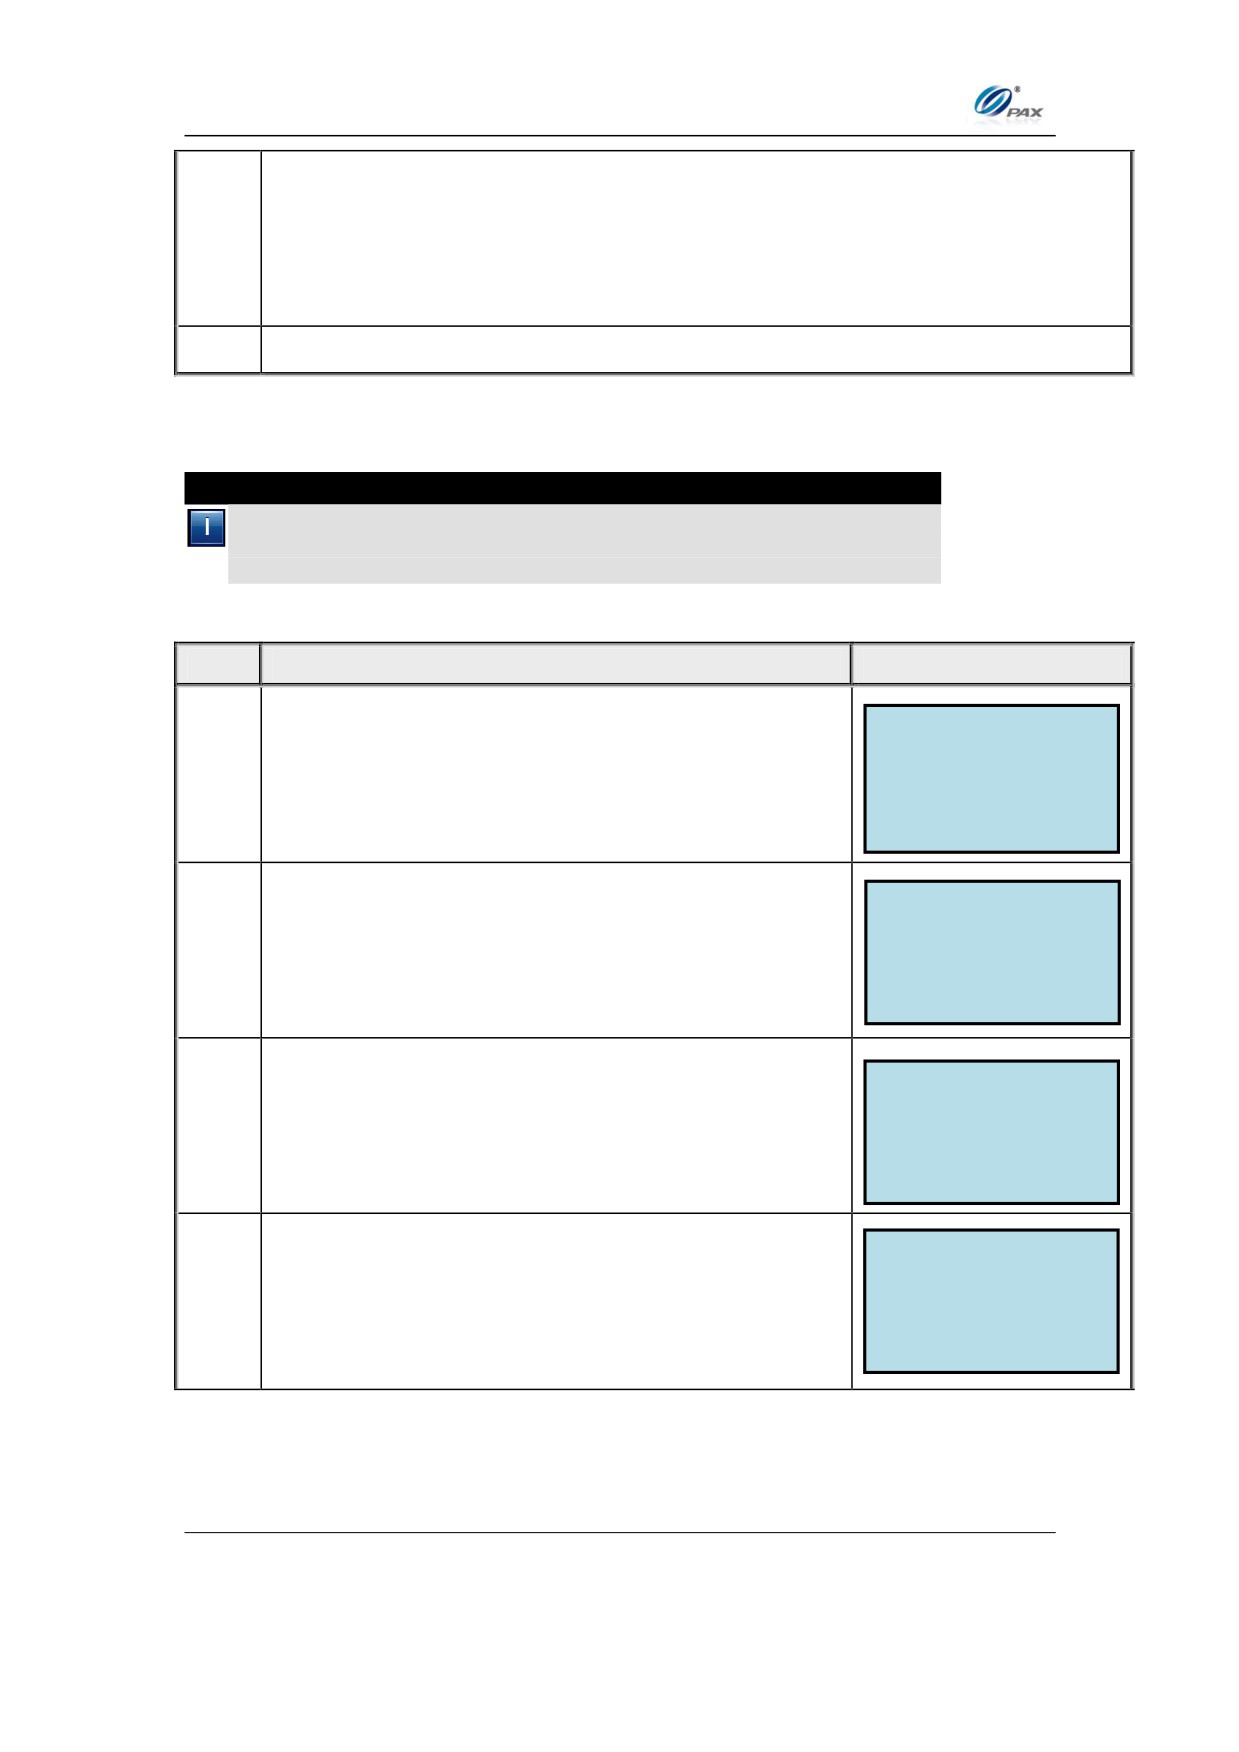
APP UPDATE
If there are transactions in the Batch the terminal
Trans remain in database
4.
will prompt the user to close the batch first.
please clear.
Terminal displays “Checking…” while checking if
Checking…
5.
there are available updates on the TMS.
If there is no available download, the Terminal
No Available DownLD.
displays “No Available DownLD”.
6.
95
Chapter 5
PAX D200 Menu Options
If there is a download available, the Terminal automatically starts the
download process; and displays “Downloading…” with the download
7.
progress percentage.
After finish downloading, the terminal displays “Success” and will reboot.
8.
Stop.
5.7.6.3 Configuration
Note
The configuration option allows you control of the type of TMS the
terminal is going to use, as well as the correct communication
settings.
STEP
ACTION
DISPLAY
SYSTEM OPTIONS:
4. Database
From the System Settings menu, press [6] to
5. Key Injection
1.
Select the App Management.
6. App Management
7. TDES Key Injection
ENTER PASSWORD:
Input the Password and press [O]
2.
APP LOAD
1. Activate
Press [3] for Configuration.
3.
2. App Update
3. Configuration
4. Terminal SN
Press [1] to set Server URL and skip to Step 5.
CONFIGURATIONS
1. Server URL
Press [2] to set Server Port and skip to Step 6.
2. Server Port
4.
3. TMS Type
Press [3] To Choose the TMS Type.
96
Chapter 5
PAX D200 Menu Options
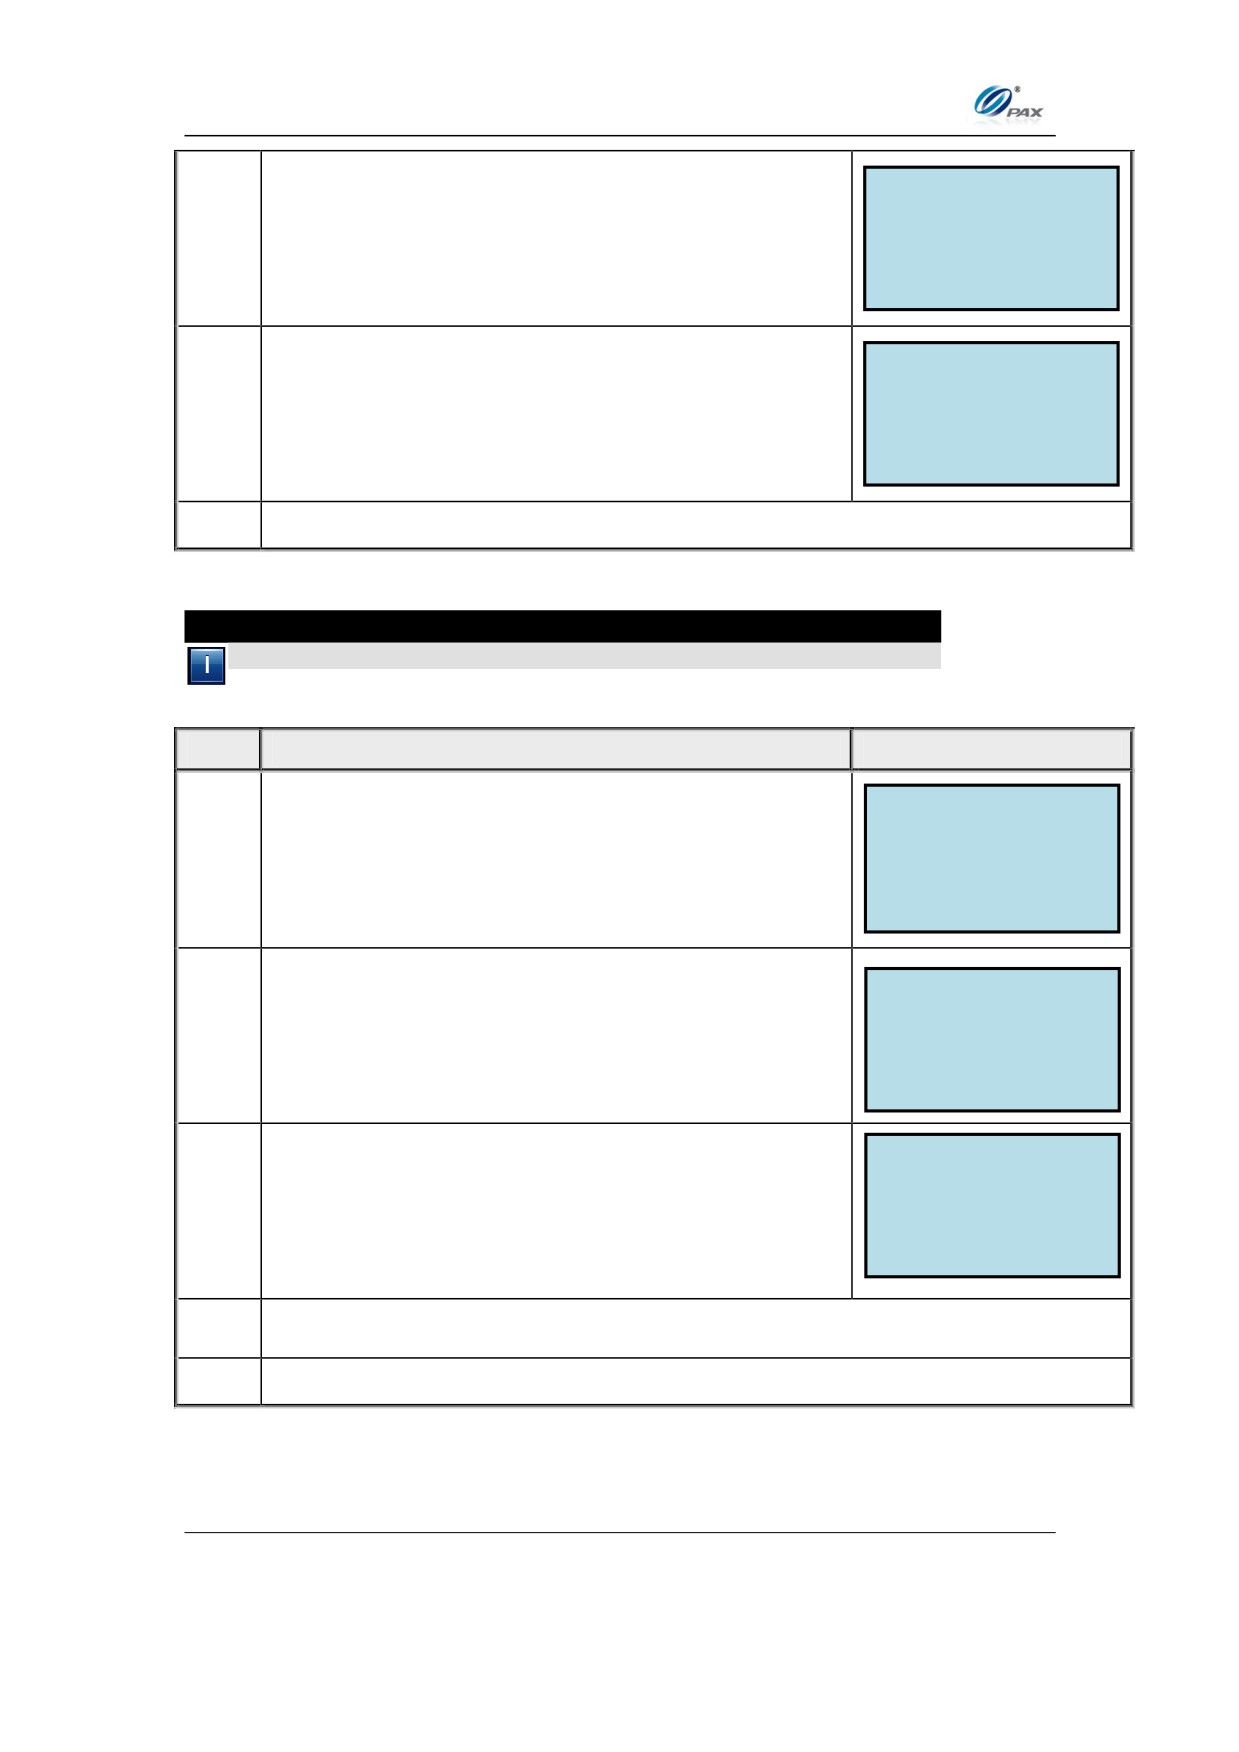
SERVER URL
Set Server URL and press [O].
▋
5.
SERVER PORT
Set Server Port and press [O].
▋
6.
7.
Stop.
5.7.6.4 Terminal SN
Note
This function displays the SN and other information of the terminal.
STEP
ACTION
DISPLAY
SYSTEM OPTIONS:
4. Database
From the System Settings menu, press [6] to
5. Key Injection
1.
6. App Management
Select the App Management.
7. TDES Key Injection
ENTER PASSWORD:
Input the Password and press [O]
2.
APP LOAD
1. Activate
Press [4] for Terminal SN.
2. App Update
3.
3. Configuration
4. Terminal SN
4.
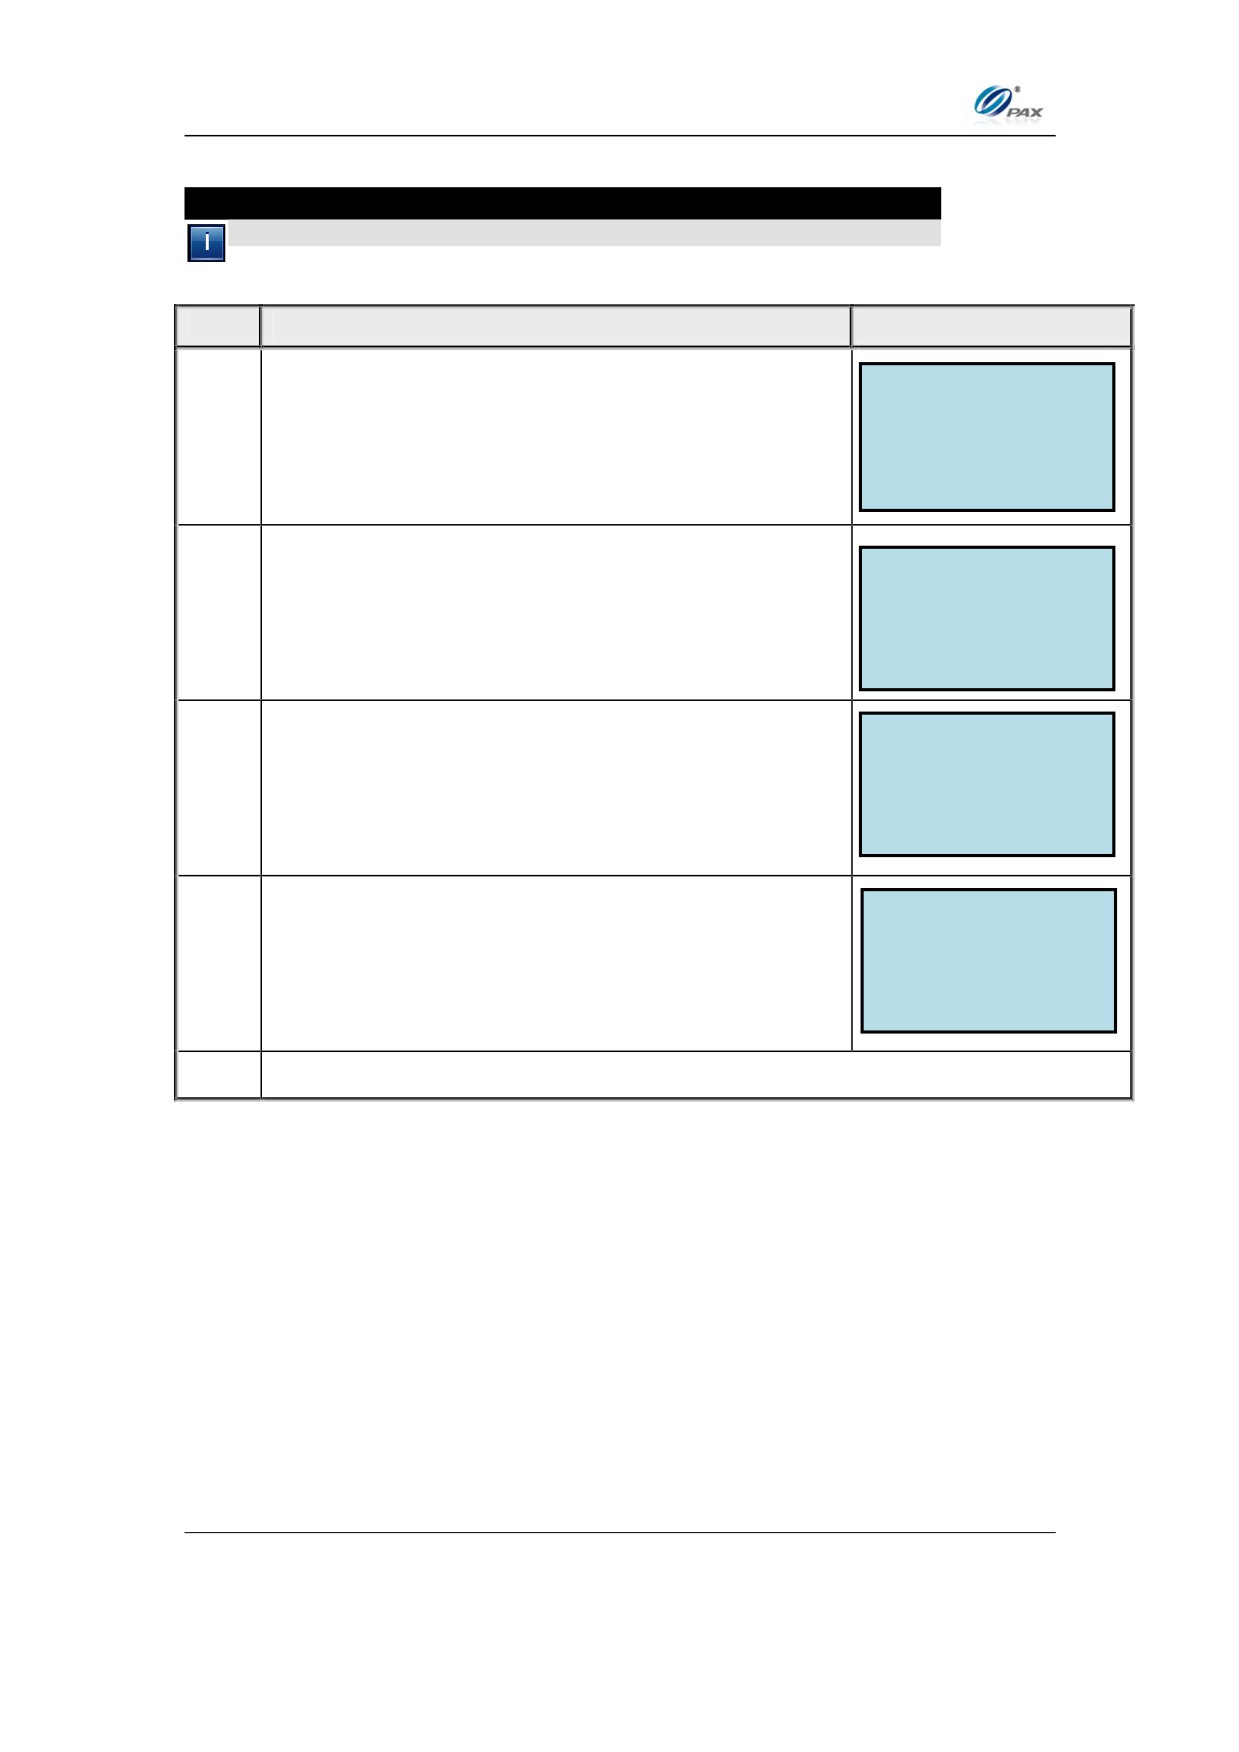
Screen displays the SN and other information of the terminal.
5.
Stop.
97
Chapter 5
PAX D200 Menu Options
5.7.7 TDES Key Injection
Note
This menu option allows you to input the TDES Key(s)
STEP
ACTION
DISPLAY
SYSTEM OPTIONS:
4. Database
From the System Settings menu, press [7] to
5. Key Injection
1.
Select the App Management.
6. App Management
7. TDES Key Injection
ENTER PASSWORD:
Input the Password and press [O]
2.
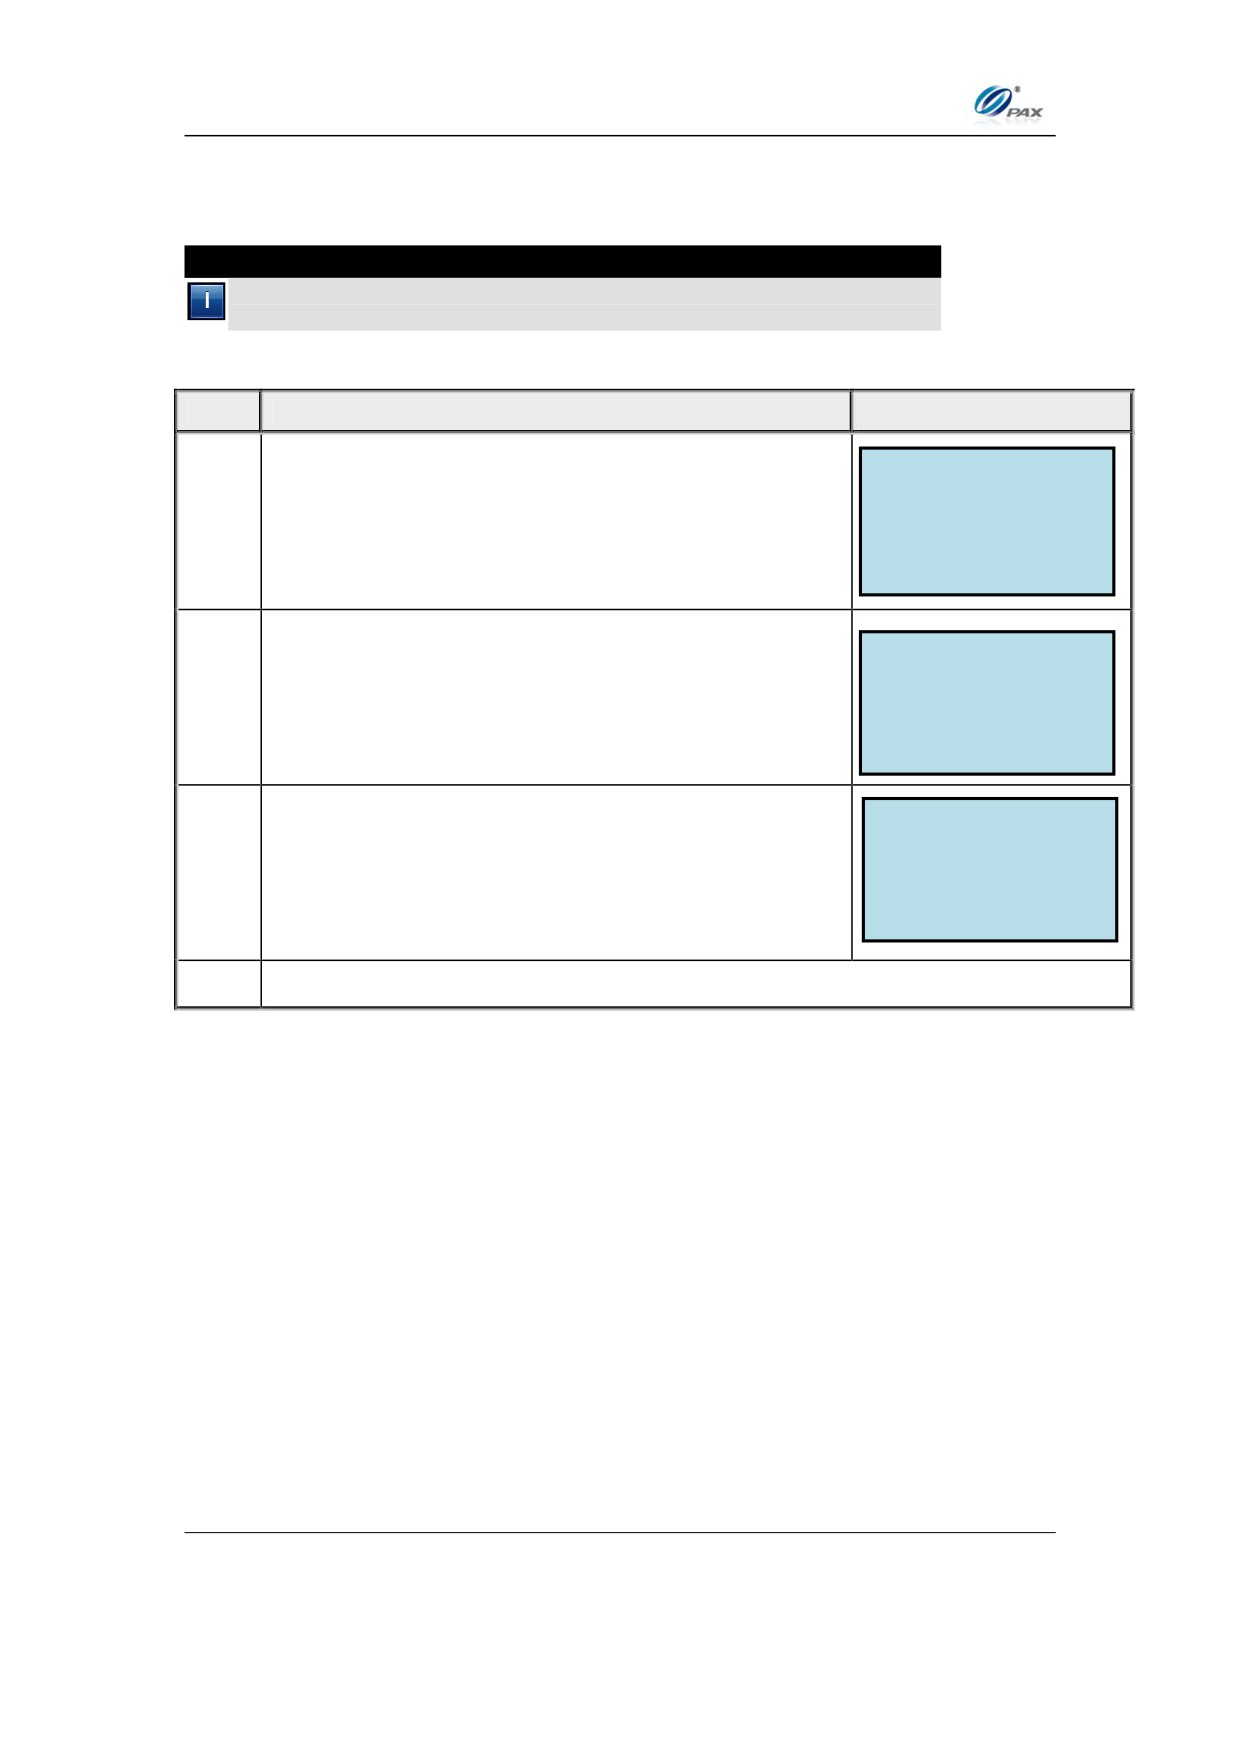
SELECT KEY LEN:
1. 8
Select Key Length and press [O].
2. 16
3.
3. 24
ENTER KEY(HEX):
Input the correct key in hexadecimal format and
|
4.
press [O].
5.
Stop.
98
Chapter 5
PAX D200 Menu Options
5.7.8 POS Register
Note
This option allows the terminal to store its IP address and S/N
information for later retrieval by a POS System.
STEP
ACTION
DISPLAY
SYSTEM OPTIONS:
5. Key Injection
From the System Settings menu, press [8] to
6. App Management
1.
Select the App Management.
7. TDES Key Injection
8. POS Register
ENTER PASSWORD:
Input the Password and press [O]
2.
POS Register
Terminal will connect to the network, connect to the
Processing
3.
server and upload the information.
5.
Stop.
99
Chapter 5
PAX D200 Menu Options
5.8 Communications
This Menu has following sub-menus pertaining to communication. These
parameters affect communications during authorization and batching only.
The following features are part of the Communication Menu:
Main Communication
Backup Comm
Maximum Tries
Connect Timeout
MENU
Receive Timeout
DESCRIPTION
Wireless Parameters
Wi-Fi Parameters
Bluetooth
ECR Communications Type
5.8.1 Main Communication
Note
Use this feature to set the main method of communication. If a method
of communication not supported by the terminal is selected, the error
message “NOT AVAILABLE” is displayed.
STEP
ACTION
DISPLAY
COMM. OPTIONS:
1. Main Communication
From the Communication Options menu press [1]
2. Backup Comm.
1.
3. Maximum Tries
for Main Communication.
4. Connect Timeout
Main Comm.:1
1. Wireless
Use the [F1] & [F2] keys to select the primary
2.
2. WiFi
communication type.
3.
Stop
100
Chapter 5
PAX D200 Menu Options
5.8.2 Backup Communication
Note
Use this feature to set the backup method of communication. If a
method of communication not supported by the terminal is selected,
the error message “NOT AVAILABLE” is displayed.
STEP
ACTION
DISPLAY
COMM. OPTIONS:
1. Main Communication
From the Communication Options menu press [2]
2. Backup Comm.
1.
3. Maximum Tries
for Backup Communication.
4. Connect Timeout
Default setting is [3] None.
Backup Comm:3
1. WiFi
Use the [F1] & [F2] keys to select the primary
2. Wireless
2.
communication type.
3. None
3.
Stop
101
Chapter 5
PAX D200 Menu Options
5.8.3 Maximum Tries
Note
Use this feature to set the maximum number of times the terminal will
attempt to use the primary communication before failing over to the
backup.
STEP
ACTION
DISPLAY
COMM. OPTIONS:
1. Main Communication
From the Communication Options menu press [3]
2. Backup Comm.
1.
3. Maximum Tries
for Maximum Tries.
4. Connect Timeout
_____________________
The terminal displays the current setting.
Max Tries
2.
1
Input the New tries # and press [O]
3.
Stop
102
Chapter 5
PAX D200 Menu Options
5.8.4 Connect Timeout
Note
Use this feature to set the timeout for connection. This option is the
number of MS the terminal will wait before failing over to the backup
communication method.
STEP
ACTION
DISPLAY
COMM. OPTIONS:
1. Main Communication
From the Communication Options menu press [4]
2. Backup Comm.
4.
3. Maximum Tries
for Connect Timeout.
4. Connect Timeout
_____________________
The terminal will display the current timeout setting.
Connect Timeout
5.
300
Input the New timeout and press [O]
6.
Stop
103
Chapter 5
PAX D200 Menu Options
5.8.5 Receive Timeout
Note
Use this feature to set the timeout for receiving messages from host.
STEP
ACTION
DISPLAY
COMM. OPTIONS:
2. Backup Comm.
From the Communication Options menu press [5]
3. Maximum Tries
7.
for Receive Timeout.
4. Connect Timeout
5. Receive Timeout
_____________________
Terminal displays the current timeout setting.
Receive Timeout
8.
450
Input the New timeout and press [O]
9.
Stop
104
Chapter 5
PAX D200 Menu Options
5.8.6 Wireless Parameters
6.
Note
All of the parameters that can be set for Wireless
(Cellular)
communication are sub-menus under the Wireless parameters
menu.
STEP
ACTION
DISPLAY
Comm. Options
4. Connect Timeout
From the Communication Options menu press [6]
5. Receive Timeout
1.
for Wireless Parameters.
6. Wireless Parameters
7. WiFi Parameters
Wireless Params:
. Use the [F1] & [F2] keys to find your selection and
1. APN
2. User Name
2.
then press [O]. Or Press the number corresponding
3. Password
with your selection.
4. Provision
5. IP Address
3.
Stop
5.8.6.1 APN
7.
Note
This option is used to configure your APN for the terminal. The
APN is required for GPRS terminals.
STEP
ACTION
DISPLAY
Comm. Options
4. Connect Timeout
From the Communication Options menu press [6]
5. Receive Timeout
1.
6. Wireless Parameters
for Wireless Parameters.
7. WiFi Parameters
105
Chapter 5
PAX D200 Menu Options
Wireless Params:
1. APN
2. User Name
2.
Press [1] to select APN, and then press [O].
3. Password
4. Provision
5. IP Address
APN:
telargo.t-mobile.com
3.
Input the APN if it is not correct and then press [O].
4.
Stop
5.8.6.2 User Name
8.
Note
This option is used to configure the User Name for the SIM card
(GPRS communications only). Most SIM cards do not require a
User Name.
STEP
ACTION
DISPLAY
Comm. Options
4. Connect Timeout
From the Communication Options menu press [6]
5. Receive Timeout
1.
for Wireless Parameters.
6. Wireless Parameters
7. WiFi Parameters
Wireless Params:
1. APN
2. User Name
2.
Press [2] to select APN, and then press [O].
3. Password
4. Provision
5. IP Address
User Name:
Input the User Name if it is not correct and then
3.
press [O].
4.
Stop
106
Chapter 5
PAX D200 Menu Options
5.8.6.3 Password
9.
Note
This option is used to configure the Password for the SIM card
(GPRS communications only). Most SIM cards do not require a
Password.
STEP
ACTION
DISPLAY
Comm. Options
4. Connect Timeout
From the Communication Options menu press [6]
5. Receive Timeout
1.
for Wireless Parameters.
6. Wireless Parameters
7. WiFi Parameters
Wireless Params:
1. APN
2. User Name
2.
Press [3] to select Password, and then press [O].
3. Password
4. Provision
5. IP Address
Password:
*********
3.
Input the APN if it is not correct and then press [O].
4.
Stop
107
Chapter 5
PAX D200 Menu Options
5.8.6.4 Provision
10. Note
This option is used to authenticate the terminal onto the Wireless
network, and only applies to CDMA terminals.
STEP
ACTION
DISPLAY
Comm. Options
4. Connect Timeout
From the Communication Options menu press [6]
5. Receive Timeout
1.
for Wireless Parameters.
6. Wireless Parameters
7. WiFi Parameters
Wireless Params:
1. APN
2. User Name
2.
Press [4] to select Provision, and then press [O].
3. Password
4. Provision
5. IP Address
The terminal will display Provisioning while it’s
3.
connecting to the network, and Programming
Provisioning...
Successful once complete.
4.
Stop
108
Chapter 5
PAX D200 Menu Options
5.8.6.5 IP Address
11. Note
This option is used to view the IP address the terminal is using on
the wireless network. This address should only be changed on the
advice of the cellular network provider.
STEP
ACTION
DISPLAY
Comm. Options
4. Connect Timeout
From the Communication Options menu press [6]
5. Receive Timeout
1.
6. Wireless Parameters
for Wireless Parameters.
7. WiFi Parameters
Wireless Params:
1. APN
2. User Name
2.
Press [5] to select IP Address, and then press [O].
3. Password
4. Provision
5. IP Address
_____________________
IP Address
The terminal will display its current IP address on
3.
000.000.000.000
screen.
4.
Stop
109
Chapter 5
PAX D200 Menu Options
5.8.6.6 Subnet Mask
12. Note
This option is used to view the Subnet Mask the terminal is using
on the wireless network. This should only be changed on the
advice of the cellular network provider.
STEP
ACTION
DISPLAY
Comm. Options
4. Connect Timeout
From the Communication Options menu press [6]
5. Receive Timeout
1.
for Wireless Parameters.
6. Wireless Parameters
7. WiFi Parameters
Wireless Params:
2. User Name
Press [6] to select Subnet mask, and then press
3. Password
2.
[O].
4. Provision
5. IP Address
6. Subnet Mask
_____________________
Subnet Mask
The terminal will display its current Subnet Mask on
3.
000.000.000.000
screen.
4.
Stop
110
Chapter 5
PAX D200 Menu Options
5.8.6.7 Gateway IP
13. Note
This option is used to view the IP address of the Gateway the
terminal is using on the wireless network. This should only be
changed on the advice of the cellular network provider.
STEP
ACTION
DISPLAY
Comm. Options
4. Connect Timeout
From the Communication Options menu press [6]
5. Receive Timeout
1.
for Wireless Parameters.
6. Wireless Parameters
7. WiFi Parameters
Wireless Params:
3. Password
4. Provision
2.
Press [7] to select Gateway IP, and then press [O].
5. IP Address
6. Subnet Mask
7. Gateway IP
_____________________
Gateway IP
The terminal will display its current IP address for
3.
000.000.000.000
the Gateway on screen.
4.
Stop
111
Chapter 5
PAX D200 Menu Options
5.8.6.8 DNS IP
14.
15. Note
This option is used to view the DNS IP address the terminal is
using on the wireless network. This should only be changed on the
advice of the cellular network provider.
STEP
ACTION
DISPLAY
Comm. Options
4. Connect Timeout
From the Communication Options menu press [6]
5. Receive Timeout
1.
6. Wireless Parameters
for Wireless Parameters.
7. WiFi Parameters
Wireless Params:
4. Provision
5. IP Address
2.
Press [8] to select DNS IP, and then press [O].
6. Subnet Mask
7. Gateway IP
8. DNS IP
_____________________
DNS IP
The terminal will display its current DNS IP on
3.
000.000.000.000
screen.
4.
Stop
112
Chapter 5
PAX D200 Menu Options
5.8.6.9 PING
16.
17. Note
PING is a diagnostic tool used to determine if the terminal is
connected to the wireless network, and the quality of that
connection. The URL defaults to a Google URL, but can be
changed to anything.
STEP
ACTION
DISPLAY
Comm. Options
4. Connect Timeout
From the Communication Options menu press [6]
5. Receive Timeout
1.
for Wireless Parameters.
6. Wireless Parameters
7. WiFi Parameters
Wireless Params:
5. IP Address
6. Subnet Mask
2.
Press [9] to select PING, and then press [O].
7. Gateway IP
8. DNS IP
9. PING
_____________________
The terminal will display the current URL on screen.
URL
3.
Press [X] to delete the current and input a different
URL if necessary, and then press [O].
Google.com:
The terminal will display the speed of the packets
Ping ok 54ms
Ping ok 173ms
4.
return and will continue to ping until the [X] is
Ping Failed
pressed.
Ping ok 123ms
5.
Stop
113
Chapter 5
PAX D200 Menu Options
5.8.7 WiFi Parameters
18. Note
All of the parameters that can be set for WiFi communication are
sub-menus under the WiFi parameters menu.
STEP
ACTION
DISPLAY
Comm. Options
4. Connect Timeout
From the Communication Options menu press [7]
5. Receive Timeout
1.
for WiFi Parameters.
6. Wireless Parameters
7. WiFi Parameters
WiFi Params:
. Use the [F1] & [F2] keys to find your selection and
1. SSID
2. Security
2.
then press [O]. Or Press the number corresponding
3. Password
with your selection.
4. DHCP Type
5. IP Address
3.
Stop
114
Chapter 5
PAX D200 Menu Options
5.8.7.1 SSID
19.
20. Note
This option is used to view/set the SSID for the WiFi network the
terminal will be connecting to.
STEP
ACTION
DISPLAY
Comm. Options
4. Connect Timeout
From the Communication Options menu press [7]
5. Receive Timeout
1.
6. Wireless Parameters
for WiFi Parameters.
7. WiFi Parameters
WiFi Params:
1. SSID
2. Security
2.
Press [1] to select SSID, and then press [O].
3. Password
4. DHCP Type
5. IP Address
_____________________
SSID
The terminal will display the SSID of the network it’s
3.
network_name
currently connected to.
___________________
__
4.
Stop
115
Chapter 5
PAX D200 Menu Options
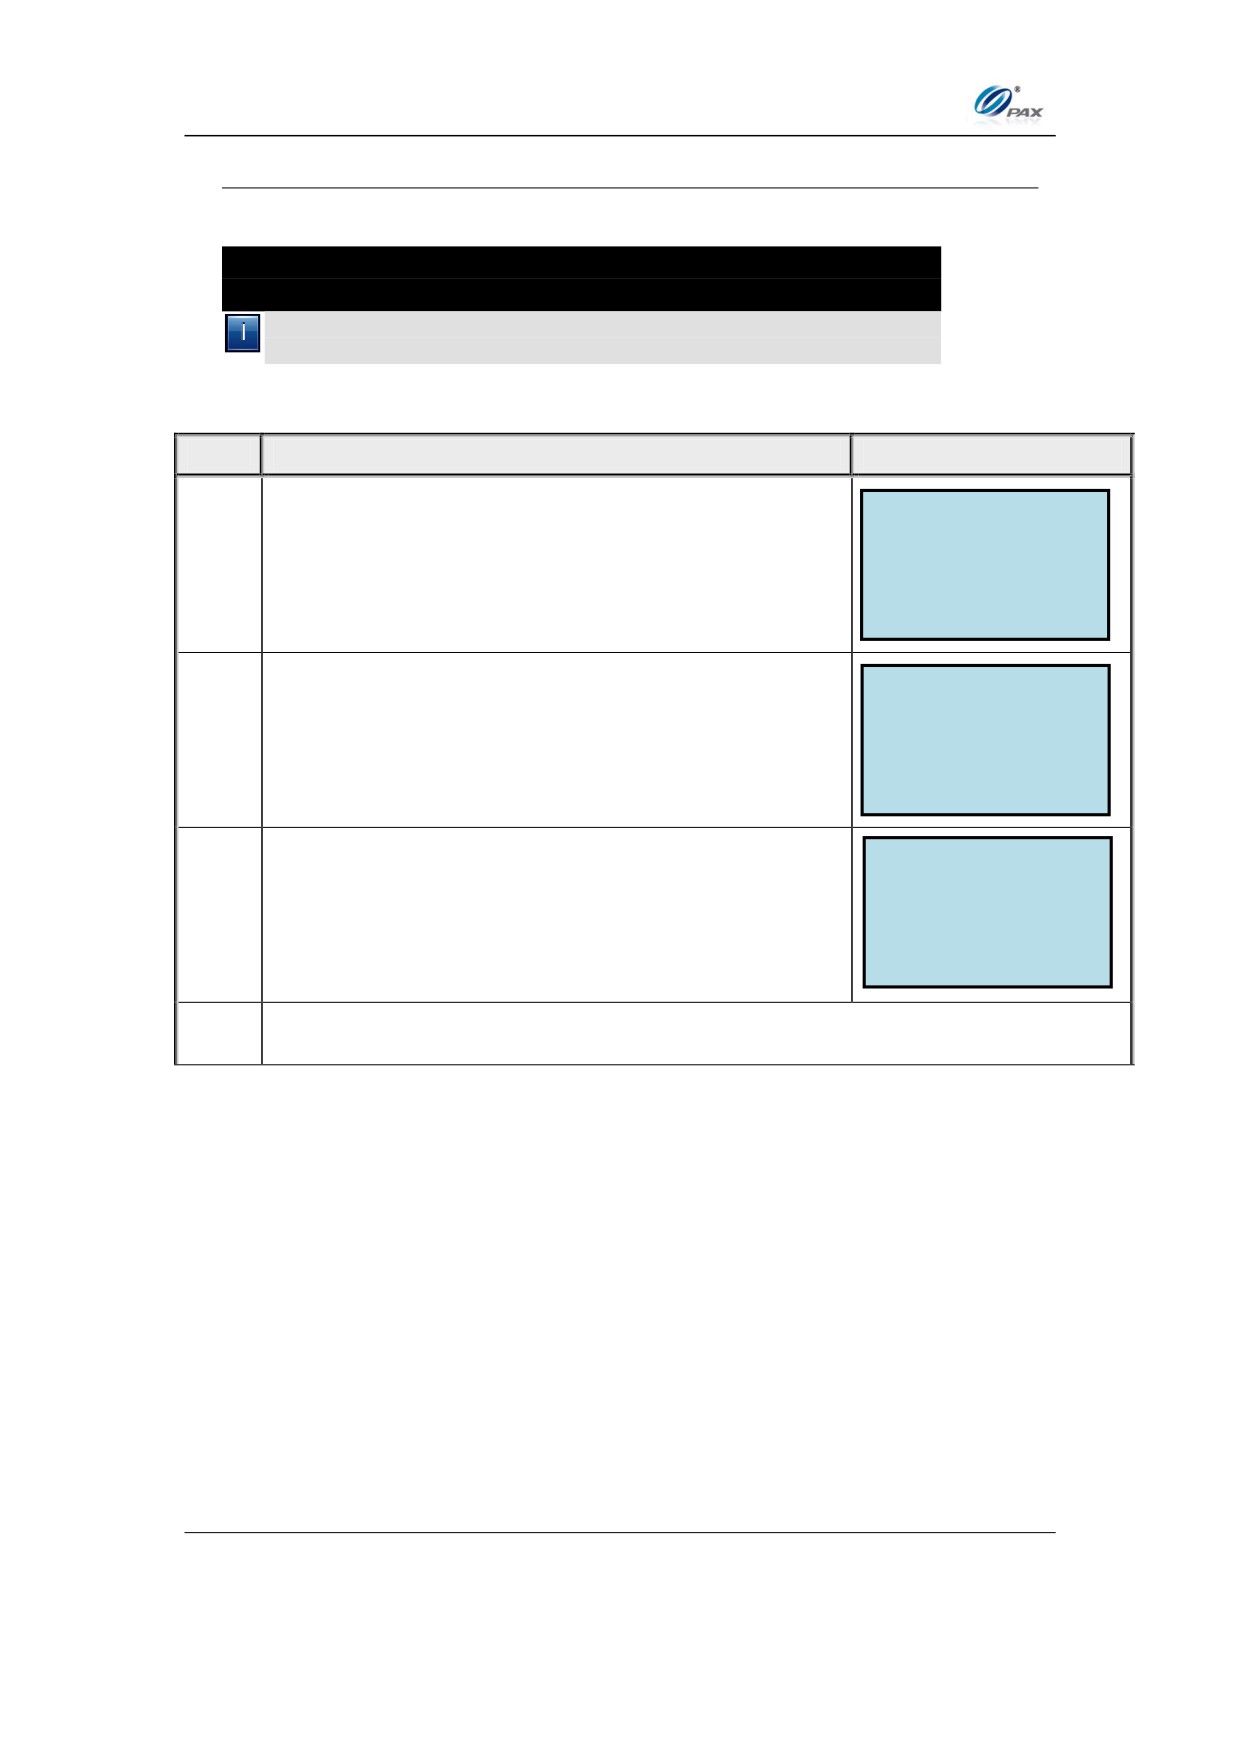
5.8.7.2 Security
21.
22. Note
This option is used to view/set the Security type for the WiFi
network the terminal will be connecting to.
STEP
ACTION
DISPLAY
Comm. Options
4. Connect Timeout
From the Communication Options menu press [7]
5. Receive Timeout
1.
6. Wireless Parameters
for WiFi Parameters.
7. WiFi Parameters
WiFi Params:
1. SSID
2. Security
2.
Press [2] to select Security, and then press [O].
3. Password
4. DHCP Type
5. IP Address
Security Type: 5
1. None
Select the proper option for the network you are
2. WEP-64
3.
3. WEP-128
connecting to and press [O].
4. WPA-TKIP
5. WPA2-AES
4.
Stop
116
Chapter 5
PAX D200 Menu Options
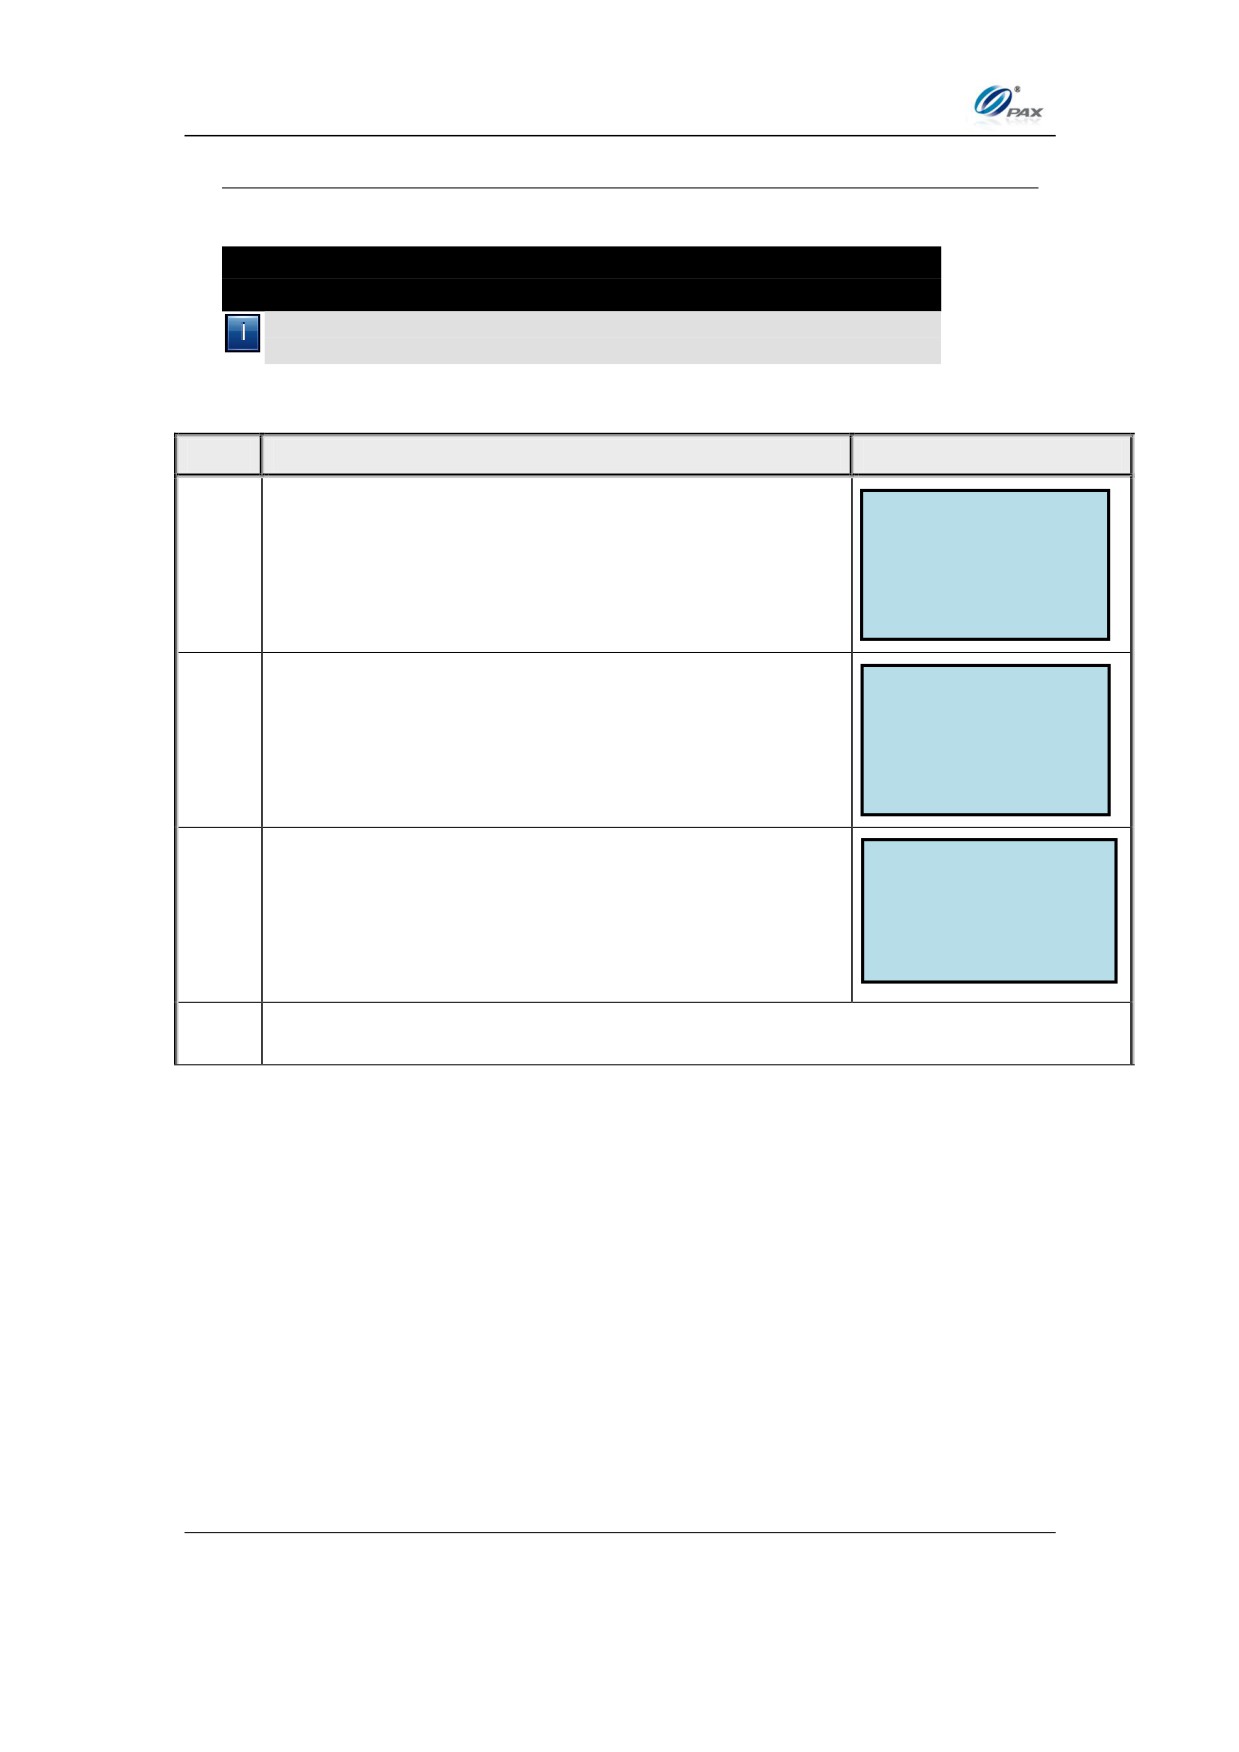
5.8.7.3 Password
23.
24. Note
This option is used to view/set the Password for the WiFi network
the terminal will be connecting to.
STEP
ACTION
DISPLAY
Comm. Options
4. Connect Timeout
From the Communication Options menu press [7]
5. Receive Timeout
1.
6. Wireless Parameters
for WiFi Parameters.
7. WiFi Parameters
WiFi Params:
1. SSID
2. Security
2.
Press [3] to select Password, and then press [O].
3. Password
4. DHCP Type
5. IP Address
_____________________
Review the password, if it is incorrect, press the [X]
Password
button to clear the old password out and use the
3.
secure_P@55word
keypad to input the correct password, then press
___________________
[O]
__
4.
Stop
117
Chapter 5
PAX D200 Menu Options
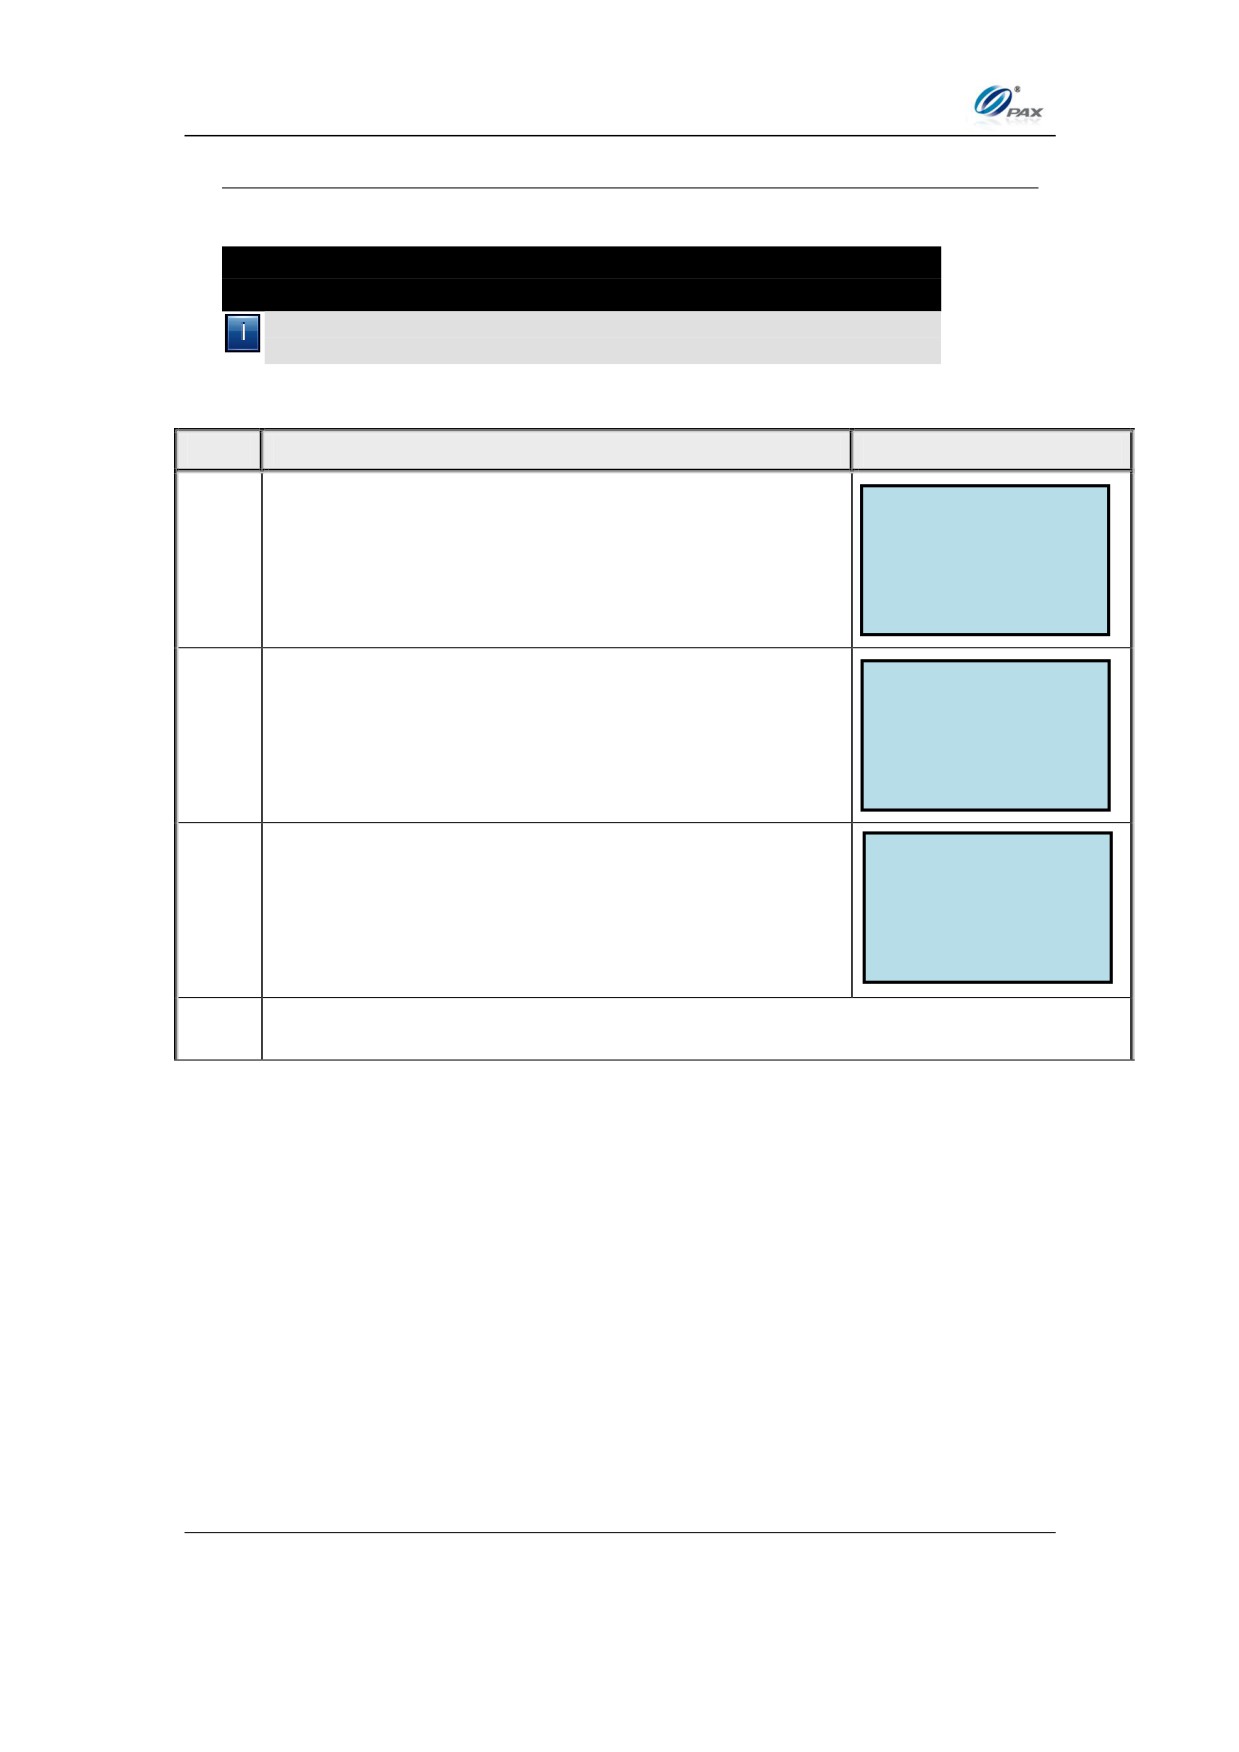
5.8.7.4 DHCP Type
25.
26. Note
This option is used to set how IP addresses are handled on the
network the terminal will be connecting to.
STEP
ACTION
DISPLAY
Comm. Options
4. Connect Timeout
From the Communication Options menu press [7]
5. Receive Timeout
1.
6. Wireless Parameters
for WiFi Parameters.
7. WiFi Parameters
WiFi Params:
1. SSID
2. Security
2.
Press [4] to select DHCP Type, and then press [O].
3. Password
4. DHCP Type
5. IP Address
DHCP Type: 1
1. Static
Select the proper option for the network you are
2. DHCP
3.
connecting to and press [O].
4.
Stop
118
Chapter 5
PAX D200 Menu Options
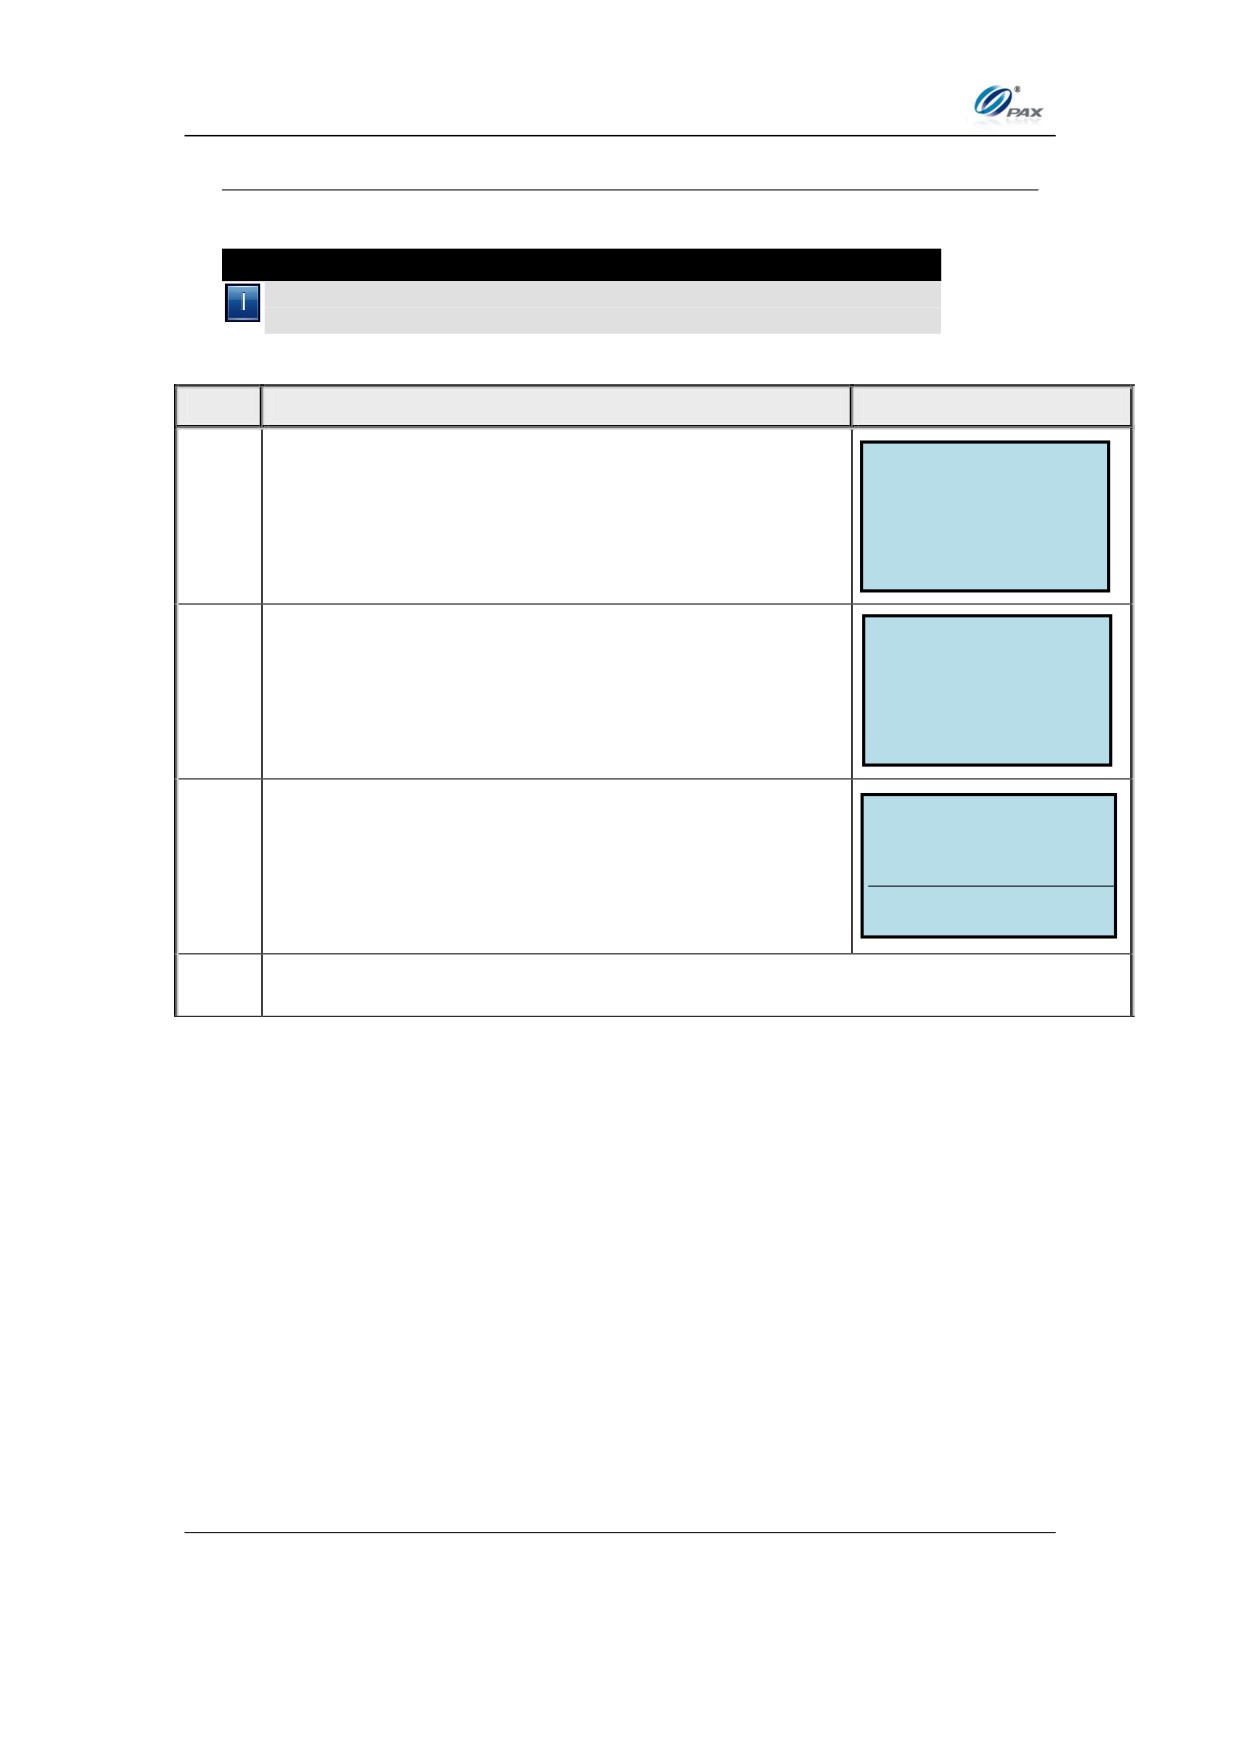
5.8.7.5 IP Address
27. Note
This option is used to view/set the IP address the terminal is
using on the WiFi network.
STEP
ACTION
DISPLAY
Comm. Options
4. Connect Timeout
From the Communication Options menu press [7]
5. Receive Timeout
1.
6. Wireless Parameters
for WiFi Parameters.
7. WiFi Parameters
WiFi Params:
1. SSID
2. Security
2.
Press [5] to select IP Address, and then press [O].
3. Password
4. DHCP Type
5. IP Address
The terminal will display its current IP address on
_____________________
IP Address
screen. If a change is necessary, clear the IP
3.
000.000.000.000
address using [X] and input the correct values, then
press [O].
4.
Stop
119
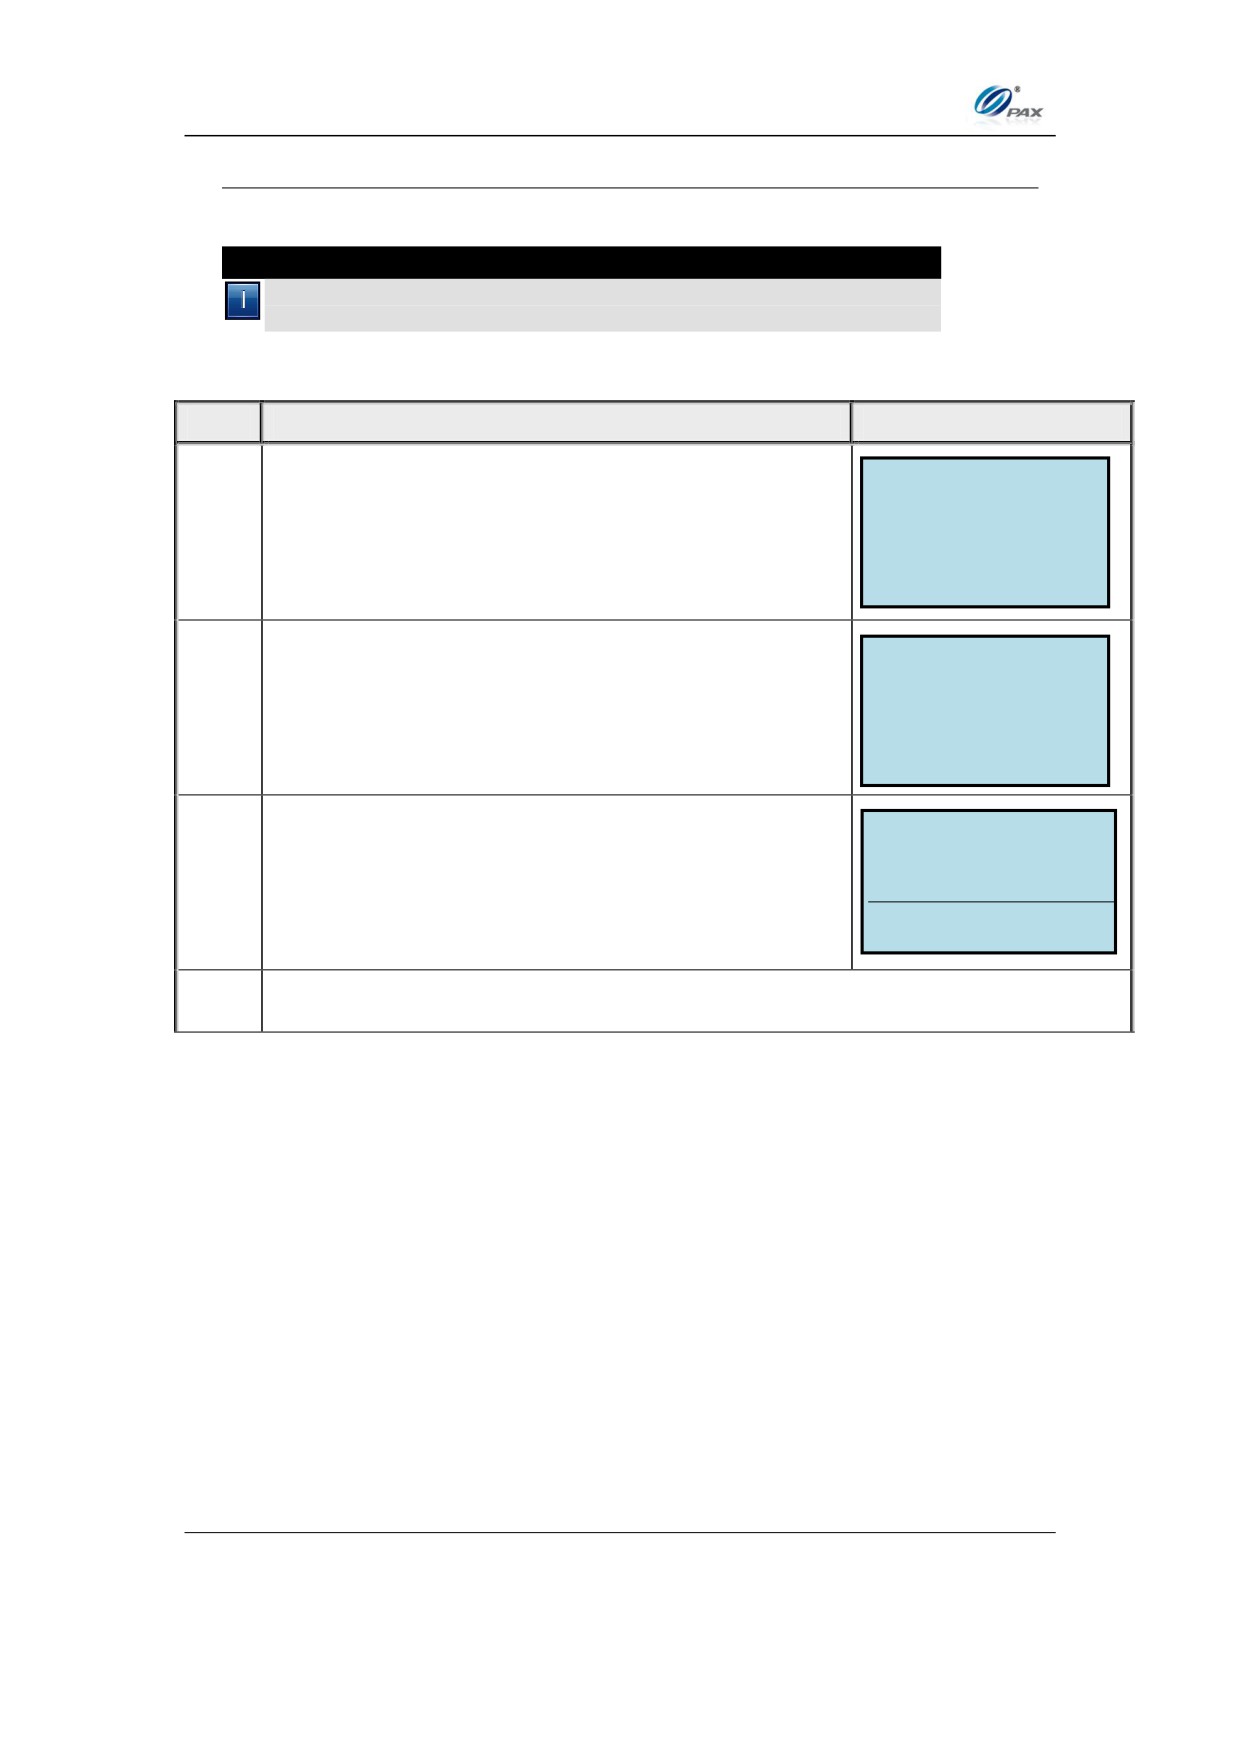
Chapter 5
PAX D200 Menu Options
5.8.7.6 Subnet Mask
28. Note
This option is used to view/set the Subnet Mask the terminal is
using on the WiFi network.
STEP
ACTION
DISPLAY
Comm. Options
4. Connect Timeout
From the Communication Options menu press [7]
5. Receive Timeout
1.
for WiFi Parameters.
6. Wireless Parameters
7. WiFi Parameters
WiFi Params:
2. User Name
Press [6] to select Subnet mask, and then press
3. Password
2.
[O].
4. DHCP Type
5. IP Address
6. Subnet Mask
The terminal will display its current Subnet Mask on
_____________________
Subnet Mask
screen. If a change is necessary, clear the Subnet
3.
000.000.000.000
Mask using [X] and input the correct values, then
press [O].
4.
Stop
120
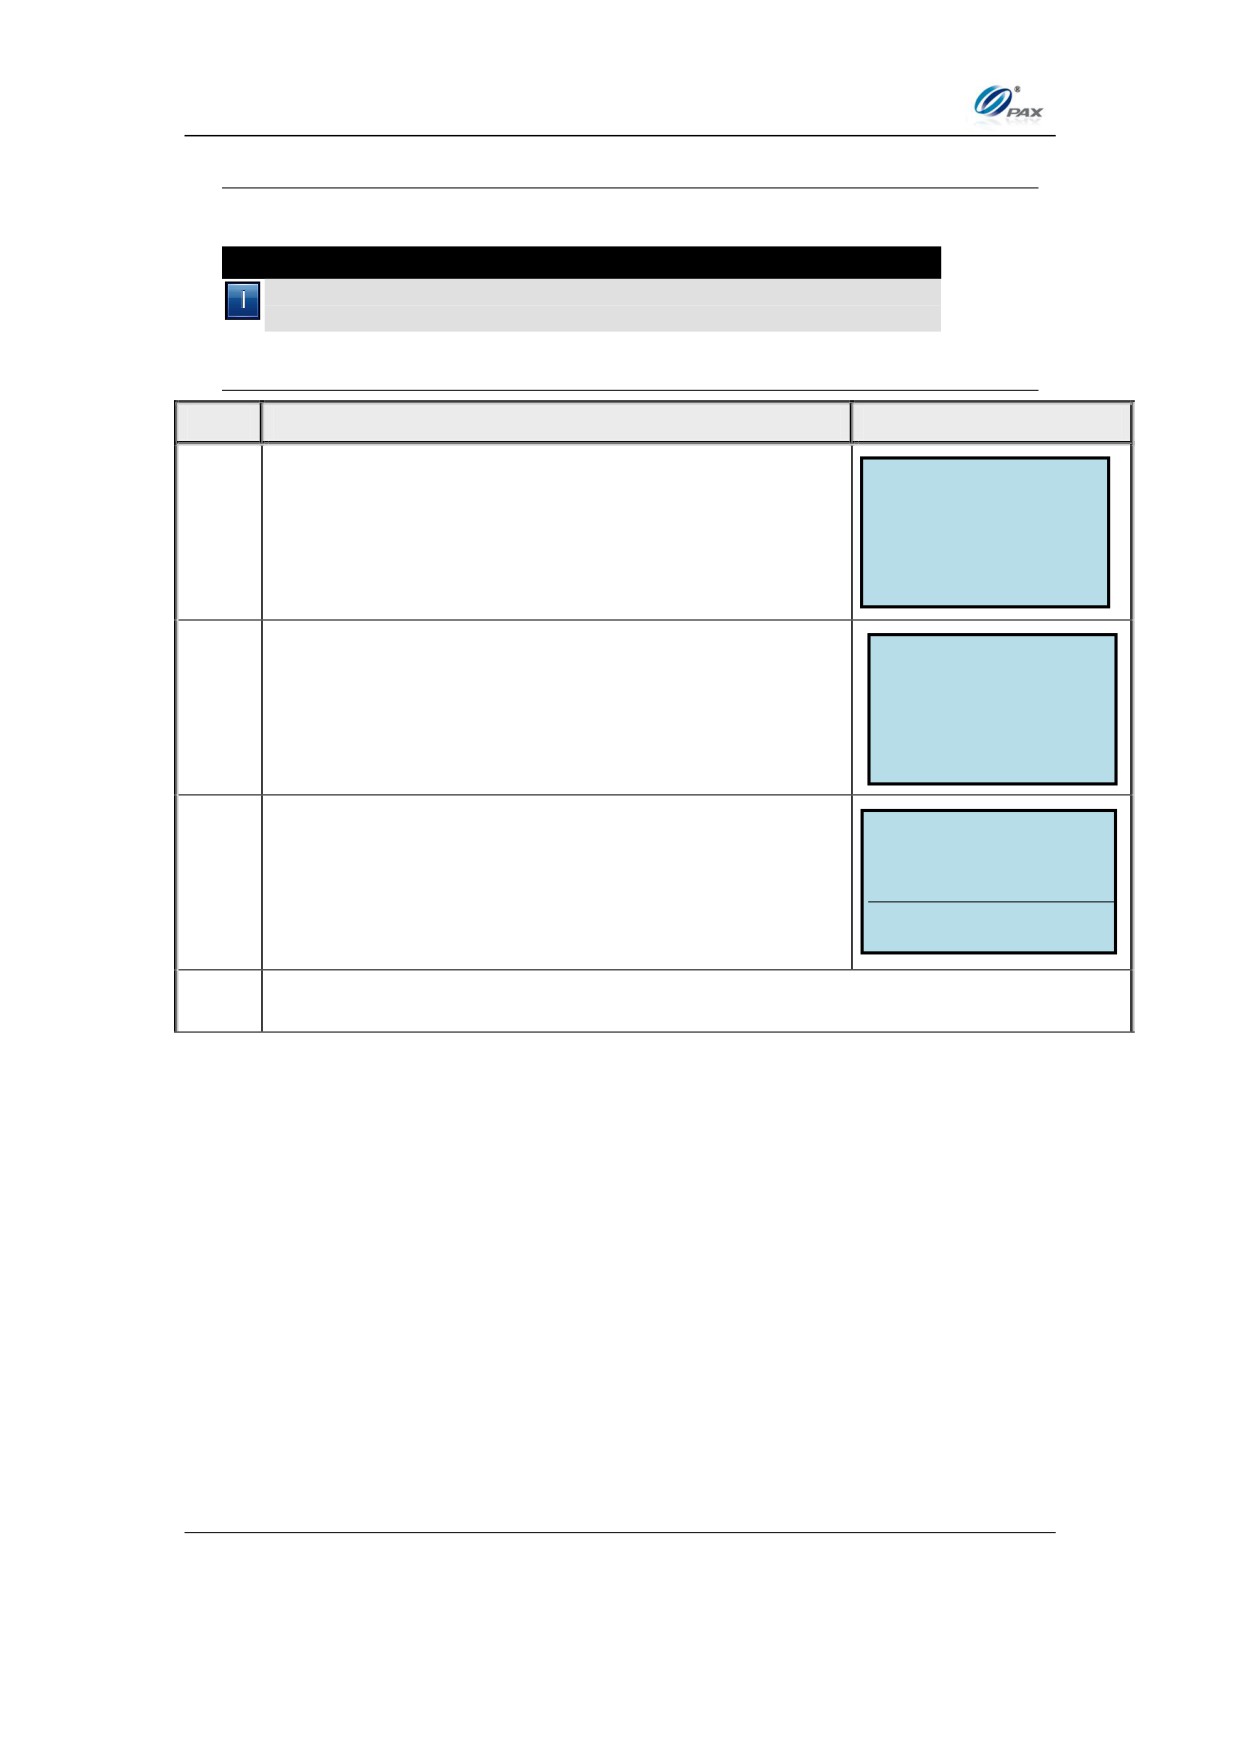
Chapter 5
PAX D200 Menu Options
5.8.7.7 Gateway IP
29. Note
This option is used to view the IP address of the Gateway the
terminal is connected to on the WiFi network.
STEP
ACTION
DISPLAY
Comm. Options
4. Connect Timeout
From the Communication Options menu press [7]
5. Receive Timeout
1.
for WiFi Parameters.
6. Wireless Parameters
7. WiFi Parameters
WiFi Params:
3. Password
4. DHCP Type
2.
Press [7] to select Gateway IP, and then press [O].
5. IP Address
6. Subnet Mask
7, Gateway IP
The terminal will display its current Gateway IP
_____________________
Gateway IP
Address on screen. If a change is necessary, clear
3.
000.000.000.000
the current Gateway IP using [X] and input the
correct values, then press [O].
4.
Stop
121
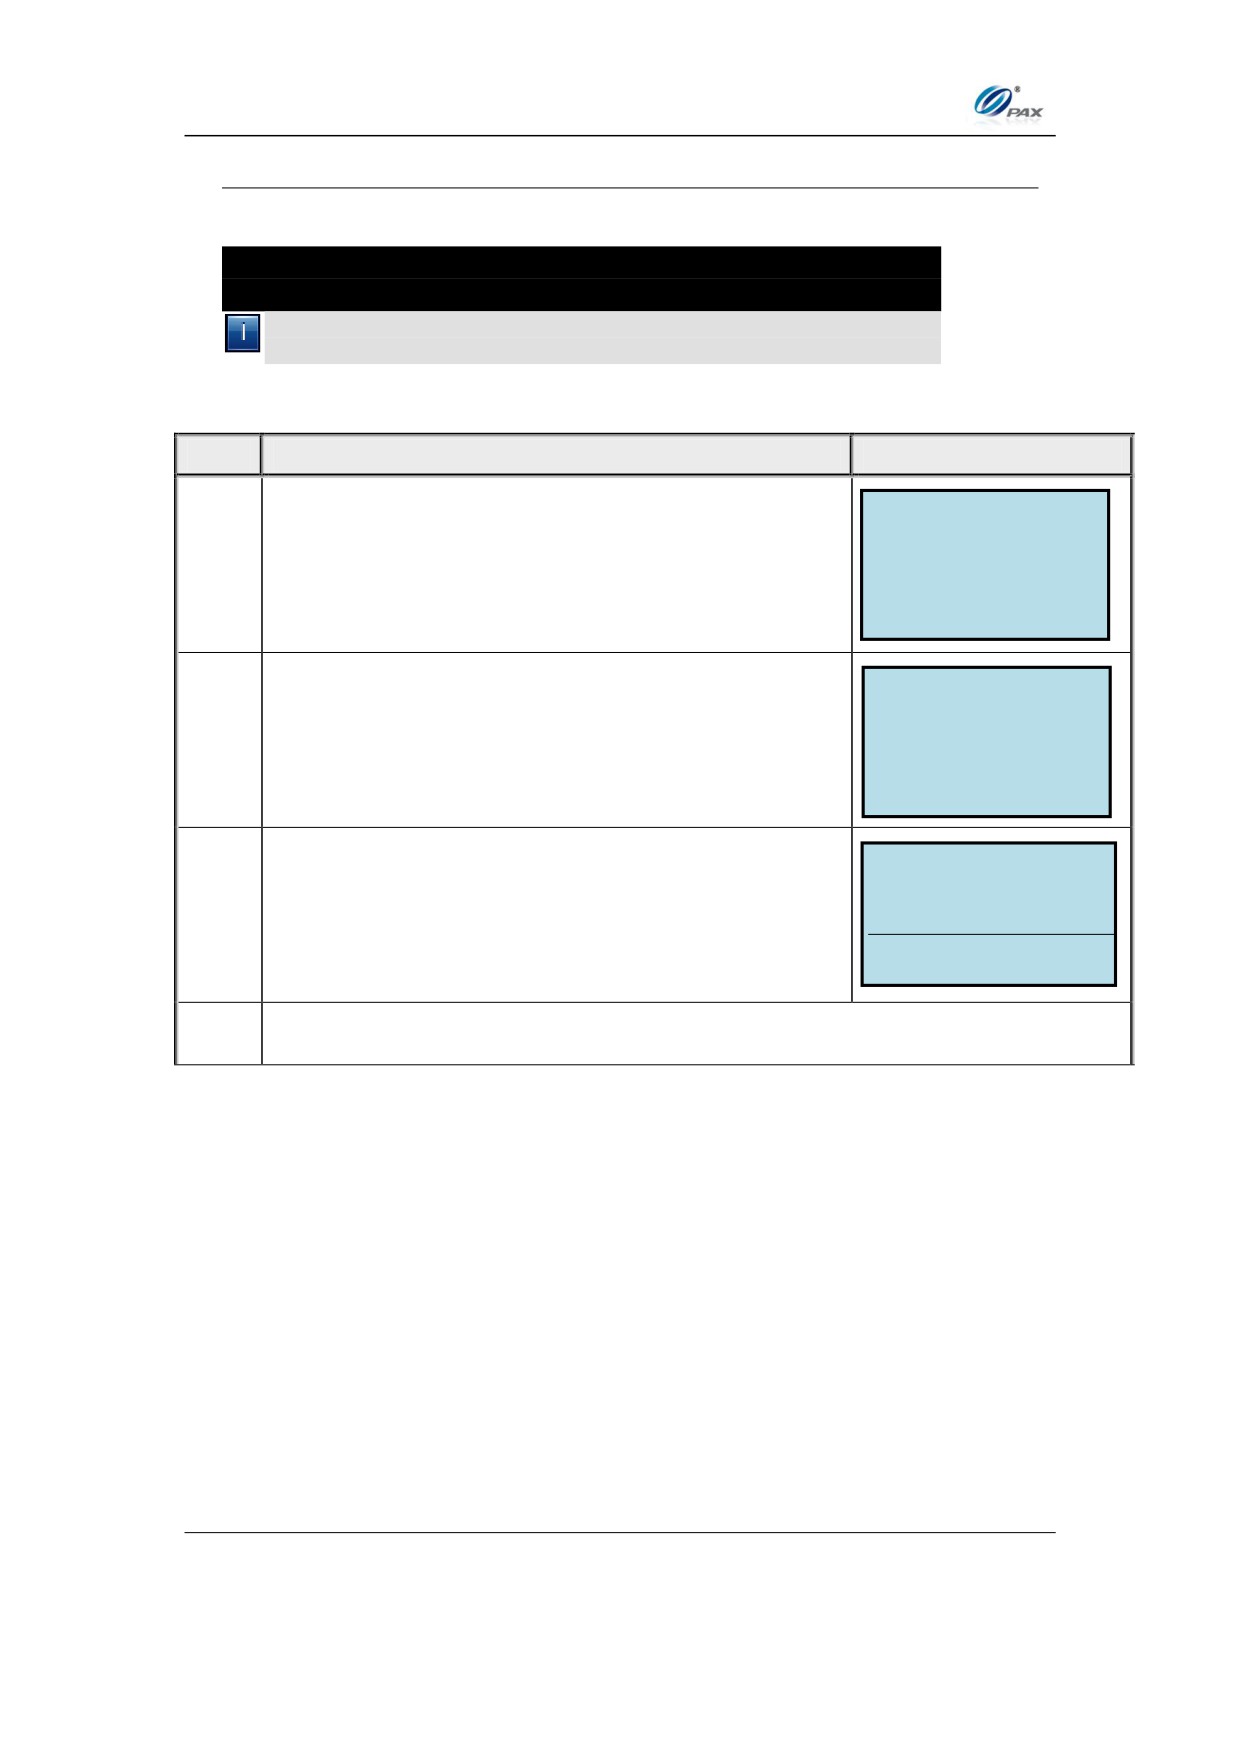
Chapter 5
PAX D200 Menu Options
5.8.7.8 DNS IP
30.
31. Note
This option is used to view the DNS IP address the terminal is
using on the WiFi network.
STEP
ACTION
DISPLAY
Comm. Options
4. Connect Timeout
From the Communication Options menu press [7]
5. Receive Timeout
1.
6. Wireless Parameters
for WiFi Parameters.
7. WiFi Parameters
WiFi Params:
4. DHCP Type
5. IP Address
2.
Press [8] to select DNS IP, and then press [O].
6. Subnet Mask
7. Gateway IP
8. DNS IP
The terminal will display its current DNS IP Address
_____________________
DNS IP
on screen. If a change is necessary, clear the
3.
000.000.000.000
current DNS IP using [X] and input the correct
values, then press [O].
4.
Stop
122
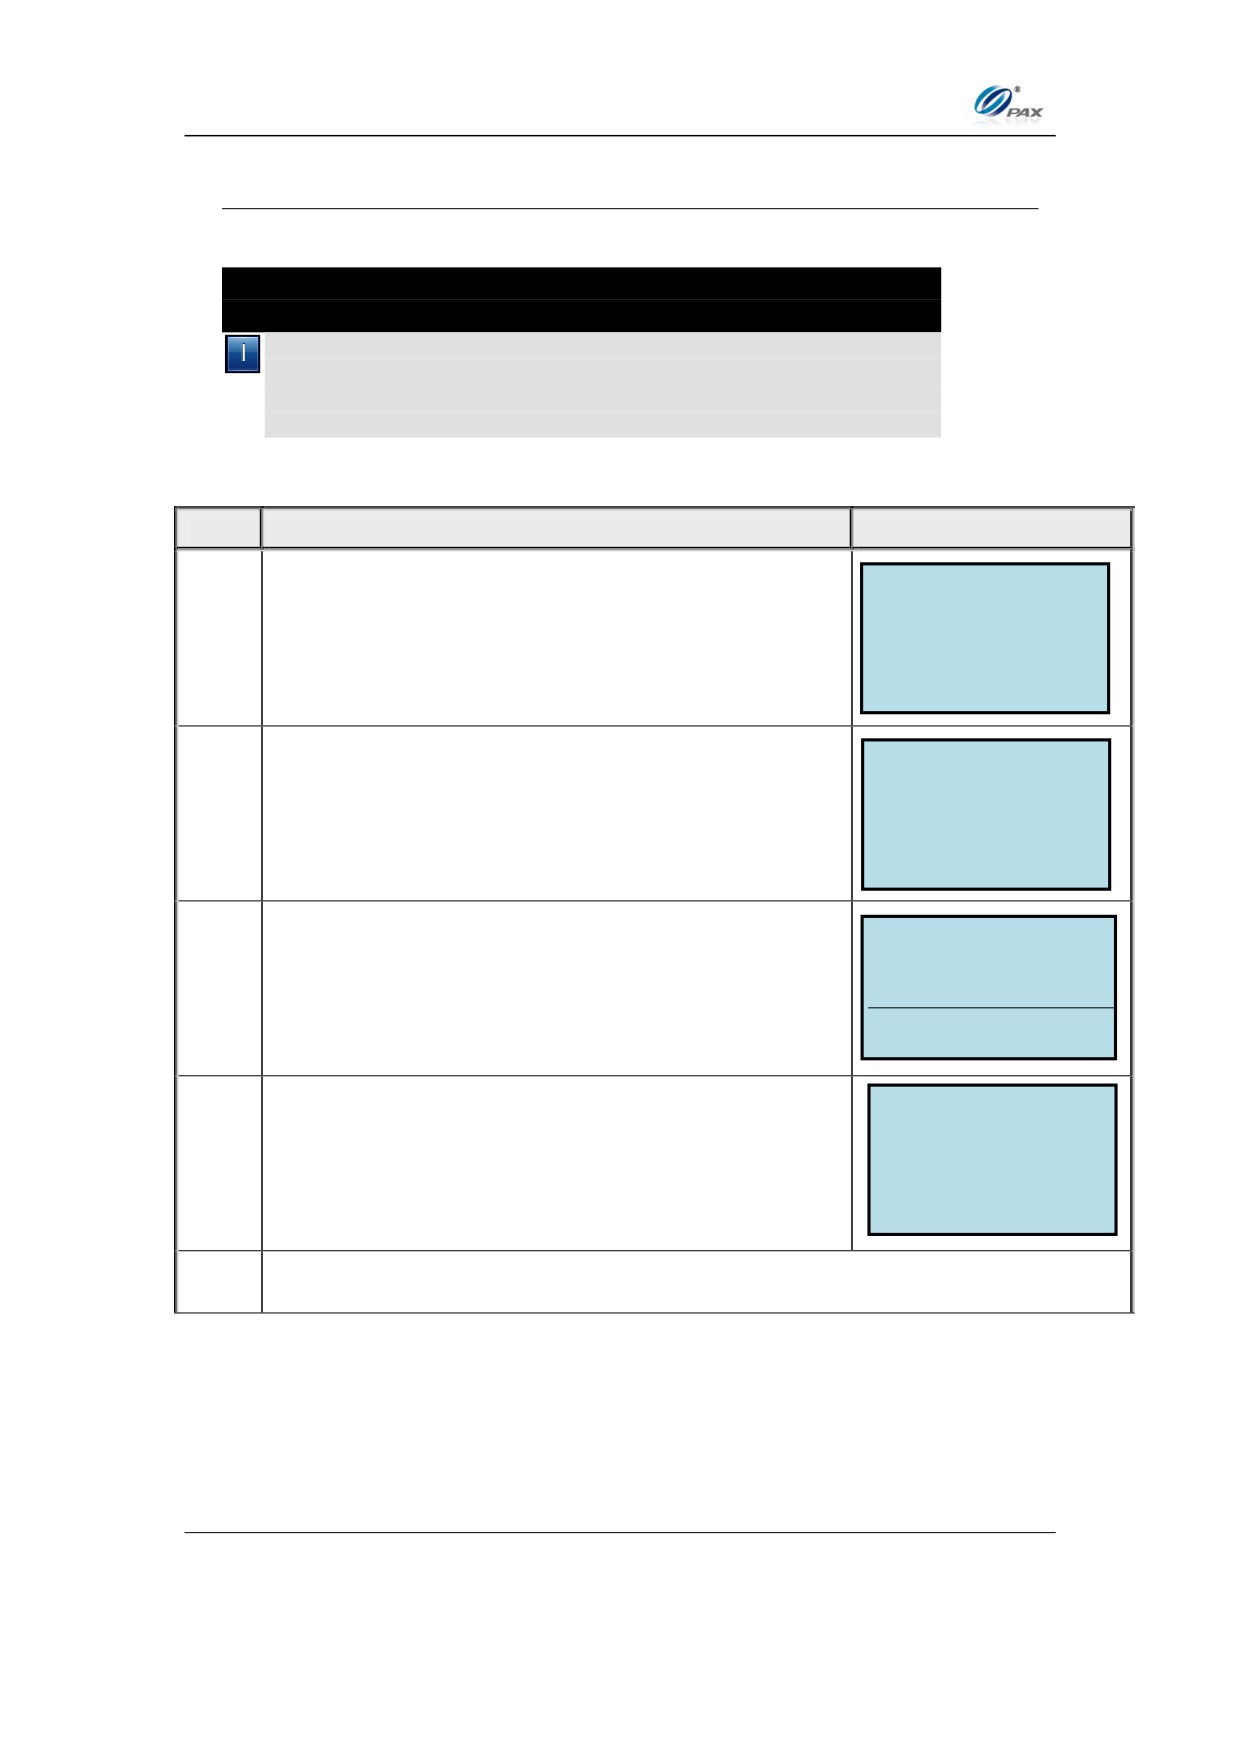
Chapter 5
PAX D200 Menu Options
5.8.7.9 PING
32.
33. Note
PING is a diagnostic tool used to determine if the terminal is
connected to the WiFi network, and the quality of that connection.
The URL defaults to a Google URL, but can be changed to
anything.
STEP
ACTION
DISPLAY
Comm. Options
4. Connect Timeout
From the Communication Options menu press [7]
5. Receive Timeout
1.
for WiFi Parameters.
6. Wireless Parameters
7. WiFi Parameters
WiFi Params:
5. IP Address
6. Subnet Mask
2.
Press [9] to select PING, and then press [O].
7. Gateway IP
8. DNS IP
9. PING
_____________________
The terminal will display the current URL on screen.
URL
3.
Press [X] to delete the current and input a different
URL if necessary, and then press [O].
Google.com:
The terminal will display the speed of the packets
Ping ok 54ms
Ping ok 173ms
4.
return and will continue to ping until the [X] is
Ping Failed
pressed.
Ping ok 123ms
5.
Stop
123
Chapter 5
PAX D200 Menu Options
5.8.7.10 Switch Router
34.
35. Note
This option is used to scan for available WiFi networks, and
allows you to select the correct network.
STEP
ACTION
DISPLAY
Comm. Options
4. Connect Timeout
From the Communication Options menu press [7]
5. Receive Timeout
1.
for WiFi Parameters.
6. Wireless Parameters
7. WiFi Parameters
WiFi Params:
6. Subnet Mask
Use the [F1] & [F2] buttons to navigate to option 10
7. Gateway IP
2.
and press the [O] button.
8. DNS IP
9. PING
10. Switch Router
Select Network:
The terminal will scan for available networks and
1. Wrong_network
2. Right_network
3.
will display a list on screen. Press the number next
3. Neighbors_network
to the correct network to select it.
4.
Stop
124
Chapter 5
PAX D200 Menu Options
5.8.8 Bluetooth
36. Note
All of the parameters that can be set for Bluetooth communication
are configured in this section.
STEP
ACTION
DISPLAY
Comm. Options
5. Receive Timeout
From the Communication Options menu press [8]
6. Wireless Parameters
1.
for Bluetooth.
7. WiFi Parameters
8. Bluetooth
WiFi Params:
. Use the [F1] & [F2] keys to find your selection and
1. Device Name
2. Pin Code
2.
then press [O]. Or Press the number corresponding
with your selection.
3.
Stop
125
Chapter 5
PAX D200 Menu Options
5.8.8.1 Device Name
37. Note
This option allows you to view the Bluetooth Device name for the
terminal.
STEP
ACTION
DISPLAY
Comm. Options
5. Receive Timeout
From the Communication Options menu press [8]
6. Wireless Parameters
1.
for Bluetooth.
7. WiFi Parameters
8. Bluetooth
Bluetooth:
1. Device Name
2. Pin Code
2.
Choose Option 1 Device name and press [O].
_____________________
Device Name:
3.
The terminal will display the device name.
D200_12756839
4.
Stop
126
Chapter 5
PAX D200 Menu Options
5.8.8.2 Pin Code
38. Note
This option allows you to view/set the PIN code for Bluetooth
communications.
STEP
ACTION
DISPLAY
Comm. Options
5. Receive Timeout
From the Communication Options menu press [8]
6. Wireless Parameters
5.
for Bluetooth.
7. WiFi Parameters
8. Bluetooth
Bluetooth:
1. Device Name
2. Pin Code
6.
Choose Option 2 Pin Code and press [O].
_____________________
Pin Code:
7.
The terminal will display the Pin code.
0000
8.
Stop
127
Chapter 5
PAX D200 Menu Options
5.8.9 ECR Com Type
39. Note
This option controls the communication method between the POS
and the terminal.
STEP
ACTION
DISPLAY
Comm. Options
6. Wireless Parameters
From the Communication Options menu press [8]
7. WiFi Parameters
4.
for Bluetooth.
8. Bluetooth
9. ECR Com Type
ECR Com Type:
. Use the [F1] & [F2] keys to find your selection and
1. Com1
2. USB
5.
then press [O]. Or Press the number corresponding
3. Ethernet
with your selection.
4. Bluetooth
6.
Stop
128