1t-3.5t R Series Internal Combustion Counterbalanced Forklift Truck. Manual - part 2
 

  Index      Engines     HANGCHA 1t-3.5t R Series Internal Combustion Counterbalanced Forklift Truck - manual 2011 year


Search            


Content   ..   1  2  3   ..


1t-3.5t R Series Internal Combustion Counterbalanced Forklift Truck. Manual - part 2


2.2K21/K25 Maintenance 
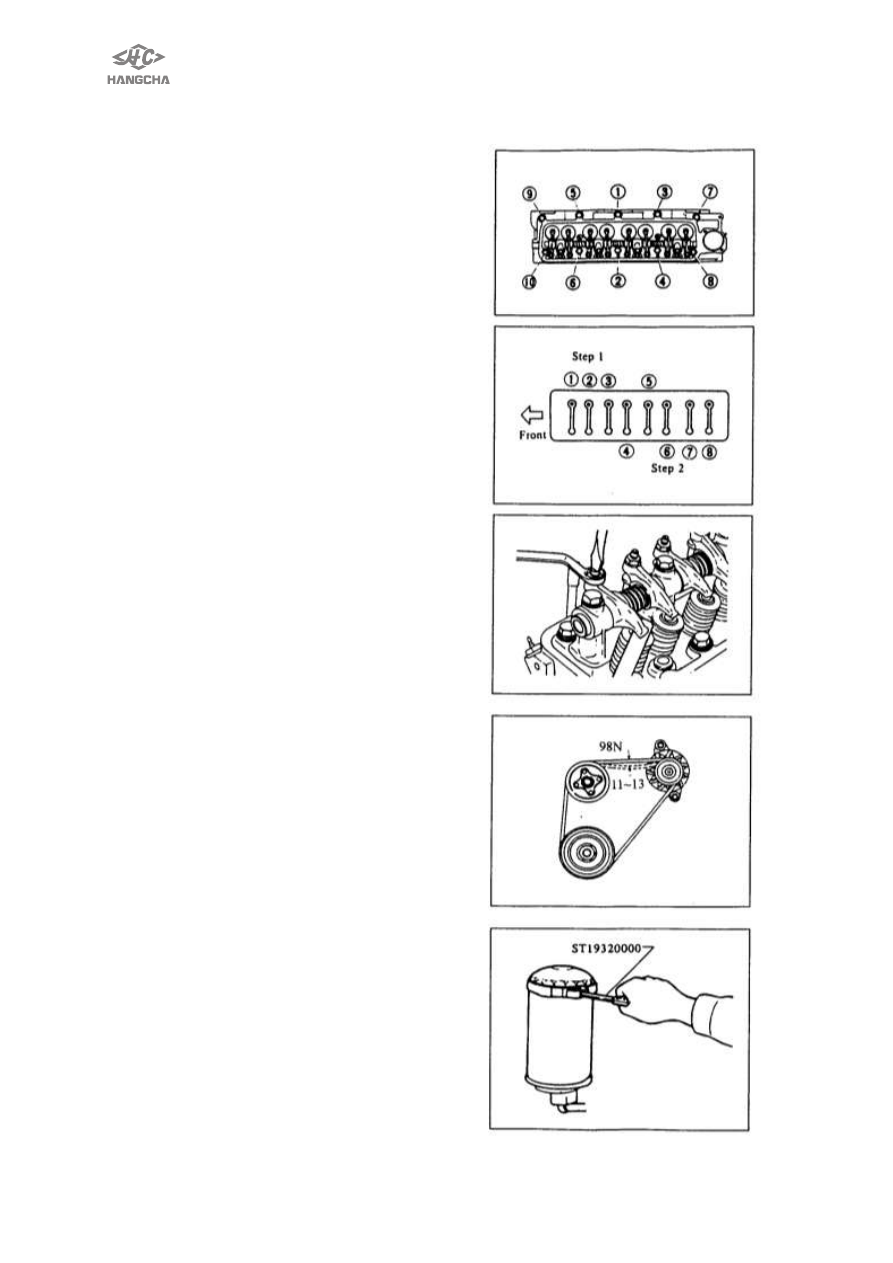
2.2.1  Retighten cylinder head bolts 
When the engine is cold, retighten 
should be made in the sequence 
shown. 
·

T: 68.6 N·

·

In two steps. 

2.2.2 Adjusting intake and exhaust 
valve clearance 

1)  Start engines and warm it up 
sufficiently. 
Then turn off engine. 
2)  Remove valve rocker cover. 
3)  Rotate crankshaft. 

Set No.1 cylinder in top dead center on 
its compression stroke and then adjust 
valve clearance. 
①      ②      ③    ⑤ 
Set NO.4 cylinder in top dead center on 
its compression stroke, and adjust valve 
clearance. 
④      ⑥      ⑦    ⑧ 
Valve clearance (Hot) 
Intake & exhaust: 0.38mm 
2.2.3.  Checking  and  Adjusting  Fan 

Belt for Tension 

1) Visually  inspect  for  cracks,  fraying, 

wear or lubricity. 
The belt should not touch the bottom 
of the pulley groove. 

2) Check  belt  deflection  by  pushing 

midway between pulleys. 
Fan belt deflection:11mm~13mm 
Pushing force::98N 

2.2.4.  Changing  engine  oil  and  oil 

filter   

1)  Start  engine  and  warm  up  engine 

sufficiently, then stop engine. 

2)  Remove  oil  filler  cap  and  oil  pan 

drain plug, and allow oil to drain. 

!

WARNING: 

Be  careful  not  to  burn  yourself,  as 

the engine oil may be hot. 

·Milky oil indicates the presence of 

cooling  water  and  finds  the  cause, 
takes corrective measure. 

·Oil  with  extremely  low  viscosity 

indicates dilution with gasoline. 


3)  Clean and install oil pan drain plug 
with washer. 
Oil pan drain plug: 29N·

m~39N·

4)  Using tool remove oil filter. 
5)  Wipe oil filter mounting surface with 
a clean rag. 
6)  Smear a little engine oil on rubber 
gasket of new oil filter. 
7)  Install new oil filter. Hand-tighten 
ONLY. 
       

Don’t use a wrench to tighten the 

filter. 
8)  Refill engine with new 
recommended engine oil, referring to 
Recommended Lubricants. 
Check oil level with dipstick. 
Oil capacity: 3.6 L。 
9)  Start engine, check area around 
drain plug and oil filter for any sign of oil 
leakage. 
If any Leakage is evident, these parts 
have not been properly installed. 
10) Warm up engine sufficiently. 
Then stop engine and wait a few 
minutes. Check oil level. If necessary, 
add engine oil. 
When checking oil level, park the forklift 
on a level surface. 
2.2.5.  Changing Engine Coolant 

! WARNING: 

To avoid the danger of being scalded, 
never attempt to change the coolant 
when the engine is hot. When using 
anti-freeze coolant, mix the anti-freeze 
coolant with water. 
2.2.6.  Cleaning Radiator Outside 
Clean outside of radiator with dry 
compressed air. 
2.2.7.  Checking 

cooling 

System, 

Hoses and Connections. 

Check hoses and fittings for Lose 
connections or deterioration. 
Retighten or replace if necessary. 


2.2.8.  Checking 

Engine 

Compression Pressure 
1) Warm  up  engine  sufficiently,  then 

stop engine. 

2) Remove all spark plugs. 
3) Properly  attach  a  compression 

tester  to  spark  plug  hole  in  cylinder 
being tested. 

4) Set carburetor throttle valve at fully 

open position. 

5) Crank  engine  and  red  gauge 

indication. 

·

Run engine at about 250r/min 

·

Engine 

compression  measurement 

should  be  made  as  quickly  as 
possible. 

Compression pressure: 
                        K21                      K25 
Standard      1.23kPa                1.27kPa 


6).Cylinder  compression  in  cylinders 
should  not  be  less  than  80%  of  the 
highest reading. 
If  cylinder  compression  in  one  or  more 
cylinders is low, pour a small quantity of 
engine  oil  into  cylinders  through  the 
spark 

plug 

holes 

and 

retest 

compression. 
·

If  adding  oil  helps  the  compression 

pressure,  piston  rings  may  be  worn  or 
damaged. 
·

If  pressure  stays  low,  valve  may  be 

sticking or seating improperly.   
·

If  cylinder  compression  in  any  two 

adjacent  cylinders  is  low,  and  if  adding 
oil does not help the compression, there 
is leakage pass on the gasket surface. 
 

  Oil  and  water  in  combustion 

chambers can result from this problem. 


2.2.9.  Cleaning  or  Replacing  Air 
Cleaning Filter (Dry paper type) 

It is necessary to clean the element 

or  replace  it  at  the  recommended 
interval, 

and 

more 

frequent 

maintenance  should  do  in  other  dirty 
operating conditions. 
2.2.10.  Cleaning  or  Replacing  Fuel 
Stained Element 
  The  fuel  strainer  element  should  be 
checked, 

cleaned 

or 

replaced 

periodically. 
2.2.11.  Checking Fuel lines 

Check 

fuel 

lines 

for 

proper 

attachment,  leaks,  cracks,  damage, 
loose 

connections, 

chaffing 

and 

deterioration.  If  necessary,  replace  any 
damaged or defective parts. 


2.2.12 Checking carburetor 


1) Checking Linkage And Valve 
·

Remove  air  horn.  Visual  check  dirt  and  linkage  of  interior  carburetor,  visual  check 

wear or damage of connecting parts.. 
·

Check throttle valve shaft for wear by moving it by hand. It must not moved(no free 

play). 
·

Check operation (opening and closing) of throttle valve and choke valve. 

Maintenance 
·

If carburetor is excessively soiled, disassemble and clean. 

·

If linkage is excessively worn, bent or damaged, replace with new one. 

·

If throttle valve shaft is excessively bent, replace with new one. 

2) Checking Auto-choke Mechanism 
·

Visually check auto-choke mechanism for deformed linkage, etc. 

·

Before starting engine, depress accelerator pedal one time. 

·

After starting engine, ensure engine speed decreases to specified idle rpm. 


Choke 

valve 

Throttle valve 

Cam lever and fast idle cam 

Ambient 

temperature 20

0

Fully 

closed 

Fast idle 

position 

Differs with ambient temperature. 
During engine starts: 
1

st

 or 2

nd

 ratchet position 

afte1 warm-up:   
3

rd

 or 4

th

rachet position 

After warm-up 

Fully open 

Idle position 

Clearance exists 


Content   ..   1  2  3   ..