Kawasaki Diesel MULE 4010 TRANS 4x4 (KAF950G9). Manual - part 88
 

  Index      Engines     Kawasaki Diesel MULE 4010 TRANS 4x4 (KAF950G9) - service manual


Search            


Content   ..  86  87  88  89   ..


Kawasaki Diesel MULE 4010 TRANS 4x4 (KAF950G9). Manual - part 88


14-6 SUSPENSION

Struts and Rear Shock Absorbers

Strut (Front Shock Absorber) Removal

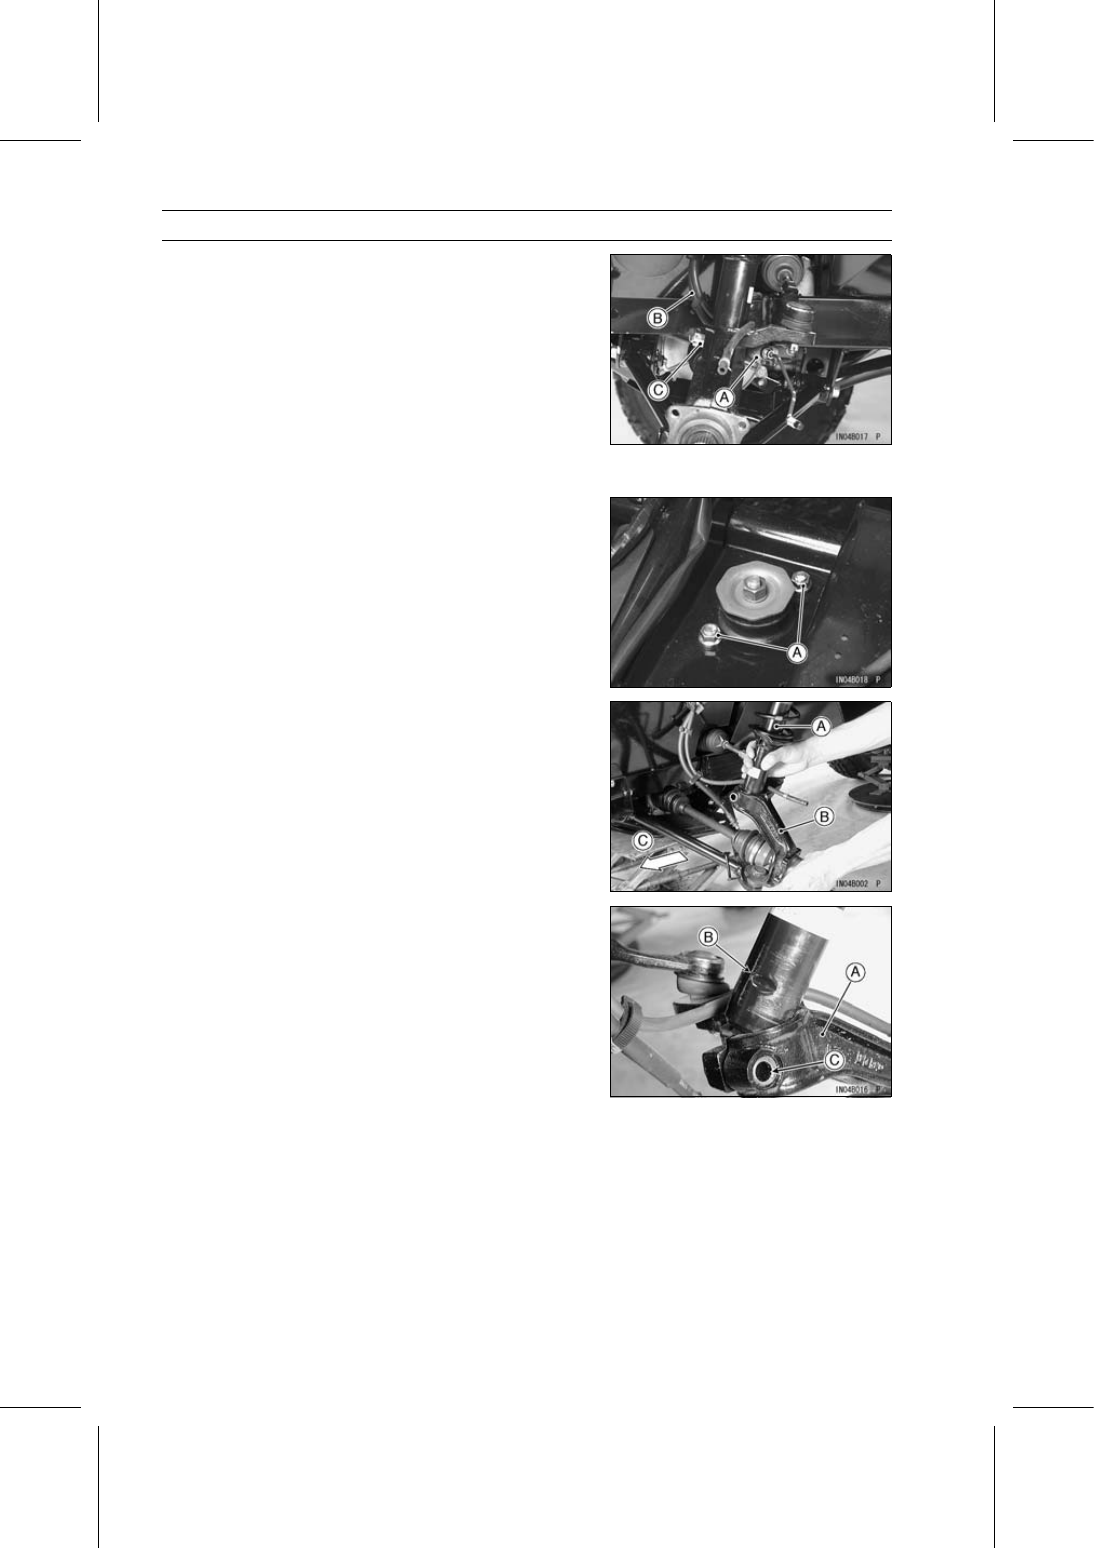
Remove:

Glove Compartment (see Glove Compartment Removal
in the Frame chapter)
Front Wheel (see Wheel Removal in the Wheels/Tires
chapter)
Brake Panel (see Brake Panel Assy Removal in the
Brakes chapter)
Brake Hose Retainer [A]
Brake Hose [B] (from Bracket)
Cotter Pin
Strut Clamp Bolt and Nut [C]

Remove the strut mounting locknuts [A].

Remove the strut [A] from the steering knuckle [B].

Front [C]

Strut (Front Shock Absorber) Installation

Insert the strut to the steering knuckle [A] while aligning
the notch [B] on the strut with the clamp bolt hole [C] on
the steering knuckle.

Replace the strut mounting locknuts with new ones.

Tighten:

Torque - Strut Mounting Locknuts: 44 N·m (4.5 kgf·m, 32

ft·lb)

Strut Clamp Nuts: 98 N·m (10.0 kgf·m, 72.3 ft·lb)

SUSPENSION 14-7

Struts and Rear Shock Absorbers

Insert a new cotter pin [A].

NOTE

When inserting the cotter pin, if the slots in the nut do
not align with the cotter pin hole in the axle, tighten the
nut clockwise [B] up to next alignment.

It should be within 30°.

Loosen once and tighten again when the slot goes past
the nearest hole.

Bend the cotter pin [A] over the nut [B].

Strut Spring Replacement

In addition to the standard springs, hard springs are avail-

able.

The hard springs stiffen the strut action and accelerate

the rebound damping.

Remove the strut (see Strut (Front Shock Absorber) Re-
moval).

Hold the large washer [A] in a vise [B].

Remove:

Locknut [C] and Small Washer
Large Washer

Remove:

Holder [A]
Thrust Plate [B]
Dust Seal
Thrust Washer
Upper Spring Seat [C]
Dust Cover [D]
Spring [E]

Install the replaced spring.

Fit the spring end [A] to the bulge [B] in the lower spring
seat [C].

14-8 SUSPENSION

Struts and Rear Shock Absorbers

Install:

Dust Cover [A]
Upper Spring Seat [B]

Fit the spring end to the bulge [C] in the dust cover and
upper spring seat.

Apply grease to the upper and lower side on the following
parts, and install them.

Dust Seal [A]
Thrust Washer [B]

Face the projection on the thrust washer downward.

Install:

Holder [A]
Large Washer [B]
Small Washer [C]
Locknut [D]

Push down the holder, and tighten the locknut.

Torque - Strut Locknuts: 49 N·m (5.0 kgf·m, 36 ft·lb)

SUSPENSION 14-9

Struts and Rear Shock Absorbers

Rear Shock Absorber Preload Adjustment

The spring adjusting sleeve [A] on the rear shock ab-

sorbers have 5 positions so that the springs can be adjusted
for different terrain and loading conditions. If the spring ac-
tion feels too soft or too stiff, adjust it in accordance with the
following table.

Spring Action

Position

Spring

Force

Setting

Load

Terrain

Speed

1 (STD)

Weak

Soft

Light

Smooth

Low

2

3
4

5

Strong

Hard

Heavy

Rough

High

Remove the rear wheel (see Wheel Removal in the
Wheels/Tires chapter).

Turn the adjusting sleeve on each rear shock absorber to
the desired position with the wrench [A].

Special Tool - Steering Stem Nut Wrench: 57001-1100

Both adjusting sleeves (left and right) must be turned to
the same relative position.

WARNING

If both adjusters are not adjusted equally, handling
may be impaired and a hazardous condition may
result. Be sure the adjusters are set equally.

Rear Shock Absorber Removal

Remove:

Rear Wheel (see Wheel Removal in the Wheels/Tires
chapter)
Rear Shock Absorber Mounting Bolts and Nuts [A] (while
moving the frame up or down with a jack)
Rear Shock Absorber [B]

Rear Shock Absorber Installation

Install the rear wheel temporarily and ground it to load the
suspension.

Replace the rear shock absorber mounting nuts with new
ones.

Tighten:

Torque - Rear Shock Absorber Mounting Nuts: 59 N·m (6.0

kgf·m, 44 ft·lb)


Content   ..  86  87  88  89   ..