BBM 21 Push Mower Model: BB21 Zone Start-Kawasaki. Manual - part 3
 

  Index      Engines     BBM 21 Push Mower Model: BB21 Zone Start-Kawasaki - service manual


Search            


Content   ..  1  2  3 


BBM 21 Push Mower Model: BB21 Zone Start-Kawasaki. Manual - part 3


9

ASSEMBLY - SETUP - ENGINE CONTROLS

Follow these steps to verify proper setup of the mower 
equipped the KAWASAKI Zone Start engine.

STEP 8
We recommend verifying that proper cable movement is 
achieved at the engine when operating the upper control bar.  

- Depress the upper control bar.
- When the upper control bar is depressed it will release the
fl ywheel brake/stop switch at the engine.
- The cable length is verifi ed at the factory however it is
important to understand the function and how to check the
adjustment.

1

2

With the control bar in the released position (1) the arm on the 
engine at (2) should be able to move forward towards its 
limiter.  This position of the arm ensures that the fl ywheel 
brake and stop switch stops the engine.  When depressing the 
control bar the stroke of the arm (3) should be a minimum of 
7/8” (22 mm) to properly release the engine brake and switch.

3

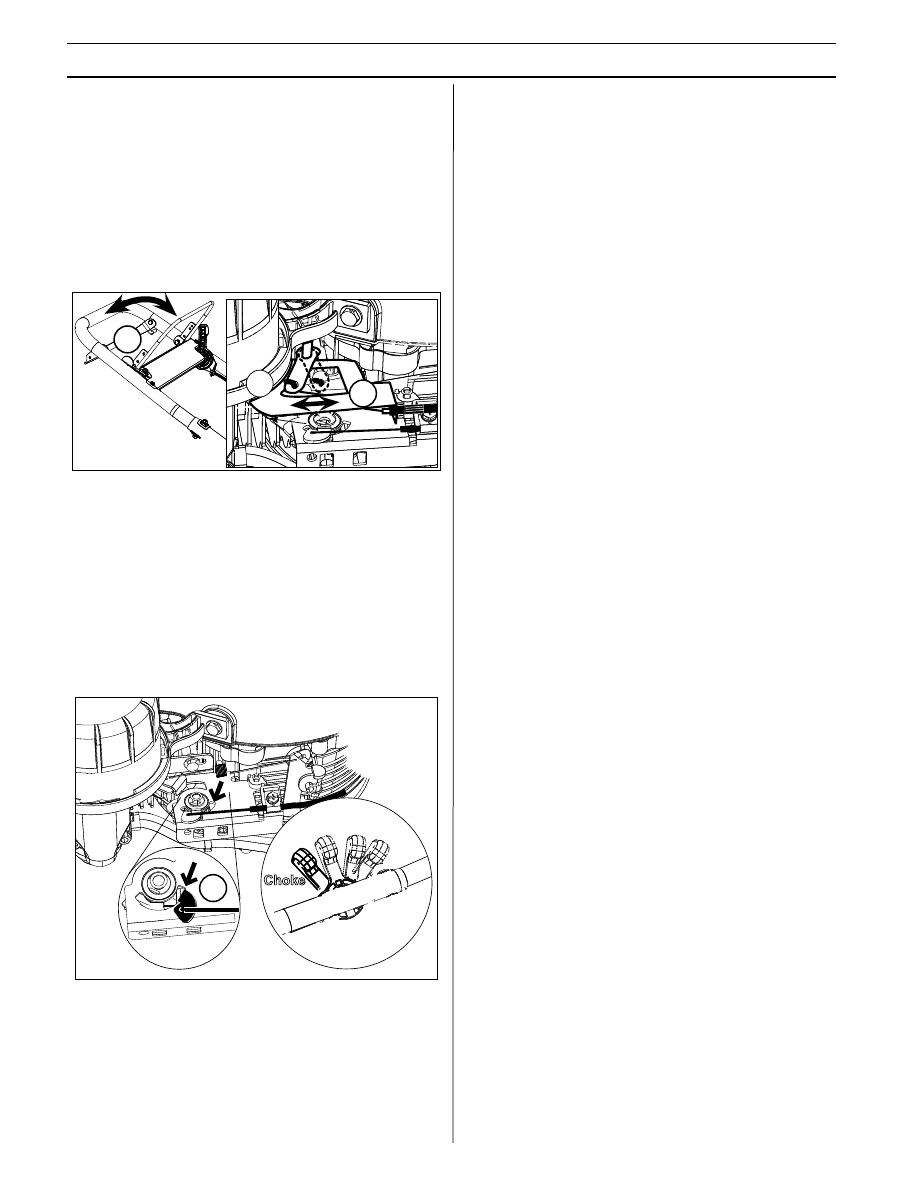
STEP 9
Verify that the throttle control is adjusted properly as follows:

- Move the throttle control to the Choke position.
- In the Choke position the arm attached to the throttle cable at
the engine should bottom out at the arrow (1).
- If needed an adjustment can be made at the throttle control.

Following these steps for the throttle adjustment will ensure 
that the Kawasaki engine performs properly for this mower. 
The engine speed is adjusted to approximately 3200 RPM at 
the factory.

NOTICE:
The engine speed should preferably be checked and verifi ed 
with a tachometer.  Normal full throttle speed of the engine 
should be adjusted to 3200 RPM.  An authorized Kawasaki 
Engine Dealer can verify and adjust the engine speed properly. 

Choke 

Full Throttle Idle Throttle

Engine Off
(BBC version)

1

10

Choke

Full 

Throttle

Idle 

Throttle

STOP

ENGINE

RUN

ENGINE

CONTROLS & OPERATION

Before operating the mower for the fi rst time, please review 
and understand the entire manual including all Warnings and 
Cautions.  
Even if you have operated other mowers in the past please 
take time to become familiar with how this mower works and 
practice all operations to build up your skills. 

BEFORE ANY OPERATION ALWAYS:

- Inspect the mower for any visible damage or broken parts
- Check the oil level in the engine on a daily basis
- Make sure that when you release the Upper Control Bar
the engine should stop within three seconds.  If the engine
does not stop, contact a 

Bad Boy Mowers Authorized

Service

 Dealer or contact Bad Boy Mower for advice.

- Never operate the mower with obvious damage or
malfunction until the problems have been corrected.

WARNING

N

ever make adjustments or repairs with the 

engine running.  Disconnect the spark plug wire, 
and keep the wire away from the plug to prevent 
accidental starting..

STATING THE ENGINE
1. To start a cold engine it is important to use the “Choke”
position.  To start a warm engine it is not necessary to use the
choke.

2. Press down on the upper control bar to release the engine
brake and kill switch.  If the upper control bar is released
during normal operation the engine should stop completely
within three seconds.

For best performance use the “Full Throttle” position for all 
mowing.  To verify that the engine is running at full throttle 
please follow the steps outlined under the setup instructions  
on pages 7 through 9.  A 

Bad Boy Mowers Authorized 

Dealer can also verify the correct full throttle adjustment.  
The engine speed should be adjusted to 3200 rpm. 

Notice: The upper control bar is an “Operators 
Presence Control” on the Zone Start mowers.  It has to 
be pushed down before starting the engine.  

STEP 10
Before fi lling the engine with gasoline - follow all instructions in 
this manual as well as all instructions provided in the 
Kawasaki 

Engine Owner’s Manual.   

Maximum fi ll volume: 
Kawasaki:   1.9 Qt (1.8 Liter) -  87 octane or higher

The engine will not operate on gasoline marketed as 
E-85 (85% ethanol)

Taking the following precautions will lessen the risk of 
injury and property damage.
Use extreme care in handling gasoline. Gasoline is ex-
tremely fl ammable and the vapors are explosive.

- Extinguish all cigarettes, cigars, pipes, and other
sources of ignition.
- Use only approved gasoline containers.
- Never remove gas cap or add fuel with the engine
running.
- Allow engine to cool a minimum of 3 minutes before
refueling.
- Never fuel the machine indoors.
- Never store the machine or fuel container where there
is an open fl ame, spark, or pilot light such as on a water
heater or other appliances.
- Never fi ll containers inside a vehicle or on a truck or
trailer bed with a plastic liner.  Always place containers
on the ground away from your vehicle when fi lling.
- Remove the mower from the truck or trailer and refuel
it on the ground.  If this is not possible, then refuel the 
equipment with a portable container, rather than from a 
gasoline dispenser nozzle.
- Keep the nozzle in contact with the rim of the fuel tank
or container opening at all times until fueling is com-
plete.  Do not use a nozzle lock-open device.
- If fuel is spilled on clothing, change clothing
immediately.
- Never overfi ll fuel tank.  Always wipe off any spilled fuel
or oil.  Replace fuel cap and tighten.

WARNING

MAXIMUM

FUEL LEVEL

FUEL FILLER

NECK

FUEL FILLER CAP

APPROVED FUEL
CONTAINER

11

DRIVE CONTROL

The drive system consists of a two speed transmission and an 
adjustable belt drive from the engine to the transmission.

The transmission speed can be set to LO - N - HI
HI speed is approximately  4mph - a fast walking speed.
LO speed is approximately 3mph - an average walking speed.

The shifter arm is intentionally made fl exible.  When the arm is 
locked in the LO or the HI position the transmission will 
automatically mesh into the gears as soon as the drive is 
engaged by operating the lower control bar. 

ENGAGING THE DRIVE

To engage and disengage the drive system pull up on the 
lower control bar (1).  Typically the drive will engage when the 
lower control bar is approximately 1 to 1.5 inches from the 
handle (2). 

Notice
Due to wear, the drive engagement position of the lower 
control bar can change.  If the distance between the lower 
bar and the handle (2) is less than a 1/4 inch when the mower 
starts to drive make an adjustment on the red knob located 
below the engine fuel tank (3).  
If needed turn the red knob 2 turns clockwise.  Verify the drive 
position of the control  bar by operating the mower.  If needed 
repeat the adjustment.

HEIGHT ADJUSTMENT

Each wheel can be adjusted individually to a specifi c cutting 
height from 1 inch to 4.5 inch.  Notice: It is only possible to 
move the adjustment on one side 2 - 3 steps each time.

Moving the front wheel height adjusters forward raises the 
cutting height.  Moving the rear wheel height adjusters towards 
the rear of the mower raises the rear cutting height.  

Always adjust the height adjusters to the same position both in 
the front and the rear for best cutting results.

WARNING

Never readjust the cutting height while the engine 
is running.  STOP the engine.  Never lift the 
mower by placing your hand or fi ngers under the 
edge of the mower deck.  

CONTROLS & OPERATION

MODES OF OPERATION

This mower is approved to be used in two different operational 
modes:

1  With a grass catcher in place
An original equipment 

Bad Boy Mowers catcher has been 

tested to be used with this mower.  It is important to always 
inspect the catcher for deterioration.  If the material is ripped or 
worn the bag shall not be used.   

2. With the mulch plug installed
If the mulch plug is installed ensure that the rear door can
close completely.

WARNING

Do not operate the lawn mower without the mulch 
plug or the 

Bad Boy Mower grass catcher in 

place.  Never attempt to operate the mower with 
the rear door removed, damaged or propped 
open. 

3

1

Low 1”  (25mm)

High 4.5” (114mm)

7 steps - 1/2”  (13mm)

               the engine before 

making any height adjustment

2

Drive Adjustment

When operating the lower control 
bar (1) typical movement on the 
red adjustment knob (3) should be 
between 1/4” to 3/8” (6 to 10 mm)

12

Maintenance - 

Service Interval

Procedures

Before each use

Check the engine oil level.
Check the operation and function of the Operators Presence Control bar.
Inspect the mower blade for wear or damage.
Inspect the cables for any wear or damage.
Inspect the grass catcher for any damage.
Check for any loose or missing screws or damaged parts.
Clean under the lawn mower deck (after usage).

First 20 Hours or 
Within 4 weeks

Change the engine oil. 
Check the throttle cable adjustment - see Page 9. 

Every 50 Hours or
every 2 months  

Lubricate the pivot arms on the control panel with oil.
Check and Clean the engine air fi lter (see the engine Owner’s Manual) 

Every 100 Hours or 
every 4 months 

Change the engine oil (more often in dusty conditions). 
Check the spark plug.
Clean the engine with compressed air.

Every 200 Hours or
every 8 months

Replace the paper air fi lter (more frequently in dusty conditions).
Replace the spark plug.
Adjust the valve clearance.

MAINTENANCE

In addition to this schedule follow the Maintenance Schedule in the

 Kawasaki Owner’s Manual.  

This maintenance schedule assumes daily use by a landscape company.  
One Month of use is assumed to be 15 to 20 days of operation.

CLEANING THE MOWER

We do not recommend using a garden hose to clean the 
mower.  The buildup of moist grass, fertilizer and water can 
cause extreme corrosion damage to many parts of the mower 
and the engine. 
Never use a Pressure Washer:
The use of a pressure washer can force water and moisture 
into ball bearings and engine parts and cause substantial 
damage. 

- Clean the underside of the mower by scraping any build-up

of grass and trash.

- Clean off the outside of the engine and the top of the mower

with compressed air.  Any accumulation of debris under the
belt cover can typically also be removed with compressed air
without removing the protective belt cover.

- Wash the Grass Bag with a garden hose frequently.  The
holes that allows the grass bag to breathe will eventually clog
with dirt.  A clogged bag will not collect the grass clippings
effectively.  Do not install and use a wet grass catcher.  It will
plug prematurely.

NOTICE

Several of the operations described in this 
Maintenance section involves placing the mower 
on its right side.  
To avoid spills of oil and gasoline always:
- Place the mower on a hard surface such as a

concrete driveway or a garage fl oor.

- Never place the mower on its side when there is

gasoline in the tank - do the service of the mower
when you have run out of gasoline during normal
operation.

- Always make sure that the Oil Filler Cap is

tightened.

Any spillage of oil or gasoline can be extremely
fl ammable and explosive and under certain
conditions can cause serious personal injury and
property damage.


13

BLADE MAINTENANCE 

For best results, the mower blade must be kept sharp.  Always 
replace a bent or damaged blade.

Removing the blade 
1. Disconnect spark plug wire from spark plug and place wire
where it cannot come in contact with plug.
2. Turn lawn mower on its right side.  (Make sure air fi lter and
carburetor are up).
3. Use a wood block between blade and mower deck to
prevent blade from turning when removing blade bolts.
NOTE: Protect your hands with gloves and/or wrap the blade
with a heavy cloth.
4. Remove blade bolts by turning counter-clockwise with a
11/16” (17mm) wrench or socket.

Installing the blade
1. Position the blade with the bent corner of the blade (sail)
pointing towards the deck.  Install the blade bolts.
Important:  Blade bolts are heat treated.  If the bolts are worn
or damaged use only bolts available from Ybravo.com
2. Use a block of wood between blade and mower deck and
tighten the blade bolts.  Always use a torque wrench.
The recommended tightening torque is 30 to 35 ft. lbs.
(40 to 45 Nm)

WARNING

Use only a replacement blade approved by

 Bad Boy 

Mowers.  Using a blade not approved by Bad Boy 

Mowers is hazardous.  It can damage your mower and 
cause serious personal injury.  

A worn or damaged blade can break and parts of the 
blade could be thrown into the operators or bystanders 
area, resulting in serious personal injury or death.

Inspecting the blade
Carefully examine the blade for straightness, damage and 
abnormal wear.  In some areas abrasive sand and dust can 
wear away the metal of the blade - see illustration.  

Sharpening the blade
File the top side of the blade (1) and maintain the original 
angle of the cutting edge.  Maintain the radius where the cut-
ting edge ends.  Always remove the same amount of material 
from both ends of the blade.  This ensures that the blade stays 
balanced.  

If sharpening is done with a grinding stone the blade should 
always be balanced using a blade balancing device.  A blade 
balance tool is available from Ybravo.com or most lawn and 
garden dealers, and hardware stores. 

If the blade shows wear or cracking at the edge where the 
blade is bent up (3) it must immediately be replaced.  

1. Cutting edge
2. Square corner
3. Erosion from sand and dirt
4. Air lift wing (sail)

1

2

3

4

1

2

3

4

1

3

4

MAINTENANCE

ENGINE OIL CHANGE

NOTICE: Before tipping lawn mower on its right side to drain 
oil, empty fuel tank by running engine until fuel tank is empty.

1. Disconnect spark plug wire from spark plug and place wire
where it cannot come in contact with plug.

2. Remove oil fi ller cap/dipstick.

3. Tip lawn mower on its right side as shown and drain oil
into a suitable container.  Rock lawn mower back and forth to
remove any oil trapped inside of engine.

4. Wipe off any spilled oil from lawn mower or side of engine.

5. Fill engine with oil. Slowly pour oil down the oil fi ll spout
into the engine.  Use an SAE 10W-30 oil (22 Fl.Oz - 0.65 Liter
without oil fi lter, 29 Fl.Oz - 0.85 Liter with oil fi lter replacement).
See engine Owner’s Manual for complete information.

6. Wait one minute to allow oil to settle.  Use the gauge on oil
fi ller cap/dipstick for checking level.  Insert dipstick into the
tube and rest the oil fi ll cap on the tube.
DO NOT thread the cap into the tube when taking the reading.

7. Continue adding small amounts of oil and rechecking
the dipstick until it reads full.  DO NOT overfi ll, or engine
will smoke on startup.

8. Always be sure to retighten oil fi ll cap/dipstick before

starting engine.

9. Reconnect spark plug wire to spark plug.


PRODUCT REGISTRATION & 

WARRANTY STATEMENT 

SECTION 1:  LIMITED WARRANTY 

Bad Boy Mowers Inc (BBM) warrants the original purchaser of a BBM branded push mowers product to which this warranty applies 
(the “Product”) that the Product shall be free from defects in material and workmanship from the date of purchase for the period of the 
applicable “Warranty Schedule” of the Product as set forth below.  Additional limitations are described in Section 2 through Section 6, 
inclusive. 

Product Category 

Standard Warranty   Rental Warranty 

BB21 Zone Start Mower 

1 Year 

No Warranty 

Replacement Parts 

(Excludes components which are part of engine

systems manufactured by third party engine manufacturers for which the 
purchaser has received a separate warranty with product at time of purchase.) 

60 Days 

No Warranty 

SECTION 2: BAD BOY MOWERS’ OBLIGATIONS UNDER THE WARRANTY 

BBM will repair or replace defective components without charge for parts or labor if a component fails because of a defect in 
material or workmanship during the warranty period. 

SECTION 3: ITEMS NOT COVERED BY THIS WARRANTY 

The following items are not covered by this warranty: 
1)

Normal customer maintenance items which become worn through normal regular use, including, but not limited to, belts, blades,
blade adapters, cables, clutches, clutch drums, filters (fuel line, fuel filters, air filters, oil filters), lubricants, rewind springs, spark
plugs, and starter ropes.

2)

Natural discoloration of material due to ultraviolet light;

3)

Engine and drive systems not manufactured by BBM; these items are covered by the respective manufacturer’s warranty as
provided in writing with the product information supplied at the time of purchase; all claims must be sent to the appropriate
manufacturer.

4)

Commercial mowing decks with sand abrasion damage.

5)

Emission Control System components necessary to comply with CARB-TIER II and EPA regulations which are manufactured by
third party engine manufacturer.

SECTION 4: EXCEPTIONS AND LIMITATIONS 

This warranty shall be inapplicable to defects resulting from the following: 
1)

Accident, abuse, misuse, negligence and neglect, including stale fuel, dirt, abrasives, moisture, rust, corrosion, or any adverse
reaction due to incorrect storage or use habits;

2)

Failure to operate or maintain the unit in accordance with the Owner’s/Operator’s manual or instruction sheet furnished by
BBM;

3)

Alterations or modifications that change the intended use of the product or affects the product’s performance, operation, safety, or
durability, or causes the product to fail to comply with any applicable laws; or:

4)

Additional damage to parts or components due to continued use occurring after any of the above.

REPAIR OR REPLACEMENT AS PROVIDED UNDER THIS WARRANTY IS THE EXCLUSIVE REMEDY OF THE PURCHASER. 
BBM SHALL NOT BE LIABLE FOR ANY INCIDENTAL OR CONSEQUENTIAL DAMAGES FOR BREACH OF ANY EXPRESS OR 
IMPLIED WARRANTY ON THESE PRODUCTS EXCEPT TO THE EXTENT PROHIBITED BY APPLICABLE LAW. ANY IMPLIED 
WARRANTY OF MERCHANTABILITY OR FITNESS FOR A PARTICULAR PURPOSE ON THESE PRODUCTS IS LIMITED IN 
DURATION TO THE WARRANTY PERIOD AS DEFINED IN THE LIMITED WARRANTY STATEMENT. BBM RESERVES THE 
RIGHT TO CHANGE OR IMPROVE THE DESIGN OF THE PRODUCT WITHOUT NOTICE, AND DOES NOT ASSUME OBLIGATION 
TO UPDATE PREVIOUSLY MANUFACTURED PRODUCTS. 

Some states do not allow the exclusion of incidental or consequential damages, or limitations on how long an implied warranty lasts, so 
the above limitations or exclusions may not apply to you. This warranty gives you specific legal rights, and you may also have other rights 
which vary by state. 

SECTION 5: CUSTOMER RESPONSIBILITIES 

The product must exhibit reasonable care, maintenance, operation, storage and general upkeep as written in the maintenance section of 
the Owner’s/Operator’s manual. Should an operational problem or failure occur, the product should not be used. Failure caused by 
continued use is not covered by warranty. Product should be delivered, at owners’ expense, as is, to an authorized BBM Dealer for 
evaluation. Proof of purchase, as explained in section 6, rests solely with the customer. 

SECTION 6: PROCEDURE TO OBTAIN WARRANTY CONSIDERATION 

It is the Owner’s and Dealer’s responsibility to make certain that the Product Registration was completed and mailed to BBM.  Product Registration should 
be completed within ten (10) days from the date of purchase in order to confirm the warranty and to facilitate post-sale service. Proof of purchase must be 
presented to the authorized BBM dealer in order to obtain warranty service. This proof must include date purchased, model number, serial number, and 
complete name and address of the selling dealer. To obtain the benefit of this warranty, the product believed to be defective must be delivered to an 
authorized BBM dealer in a timely manner, no later than thirty (30) days from date of the operational problem or failure. The product must be delivered at 
the owner’s expense. Downtime, pick-up and delivery charges are not covered by this warranty. An authorized BBM dealer can be located by calling (866) 
622-3269.  Subject to change without notice.

1

All Bad Boy Push Mowers can be registered for warranty by mailing copy of the warranty registration in this manual with a copy 

of the sales invoice/receipt to: Bad Boy Inc

, Attention: Warranty Department, 102 Industrial Dr, Batesville, AR 72501

. 


Content   ..  1  2  3