BBM OUTLAW STAND-ON MODEL ZERO-TURN MOWER. Manual - part 6
 

  Index      Engines     BBM OUTLAW STAND-ON MODEL ZERO-TURN MOWER - service manual


Search            


Content   ..  4  5  6  7   ..


BBM OUTLAW STAND-ON MODEL ZERO-TURN MOWER. Manual - part 6


PAGE


21

SECTION 2: DRIVE BELT

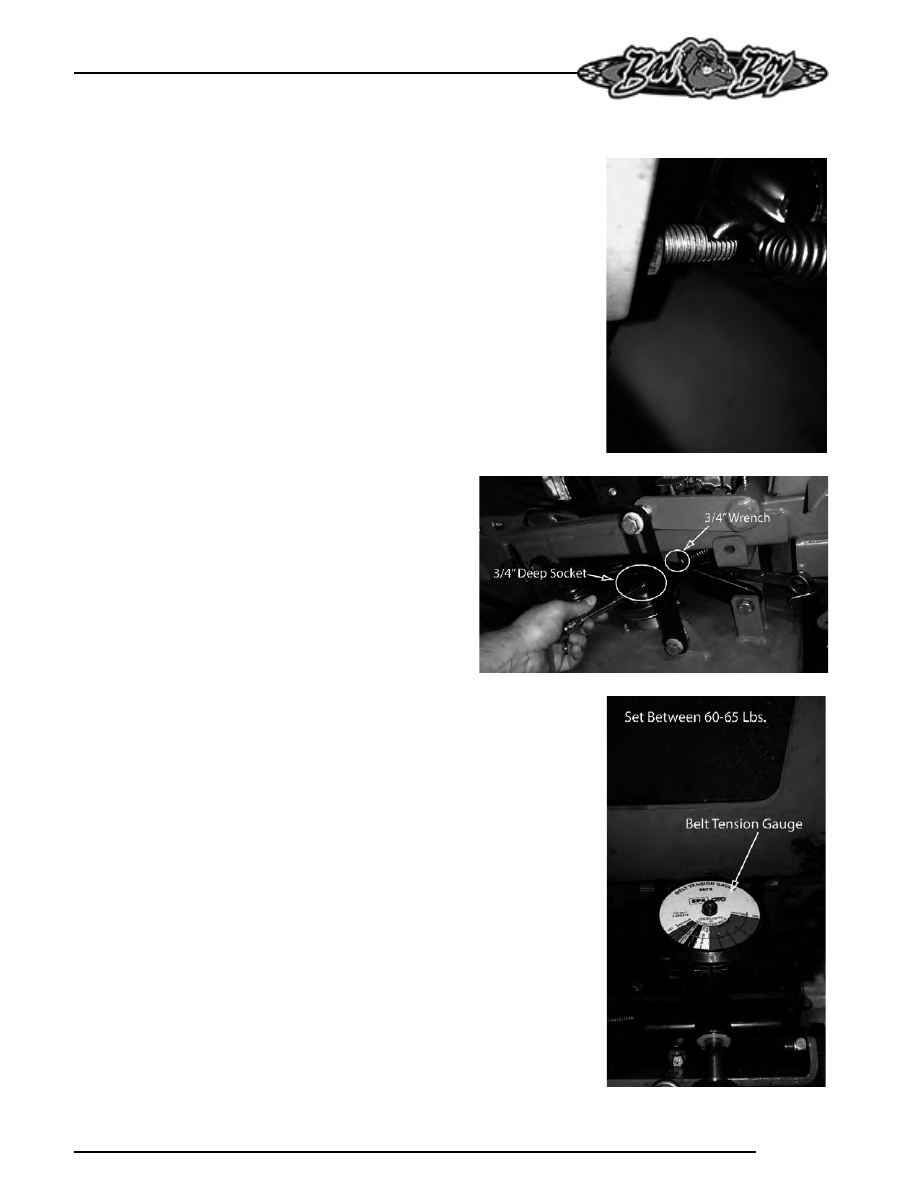
Shown on the right is a typical pump belt tensioner for your 
model mower. This is how you can adjust the belt pump 
belt tension on your mower. There are two jam nuts on an 
all thread that need to be adjusted in ordered to change the 
tension in the spring

Use a  3/4" wrench and a deep socket in order to loosen the 
two nuts. Tighten the outside nut if more belt tension is 
desired and loosen the outside nut if less belt tension is 
desired. 

The pump belt tension should be set between 60-65 lbs. 
This should be measured with a belt tension gauge. Your 
dealer or service center will have a belt tension gauge or 
you can buy one (Part Number 041-9999-00). 

PAGE 

22

SECTION 3: ENGINE

Kawasaki FX691V and FX730V 

This machine has an oil drain hose installed on the engine to 
allow for easier oil changes. Bad Boy  recommends that the oil 
and filter be changed after the initial 8 hrs of use, and at intervals 
of 50 usage hours or yearly, whichever occurs first after that. 
The oil capacity is 2 quarts. Bad Boy 10W-30 synthetic blend 
engine oil is recommended for maximum protection. 

3.1 Changing your engine oil and oil filter:


1) Remove oil dipstick and open oil drain using

a. 10 mm socket or a flat head screwdriver

until oil begins flowing. Allow oil to

completely drain. (Make

sure to have an oil pan ready to capture old

oil and properly dispose old oil.)

2) The oil filter is located on the right side of the

engine. Clean area around oil

filter. Place a container under the oil

filter to capture any oil and remove

filter. Wipe off mounting surface and reinstall

drain plug. Torque to 10

ft.*lb.

3) Place new filter in shallow pan with open

end up. Fill with new oil until oil reaches the

bottom of the threads.

Allow 2 minutes for oil to be absorbed

by filter material.

4) Apply a thin film of clean oil to rubber

gasket on new filter

5) Refer to instructions on oil filter for proper

installation.

6) Fill crankcase with approximately 2 quarts of

new oil. Level should top of indicator on

dipstick.

7) Reinstall oil fill/dipstick and tighten securely.

8) Start engine; check for oil leaks. Stop

Engine; correct oil leaks. Recheck oil level

9) Dispose of used oil and filter in accordance

with local ordinances.

PAGE


23

The fuel filter is located in the fuel line on the left side of 
the engine by the starter motor. Replace the filter yearly. 
Prior to the removal of the old filter, note the direction of 
fuel flow as indicated on the filter. Have towels readily 
available in order to quickly remove any fuel leakage. 
Always use new hose clamps and ensure the security of 
the new filter by lightly pulling on each hose. Always 
perform maintenance outdoors or in a well ventilated 
area. Do not smoke or allow any open flames in the 
vicinity of any maintenance activities

3.2 Changing your fuel filter: 

1) Locate your fuel filter and mark the direction it is

facing.

2) Clamp each side of the fuel filter to minimize and

gas spills.

3) Remove the clips from each side of the fuel filter

and remove the fuel filter.

4) Place the new fuel filter in the same direction as

the old and place clips back into place and remove
clamps.

PAGE 


24

7KHDLUFOHDQHULVWKHHQJLQH¶VRQO\GHIHQVHDJDLQVW
GDPDJLQJIRUHLJQSDUWLFOHV,WLVYHU\LPSRUWDQWWKDWWKH
DLUFOHDQHUHOHPHQWLVLQVSHFWHGSULRUWRHDFKXVH
5HPRYHWKHHOHPHQWDQGWDSLWVVLGHVLQRUGHUWRUHPRYH
GHEULV'RQRWEORZWKHILOWHURXWXVLQJFRPSUHVVHGDLU
'RLQJVRZLOOJUHDWO\UHGXFHWKHDLUFOHDQHU¶V
HIIHFWLYHQHVV5HSODFH\HDUO\PRUHRIWHQLQGXVW\
HQYLURQPHQWV$GKHULQJWRWKHVHSUDFWLFHVZLOOKHOS
SUHYHQWORVVRISRZHUDQGSUHPDWXUHHQJLQHIDLOXUH


3.3 Changing the air cleaner: 

1) Locate the air filter and unbuckle the air filter

cover.

2) Remove the cover and take out the outer

white element and the inner blue element.

3) Clean or replace elements.

4) Reattach the cover making sure the air

intake is facing down.


Content   ..  4  5  6  7   ..