DB2 Server for VSE. Operations Guide / Handbooks (2004-2007) - page 20
RENAME
RENAME old_stored_statement_name
new_stored_statement_name
RENAME is an ISQL command that changes the name of a stored SQL statement.
old_stored_statement_name
is the current name of the stored SQL statement. The name PREVIOUS should
not be used.
new_stored_statement_name
is the new name for the stored SQL statement. It can be up to 8 characters. Do
not use the name PREVIOUS.
Chapter 10. ISQL Commands
145
RIGHT
1
RIGHT
integer
RIGHT is an ISQL display command that causes the display to start integer
columns to the right, counting from the leftmost column of the display, provided
no columns are being excluded. The number refers to the columns provided by the
SELECT statement, not those currently displayed. You must use the order of the
columns specified in the SELECT clause of the SELECT statement that provided
the query result to determine the value for integer. If the value of integer represents
a column being excluded, the display starts at the next displayable column to the
right of the excluded column. If no more columns to the right can be displayed, a
blank display results.
Specifying a value greater than the number of columns remaining to the right
displays the last column or a blank display if the last column is excluded.
If no number is specified, the display moves one column to the right or to the next
displayable column to the right if that column is excluded.
The RIGHT 1 command can be invoked by pressing PF11. Because you can reset
your PF key values, you can assign the RIGHT 1 function to any PF key. The
default function key is PF11 or PF23.
146
Interactive SQL Guide and Reference
RUN
RUN routine_name
(
2
parameter
)
RUN is an ISQL command that starts the processing of a routine.
You can run another user’s routine if you have obtained the SELECT privilege by a
GRANT statement on that user’s ROUTINE table. Once you have the SELECT
privilege on the user’s ROUTINE table, you can run those routines by qualifying
the routine name with the owner’s authorization ID. For example, to run a routine
called REPORTS that is owned by a user whose authorization ID is MIKE, you use:
run mike.reports
You do not have to identify the table name, ROUTINE, because the name of
everyone’s routine table is the same. Care must be taken in running another user’s
routine because any stored SQL statements or synonyms used in a routine are not
recognized unless you have also defined them.
Parameters can also be passed to the routine by including them on the RUN
command.
routine_name
is the name of the routine to be run.
parameter
is the parameter to be substituted for placeholders in the commands contained
in the named routine. If more than one parameter is used, separate them by
blanks.
Enclose a parameter in single quotation marks if it contains a blank. Any
characters between the terminating single quotation mark and the next blank
are ignored.
If there are more placeholders in the routine than there are parameters on the
RUN command, the extra placeholders are replaced by null characters. Extra
parameters on the RUN command are ignored.
Example
The following command executes your routine named SAMPLE and provides three
parameters:
run sample (BLUE RED,GREEN 'WHITE BLACK')
The placeholders (indicated by &) in the routine are replaced by:
v BLUE to be substituted for all occurrences of &1
v RED,GREEN to be substituted for all occurrences of &2
v WHITE BLACK to be substituted for all occurrences of &3.
Chapter 10. ISQL Commands
147
SAVE
SAVE
SAVE is an ISQL command that is only meaningful while using the INPUT
command with AUTOCOMMIT on. If AUTOCOMMIT is on, it saves all changes
made since the last SAVE command or since the start of the INPUT command if no
SAVE command has been typed.
SAVE has no effect with AUTOCOMMIT off. With AUTOCOMMIT off, a COMMIT
is necessary to save all input. This also commits all changes made during the
current logical unit of work. The COMMIT must be typed after the INPUT
command is ended.
148
Interactive SQL Guide and Reference
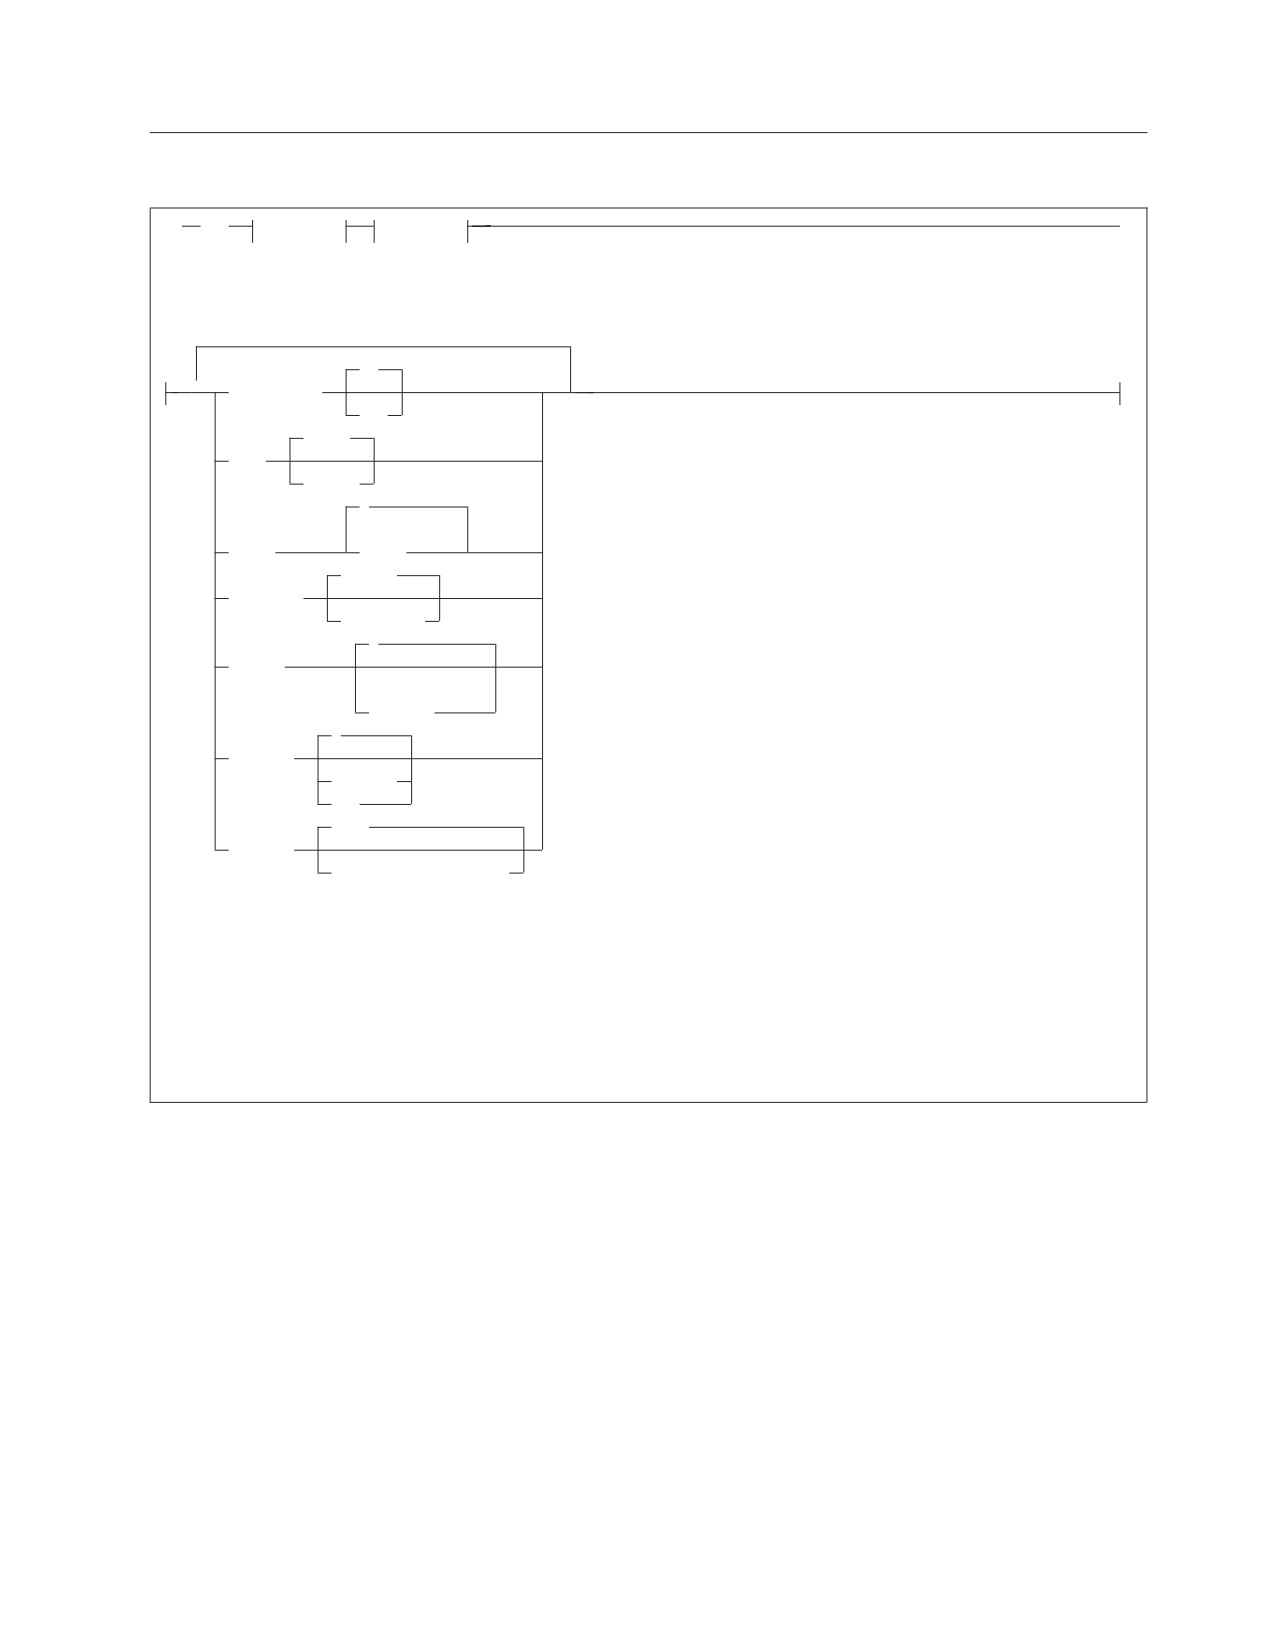
SET
SET
Group_1
Group_2
Group_1:
ON
2
AUTOCommit
OFF
UPper
CASE
STRing
?
(1)
(2)
CLAss
class
hyphen
CONTinue
character
(1)
1
COPies
(3)
integer
0
COSTest
integer
OFF
//./
DECimal
/thousands/decimal/
Notes:
1
The parameters CLAss, COPies, and PRINTRoute are not applicable to VM.
2
Output class wanted (letters from A to Z).
3
Number of copies to be printed.
4
A maximum of 20 characters can be used for null values.
Chapter 10. ISQL Commands
149
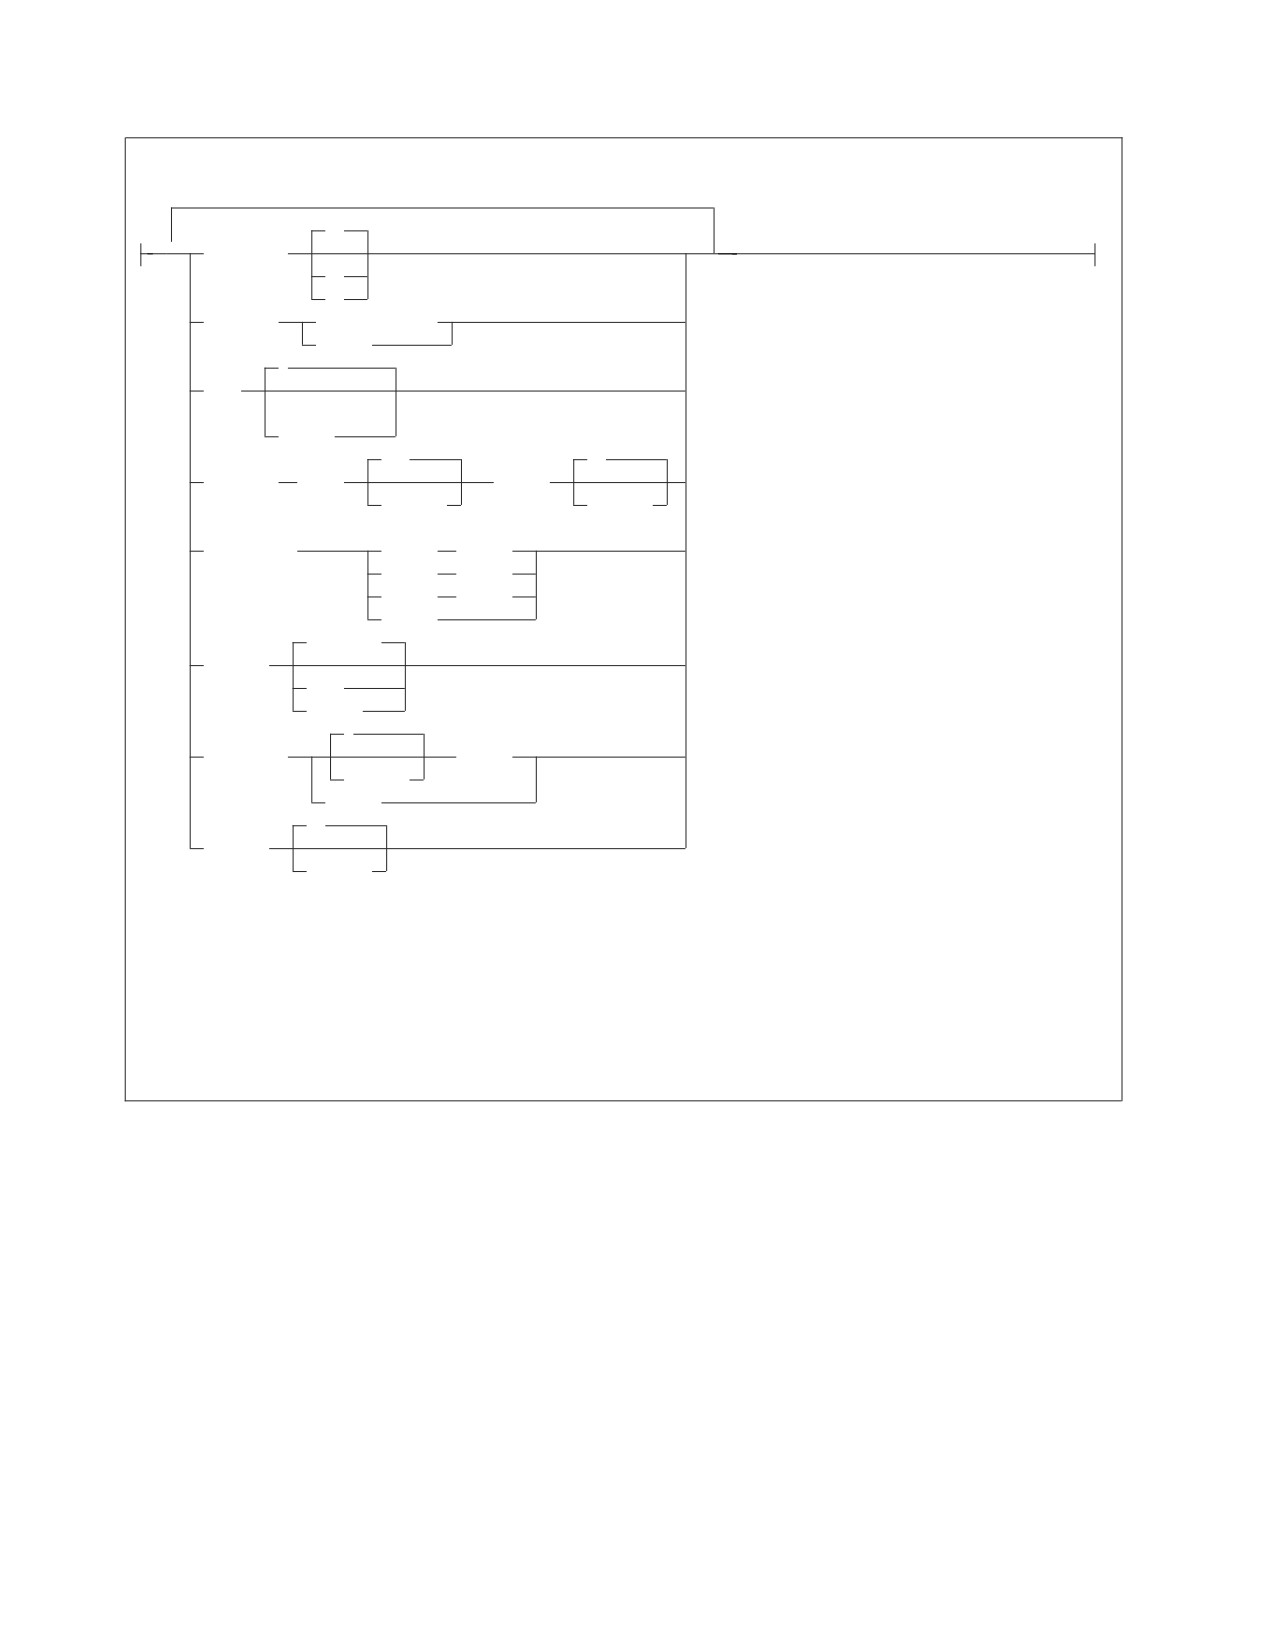
Group_2:
RR
2
ISOLation
CS
UR
LANGuage
language_name
langid
?
NULL
(4)
string
132
66
PAGEsize WIDth
LENgth
integer
integer
(1)
PRINTRoute
DESTid
wkstat
TERMid
termid
TOUser
userid
SYSTem
CONTInue
RUNMode
STOP
CANCEL
2
SEParator
BLANKs
integer
string
20
VARChar
integer
Notes:
1
The parameters CLAss, COPies, and PRINTRoute are not applicable to VM.
2
Output class wanted, (letters from A to Z).
3
Number of copies to be printed.
4
A maximum of 20 characters can be used for null values.
SET is an ISQL command that controls a number of functions.
When ISQL is started, the following operational characteristics are in force:
v AUTOCOMMIT is ON.
v CASE is UPPER.
v CLASS is a question mark (?). (DB2 Server for VSE only)
v CONTINUE is a hyphen (-).
v COPIES is 1. (DB2 Server for VSE only)
v COSTEST is zero.
v DECIMAL is //./.
v ISOLATION is repeatable read.
v LANGUAGE is the default language as defined in the SYSOPTIONS catalog.
v NULL is a question mark (?).
v PAGESIZE is LENGTH=66 WIDTH=132.
v PRINTROUTE is to the system printer. (DB2 Server for VSE only)
v RUNMODE is CONTINUE.
150
Interactive SQL Guide and Reference
v SEPARATOR is two blanks.
v VARCHAR is 20.
The current setting of these functions can be listed with the LIST command. Some
of these settings may already have been changed by a PROFILE routine, or you
may want to change the settings for your session in your PROFILE routine, which
is run automatically when you start ISQL.
Notes:
1. In the VM environment, the user must use the CP commands SPOOL and TAG
to change the routing of the print output.
2. When you are using DRDA protocol in the VSE or VM environment, the
isolation level is set to CS.
AUTOCommit
specifies if commands are to be committed automatically. Unless otherwise
specified, commands are committed automatically.
ON
specifies that changes to tables resulting from an SQL statement are
committed automatically when the statement is processed. This is the
default.
There is an exception to the automatic committing of changes. If the SQL
statement is INSERT, UPDATE, or DELETE, and it affects more than one
data row, the changes are not immediately committed. Instead, the system
issues a message that lets you either commit the work, or cancel or
rollback the changes. If you type CANCEL or ROLLBACK, the changes are
not committed; if you type any other statement, the changes are
committed.
OFF
specifies that changes are not to be committed to a table until a COMMIT
statement is typed.
CASE
specifies if characters enclosed in single quotation marks are to be converted to
uppercase. Unless otherwise specified, all characters typed from the keyboard
are converted to uppercase.
If you specify that the characters are to be converted, SQL uses the conversion
information from the SYSCHARSETS system catalog to handle the conversion.
UPper
specifies that all characters typed from the keyboard or a routine are
converted to uppercase characters. This is the default.
STRing
specifies that all characters enclosed in single quotation marks typed from
the keyboard or a routine are not converted to uppercase characters.
CLAss (DB2 Server for VSE only)
specifies the printer output class.
class
is the output class desired (a letter from A to Z).
? specifies the default printer class of the system.
Unless otherwise specified, the default printer class for the system is used.
Chapter 10. ISQL Commands
151
Note: Class cannot be specified for a CICS/VSE terminal printer.
CONTInue
specifies the continuation character.
character
is the continuation character to use for continuation of input lines.
Choose a character that is not normally the last character of a statement. Also,
do not use a single or double quotation mark, a semicolon, or a blank. Unless
otherwise set, the continuation character is the hyphen (-).
COPies (DB2 Server for VSE only)
specifies the number of copies for printed reports.
integer
is the number of copies that are to be printed when subsequent PRINT
commands are issued.
Unless otherwise specified, the number of copies for printed reports is one.
A maximum of 99 copies can be specified.
Note: The number of copies cannot be specified for a CICS/VSE terminal
printer.
COSTest
specifies when the ISQL Query Cost Estimate (QCE) is displayed. Unless OFF is
specified, the QCE message is always displayed.
OFF
specifies that the ISQL QCE message should not be displayed.
integer
specifies that the ISQL QCE message should be displayed. Replace integer
with any number from 0 to 9999. The QCE is displayed if it is greater than
integer.
While you cannot specify any number greater than 9999, the QCE message
displays ‘>9999’ to indicate the cost is greater than 9999.
For additional information about the ISQL Query Cost Estimate, refer to the
DB2 Server for VSE & VM Database Administration manual.
DECimal
specifies the type of punctuation to use when displaying a decimal column.
/thousands/
is the thousands separator character. Valid characters are a period, a
comma, and a blank.
/decimal/
is the decimal separator character. Valid characters are a period and a
comma.
The slash distinguishes the thousands separator character from the decimal
separator character.
Unless otherwise specified, no thousands separator is used, and the decimal
separator is a period.
152
Interactive SQL Guide and Reference
Valid combinations of t and d are:
Thousands Separator
Decimal Separator
Example
(nothing)
1234.56
,
1,234.56
,
1.234,56
(a blank)
,
1 234,56
For example, assume the value 123456 is contained in a decimal column that
was created with two decimal places. Then, specifying:
set decimal /,/./
provides the following punctuation when this field is displayed:
1,234.56
The DECIMAL keyword does not change how input is specified, only how
output is displayed. For example, to reference the above number (1,234.56) in a
column called SALES in a WHERE clause, you use:
where SALES=1234.56
ISOLation
specifies the isolation level placed on data when you read information from the
application server. You specify the type of lock that the system places on the
data. This is specifying the isolation level. The isolation level specified sets the
degree of independence one terminal user has from another terminal user.
For guidelines on using this setting, see “Specifying the Isolation Level” on
page 95.
RR
requests the isolation level repeatable read. This setting holds locks on the
data you are using until a COMMIT or ROLLBACK is performed. These
locks isolate the data from other users. No one can modify any rows you
have read until your work has been committed or rolled back. Use this
setting when it is important to keep data completely isolated. This is the
default.
Note: For DB2 Server for VSE & VM, if you are using the DRDA protocol,
the default isolation level is set to CS. If you specify any other
setting, it will be ignored.
CS
requests the isolation level cursor stability. Isolation level cursor stability
has meaning only for data in public dbspaces with row and page level
locking. The system locks individual rows or pages depending on the lock
specified in ACQUIRE DBSPACE, ALTER DBSPACE, and LOCK
statements. Use the CS setting to free the data you are reading as soon as
possible.
UR
requests the isolation level uncommitted read. Isolation level uncommitted
read has meaning only for data in public dbspaces with row and page
level locking. This setting applies only to read-only operations (SELECTs).
For other operations (UPDATE, DELETE, and INSERT), the rules of CS
apply. This setting reduces lock contention on data being read; however,
data integrity may be compromised because read-only access to
Chapter 10. ISQL Commands
153
uncommitted data is allowed. Use the UR setting only when it is not
necessary that the data you are reading be committed.
The isolation level specification affects the UPDATE, DELETE, INSERT
with subselect form, and SELECT statements. The correct value to specify
depends on what activity you are performing. Locking problems can be
reduced if the isolation level can be set to cursor stability in your system.
Note: Read and update access to the catalog is performed with a
repeatable read setting, regardless of how you set the isolation level.
This access is activated by dynamic preprocessing of SQL statements
and by SQL data definition statements such as CREATE, ACQUIRE,
and GRANT. Your selects (and updates and deletes, if you are a
DBA) against the catalog are performed according to the isolation
level you set.
SET ISOLATION is acceptable only when the target application server is a
local application server. Otherwise the isolation level of CS is assumed and
the SET ISOLATION command will have no effect.
LANGuage
specifies the language in which online HELP and error messages are displayed.
Operator messages are displayed in the national language of the application
server.
language_name
is the language being specified; for example, French. The description of the
language can be either the IBM-supplied description or the description
chosen by your site. For example, your site may prefer to use Francais
instead of French. Language-name can be up to 40 characters long.
langid
is a 5-character language identifier that can be specified instead of the
language name. The language identifiers are:
AMENG
Mixed Case American English
UCENG
Uppercase American English
FRANC
French
GER
German
KANJI
Japanese
KOR
Korean
HANZI
Simplified Chinese
If the language you specify is not supported, the current language remains
unchanged.
NULL
specifies the characters to be displayed in null fields. Unless otherwise
specified, a question mark (?) is used.
string
specifies the characters (up to a maximum of 20) to use for null fields.
Enclose the string in single quotation marks if it contains a blank.
For example, the following command:
set null empty
154
Interactive SQL Guide and Reference
causes the word EMPTY to be displayed in all null fields.
PAGEsize
specifies the page size for printed output.
WIDth
specifies the width of the paper being used.
integer
is the number of characters that can fit on a line of the output paper.
Unless otherwise specified, the page width is 132. You can specify
values from 19 to 204.
Note: If you are sending your output to the terminal printer, you should
set the page width to the printer width-1 to avoid spacing problems.
For example, if the terminal printer width is 132, then set the width
to 131 with the command SET PAGE WID 131.
LENgth
specifies the length of the page being used.
integer
is the number of printed lines that can fit on the output paper. Unless
otherwise specified, the page length is 66. You can specify values from
9 to 32767. The maximum number of lines that can actually be printed
on a page is 8 less than the length. Eight lines are reserved for top and
bottom titles and margins.
PRINTRoute (DB2 Server for VSE only)
specifies where print output is to be sent.
DESTid
specifies that printed output is to be directed to the designated POWER
remote workstation.
wkstat
is the ID of the desired remote workstation. wkstat can be any number
from 0 to 250. When wkstat is 0, the printed output is to be directed to
the system printer.
TERMid
specifies that printed output is to be directed to the designated CICS/VSE
terminal.
termid
is the terminal identifier of the desired CICS/VSE terminal. The termid
must be from one to four alphanumeric characters.
TOUser
spools the print output the same way it will spool the print output when
the user enters PRINT TOUser userid
userid
is the VSE POWER user identifier of the user to whom the output is being
spooled. An identifier cannot be longer than eight alphanumeric characters.
If the userid is any number from 1 to 250, ISQL will spool the print output
to the POWER remote workstation whome ID is the number specified.
SYStem
specifies that printed output is to be directed to the system printer.
Chapter 10. ISQL Commands
155
RUNMode
specifies whether processing should continue when an error is detected in a
routine. Unless otherwise specified, processing continues.
CONTInue
specifies that processing is to continue to the next command even if errors
are detected in the routine. This is the default.
STOP
specifies that processing is to stop if an error is detected in the routine. No
rollback is performed, and processing is terminated.
CANCEL
specifies that an internal CANCEL is to be issued if an error is detected. A
rollback is issued internally.
SEParator
specifies the separation between columns. Unless otherwise specified, two
blanks are used.
integer BLANKs
specifies the number of spaces to be displayed between columns. Replace
integer with the number of blanks desired. The maximum number of
blanks that can be specified is 254.
string
specifies the characters to be displayed between columns. Enclose the
string in single quotation marks if it contains a blank. For example, if you
want to draw a vertical line between columns, you type:
set separator ' | '
which places a blank, a vertical bar, and a blank between all columns. The
string can be up to 254 characters long.
VARChar
specifies the display width of variable length columns.
integer
is the length desired. The maximum width that can be specified is 254.
Unless otherwise set, the VARCHAR length is 20. Since only the first 20
characters of a variable length column are displayed, this command or a
FORMAT VARCHAR is necessary to view those columns that are wider
than 20 characters.
The SET command can be used with more than one keyword option, allowing you
to set several operational characteristics with a single SET command. These
characteristics are effective for the duration of your terminal session. In the
following example, a single SET command sets operational characteristics for
AUTOCOMMIT, NULL, and SEPARATOR:
set autocommit on null 'no data' separator 2 blanks
156
Interactive SQL Guide and Reference
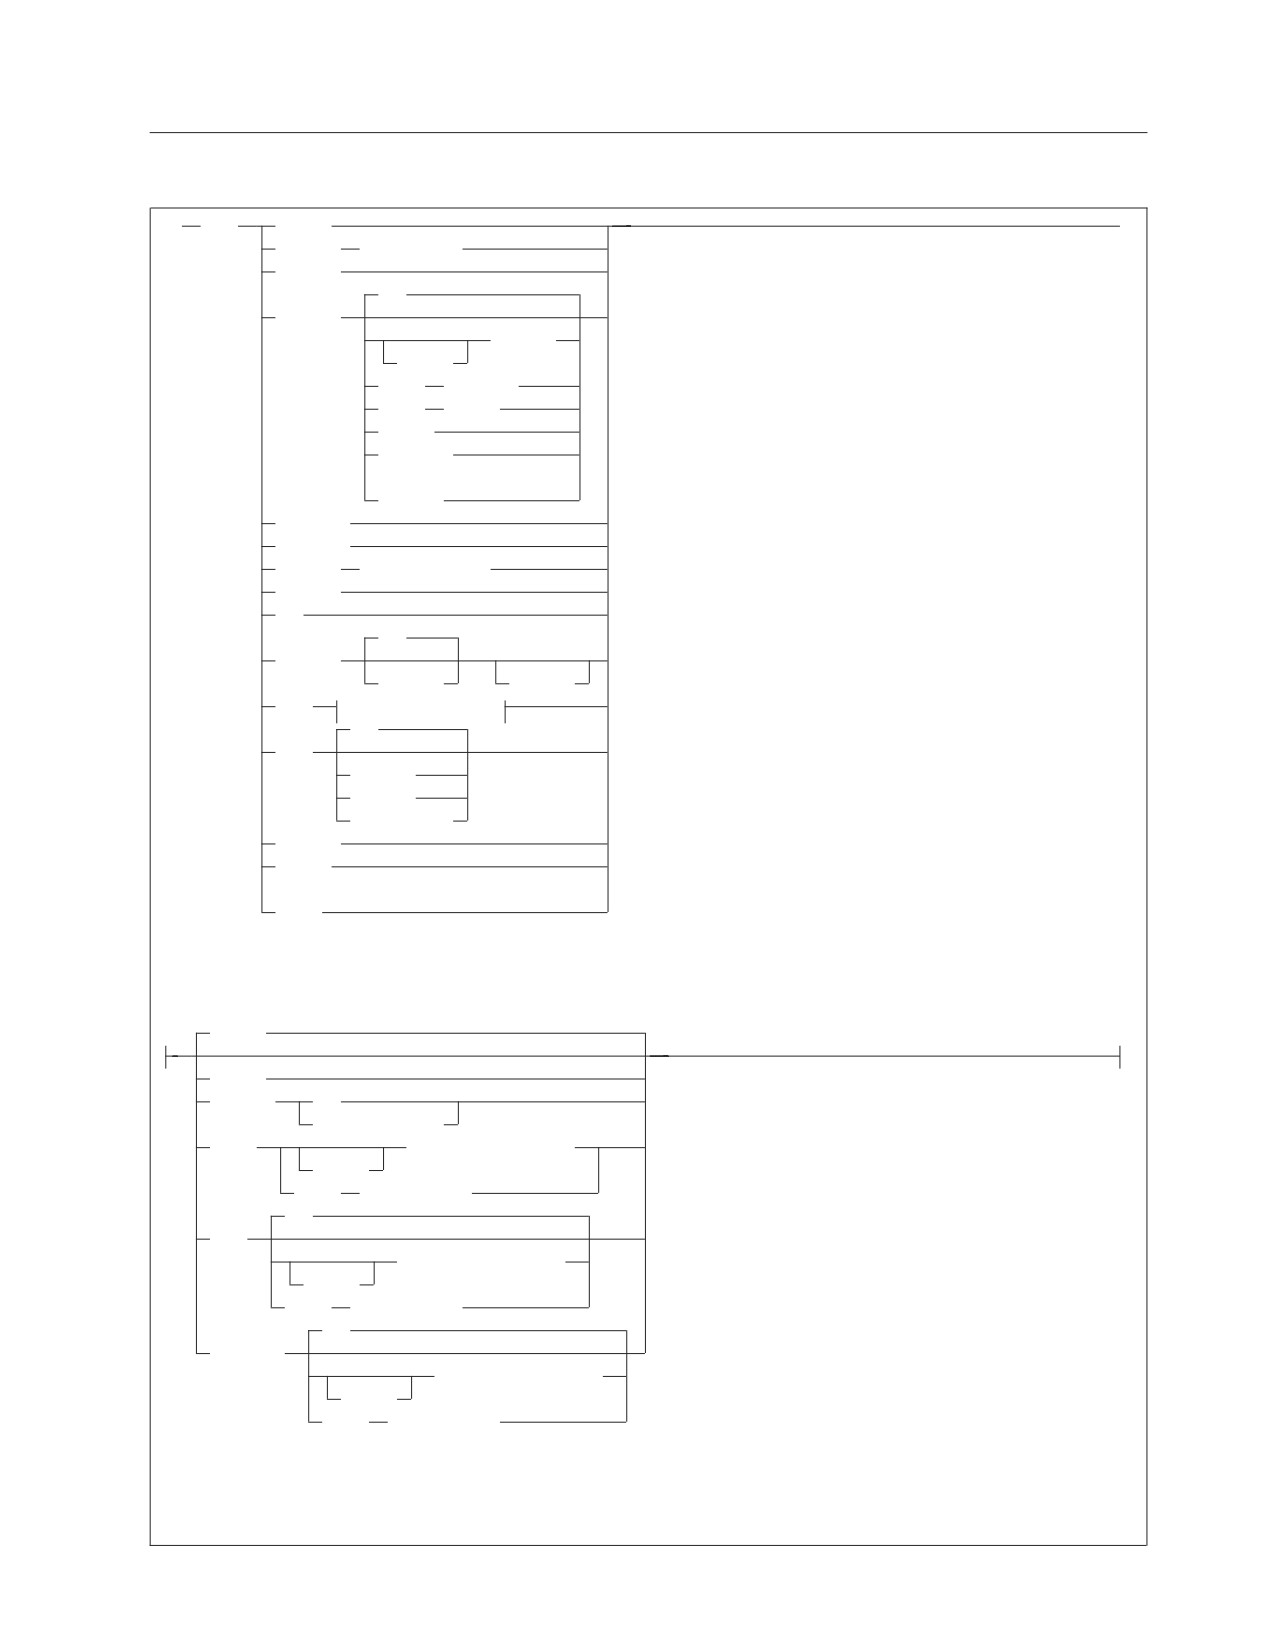
SHOW
SHOW
ACTIVE
ADDRESS module-name
BUFFERS
ALL
CONNECT
userid1
USERID
AGENT agent-no
LUWID luwid1
ACTIVE
INACTIVE
(1)
WAITING
DBCONFIG
DBEXTENT
DBSPACE dbspace-number
INVALID
LOG
ALL
LOGHIST
integer
SERVICE
LOCK
lock parameters
ALL
POOL
SUMMARY
DELETED
pool_number
STORAGE
SYSTEM
(1)
USERS
lock parameters
MATRIX
ACTIVE
DBSPACE
ALL
dbspace_number
GRAPH
authorization_name
USERID
AGENT agent_number
ALL
USER
authorization_name
USERID
AGENT agent_number
ALL
WANTLOCK
authorization_name
USERID
AGENT agent_number
Notes:
1
The parameters WAITING and USERS are not applicable to DB2
Server for VSE
Chapter 10. ISQL Commands
157
SHOW is an operator command used primarily to monitor system activity. It is not
allowed during an LUW, and you must end an LUW that is in progress before
issuing SHOW.
The SHOW command can only be used when the target application server is a
local application server. It cannot be used when the application server is a remote
application server.
See the DB2 Server for VSE & VM Operation manual for a description of the
keywords used on this command and for a description of the information
displayed.
This command results in one or more displays.
DB2 Server for VSE
Instructions for proceeding to the next display of data or ending the display
are provided in the status area.
DB2 Server for VM
Instructions for proceeding to the next display of data or ending the display
are provided in the output area.
When using the SHOW DBSPACE command, replace dbspace-number with the
number of the particular dbspace for which you want information.
The SHOW command is not available on non-DB2 Server for VSE & VM
application servers or if you are using the DRDA protocol.
Note: If the national language of the application server differs from the national
language that the user has set for the ISQL session, the messages generated
by this operator command are issued in the national language of the
application server.
158
Interactive SQL Guide and Reference

START
START
stored_statement_name
(
2
parameter
)
START is an ISQL command that causes a stored SQL statement or the current SQL
statement to be processed.
The START command can be invoked by pressing PF2. The START command can
be invoked by pressing PF2 (or PF14). Because you can reset your PF keys, you can
assign the START function to any PF key.
stored_statement_name
is the name of the stored SQL statement to be started. The name PREVIOUS is
not allowed. To start the previous SQL statement, you must first recall it to the
command buffer and enter START without supplying a name. If
stored_statement_name is not specified, or START PF is pressed, the current SQL
statement is started.
parameter
is the parameter to be substituted for the placeholders in the SQL statement. If
you use more than one parameter, separate them with blanks. Enclose a
parameter in single quotation marks if it contains a blank. Any characters
between the terminating single quotation mark and the next blank are ignored.
All placeholders in the SQL statement that do not have a corresponding
parameter on the START command are replaced by null characters or are
erased. Extra parameters on the START command are ignored.
The parameter can contain DBCS characters.
Example
Assume you have the following SQL statement stored as SELPD:
select &1,&2,&3 -
from emp_act -
where actno = &4 -
or emstdate = '&5'
You could type the START command as:
start selpd (empno actno emptime 90 '1982-06-01')
The resulting statement started is:
select empno,actno,emptime -
from emp_act -
where actno = 90 -
or emstdate = '1982-06-01'
Notice that single quotation marks are needed around the &5 placeholder in the
stored SQL statement because that placeholder stands for a character data item.
Single quotation marks are not needed around &4 because &4 stands for a numeric
data item. Single quotation marks are not needed for &1, &2, and &3 because they
do not contain any blanks.
Chapter 10. ISQL Commands
159
In a stored SQL statement, you can only use the ampersand (&) to create
placeholders.
In the above example, the formatting information is not saved because
placeholders are used in the SELECT clause.
160
Interactive SQL Guide and Reference
STORE
STORE stored_statement_name
REPLACE
STORE is an ISQL command that causes the current SQL (only) statement to be
saved for later use. SQL statements remain stored until erased. When storing an
SQL statement, you must associate a name with it. Use this name to recall the SQL
statement when you want to execute it. The SQL statement, when stored, also
remains as the current SQL statement.
Stored statements can be started, listed, renamed, erased, or recalled. When a
stored statement is started, renamed, or recalled, it becomes the current SQL
statement.
stored_statement_name
is the name you want to use to refer to the stored statement. Names can be up
to 8 characters long. The name PREVIOUS is not allowed because ISQL always
stores the current statement under that name when a new SQL statement is
typed.
REPLACE
specifies that the current statement is to replace any existing stored SQL
statement with the same name. If REPLACE is not specified and there is an
existing stored SQL statement with the same name, a warning message is
issued. This message gives you three options to select from:
v REPLACE, to replace the existing stored SQL statement with the current SQL
statement
v END, to end the processing of the STORE command.
v Type a different name to be used as the name for the current SQL statement
being stored.
When you store a SELECT statement, related display formatting information is also
stored. Formatting is defined by FORMAT commands or current DB2 Server for
VSE & VM formatting defaults. This information, which cannot be “seen”, remains
stored with the SELECT statement and formats the display when the statement is
recalled and executed. However, the following exceptions exist:
v Formatting information is not saved when SELECT statements are stored that
contain placeholders in the SELECT or FROM clauses. Formatting information is
saved when the placeholders occur in clauses other than the SELECT and FROM
clauses.
v If a stored SELECT command is changed by a CHANGE command, formatting
information is saved only when the change occurs in the WHERE, GROUP BY,
ORDER BY, or HAVING clauses (that is, when the change does not occur in the
SELECT or FROM clauses).
v If a table referenced by a stored query is dropped and later created with
different column characteristics (such as DECIMAL instead of INTEGER),
existing formatting information is not used.
The notation SELECT * FROM table_name is not recommended for use in stored
SELECT statements. It is possible that someone can add a new column to the table,
which causes any stored format information for the SELECT statement to be
Chapter 10. ISQL Commands
161
erased. By explicitly naming the columns required, or by referring to a view
instead of a table (the view can have SELECT *), you can avoid this problem.
The steps necessary to store FORMAT command information along with an SQL
statement are:
1. Execute a SELECT statement to retrieve data.
2. Type one or more FORMAT commands to format the display.
3. Type an END command to end the display.
4. Type a STORE command to store the statement (which is still the current SQL
statement) and any formatting information.
162
Interactive SQL Guide and Reference
TAB
1
TAB
integer
TAB is an ISQL display command that enables you to view all the characters of a
column that is too wide to fit on the display. It lets you display any adjacent
characters of the column; the number of characters displayed is equal to the width
of your display. Before issuing TAB, place the desired column at the left edge of
the display.
integer
is the number that represents the character’s position where the display is to
start. If no number is specified, the display starts at the first character position
of the column.
The TAB command is valid only for CHAR or VARCHAR columns.
Example
Suppose you are viewing a column whose length attribute is 100 characters. If you
are using a 24 x 80 display and you want to view the characters beyond the 80th,
you type:
tab 81
This displays the column, starting with the 81st character at the left edge of the
display.
Chapter 10. ISQL Commands
163
164
Interactive SQL Guide and Reference
Appendix A. Answers to the Exercises
The following answers are shown with each clause on a separate line so that you
can easily check your commands. You can, of course, put the entire command on
one line if it fits. Or, you can use several lines and break each line at a different
place than shown here. It is your choice. Just follow the rules for using the
continuation character.
Exercise 1:
(page 31)
1.
forward 39
2.
forward max
3.
right 1
or
column 2
4.
left 1
or
column 1
5.
backward max
6.
print
7.
end
Exercise 2:
(page 42)
1.
hold select * from department
2.
change /*/&1,&2/;
3.
a. start (deptno deptname)
b. end
4.
change /nt/nt where &3/;
5.
start (deptname mgrno admrdept='e01')
Exercise 3:
(page 50)
1.
select empno,projno,emptime -
from emp_act -
where projno='if1000' or projno='if2000'
-
order by projno,empno
2.
format separator '
* '
3.
format exclude empno
OR
format exclude 1
OR
format include only (projno emptime)
OR
format include only (2 3)
4. a. format column emptime name proptn
OR
format column 3 name proptn
b. format column proptn width 8
OR
format column 3 width 8
Note: You can also do items 2 through 4 using a single FORMAT command:
format separator ' * ' exclude 1 -
column emptime name proptn width 8
165
Exercise 4:
(page 65)
DB2 Server for VSE
1.
set copies 2
2.
list set *
3.
select * -
from proj_act -
where projno='ad3112' -
order by acendate
4.
format group acendate
AND
format exclude (acstdate)
OR
format group acendate exclude (4)
5.
format ttitle 'personnel programming deadlines'
6.
print
DB2 Server for VM
1.
list set *
2.
select * -
from proj_act -
where projno='ad3112' -
order by acendate
3.
format group acendate
AND
format exclude (acstdate)
OR
format group acendate exclude (4)
4.
format ttitle 'personnel programming deadlines'
5.
print copies 2
Exercise 5:
(page 72)
1.
recall myquery
2.
change /&1/salary between 25000 and 30000 order by
2/
3.
start
4.
format exclude (3)
OR
format exclude (midinit)
5.
format separator ' |*| '
6.
format column edlevel name 'school years'
7.
a. end
b. store EXER11
8.
list sql *
9.
help store
Exercise 6:
(page 81)
This answer assumes you have a REMARKS column in your ROUTINE table.
166
Interactive SQL Guide and Reference
1.
input routine
a. 'exer13',10,'select actno,actdesc -',null
'exer13',20,'from activity',null
b. 'exer13',30,'format separator 3 blanks',null
c. 'exer13',40,'display',null
d. 'exer13',50,'print copies 3',null
e. 'exer13',60,'end',null
end
Note: Any sequence numbers are valid as long as they are in ascending order.
Appendix A. Answers to the Exercises
167
168
Interactive SQL Guide and Reference
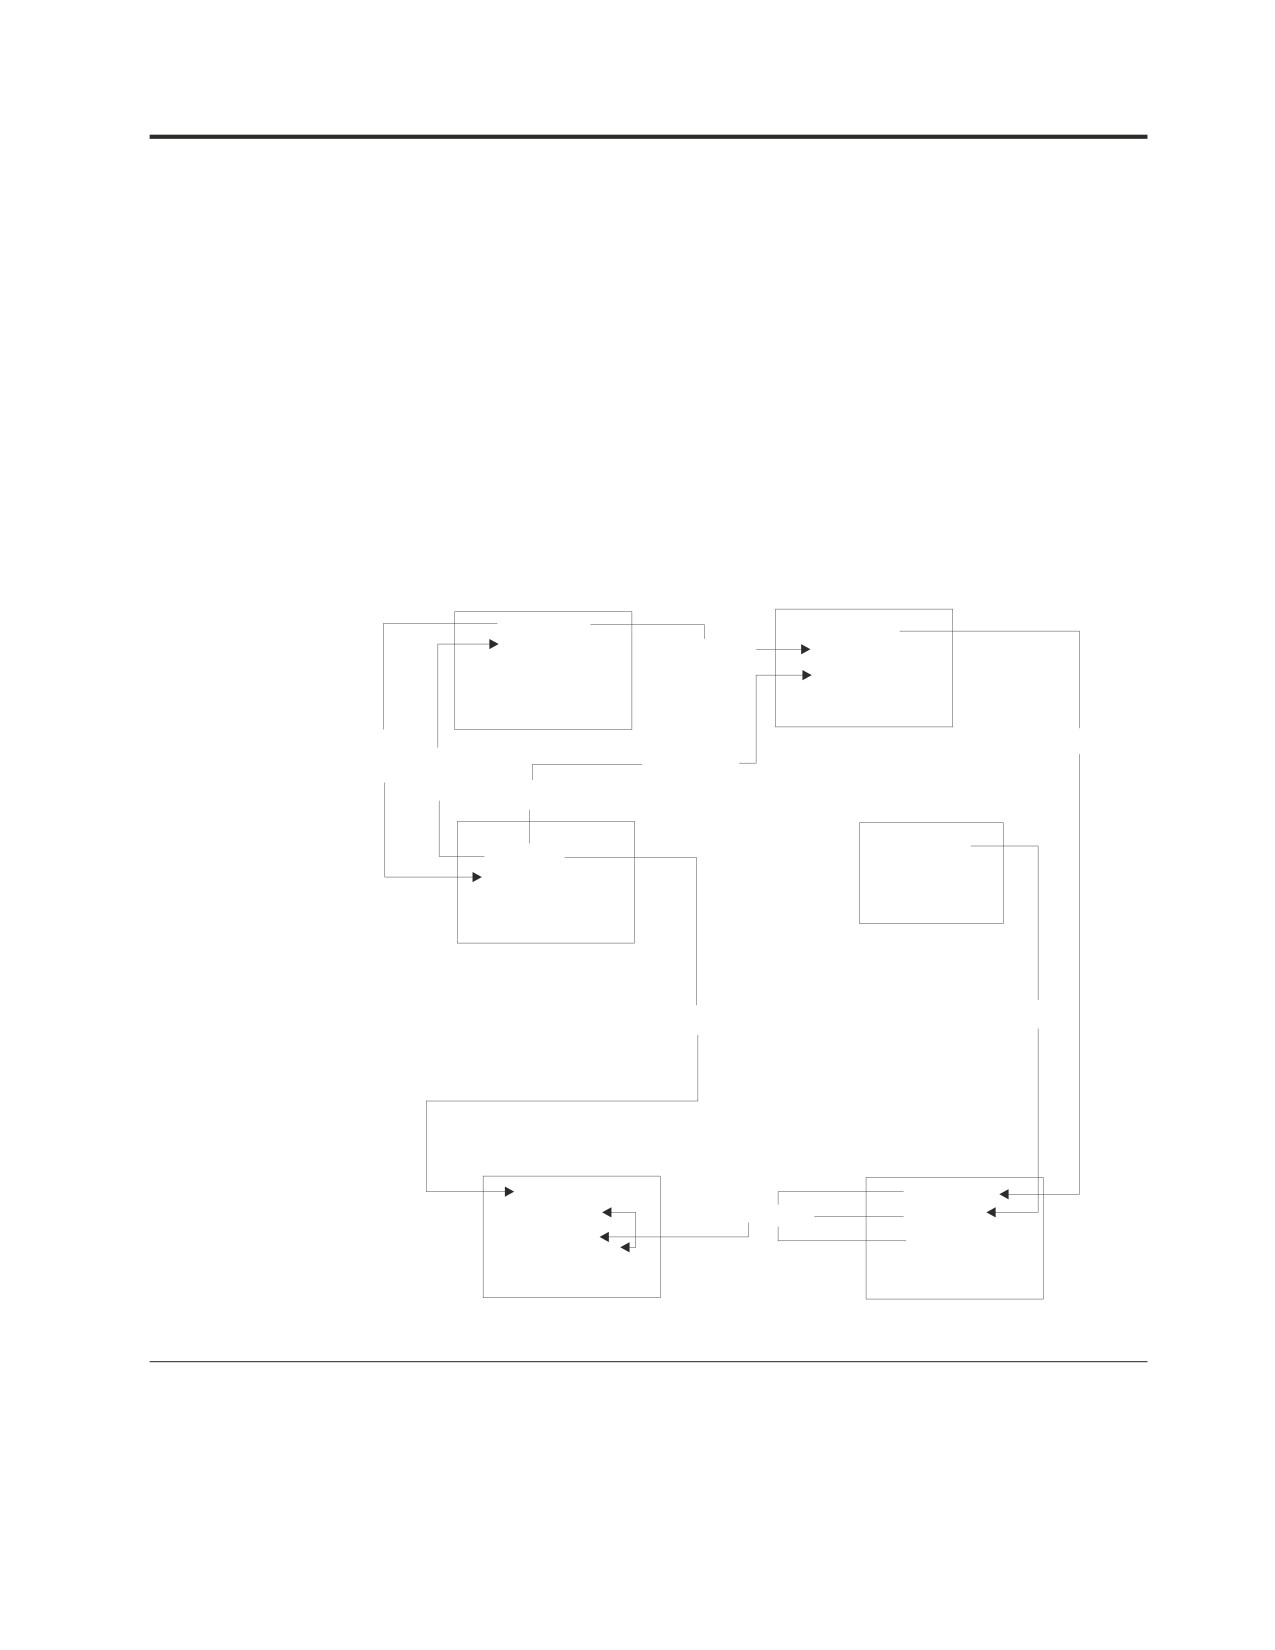
Appendix B. Sample Tables
The sample tables illustrated in this appendix are used in examples throughout the
library. These tables simulate a database created for use in organization or project
management applications. As a group, the tables include information that describes
employees, departments, projects, and activities. Figure 50 shows the relationships
among the tables. These relationships are established by referential constraints,
where a foreign key in the dependent table references a primary key in the parent
table. In the figure, the referential constraint is symbolized by lines joining the
keys; the arrowheads point from the primary key to the foreign key. Only those
columns named as foreign or primary keys are listed in the figure. All tables have
additional columns. You can easily review the contents of any table by executing
an SQL statement, such as SELECT * FROM SQLDBA.DEPARTMENT.
DEPARTMENT
PROJECT
DEPTNO
PROJNO
MGRNO
RESTRICT
DEPTNO
RESPEMP
RESTRICT
SET
SET NULL
SET
NULL
NULL
EMPLOYEE
ACTIVITY
ACTNO
EMPNO
WORKDEPT
RESTRICT
CASCADE
EMP_ACT
PROJ_ACT
EMPNO
PROJNO
PROJNO
RESTRICT
ACTNO
ACTNO
ACTSTDATE
EMSTDATE
Figure 50. Relationships among Tables in the Sample Application
DEPARTMENT Table
The DEPARTMENT table describes each department in the business and identifies
its manager and the department to which it reports. The table contents are shown
in Figure 51 on page 170; a description of the columns is shown in Figure 52.
169
DEPTNO DEPTNAME
MGRNO ADMRDEPT
A00
SPIFFY COMPUTER SERVICE DIV.
000010
A00
B01
PLANNING
000020
A00
C01
INFORMATION CENTER
000030
A00
D01
DEVELOPMENT CENTER
?
A00
E01
SUPPORT SERVICES
000050
A00
D11
MANUFACTURING SYSTEMS
000060
D01
D21
ADMINISTRATION SYSTEMS
000070
D01
E11
OPERATIONS
000090
E01
E21
SOFTWARE SUPPORT
000100
E01
Figure 51. DEPARTMENT Table Contents
Column Name
Description
DEPTNO
Department number, the primary key
DEPTNAME
A name describing the general activities of
the department
MGRNO
Employee number (EMPNO) of the
department manager
ADMRDEPT
Number of the department to which this
department reports; the department at the
highest level reports to itself
Figure 52. Columns of the DEPARTMENT Table
The DEPARTMENT table is created with:
CREATE TABLE DEPARTMENT
(DEPTNO
CHAR(3)
NOT NULL,
DEPTNAME VARCHAR(36)
NOT NULL,
MGRNO
CHAR(6)
,
ADMRDEPT
CHAR(3)
NOT NULL,
PRIMARY KEY (DEPTNO)
)
After the EMPLOYEE table has been created, a foreign key is added to the
DEPARTMENT table with this statement:
ALTER TABLE DEPARTMENT ADD
FOREIGN KEY R_EMPLY1 (MGRNO) REFERENCES EMPLOYEE
ON DELETE SET NULL
Relationship to Other Tables
DEPARTMENT is a parent of the EMPLOYEE and PROJECT tables.
The DEPARTMENT table is a dependent of the EMPLOYEE table; the MGRNO
column is the foreign key in the DEPARTMENT table and references EMPNO, the
primary key in the EMPLOYEE table.
170
Interactive SQL Guide and Reference
EMPLOYEE Table
The EMPLOYEE table identifies all employees by an employee number and lists
basic personnel information. The table in Table 8 on page 172 shows the contents of
the EMPLOYEE table; Table 9 on page 174 shows a description of the columns.
Appendix B. Sample Tables
171

Table 8. EMPLOYEE Table Contents
MID
WORK
PHONE
ED
EMPNO FIRSTNME
INIT
LASTNAME
DEPT
NO
HIREDATE JOB
LEVEL SEX
BIRTHDATE SALARY BONUS
COMM
char(6)
varchar(12)
char(1)
varchar(15)
char(3)
char(4)
date
char(8)
smallint
char(1)
date
dec(9,2)
dec(9,2)
dec(9,2)
not null
not null
not
not null
not null
null
000010
CHRISTINE
I
HAAS
A00
3978
1965-01-01
PRES
18
F
1933-08-24
52750
1000
4220
000020
MICHAEL
L
THOMPSON
B01
3476
1973-10-10
MANAGER
18
M
1948-02-02
41250
800
3300
000030
SALLY
A
KWAN
C01
4738
1975-04-05
MANAGER
20
F
1941-05-11
38250
800
3060
000050
JOHN
B
GEYER
E01
6789
1949-08-17
MANAGER
16
M
1925-09-15
40175
800
3214
000060
IRVING
F
STERN
D11
6423
1973-09-14
MANAGER
16
M
1945-07-07
32250
500
2580
000070
EVA
D
PULASKI
D21
7831
1980-09-30
MANAGER
16
F
1953-05-26
36170
700
2893
000090
EILEEN
W
HENDERSON
E11
5498
1970-08-15
MANAGER
16
F
1941-05-15
29750
600
2380
000100
THEODORE
Q
SPENSER
E21
0972
1980-06-19
MANAGER
14
M
1956-12-18
26150
500
2092
000110
VINCENZO
G
LUCCHESSI
A00
3490
1958-05-16
SALESREP
19
M
1929-11-05
46500
900
3720
000120
SEAN
O’CONNELL
A00
2167
1963-12-05
CLERK
14
M
1942-10-18
29250
600
2340
000130
DOLORES
M
QUINTANA
C01
4578
1971-07-28
ANALYST
16
F
1925-09-15
23800
500
1904
000140
HEATHER
A
NICHOLLS
C01
1793
1976-12-15
ANALYST
18
F
1946-01-19
28420
600
2274
000150
BRUCE
ADAMSON
D11
4510
1972-02-12
DESIGNER
16
M
1947-05-17
25280
500
2022
000160
ELIZABETH
R
PIANKA
D11
3782
1977-10-11
DESIGNER
17
F
1955-04-12
22250
400
1780
000170
MASATOSHI
J
YOSHIMURA
D11
2890
1978-09-15
DESIGNER
16
M
1951-01-05
24680
500
1974
000180
MARILYN
S
SCOUTTEN
D11
1682
1973-07-07
DESIGNER
17
F
1949-02-21
21340
500
1707
000190
JAMES
H
WALKER
D11
2986
1974-07-26
DESIGNER
16
M
1952-06-25
20450
400
1636
000200
DAVID
BROWN
D11
4501
1966-03-03
DESIGNER
16
M
1941-05-29
27740
600
2217
000210
WILLIAM
T
JONES
D11
0942
1979-04-11
DESIGNER
17
M
1953-02-23
18270
400
1462
000220
JENNIFER
K
LUTZ
D11
0672
1968-08-29
DESIGNER
18
F
1948-03-19
29840
600
2387
000230
JAMES
J
JEFFERSON
D21
2094
1966-11-21
CLERK
14
M
1935-05-30
22180
400
1774
000240
SALVATORE
M
MARINO
D21
3780
1979-12-05
CLERK
17
M
1954-03-31
28760
600
2301
000250
DANIEL
S
SMITH
D21
0961
1969-10-30
CLERK
15
M
1939-11-12
19180
400
1534
000260
SYBIL
P
JOHNSON
D21
8953
1975-09-11
CLERK
16
F
1936-10-05
17250
300
1380
000270
MARIA
L
PEREZ
D21
9001
1980-09-30
CLERK
15
F
1953-05-26
27380
500
2190
Table 8. EMPLOYEE Table Contents (continued)
MID
WORK PHONE
ED
EMPNO FIRSTNME INIT LASTNAME DEPT NO
HIREDATE JOB
LEVEL SEX BIRTHDATE SALARY BONUS COMM
000280
ETHEL
R
SCHNEIDER E11
8997
1967-03-24
OPERATOR
17
F
1936-03-28
26250
500
2100
000290
JOHN
R
PARKER
E11
4502
1980-05-30
OPERATOR
12
M
1946-07-09
15340
300
1227
000300
PHILIP
X
SMITH
E11
2095
1972-06-19
OPERATOR
14
M
1936-10-27
17750
400
1420
000310
MAUDE
F
SETRIGHT
E11
3332
1964-09-12
OPERATOR
12
F
1931-04-21
15900
300
1272
000320
RAMLAL
V
MEHTA
E21
9990
1965-07-07
FIELDREP
16
M
1932-08-11
19950
400
1596
000330
WING
LEE
E21
2103
1976-02-23
FIELDREP
14
M
1941-07-18
25370
500
2030
000340
JASON
R
GOUNOT E21
5698
1947-05-05
FIELDREP
16
M
1926-05-17
23840
500
1907

Table 9. Columns of the EMPLOYEE Table
Column Name
Description
EMPNO
Employee number (the primary key)
FIRSTNME
First name of the employee
MIDINIT
Middle initial of the employee
LASTNAME
Last name of the employee
WORKDEPT
Number of department in which the
employee works
PHONENO
Employee telephone number
HIREDATE
Date of hire
JOB
Job held by the employee
EDLEVEL
Number of years of formal education
SEX
Sex of the employee (M or F)
BIRTHDATE
Date of birth
SALARY
Yearly salary
BONUS
Yearly bonus
COMM
Yearly commission
The EMPLOYEE table has a foreign key referencing the primary key in the
DEPARTMENT table. The DEPARTMENT table must, therefore, be created first.
The EMPLOYEE table is then created with:
CREATE TABLE EMPLOYEE
(EMPNO
CHAR(6)
NOT NULL,
FIRSTNME VARCHAR(12)
NOT NULL,
MIDINIT CHAR(1)
NOT NULL,
LASTNAME VARCHAR(15)
NOT NULL,
WORKDEPT CHAR(3)
,
PHONENO CHAR(4)
,
HIREDATE DATE
,
JOB
CHAR(8)
,
EDLEVEL
SMALLINT
NOT NULL,
SEX
CHAR(1)
,
BIRTHDATE DATE
,
SALARY
DECIMAL(9,2)
,
BONUS
DECIMAL(9,2)
,
COMM
DECIMAL(9,2)
,
PRIMARY KEY (EMPNO)
,
FOREIGN KEY R_DEPT1 (WORKDEPT) REFERENCES DEPARTMENT
ON DELETE SET NULL
)
Relationship to Other Tables
The EMPLOYEE table is a parent of the DEPARTMENT table, the PROJECT table,
and the EMP_ACT table.
The EMPLOYEE table is a dependent of the DEPARTMENT table; the foreign key
on the WORKDEPT column in the EMPLOYEE table references the primary key on
the DEPTNO column in the DEPARTMENT table.
174
Interactive SQL Guide and Reference
PROJECT Table
The PROJECT table describes each project that the business is currently
undertaking. Data contained in each row includes the project number, name,
person responsible, and schedule dates as shown in Table 10; Table 11
describes the
columns.
Table 10. PROJECT Table Contents
PROJNO
PROJNAME
DEPTNO
RESPEMP
PRSTAFF
PRSTDATE
PRENDATE
MAJPROJ
AD3100
ADMIN SERVICES
D01
000010
6.5
1982-01-01
1983-02-01
?
AD3110
GENERAL ADMIN
D21
000070
6
1982-01-01
1983-02-01
AD3100
SYSTEMS
AD3111
PAYROLL
D21
000230
2
1982-01-01
1983-02-01
AD3110
PROGRAMMING
AD3112
PERSONNEL
D21
000250
1
1982-01-01
1983-02-01
AD3110
PROGRAMMING
AD3113
ACCOUNT
D21
000270
2
1982-01-01
1983-02-01
AD3110
PROGRAMMING
IF1000
QUERY SERVICES
C01
000030
2
1982-01-01
1983-02-01
?
IF2000
USER EDUCATION
C01
000030
1
1982-01-01
1983-02-01
?
MA2100
WELD LINE
D01
000010
12
1982-01-01
1983-02-01
?
AUTOMATION
MA2110
WL
D11
000060
9
1982-01-01
1983-02-01
MA2100
PROGRAMMING
MA2111
W L PROGRAM
D11
000220
2
1982-01-01
1982-12-01
MA2110
DESIGN
MA2112
W L ROBOT
D11
000150
3
1982-01-01
1982-12-01
MA2110
DESIGN
MA2113
W L PROD CONT
D11
000160
3
1982-02-15
1982-12-01
MA2110
PROGS
OP1000
OPERATION
E01
000050
6
1982-01-01
1983-02-01
?
SUPPORT
OP1010
OPERATION
E11
000090
5
1982-01-01
1983-02-01
OP1000
OP2000
GEN SYSTEMS
E01
000050
5
1982-01-01
1983-02-01
?
SERVICES
OP2010
SYSTEMS
E21
000100
4
1982-01-01
1983-02-01
OP2000
SUPPORT
OP2011
SCP SYSTEMS
E21
000320
1
1982-01-01
1983-02-01
OP2010
SUPPORT
OP2012
APPLICATIONS
E21
000330
1
1982-01-01
1983-02-01
OP2010
SUPPORT
OP2013
DB/DC SUPPORT
E21
000340
1
1982-01-01
1983-02-01
OP2010
PL2100
WELD LINE
B01
000020
1
1982-01-01
1982-09-15
MA2100
PLANNING
Table 11. Columns of the PROJECT Table
Column Name
Description
PROJNO
Project number (the primary key)
PROJNAME
Project name
Appendix B. Sample Tables
175
Table 11. Columns of the PROJECT Table (continued)
Column Name
Description
DEPTNO
Number of department responsible for the
project
RESPEMP
Number of employee responsible for the
project
PRSTAFF
Estimated mean project staffing (mean
number of persons) needed between
PRSTDATE and PRENDATE to achieve the
whole project, including any subprojects
PRSTDATE
Estimated project start date
PRENDATE
Estimated project end date
MAJPROJ
Number of any major project of which the
subject project may be a part
The PROJECT table has foreign keys referencing DEPARTMENT and EMPLOYEE.
The EMPLOYEE and DEPARTMENT tables must be created before the PROJECT
table. Once EMPLOYEE and DEPARTMENT are created, the following statement
creates the PROJECT table:
CREATE TABLE PROJECT
(PROJNO
CHAR(6)
NOT NULL,
PROJNAME VARCHAR(24)
NOT NULL,
DEPTNO
CHAR(3)
NOT NULL,
RESPEMP
CHAR(6)
,
PRSTAFF
DECIMAL(5,2)
,
PRSTDATE
DATE
,
PRENDATE
DATE
,
MAJPROJ
CHAR(6)
,
PRIMARY KEY (PROJNO)
,
FOREIGN KEY R_DEPT2 (DEPTNO) REFERENCES DEPARTMENT
ON DELETE RESTRICT
,
FOREIGN KEY R_EMPLY2 (RESPEMP) REFERENCES EMPLOYEE
ON DELETE SET NULL
)
Relationship to Other Tables
PROJECT is a parent of the PROJ_ACT table.
PROJECT is a dependent of:
v The DEPARTMENT table; the foreign key on the DEPTNO column in PROJECT
references the primary key in the DEPARTMENT table.
v The EMPLOYEE table; the foreign key on the RESPEMP column in PROJECT
references the primary key in the EMPLOYEE table.
ACTIVITY Table
The ACTIVITY tables describes the activities that can be performed during a
project. The table acts as a master list of possible activities, identifying the activity
number, and providing a description of the activity. Figure 53 on page 177 shows
table contents; Figure 54 on page 177 shows a description of the columns.
176
Interactive SQL Guide and Reference

ACTNO
ACTKWD
ACTDESC
160
ADMDB
Adm databases
170
ADMDC
Adm data comm
90
ADMQS
Adm query system
150
ADMSYS
Adm operating sys
70
CODE
Code programs
110
COURSE
Develop courses
30
DEFINE
Define specs
180
DOC
Document
20
ECOST
Estimate cost
40
LEADPR
Lead program/design
60
LOGIC
Describe logic
140
MAINT
Maint software sys
10
MANAGE
Manage/advise
130
OPERAT
Oper computer sys
50
SPECS
Write specs
120
STAFF
Pers and staffing
100
TEACH
Teach classes
80
TEST
Test programs
Figure 53. ACTIVITY Table Contents
Column Name
Description
ACTNO
Activity number (the primary key)
ACTKWD
Activity keyword (up to six characters)
ACTDESC
Activity description
Figure 54. Columns of the ACTIVITY Table
The ACTIVITY table is created with:
CREATE TABLE ACTIVITY
(ACTNO
SMALLINT
NOT NULL,
ACTKWD CHAR(6)
NOT NULL,
ACTDESC VARCHAR(20)
NOT NULL,
PRIMARY KEY (ACTNO)
)
Relationship to Other Tables
ACTIVITY is a parent of the PROJ_ACT table.
PROJ_ACT Table
The PROJ_ACT table lists the activities performed for each project. The table
contains information on the start and completion dates of the project activity as
well as staffing requirements as shown in Figure 55 on page 178. Figure 56 on
page 179 shows a description of the columns.
Appendix B. Sample Tables
177
PROJNO
ACTNO
ACSTAFF
ACSTDATE
ACENDATE
AD3100
10
0.50
1982-01-01
1982-07-01
AD3110
10
1.00
1982-01-01
1983-01-01
AD3111
60
0.80
1982-01-01
1982-04-15
AD3111
70
1.50
1982-02-15
1982-10-15
AD3111
80
1.25
1982-04-15
1983-01-15
AD3111
180
1.00
1982-10-15
1983-01-15
AD3112
60
0.75
1982-01-01
1982-05-15
AD3112
60
0.75
1982-12-01
1983-01-01
AD3112
70
0.75
1982-01-01
1982-10-15
AD3112
80
0.35
1982-08-15
1982-12-01
AD3112
180
0.50
1982-08-15
1983-01-01
AD3113
60
0.75
1982-03-01
1982-10-15
AD3113
70
1.25
1982-06-01
1982-12-15
AD3113
80
1.75
1982-01-01
1982-04-15
AD3113
180
0.75
1982-03-01
1982-07-01
IF1000
10
0.50
1982-01-01
1983-01-01
IF1000
90
1.00
1982-01-01
1983-01-01
IF1000
100
0.50
1982-01-01
1983-01-01
IF2000
10
0.50
1982-01-01
1983-01-01
IF2000
100
0.75
1982-01-01
1982-07-01
IF2000
110
0.50
1982-03-01
1982-07-01
IF2000
110
0.50
1982-10-01
1983-01-01
MA2100
10
0.50
1982-01-01
1982-11-01
MA2100
20
1.00
1982-01-01
1982-03-01
MA2110
10
1.00
1982-01-01
1983-02-01
MA2111
40
1.00
1982-01-01
1983-02-01
MA2111
50
1.00
1982-01-01
1092-06-01
MA2111
60
1.00
1982-06-01
1983-02-01
MA2112
60
2.00
1982-01-01
1982-07-01
MA2112
70
1.50
1983-02-01
1983-02-01
Figure 55. Partial Contents of PROJ_ACT Table
178
Interactive SQL Guide and Reference

Column Name
Description
PROJNO
Project number
ACTNO
Activity number
ACSTAFF
Estimated mean number of employees
needed to staff the activity
ACSTDATE
Estimated activity start date
ACENDATE
Estimated activity completion date
Figure 56. Columns of the PROJ_ACT Table
The table has a composite primary key and was created with:
CREATE TABLE PROJ_ACT
(PROJNO
CHAR(6)
NOT NULL,
ACTNO
SMALLINT
NOT NULL,
ACSTAFF
DECIMAL(5,2)
,
ACSTDATE
DATE
NOT NULL,
ACENDATE
DATE
,
PRIMARY KEY (PROJNO, ACTNO, ACTSTDATE),
FOREIGN KEY R_PROJ2 (PROJNO) REFERENCES PROJECT
ON DELETE RESTRICT,
FOREIGN KEY R_ACTIV (ACTNO) REFERENCE ACTIVITY
ON DELETE RESTRICT)
Relationship to Other Tables
PROJ_ACT is a parent of the EMP_ACT table.
It is a dependent of:
v The ACTIVITY table; the foreign key on ACTNO in the PROJ_ACT table
references the primary key, ACTNO, in the ACTIVITY table.
v The PROJECT table; the foreign key on PROJNO in the PROJ_ACT table
references the primary key, PROJNO, in the PROJECT table.
EMP_ACT Table
The EMP_ACT table identifies the employee performing each activity listed for
each project. The table in Figure 57 on page 180 shows some of the rows in this
table. Figure 58 on page 180 shows a description of the columns.
Appendix B. Sample Tables
179

EMPNO PROJNO ACTNO
EMPTIME EMSTDATE EMENDATE
000130
IF1000
90
1.00
1982-01-01
1982-10-01
000130
IF1000
100
.50
1982-10-01
1983-01-01
000140
IF1000
90
.50
1982-10-01
1983-01-01
000030
IF1000
10
.50
1982-06-01
1983-01-01
000030
IF2000
10
.50
1982-01-01
1983-01-01
000140
IF2000
100
1.00
1982-01-01
1982-03-01
000140
IF2000
100
.50
1982-03-01
1982-07-01
000140
IF2000
110
.50
1982-03-01
1982-07-01
000140
IF2000
110
.50
1982-10-01
1983-01-01
000010
MA2100
10
.50
1982-01-01
1982-11-01
000110
MA2100
20
1.00
1982-01-01
1982-03-01
000020
PL2100
30
1.00
1982-01-01
1982-09-15
000010
MA2110
10
1.00
1982-01-01
1983-02-01
000220
MA2111
40
1.00
1982-01-01
1983-02-01
Figure 57. Partial Contents of EMP_ACT Table
Column Name
Description
EMPNO
Employee number
PROJNO
Project number of the project to which the
employee is assigned
ACTNO
Activity number within a project to which
an employee is assigned
EMPTIME
A proportion of the employee’s full time
(between 0.00 and 1.00) to be spent on the
project from EMSTDATE to EMENDATE
EMSTDATE
Date the activity starts
EMENDATE
Completion date of the activity
Figure 58. Columns of the EMP_ACT Table
Since the table has foreign keys referencing EMPLOYEE and PROJ_ACT, those
tables must be created first.
This table was created with:
CREATE TABLE EMP_ACT
(EMPNO
CHAR(6)
NOT NULL,
PROJNO
CHAR(6)
NOT NULL,
ACTNO
SMALLINT
NOT NULL,
EMPTIME
DECIMAL(5,2)
,
EMSTDATE
DATE
,
EMENDATE
DATE
,
FOREIGN KEY R_PROACT (PROJNO,ACTNO,EMSTDATE)
180
Interactive SQL Guide and Reference

REFERENCES PROJ_ACT ON DELETE RESTRICT,
FOREIGN KEY R_EMPLY3 (EMPNO) REFERENCES EMPLOYEE
ON DELETE CASCADE
)
Relationship to Other Tables
The EMP_ACT table is a dependent of:
v The EMPLOYEE table; the foreign key on EMPNO in the EMP_ACT table
references the primary key, EMPNO, in the EMPLOYEE table.
v The PROJ_ACT table; the foreign key on the set of PROJNO, ACTNO,
EMSTDATE in the EMP_ACT table references the primary key, PROJNO,
ACTNO, ACSTDATE, in the PROJ_ACT table.
IN_TRAY Table
The IN_TRAY table contains a person’s note log. The table contents are shown in
Figure 59; a description of the columns is shown in Figure 60.
RECEIVED
SOURCE
SUBJECT
NOTE_TEXT
1965-01-01-07.00.00
SQLDBA
English
Here is a note from
your DBA.
Figure 59. IN_TRAY Table Contents
Column Name
Description
RECEIVED
Date and time note was received
SOURCE
User id of person sending note
SUBJECT
Brief description
NOTE_TEXT
The text of the note
Figure 60. Columns of the IN_TRAY Table
This table was created with:
CREATE TABLE IN_TRAY
(RECEIVED
TIMESTAMP NOT NULL,
SOURCE
CHAR(8)
NOT NULL,
SUBJECT
CHAR(64)
,
NOTE_TEXT
VARCHAR(4000)
)
CL_SCHED Table
The CL_SCHED table describes a classroom schedule. The table contents are
shown in Figure 61; a description of the columns is shown in Figure 62 on
page 182.
CLASS_CODE
DAY
STARTING
ENDING
101:KAR
2
14.10.00
16.10.00
202:LMM
3
14.40.00
16.40.00
303:RAR
4
09.00.00
09.40.00
Figure 61. CL_SCHED Table Contents
Appendix B. Sample Tables
181
CL_SCHED Table
Column Name
Description
CLASS_CODE
Class Code (room:teacher)
DAY
Day number of four day schedule
STARTING
Class start time
ENDING
Class end time
Figure 62. Columns of the CL_SCHED Table
This table was created with:
CREATE TABLE CL_SCHED
(CLASS_CODE
CHAR(7) NOT NULL,
DAY
SMALLINT NOT NULL,
STARTING
TIME
NOT NULL,
ENDING
TIME
NOT NULL)
Note: For more information about data types, refer to the DB2 Server for VSE &
VM Application Programming manual.
182
Interactive SQL Guide and Reference
Appendix C. Summary of ISQL PF Keys
Listed below is a summary of the default PF key functions:
PF1, PF13
Issues a HELP command, which retrieves an explanation of how to
use HELP information and a list of the topics available.
PF2, PF14
Issues a START command, which starts the statement in the SQL
command buffer (the current SQL statement).
PF3, PF15
Issues an END command.
PF4, PF16
Issues a PRINT command, which requests the currently displayed
query result to be printed on the designated printer.
PF5, PF17
Issues a RECALL command, which displays the contents of the
SQL command buffer.
PF6, PF18
Not assigned.
PF7, PF19
Issues a BACKWARD command, which moves your view of the
query result backward one-half display.
PF8, PF20
Issues a FORWARD command, which moves your view of the
query result forward one-half display.
PF9, PF21
Issues a HOLD command.
PF10, PF22
Issues a LEFT 1 command, which moves your view of the query
result one column to the left.
PF11, PF23
Issues a RIGHT 1 command, which moves your view of the query
result one column to the right.
PF12, PF24
Issues a RETRIEVE command, which displays the last input line
from the SQL command buffer and places it in the input area. Each
successive use of RETRIEVE retrieves an earlier input line. When
there are no more lines in the SQL command buffer to be retrieved,
the newest line (the last one entered in the buffer) is again
retrieved.
Using PF Keys in CMS FULLSCREEN Mode (DB2 Server for VM)
If you are using ISQL in CMS FULLSCREEN mode, you may want to reset the
functions of some PF keys. You can reset your keys by executing a routine. The
routine can be a PROFILE routine which is executed automatically every time you
start ISQL. To reset the PF key functions, you can include the following example
commands in the routine:
CMS
SET LINEND OFF
SET CMSPF 07 BACKWARD NOECHO #WM SCROLL BACKWARD CMS 1
SET CMSPF 08 FORWARD NOECHO #WM SCROLL FORWARD CMS 1
SET LINEND ON
RETURN
This addition to your routine lets you use PF7 and PF8 in ISQL command mode to
scroll forward and backward in a manner similar to the CMS FULLSCREEN mode.
183
For information about creating and running routines, see “Chapter 7. Creating and
Using Routines” on page 73.
You can also reset the PF keys every time you use ISQL. For more information on
resetting the PF keys, see “Routines to Which Parameters Can Be Passed (DB2
Server for VM)” on page 73.
184
Interactive SQL Guide and Reference