Kia Rio / Rio Hatchback (2022 year). Manual in english - page 9
Features of your vehicle
The spray and wiper operation will
continue until you release the lever. If
WARNING - Obscured
CAUTION - Wipers &
the washer does not work, check the
visibility
windshields
washer fluid level.
Do not use the washer in freez-
•
To prevent possible damage
If the fluid level is not sufficient, you
ing temperatures without first
to the wipers or windshield,
should add appropriate non-abrasive
warming the windshield with
do not operate the wipers
windshield washer fluid to the wash-
the defrosters; the washer solu-
when the windshield is dry.
er reservoir.
tion could freeze on the wind-
•
To prevent damage to the wiper
The reservoir filler neck is located in
shield and obscure your vision.
blades, do not use gasoline,
the front of the engine compartment
kerosene, paint thinner, or
on the passenger side.
other solvents on or near them.
CAUTION - Wiper position
•
To prevent damage to the
wiper arms and other compo-
CAUTION - Washer pump
When washing the vehicle, set
nents, do not attempt to move
the wiper switch in the off posi-
To prevent possible damage to
the wipers manually.
tion to stop the auto wiper oper-
the washer pump, do not oper-
ation. The wiper may operate
ate the washer when the fluid
and be damaged if the switch is
reservoir is empty.
set in the AUTO mode while
washing the vehicle.
4
102
Features of your vehicle
Rear window wiper and wash-
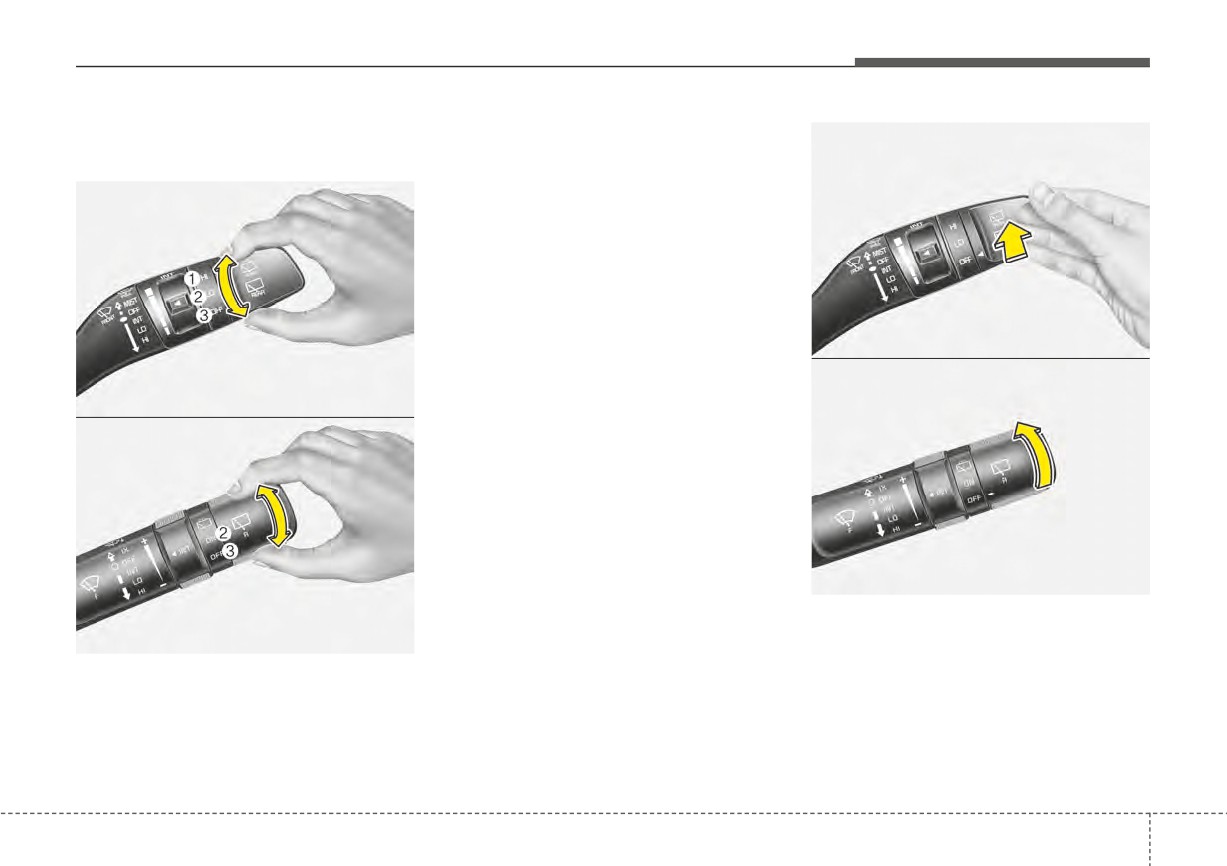
(1) HI - High wiper speed
■ Type A
er switch (for 5 door)
(2) ON/LO - Low wiper speed
■ Type A
(3) OFF - Wiper is not in operation
OSC047431N
■ Type B
OSC047430N
■ Type B
OSC040426N
Push the lever away from you or turn
the wiper lever switch upwards fully
OSC040425N
to spray rear washer fluid and to run
The rear window wiper and washer
the rear wipers 1~3 cycle. The spray
switch is located at the end of the
and wiper operation will continue
wiper and washer switch lever. Turn
until you release the lever.
the switch to operate the rear wiper
and washer.
4
103
Features of your vehicle
INTERIOR LIGHT
Do not use the interior lights for
Automatic turn off function
Map lamp (if equipped)
extended periods when the engine is
(if equipped)
not running as this may cause bat-
The interior lights automatically turn
tery discharge.
off approximately
20 minutes after
the ignition switch is turned off.
WARNING - Interior light
If your vehicle is equipped with the
theft alarm system, the interior lights
Do not use the interior lights
automatically turn off approximately
when driving in the dark. The
5 seconds after the system is in
glare from the interior lights
armed stage.
may obstruct your view and
cause an accident.
OYB046456
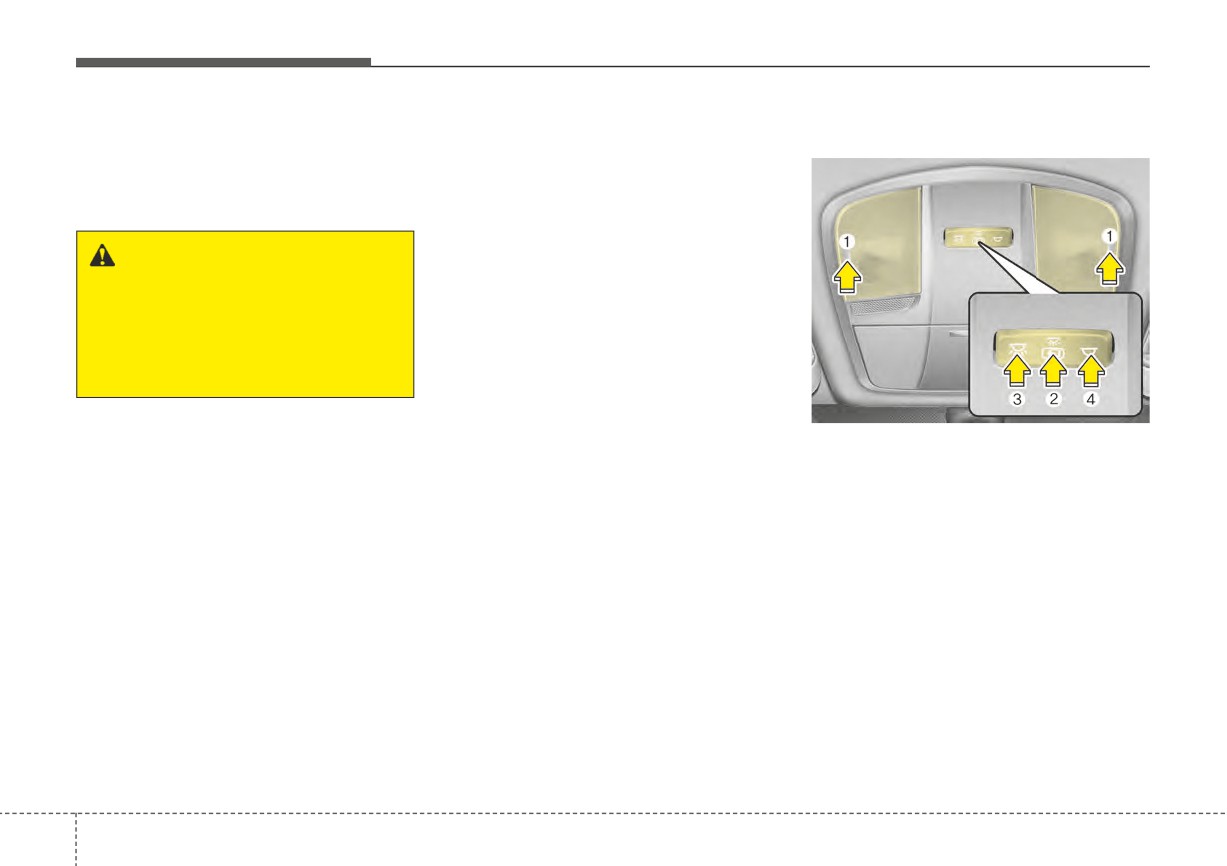
Push the lens (1) to turn the map lamp
on or off. This light produces a spot
beam for convenient use as a map
lamp at night or as a personal lamp for
the driver and front passenger.
4
104
Features of your vehicle
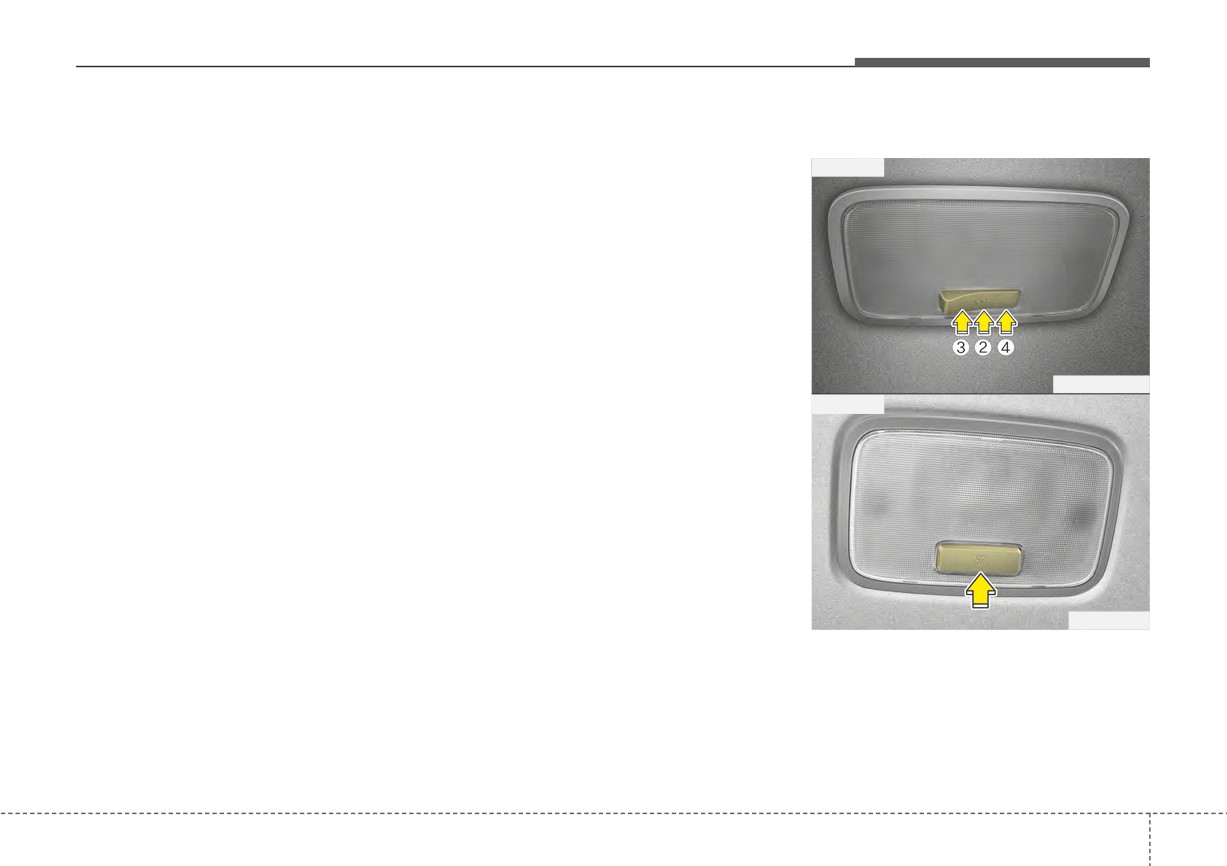
• DOOR (2) :
• ON (3) : The map lamp and the
Room lamp
room lamp stay on at all
In the DOOR position, the map
■ Type A
times.
lamp and the room lamp come on
when any door is opened regard-
• OFF (4) : The lights turn off even if
less of the ignition switch position.
a door is opened.
When doors are unlocked by the
transmitter, the map lamp and the
✽ NOTICE
room lamp come on for approxi-
When the lamp is turned ON by
mately 30 seconds as long as any
pressing the lens (1), the lamp does
door is not open.
not turn off even if the switch (2) is
The map lamp and the room lamp
in the OFF position.
turn off gradually after approxi-
OSC047432N
mately 30 seconds if the door is
■ Type B
closed.
However, if the ignition switch is
ON or all doors are locked, the
map lamp and the room lamp will
turn off immediately. If a door is
opened with the ignition switch in
the ACC or LOCK position, the
map lamp and the room lamp stays
on for about 20 minutes. However,
OYB046404
if a door is opened with the ignition
switch in the ON position, the map
To turn the room lamp ON or OFF,
lamp and the room lamp stays on
push the switch.
continuously. If the type B room
If your vehicle is not equipped with a
lamp switch is OFF, it doesn't work.
map lamp, the room lamp will also
turn on or off as follows.
4
105
Features of your vehicle
- The room lamp comes on when a
• DOOR (2) :
• ON (3) : The map lamp and the
door is opened. The lamps go out
room lamp stay on at all
In the DOOR position, the map
after approximately 30 seconds.
times.
lamp and the room lamp come on
- The room lamp comes on for
when any door is opened regard-
• OFF (4) : The lights turn off even if
approximately 30 seconds when
less of the ignition switch position.
a door is opened.
doors are unlocked with a trans-
When doors are unlocked by the
mitter as long as the doors are
transmitter, the map lamp and the
✽ NOTICE
not opened.
room lamp come on for approxi-
When the lamp is turned ON by
- The room lamp will stay on for
mately 30 seconds as long as any
pressing the lens (1), the lamp does
door is not open.
approximately
20 minutes if a
not turn off even if the switch (2) is
door is opened with the ignition
The map lamp and the room lamp
in the OFF position.
switch in the ACC or LOCK/OFF
turn off gradually after approxi-
position.
mately 30 seconds if the door is
closed.
- The room lamp will stay on con-
tinuously if the door is opened
However, if the ignition switch is
with the ignition switch in the ON
ON or all doors are locked, the
position.
map lamp and the room lamp will
turn off immediately. If a door is
- The room lamp will go out imme-
opened with the ignition switch in
diately if the ignition switch is
the ACC or LOCK position, the
changed to the ON position or all
map lamp and the room lamp stays
doors are locked.
on for about 20 minutes. However,
if a door is opened with the ignition
switch in the ON position, the map
lamp and the room lamp stays on
continuously. If the type B room
lamp switch is OFF, it doesn't work.
4
106
Features of your vehicle
Trunk/Liftgate room lamp
The trunk/liftgate room lamp comes Glove box lamp
on as long as the trunk/liftgate lid is
• 4 Door
open. To prevent unnecessary charg-
ing system drain, close the trunk/lift-
gate lid securely after using the
trunk/liftgate room lamp.
OSC047412N
• 5 Door
OYB046407
The glove box lamp comes on when
the glove box is opened. To prevent
unnecessary charging system drain,
close the glove box securely after
use.
OYB046405
The trunk/liftgate room lamp comes
on when the trunk/liftgate is opened.
4
107
Features of your vehicle
Vanity mirror lamp (if equipped)
CAUTION
Always have the switch in the
off position when the vanity mir-
ror lamp is not in use. If the sun-
visor is closed without turning
the lamp off, it may discharge
the battery or damage the sunvi-
sor.
OYB046406
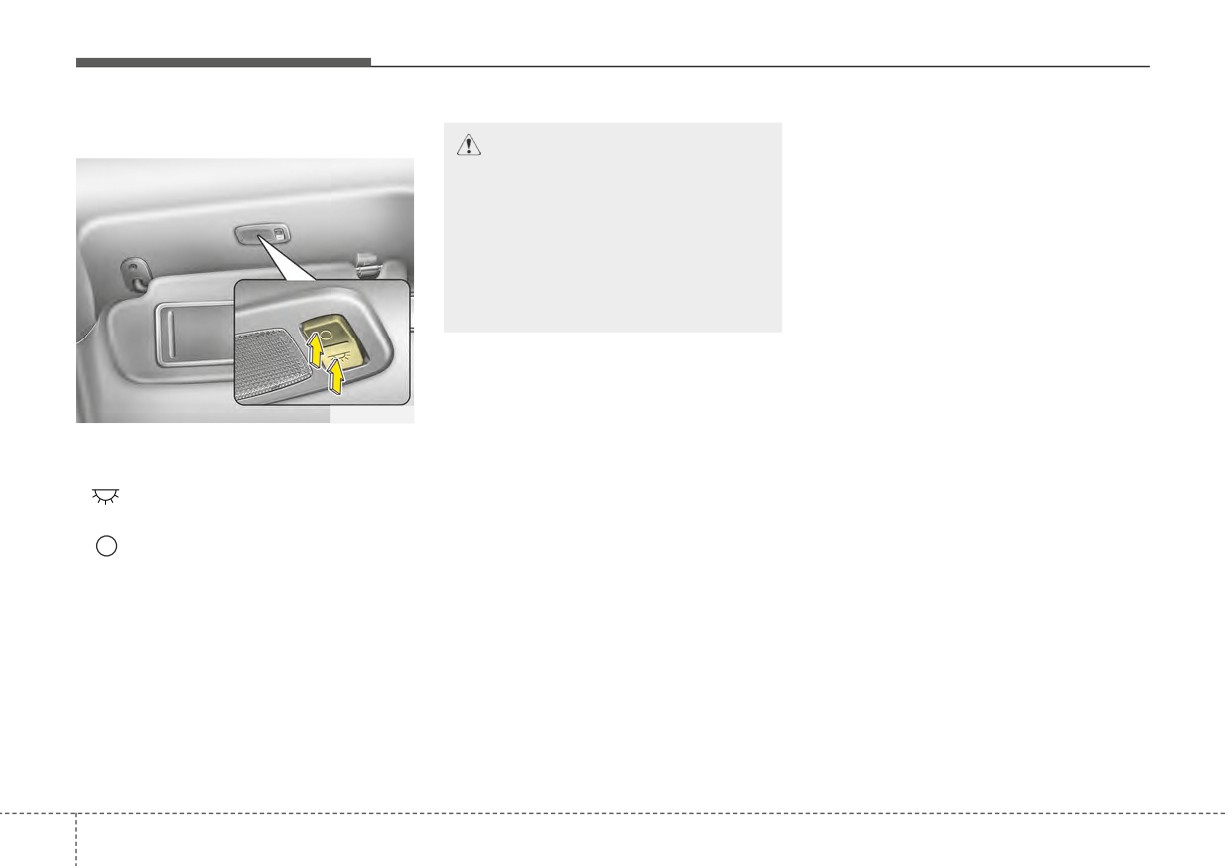
Push the switch to turn the light on or
off.
•
: The lamp will turn on if this
button is pressed.
•
: The lamp will turn off if this
button is pressed.
4
108
Features of your vehicle
DEFROSTER
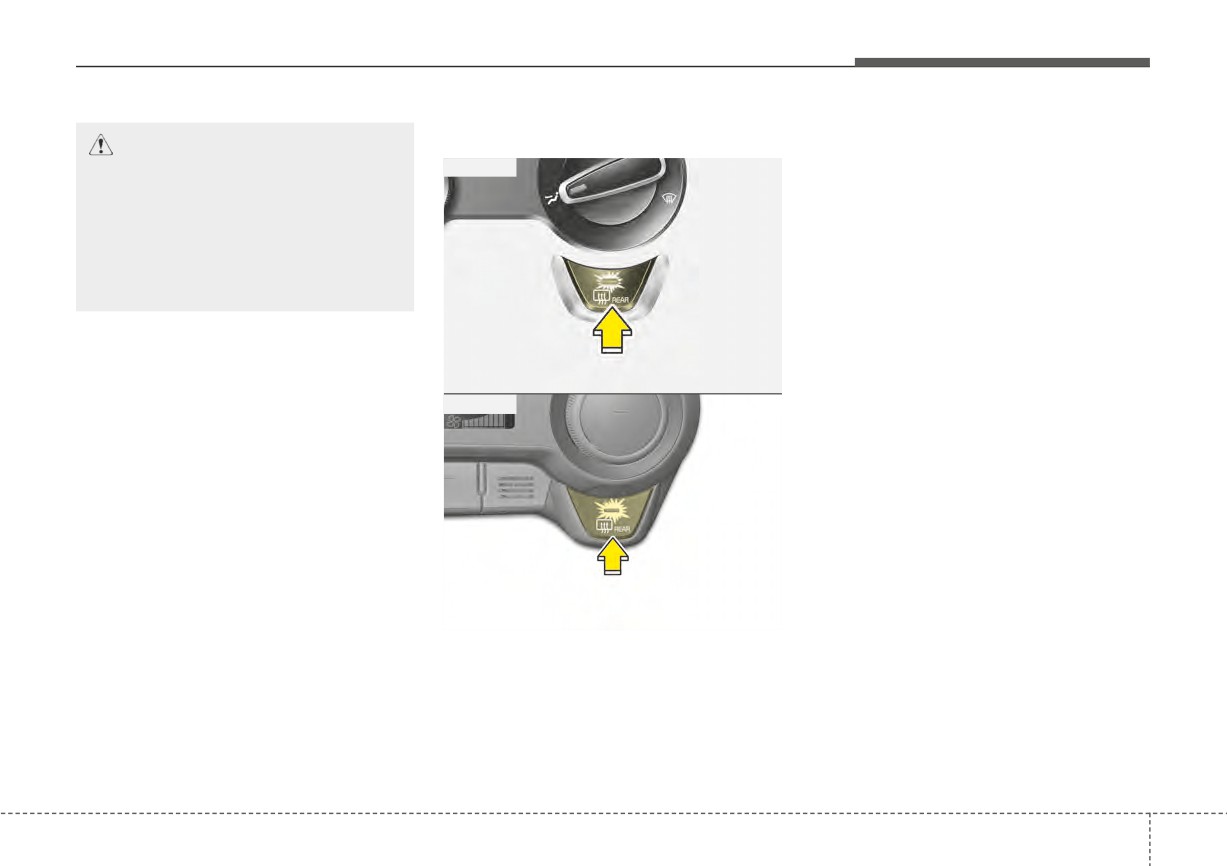
Rear window defroster
To activate the rear window
CAUTION
- Conductors
defroster, press the rear window
■ Type A
To prevent damage to the con-
defroster button located in the center
ductors bonded to the inside
facia switch panel. The indicator on
surface of the rear window,
the rear window defroster button illu-
never use sharp instruments or
minates when the defroster is on.
window cleaners containing
If there is heavy accumulation of
abrasives to clean the window.
snow on the rear window, brush it off
before operating the rear defroster.
The rear window defroster automati-
If you want to defrost and defog the
cally turns off after approximately 20
front windshield, refer to “Windshield
OSC040509
minutes or when the ignition switch is
Defrosting and Defogging” in this
■ Type B
turned off. To turn off the defroster
section.
manually, press the rear window
defroster button again.
Outside mirror defroster
(if equipped)
If your vehicle is equipped with the
outside rearview mirror defrosters,
they will operate at the same time you
OSC040510N
turn on the rear window defroster.
The defroster heats the window to
remove frost, fog and thin ice from
the interior and exterior of the rear
window, while the engine is running.
4
109
Features of your vehicle
MANUAL CLIMATE CONTROL SYSTEM
1. Fan speed control knob
2. Mode selection knob
3. Temperature control knob
4. Air conditioning button
5. Rear window defroster button
6. Air intake control button
OSC040300N
4
110
Features of your vehicle
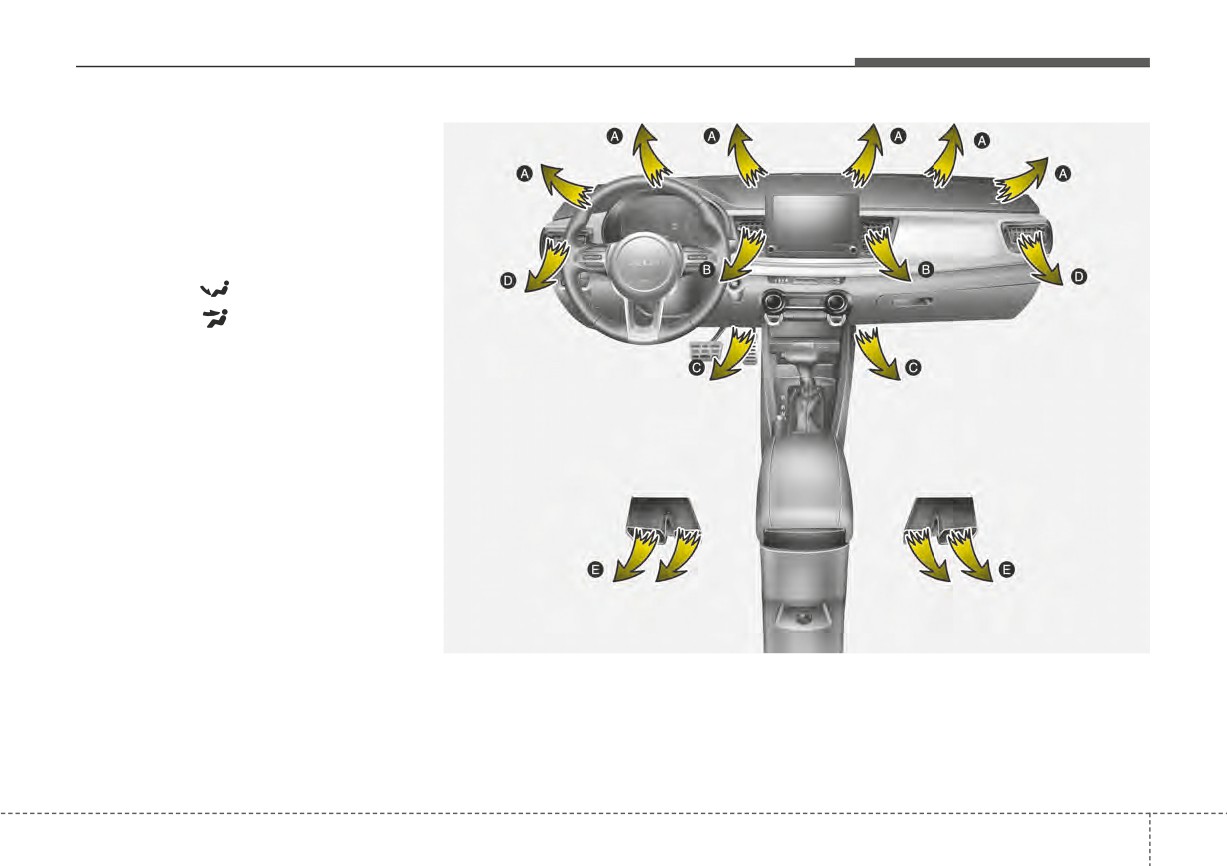
Heating and air conditioning
1. Start the engine.
2. Set the mode to the desired posi-
tion.
To improve the effectiveness of
heating and cooling :
- Heating:
- Cooling:
3. Set the temperature control to the
desired position.
4. Set the air intake control to the
outside (fresh) air or recirculated
air position.
5. Set the fan speed control to the
desired speed.
6. If air conditioning is desired, turn
the air conditioning system on.
(if equipped)
(if equipped)
OSC041478N
4
111
Features of your vehicle
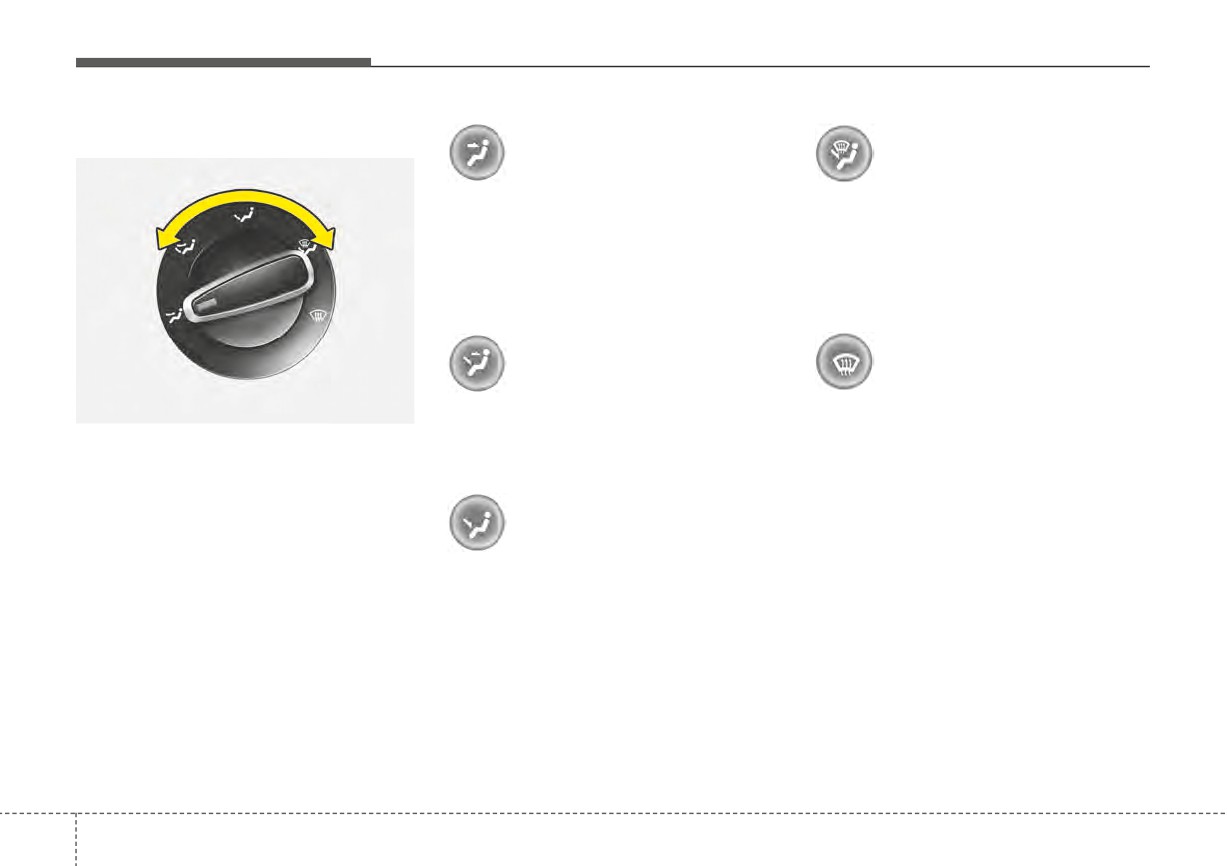
Mode selection
Face-Level (B, D)
Floor/Defrost-Level (A, C, D, E)
Air flow is directed toward the upper
Most of the air flow is directed to the
body and face. Additionally, each
floor and the windshield with a small
outlet can be controlled to direct the
amount directed to the side window
air discharged from the outlet.
defrosters.
Bi-Level (B, C, D, E)
Defrost-Level (A, D)
OYB046303
Air flow is directed towards the face
Most of the air flow is directed to the
The mode selection knob controls
and the floor.
windshield with a small amount of air
the direction of the air flow through
directed to the side window defrosters.
the ventilation system.
Air can be directed to the floor, dash-
Floor-Level (A, C, D, E)
board outlets, or windshield. Five
symbols are used to represent Face,
Bi-Level, Floor, Floor-Defrost and
Most of the air flow is directed to the
Defrost air position.
floor, with a small amount of the air
being directed to the windshield and
side window defrosters.
4
112
Features of your vehicle
MAX A/C-Level (B, D) (if equipped)
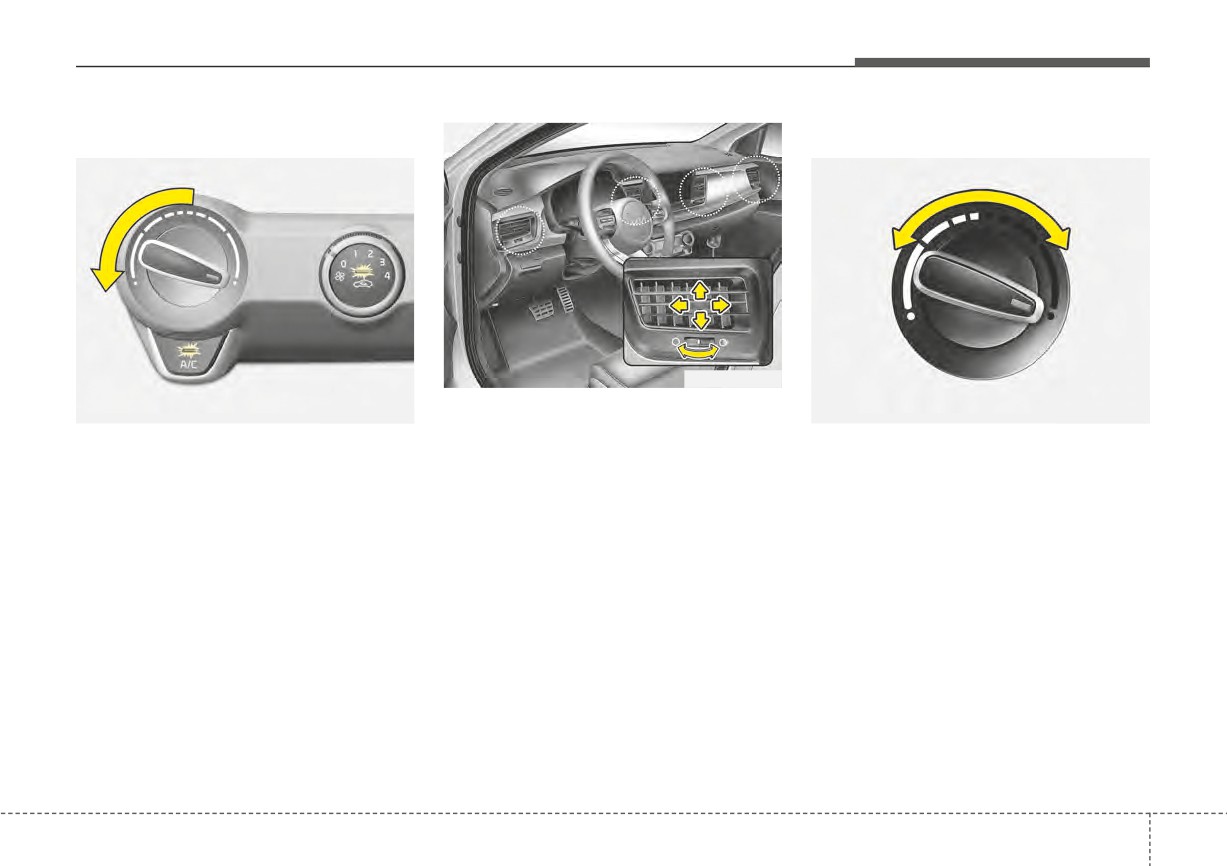
Temperature control
OSC041479N
Instrument panel vents
OSC040311N
OYB046305
The outlet vents can be opened or
The MAX A/C mode is used to cool
The temperature control knob allows
closed separately using the thumb-
the inside of the vehicle faster. Air
you to control the temperature of the
wheel.
flow is directed toward the upper
air flowing from the ventilation sys-
body and face.
Also, you can adjust the direction of
tem. To change the air temperature in
air delivered from these vents using
the passenger compartment, turn
In this mode, the air conditioning and
the vent control lever as shown.
the knob to the right for warmer and
the recirculated air position will be
selected automatically.
hot air, or to the left for cooler air.
4
113
Features of your vehicle
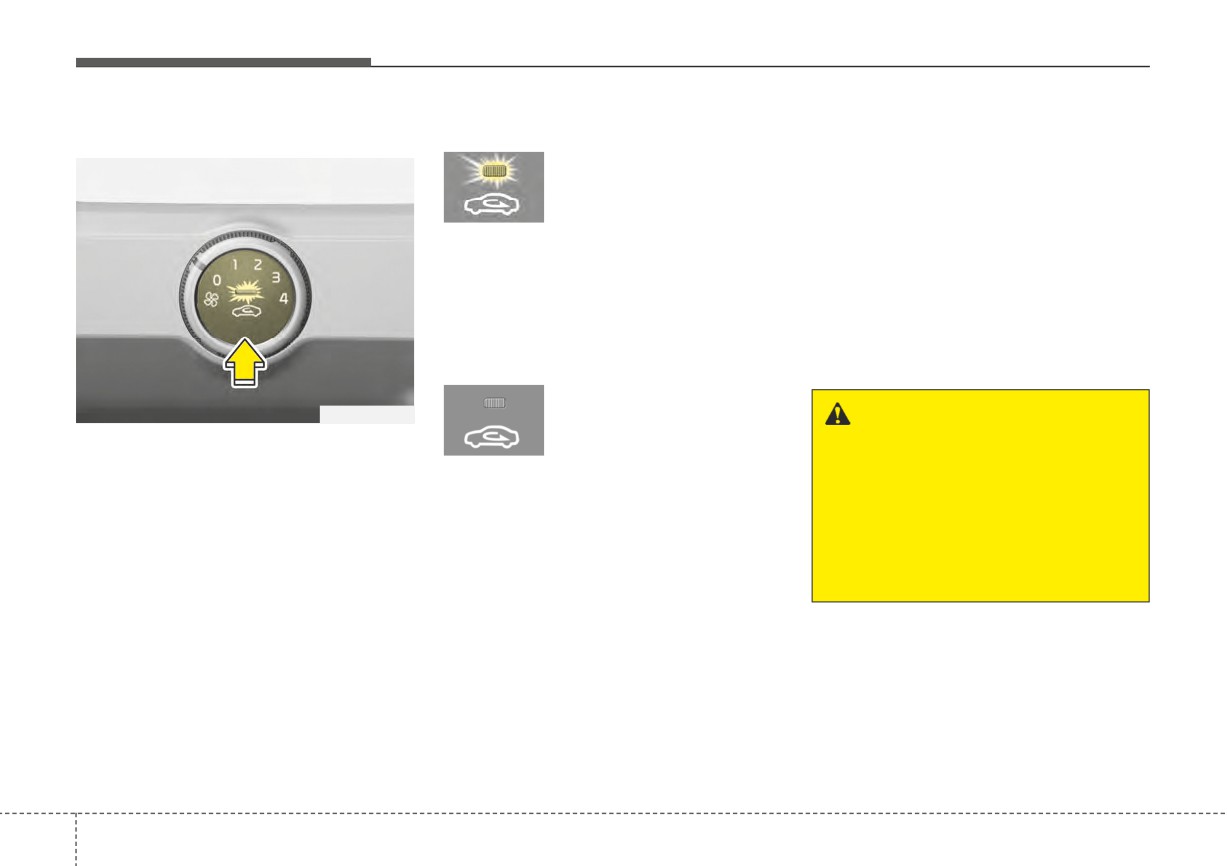
Air intake control
Recirculated air position
Prolonged operation of the heater in
the recirculated air position (without air
With the recirculated air
position selected, air
conditioning selected) may cause fog-
ging of the windshield and side win-
from the passenger
compartment will be
dows and the air within the passenger
compartment may become stale.
drawn through the heat-
ing system and heated
In addition, prolonged operation of
or cooled according to
the air conditioning with the recircu-
the function selected.
lated air position selected will result
in excessively dry air in the passen-
ger compartment.
Outside (fresh) air position
If the recirculated air
OSC040312N
position is not selected
WARNING - Reduced
This is used to select outside (fresh)
or turned off, air enters
Visibility
air position or recirculated air position.
the vehicle from outside
Continuous use of the climate
and is heated or cooled
To change the air intake control posi-
control system in the recirculat-
according to the function
tion, push the control button.
ed air position may allow
selected.
humidity to increase inside the
vehicle which may fog the glass
and obscure visibility.
4
114
Features of your vehicle
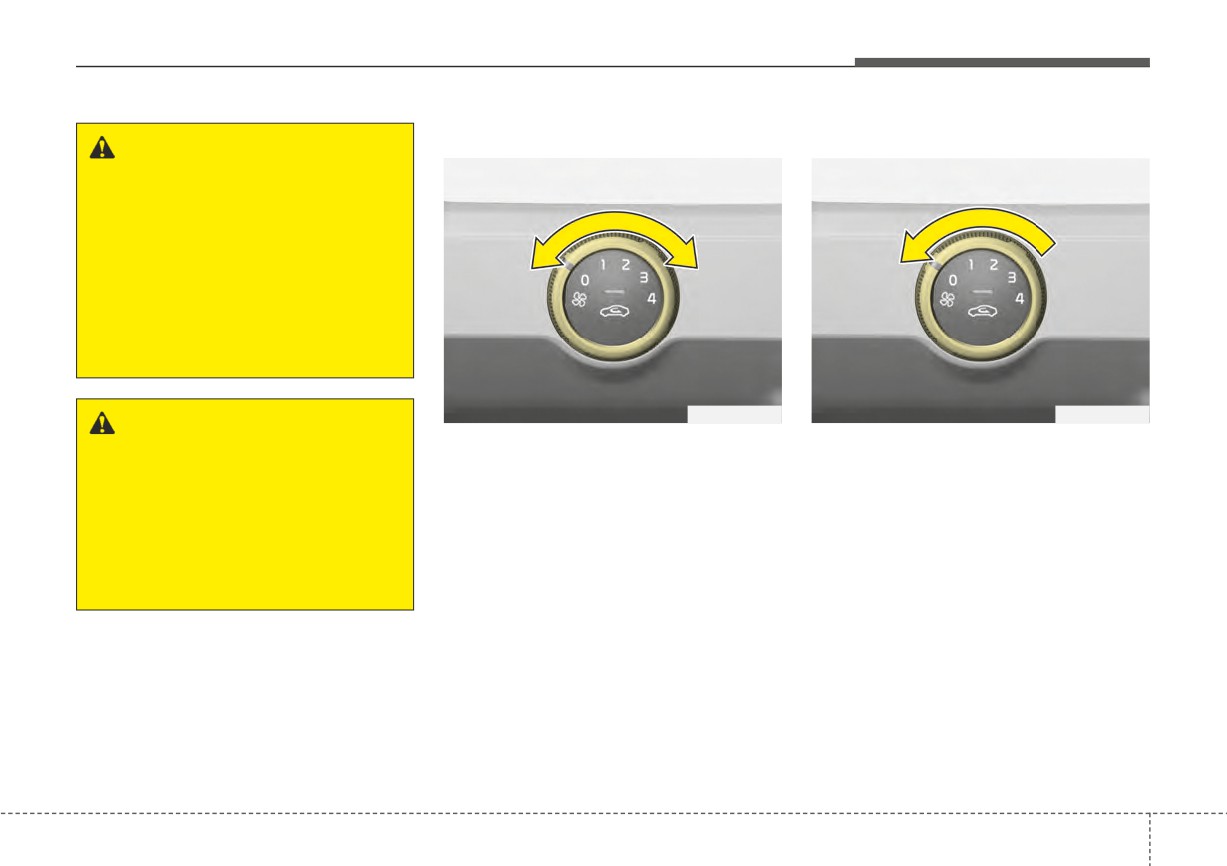
Fan speed control
To turn off the blowers
WARNING - Recirculated
Air
Continue using the climate con-
trol system in the recirculated
air position can cause drowsi-
ness or sleepiness, and loss of
vehicle control. Set the air
intake control to the outside
(fresh) air position as much as
possible while driving.
OSC040313N
OSC040314N
WARNING - Sleeping with
The ignition switch must be in the ON
To turn off the blowers, turn the fan
A/C on
position for fan operation.
speed control knob to the “0” position.
Do not sleep in a vehicle with
The fan speed control knob allows
the air conditioning or heating
you to control the fan speed of the air
on as this may cause serious
flowing from the ventilation system.
harm or death due to a drop in
To change the fan speed, turn the
the oxygen level and/or body
knob to the right for higher speed or
temperature.
left for lower speed.
4
115
Features of your vehicle
Air conditioning
System operation
Operation Tips
•
To prevent dust or unpleasant
Ventilation
fumes from entering the vehicle
1. Set the mode to the
position.
through the ventilation system,
2. Set the air intake control to the
temporarily set the air intake con-
outside (fresh) air position.
trol to the recirculated air position.
3. Set the temperature control to the
Be sure to return the control to the
desired position.
fresh air position when the dust or
fumes have passed to keep fresh
4. Set the fan speed control to the
air in the vehicle. This will help
desired speed.
keep the driver alert and comfort-
able.
Heating
•
Air for the heating/cooling system
OYB046309
1. Set the mode to the
position.
is drawn in through the grilles just
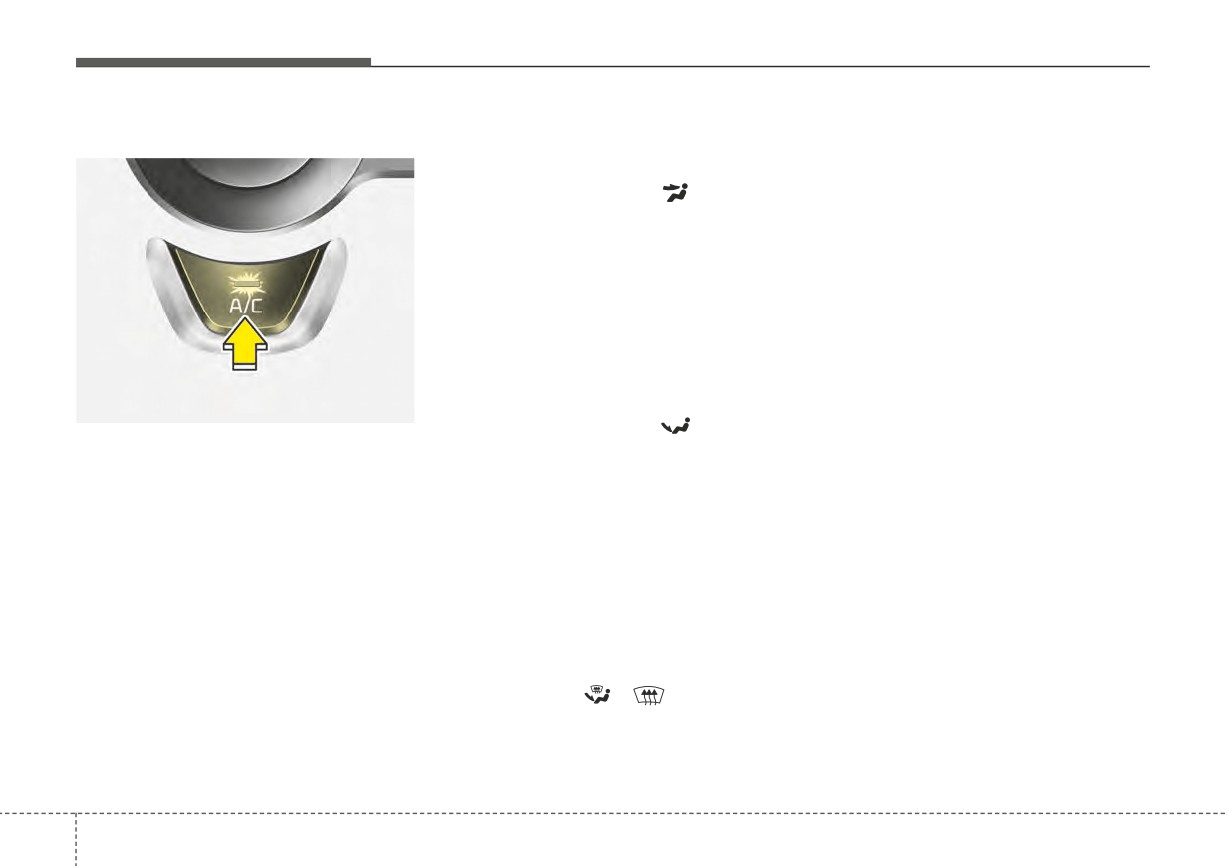
Press the A/C button to turn the air
ahead of the windshield. Care
2. Set the air intake control to the
conditioning system on (indicator light
outside (fresh) air position.
should be taken that these are not
will illuminate). Press the button again
blocked by leaves, snow, ice or
3. Set the temperature control to the
to turn the air conditioning system off.
other obstructions.
desired position.
•
To prevent interior fog on the wind-
4. Set the fan speed control to the
shield, set the air intake control to
desired speed.
the fresh air position and fan speed
5. If dehumidified heating is desired,
to the desired position, turn on the
turn the air conditioning system (if
air conditioning system, and adjust
equipped) on.
the temperature control to the
• If the windshield fogs up, set the
desired temperature.
mode to the
,
position.
4
116
Features of your vehicle
Air conditioning
CAUTION
CAUTION - Excessive A/C
Kia Air Conditioning Systems are
filled with R-1234yf refrigerant.
•
The refrigerant system should
While using the air conditioning
only be serviced by trained
system, monitor the tempera-
1. Start the engine. Push the air con-
and certified technicians to
ture gauge closely while driving
ditioning button.
ensure proper and safe opera-
up hills or in heavy traffic when
2. Set the mode to the
position.
tion.
outside temperatures are high.
3. Set the air intake control to the
Air conditioning system opera-
•
The refrigerant system should
recirculated air position. However,
be serviced in a well-ventilat-
tion may cause engine over-
prolonged operation in the recircu-
heating and potential engine
ed place.
lated air position will excessively
damage. Continue to use the
•
The air conditioning evapora-
dry the air. In this case, change the
blower fan but turn the air con-
tor (cooling coil) shall never
air position.
ditioning system off if the tem-
be repaired or replaced with
perature gauge indicates engine
4. Adjust the fan speed control and
one removed from a used or
temperature control to maintain
overheating.
salvaged vehicle and new
maximum comfort.
replacement MAC evaporators
should be certified
(and
✽ NOTICE
labeled) as meeting
SAE
When opening the windows in humid
Standard J2842.
weather, air conditioning may create
water droplets inside the vehicle.
Since excessive water droplets may
cause damage to electrical equip-
ment, air conditioning should only be
used with the windows closed.
4
117
Features of your vehicle
Air conditioning system operation tips
•
Operating the air conditioning sys-
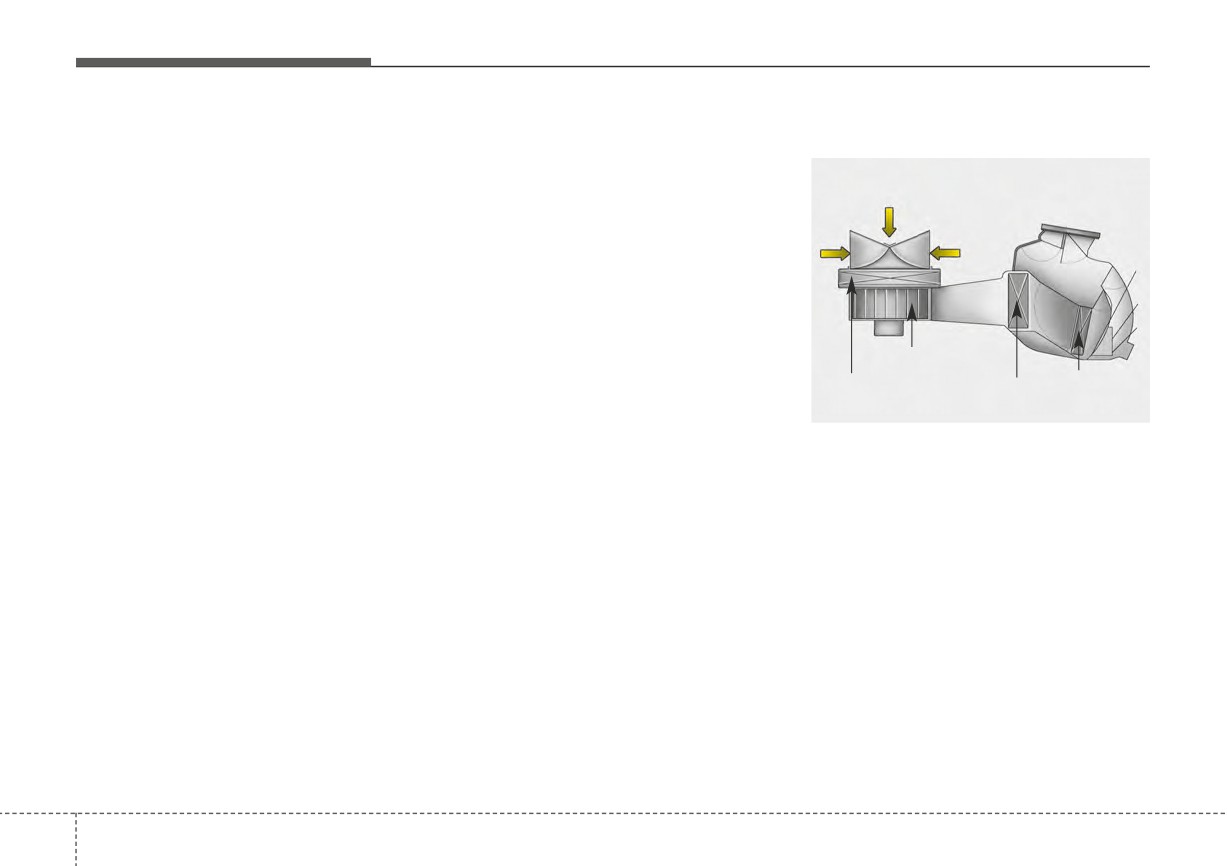
Climate control air filter
tem in the recirculated air position
•
If the vehicle has been parked in
direct sunlight during hot weather,
provides maximum cooling, how-
Outside air
ever, continual operation in this
open the windows for a short time
to let the hot air inside the vehicle
mode may cause the air inside the
vehicle to become stale.
Recirculated
escape.
air
•
To help reduce moisture inside of
•
During cooling operation, you may
occasionally notice a misty air flow
the windows on rainy or humid
days, decrease the humidity inside
because of rapid cooling and
humid air intake. This is a normal
the vehicle by operating the air
conditioning system.
operating characteristic of the sys-
Blower
tem.
•
During air conditioning system
Climate control
EvaporatorHeater core
air filter
core
operation, you may occasionally
OMG075033
notice a slight change in engine
The climate control air filter installed
speed as the air conditioning com-
behind the glove box filters the dust or
pressor cycles. This is a normal
other pollutants that come into the
system operation characteristic.
vehicle from the outside through the
•
Use the air conditioning system
heating and air conditioning system. If
every month for a few minutes to
dust or other pollutants accumulate in
ensure maximum system perform-
the filter over a period of time, the air
ance.
flow from the air vents may decrease,
•
When using the air conditioning
resulting in moisture accumulation on
system, you may notice clear water
the inside of the windshield even
dripping (or even puddling) on the
when the outside (fresh) air position is
ground under the passenger side
selected. If this happens, have the cli-
of the vehicle. This is a normal
mate control air filter replaced by an
operating characteristic of the sys-
authorized Kia dealer.
tem.
4
118
Features of your vehicle
✽ NOTICE
Checking the amount of air
• Replace the filter according to the
conditioner refrigerant and
Maintenance Schedule.
compressor lubricant
If the vehicle is being driven in
When the amount of refrigerant is
severe conditions such as dusty,
low, the performance of the air con-
rough roads, more frequent cli-
ditioning is reduced. Overfilling also
mate control air filter inspections
has a negative influence on the air
and changes are required.
conditioning system.
• When the air flow rate suddenly
Therefore, if abnormal operation is
decreases, the system should be
found, have the system inspected by
checked at an authorized Kia
an authorized Kia dealer.
dealer.
OYB086002
The refrigerant label is located on
the underside of the hood.
4
119
Features of your vehicle
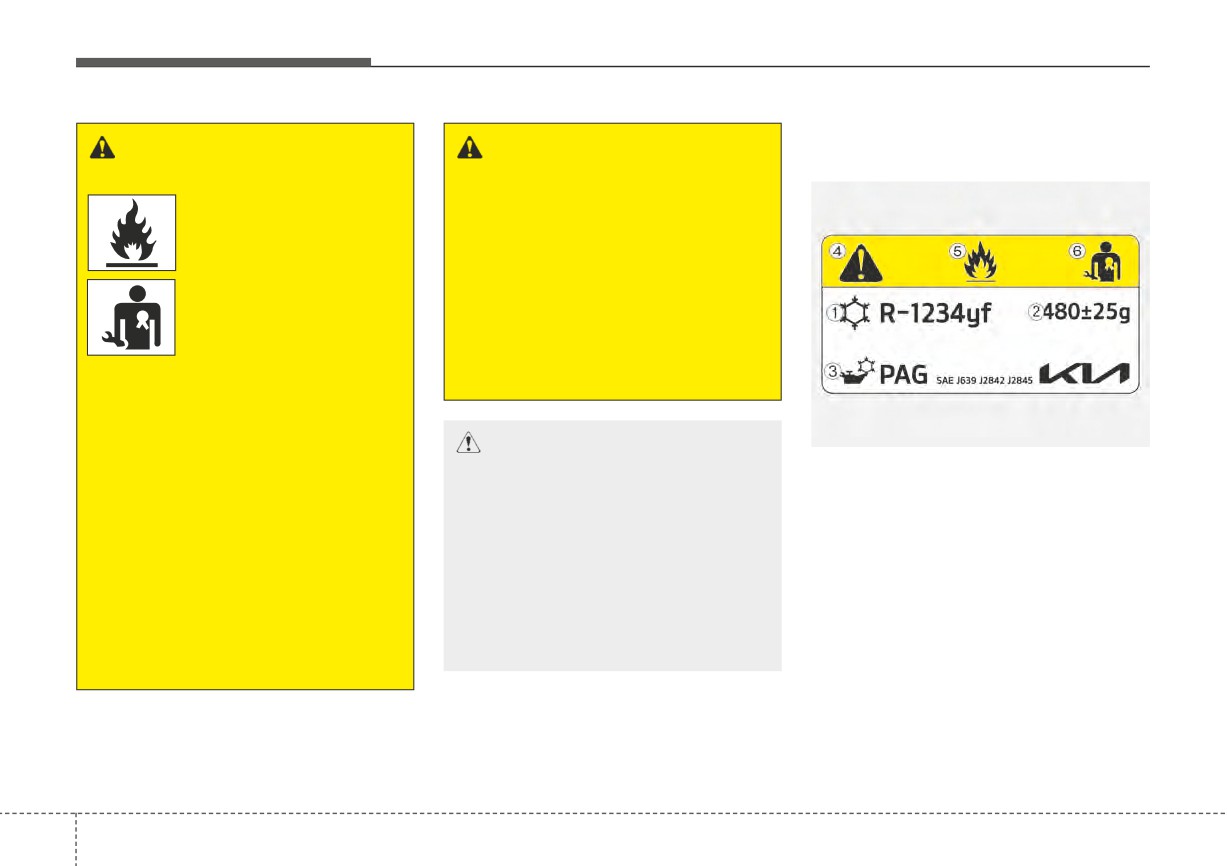
Air Conditioning refrigerant
WARNING - Vehicles
WARNING
label
equipped with R-1234yf
The oil and refrigerant in your
■ Example
Since the refrigerant
vehicle’s air conditioning sys-
is mildly flammable
tem is under very high pressure.
and operated at high
If proper service procedures are
pressure, the air con-
not followed an explosion may
ditioning
system
result. To reduce the risk of seri-
should only be serv-
ous injury or death, the air con-
iced by trained and
ditioning system in your vehicle
certified technicians.
should only be serviced by
(Refer to the SAE
trained and certified technicians.
J2845)
It is important that the correct
OSC061044N
type and amount of oil and
CAUTION - AC Repair
refrigerant are used.
It is important that the correct
❈ The actual Air Conditioning refrig-
All refrigerants should be
type and amount of oil and
erant label in the vehicle may differ
reclaimed with proper equip-
refrigerant is used, otherwise
from the illustration.
ment.
damage to the vehicle may
occur. To prevent damage, the
Venting refrigerants directly to
Each symbol and specification on
air conditioning system in your
the atmosphere is harmful to
the air conditioning refrigerant label
vehicle should only be serviced
individuals and environment.
is represented below :
by trained and certified techni-
Failure to heed these warnings
1. Classification of refrigerant
cians.
can lead to serious injuries.
2. Amount of refrigerant
3. Classification of Compressor lubri-
The air conditioning system should
cant
be serviced by an authorized Kia
4. Caution
dealer.
4 120
Features of your vehicle
5. Flammable Refrigerant
Activate upon Washer Fluid
System setting
6. Requires Registered Technician to
Use
1. ENGINE START/STOP button is
Service Air Conditioning system
To prevent the odor from entering the
ON.
inside of the vehicle, the ventilation
2. Select Floor-Level (
) air flow
system changes to Recirculated Air
direction by pressing Mode
❈ Refer to chapter 8 for more detail
Mode for a while when the wind-
Selection button.
on the location of air conditioning
shield washer fluid sprayed.
refrigerant label.
3. With pressing Air Conditioning
However, at low outside tempera-
button, press the Recirculated Air
tures, to prevent windshield fogging,
button more than 4 times within 2
the system continues to operate in
seconds.
outside air mode.
4. If the system is set up, the indica-
tor on Recirculated Air button will
blink 6 times.
System cancellation
1. ENGINE START/STOP button is
ON.
2. Select Floor-Level (
) air flow
direction by pressing Mode
Selection button.
3. While pressing Air Conditioning
button, press the Recirculated Air
button more than 4 times within 2
seconds.
4. If the system is cancelled, the indi-
cator on Recirculated Air button
will blink 3 times.
4
121
Features of your vehicle
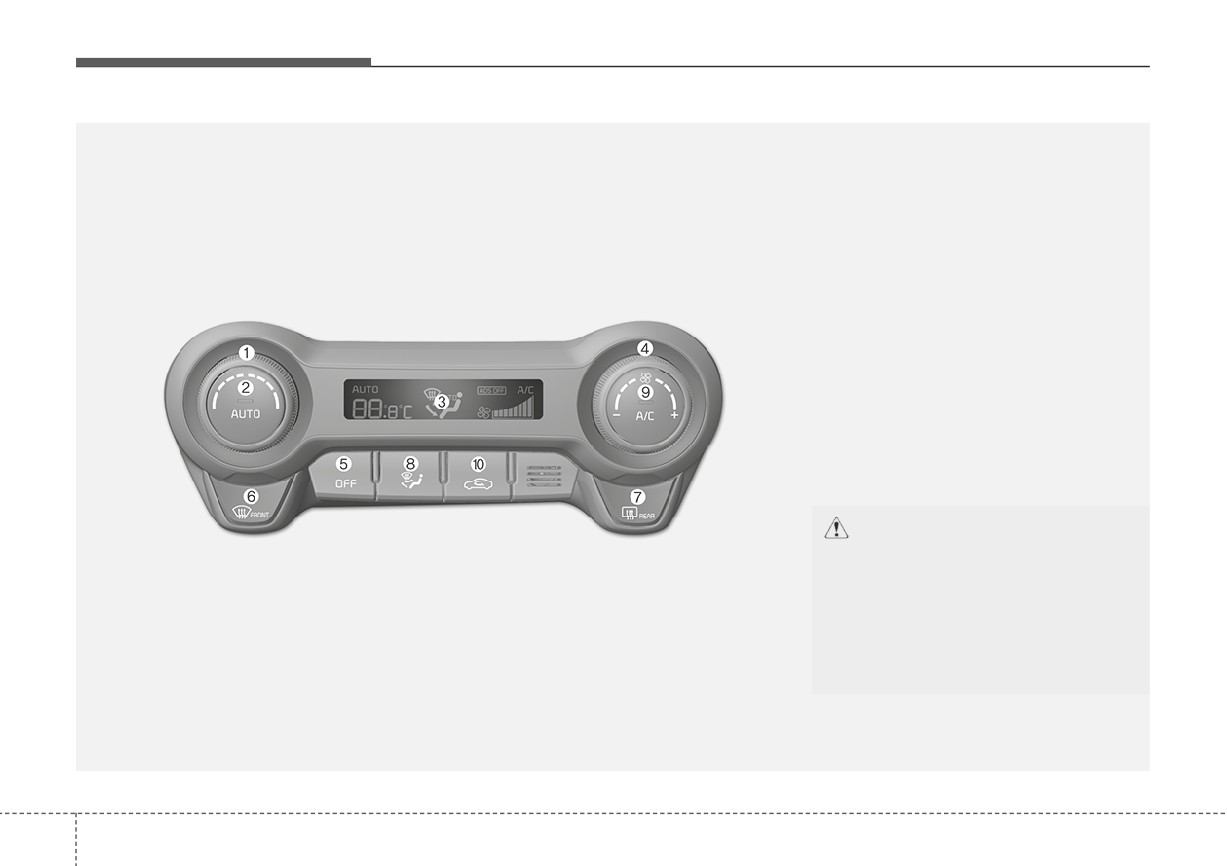
AUTOMATIC CLIMATE CONTROL SYSTEM (IF EQUIPPED)
1. Temperature control knob
2. AUTO (automatic control) button
3. Climate control display
4. Fan speed control knob
5. OFF button
6. Front windshield defroster button
7. Rear window defroster button
8. Mode selection button
9. Air conditioning button
10. Air intake control button
CAUTION
Operating the blower when the
ignition switch is in the ON posi-
tion could cause the battery to
discharge. It is best to operate the
blower when the engine is run-
ning.
OSC040511N
4
122
Features of your vehicle
Automatic heating and air con-
✽ NOTICE
ditioning
•
To turn the automatic operation
off, select any button or switch of
the following:
- Mode selection button
- Air conditioning button
- Front windshield defroster button
(Press the button one more time
to deselect the front windshield
defroster function. The 'AUTO'
sign will illuminate on the infor-
OSC040580N
mation display once again.)
- Air intake control button
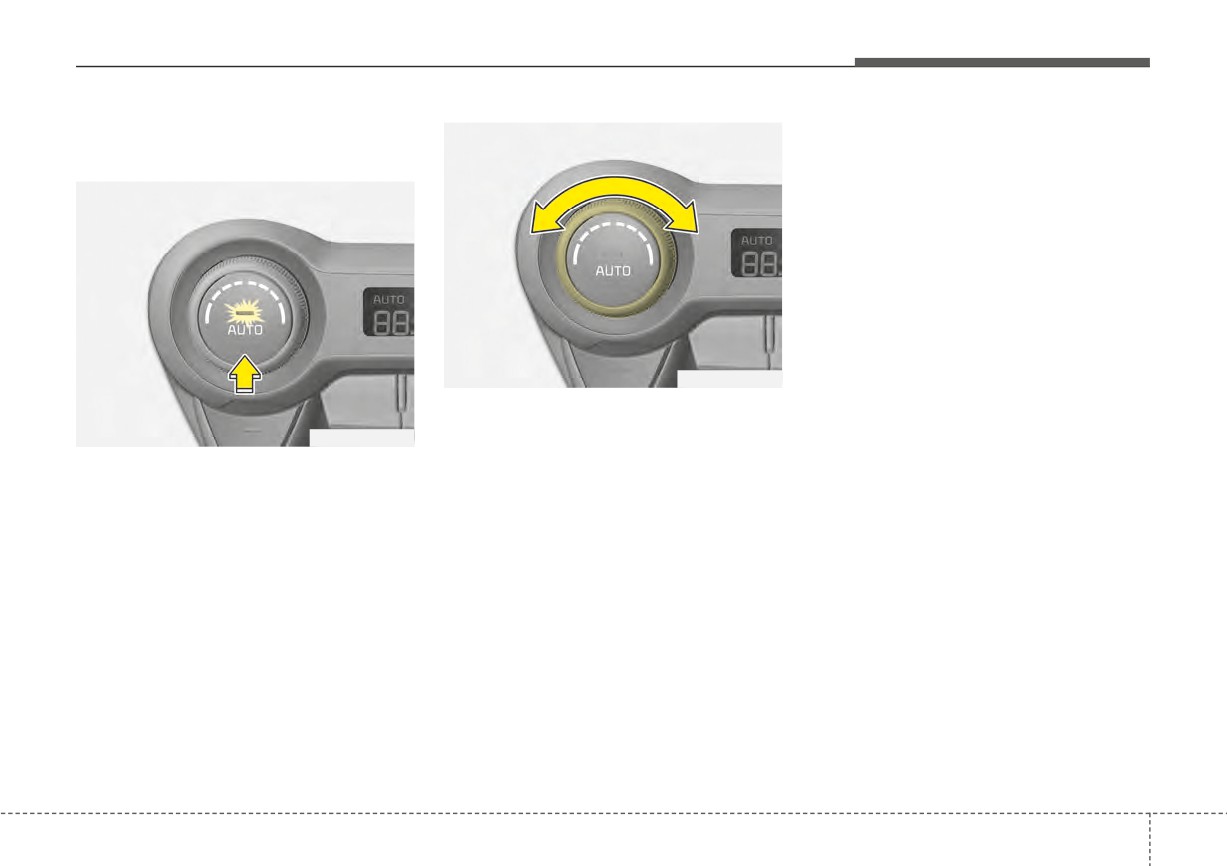
2. Turn the temperature control knob
- Fan speed control knob
to set the desired temperature.
OSC040579N
The selected function will be con-
trolled manually while other func-
1. Push the AUTO button. The modes,
fan speeds, air intake and air-con-
tions operate automatically.
•
For your convenience and to
ditioning will be controlled automat-
ically by temperature setting.
improve the effectiveness of the
climate control, use the AUTO
button and set the temperature to
73°F (23°C).
4
123