TMS320C6000 Assembly Language Tools v 6.1. User's Guide - page 4
Macro Parameters/Substitution Symbols
5.3.1
Directives That Define Substitution Symbols
You can manipulate substitution symbols with the .asg and .eval directives.
• The .asg directive assigns a character string to a substitution symbol.
For the .asg directive, the quotation marks are optional. If there are no quotation marks, the assembler
reads characters up to the first comma and removes leading and trailing blanks. In either case, a
character string is read and assigned to the substitution symbol. The syntax of the .asg directive is:
.asg["]character string["], substitution symbol
Example 5-3 shows character strings being assigned to substitution symbols.
Example 5-3. The .asg Directive
.asg
"A4", RETVAL
; return value
• The .eval directive performs arithmetic on numeric substitution symbols.
The .eval directive evaluates the expression and assigns the string value of the result to the
substitution symbol. If the expression is not well defined, the assembler generates an error and
assigns the null string to the symbol. The syntax of the .eval directive is:
.eval well-defined expression, substitution symbol
Example 5-4 shows arithmetic being performed on substitution symbols.
Example 5-4. The .eval Directive
.asg
1,counter
.loop
100
.word
counter
.eval
counter + 1,counter
.endloop
In Example 5-4, the .asg directive could be replaced with the .eval directive (.eval 1, counter) without
changing the output. In simple cases like this, you can use .eval and .asg interchangeably. However, you
must use .eval if you want to calculate a value from an expression. While .asg only assigns a character
string to a substitution symbol, .eval evaluates an expression and then assigns the character string
equivalent to a substitution symbol.
See Assign a Substitution Symbol for more information about the .asg and .eval assembler directives.
5.3.2
Built-In Substitution Symbol Functions
The following built-in substitution symbol functions enable you to make decisions on the basis of the string
value of substitution symbols. These functions always return a value, and they can be used in
expressions. Built-in substitution symbol functions are especially useful in conditional assembly
expressions. Parameters of these functions are substitution symbols or character-string constants.
In the function definitions shown in Table 5-1, a and b are parameters that represent substitution symbols
or character-string constants. The term string refers to the string value of the parameter. The symbol ch
represents a character constant.
Macro Description
127
Macro Parameters/Substitution Symbols
Table 5-1. Substitution Symbol Functions and Return Values
Function
Return Value
$symlen (a)
Length of string a
$symcmp (a,b)
< 0 if a < b; 0 if a = b; > 0 if a > b
$firstch (a,ch)
Index of the first occurrence of character constant ch in string a
$lastch (a,ch)
Index of the last occurrence of character constant ch in string a
$isdefed (a)
1 if string a is defined in the symbol table
0 if string a is not defined in the symbol table
$ismember (a,b)
Top member of list b is assigned to string a
0 if b is a null string
$iscons (a)
1 if string a is a binary constant
2 if string a is an octal constant
3 if string a is a hexadecimal constant
4 if string a is a character constant
5 if string a is a decimal constant
$isname(a)
1 if string a is a valid symbol name
0 if string a is not a valid symbol name
$isreg (a)(1)
1 if string a is a valid predefined register name
0 if string a is not a valid predefined register name
(1)
For more information about predefined register names, see Section 3.8.5.
Example 5-5 shows built-in substitution symbol functions.
Example 5-5. Using Built-In Substitution Symbol Functions
pushx .macro list
!
! Push more than one item
! $ismember removes the first item in the list
.var
item
.loop
.break
($ismember(item, list) = 0)
STW
item,*B15--[1]
.endloop
.endm
pushx
A0,A1,A2,A3
5.3.3
Recursive Substitution Symbols
When the assembler encounters a substitution symbol, it attempts to substitute the corresponding
character string. If that string is also a substitution symbol, the assembler performs substitution again. The
assembler continues doing this until it encounters a token that is not a substitution symbol or until it
encounters a substitution symbol that it has already encountered during this evaluation.
In Example 5-6, the x is substituted for z; z is substituted for y; and y is substituted for x. The assembler
recognizes this as infinite recursion and ceases substitution.
Example 5-6. Recursive Substitution
.asg
"x",z
; declare z and assign z = "x"
.asg
"z",y
; declare y and assign y = "z"
.asg
"y",x
; declare x and assign x = "y"
MVKL
x, A1
MVKH
x, A1
MVKL
x, A1
; recursive expansion
MVKH
x, A1
; recursive expansion
128
Macro Description
Macro Parameters/Substitution Symbols
5.3.4
Forced Substitution
In some cases, substitution symbols are not recognizable to the assembler. The forced substitution
operator, which is a set of colons surrounding the symbol, enables you to force the substitution of a
symbol's character string. Simply enclose a symbol with colons to force the substitution. Do not include
any spaces between the colons and the symbol.
The syntax for the forced substitution operator is:
:symbol:
The assembler expands substitution symbols surrounded by colons before expanding other substitution
symbols.
You can use the forced substitution operator only inside macros, and you cannot nest a forced substitution
operator within another forced substitution operator.
Example 5-7 shows how the forced substitution operator is used.
Example 5-7. Using the Forced Substitution Operator
force
.macro
x
.loop
8
PORT:x:
.set
x*4
.eval
x+1, x
.endloop
.endm
force
0
PORT0
.set
0
PORT1
.set
4
PORT7
.set
28
5.3.5
Accessing Individual Characters of Subscripted Substitution Symbols
In a macro, you can access the individual characters (substrings) of a substitution symbol with subscripted
substitution symbols. You must use the forced substitution operator for clarity.
You can access substrings in two ways:
•
:symbol (well-defined expression):
This method of subscripting evaluates to a character string with one character.
•
:symbol (well-defined expression1, well-defined expression2):
In this method, expression1 represents the substring's starting position, and expression2 represents the
substring's length. You can specify exactly where to begin subscripting and the exact length of the
resulting character string. The index of substring characters begins with 1, not 0.
Example 5-8 and Example 5-9 show built-in substitution symbol functions used with subscripted
substitution symbols.
In Example 5-8, subscripted substitution symbols redefine the STW instruction so that it handles
immediates.. In Example 5-9, the subscripted substitution symbol is used to find a substring strg1
beginning at position start in the string strg2. The position of the substring strg1 is assigned to the
substitution symbol pos.
Macro Description
129
Macro Parameters/Substitution Symbols
Example 5-8. Using Subscripted Substitution Symbols to Redefine an Instruction
storex
.macro
x
.var
tmp
.asg
:x(1):, tmp
.if
$symcmp(tmp,"A") == 0
STW
x,*A15--(4)
.elseif
$symcmp(tmp,"B") == 0
STW
x,*A15--(4)
.elseif
$iscons(x)
MVK
x,A0
STW
A0,*A15--(4)
.else
.emsg
"Bad Macro Parameter"
.endif
.endm
storex
10h
storex
A15
Example 5-9. Using Subscripted Substitution Symbols to Find Substrings
substr
.macro
start,strg1,strg2,pos
.var
len1,len2,i,tmp
.if
$symlen(start) = 0
.eval
1,start
.endif
.eval
0,pos
.eval
start,i
.eval
$symlen(strg1),len1
.eval
$symlen(strg2),len2
.loop
.break
I = (len2 - len1 + 1)
.asg
":strg2(i,len1):",tmp
.if
$symcmp(strg1,tmp) = 0
.eval
i,pos
.break
.else
.eval
I + 1,i
.endif
.endloop
.endm
.asg
0,pos
.asg
"ar1 ar2 ar3 ar4",regs
substr
1,"ar2",regs,pos
.word
pos
5.3.6
Substitution Symbols as Local Variables in Macros
If you want to use substitution symbols as local variables within a macro, you can use the .var directive to
define up to 32 local macro substitution symbols (including parameters) per macro. The .var directive
creates temporary substitution symbols with the initial value of the null string. These symbols are not
passed in as parameters, and they are lost after expansion.
.var sym1 [,sym2 , ... ,symn]
The .var directive is used in Example 5-8 and Example 5-9.
130
Macro Description
Macro Libraries
5.4
Macro Libraries
One way to define macros is by creating a macro library. A macro library is a collection of files that contain
macro definitions. You must use the archiver to collect these files, or members, into a single file (called an
archive). Each member of a macro library contains one macro definition. The files in a macro library must
be unassembled source files. The macro name and the member name must be the same, and the macro
filename's extension must be .asm. For example:
Macro Name
Filename in Macro Library
simple
simple.asm
add3
add3.asm
You can access the macro library by using the .mlib assembler directive (described in Define Macro
Library ). The syntax is:
.mlib filename
When the assembler encounters the .mlib directive, it opens the library named by filename and creates a
table of the library's contents. The assembler enters the names of the individual members within the library
into the opcode tables as library entries; this redefines any existing opcodes or macros that have the same
name. If one of these macros is called, the assembler extracts the entry from the library and loads it into
the macro table.
The assembler expands the library entry in the same way it expands other macros. See Section 5.1 for
how the assembler expands macros. You can control the listing of library entry expansions with the .mlist
directive. For more information about the .mlist directive, see Section 5.8 and Start/Stop Macro Expansion
Listing . Only macros that are actually called from the library are extracted, and they are extracted only
once.
You can use the archiver to create a macro library by including the desired files in an archive. A macro
library is no different from any other archive, except that the assembler expects the macro library to
contain macro definitions. The assembler expects only macro definitions in a macro library; putting object
code or miscellaneous source files into the library may produce undesirable results. For information about
creating a macro library archive, see Chapter 6.
Macro Description
131
Using Conditional Assembly in Macros
5.5
Using Conditional Assembly in Macros
The conditional assembly directives are .if/.elseif/.else/.endif and .loop/ .break/.endloop. They can be
nested within each other up to 32 levels deep. The format of a conditional block is:
.if well-defined expression
[.elseif well-defined expression]
[.else]
.endif
The .elseif and .else directives are optional in conditional assembly. The .elseif directive can be used
more than once within a conditional assembly code block. When .elseif and .else are omitted and when
the .if expression is false (0), the assembler continues to the code following the .endif directive. See
Assemble Conditional Blocks for more information on the .if/ .elseif/.else/.endif directives.
The .loop/.break/.endloop directives enable you to assemble a code block repeatedly. The format of a
repeatable block is:
.loop [well-defined expression]
[.break [well-defined expression]]
.endloop
The .loop directive's optional well-defined expression evaluates to the loop count (the number of loops to
be performed). If the expression is omitted, the loop count defaults to 1024 unless the assembler
encounters a .break directive with an expression that is true (nonzero). See Assemble Conditional Blocks
Repeatedly for more information on the .loop/.break/.endloop directives.
The .break directive and its expression are optional in repetitive assembly. If the expression evaluates to
false, the loop continues. The assembler breaks the loop when the .break expression evaluates to true or
when the .break expression is omitted. When the loop is broken, the assembler continues with the code
after the .endloop directive.
For more information, see Section 4.7.
Example 5-10, Example 5-11, and Example 5-12 show the .loop/.break/ .endloop directives, properly
nested conditional assembly directives, and built-in substitution symbol functions used in a conditional
assembly code block.
Example 5-10. The .loop/.break/.endloop Directives
.asg
1,x
.loop
.break
(x == 10)
; if x == 10, quit loop/break with expression
.eval
x+1,x
.endloop
132
Macro Description
Using Conditional Assembly in Macros
Example 5-11. Nested Conditional Assembly Directives
.asg
1,x
.loop
.if
(x == 10)
; if x == 10, quit loop
.break
(x == 10)
; force break
.endif
.eval
x+1,x
.endloop
Example 5-12. Built-In Substitution Symbol Functions in a Conditional Assembly Code Block
MACK3
.macro src1, src2, sum, k
!
!
dst = dst + k * (src1 * src2)
.if
k = 0
MPY
src1, src2, src2
NOP
ADD
src2, sum, sum
.else
MPY
src1,src2,src2
MVK
k,src1
MPY
src1,src2,src2
NOP
ADD
src2,sum,sum
.endif
.endm
MACK3
A0,A1,A3,0
MACK3
A0,A1,A3,100
Macro Description
133
Using Labels in Macros
5.6
Using Labels in Macros
All labels in an assembly language program must be unique. This includes labels in macros. If a macro is
expanded more than once, its labels are defined more than once. Defining a label more than once is
illegal. The macro language provides a method of defining labels in macros so that the labels are unique.
Simply follow each label with a question mark, and the assembler replaces the question mark with a
period followed by a unique number. When the macro is expanded, you do not see the unique number in
the listing file. Your label appears with the question mark as it did in the macro definition. You cannot
declare this label as global. The syntax for a unique label is:
label ?
Example 5-13 shows unique label generation in a macro. The maximum label length is shortened to allow
for the unique suffix. For example, if the macro is expanded fewer than 10 times, the maximum label
length is 126 characters. If the macro is expanded from 10 to 99 times, the maximum label length is 125.
The label with its unique suffix is shown in the cross-listing file. To obtain a cross-listing file, invoke the
assembler with the --cross_reference option (see Section 3.3).
Example 5-13. Unique Labels in a Macro
1
min
.macro x,y,z
2
3
MV
y,z
4
||
CMPLT
x,y,y
5
[y]
B
l?
6
NOP
5
7
MV
x,z
8
l?
9
.endm
10
11
12 00000000
MIN
A0,A1,A2
1
1
00000000 010401A1
MV
A1,A2
1
00000004 00840AF8
||
CMPLT
A0,A1,A1
1
00000008 80000292
[A1]
B
l?
1
0000000c 00008000
NOP
5
1
00000010 010001A0
MV
A0,A2
1
00000014
l?
LABEL
VALUE
DEFN
REF
.TMS320C60
00000001
0
.tms320C60
00000001
0
l$1$
00000014'
12
12
134
Macro Description
Producing Messages in Macros
5.7
Producing Messages in Macros
The macro language supports three directives that enable you to define your own assembly-time error and
warning messages. These directives are especially useful when you want to create messages specific to
your needs. The last line of the listing file shows the error and warning counts. These counts alert you to
problems in your code and are especially useful during debugging.
.emsg
sends error messages to the listing file. The .emsg directive generates errors in the same
manner as the assembler, incrementing the error count and preventing the assembler from
producing an object file.
.mmsg sends assembly-time messages to the listing file. The .mmsg directive functions in the same
manner as the .emsg directive but does not set the error count or prevent the creation of an
object file.
.wmsg sends warning messages to the listing file. The .wmsg directive functions in the same
manner as the .emsg directive, but it increments the warning count and does not prevent the
generation of an object file.
Macro comments are comments that appear in the definition of the macro but do not show up in the
expansion of the macro. An exclamation point in column 1 identifies a macro comment. If you want your
comments to appear in the macro expansion, precede your comment with an asterisk or semicolon.
Example 5-14 shows user messages in macros and macro comments that do not appear in the macro
expansion.
For more information about the .emsg, .mmsg, and .wmsg assembler directives, see Define Messages .
Example 5-14. Producing Messages in a Macro
TEST
.macro x,y
!
! This macro checks for the correct number of parameters.
! It generates an error message if x and y are not present.
!
! The first line tests for proper input.
!
.if
($symlen(x) + ||$symlen(y) == 0)
.emsg
"ERROR --missing parameter in call to TEST"
.mexit
.else
.endif
.if
.endif
.endm
Macro Description
135
Using Directives to Format the Output Listing
5.8
Using Directives to Format the Output Listing
Macros, substitution symbols, and conditional assembly directives may hide information. You may need to
see this hidden information, so the macro language supports an expanded listing capability.
By default, the assembler shows macro expansions and false conditional blocks in the list output file. You
may want to turn this listing off or on within your listing file. Four sets of directives enable you to control
the listing of this information:
•
Macro and loop expansion listing
.mlist
expands macros and .loop/.endloop blocks. The .mlist directive prints all code
encountered in those blocks.
.mnolist
suppresses the listing of macro expansions and .loop/ .endloop blocks.
For macro and loop expansion listing, .mlist is the default.
•
False conditional block listing
.fclist
causes the assembler to include in the listing file all conditional blocks that do not
generate code (false conditional blocks). Conditional blocks appear in the listing
exactly as they appear in the source code.
.fcnolist
suppresses the listing of false conditional blocks. Only the code in conditional blocks
that actually assemble appears in the listing. The .if, .elseif, .else, and .endif directives
do not appear in the listing.
For false conditional block listing, .fclist is the default.
•
Substitution symbol expansion listing
.sslist
expands substitution symbols in the listing. This is useful for debugging the expansion
of substitution symbols. The expanded line appears below the actual source line.
.ssnolist
turns off substitution symbol expansion in the listing.
For substitution symbol expansion listing, .ssnolist is the default.
•
Directive listing
.drlist
causes the assembler to print to the listing file all directive lines.
.drnolist
suppresses the printing of certain directives in the listing file. These directives are
.asg, .eval, .var, .sslist, .mlist, .fclist, .ssnolist, .mnolist, .fcnolist, .emsg, .wmsg,
.mmsg, .length, .width, and .break.
For directive listing, .drlist is the default.
5.9
Using Recursive and Nested Macros
The macro language supports recursive and nested macro calls. This means that you can call other
macros in a macro definition. You can nest macros up to 32 levels deep. When you use recursive macros,
you call a macro from its own definition (the macro calls itself).
When you create recursive or nested macros, you should pay close attention to the arguments that you
pass to macro parameters because the assembler uses dynamic scoping for parameters. This means that
the called macro uses the environment of the macro from which it was called.
Example 5-15 shows nested macros. The y in the in_block macro hides the y in the out_block macro. The
x and z from the out_block macro, however, are accessible to the in_block macro.
136
Macro Description
Using Recursive and Nested Macros
Example 5-15. Using Nested Macros
in_block
.macro y,a
; visible parameters are y,a and x,z from the calling macro
.endm
out_block .macro
x,y,z
; visible parameters are x,y,z
in_block x,y
; macro call with x and y as arguments
.endm
out_block
; macro call
Example 5-16 shows recursive and fact macros. The fact macro produces assembly code necessary to
calculate the factorial of n, where n is an immediate value. The result is placed in the A1
register. The fact
macro accomplishes this by calling fact1, which calls itself recursively.
Example 5-16. Using Recursive Macros
.fcnolist
fact1
.macro n
.if n == 1
MVK globcnt, A1
; Leave the answer in the A1 register.
.else
.eval 1, temp
; Compute the decrement of symbol n.
.eval globcnt*temp, globcnt
; Multiply to get a new result.
fact1 temp
; Recursive call.
.endif
.endm
fact
.macro n
.if ! $iscons(n)
; Test that input is a constant.
.emsg "Parm not a constant"
.elseif n < 1
; Type check input.
MVK 0, A1
.else
.var temp
.asg n, globcnt
fact1 n
; Perform recursive procedure
.endif
.endm
Macro Description
137
Macro Directives Summary
5.10
Macro Directives Summary
The directives listed in Table 5-2 through Table 5-6 can be used with macros. The .macro, .mexit, .endm
and .var directives are valid only with macros; the remaining directives are general assembly language
directives.
Table 5-2. Creating Macros
See
Mnemonic and Syntax
Description
Macro Use Directive
.endm
End macro definition
Section 5.2
.endm
macname .macro
[parameter1][,... , parametern]
Define macro by macname
Section 5.2
.macro
.mexit
Go to .endm
Section 5.2
Section 5.2
.mlib filename
Identify library containing macro definitions
Section 5.4
.mlib
Table 5-3. Manipulating Substitution Symbols
See
Mnemonic and Syntax
Description
Macro Use Directive
.asg ["]character string["], substitution symbol
Assign character string to substitution symbol
Section 5.3.1
.asg
.eval well-defined expression, substitution symbol
Perform arithmetic on numeric substitution symbols
Section 5.3.1
.eval
.var sym1 [,sym2 , ...,symn]
Define local macro symbols
Section 5.3.6
.var
Table 5-4. Conditional Assembly
See
Mnemonic and Syntax
Description
Macro Use Directive
.break [well-defined expression]
Optional repeatable block assembly
Section 5.5
.break
.endif
End conditional assembly
Section 5.5
.endif
.endloop
End repeatable block assembly
Section 5.5
.endloop
.else
Optional conditional assembly block
Section 5.5
.else
.elseif well-defined expression
Optional conditional assembly block
Section 5.5
.elseif
.if well-defined expression
Begin conditional assembly
Section 5.5
.if
.loop [well-defined expression]
Begin repeatable block assembly
Section 5.5
.loop
Table 5-5. Producing Assembly-Time Messages
See
Mnemonic and Syntax
Description
Macro Use Directive
.emsg
Send error message to standard output
Section 5.7
.emsg
.mmsg
Send assembly-time message to standard output
Section 5.7
.mmsg
.wmsg
Send warning message to standard output
Section 5.7
.wmsg
Table 5-6. Formatting the Listing
See
Mnemonic and Syntax
Description
Macro Use
Directive
.fclist
Allow false conditional code block listing (default)
Section 5.8
.fclist
.fcnolist
Suppress false conditional code block listing
Section 5.8
.fcnolist
.mlist
Allow macro listings (default)
Section 5.8
.mlist
.mnolist
Suppress macro listings
Section 5.8
.mnolist
.sslist
Allow expanded substitution symbol listing
Section 5.8
.sslist
.ssnolist
Suppress expanded substitution symbol listing (default)
Section 5.8
.ssnolist
138
Macro Description
Chapter 6
Archiver Description
The TMS320C6000™ archiver lets you combine several individual files into a single archive file. For
example, you can collect several macros into a macro library. The assembler searches the library and
uses the members that are called as macros by the source file. You can also use the archiver to collect a
group of object files into an object library. The linker includes in the library the members that resolve
external references during the link. The archiver allows you to modify a library by deleting, replacing,
extracting, or adding members.
Topic
Page
6.1
Archiver Overview
140
6.2
The Archiver's Role in the Software Development Flow
141
6.3
Invoking the Archiver
142
6.4
Archiver Examples
143
Archiver Description
139
Archiver Overview
6.1
Archiver Overview
You can build libraries from any type of files. Both the assembler and the linker accept archive libraries as
input; the assembler can use libraries that contain individual source files, and the linker can use libraries
that contain individual object files.
One of the most useful applications of the archiver is building libraries of object modules. For example,
you can write several arithmetic routines, assemble them, and use the archiver to collect the object files
into a single, logical group. You can then specify the object library as linker input. The linker searches the
library and includes members that resolve external references.
You can also use the archiver to build macro libraries. You can create several source files, each of which
contains a single macro, and use the archiver to collect these macros into a single, functional group. You
can use the .mlib directive during assembly to specify that macro library to be searched for the macros
that you call. Chapter 5, Macro Language, discusses macros and macro libraries in detail, while this
chapter explains how to use the archiver to build libraries.
140
Archiver Description
The Archiver's Role in the Software Development Flow
6.2
The Archiver's Role in the Software Development Flow
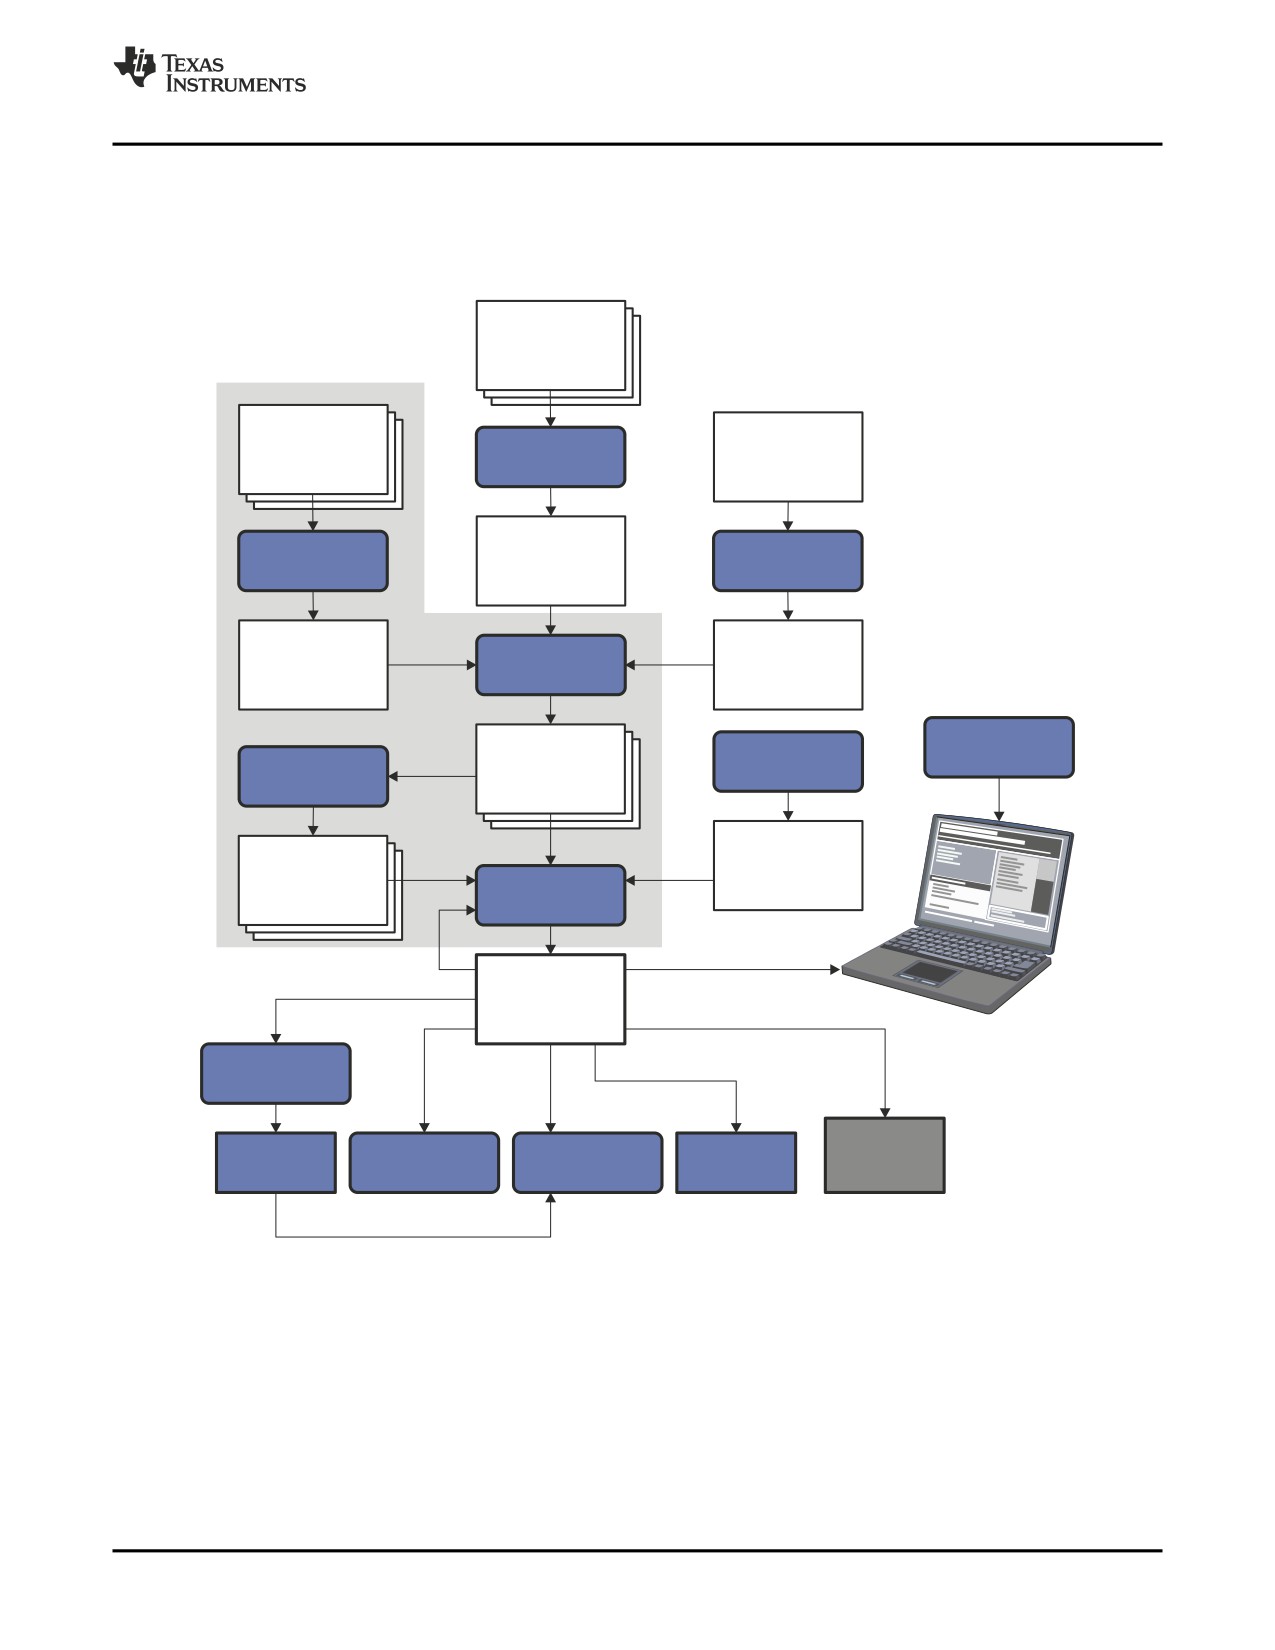
Figure 6-1 shows the archiver's role in the software development process. The shaded portion highlights
the most common archiver development path. Both the assembler and the linker accept libraries as input.
Figure 6-1. The Archiver in the TMS320C6000 Software Development Flow
C/C++
source
files
Macro
source
C/C++
Linear
files
compiler
assembly
Assembler
Assembly
Archiver
source
optimizer
Assembly
Macro
Assembler
optimized
library
file
Debugging
Library-build
Object
tools
process
Archiver
files
Run-time-
Library of
support
object
library
Linker
files
Executable
object file
Hex-conversion
utility
EPROM
Cross-reference
Object file
C6000
Absolute lister
programmer
lister
utilities
Archiver Description
141
Invoking the Archiver
6.3
Invoking the Archiver
To invoke the archiver, enter:
ar6x [-]command [options] libname [filename1 ... filenamen]
ar6x
is the command that invokes the archiver.
[-]command
tells the archiver how to manipulate the existing library members and any specified . A
command can be preceded by an optional hyphen. You must use one of the following
commands when you invoke the archiver, but you can use only one command per
invocation. The archiver commands are as follows:
@ uses the contents of the specified file instead of command line entries. You can
use this command to avoid limitations on command line length imposed by the
host operating system. Use a ; at the beginning of a line in the command file to
include comments. (See Example 6-1 for an example using an archiver command
file.)
a adds the specified files to the library. This command does not replace an existing
member that has the same name as an added file; it simply appends new
members to the end of the archive.
d deletes the specified members from the library.
r
replaces the specified members in the library. If you do not specify filenames, the
archiver replaces the library members with files of the same name in the current
directory. If the specified file is not found in the library, the archiver adds it instead
of replacing it.
t
prints a table of contents of the library. If you specify filenames, only those files
are listed. If you do not specify any filenames, the archiver lists all the members in
the specified library.
x extracts the specified files. If you do not specify member names, the archiver
extracts all library members. When the archiver extracts a member, it simply
copies the member into the current directory; it does not remove it from the library.
options
In addition to one of the commands, you can specify options. To use options, combine
them with a command; for example, to use the a command and the s option, enter -as
or as. The hyphen is optional for archiver options only. These are the archiver options:
-q
(quiet) suppresses the banner and status messages.
-s prints a list of the global symbols that are defined in the library. (This option is
valid only with the a, r, and d commands.)
-u replaces library members only if the replacement has a more recent modification
date. You must use the r command with the -u option to specify which members to
replace.
-v
(verbose) provides a file-by-file description of the creation of a new library from an
old library and its members.
libname
names the archive library to be built or modified. If you do not specify an extension for
libname, the archiver uses the default extension .lib.
filenames
names individual files to be manipulated. These files can be existing library members or
new files to be added to the library. When you enter a filename, you must enter a
complete filename including extension, if applicable.
142
Archiver Description
Archiver Examples
Naming Library Members
Note: It is possible (but not desirable) for a library to contain several members with the same
name. If you attempt to delete, replace, or extract a member whose name is the same as
another library member, the archiver deletes, replaces, or extracts the first library member
with that name.
6.4
Archiver Examples
The following are examples of typical archiver operations:
• If you want to create a library called function.lib that contains the files sine.obj, cos.obj, and flt.obj,
enter:
ar6x -a function sine.obj cos.obj flt.obj
The archiver responds as follows:
==> new archive 'function.lib'
==> building new archive 'function.lib'
•
You can print a table of contents of function.lib with the -t command, enter:
ar6x
-t function
The archiver responds as follows:
FILE NAME
SIZE
DATE
----------------
-----
------------------------
sine.obj
300
Wed Jun 14 10:00:24 2006
cos.obj
300
Wed Jun 14 10:00:30 2006
flt.obj
300
Wed Jun 14 09:59:56 2006
•
If you want to add new members to the library, enter:
ar6x
-as function atan.obj
The archiver responds as follows:
==> symbol defined: '_sin'
==> symbol defined: '$sin'
==> symbol defined: '_cos'
==> symbol defined: '$cos'
==> symbol defined: '_tan'
==> symbol defined: '$tan'
==> symbol defined: '_atan
==> symbol defined: '$atan'
==> building archive 'function.lib'
Because this example does not specify an extension for the libname, the archiver adds the files to the
library called function.lib. If function.lib does not exist, the archiver creates it. (The -s option tells the
archiver to list the global symbols that are defined in the library.)
•
If you want to modify a library member, you can extract it, edit it, and replace it. In this example,
assume there is a library named macros.lib that contains the members push.asm, pop.asm, and
swap.asm.
ar6x
-x macros push.asm
The archiver makes a copy of push.asm and places it in the current directory; it does not remove
push.asm from the library. Now you can edit the extracted file. To replace the copy of push.asm in the
library with the edited copy, enter:
ar6x
-r macros push.asm
Archiver Description
143
Archiver Examples
• If you want to use a command file, specify the command filename after the -@ command. For
example:
ar6x
-@modules.cmd
The archiver responds as follows:
==> building archive 'modules.lib'
Example 6-1 is the modules.cmd command file. The r command specifies that the filenames given in
the command file replace files of the same name in the modules.lib library. The -u option specifies that
these files are replaced only when the current file has a more recent revision date than the file that is
in the library.
Example 6-1. Archiver Command File
; Command file to replace members of the
;
modules library with updated files
; Use r command and u option:
ru
; Specify library name:
modules.lib
; List filenames to be replaced if updated:
align.asm
bss.asm
data.asm
text.asm
sect.asm
clink.asm
copy.asm
double.asm
drnolist.asm
emsg.asm
end.asm
144
Archiver Description
Chapter 7
Linker Description
The TMS320C6000™ linker creates executable modules by combining object modules. This chapter
describes the linker options, directives, and statements used to create executable modules. Object
libraries, command files, and other key concepts are discussed as well.
The concept of sections is basic to linker operation; Chapter 2 discusses the object module sections in
detail.
Topic
Page
7.1
Linker Overview
146
7.2
The Linker's Role in the Software Development Flow
147
7.3
Invoking the Linker
148
7.4
Linker Options
149
7.5
Linker Command Files
165
7.6
Object Libraries
167
7.7
The MEMORY Directive
168
7.8
The SECTIONS Directive
170
7.9
Specifying a Section's Run-Time Address
180
7.10
Using UNION and GROUP Statements
183
7.11
Special Section Types (DSECT, COPY, and NOLOAD)
187
7.12
Default Allocation Algorithm
188
7.13
Assigning Symbols at Link Time
189
7.14
Creating and Filling Holes
194
7.15
Linker-Generated Copy Tables
197
7.16
Partial (Incremental) Linking
204
7.17
Linking C/C++ Code
205
7.18
Linker Example
207
Linker Description
145
Linker Overview
7.1
Linker Overview
The TMS320C6000 linker allows you to configure system memory by allocating output sections efficiently
into the memory map. As the linker combines object files, it performs the following tasks:
• Allocates sections into the target system's configured memory
• Relocates symbols and sections to assign them to final addresses
• Resolves undefined external references between input files
The linker command language controls memory configuration, output section definition, and address
binding. The language supports expression assignment and evaluation. You configure system memory by
defining and creating a memory model that you design. Two powerful directives, MEMORY and
SECTIONS, allow you to:
• Allocate sections into specific areas of memory
• Combine object file sections
• Define or redefine global symbols at link time
146
Linker Description
The Linker's Role in the Software Development Flow
7.2
The Linker's Role in the Software Development Flow
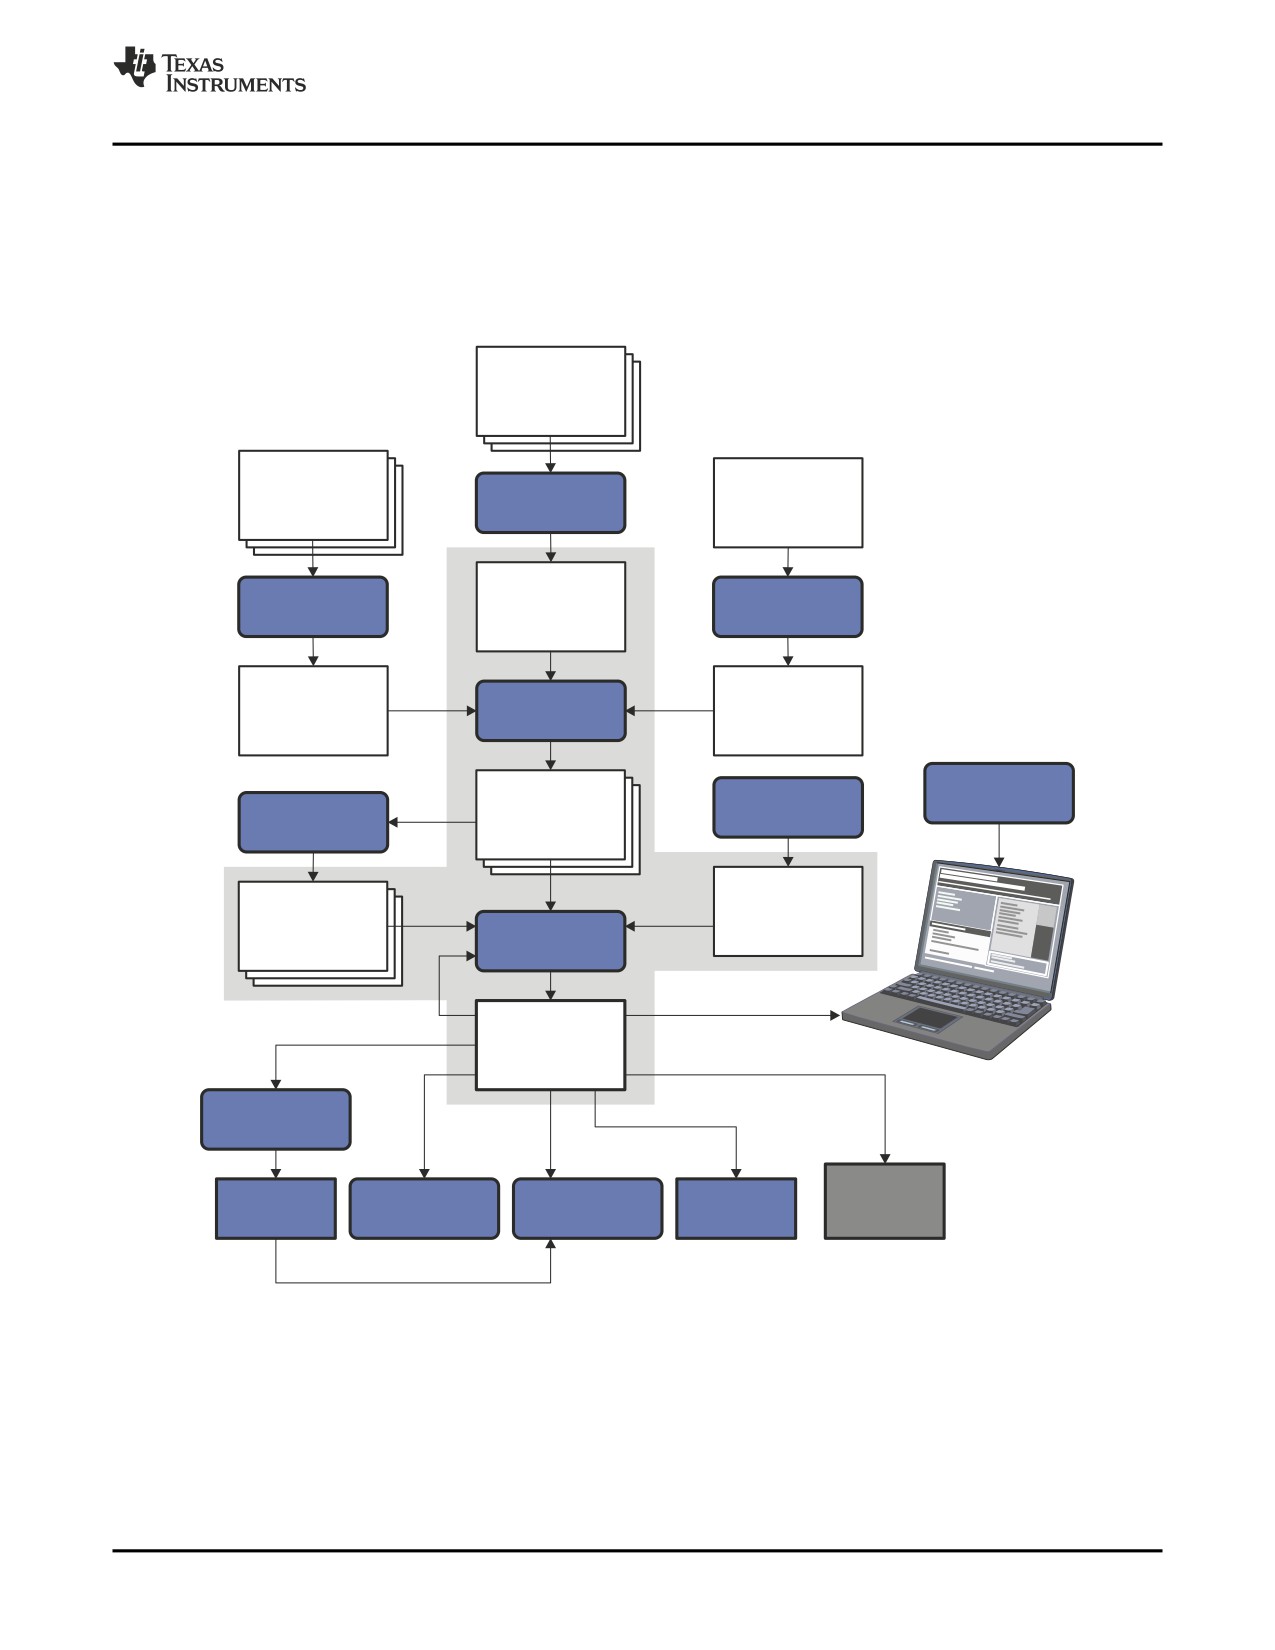
Figure 7-1 illustrates the linker's role in the software development process. The linker accepts several
types of files as input, including object files, command files, libraries, and partially linked files. The linker
creates an executable object module that can be downloaded to one of several development tools or
executed by a TMS320C6000 device.
Figure 7-1. The Linker in the TMS320C6000 Software Development Flow
C/C++
source
files
Macro
source
C/C++
Linear
files
compiler
assembly
Assembler
Assembly
Archiver
source
optimizer
Assembly
Macro
Assembler
optimized
library
file
Debugging
Library-build
Object
tools
process
Archiver
files
Run-time-
Library of
support
object
library
Linker
files
Executable
object file
Hex-conversion
utility
EPROM
Cross-reference
Object file
C6000
Absolute lister
programmer
lister
utilities
Linker Description
147
Invoking the Linker
7.3
Invoking the Linker
The general syntax for invoking the linker is:
cl6x --run_linker [options] filename1
filenamen
cl6x --run_linker
is the command that invokes the linker. The --run_linker option's short form is
-z.
options
can appear anywhere on the command line or in a link command file. (Options
are discussed in Section 7.4.)
filename1, filenamen
can be object files, link command files, or archive libraries. The default
extension for all input files is .obj; any other extension must be explicitly
specified. The linker can determine whether the input file is an object or ASCII
file that contains linker commands. The default output filename is a.out, unless
you use the --output_file option to name the output file.
There are two methods for invoking the linker:
• Specify options and filenames on the command line. This example links two files, file1.obj and file2.obj,
and creates an output module named link.out.
cl6x --run_linker file1.obj file2.obj --output_file=link.out
• Put filenames and options in a link command file. Filenames that are specified inside a link command
file must begin with a letter. For example, assume the file linker.cmd contains the following lines:
--output_file=link.out
file1.obj
file2.obj
Now you can invoke the linker from the command line; specify the command filename as an input file:
cl6x
--run_linker linker.cmd
When you use a command file, you can also specify other options and files on the command line. For
example, you could enter:
cl6x
--run_linker
--map_file=link.map linker.cmd file3.obj
The linker reads and processes a command file as soon as it encounters the filename on the
command line, so it links the files in this order: file1.obj, file2.obj, and file3.obj. This example creates an
output file called link.out and a map file called link.map.
For information on invoking the linker for C/C++ files, see Section 7.17.
148
Linker Description
Linker Options
7.4
Linker Options
Linker options control linking operations. They can be placed on the command line or in a command file.
Linker options must be preceded by a hyphen (-). Options can be separated from arguments (if they have
them) by an optional space. Table 7-1 summarizes the linker options.
Table 7-1. Linker Options Summary
Option
Alias
Description
Section
--absolute_exe
-a
Produces an absolute, executable module. This is the default; if neither
Section
7.4.2.1
--absolute_exe nor --relocatable is specified, the linker acts as if
--absolute_exe were specified.
-ar
Produces a relocatable, executable object module
Section
7.4.2.3
--arg_size
--args
Allocates memory to be used by the loader to pass arguments
Section
7.4.3
--compress_dwarf
Aggressively reduces the size of DWARF information from input object files
Section
7.4.4
--define
Predefines name as a preprocessor macro.
Section
7.4.8
--diag_error
Categorizes the diagnostic identified by num as an error
Section
7.4.5
--diag_remark
Categorizes the diagnostic identified by num as a remark
Section
7.4.5
--diag_suppress
Suppresses the diagnostic identified by num
Section
7.4.5
--diag_warning
Categorizes the diagnostic identified by num as a warning
Section
7.4.5
--disable_auto_rts
Disables the automatic selection of a run-time-support library
Section
7.4.6
--disable_clink
-j
Disables conditional linking of COFF object modules
Section
7.4.7
--display_error_number
Displays a diagnostic's identifiers along with its text
Section
7.4.5
--disable_pp
Disables preprocessing for command files
Section
7.4.8
--entry_point
-e
Defines a global symbol that specifies the primary entry point for the output
Section
7.4.9
module
--fill_value
-f
Sets default fill values for holes within output sections; fill_value is a 32-bit
Section
7.4.10
constant
--generate_dead_funcs_list
Writes a list of the dead functions that were removed by the linker to file
Section
7.4.11
fname.
--gen_func_subsections
Puts each function in a separate subsection in the object file
Section
7.4.12
--issue_remarks
Issues remarks (nonserious warnings)
Section
7.4.5
--library
-l
Names an archive library or link command filename as linker input
Section
7.4.14
--linker_help
-help
Displays information about syntax and available options
-
--make_global
-g
Makes symbol global (overrides -h)
Section
7.4.15
--make_static
-h
Makes all global symbols static
Section
7.4.16
--map_file
-m
Produces a map or listing of the input and output sections, including holes, and
Section
7.4.17
places the listing in filename
--mapfile_contents
Controls the information that appears in the map file.
Section
7.4.18
--no_demangle
Disables demangling of symbol names in diagnostics
Section
7.4.19
--no_sym_merge
-b
Disables merge of symbolic debugging information in COFF object files
Section
7.4.20
--no_sym_table
-s
Strips symbol table information and line number entries from the output
Section
7.4.21
module
--no_warnings
Suppresses warning diagnostics (errors are still issued)
Section
7.4.5
--output_file
-o
Names the executable output module. The default filename is a.out.
Section
7.4.22
--priority
-priority
Satisfies unresolved references by the first library that contains a definition for
Section
7.4.24
that symbol
--ram_model
-cr
Initializes variables at load time
Section
7.4.23
--relocatable
-r
Produces a nonexecutable, relocatable output module
Section
7.4.2.2
--reread_libs
-x
Forces rereading of libraries, which resolves back references
Section
7.4.24
--rom_model
-c
Autoinitializes variables at run time
Section
7.4.23
--run_abs
-abs
Produces an absolute listing file
Section
7.4.25
--runtime
Designates the header include path to use different libraries
Section
7.4.26
--scan_libraries
-scanlibs
Scans all libraries for duplicate symbol definitions
Section
7.4.27
Linker Description
149
Linker Options
Table 7-1. Linker Options Summary (continued)
Option
Alias
Description
Section
--search_path
-I
Alters library-search algorithms to look in a directory named with pathname
Section 7.4.14.1
before looking in the default location. This option must appear before the
--library option.
--set_error_limit
Sets the error limit to num. The linker abandons linking after this number of
Section 7.4.5
errors. (The default is 100.)
--stack_size
-stack
Sets C system stack size to size bytes and defines a global symbol that
Section 7.4.28
specifies the stack size. Default = 1K bytes
--strict_compatibility
Performs more conservative and rigorous compatibility checking of input object Section 7.4.29
files
--symbol_map
Maps symbol references to a symbol definition of a different name
Section 7.4.30
--trampolines
Generates far call trampolines
Section 7.4.31
--undef_sym
-u
Places an unresolved external symbol into the output module's symbol table
Section 7.4.32
--undefine
Removes the preprocessor macro name.
Section 7.4.8
--verbose_diagnostics
Provides verbose diagnostics that display the original source with line-wrap
Section 7.4.5
--xml_link_info
Generates a well-formed XML file containing detailed information about the
Section 7.4.34
result of a link
7.4.1
Wild Cards in File, Section, and Symbol Patterns
The linker allows file, section, and symbol names to be specified using the asterisk (*) and question mark
(?) wild cards. Using * matches any number of characters and using ? matches a single character. Using
wild cards can make it easier to handle related objects, provided they follow a suitable naming convention.
For example:
mp3*.obj
/* matches anything .obj that begins with mp3
*/
task?.o*
/* matches task1.obj, task2.obj, taskX.o55, etc. */
SECTIONS
{
.fast_code: { *.obj(*fast*) }
> FAST_MEM
.vectors
: { vectors.obj(.vector:part1:*) > 0xFFFFFF00
.str_code : { rts*.lib<str*.obj>(.text) }
> S1ROM
}
7.4.2
Relocation Capabilities (--absolute_exe and --relocatable Options)
The linker performs relocation, which is the process of adjusting all references to a symbol when the
symbol's address changes. The linker supports two options (--absolute_exe and --relocatable) that allow
you to produce an absolute or a relocatable output module. The linker also supports a third option (-ar)
that allows you to produce an executable, relocatable output module.
When the linker encounters a file that contains no relocation or symbol table information, it issues a
warning message (but continues executing). Relinking an absolute file can be successful only if each input
file contains no information that needs to be relocated (that is, each file has no unresolved references and
is bound to the same virtual address that it was bound to when the linker created it).
7.4.2.1
Producing an Absolute Output Module (--absolute_exe option)
When you use the --absolute_exe option without the --relocatable option, the linker produces an absolute,
executable output module. Absolute files contain no relocation information. Executable files contain the
following:
• Special symbols defined by the linker (see Section 7.13.4)
• An optional header that describes information such as the program entry point
• No unresolved references
The following example links file1.obj and file2.obj and creates an absolute output module called a.out:
cl6x --run_linker --absolute_exe file1.obj file2.obj
150
Linker Description
Linker Options
The --absolute_exe and --relocatable Options
Note: If you do not use the --absolute_exe or the --relocatable option, the linker acts as if you
specified --absolute_exe.
7.4.2.2
Producing a Relocatable Output Module (--relocatable option)
When you use the -ar option, the linker retains relocation entries in the output module. If the output
module is relocated (at load time) or relinked (by another linker execution), use --relocatable to retain the
relocation entries.
The linker produces a file that is not executable when you use the --relocatable option without the
--absolute_exe option. A file that is not executable does not contain special linker symbols or an optional
header. The file can contain unresolved references, but these references do not prevent creation of an
output module.
This example links file1.obj and file2.obj and creates a relocatable output module called a.out:
cl6x --run_linker --relocatable file1.obj file2.obj
The output file a.out can be relinked with other object files or relocated at load time. (Linking a file that will
be relinked with other files is called partial linking. For more information, see Section 7.16.)
7.4.2.3
Producing an Executable, Relocatable Output Module (-ar Option)
If you invoke the linker with both the --absolute_exe and --relocatable options, the linker produces an
executable, relocatable object module. The output file contains the special linker symbols, an optional
header, and all resolved symbol references; however, the relocation information is retained.
This example links file1.obj and file2.obj and creates an executable, relocatable output module called
xr.out:
cl6x --run_linker -ar file1.obj file2.obj --output_file=xr.out
7.4.3
Allocate Memory for Use by the Loader to Pass Arguments (--arg_size Option)
The --arg_size option instructs the linker to allocate memory to be used by the loader to pass arguments
from the command line of the loader to the program. The syntax of the --arg_size option is:
--arg_size= size
The size is a number representing the number of bytes to be allocated in target memory for command-line
arguments.
By default, the linker creates the __c_args__ symbol and sets it to -1. When you specify --arg_size=size,
the following occur:
• The linker creates an uninitialized section named .args of size bytes.
• The __c_args__ symbol contains the address of the .args section.
The loader and the target boot code use the .args section and the __c_args__ symbol to determine
whether and how to pass arguments from the host to the target program. See the TMS320C6000
Optimizing Compiler User's Guide for information about the loader.
7.4.4
Compress DWARF Information (--compress_dwarf Option)
The --compress_dwarf option aggressively reduces the size of DWARF information by eliminating
duplicate information from input object files. This is the default behavior for COFF object files, and can be
disabled for COFF with the legacy --no_sym_merge option. For ELF object files, the --compress_dwarf
option eliminates duplicate information that could not be removed through the use of ELF COMDAT
groups (see the ELF specification for information on COMDAT groups).
Linker Description
151
Linker Options
7.4.5
Control Linker Diagnostics
The linker uses certain C/C++ compiler options to control linker-generated diagnostics. The diagnostic
options must be specified before the --run_linker option.
--diag_error=num
Categorizes the diagnostic identified by num as an error. To determine the
numeric identifier of a diagnostic message, use the --display_error_number
option first in a separate link. Then use --diag_error=num to recategorize the
diagnostic as an error. You can only alter the severity of discretionary
diagnostics.
--diag_remark=num
Categorizes the diagnostic identified by num as a remark. To determine the
numeric identifier of a diagnostic message, use the --display_error_number
option first in a separate link. Then use --diag_remark=num to recategorize
the diagnostic as a remark. You can only alter the severity of discretionary
diagnostics.
--diag_suppress=num
Suppresses the diagnostic identified by num. To determine the numeric
identifier of a diagnostic message, use the --display_error_number option first
in a separate link. Then use --diag_suppress=num to suppress the diagnostic.
You can only suppress discretionary diagnostics.
--diag_warning=num
Categorizes the diagnostic identified by num as a warning. To determine the
numeric identifier of a diagnostic message, use the --display_error_number
option first in a separate link. Then use --diag_warning=num to recategorize
the diagnostic as a warning. You can only alter the severity of discretionary
diagnostics.
--display_error_number
Displays a diagnostic's numeric identifier along with its text. Use this option in
determining which arguments you need to supply to the diagnostic
suppression options (--diag_suppress, --diag_error, --diag_remark, and
--diag_warning). This option also indicates whether a diagnostic is
discretionary. A discretionary diagnostic is one whose severity can be
overridden. A discretionary diagnostic includes the suffix -D; otherwise, no
suffix is present. See the TMS320C6000 Optimizing Compiler User's Guide for
more information on understanding diagnostic messages.
--issue_remarks
Issues remarks (nonserious warnings), which are suppressed by default.
--no_warnings
Suppresses warning diagnostics (errors are still issued).
--set_error_limit=num
Sets the error limit to num, which can be any decimal value. The linker
abandons linking after this number of errors. (The default is 100.)
--verbose_diagnostics
Provides verbose diagnostics that display the original source with line-wrap
and indicate the position of the error in the source line
7.4.6
Disable Automatic Library Selection (--disable_auto_rts Option)
The --disable_auto_rts option disables the automatic selection of a run-time-support library. See the
TMS320C6000 Optimizing Compiler User's Guide for details on the automatic selection process.
7.4.7
Disable Conditional Linking (--disable_clink Option)
The --disable_clink option disables removal of unreferenced sections in COFF object modules. Only
sections marked as candidates for removal with the .clink assembler directive are affected by conditional
linking. See Conditionally Leave Section Out of Object Module Output for details on setting up conditional
linking using the .clink directive.
152
Linker Description
Linker Options
7.4.8
Link Command File Preprocessing (--disable_pp, --define and --undefine Options)
The linker preprocesses link command files using a standard C preprocessor. Therefore, the command
files can contain well-known preprocessing directives such as #define, #include, and #if / #endif.
Three linker options control the preprocessor:
--disable_pp
Disables preprocessing for command files
--define=name[=val]
Predefines name as a preprocessor macro
--undefine=name
Removes the macro name
The compiler has --define and --undefine options with the same meanings. However, the linker options are
distinct; only --define and --undefine options specified after --run_linker are passed to the linker. For
example:
cl6x --define=FOO=1 main.c --run_linker --define=BAR=2 lnk.cmd
The linker sees only the --define for BAR; the compiler only sees the --define for FOO.
When one command file #includes another, preprocessing context is carried from parent to child in the
usual way (that is, macros defined in the parent are visible in the child). However, when a command file is
invoked other than through #include, either on the command line or by the typical way of being named in
another command file, preprocessing context is not carried into the nested file. The exception to this is
--define and --undefine options, which apply globally from the point they are encountered. For example:
--define GLOBAL
#define LOCAL
#include "incfile.cmd"
/* sees GLOBAL and LOCAL */
nestfile.cmd
/* only sees GLOBAL
*/
Two cautions apply to the use of --define and --undefine in command files. First, they have global effect as
mentioned above. Second, since they are not actually preprocessing directives themselves, they are
subject to macro substitution, probably with unintended consequences. This effect can be defeated by
quoting the symbol name. For example:
--define MYSYM=123
--undefine MYSYM
/* expands to --undefine 123 (!) */
--undefine "MYSYM"
/* ahh, that's better
*/
The linker uses the same search paths to find #include files as it does to find libraries. That is, #include
files are searched in the following places:
1. If the #include file name is in quotes (rather than <brackets>), in the directory of the current file
2. In the list of directories specified with --Iibrary options or environment variables (see Section 7.4.14)
There are two exceptions: relative pathnames (such as "../name") always search the current directory; and
absolute pathnames (such as "/usr/tools/name") bypass search paths entirely.
The linker has the standard built-in definitions for the macros __FILE__, __DATE__, and __TIME__. It
does not, however, have the compiler-specific options for the target (__TMS320C6000__), version
(__TI_COMPILER_VERSION__), run-time model, and so on.
Linker Description
153
Linker Options
7.4.9
Define an Entry Point (--entry_point Option)
The memory address at which a program begins executing is called the entry point. When a loader loads
a program into target memory , the program counter (PC) must be initialized to the entry point; the PC
then points to the beginning of the program.
The linker can assign one of four values to the entry point. These values are listed below in the order in
which the linker tries to use them. If you use one of the first three values, it must be an external symbol in
the symbol table.
• The value specified by the --entry_point option. The syntax is:
--entry_point= global_symbol
where global_symbol defines the entry point and must be defined as an external symbol of the input
files.
• The value of symbol _c_int00 (if present). The _c_int00 symbol must be the entry point if you are
linking code produced by the C compiler.
• The value of symbol _main (if present)
•
0
(default value)
This example links file1.obj and file2.obj. The symbol begin is the entry point; begin must be defined as
external in file1 or file2.
cl6x --run_linker --entry_point=begin file1.obj file2.obj
7.4.10
Set Default Fill Value (--fill_value Option)
The --fill_value option fills the holes formed within output sections. The syntax for the --fill_value option is:
--fill_value=value
The argument value is a 32-bit constant (up to eight hexadecimal digits). If you do not use --fill_value, the
linker uses 0 as the default fill value.
This example fills holes with the hexadecimal value ABCDABCD:
cl6x --run_linker --fill_value=0xABCDABCD file1.obj file2.obj
7.4.11
Generate List of Dead Functions (--generate_dead_funcs_list Option)
The --generate_dead_funcs_list option creates a list of functions that are never referenced (dead) and
writes the list to the specified file. If no filename is specified, the default filename dead_funcs.txt is used.
The syntax for the option is:
--generate_dead_funcs_list=filename
Refer to the TMS320C6000 Optimizing Compiler User's Guide for details on the
--generate_dead_funcs_list option.
7.4.12
Using Function Subsections (--gen_func_subsections Option)
When the linker places code into an executable file, it allocates all the functions in a single source file as a
group. This means that if any function in a file needs to be linked into an executable, then all the functions
in the file are linked in. This can be undesirable if a file contains many functions and only a few are
required for an executable.
This situation may exist in libraries where a single file contains multiple functions, but the application only
needs a subset of those functions. An example is a library .obj file that contains a signed divide routine
and an unsigned divide routine. If the application requires only signed division, then only the signed divide
routine is required for linking. By default, both the signed and unsigned routines are linked in since they
exist in the same .obj file.
The --gen_func_subsections compiler option remedies this problem by placing each function in a file in its
own subsection. Thus, only the functions that are referenced in the application are linked into the final
executable. This can result in an overall code size reduction.
154
Linker Description
Linker Options
However, be aware that using the --gen_func_subsections compiler option can result in overall code size
growth if all or nearly all functions are being referenced. This is because any section containing code must
be aligned to a 32-byte boundary to support the C6000 branching mechanism. When the
--gen_func_subsections option is not used, all functions in a source file are usually placed in a common
section which is aligned. When --gen_func_subsections is used, each function defined in a source file is
placed in a unique section. Each of the unique sections requires alignment. If all the functions in the file
are required for linking, code size may increase due to the additional alignment padding for the individual
subsections.
Thus, the --gen_func_subsections compiler option is advantageous for use with libraries where normally
only a limited number of the functions in a file are used in any one executable.
The alternative to the --gen_func_subsections option is to place each function in its own file.
7.4.13
Define Heap Size (--heap_size Option)
The C/C++ compiler uses an uninitialized section called .sysmem for the C run-time memory pool used by
malloc(). You can set the size of this memory pool at link time by using the --heap_size option. The syntax
for the --heap_size option is:
--heap_size= size
The size must be a constant. This example defines a 4K byte heap:
cl6x --run_linker --heap_size=0x1000 /* defines a 4k heap (.sysmem section)*/
The linker creates the .sysmem section only if there is a .sysmem section in an input file.
The linker also creates a global symbol __SYSMEM_SIZE and assigns it a value equal to the size of the
heap. The default size is 1K bytes.
For more information about C/C++ linking, see Section 7.17.
7.4.14
Alter the Library Search Algorithm (--library Option, --search_path Option, and
C6X_C_DIR Environment Variable)
Usually, when you want to specify a file as linker input, you simply enter the filename; the linker looks for
the file in the current directory. For example, suppose the current directory contains the library object.lib.
Assume that this library defines symbols that are referenced in the file file1.obj. This is how you link the
files:
cl6x --run_linker file1.obj object.lib
If you want to use a file that is not in the current directory, use the --library linker option. The --library
option's short form is -l. The syntax for this option is:
--library=[pathname] filename
The filename is the name of an archive, an object file, or link command file. You can specify up to 128
search paths.
The --library option is not required when one or more members of an object library are specified for input
to an output section. For more information about allocating archive members, see Section 7.8.7.
You can augment the linker's directory search algorithm by using the --search_path linker option or the
C6X_C_DIR environment variable. The linker searches for object libraries and command files in the
following order:
1. It searches directories named with the --search_path linker option. The --search_path option must
appear before the --Iibrary option on the command line or in a command file.
2. It searches directories named with C6X_C_DIR.
3. If C6X_C_DIR is not set, it searches directories named with the assembler's C6X_A_DIR environment
variable.
4. It searches the current directory.
Linker Description
155
Linker Options
7.4.14.1
Name an Alternate Library Directory (--search_path Option)
The --search_path option names an alternate directory that contains input files. The --search_path option's
short form is -I. The syntax for this option is:
--search_path=pathname
The pathname names a directory that contains input files.
When the linker is searching for input files named with the --library option, it searches through directories
named with --search_path first. Each --search_path option specifies only one directory, but you can have
several --search_path options per invocation. When you use the --search_path option to name an
alternate directory, it must precede any --library option used on the command line or in a command file.
For example, assume that there are two archive libraries called r.lib and lib2.lib. The table below shows
the directories that r.lib and lib2.lib reside in, how to set environment variable, and how to use both
libraries during a link. Select the row for your operating system:
Operating System
Pathname
Enter
cl6x
--run_linker f1.obj f2.obj
--search_path=/ld
UNIX (Bourne shell)
/ld and /ld2
--search_path=/ld2
--library=r.lib
--library=lib2.lib
cl6x
--run_linker f1.obj f2.obj
--search_path=\ld
Windows
\ld and \ld2
--search_path=\ld2
--library=r.lib
--library=lib2.lib
7.4.14.2
Name an Alternate Library Directory (C6X_C_DIR Environment Variable)
An environment variable is a system symbol that you define and assign a string to. The linker uses an
environment variable named C6X_C_DIR to name alternate directories that contain object libraries. The
command syntaxes for assigning the environment variable are:
Operating System
Enter
UNIX (Bourne shell) C6X_C_DIR=" pathname1 ; pathname2 ; . . . "; export C6X_C_DIR
Windows
set C6X_C_DIR= pathname1 ; pathname2 ; . . .
The pathnames are directories that contain input files. Use the --library linker option on the command line
or in a command file to tell the linker which library or link command file to search for. The pathnames must
follow these constraints:
• Pathnames must be separated with a semicolon.
• Spaces or tabs at the beginning or end of a path are ignored. For example the space before and after
the semicolon in the following is ignored:
set C6X_C_DIR= c:\path\one\to\tools ; c:\path\two\to\tools
• Spaces and tabs are allowed within paths to accommodate Windows directories that contain spaces.
For example, the pathnames in the following are valid:
set C6X_C_DIR=c:\first path\to\tools;d:\second path\to\tools
In the example below, assume that two archive libraries called r.lib and lib2.lib reside in ld and ld2
directories. The table below shows the directories that r.lib and lib2.lib reside in, how to set the
environment variable, and how to use both libraries during a link. Select the row for your operating system:
Operating System
Pathname
Invocation Command
C6X_C_DIR="/ld
;/ld2"; export C6X_C_DIR; cl6x
--run_linker f1.obj
UNIX (Bourne shell)
/ld and /ld2
f2.obj
--library=r.lib
--library=lib2.lib
set C6X_C_DIR=\ld;\ld2
cl6x
--run_linker f1.obj f2.obj
--library=r.lib
Windows
\ld and \ld2
--library=lib2.lib
156
Linker Description
Linker Options
The environment variable remains set until you reboot the system or reset the variable by entering:
Operating System
Enter
UNIX (Bourne shell) unset C6X_C_DIR
Windows
set C6X_C_DIR=
The assembler uses an environment variable named C6X_A_DIR to name alternate directories that
contain copy/include files or macro libraries. If C6X_C_DIR is not set, the linker searches for object
libraries in the directories named with C6X_A_DIR. For information about C6X_A_DIR, see Section 3.4.2.
For more information about object libraries, see Section 7.6.
7.4.15
Make a Symbol Global (--make_global Option)
The --make_static option makes all global symbols static. If you have a symbol that you want to remain
global and you use the --make_static option, you can use the --make_global option to declare that symbol
to be global. The --make_global option overrides the effect of the --make_static option for the symbol that
you specify. The syntax for the --make_global option is:
--make_global= global_symbol
7.4.16
Make All Global Symbols Static (--make_static Option)
The --make_static option makes all global symbols static. Static symbols are not visible to externally linked
modules. By making global symbols static, global symbols are essentially hidden. This allows external
symbols with the same name (in different files) to be treated as unique.
The --make_static option effectively nullifies all .global assembler directives. All symbols become local to
the module in which they are defined, so no external references are possible. For example, assume
file1.obj and file2.obj both define global symbols called EXT. By using the --make_static option, you can
link these files without conflict. The symbol EXT defined in file1.obj is treated separately from the symbol
EXT defined in file2.obj.
cl6x --run_linker --make_static file1.obj file2.obj
7.4.17
Create a Map File (--map_file Option)
The --map_file option creates a linker map listing and puts it in filename. The syntax for the --map_file
option is:
--map_file= filename
The linker map describes:
• Memory configuration
• Input and output section allocation
• Linker-generated copy tables
• Trampolines
• The addresses of external symbols after they have been relocated
The map file contains the name of the output module and the entry point; it can also contain up to three
tables:
• A table showing the new memory configuration if any nondefault memory is specified (memory
configuration). The table has the following columns; this information is generated on the basis of the
information in the MEMORY directive in the link command file:
- Name. This is the name of the memory range specified with the MEMORY directive.
- Origin. This specifies the starting address of a memory range.
- Length. This specifies the length of a memory range.
- Unused. This specifies the total amount of unused (available) memory in that memory area.
Linker Description
157
Linker Options
- Attributes. This specifies one to four attributes associated with the named range:
R specifies that the memory can be read.
W specifies that the memory can be written to.
X specifies that the memory can contain executable code.
I
specifies that the memory can be initialized.
For more information about the MEMORY directive, see Section 7.7.
• A table showing the linked addresses of each output section and the input sections that make up the
output sections (section allocation map). This table has the following columns; this information is
generated on the basis of the information in the SECTIONS directive in the link command file:
- Output section. This is the name of the output section specified with the SECTIONS directive.
- Origin. The first origin listed for each output section is the starting address of that output section.
The indented origin value is the starting address of that portion of the output section.
- Length. The first length listed for each output section is the length of that output section. The
indented length value is the length of that portion of the output section.
- Attributes/input sections. This lists the input file or value associated with an output section. If the
input section could not be allocated, the map file will indicate this with "FAILED TO ALLOCATE".
For more information about the SECTIONS directive, see Section 7.8.
• A table showing each external symbol and its address sorted by symbol name.
• A table showing each external symbol and its address sorted by symbol address.
This following example links file1.obj and file2.obj and creates a map file called map.out:
cl6x --run_linker file1.obj file2.obj --map_file=map.out
Example 7-24 shows an example of a map file.
7.4.18
Managing Map File Contents (--mapfile_contents Option)
The --mapfile_contents option assists with managing the content of linker-generated map files. The syntax
for the --mapfile_contents option is:
--mapfile_contents=filter[, filter]
When the --map_file option is specified, the linker produces a map file containing information about
memory usage, placement information about sections that were created during a link, details about
linker-generated copy tables, and symbol values.
The new --mapfile_contents option provides a mechanism for you to control what information is included in
or excluded from a map file. When you specify --mapfile_contents=help from the command line, a help
screen listing available filter options is displayed.
The following filter options are available:
Attribute
Description
Default State
copytables
Copy tables
On
entry
Entry point
On
load_addr
Display load addresses
Off
memory
Memory ranges
On
sections
Sections
On
sym_defs
Defined symbols per file
Off
sym_name
Symbols sorted by name
On
sym_runaddr
Symbols sorted by run address
On
all
Enables all attributes
none
Disables all attributes
158
Linker Description
Linker Options
The --mapfile_contents option controls display filter settings by specifying a comma-delimited list of display
attributes. When prefixed with the word no, an attribute is disabled instead of enabled. For example:
--mapfile_contents=copytables,noentry
--mapfile_contents=all,nocopytables
--mapfile_contents=none,entry
By default, those sections that are currently included in the map file when the --map_file option is specified
are included. The filters specified in the --mapfile_contents options are processed in the order that they
appear in the command line. In the third example above, the first filter, none, clears all map file content.
The second filter, entry, then enables information about entry points to be included in the generated map
file. That is, when --mapfile_contents=none,entry is specified, the map file contains only information about
entry points.
There are two new filters included with the --mapfile_contents option, load_addr and sym_defs. These are
both disabled by default. If you turn on the load_addr filter, the map file includes the load address of
symbols that are included in the symbol list in addition to the run address (if the load address is different
from the run address).
The sym_defs filter can be used to include information about all static and global symbols defined in an
application on a file by file basis. You may find it useful to replace the sym_name and sym_runaddr
sections of the map file with the sym_defs section by specifying the following --mapfile_contents option:
--mapfile_contents=nosym_name,nosym_runaddr,sym_defs
7.4.19
Disable Name Demangling (--no_demangle)
By default, the linker uses demangled symbol names in diagnostics. For example:
undefined symbol
first referenced in file
ANewClass::getValue()
test.obj
The --no_demangle option disables the demangling of symbol names in diagnostics. For example:
undefined symbol
first referenced in file
_ZN9ANewClass8getValueEv
test.obj
7.4.20
Disable Merge of Symbolic Debugging Information (--no_sym_merge Option)
By default, the linker eliminates duplicate entries of symbolic debugging information. Such duplicate
information is commonly generated when a C program is compiled for debugging. For example:
-[ header.h ]-
typedef struct
{
<define some structure members>
} XYZ;
-[ f1.c ]-
#include "header.h"
-[ f2.c ]-
#include "header.h"
When these files are compiled for debugging, both f1.obj and f2.obj have symbolic debugging entries to
describe type XYZ. For the final output file, only one set of these entries is necessary. The linker
eliminates the duplicate entries automatically.
Use the COFF only --no_sym_merge option if you want the linker to keep such duplicate entries in COFF
object files. Using the --no_sym_merge option has the effect of the linker running faster and using less
machine memory.
Linker Description
159
Linker Options
7.4.21
Strip Symbolic Information (--no_sym_table Option)
The --no_sym_table option creates a smaller output module by omitting symbol table information and line
number entries. The --no_sym_table option is useful for production applications when you do not want to
disclose symbolic information to the consumer.
This example links file1.obj and file2.obj and creates an output module, stripped of line numbers and
symbol table information, named nosym.out:
cl6x --run_linker --output_file=nosym.out --no_sym_table file1.obj file2.obj
Using the --no_sym_table option limits later use of a symbolic debugger.
Stripping Symbolic Information
Note: To remove symbol table information, use the strip6x utility as described in Section 10.4. The
--no_sym_table option is deprecated.
7.4.22
Name an Output Module (--output_file Option)
The linker creates an output module when no errors are encountered. If you do not specify a filename for
the output module, the linker gives it the default name a.out. If you want to write the output module to a
different file, use the --output_file option. The syntax for the --output_file option is:
--output_file= filename
The filename is the new output module name.
This example links file1.obj and file2.obj and creates an output module named run.out:
cl6x --run_linker --output_file=run.out file1.obj file2.obj
7.4.23
C Language Options (--ram_model and --rom_model Options)
The --ram_model and --rom_model options cause the linker to use linking conventions that are required by
the C compiler.
• The --ram_model option tells the linker to initialize variables at load time.
• The --rom_model option tells the linker to autoinitialize variables at run time.
For more information, see Section 7.17, Section 7.17.4, and Section 7.17.5.
7.4.24
Exhaustively Read and Search Libraries (--reread_libs and --priority Options)
There are two ways to exhaustively search for unresolved symbols:
• Reread libraries if you cannot resolve a symbol reference (--reread_libs).
• Search libraries in the order that they are specified (--priority).
The linker normally reads input files, including archive libraries, only once when they are encountered on
the command line or in the command file. When an archive is read, any members that resolve references
to undefined symbols are included in the link. If an input file later references a symbol defined in a
previously read archive library, the reference is not resolved.
With the --reread_libs option, you can force the linker to reread all libraries. The linker rereads libraries
until no more references can be resolved. Linking using --reread_libs may be slower, so you should use it
only as needed. For example, if a.lib contains a reference to a symbol defined in b.lib, and b.lib contains a
reference to a symbol defined in a.lib, you can resolve the mutual dependencies by listing one of the
libraries twice, as in:
cl6x --run_linker --library=a.lib --library=b.lib --library=a.lib
or you can force the linker to do it for you:
cl6x --run_linker -reread_libs --library=a.lib --library=b.lib
160
Linker Description
Linker Options
The --priority option provides an alternate search mechanism for libraries. Using --priority causes each
unresolved reference to be satisfied by the first library that contains a definition for that symbol. For
example:
objfile
references A
lib1
defines B
lib2
defines A, B; obj defining A references B
% cl6x --run_linker objfile lib1 lib2
Under the existing model, objfile resolves its reference to A in lib2, pulling in a reference to B, which
resolves to the B in lib2.
Under --priority, objfile resolves its reference to A in lib2, pulling in a reference to B, but now B is resolved
by searching the libraries in order and resolves B to the first definition it finds, namely the one in lib1.
The --priority option is useful for libraries that provide overriding definitions for related sets of functions in
other libraries without having to provide a complete version of the whole library.
For example, suppose you want to override versions of malloc and free defined in the rts62.lib without
providing a full replacement for rts62.lib. Using --priority and linking your new library before rts62.lib
guarantees that all references to malloc and free resolve to the new library.
The --priority option is intended to support linking programs with DSP/BIOS where situations like the one
illustrated above occur.
7.4.25
Create an Absolute Listing File (--run_abs Option)
The --run_abs option produces an output file for each file that was linked. These files are named with the
input filenames and an extension of .abs. Header files, however, do not generate a corresponding .abs
file.
7.4.26
Designate Header Path (--runtime Option)
The --runtime option designates the header include path to use different libraries. The syntax for the
--runtime option is:
--runtime=pathname
7.4.27
Scan All Libraries for Duplicate Symbol Definitions (--scan_libraries)
The --scan_libraries option scans all libraries during a link looking for duplicate symbol definitions to those
symbols that are actually included in the link. The scan does not consider absolute symbols or symbols
defined in COMDAT sections. The --scan_libraries option helps determine those symbols that were
actually chosen by the linker over other existing definitions of the same symbol in a library.
The library scanning feature can be used to check against unintended resolution of a symbol reference to
a definition when multiple definitions are available in the libraries.
7.4.28
Define Stack Size (--stack_size Option)
The TMS320C6000 C/C++ compiler uses an uninitialized section, .stack, to allocate space for the run-time
stack. You can set the size of this section in bytes at link time with the --stack_size option. The syntax for
the --stack_size option is:
--stack_size= size
The size must be a constant and is in bytes. This example defines a 4K byte stack:
cl6x --run_linker --stack_size=0x1000 /* defines a 4K stack (.stack section) */
If you specified a different stack size in an input section, the input section stack size is ignored. Any
symbols defined in the input section remain valid; only the stack size is different.
When the linker defines the .stack section, it also defines a global symbol, __STACK_SIZE, and assigns it
a value equal to the size of the section. The default software stack size is 1K bytes.
Linker Description
161
Linker Options
7.4.29
Enforce Strict Compatibility (--strict_compatibility Option)
The linker performs more conservative and rigorous compatibility checking of input object files when you
specify the --strict_compatibility option. Using this option guards against additional potential compatibility
issues, but may signal false compatibility errors when linking in object files built with an older toolset (prior
to v6.1 beta), or with object files built with another compiler vendor's toolset. To avoid issues with legacy
libraries, the --strict_compatibility option is turned off by default.
7.4.30
Mapping of Symbols (--symbol_map Option)
Symbol mapping allows a symbol reference to be resolved by a symbol with a different name. Symbol
mapping allows functions to be overridden with alternate definitions. This feature can be used to patch in
alternate implementations, which provide patches (bug fixes) or alternate functionality. The syntax for the
--symbol_map option is:
--symbol_map=refname=defname
For example, the following code makes the linker resolve any references to foo by the definition
foo_patch:
--symbol_map='foo=foo_patch'
7.4.31
Generate Far Call Trampolines (--trampolines Option)
The TMS320C6000 has PC-relative call and PC-relative branch instructions whose range is smaller than
the entire address space. When these instructions are used, the destination address must be near enough
to the instruction that the difference between the call and the destination fits in the available encoding bits.
If the called function is too far away from the calling function, the linker generates an error.
The alternative to a PC-relative call is an absolute call, which is often implemented as an indirect call: load
the called address into a register, and call that register. This is often undesirable because it takes more
instructions (speed- and size-wise) and requires an extra register to contain the address.
By default, the compiler generates near calls. The --trampolines option causes the linker to generate a
trampoline code section for each call that is linked out-of-range of its called destination. The trampoline
code section contains a sequence of instructions that performs a transparent long branch to the original
called address. Each calling instruction that is out-of-range from the called function is redirected to the
trampoline.
For example, in a section of C code the bar function calls the foo function. The compiler generates this
code for the function:
bar:
call
foo
; call the function "foo"
If the foo function is placed out-of-range from the call to foo that is inside of bar, then with --trampolines
the linker changes the original call to foo into a call to foo_trampoline as shown:
bar:
call
foo_trampoline
; call a trampoline for foo
The above code generates a trampoline code section called foo_trampoline, which contains code that
executes a long branch to the original called function, foo. For example:
foo_trampoline:
branch_long
foo
Trampolines can be shared among calls to the same called function. The only requirement is that all calls
to the called function be linked near the called function's trampoline.
When the linker produces a map file (the --map_file option) and it has produced one or more trampolines,
then the map file will contain statistics about what trampolines were generated to reach which functions. A
list of calls for each trampoline is also provided in the map file.
162
Linker Description
Linker Options
The Linker Assumes B15 Contains the Stack Pointer
Note: Assembly language programmers must be aware that the linker assumes B15 contains the
stack pointer. The linker must save and restore values on the stack in trampoline code that it
generates. If you do not use B15 as the stack pointer, you should use the linker option that
disables trampolines, --trampolines=off. Otherwise, trampolines could corrupt memory and
overwrite register values.
7.4.31.1
Carrying Trampolines From Load Space to Run Space
It is sometimes useful to load code in one location in memory and run it in another. The linker provides the
capability to specify separate load and run allocations for a section. The burden of actually copying the
code from the load space to the run space is left to you.
A copy function must be executed before the real function can be executed in its run space. To facilitate
this copy function, the assembler provides the .label directive, which allows you to define a load-time
address. These load-time addresses can then be used to determine the start address and size of the code
to be copied. However, this mechanism will not work if the code contains a call that requires a trampoline
to reach its called function. This is because the trampoline code is generated at link time, after the
load-time addresses associated with the .label directive have been defined. If the linker detects the
definition of a .label symbol in an input section that contains a trampoline call, then a warning is
generated.
To solve this problem, you can use the START(), END(), and SIZE() operators (see Section 7.13.7).
These operators allow you to define symbols to represent the load-time start address and size inside the
link command file. These symbols can be referenced by the copy code, and their values are not resolved
until link time, after the trampoline sections have been allocated.
Here is an example of how you could use the START() and SIZE() operators in association with an output
section to copy the trampoline code section along with the code containing the calls that need trampolines:
SECTIONS
{
.foo : load = ROM, run = RAM, start(foo_start), size(foo_size)
{ x.obj(.text) }
.text: {} > ROM
.far : { --library=rts.lib(.text) } > FAR_MEM
}
A function in x.obj contains an run-time-support call. The run-time-support library is placed in far memory
and so the call is out-of-range. A trampoline section will be added to the .foo output section by the linker.
The copy code can refer to the symbols foo_start and foo_size as parameters for the load start address
and size of the entire .foo output section. This allows the copy code to copy the trampoline section along
with the original x.obj code in .text from its load space to its run space.
7.4.31.2
Disadvantages of Using Trampolines
An alternative method to creating a trampoline code section for a call that cannot reach its called function
is to actually modify the source code for the call. In some cases this can be done without affecting the size
of the code. However, in general, this approach is extremely difficult, especially when the size of the code
is affected by the transformation.
While generating far call trampolines provides a more straightforward solution, trampolines have the
disadvantage that they are somewhat slower than directly calling a function. They require both a call and a
branch. Additionally, while inline code could be tailored to the environment of the call, trampolines are
generated in a more general manner, and may be slightly less efficient than inline code.
Linker Description
163
Linker Options
7.4.32
Introduce an Unresolved Symbol (--undef_sym Option)
The --undef_sym option introduces an unresolved symbol into the linker's symbol table. This forces the
linker to search a library and include the member that defines the symbol. The linker must encounter the
--undef_sym option before it links in the member that defines the symbol. The syntax for the --undef_sym
option is:
--undef_sym= symbol
For example, suppose a library named rts62.lib contains a member that defines the symbol symtab; none
of the object files being linked reference symtab. However, suppose you plan to relink the output module
and you want to include the library member that defines symtab in this link. Using the --undef_sym option
as shown below forces the linker to search rts62.lib for the member that defines symtab and to link in the
member.
cl6x --run_linker --undef_sym=symtab file1.obj file2.obj rts62.lib
If you do not use --undef_sym, this member is not included, because there is no explicit reference to it in
file1.obj or file2.obj.
7.4.33
Display a Message When an Undefined Output Section Is Created (--warn_sections
Option)
In a link command file, you can set up a SECTIONS directive that describes how input sections are
combined into output sections. However, if the linker encounters one or more input sections that do not
have a corresponding output section defined in the SECTIONS directive, the linker combines the input
sections that have the same name into an output section with that name. By default, the linker does not
display a message to tell you that this occurred.
You can use the --warn_sections option to cause the linker to display a message when it creates a new
output section.
For more information about the SECTIONS directive, see Section 7.8. For more information about the
default actions of the linker, see Section 7.12.
7.4.34
Generate XML Link Information File (--xml_link_info Option)
The linker supports the generation of an XML link information file through the --xml_link_info=file option.
This option causes the linker to generate a well-formed XML file containing detailed information about the
result of a link. The information included in this file includes all of the information that is currently produced
in a linker generated map file.
See Appendix B for specifics on the contents of the generated XML file.
164
Linker Description
Linker Command Files
7.5
Linker Command Files
Linker command files allow you to put linking information in a file; this is useful when you invoke the linker
often with the same information. Linker command files are also useful because they allow you to use the
MEMORY and SECTIONS directives to customize your application. You must use these directives in a
command file; you cannot use them on the command line.
Linker command files are ASCII files that contain one or more of the following:
• Input filenames, which specify object files, archive libraries, or other command files. (If a command file
calls another command file as input, this statement must be the last statement in the calling command
file. The linker does not return from called command files.)
• Linker options, which can be used in the command file in the same manner that they are used on the
command line
• The MEMORY and SECTIONS linker directives. The MEMORY directive defines the target memory
configuration (see Section 7.7). The SECTIONS directive controls how sections are built and allocated
(see Section 7.8.)
• Assignment statements, which define and assign values to global symbols
To invoke the linker with a command file, enter the cl6x --run_linker command and follow it with the name
of the command file:
cl6x --run_linker command_filename
The linker processes input files in the order that it encounters them. If the linker recognizes a file as an
object file, it links the file. Otherwise, it assumes that a file is a command file and begins reading and
processing commands from it. Command filenames are case sensitive, regardless of the system used.
Example 7-1 shows a sample link command file called link.cmd.
Example 7-1. Linker Command File
a.obj
/* First input filename
*/
b.obj
/* Second input filename
*/
--output_file=prog.out
/* Option to specify output file */
--map_file=prog.map
/* Option to specify map file
*/
The sample file in Example 7-1 contains only filenames and options. (You can place comments in a
command file by delimiting them with /* and */.) To invoke the linker with this command file, enter:
cl6x
--run_linker link.cmd
You can place other parameters on the command line when you use a command file:
cl6x
--run_linker
--relocatable link.cmd c.obj d.obj
The linker processes the command file as soon as it encounters the filename, so a.obj and b.obj are
linked into the output module before c.obj and d.obj.
You can specify multiple command files. If, for example, you have a file called names.lst that contains
filenames and another file called dir.cmd that contains linker directives, you could enter:
cl6x
--run_linker names.lst dir.cmd
One command file can call another command file; this type of nesting is limited to 16 levels. If a command
file calls another command file as input, this statement must be the last statement in the calling command
file.
Linker Description
165
Linker Command Files
Blanks and blank lines are insignificant in a command file except as delimiters. This also applies to the
format of linker directives in a command file. Example 7-2 shows a sample command file that contains
linker directives.
Example 7-2. Command File With Linker Directives
a.obj b.obj c.obj
/* Input filenames
*/
--output_file=prog.out
/* Options
*/
--map_file=prog.map
MEMORY
/* MEMORY directive
*/
{
FAST_MEM: origin = 0x0100
length = 0x0100
SLOW_MEM: origin = 0x7000
length = 0x1000
}
SECTIONS
/* SECTIONS directive
*/
{
.text:
> SLOW_MEM
.data:
> SLOW_MEM
.bss:
> FAST_MEM
}
For more information, see Section 7.7 for the MEMORY directive, and Section 7.8 for the SECTIONS
directive.
7.5.1
Reserved Names in Linker Command Files
The following names are reserved as keywords for linker directives. Do not use them as symbol or section
names in a command file.
align
DSECT
len
o
RUN
ALIGN
f
length
org
SECTIONS
attr
fill
LENGTH
origin
spare
ATTR
FILL
load
ORIGIN
type
block
group
LOAD
range
TYPE
BLOCK
GROUP
MEMORY
run
UNION
COPY
l
(lowercase L)
NOLOAD
7.5.2
Constants in Linker Command Files
You can specify constants with either of two syntax schemes: the scheme used for specifying decimal,
octal, or hexadecimal constants used in the assembler (see Section 3.6) or the scheme used for integer
constants in C syntax.
Examples:
Format
Decimal
Octal
Hexadecimal
Assembler format
32
40q
020h
C format
32
040
0x20
166
Linker Description
Object Libraries
7.6
Object Libraries
An object library is a partitioned archive file that contains object files as members. Usually, a group of
related modules are grouped together into a library. When you specify an object library as linker input, the
linker includes any members of the library that define existing unresolved symbol references. You can use
the archiver to build and maintain libraries. Chapter 6 contains more information about the archiver.
Using object libraries can reduce link time and the size of the executable module. Normally, if an object
file that contains a function is specified at link time, the file is linked whether the function is used or not;
however, if that same function is placed in an archive library, the file is included only if the function is
referenced.
The order in which libraries are specified is important, because the linker includes only those members
that resolve symbols that are undefined at the time the library is searched. The same library can be
specified as often as necessary; it is searched each time it is included. Alternatively, you can use the
--reread_libs option to reread libraries until no more references can be resolved (see Section 7.4.24). A
library has a table that lists all external symbols defined in the library; the linker searches through the table
until it determines that it cannot use the library to resolve any more references.
The following examples link several files and libraries, using these assumptions:
• Input files f1.obj and f2.obj both reference an external function named clrscr.
• Input file f1.obj references the symbol origin.
• Input file f2.obj references the symbol fillclr.
• Member 0 of library libc.lib contains a definition of origin.
• Member 3 of library liba.lib contains a definition of fillclr.
• Member 1 of both libraries defines clrscr.
If you enter:
cl6x
--run_linker f1.obj f2.obj liba.lib libc.lib
then:
• Member 1 of liba.lib satisfies the f1.obj and f2.obj references to clrscr because the library is searched
and the definition of clrscr is found.
• Member 0 of libc.lib satisfies the reference to origin.
• Member 3 of liba.lib satisfies the reference to fillclr.
If, however, you enter:
cl6x
--run_linker fl.obj f2.obj libc.lib liba.lib
then the references to clrscr are satisfied by member 1 of libc.lib.
If none of the linked files reference symbols defined in a library, you can use the --undef_sym option to
force the linker to include a library member. (See Section 7.4.32.) The next example creates an undefined
symbol rout1 in the linker's global symbol table:
cl6x
--run_linker
--undef_sym=rout1
libc.lib
If any member of libc.lib defines rout1, the linker includes that member.
Library members are allocated according to the SECTIONS directive default allocation algorithm; see
Section 7.8.
Section 7.4.14 describes methods for specifying directories that contain object libraries.
Linker Description
167
The MEMORY Directive
7.7
The MEMORY Directive
The linker determines where output sections are allocated into memory; it must have a model of target
memory to accomplish this. The MEMORY directive allows you to specify a model of target memory so
that you can define the types of memory your system contains and the address ranges they occupy. The
linker maintains the model as it allocates output sections and uses it to determine which memory locations
can be used for object code.
The memory configurations of TMS320C6000 systems differ from application to application. The
MEMORY directive allows you to specify a variety of configurations. After you use MEMORY to define a
memory model, you can use the SECTIONS directive to allocate output sections into defined memory.
For more information, see Section 2.3 and Section 2.4.
7.7.1
Default Memory Model
If you do not use the MEMORY directive, the linker uses a default memory model that is based on the
TMS320C6000 architecture. This model assumes that the full 32-bit address space (232 locations) is
present in the system and available for use. For more information about the default memory model, see
Section 7.12.
7.7.2
MEMORY Directive Syntax
The MEMORY directive identifies ranges of memory that are physically present in the target system and
can be used by a program. Each range has several characteristics:
• Name
• Starting address
• Length
• Optional set of attributes
• Optional fill specification
When you use the MEMORY directive, be sure to identify all memory ranges that are available for loading
code. Memory defined by the MEMORY directive is configured; any memory that you do not explicitly
account for with MEMORY is unconfigured. The linker does not place any part of a program into
unconfigured memory. You can represent nonexistent memory spaces by simply not including an address
range in a MEMORY directive statement.
The MEMORY directive is specified in a command file by the word MEMORY (uppercase), followed by a
list of memory range specifications enclosed in braces. The MEMORY directive in Example 7-3 defines a
system that has 4K bytes of fast external memory at address 0x0000 0000, 2K bytes of slow external
memory at address 0x0000 1000 and 4K bytes of slow external memory at address 0x1000 0000.
Example 7-3. The MEMORY Directive
/********************************************************/
/*
Sample command file with MEMORY directive
*/
/********************************************************/
file1.obj
file2.obj
/*
Input files
*/
--output_file=prog.out
/*
Options
*/
MEMORY
{
FAST_MEM (RX): origin = 0x00000000
length = 0x00001000
SLOW_MEM (RW): origin = 0x00001000
length = 0x00000800
EXT_MEM (RX): origin = 0x10000000
length = 0x00001000
168
Linker Description