TMS320C6000 Assembly Language Tools v 6.1. User's Guide - page 3
.double — Initialize Double-Precision Floating-Point Value
.double
Initialize Double-Precision Floating-Point Value
Syntax
.double value1 [, ... , valuen]
Description
The .double directive places the IEEE double-precision floating-point representation of
one or more floating-point values into the current section. Each value must be a
floating-point constant or a symbol that has been equated to a floating-point constant.
Each constant is converted to a floating-point value in IEEE double-precision 64-bit
format. Double-precision floating point constants are aligned to a double word boundary.
The 64-bit value is stored in the format shown in Figure 4-5.
Figure 4-5. Double-Precision Floating-Point Format
S
E E E E E E E E E E E
M M M M M M M M M M M M M M M M M M M M
31
20
0
M M M M M M M M M M M M M M M M M M M MM M M M M M M M M M M M
31
0
Legend: S = sign
E = exponent (11-bit biased)
M = mantissa (52-bit fraction)
When you use .double in a .struct/.endstruct sequence, .double defines a member's size;
it does not initialize memory. For more information, see the .struct/.endstruct/.tag topic .
Example
This example shows the .double directive.
1 00000000 2C280291
.double -2.0e25
00000004 C5308B2A
2 00000008 00000000
.double 6
0000000c 40180000
3 00000010 00000000
.double 456
00000014 407C8000
Assembler Directives
85
.drlist/.drnolist —
Control Listing of Directives
.drlist/.drnolist
Control Listing of Directives
Syntax
.drlist
.drnolist
Description
Two directives enable you to control the printing of assembler directives to the listing file:
The .drlist directive enables the printing of all directives to the listing file.
The .drnolist directive suppresses the printing of the following directives to the listing
file. The .drnolist directive has no affect within macros.
•
.asg
•
.fcnolist
•
.ssnolist
•
.break
•
.mlist
•
.var
•
.emsg
•
.mmsg
•
.wmsg
•
.eval
•
.mnolist
•
.fclist
•
.sslist
By default, the assembler acts as if the .drlist directive had been specified.
Example
This example shows how .drnolist inhibits the listing of the specified directives.
Source file:
.length 65
.width
85
.asg
0, x
.loop
2
.eval
x+1, x
.endloop
.drnolist
.length 55
.width
95
.asg
1, x
.loop
3
.eval
x+1, x
.endloop
Listing file:
3
.asg
0, x
4
.loop
2
5
.eval
x+1, x
6
.endloop
1
.eval
0+1, x
1
.eval
1+1, x
7
8
.drnolist
12
.loop
3
13
.eval
x+1, x
14
.endloop
86
Assembler Directives
.emsg/.mmsg/.wmsg — Define Messages
.emsg/.mmsg/.wmsg Define Messages
Syntax
.emsg string
.mmsg string
.wmsg string
Description
These directives allow you to define your own error and warning messages. When you
use these directives, the assembler tracks the number of errors and warnings it
encounters and prints these numbers on the last line of the listing file.
The .emsg directive sends an error message to the standard output device in the same
manner as the assembler. It increments the error count and prevents the assembler from
producing an object file.
The .mmsg directive sends an assembly-time message to the standard output device in
the same manner as the .emsg and .wmsg directives. It does not, however, set the error
or warning counts, and it does not prevent the assembler from producing an object file.
The .wmsg directive sends a warning message to the standard output device in the
same manner as the .emsg directive. It increments the warning count rather than the
error count, however. It does not prevent the assembler from producing an object file.
Example
In this example, the message ERROR -- MISSING PARAMETER is sent to the standard
output device.
Source file:
.global PARAM
MSG_EX
.macro parm1
.if
$symlen(parm1) = 0
.emsg
"ERROR -- MISSING PARAMETER"
.else
MVK
parm1, A1
.endif
.endm
MSG_EX PARAM
MSG_EX
Listing file:
1
.global PARAM
2
MSG_EX
.macro parm1
3
.if
$symlen(parm1) = 0
4
.emsg
"ERROR -- MISSING PARAMETER"
5
.else
6
MVK parm1, A1
7
.endif
8
.endm
9
10 00000000
MSG_EX PARAM
1
.if
$symlen(parm1) = 0
1
.emsg
"ERROR -- MISSING PARAMETER"
1
.else
1
00000000 00800028!
MVK PARAM, A1
1
.endif
11
12 00000004
MSG_EX
1
.if
$symlen(parm1) = 0
1
.emsg
"ERROR -- MISSING PARAMETER"
***** USER ERROR ***** - : ERROR -- MISSING PARAMETER
1
.else
1
MVK parm1, A1
1
.endif
1 Error, No Warnings
In addition, the following messages are sent to standard output by the assembler:
*** ERROR!
line 12:
***** USER ERROR ***** - : ERROR -- MISSING PARAMETER
Assembler Directives
87
.end — End Assembly
.emsg
"ERROR -- MISSING PARAMETER"
]]
1 Assembly Error, No Assembly Warnings
Errors in source - Assembler Aborted
.end
End Assembly
Syntax
.end
Description
The .end directive is optional and terminates assembly. The assembler ignores any
source statements that follow a .end directive. If you use the .end directive, it must be
the last source statement of a program.
This directive has the same effect as an end-of-file character. You can use .end when
you are debugging and you want to stop assembling at a specific point in your code.
Ending a Macro
Note: Do not use the .end directive to terminate a macro; use the .endm macro
directive instead.
Example
This example shows how the .end directive terminates assembly. If any source
statements follow the .end directive, the assembler ignores them.
Source file:
start:
.text
ZERO
A0
ZERO
A1
ZERO
A3
.end
ZERO
A4
Listing file:
1 00000000
start:
.text
2 00000000 000005E0
ZERO
A0
3 00000004 008425E0
ZERO
A1
4 00000008 018C65E0
ZERO
A3
5
.end
88
Assembler Directives
.fclist/.fcnolist — Control Listing of False Conditional Blocks
.fclist/.fcnolist
Control Listing of False Conditional Blocks
Syntax
.fclist
.fcnolist
Description
Two directives enable you to control the listing of false conditional blocks:
The .fclist directive allows the listing of false conditional blocks (conditional blocks that
do not produce code).
The .fcnolist directive suppresses the listing of false conditional blocks until a .fclist
directive is encountered. With .fcnolist, only code in conditional blocks that are actually
assembled appears in the listing. The .if, .elseif, .else, and .endif directives do not
appear.
By default, all conditional blocks are listed; the assembler acts as if the .fclist directive
had been used.
Example
This example shows the assembly language and listing files for code with and without
the conditional blocks listed.
Source file:
a
.set
0
b
.set
1
.fclist
; list false conditional blocks
.if
a
MVK
5,A0
.else
MVK
0,A0
.endif
.fcnolist ; do not list false conditional blocks
.if
a
MVK
5,A0
.else
MVK
0,A0
.endif
Listing file:
1
00000000
a
.set
0
2
00000001
b
.set
1
3
.fclist
; list false conditional blocks
4
.if
a
5
MVK
5,A0
6
.else
7 00000000 00000028
MVK
0,A0
8
.endif
9
.fcnolist ; do not list false conditional blocks
13 00000004 00000028
MVK
0,A0
Assembler Directives
89
.field — Initialize Field
.field
Initialize Field
Syntax
.field value [, size in bits]
Description
The .field directive initializes a multiple-bit field within a single word (32 bits) of memory.
This directive has two operands:
• The value is a required parameter; it is an expression that is evaluated and placed in
the field. The value must be absolute.
• The size in bits is an optional parameter; it specifies a number from 1 to 32, which is
the number of bits in the field. If you do not specify a size, the assembler assumes
the size is 32 bits. If you specify a value that cannot fit in size in bits, the assembler
truncates the value and issues a warning message. For example, .field 3,1 causes
the assembler to truncate the value 3 to 1; the assembler also prints the message:
*** WARNING! line 21: W0001: Field value truncated to 1
.field
3, 1
Successive .field directives pack values into the specified number of bits starting at the
current 32-bit slot. Fields are packed starting at the least significant bit (bit 0), moving
toward the most significant bit (bit 31) as more fields are added. If the assembler
encounters a field size that does not fit in the current 32-bit word, it fills the remaining
bits of the current byte with 0s, increments the SPC to the next word boundary, and
begins packing fields into the next word.
You can use the .align directive to force the next .field directive to begin packing into a
new word.
If you use a label, it points to the byte that contains the specified field.
When you use .field in a .struct/.endstruct sequence, .field defines a member's size; it
does not initialize memory. For more information, see the .struct/.endstruct/.tag topic .
Example
This example shows how fields are packed into a word. The SPC does not change until
a word is filled and the next word is begun. Figure 4-6 shows how the directives in this
example affect memory.
1
************************************
2
**
Initialize a 24-bit field.
**
3
************************************
4 00000000 00BBCCDD
.field
0BBCCDDh, 24
5
6
************************************
7
**
Initialize a 5-bit field
**
8
************************************
9 00000000 0ABBCCDD
.field
0Ah, 5
10
11
***********************************
12
**
Initialize a 4-bit field
**
13
**
in a new word.
**
14
************************************
15 00000004 0000000C
.field
0Ch, 4
16
17
************************************
18
**
Initialize a 3-bit field
**
19
************************************
20 00000004 0000001C
x:
.field
01h, 3
21
22
************************************
23
**
Initialize a 32-bit field
**
24
**
relocatable field in the
**
25
**
next word
**
26
************************************
27 00000008 00000004'
.field x
90
Assembler Directives
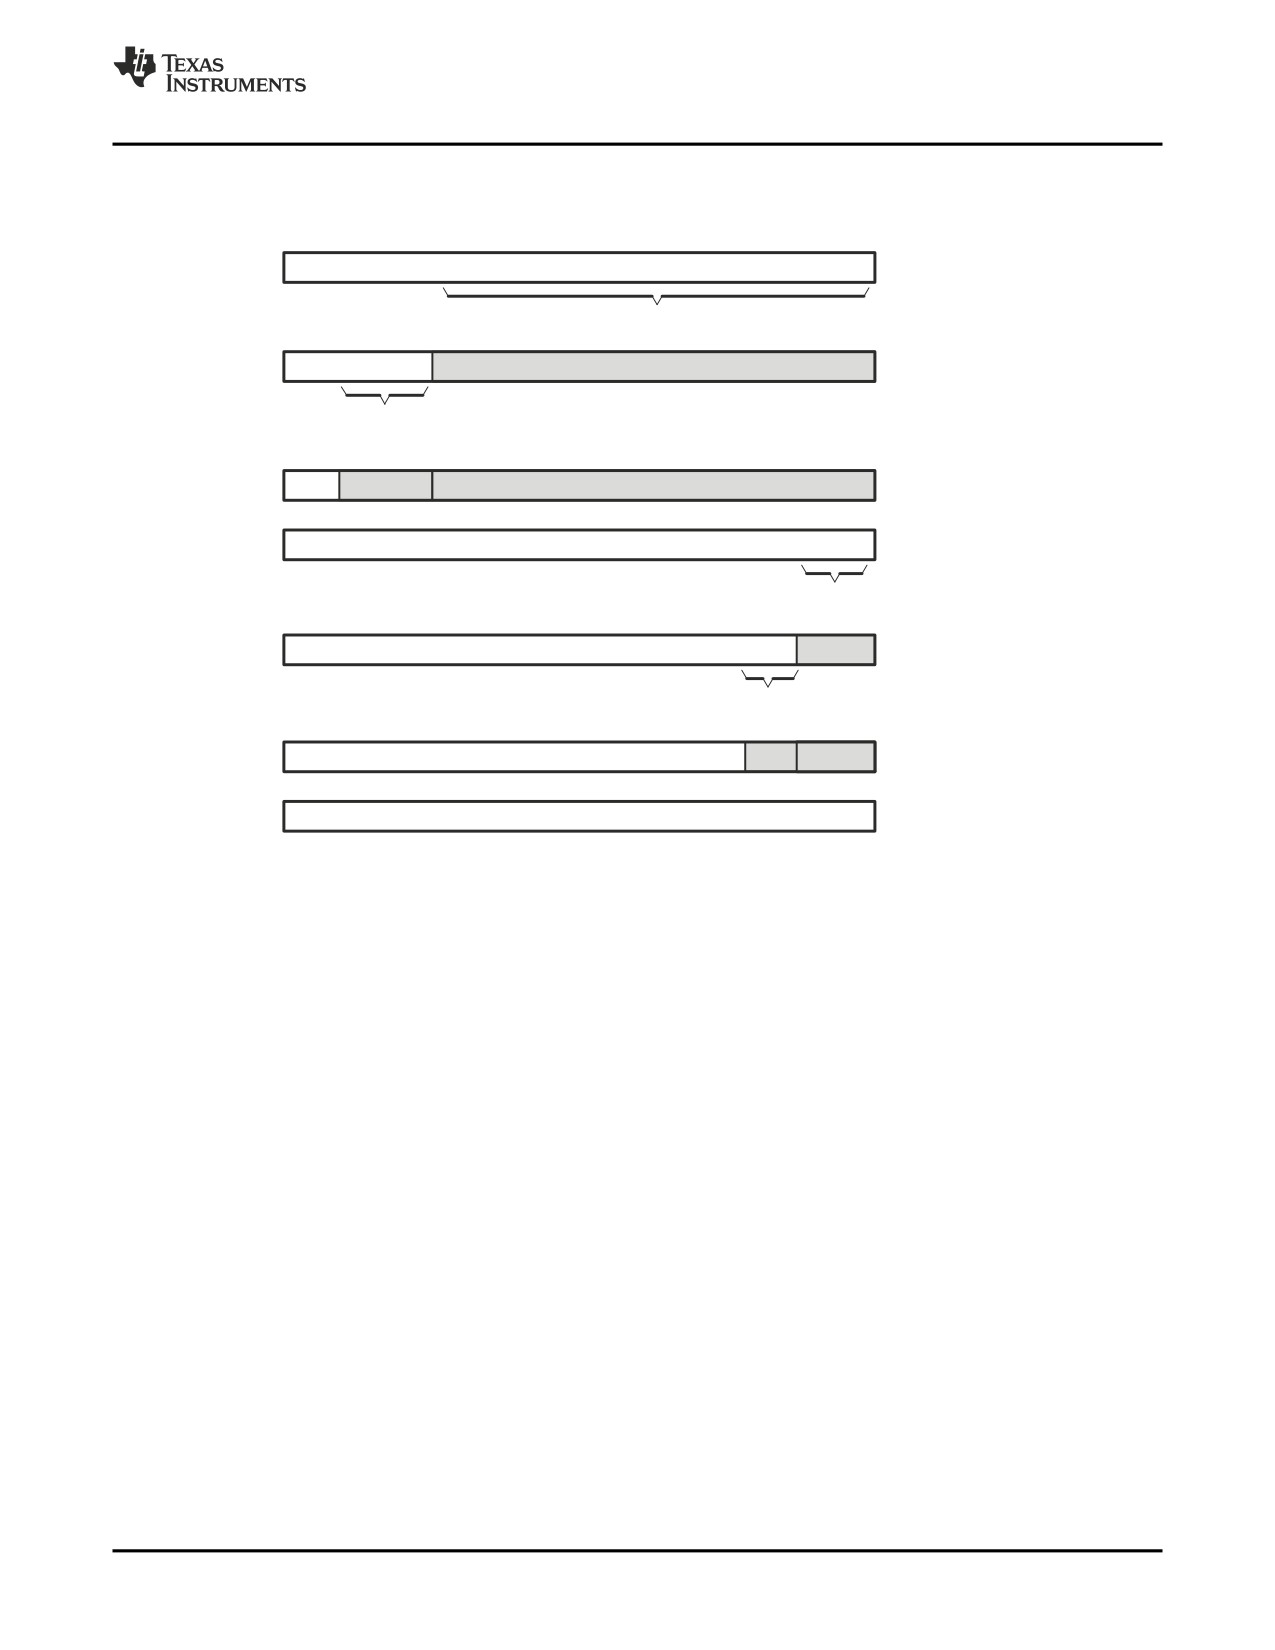
.field — Initialize Field
Figure 4-6. The .field Directive
Word
Contents
Code
31302928272625242322212019181716 1514131211 109 8 7 6 5 4 3 2 1 0
(a)
0
.field 0BBCCDDh, 24
1 0 1 1 1 0 1 11 1 0 0 1 1 0 0 1 1 0 1 1 1 0 1
24-bit field
31302928272625242322212019181716 1514131211 109 8 7 6 5 4 3 2 1 0
(b)
0
.field 0Ah, 5
0 1 0 1 0
1 0 1 1 1 0 1 11 1 0 0 1 1 0 0 1 1 0 1 1 1 0 1
5-bit field
24-bit field
31302928272625242322212019181716 1514131211 109 8 7 6 5 4 3 2 1 0
.field
0Ch, 4
(c)
0
0 0 0
0 1 0 1 0
1 0 1 1 1 0 1 11 1 0 0 1 1 0 0 1 1 0 1 1 1 0 1
31302928272625242322212019181716 1514131211 109 8 7 6 5 4 3 2 1 0
1
1 1 0 0
4-bit field
31302928272625242322212019181716
1514131211109 8 7 6 5 4 3 2 1 0
(d)
1
0 0 1
1 1 0 0
.field
01h, 3
3-bit field
31302928272625242322212019181716 1514131211 109 8 7 6 5 4 3 2 1 0
(e)
1
0 0 0 0 0 0 0 0 0 0 0 0 0 0 0 0
0 0 0 0 0 0 0 0 0
0 0 1
1 1 0 0
.field
x
31302928272625242322212019181716 1514131211 109 8 7 6 5 4 3 2 1 0
2
0 0 0 0 0 0 0 0 0 0 0 0 0 0 0 0
0 0 0 0 0 0 0 0 0 0 0 0 0 1 0 0
Assembler Directives
91
.float — Initialize Single-Precision Floating-Point Value
.float
Initialize Single-Precision Floating-Point Value
Syntax
.float value [, ...,valuen]
Description
The .float directive places the IEEE single-precision floating-point representation of a
single floating-point constant into a word in the current section. The value must be a
floating-point constant or a symbol that has been equated to a floating-point constant.
Each constant is converted to a floating-point value in IEEE single-precision 32-bit
format.
The 32-bit value is stored exponent byte first, most significant byte of fraction second,
and least significant byte of fraction third, in the format shown in Figure 4-7.
Figure 4-7. Single-Precision Floating-Point Format
S
E E E E E E E E
M M M M M M M M M M M M M M M M M M M M M M M
31
23
0
value = (-1)S x (1.0 + mantissa) x (2)exponent-127
Legend: S = sign (1 bit)
E = exponent (8-bit biased)
M = mantissa (23-bit fraction)
When you use .float in a .struct/.endstruct sequence, .float defines a member's size; it
does not initialize memory. For more information, see the .struct/.endstruct/.tag topic .
Example
Following are examples of the .float directive:
1 00000000 E9045951
.float
-1.0e25
2 00000004 40400000
.float
3
3 00000008 42F60000
.float
123
92
Assembler Directives
.global/.def/.ref — Identify Global Symbols
.global/.def/.ref
Identify Global Symbols
Syntax
.global symbol1[, ..., symboln]
.def symbol1[, ..., symboln]
.ref symbol1[, ... , symboln]
Description
Three directives identify global symbols that are defined externally or can be referenced
externally:
The .def directive identifies a symbol that is defined in the current module and can be
accessed by other files. The assembler places this symbol in the symbol table.
The .ref directive identifies a symbol that is used in the current module but is defined in
another module. The linker resolves this symbol's definition at link time.
The .global directive acts as a .ref or a .def, as needed.
A global symbol is defined in the same manner as any other symbol; that is, it appears
as a label or is defined by the .set, .equ, .bss, or .usect directive. As with all symbols, if a
global symbol is defined more than once, the linker issues a multiple-definition error. The
.ref directive always creates a symbol table entry for a symbol, whether the module uses
the symbol or not; .global, however, creates an entry only if the module actually uses the
symbol.
A symbol can be declared global for either of two reasons:
• If the symbol is not defined in the current module (which includes macro, copy, and
include files), the .global or .ref directive tells the assembler that the symbol is
defined in an external module. This prevents the assembler from issuing an
unresolved reference error. At link time, the linker looks for the symbol's definition in
other modules.
• If the symbol is defined in the current module, the .global or .def directive declares
that the symbol and its definition can be used externally by other modules. These
types of references are resolved at link time.
Example
This example shows four files. The file1.lst and file2.lst refer to each other for all symbols
used; file3.lst and file4.lst are similarly related.
The file1.lst and file3.lst files are equivalent. Both files define the symbol INIT and
make it available to other modules; both files use the external symbols X, Y, and Z. Also,
file1.lst uses the .global directive to identify these global symbols; file3.lst uses .ref and
.def to identify the symbols.
The file2.lst and file4.lst files are equivalent. Both files define the symbols X, Y, and Z
and make them available to other modules; both files use the external symbol INIT. Also,
file2.lst uses the .global directive to identify these global symbols; file4.lst uses .ref and
.def to identify the symbols.
file1.lst
1
; Global symbol defined in this file
2
.global INIT
3
; Global symbols defined in file2.lst
4
.global X, Y, Z
5 00000000
INIT:
6 00000000 00902058
ADD.L1 0x01,A4,A1
7 00000004 00000000!
.word
X
8
;
9
;
10
;
11
.end
Assembler Directives
93
.global/.def/.ref —
Identify Global Symbols
file2.lst
1
; Global symbols defined in this file
2
.global X, Y, Z
3
; Global symbol defined in file1.lst
4
.global INIT
5
00000001
X:
.set
1
6
00000002
Y:
.set
2
7
00000003
Z:
.set
3
8
00000000
00000000!
.word
INIT
9
;
10
;
11
;
12
.end
file3.lst
1
; Global symbol defined in this file
2
.def
INIT
3
; Global symbols defined in file4.lst
4
.ref
X, Y, Z
5
00000000
INIT:
6
00000000
00902058
ADD.L1 0x01,A4,A1
7
00000004
00000000!
.word
X
8
;
9
;
10
;
11
.end
file4.lst
1
; Global symbols defined in this file
2
.def
X, Y, Z
3
; Global symbol defined in file3.lst
4
.ref
INIT
5
00000001
X:
.set
1
6
00000002
Y:
.set
2
7
00000003
Z:
.set
3
8
00000000
00000000!
.word
INIT
9
;
10
;
11
;
12
.end
94
Assembler Directives
.half/.short/.uhalf/.ushort — Initialize 16-Bit Integers
.half/.short/.uhalf/.ushort Initialize 16-Bit Integers
Syntax
.half value1[, ... , valuen]
.short value1[, ... , valuen]
.uhalf value1[, ... , valuen]
.ushort value1[, ... , valuen]
Description
The .half, .uhalf, .short, and .ushort directives place one or more values into
consecutive halfwords in the current section. Each value is placed in a 2-byte slot by
itself. A value can be either:
• An expression that the assembler evaluates and treats as a 16-bit signed or unsigned
number
• A character string enclosed in double quotes. Each character in a string represents a
separate value and is stored alone in the least significant eight bits of a 16-bit field,
which is padded with 0s.
The assembler truncates values greater than 16 bits. You can use as many values as fit
on a single line, but the total line length cannot exceed 200 characters.
If you use a label with .half, .short, .uhalf, or .ushort; it points to the location where the
assembler places the first byte.
These directives perform a halfword (16-bit) alignment before data is written to the
section. This guarantees that data resides on a 16-bit boundary.
When you use .half, .short, .uhalf, or .ushort in a .struct/.endstruct sequence, they define
a member's size; they do not initialize memory. For more information, see the
.struct/.endstruct/.tag topic .
Example
In this example, .half is used to place 16-bit values (10, -1, abc, and a) into consecutive
halfwords in memory; .short is used to place 16-bit values (8, -3, def, and b) into
consecutive halfwords in memory. The label STRN has the value 100ch, which is the
location of the first initialized halfword for .short.
1 00000000
.space
100h * 16
2 00001000 0000000A
.half
10, -1, "abc", 'a'
00001002 0000FFFF
00001004 00000061
00001006 00000062
00001008 00000063
0000100a 00000061
3 0000100c 00000008
STRN
.short
8, -3, "def", 'b'
0000100e 0000FFFD
00001010 00000064
00001012 00000065
00001014 00000066
00001016 00000062
Assembler Directives
95
.if/.elseif/.else/.endif — Assemble Conditional Blocks
.if/.elseif/.else/.endif
Assemble Conditional Blocks
Syntax
.if well-defined expression
[.elseif well-defined expression]
[.else]
.endif
Description
Four directives provide conditional assembly:
The .if directive marks the beginning of a conditional block. The well-defined expression
is a required parameter.
• If the expression evaluates to true (nonzero), the assembler assembles the code that
follows the expression (up to a .elseif, .else, or .endif).
• If the expression evaluates to false (0), the assembler assembles code that follows a
.elseif (if present), .else (if present), or .endif (if no .elseif or .else is present).
The .elseif directive identifies a block of code to be assembled when the .if expression is
false (0) and the .elseif expression is true (nonzero). When the .elseif expression is
false, the assembler continues to the next .elseif (if present), .else (if present), or .endif
(if no .elseif or .else is present). The .elseif directive is optional in the conditional block,
and more than one .elseif can be used. If an expression is false and there is no .elseif
statement, the assembler continues with the code that follows a .else (if present) or a
.endif.
The .else directive identifies a block of code that the assembler assembles when the .if
expression and all .elseif expressions are false (0). The .else directive is optional in the
conditional block; if an expression is false and there is no .else statement, the assembler
continues with the code that follows the .endif.
The .endif directive terminates a conditional block.
The .elseif and .else directives can be used in the same conditional assembly block, and
the .elseif directive can be used more than once within a conditional assembly block.
See Section 3.9.4 for information about relational operators.
Example
This example shows conditional assembly:
1
00000001
SYM1
.set
1
2
00000002
SYM2
.set
2
3
00000003
SYM3
.set
3
4
00000004
SYM4
.set
4
5
6
If_4:
.if
SYM4 = SYM2 * SYM2
7 00000000 00000004
.byte
SYM4
; Equal values
8
.else
9
.byte
SYM2 * SYM2
; Unequal values
10
.endif
11
12
If_5:
.if
SYM1 <;= 10
13 00000001 0000000A
.byte
10
; Less than / equal
14
.else
15
.byte
SYM1
; Greater than
16
.endif
17
18
If_6:
.if
SYM3 * SYM2 != SYM4 + SYM2
19
.byte
SYM3 * SYM2
; Unequal value
20
.else
21 00000002 00000008
.byte
SYM4 + SYM4
; Equal values
22
.endif
23
24
If_7:
.if
SYM1 = SYM2
25
.byte
SYM1
26
.elseif SYM2 + SYM3 = 5
27 00000003 00000005
.byte
SYM2 + SYM3
28
.endif
96
Assembler Directives
.int/.long/.word/.uint/.uword — Initialize 32-Bit Integers
.int/.long/.word/.uint/.uword Initialize 32-Bit Integers
Syntax
.int value1[, ... , valuen]
.long value1[, ... , valuen]
.word value1[, ... , valuen]
.uint value1[, ... , valuen]
.uword value1[, ... , valuen]
Description
The .int, .uint, .long, .word, and .uword directives place one or more values into
consecutive words in the current section. Each value is placed in a 32-bit word by itself
and is aligned on a word boundary. A value can be either:
• An expression that the assembler evaluates and treats as a 32-bit signed or unsigned
number
• A character string enclosed in double quotes. Each character in a string represents a
separate value and is stored alone in the least significant eight bits of a 32-bit field,
which is padded with 0s.
A value can be either an absolute or a relocatable expression. If an expression is
relocatable, the assembler generates a relocation entry that refers to the appropriate
symbol; the linker can then correctly patch (relocate) the reference. This allows you to
initialize memory with pointers to variables or labels.
You can use as many values as fit on a single line (200 characters). If you use a label
with these directives, it points to the first word that is initialized.
When you use .int, .uint, .long, .word, or .uword directives in a .struct/.endstruct
sequence, they define a member's size; they do not initialize memory. See the
.struct/.endstruct/.tag topic .
Example
1
This example uses the .int directive to initialize words. Notice that the symbol SYMPTR
puts the symbol's address in the object code and generates a relocatable reference
(indicated by the - character appended to the object word).
1 00000000
.space 73h
2 00000000
.bss
PAGE, 128
3 00000080
.bss
SYMPTR, 3
4 00000074 003C12E4
INST: LDW.D2 *++B15[0],A0
5 00000078 0000000A
.int
10, SYMPTR, -1, 35 + 'a', INST
0000007c 00000080-
00000080 FFFFFFFF
00000084 00000084
00000088 00000074'
Example
2
This example initializes two 32-bit fields and defines DAT1 to point to the first location.
The contents of the resulting 32-bit fields are FFFABCDh and 141h.
1 00000000 FFFFABCD DAT1:
.long
0FFFFABCDh,'A'+100h
00000004 00000141
Example
3
This example initializes five words. The symbol WordX points to the first word.
1 00000000 00000C80
;WordX
.word
3200,1+'AB',-'AF',0F410h,'A'
00000004 00004242
00000008 FFFFB9BF
0000000c 0000F410
00000010 00000041
Data Size of longs
Note: For the C6000 C/C++ compiler, a long data value is 40 bits. For the
C6000 assembler, a long data value is 32 bits. Therefore, the .long
directive treats values assigned to it as 32-bit values.
Assembler Directives
97
.label — Create a Load-Time Address Label
.label
Create a Load-Time Address Label
Syntax
.label symbol
Description
The .label directive defines a special symbol that refers to the load-time address rather
than the run-time address within the current section. Most sections created by the
assembler have relocatable addresses. The assembler assembles each section as if it
started at 0, and the linker relocates it to the address at which it loads and runs.
For some applications, it is desirable to have a section load at one address and run at a
different address. For example, you may want to load a block of performance-critical
code into slower memory to save space and then move the code to high-speed memory
to run it. Such a section is assigned two addresses at link time: a load address and a run
address. All labels defined in the section are relocated to refer to the run-time address
so that references to the section (such as branches) are correct when the code runs.
The .label directive creates a special label that refers to the load-time address. This
function is useful primarily to designate where the section was loaded for purposes of
the code that relocates the section.
Example
This example shows the use of a load-time address label.
sect ".examp"
.label examp_load ; load address of section
start:
; run address of section
<code>
finish:
; run address of section end
.label examp_end
; load address of section end
See Section 7.9 for more information about assigning run-time and load-time addresses
in the linker.
98
Assembler Directives
.length/.width — Set Listing Page Size
.length/.width
Set Listing Page Size
Syntax
.length [page length]
.width [page width]
Description
Two directives allow you to control the size of the output listing file.
The .length directive sets the page length of the output listing file. It affects the current
and following pages. You can reset the page length with another .length directive.
• Default length: 60 lines. If you do not use the .length directive or if you use the
.length directive without specifying the page length, the output listing length defaults
to 60 lines.
• Minimum length: 1 line
• Maximum length: 32 767 lines
The .width directive sets the page width of the output listing file. It affects the next line
assembled and the lines following. You can reset the page width with another .width
directive.
• Default width: 132 characters. If you do not use the .width directive or if you use the
.width directive without specifying a page width, the output listing width defaults to
132 characters.
• Minimum width: 80 characters
• Maximum width: 200 characters
The width refers to a full line in a listing file; the line counter value, SPC value, and
object code are counted as part of the width of a line. Comments and other portions of a
source statement that extend beyond the page width are truncated in the listing.
The assembler does not list the .width and .length directives.
Example
The following example shows how to change the page length and width.
********************************************
**
Page length = 65 lines
**
**
Page width = 85 characters
**
********************************************
.length
65
.width
85
********************************************
**
Page length = 55 lines
**
**
Page width = 100 characters
**
********************************************
.length
55
.width
100
Assembler Directives
99
.list/.nolist —
Start/Stop Source Listing
.list/.nolist
Start/Stop Source Listing
Syntax
.list
.nolist
Description
Two directives enable you to control the printing of the source listing:
The .list directive allows the printing of the source listing.
The .nolist directive suppresses the source listing output until a .list directive is
encountered. The .nolist directive can be used to reduce assembly time and the source
listing size. It can be used in macro definitions to suppress the listing of the macro
expansion.
The assembler does not print the .list or .nolist directives or the source statements that
appear after a .nolist directive. However, it continues to increment the line counter. You
can nest the .list/.nolist directives; each .nolist needs a matching .list to restore the
listing.
By default, the source listing is printed to the listing file; the assembler acts as if the .list
directive had been used. However, if you do not request a listing file when you invoke
the assembler by including the --asm_listing option on the command line (see
Section 3.3), the assembler ignores the .list directive.
Example
This example shows how the .list and .nolist directives turn the output listing on and off.
The .nolist, the table: .data through .byte lines, and the .list directives do not appear in
the listing file. Also, the line counter is incremented even when source statements are
not listed.
Source file:
.data
.space
0CCh
.text
ABS
A0,A1
.nolist
table:
.data
.word
-1
.byte
0FFh
.list
.text
MV
A0,A1
.data
coeff
.word
00h,0ah,0bh
Listing file:
1 00000000
.data
2 00000000
.space
0CCh
3 00000000
.text
4 00000000 00800358
ABS
A0,A1
5
13
14 00000004
.text
15 00000004 008001A0
MV
A0,A1
16 000000d1
.data
17 000000d4 00000000
coeff
.word
00h,0ah,0bh
000000d8 0000000A
000000dc 0000000B
100
Assembler Directives
.loop/.endloop/.break — Assemble Code Block Repeatedly
.loop/.endloop/.break Assemble Code Block Repeatedly
Syntax
.loop [well-defined expression]
.break [well-defined expression]
.endloop
Description
Three directives allow you to repeatedly assemble a block of code:
The .loop directive begins a repeatable block of code. The optional expression
evaluates to the loop count (the number of loops to be performed). If there is no
well-defined expression, the loop count defaults to 1024, unless the assembler first
encounters a .break directive with an expression that is true (nonzero) or omitted.
The .break directive, along with its expression, is optional. This means that when you
use the .loop construct, you do not have to use the .break construct. The .break directive
terminates a repeatable block of code only if the well-defined expression is true
(nonzero) or omitted, and the assembler breaks the loop and assembles the code after
the .endloop directive. If the expression is false (evaluates to 0), the loop continues.
The .endloop directive terminates a repeatable block of code; it executes when the
.break directive is true (nonzero) or when the number of loops performed equals the loop
count given by .loop.
Example
This example illustrates how these directives can be used with the .eval directive. The
code in the first six lines expands to the code immediately following those six lines.
1
.eval
0,x
2
COEF
.loop
3
.word
x*100
4
.eval
x+1, x
5
.break
x = 6
6
.endloop
1
00000000 00000000
.word
0*100
1
.eval
0+1, x
1
.break
1 = 6
1
00000004 00000064
.word
1*100
1
.eval
1+1, x
1
.break
2 = 6
1
00000008 000000C8
.word
2*100
1
.eval
2+1, x
1
.break
3 = 6
1
0000000c 0000012C
.word
3*100
1
.eval
3+1, x
1
.break
4 = 6
1
00000010 00000190
.word
4*100
1
.eval
4+1, x
1
.break
5 = 6
1
00000014 000001F4
.word
5*100
1
.eval
5+1, x
1
.break
6 = 6
Assembler Directives
101
.macro/.endm —
Define Macro
.macro/.endm
Define Macro
Syntax
macname .macro [parameter1[, ... parametern]]
model statements or macro directives
.endm
Description
The .macro and .endm directives are used to define macros.
You can define a macro anywhere in your program, but you must define the macro
before you can use it. Macros can be defined at the beginning of a source file, in an
.include/.copy file, or in a macro library.
macname
names the macro. You must place the name in the source
statement's label field.
.macro
identifies the source statement as the first line of a macro definition.
You must place .macro in the opcode field.
[parameters]
are optional substitution symbols that appear as operands for the
.macro directive.
model statements are instructions or assembler directives that are executed each time
the macro is called.
macro directives are used to control macro expansion.
.endm
marks the end of the macro definition.
Macros are explained in further detail in Chapter 5.
102
Assembler Directives
.mlib — Define Macro Library
.mlib
Define Macro Library
Syntax
.mlib ["]filename["]
Description
The .mlib directive provides the assembler with the filename of a macro library. A macro
library is a collection of files that contain macro definitions. The macro definition files are
bound into a single file (called a library or archive) by the archiver.
Each file in a macro library contains one macro definition that corresponds to the name
of the file. The filename of a macro library member must be the same as the macro
name, and its extension must be .asm. The filename must follow host operating system
conventions; it can be enclosed in double quotes. You can specify a full pathname (for
example, c:\320tools\macs.lib). If you do not specify a full pathname, the assembler
searches for the file in the following locations in the order given:
1. The directory that contains the current source file
2. Any directories named with the --include_path assembler option
3. Any directories specified by the C6X_A_DIR environment variable
4. Any directories specified by the C6X_C_DIR environment variable
See Section 3.4 for more information about the --include_path option.
When the assembler encounters a .mlib directive, it opens the library specified by the
filename and creates a table of the library's contents. The assembler enters the names
of the individual library members into the opcode table as library entries. This redefines
any existing opcodes or macros that have the same name. If one of these macros is
called, the assembler extracts the entry from the library and loads it into the macro table.
The assembler expands the library entry in the same way it expands other macros, but it
does not place the source code into the listing. Only macros that are actually called from
the library are extracted, and they are extracted only once.
See Chapter 5 for more information on macros and macro libraries.
Example
This example creates a macro library that defines two macros, inc1 and dec1. The file
inc1.asm contains the definition of inc1, and dec1.asm contains the definition of dec1.
inc1.asm
dec1.asm
* Macro for incrementing
* Macro for decrementing
inc1
.macro A
dec1
.macro A
ADD A,1,A
SUB A,1,A
.endm
.endm
Use the archiver to create a macro library:
ar6x -a mac inc1.asm dec1.asm
Now you can use the .mlib directive to reference the macro library and define the inc1
and dec1 macros:
1
.mlib
"mac.lib"
2
3
* Macro Call
4 00000000
inc1
A0
1
00000000 000021A0
ADD
A0,1,A0
5
6
* Macro Call
7 00000004
dec1
B0
1
00000004 0003E1A2
SUB
B0,1,B0
Assembler Directives
103
.mlist/.mnolist —
Start/Stop Macro Expansion Listing
.mlist/.mnolist
Start/Stop Macro Expansion Listing
Syntax
.mlist
.mnolist
Description
Two directives enable you to control the listing of macro and repeatable block
expansions in the listing file:
The .mlist directive allows macro and .loop/.endloop block expansions in the listing file.
The .mnolist directive suppresses macro and .loop/.endloop block expansions in the
listing file.
By default, the assembler behaves as if the .mlist directive had been specified.
See Chapter 5 for more information on macros and macro libraries. See the
.loop/.break/.endloop topic for information on conditional blocks.
Example
This example defines a macro named STR_3. The first time the macro is called, the
macro expansion is listed (by default). The second time the macro is called, the macro
expansion is not listed, because a .mnolist directive was assembled. The third time the
macro is called, the macro expansion is again listed because a .mlist directive was
assembled.
1
STR_3
.macro
P1, P2, P3
2
.string ":p1:", ":p2:", ":p3:"
3
.endm
4
5
00000000
STR_3 "as", "I", "am"
1
00000000
0000003A
.string ":p1:", ":p2:", ":p3:"
00000001
00000070
00000002
00000031
00000003
0000003A
00000004
0000003A
00000005
00000070
00000006
00000032
00000007
0000003A
00000008
0000003A
00000009
00000070
0000000a
00000033
0000000b
0000003A
6
.mnolist
7
0000000c
STR_3 "as", "I", "am"
8
.mlist
9
00000018
STR_3 "as", "I", "am"
1
00000018
0000003A
.string ":p1:", ":p2:", ":p3:"
00000019
00000070
0000001a
00000031
0000001b
0000003A
0000001c
0000003A
0000001d
00000070
0000001e
00000032
0000001f
0000003A
00000020
0000003A
00000021
00000070
00000022
00000033
00000023
0000003A
104
Assembler Directives
.newblock — Terminate Local Symbol Block
.newblock
Terminate Local Symbol Block
Syntax
.newblock
Description
The .newblock directive undefines any local labels currently defined. Local labels, by
nature, are temporary; the .newblock directive resets them and terminates their scope.
A local label is a label in the form $n, where n is a single decimal digit, or name?, where
name is a legal symbol name. Unlike other labels, local labels are intended to be used
locally, cannot be used in expressions, and do not qualify for branch expansion if used
with a branch. They can be used only as operands in 8-bit jump instructions. Local labels
are not included in the symbol table.
After a local label has been defined and (perhaps) used, you should use the .newblock
directive to reset it. The .text, .data, and .sect directives also reset local labels. Local
labels that are defined within an include file are not valid outside of the include file.
See Section 3.8.2 for more information on the use of local labels.
Example
This example shows how the local label $1 is declared, reset, and then declared again.
1
.global table1, table2
2
3 00000000 00000028!
MVKL
table1,A0
4 00000004 00000068!
MVKH
table1,A0
5 00000008 008031A9
MVK
99, A1
6 0000000c 010848C0
||
ZERO
A2
7
8 00000010 80000212
$1:[A1] B
$1
9 00000014 01003674
STW
A2, *A0++
10 00000018 0087E1A0
SUB
A1,1,A1
11 0000001c 00004000
NOP
3
12
13
.newblock ; undefine $1
14
15 00000020 00000028!
MVKL
table2,A0
16 00000024 00000068!
MVKH
table2,A0
17 00000028 008031A9
MVK
99, A1
18 0000002c 010829C0
||
SUB
A2,1,A2
19
20 00000030 80000212
$1:[A1] B
$1
21 00000034 01003674
STW
A2, *A0++
22 00000038 0087E1A0
SUB
A1,1,A1
23 0000003c 00004000
NOP
3
Assembler Directives
105
.nocmp
—
Do
Not
Utilize
16-Bit Instructions in Section
.nocmp
Do Not Utilize 16-Bit Instructions in Section
Syntax
.nocmp
Description
The C6400+ and C6740 .nocmp directive instructs the compiler to not utilize 16-bit
instructions for the code section .nocmp appears in. The .nocmp directive can appear
anywhere in the section.
Example
In the example, the section one is not compressed, whereas section two is compressed.
.sect "one"
LDW *A4, A5
LDW *B4, A5
.nocmp
NOP 4
ADD A4, A5, A6
ADD B4, B5, B6
NOP
.sect "two"
ADD A4, A5, A6
NOP
NOP
.option
Select Listing Options
Syntax
.option option1[, option2, . . .]
Description
The .option directive selects options for the assembler output listing. The options must
be separated by commas; each option selects a listing feature. These are valid options:
A
turns on listing of all directives and data, and subsequent expansions, macros,
and blocks.
B
limits the listing of .byte and .char directives to one line.
D
turns off the listing of certain directives (same effect as .drnolist).
H
limits the listing of .half and .short directives to one line.
L
limits the listing of .long directives to one line.
M turns off macro expansions in the listing.
N
turns off listing (performs .nolist).
O
turns on listing (performs .list).
R
resets the B, H, L, M, T, and W directives (turns off the limits of B, H, L, M, T,
and W).
T
limits the listing of .string directives to one line.
W limits the listing of .word and .int directives to one line.
X
produces a cross-reference listing of symbols. You can also obtain a
cross-reference listing by invoking the assembler with the --cross_reference
option (see Section 3.3).
Options are not case sensitive.
Example
This example shows how to limit the listings of the .byte, .char, .int, long, .word, and
.string directives to one line each.
1
****************************************
2
** Limit the listing of .byte, .char, **
3
**
.int, .word, and .string
**
4
**
directives to 1 line each.
**
5
****************************************
106
Assembler Directives
.page — Eject Page in Listing
6
.option B, W, T
7
00000000
000000BD
.byte
-'C', 0B0h, 5
8
00000003
000000BC
.char
-'D', 0C0h, 6
9
00000008
0000000A
.int
10, 35 + 'a', "abc"
10
0000001c AABBCCDD
.long
0AABBCCDDh, 536 + 'A'
00000020
00000259
11
00000024
000015AA
.word
5546, 78h
12
0000002c
00000052
.string "Registers"
13
14
****************************************
15
**
Reset the listing options.
**
16
****************************************
17
.option R
18
00000035
000000BD
.byte
-'C', 0B0h, 5
00000036
000000B0
00000037
00000005
19
00000038
000000BC
.char
-'D', 0C0h, 6
00000039
000000C0
0000003a
00000006
20
0000003c
0000000A
.int
10, 35 + 'a', "abc"
00000040
00000084
00000044
00000061
00000048
00000062
0000004c
00000063
21
00000050
AABBCCDD
.long
0AABBCCDDh, 536 + 'A'
00000054
00000259
22
00000058
000015AA
.word
5546, 78h
0000005c
00000078
23
00000060
00000052
.string "Registers"
00000061
00000065
00000062
00000067
00000063
00000069
00000064
00000073
00000065
00000074
00000066
00000065
00000067
00000072
00000068
00000073
.page
Eject Page in Listing
Syntax
.page
Description
The .page directive produces a page eject in the listing file. The .page directive is not
printed in the source listing, but the assembler increments the line counter when it
encounters the .page directive. Using the .page directive to divide the source listing into
logical divisions improves program readability.
Example
This example shows how the .page directive causes the assembler to begin a new page
of the source listing.
Source file:
.title
"**** Page Directive Example ****"
;
;
;
.page
Listing file:
TMS320C6000 Assembler
Version x.xx
Tue Apr 17 17:16:51 2007
Copyright ) 1996-2007 Texas Instruments Incorporated
**** Page Directive Example ****
PAGE
1
2
;
3
;
4
;
TMS320C6000 Assembler
Version x.xx
Tue Apr 17 17:16:51 2007
Copyright ) 1996-2007 Texas Instruments Incorporated
**** Page Directive Example ****
PAGE
2
No Errors, No Warnings
Assembler Directives
107
.sect — Assemble Into Named Section
.sect
Assemble Into Named Section
Syntax
.sect "section name"
Description
The .sect directive defines a named section that can be used like the default .text and
.data sections. The .sect directive tells the assembler to begin assembling source code
into the named section.
The section name identifies the section. The section name is significant to 200
characters and must be enclosed in double quotes. A section name can contain a
subsection name in the form section name:subsection name.
See Chapter 2 for more information about sections.
Example
This example defines two special-purpose sections, Sym_Defs and Vars, and assembles
code into them.
1
**********************************************
2
**
Begin assembling into .text section.
**
3
**********************************************
4 00000000
.text
5 00000000 000005E0
ZERO
A0
6 00000004 008425E0
ZERO
A1
7
8
**********************************************
9
**
Begin assembling into vars section.
**
10
**********************************************
11 00000000
.sect
"vars"
12 00000000 4048F5C3
pi
.float
3.14
13 00000004 000007D0
max
.int
2000
14 00000008 00000001
min
.int
1
15
16
**********************************************
17
**
Resume assembling into .text section.
**
18
**********************************************
19 00000008
.text
20 00000008 010000A8
MVK
1,A2
21 0000000c 018000A8
MVK
1,A3
22
23
**********************************************
24
**
Resume assembling into vars section.
**
25
**********************************************
26 0000000c
.sect
"vars"
27 0000000c 00000019
count
.short
25
108
Assembler Directives
.set/.equ — Define Assembly-Time Constant
.set/.equ
Define Assembly-Time Constant
Syntax
symbol .set value
symbol .equ value
Description
The .set and .equ directives equate a constant value to a symbol. The symbol can then
be used in place of a value in assembly source. This allows you to equate meaningful
names with constants and other values. The .set and .equ directives are identical and
can be used interchangeably.
• The symbol is a label that must appear in the label field.
• The value must be a well-defined expression, that is, all symbols in the expression
must be previously defined in the current source module.
Undefined external symbols and symbols that are defined later in the module cannot be
used in the expression. If the expression is relocatable, the symbol to which it is
assigned is also relocatable.
The value of the expression appears in the object field of the listing. This value is not
part of the actual object code and is not written to the output file.
Symbols defined with .set or .equ can be made externally visible with the .def or .global
directive (see the .global/.def/.ref topic ). In this way, you can define global absolute
constants.
Example
This example shows how symbols can be assigned with .set and .equ.
1
**********************************************
2
**
Equate symbol AUX_R1 to register A1
**
3
**
and use it instead of the register.
**
4
**********************************************
5
00000001
AUX_R1
.set
A1
6 00000000 00B802D4
STH
AUX_R1,*+B14
7
8
**********************************************
9
**
Set symbol index to an integer expr.
**
10
**
and use it as an immediate operand.
**
11
**********************************************
12
00000035
INDEX
.equ
100/2 +3
13 00000004 01001AD0
ADDK
INDEX, A2
14
15
**********************************************
16
** Set symbol SYMTAB to a relocatable expr. **
17
**
and use it as a relocatable operand.
**
18
**********************************************
19 00000008 0000000A
LABEL
.word
10
20
00000009' SYMTAB
.set
LABEL + 1
21
22
**********************************************
23
**
Set symbol NSYMS equal to the symbol
**
24
**
INDEX and use it as you would INDEX.
**
25
**********************************************
26
00000035
NSYMS
.set
INDEX
27 0000000c 00000035
.word
NSYMS
Assembler Directives
109
.space/.bes —
Reserve Space
.space/.bes
Reserve Space
Syntax
[label]
.space size in bytes
[label]
.bes size in bytes
Description
The .space and .bes directives reserve the number of bytes given by size in bytes in the
current section and fill them with 0s. The section program counter is incremented to
point to the word following the reserved space.
When you use a label with the .space directive, it points to the first byte reserved. When
you use a label with the .bes directive, it points to the last byte reserved.
Example
This example shows how memory is reserved with the .space and .bes directives.
1
*****************************************************
2
**
Begin assembling into the .text section.
**
3
*****************************************************
4
00000000
.text
5
*****************************************************
6
** Reserve 0F0 bytes (60 words in .text section). **
7
*****************************************************
8
00000000
.space
0F0h
9
000000f0
00000100
.word
100h, 200h
000000f4
00000200
10
*****************************************************
11
**
Begin assembling into the .data section.
**
12
*****************************************************
13
00000000
.data
14
00000000
00000049
.string "In .data"
00000001
0000006E
00000002
00000020
00000003
0000002E
00000004
00000064
00000005
00000061
00000006
00000074
00000007
00000061
15
*****************************************************
16
**
Reserve 100 bytes in the .data section;
**
17
**
RES_1 points to the first word
**
18
**
that contains reserved bytes.
**
19
*****************************************************
20
00000008
RES_1:
.space
100
21
0000006c
0000000F
.word
15
22
00000070
00000008"
.word
RES_1
23
*****************************************************
24
**
Reserve 20 bytes in the .data section;
**
25
**
RES_2 points to the last word
**
26
**
that contains reserved bytes.
**
27
*****************************************************
28
00000087
RES_2:
.bes
20
29
00000088
00000036
.word
36h
30
0000008c
00000087"
.word
RES_2
110
Assembler Directives
.sslist/.ssnolist — Control Listing of Substitution Symbols
.sslist/.ssnolist
Control Listing of Substitution Symbols
Syntax
.sslist
.ssnolist
Description
Two directives allow you to control substitution symbol expansion in the listing file:
The .sslist directive allows substitution symbol expansion in the listing file. The
expanded line appears below the actual source line.
The .ssnolist directive suppresses substitution symbol expansion in the listing file.
By default, all substitution symbol expansion in the listing file is suppressed; the
assembler acts as if the .ssnolist directive had been used.
Lines with the pound (#) character denote expanded substitution symbols.
Example
This example shows code that, by default, suppresses the listing of substitution symbol
expansion, and it shows the .sslist directive assembled, instructing the assembler to list
substitution symbol code expansion.
1 00000000
.bss
x,4
2 00000004
.bss
y,4
3 00000008
.bss
z,4
4
5
addm
.macro src1,src2,dst
6
LDW
*+B14(:src1:), A0
7
LDW
*+B14(:src2:), A1
8
NOP
4
9
ADD
A0,A1,A0
10
STW
A0,*+B14(:dst:)
11
.endm
12
13 00000000
addm
x,y,z
1
00000000 0000006C-
LDW
*+B14(x), A0
1
00000004 0080016C-
LDW
*+B14(y), A1
1
00000008 00006000
NOP
4
1
0000000c 000401E0
ADD
A0,A1,A0
1
00000010 0000027C-
STW
A0,*+B14(z)
14
15
.sslist
16 00000014
addm
x,y,z
1
00000014 0000006C-
LDW
*+B14(:src1:), A0
#
LDW
*+B14(x), A0
1
00000018 0080016C-
LDW
*+B14(:src2:), A1
#
LDW
*+B14(y), A1
1
0000001c 00006000
NOP
4
1
00000020 000401E0
ADD
A0,A1,A0
1
00000024 0000027C-
STW
A0,*+B14(:dst:)
#
STW
A0,*+B14(z)
17
Assembler Directives
111
.string — Initialize Text
.string
Initialize Text
Syntax
.string {expr1 | "string1"}[, ... , {exprn | "stringn"}]
Description
The .string directive places 8-bit characters from a character string into the current
section. The expr or string can be one of the following:
• An expression that the assembler evaluates and treats as an 8-bit signed number.
• A character string enclosed in double quotes. Each character in a string represents a
separate value, and values are stored in consecutive bytes. The entire string must be
enclosed in quotes.
The assembler truncates any values that are greater than eight bits. You can have up to
100 operands, but they must fit on a single source statement line.
If you use a label, it points to the location of the first byte that is initialized.
When you use .string in a .struct/.endstruct sequence, .string defines a member's size; it
does not initialize memory. For more information, see the .struct/.endstruct/.tag topic .
Example
In this example, 8-bit values are placed into consecutive bytes in the current section.
The label Str_Ptr has the value 0h, which is the location of the first initialized byte.
1 00000000 00000041
Str_Ptr:
.string "ABCD"
00000001 00000042
00000002 00000043
00000003 00000044
2 00000004 00000041
.string
41h, 42h, 43h, 44h
00000005 00000042
00000006 00000043
00000007 00000044
3 00000008 00000041
.string "Austin", "Houston"
00000009 00000075
0000000a 00000073
0000000b 00000074
0000000c 00000069
0000000d 0000006E
0000000e 00000048
0000000f 0000006F
00000010 00000075
00000011 00000073
00000012 00000074
00000013 0000006F
00000014 0000006E
4 00000015 00000030
.string
36 + 12
112
Assembler Directives
.struct/.endstruct/.tag
— Declare Structure Type
.struct/.endstruct/.tag Declare Structure Type
Syntax
[stag]
.struct
[expr]
[mem0] element
[expr0]
[mem1] element
[expr1]
[memn]
.tag stag
[exprn]
[memN] element
[exprN]
[size]
.endstruct
label
.tag
stag
Description
The .struct directive assigns symbolic offsets to the elements of a data structure
definition. This allows you to group similar data elements together and let the assembler
calculate the element offset. This is similar to a C structure or a Pascal record. The
.struct directive does not allocate memory; it merely creates a symbolic template that can
be used repeatedly.
The .endstruct directive terminates the structure definition.
The .tag directive gives structure characteristics to a label, simplifying the symbolic
representation and providing the ability to define structures that contain other structures.
The .tag directive does not allocate memory. The structure tag (stag) of a .tag directive
must have been previously defined.
Following are descriptions of the parameters used with the .struct, .endstruct, and .tag
directives:
• The stag is the structure's tag. Its value is associated with the beginning of the
structure. If no stag is present, the assembler puts the structure members in the
global symbol table with the value of their absolute offset from the top of the
structure. A .stag is optional for .struct, but is required for .tag.
• The expr is an optional expression indicating the beginning offset of the structure.
The default starting point for a structure is 0.
• The memn/N is an optional label for a member of the structure. This label is absolute
and equates to the present offset from the beginning of the structure. A label for a
structure member cannot be declared global.
• The element is one of the following descriptors: .byte, .char, .int, .long, .word,
.double, .half, .short, .string, .float, and .field. All of these except .tag are typical
directives that initialize memory. Following a .struct directive, these directives
describe the structure element's size. They do not allocate memory. A .tag directive
is a special case because stag must be used (as in the definition of stag).
• The exprn/N is an optional expression for the number of elements described. This
value defaults to 1. A .string element is considered to be one byte in size, and a .field
element is one bit.
• The size is an optional label for the total size of the structure.
Directives That Can Appear in a .struct/.endstruct Sequence
Note: The only directives that can appear in a .struct/.endstruct sequence are
element descriptors, conditional assembly directives, and the .align
directive, which aligns the member offsets on word boundaries. Empty
structures are illegal.
Assembler Directives
113
.struct/.endstruct/.tag —
Declare Structure Type
The following examples show various uses of the .struct, .tag, and .endstruct directives.
Example
1
1
real_rec
.struct
; stag
2
00000000
nom
.int
; member1 = 0
3
00000004
den
.int
; member2 = 1
4
00000008
real_len
.endstruct
; real_len = 2
5
6
00000000
0080016C-
LDW
*+B14(real+real_rec.den), A1
7
; access structure
8
9
00000000
.bss real, real_len
; allocate mem rec
10
Example
2
11
cplx_rec
.struct
; stag
12
00000000
reali
.tag real_rec
; member1
= 0
13
00000008
imagi
.tag real_rec
; member2
= 2
14
00000010
cplx_len
.endstruct
; cplx_len = 4
15
16
complex
.tag cplx_rec
; assign structure
17
; attribute
18
00000008
.bss complex, cplx_len
; allocate mem rec
19
20
00000004
0100046C-
LDW
*+B14(complex.imagi.nom), A2
21
; access structure
22
00000008
0100036C-
LDW
*+B14(complex.reali.den), A2
23
; access structure
24
0000000c
018C4A78
CMPEQ A2, A3, A3
Example
3
1
.struct
; no stag puts
2
; mems into global
3
; symbol table
4
5
00000000
X
.byte
; create 3 dim
6
00000001
Y
.byte
; templates
7
00000002
Z
.byte
8
00000003
.endstruct
Example
4
1
bit_rec
.struct
; stag
2
00000000
stream
.string 64
3
00000040
bit7
.field
7
; bit7 = 64
4
00000040
bit1
.field
9
; bit9 = 64
5
00000042
bit5
.field
10
; bit5 = 64
6
00000044
x_int
.byte
; x_int = 68
7
00000045
bit_len
.endstruct
; length = 72
8
9
bits
.tag bit_rec
10
00000000
.bss bits, bit_len
11
12
00000000
0100106C-
LDW
*+B14(bits.bit7), A2
13
; load field
14
00000004
0109E7A0
AND
0Fh, A2, A2
; mask off garbage
114
Assembler Directives
.tab — Define Tab Size
.tab
Define Tab Size
Syntax
.tab size
Description
The .tab directive defines the tab size. Tabs encountered in the source input are
translated to size character spaces in the listing. The default tab size is eight spaces.
Example
In this example, each of the lines of code following a .tab statement consists of a single
tab character followed by an NOP instruction.
Source file:
; default tab size
NOP
NOP
NOP
.tab 4
NOP
NOP
NOP
.tab 16
NOP
NOP
NOP
Listing file:
1
; default tab size
2 00000000 00000000
NOP
3 00000004 00000000
NOP
4 00000008 00000000
NOP
5
.tab4
7 0000000c 00000000
NOP
8 00000010 00000000
NOP
9 00000014 00000000
NOP
10
.tab 16
12 00000018 00000000
NOP
13 0000001c 00000000
NOP
14 00000020 00000000
NOP
Assembler Directives
115
.text — Assemble Into the .text Section
.text
Assemble Into the .text Section
Syntax
.text
Description
The .text directive tells the assembler to begin assembling into the .text section, which
usually contains executable code. The section program counter is set to 0 if nothing has
yet been assembled into the .text section. If code has already been assembled into the
.text section, the section program counter is restored to its previous value in the section.
The .text section is the default section. Therefore, at the beginning of an assembly, the
assembler assembles code into the .text section unless you use a .data or .sect directive
to specify a different section.
For more information about sections, see Chapter 2.
Example
This example assembles code into the .text and .data sections.
1
******************************************
2
** Begin assembling into .data section. **
3
******************************************
4 00000000
.data
5 00000000 00000005
.byte
5,6
00000001 00000006
6
7
******************************************
8
** Begin assembling into .text section. **
9
******************************************
10 00000000
.text
11 00000000 00000001
.byte
1
12 00000001 00000002
.byte
2,3
00000002 00000003
13
14
******************************************
15
** Resume assembling into .data section.**
16
******************************************
17 00000002
.data
18 00000002 00000007
.byte
7,8
00000003 00000008
19
20
******************************************
21
** Resume assembling into .text section.**
22
******************************************
23 00000003
.text
24 00000003 00000004
.byte
4
116
Assembler Directives
.title — Define Page Title
.title
Define Page Title
Syntax
.title "string"
Description
The .title directive supplies a title that is printed in the heading on each listing page. The
source statement itself is not printed, but the line counter is incremented.
The string is a quote-enclosed title of up to 64 characters. If you supply more than 64
characters, the assembler truncates the string and issues a warning:
*** WARNING! line x: W0001: String is too long - will be truncated
The assembler prints the title on the page that follows the directive and on subsequent
pages until another .title directive is processed. If you want a title on the first page, the
first source statement must contain a .title directive.
Example
In this example, one title is printed on the first page and a different title is printed on
succeeding pages.
Source file:
.title "**** Fast Fourier Transforms ****"
;
;
;
.title "**** Floating-Point Routines ****"
.page
Listing file:
TMS320C6000 Assembler
Version x.xx
Tue Apr 17 17:18:21 2007
Copyright ) 1996-2007 Texas Instruments Incorporated
**** Fast Fourier Transforms ****
PAGE
1
2
;
3
;
4
;
TMS320C6000 Assembler
Version x.xx
Tue Apr 17 17:18:21 2007
Copyright ) 1996-2007 Texas Instruments Incorporated
**** Floating-Point Routines ****
PAGE
2
No Errors, No Warnings
Assembler Directives
117
.union/.endunion/.tag — Declare Union Type
.union/.endunion/.tag Declare Union Type
Syntax
[stag]
.union
[expr]
[mem0] element
[expr0]
[mem1] element
[expr1]
[memn]
.tag stag
[exprn]
[memN] element
[exprN]
[size]
.endunion
label
.tag
stag
Description
The .union directive assigns symbolic offsets to the elements of alternate data structure
definitions to be allocated in the same memory space. This enables you to define
several alternate structures and then let the assembler calculate the element offset. This
is similar to a C union. The .union directive does not allocate any memory; it merely
creates a symbolic template that can be used repeatedly.
A .struct definition can contain a .union definition, and .structs and .unions can be
nested.
The .endunion directive terminates the union definition.
The .tag directive gives structure or union characteristics to a label, simplifying the
symbolic representation and providing the ability to define structures or unions that
contain other structures or unions. The .tag directive does not allocate memory. The
structure or union tag of a .tag directive must have been previously defined.
Following are descriptions of the parameters used with the .struct, .endstruct, and .tag
directives:
• The utag is the union's tag. is the union's tag. Its value is associated with the
beginning of the union. If no utag is present, the assembler puts the union members
in the global symbol table with the value of their absolute offset from the top of the
union. In this case, each member must have a unique name.
• The expr is an optional expression indicating the beginning offset of the union.
Unions default to start at 0. This parameter can only be used with a top-level union. It
cannot be used when defining a nested union.
• The memn/N is an optional label for a member of the union. This label is absolute and
equates to the present offset from the beginning of the union. A label for a union
member cannot be declared global.
• The element is one of the following descriptors: .byte, .char, .int, .long, .word,
.double, .half, .short, .string, .float, and .field. An element can also be a complete
declaration of a nested structure or union, or a structure or union declared by its tag.
Following a .union directive, these directives describe the element's size. They do not
allocate memory.
• The exprn/N is an optional expression for the number of elements described. This
value defaults to 1. A .string element is considered to be one byte in size, and a .field
element is one bit.
• The size is an optional label for the total size of the union.
118
Assembler Directives
.union/.endunion/.tag — Declare Union Type
Directives That Can Appear in a .union/.endunion Sequence
Note: The only directives that can appear in a .union/.endunion sequence are
element descriptors, structure and union tags, and conditional assembly
directives. Empty structures are illegal.
These examples show unions with and without tags.
Example 1
1
.global employid
2
xample
.union
; utag
3
0000
ival
.word
; member1 = int
4
0000
fval
.float
; member2 = float
5
0000
sval
.string
; member3 = string
6
0002
real_len
.endunion
; real_len = 2
7
8 000000
.bss employid, real_len
;allocate memory
9
10
employid
.tag xample
; name an instance
11 000000 0000-
ADD
employid.fval, A
; access union element
Example 2
1
2
.union
; utag
3
0000
x
.long
; member1 = long
4
0000
y
.float
; member2 = float
5
0000
z
.word
; member3 = word
6
0002
size_u
.endunion
; real_len = 2
7
Assembler Directives
119
.usect — Reserve Uninitialized Space
.usect
Reserve Uninitialized Space
Syntax
symbol .usect "section name", size in bytes [, alignment[, bank offset]]
Description
The .usect directive reserves space for variables in an uninitialized, named section. This
directive is similar to the .bss directive; both simply reserve space for data and that
space has no contents. However, .usect defines additional sections that can be placed
anywhere in memory, independently of the .bss section.
• The symbol points to the first location reserved by this invocation of the .usect
directive. The symbol corresponds to the name of the variable for which you are
reserving space.
• The section name is significant to 200 characters and must be enclosed in double
quotes. This parameter names the uninitialized section. A section name can contain
a subsection name in the form section name:subsection name.
• The size in bytes is an expression that defines the number of bytes that are reserved
in section name.
• The alignment is an optional parameter that ensures that the space allocated to the
symbol occurs on the specified boundary. This boundary indicates the size of the slot
in bytes and can be set to any power of 2.
• The bank offset is an optional parameter that ensures that the space allocated to the
symbol occurs on a specific memory bank boundary. The bank offset value measures
the number of bytes to offset from the alignment specified before assigning the
symbol to that location.
Initialized sections directives (.text, .data, and .sect) end the current section and tell the
assembler to begin assembling into another section. A .usect or .bss directive
encountered in the current section is simply assembled, and assembly continues in the
current section.
Variables that can be located contiguously in memory can be defined in the same
specified section; to do so, repeat the .usect directive with the same section name and
the subsequent symbol (variable name).
For more information about sections, see Chapter 2.
120
Assembler Directives
.usect — Reserve Uninitialized Space
Example
This example uses the .usect directive to define two uninitialized, named sections, var1
and var2. The symbol ptr points to the first byte reserved in the var1 section. The symbol
array points to the first byte in a block of 100 bytes reserved in var1, and dflag points to
the first byte in a block of 50 bytes in var1. The symbol vec points to the first byte
reserved in the var2 section.
Figure 4-8 shows how this example reserves space in two uninitialized sections, var1
and var2.
1
***************************************************
2
**
Assemble into .text section
**
3
***************************************************
4
00000000
.text
5
00000000 008001A0
MV
A0,A1
6
7
***************************************************
8
**
Reserve 2 bytes in var1.
**
9
***************************************************
10
00000000
ptr
.usect "var1",2
11
00000004 0100004C-
LDH
*+B14(ptr),A2
; still in .text
12
13
***************************************************
14
**
Reserve 100 bytes in var1
**
15
***************************************************
16
00000002
array
.usect "var1",100
17
00000008 01800128-
MVK
array,A3
; still in .text
18
0000000c 01800068-
MVKH
array,A3
19
20
***************************************************
21
**
Reserve 50 bytes in var1
**
22
***************************************************
23
00000066
dflag
.usect "var1",50
24
00000010 02003328-
MVK
dflag,A4
25
00000014 02000068-
MVKH
dflag,A4
26
27
***************************************************
28
**
Reserve 100 bytes in var1
**
29
***************************************************
30
00000000
vec
.usect "var2",100
31
00000018 0000002A-
MVK
vec,B0
; still in .text
32
0000001c 0000006A-
MVKH
vec,B0
Figure 4-8. The .usect Directive
Section var1
Section var2
ptr
ptr
2 bytes
array
100 bytes
100 bytes
100 bytes reserved
in var2
dflag
50 bytes
152 bytes reserved
in var1
Assembler Directives
121
.var — Use Substitution Symbols as Local Variables
.var
Use Substitution Symbols as Local Variables
Syntax
.var sym1[, sym2, ... , symn]
Description
The .var directive allows you to use substitution symbols as local variables within a
macro. With this directive, you can define up to 32 local macro substitution symbols
(including parameters) per macro.
The .var directive creates temporary substitution symbols with the initial value of the null
string. These symbols are not passed in as parameters, and they are lost after
expansion.
See Chapter 5 for information on macros.
122
Assembler Directives
Chapter 5
Macro Description
The TMS320C6000™ assembler supports a macro language that enables you to create your own
instructions. This is especially useful when a program executes a particular task several times. The macro
language lets you:
• Define your own macros and redefine existing macros
• Simplify long or complicated assembly code
• Access macro libraries created with the archiver
• Define conditional and repeatable blocks within a macro
• Manipulate strings within a macro
• Control expansion listing
Topic
Page
5.1
Using Macros
124
5.2
Defining Macros
124
5.3
Macro Parameters/Substitution Symbols
126
5.4
Macro Libraries
131
5.5
Using Conditional Assembly in Macros
132
5.6
Using Labels in Macros
134
5.7
Producing Messages in Macros
135
5.8
Using Directives to Format the Output Listing
136
5.9
Using Recursive and Nested Macros
136
5.10
Macro Directives Summary
138
Macro Description
123
Using Macros
5.1
Using Macros
Programs often contain routines that are executed several times. Instead of repeating the source
statements for a routine, you can define the routine as a macro, then call the macro in the places where
you would normally repeat the routine. This simplifies and shortens your source program.
If you want to call a macro several times but with different data each time, you can assign parameters
within a macro. This enables you to pass different information to the macro each time you call it. The
macro language supports a special symbol called a substitution symbol, which is used for macro
parameters. See Section 5.3 for more information.
Using a macro is a 3-step process.
Step 1. Define the macro. You must define macros before you can use them in your program. There
are two methods for defining macros:
a. Macros can be defined at the beginning of a source file or in a copy/include file. See
Section 5.2, Defining Macros, for more information.
b. Macros can also be defined in a macro library. A macro library is a collection of files in
archive format created by the archiver. Each member of the archive file (macro library)
may contain one macro definition corresponding to the member name. You can access a
macro library by using the .mlib directive. For more information, see Section 5.4.
Step 2. Call the macro. After you have defined a macro, call it by using the macro name as a
mnemonic in the source program. This is referred to as a macro call.
Step 3. Expand the macro. The assembler expands your macros when the source program calls
them. During expansion, the assembler passes arguments by variable to the macro
parameters, replaces the macro call statement with the macro definition, then assembles the
source code. By default, the macro expansions are printed in the listing file. You can turn off
expansion listing by using the .mnolist directive. For more information, see Section 5.8.
When the assembler encounters a macro definition, it places the macro name in the opcode table. This
redefines any previously defined macro, library entry, directive, or instruction mnemonic that has the same
name as the macro. This allows you to expand the functions of directives and instructions, as well as to
add new instructions.
5.2
Defining Macros
You can define a macro anywhere in your program, but you must define the macro before you can use it.
Macros can be defined at the beginning of a source file or in a .copy/.include file (see Copy Source File );
they can also be defined in a macro library. For more information about macro libraries, see Section 5.4.
Macro definitions can be nested, and they can call other macros, but all elements of the macro must be
defined in the same file. Nested macros are discussed in Section 5.9.
A macro definition is a series of source statements in the following format:
macname
.macro
[parameter1] [, ... ,parametern]
model statements or macro directives
[.mexit]
.endm
macname
names the macro. You must place the name in the source statement's label field.
Only the first 128 characters of a macro name are significant. The assembler
places the macro name in the internal opcode table, replacing any instruction or
previous macro definition with the same name.
.macro
is the directive that identifies the source statement as the first line of a macro
definition. You must place .macro in the opcode field.
124
Macro Description
Defining Macros
parameter1,
are optional substitution symbols that appear as operands for the .macro directive.
parametern
Parameters are discussed in Section 5.3.
model statements are instructions or assembler directives that are executed each time the macro is
called.
macro directives
are used to control macro expansion.
.mexit
is a directive that functions as a goto .endm. The .mexit directive is useful when
error testing confirms that macro expansion fails and completing the rest of the
macro is unnecessary.
.endm
is the directive that terminates the macro definition.
If you want to include comments with your macro definition but do not want those comments to appear in
the macro expansion, use an exclamation point to precede your comments. If you do want your comments
to appear in the macro expansion, use an asterisk or semicolon. See Section 5.7 for more information
about macro comments.
Example 5-1 shows the definition, call, and expansion of a macro.
Example 5-1. Macro Definition, Call, and Expansion
Macro definition: The following code defines a macro, sadd4, with four parameters:
1
sadd4
.macro r1,r2,r3,r4
2
!
3
! sadd4
r1, r2 ,r3, r4
4
! r1 = r1 + r2 + r3 + r4 (saturated)
5
!
6
SADD
r1,r2,r1
7
SADD
r1,r3,r1
8
SADD
r1,r4,r1
9
.endm
Macro call: The following code calls the sadd4 macro with four arguments:
10
11 00000000
sadd4
A0,A1,A2,A3
Macro expansion: The following code shows the substitution of the macro definition for the macro call.
The assembler substitutes A0, A1, A2, and A3 for the r1, r2, r3, and r4 parameters of sadd4.
1
00000000 00040278
SADD
A0,A1,A0
1
00000004 00080278
SADD
A0,A2,A0
1
00000008 000C0278
SADD
A0,A3,A0
Macro Description
125
Macro Parameters/Substitution Symbols
5.3
Macro Parameters/Substitution Symbols
If you want to call a macro several times with different data each time, you can assign parameters within
the macro. The macro language supports a special symbol, called a substitution symbol, which is used for
macro parameters.
Macro parameters are substitution symbols that represent a character string. These symbols can also be
used outside of macros to equate a character string to a symbol name (see Section 3.8.6).
Valid substitution symbols can be up to 128 characters long and must begin with a letter. The remainder
of the symbol can be a combination of alphanumeric characters, underscores, and dollar signs.
Substitution symbols used as macro parameters are local to the macro they are defined in. You can define
up to 32 local substitution symbols (including substitution symbols defined with the .var directive) per
macro. For more information about the .var directive, see Section 5.3.6.
During macro expansion, the assembler passes arguments by variable to the macro parameters. The
character-string equivalent of each argument is assigned to the corresponding parameter. Parameters
without corresponding arguments are set to the null string. If the number of arguments exceeds the
number of parameters, the last parameter is assigned the character-string equivalent of all remaining
arguments.
If you pass a list of arguments to one parameter or if you pass a comma or semicolon to a parameter, you
must surround these terms with quotation marks .
At assembly time, the assembler replaces the macro parameter/substitution symbol with its corresponding
character string, then translates the source code into object code.
Example 5-2 shows the expansion of a macro with varying numbers of arguments.
Example 5-2. Calling a Macro With Varying Numbers of Arguments
Macro definition:
Parms
.macro
a,b,c
;
a = :a:
;
b = :b:
;
c = :c:
.endm
Calling the macro:
Parms
100,label
Parms
100,label,x,y
;
a = 100
;
a = 100
;
b = label
;
b = label
;
c = " "
;
c = x,y
Parms
100, , x
Parms
"100,200,300",x,y
;
a = 100
;
a = 100,200,300
;
b = " "
;
b = x
;
c = x
;
c = y
Parms
"""string""",x,y
;
a = "string"
;
b = x
;
c = y
126
Macro Description