Toyota 4Runner (2022 year). Manual in english - page 4

3-2. Opening, closing and locking the doors
127
Automatic running boards
The Automatic running boards are linked to the side door opera-
tions, extending and retracting when a side door is opened and
closed. When a door is opened or closed, the board on the same
side extends or retracts.
3
1
Opening a door: The appropriate board extends
2
Closing a door: The appropriate board retracts
Turning off the Automatic running boards system
Press “OFF” on the Automatic running boards switch to turn off the
Automatic running boards system.
1
On (Automatic mode)
2
Off
The orange line at the top of the
switch illuminates to indicate that
the Automatic running boards sys-
tem is on.
When extension of the boards is
not necessary, or extension of a
board is not desirable due to an
obstacle, turn the Automatic run-
ning boards switch off before open-
ing the side door.
: If equipped
128
3-2. Opening, closing and locking the doors
■ Jam protection function
During Automatic running boards operation:
If a board contacts an obstacle when extending, it will retract. If an obstacle
gets caught between a board and the vehicle when retracting, the board will
extend.
If an obstacle is detected 3 times in a row during Automatic running boards
operation, the board will stop at the position it contacts the obstacle. When a
side door on the same side as the board is opened and closed one more
time, the board will extend and retract, or retract and extend. After this, the
board will resume normal operation.
■Automatic retraction function
The boards will be automatically retracted, for safety, under the following con-
ditions:
● A board is not completely retracted
● Vehicle speed is approximately 5 mph (8 km/h) or higher
The boards will not automatically extend again when vehicle speed returns to
less than 5 mph (8 km/h).
■If the Automatic running boards indicator comes on when driving first
commences
A board has not completely retracted. Check that nothing is caught between
the board and the vehicle.
Additionally, if the engine is started immediately after a door has been closed,
the automatic running board may not retract completely and the automatic
running boards indicator may illuminate. In this case, open and close the door
to retract the running board and turn off the indicator.
■If the Automatic running boards indicator light flashes
There may be a malfunction in the Automatic running boards system. Have
the vehicle inspected by your Toyota dealer immediately.
■When snow or mud is attached to the board or the board is frozen
The Automatic running boards may not operate correctly. Before stepping on
a board, check that it is completely extended. If the Automatic running boards
are not operating correctly, turn the Automatic running boards switch off and
refrain from use.
When removing snow or mud, turn the Automatic running boards switch off.
■ After recharging/reconnecting the battery
If the Automatic running boards have not completely extended or retracted,
the boards may not move in the intended direction the first time they are oper-
ated. However, from the second time onwards, the boards will resume normal
operation.
■ When getting in and out of the vehicle
Take care because clothes and shoes may become dirty due to contact with
the lower part of the vehicle body.

3-2. Opening, closing and locking the doors
129
WARNING
■ Jam protection function
Observe the following precautions.
Failure to do so may cause serious injury.
Never use any part of your body to intentionally activate the jam protection
function.
The jam protection function may not work depending on the shape of the
object that is caught. Be careful not to get fingers or other body parts
caught.
■Cautions regarding the Automatic running boards
Observe the following precautions.
Failure to do so may cause serious injury.
3
● Check to make sure that all passengers and people in the vehicle’s sur-
rounding area do not have a hand on a board or any part of their body in a
position where it could be caught between a board and the vehicle when
an Automatic running board is being operated.
● Confirm that the boards have completely extended or retracted before get-
ting in or out of the vehicle. If someone gets in or out of the vehicle during
Automatic running board operation, the boards may stop extending or
retracting.
● Drive the vehicle after confirming that the boards have completely
retracted. Driving with a board extended is dangerous because it may hit
other people or objects.
● Take care when pressing the Automatic running boards switch. The board
will extend or retract and may hit other people or objects.
● Always check that the Automatic running boards switch is turned off when
cleaning a board.
● Do not allow children to operate the Automatic running boards.
Operating Automatic running boards in a manner so that a board contacts
someone can cause serious injury, and in some instances, even death.

130
3-2. Opening, closing and locking the doors
Back door
Unlocking and locking the back door from the outside
◆ Smart key system (if equipped)
Carry the electronic key to enable this function.
Press the button to unlock
1
the door.
2
Press the button to lock the
door.
Check that the door is securely
locked.
◆ Wireless remote control
P. 110
◆ Key (vehicles without a smart key system)
Turning the key operates the doors as follows:
1
Locks all the doors
2
Unlocks all the doors

3-2. Opening, closing and locking the doors
131
Unlocking and locking the back door from the inside
1
Locks all the doors
2
Unlocks all the doors
Opening the back door from outside the vehicle
Raise the back door while
pushing
3
up the back door opener switch.
Rear step bumper
The rear step bumper is intended
for rear end protection and easier
step-up loading.
When closing the back door
Lower the back door using the
back door strap and/or the back
door handle, and make sure to
push the back door down from the
outside to close it.

132
3-2. Opening, closing and locking the doors
■Luggage compartment lights
Each luggage compartment light has the following 3 positions:
1
Turns the light off
2
Turns the light on
3
Turns the light on/off linked to back door
position
If the luggage compartment lights remain on, the lights will go off automati-
cally after 20 minutes.
■ If the back door opener is inoperative or the battery is discharged
P. 519
WARNING
■Before driving
Observe the following precautions.
Failure to do so may result in death or serious injury.
● Make sure that the back door is fully closed. If the back door is not fully
closed, it may open unexpectedly while driving and hit near-by objects or
luggage in the luggage compartment may be thrown out, causing an acci-
dent.
● Do not allow children to play in the luggage compartment.
If a child is accidentally locked in the luggage compartment, they could
have heat exhaustion or other injuries.
● Do not allow a child to open or close the back door.
Doing so may cause the back door to move unexpectedly, or cause the
child’s hands, head, or neck to be caught by the closing back door.
● Do not get on the rear step bumper.
■ Important points while driving
Never let anyone sit in the luggage compartment. In the event of sudden
braking or a collision, they are susceptible to death or serious injury.

3-2. Opening, closing and locking the doors
133
WARNING
■Operating the back door
Observe the following precautions.
Failure to do so may cause parts of the body to be caught, resulting in death
or serious injury.
● Remove any heavy loads, such as snow and ice, from the back door
before opening it. Failure to do so may cause the back door to suddenly
shut again after it is opened.
● When opening or closing the back door, thoroughly check to make sure
the surrounding area is safe.
● If anyone is in the vicinity, make sure they are safe and let them know that
the back door is about to open or close.
● Use caution when opening or closing the back door in windy weather as it
3
may move abruptly in strong wind.
● The back door may suddenly shut if it is
not opened fully. It is more difficult to
open or close the back door on an
incline than on a level surface, so
beware of the back door unexpectedly
opening or closing by itself. Make sure
that the back door is fully open and
secure before using the luggage com-
partment.
● When closing the back door, take extra
care to prevent your fingers etc. from
being caught.
● When closing the back door, make sure
to press it lightly on its outer surface. If
the back door handle or back door strap
is used to fully close the back door, it
may result in hands or arms being
caught.

134
3-2. Opening, closing and locking the doors
WARNING
● Do not pull on the back door damper stay to close the back door, and do
not hang on the back door damper stay.
Doing so may cause hands to be caught or the back door damper stay to
break, causing an accident.
● If a bicycle carrier or similar heavy object is attached to the back door, it
may suddenly shut again after being opened, causing someone’s hands,
head or neck to be caught and injured. When installing an accessory part
to the back door, using a genuine Toyota part is recommended.
NOTICE
■ To prevent damage to the back door components
Do not allow more than one person to get on the rear step bumper at a time.
■ Back door damper stays
The back door is equipped with damper stays that hold the back door in
place.
Observe the following precautions.
Failure to do so may cause damage to the back door damper stay, resulting
in malfunction.
● Do not attach any foreign objects, such
as stickers, plastic sheets, or adhesives
to the damper stay rod.
● Do not touch the damper stay rod with
gloves or other fabric items.
● Do not attach any accessories other
than genuine Toyota parts to the back
door.
● Do not place your hand on the damper stay or apply lateral forces to it.

3-3. Adjusting the seats
135
Front seats
Adjustment procedure
Power seat
3
1
Seat position adjustment
4
Vertical height adjustment
switch
switch (driver’s side only)
2
Seatback angle adjustment
5
Lumbar support adjustment
switch
switch (driver’s side only)
3
Seat cushion
(front) angle
adjustment switch
(driver’s
side only)
Manual seat
1
Seat position adjustment lever
2
Seatback angle adjustment
lever

136
3-3. Adjusting the seats
Active head restraints
When the occupant’s lower back
presses against the seatback
during a rear-end collision, the
head restraint moves slightly for-
ward and upward to help reduce
the risk of whiplash to the seat
occupant.
■ The auto away function for exiting the driver seat
If the seat is already close to the rearmost position, the auto away function
may not operate when the driver exits the vehicle.
■ Active head restraints
Even small forces applied to the seatback may cause the head restraint to
move. Pushing up a locked head restraint forcibly may appear the head
restraint inner structure. These do not indicate problems.
During
rear-end
collision
Inner
structure

3-3. Adjusting the seats
137
WARNING
■ When adjusting the seat position
● Take care when adjusting the seat position to ensure that other passen-
gers are not injured by the moving seat.
● Do not put your hands under the seat or near the moving parts to avoid
injury.
Fingers or hands may become jammed in the seat mechanism.
■ Seat adjustment
● To reduce the risk of sliding under the lap belt during a collision, do not
recline the seat more than necessary.
If the seat is too reclined, the lap belt may slide past the hips and apply
restraint forces directly to the abdomen, or your neck may contact the
shoulder belt, increasing the risk of death or serious injury in the event of
3
an accident.
Adjustments should not be made while driving as the seat may unexpect-
edly move and cause the driver to lose control of the vehicle.
● After adjusting the seat, make sure that the seat is locked in position.
(manual seat only)
■ When adjusting the seat positions
Make sure to leave enough space around the feet so they do not get stuck.

138
3-3. Adjusting the seats
Rear seats
Adjustment procedures
Vehicles without third row seats
■ Rear seat
Pull up the seatback angle
adjustment lever until the lock is
released.
3-3. Adjusting the seats
139
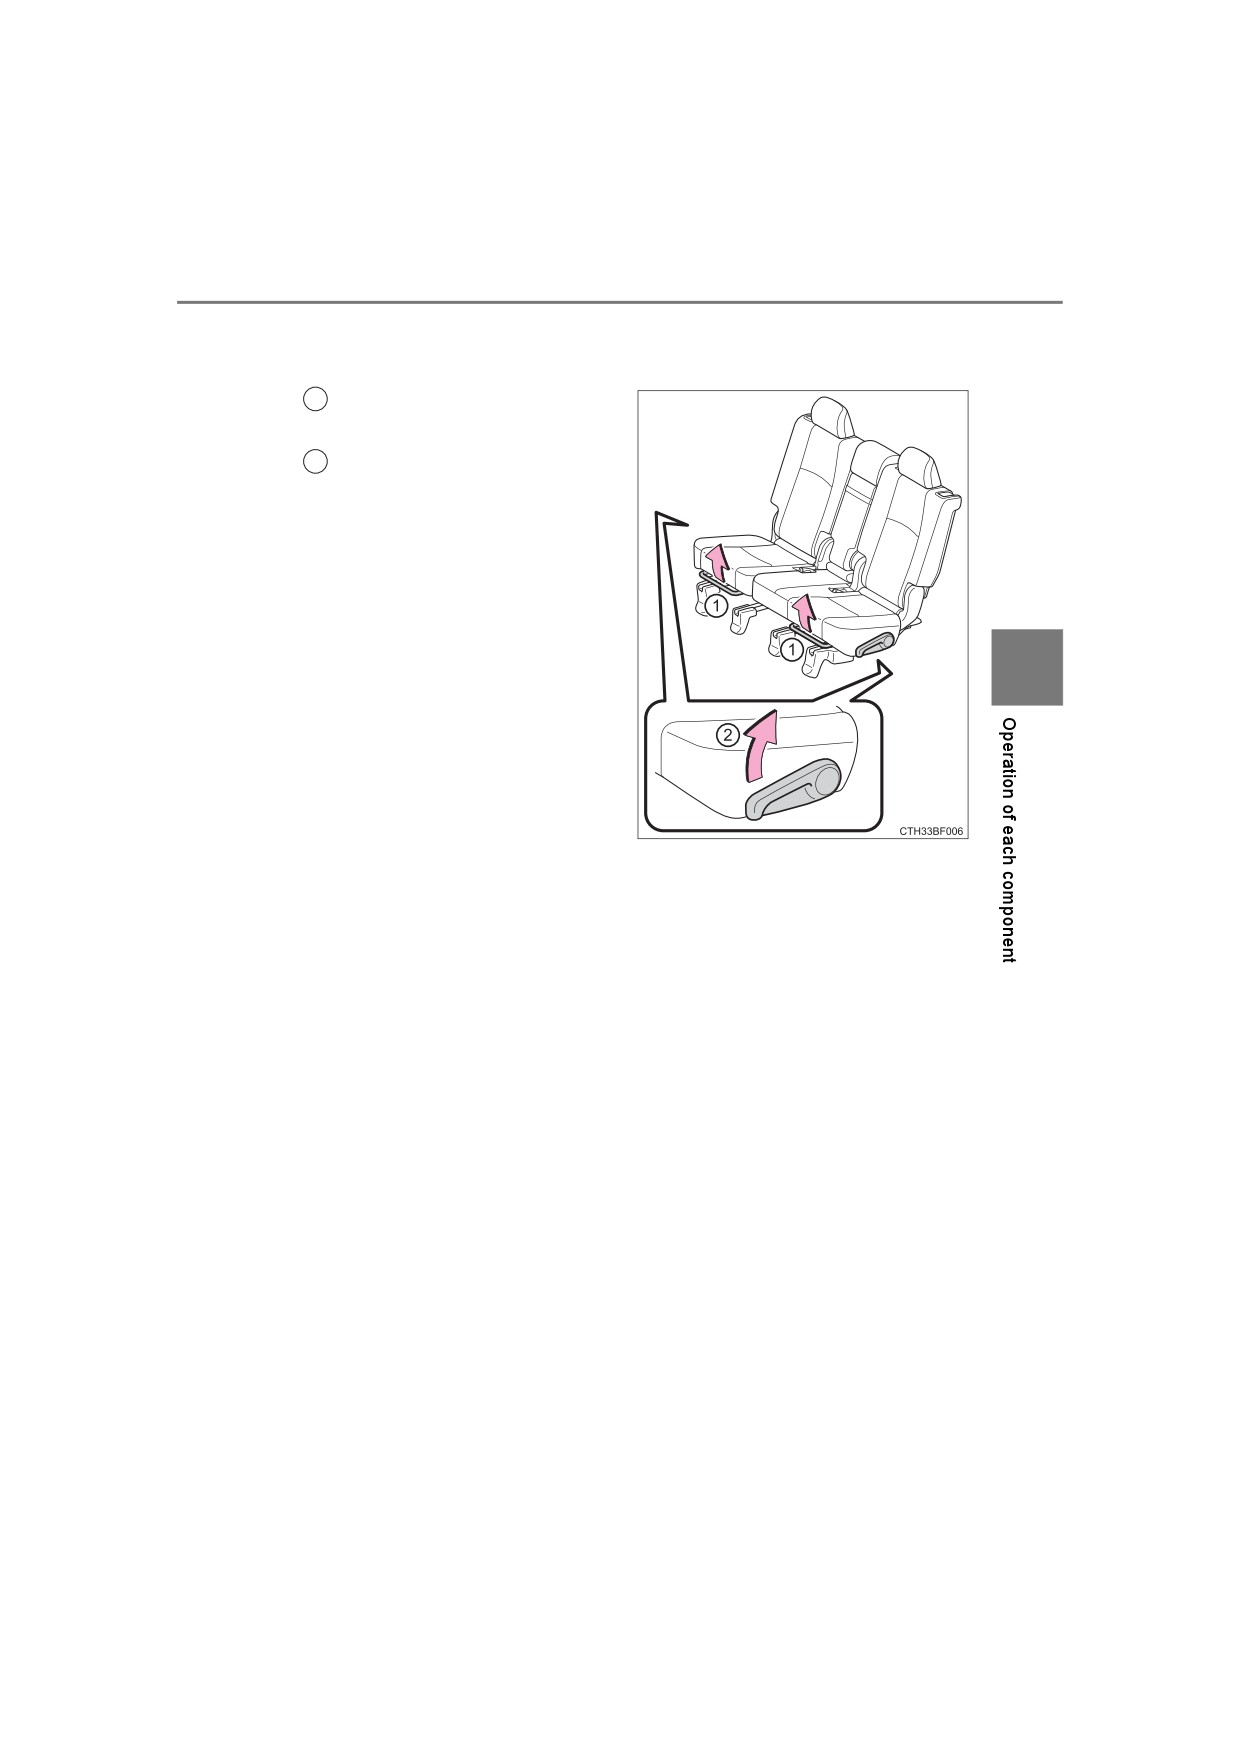
Vehicles with third row seats
■ Second row seats
1
Seat position adjustment
lever
2
Seatback angle adjustment
lever
3
■ Third row seats
The third row seats do not have a seat adjustment function.
140
3-3. Adjusting the seats
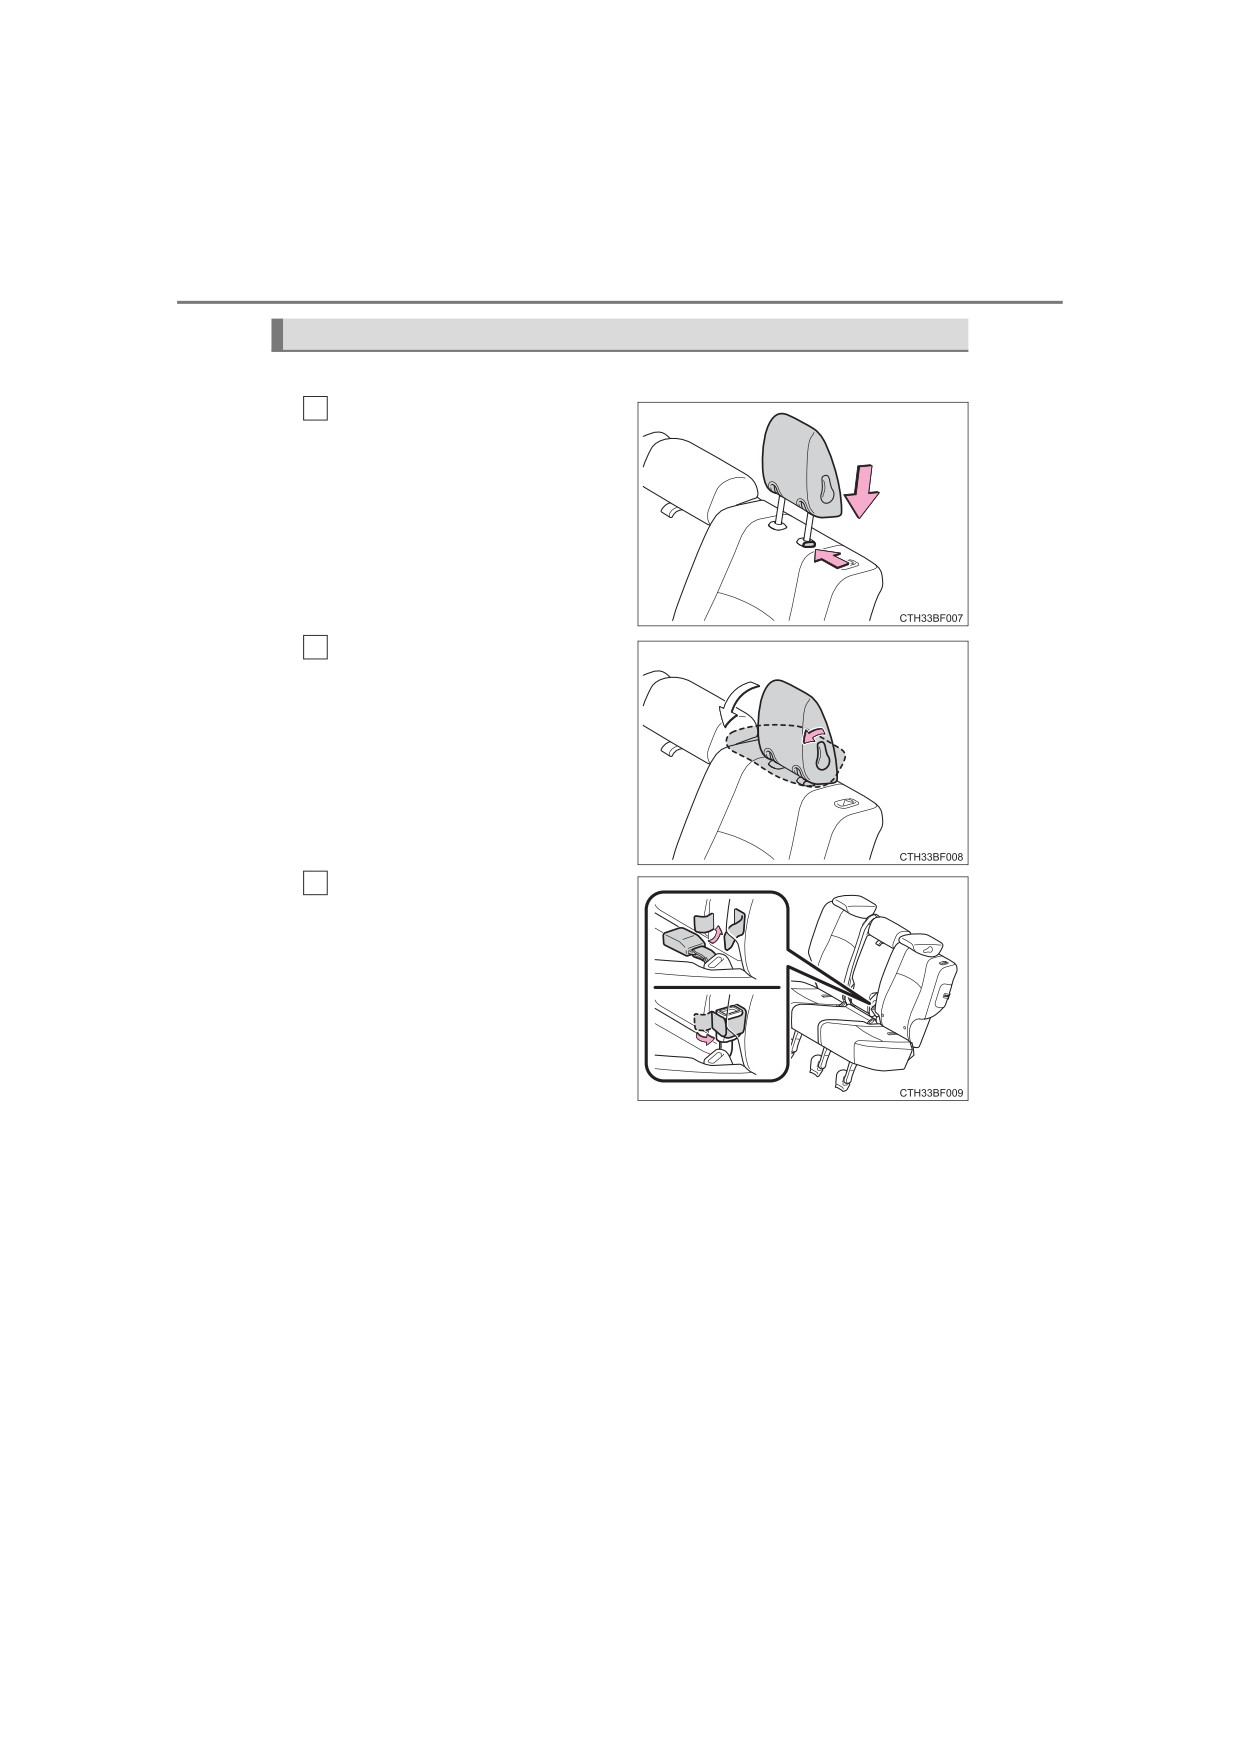
Folding down the rear seats (vehicles without third row seats)
■ Before folding down the rear seats
Adjust the head restraints to
1
the downmost position.
2
Fold down the head
restraints.
When returning the head
restraints to their original posi-
tions, make sure they are locked
securely.
3
Stow the rear seat belt buck-
les.
3-3. Adjusting the seats
141
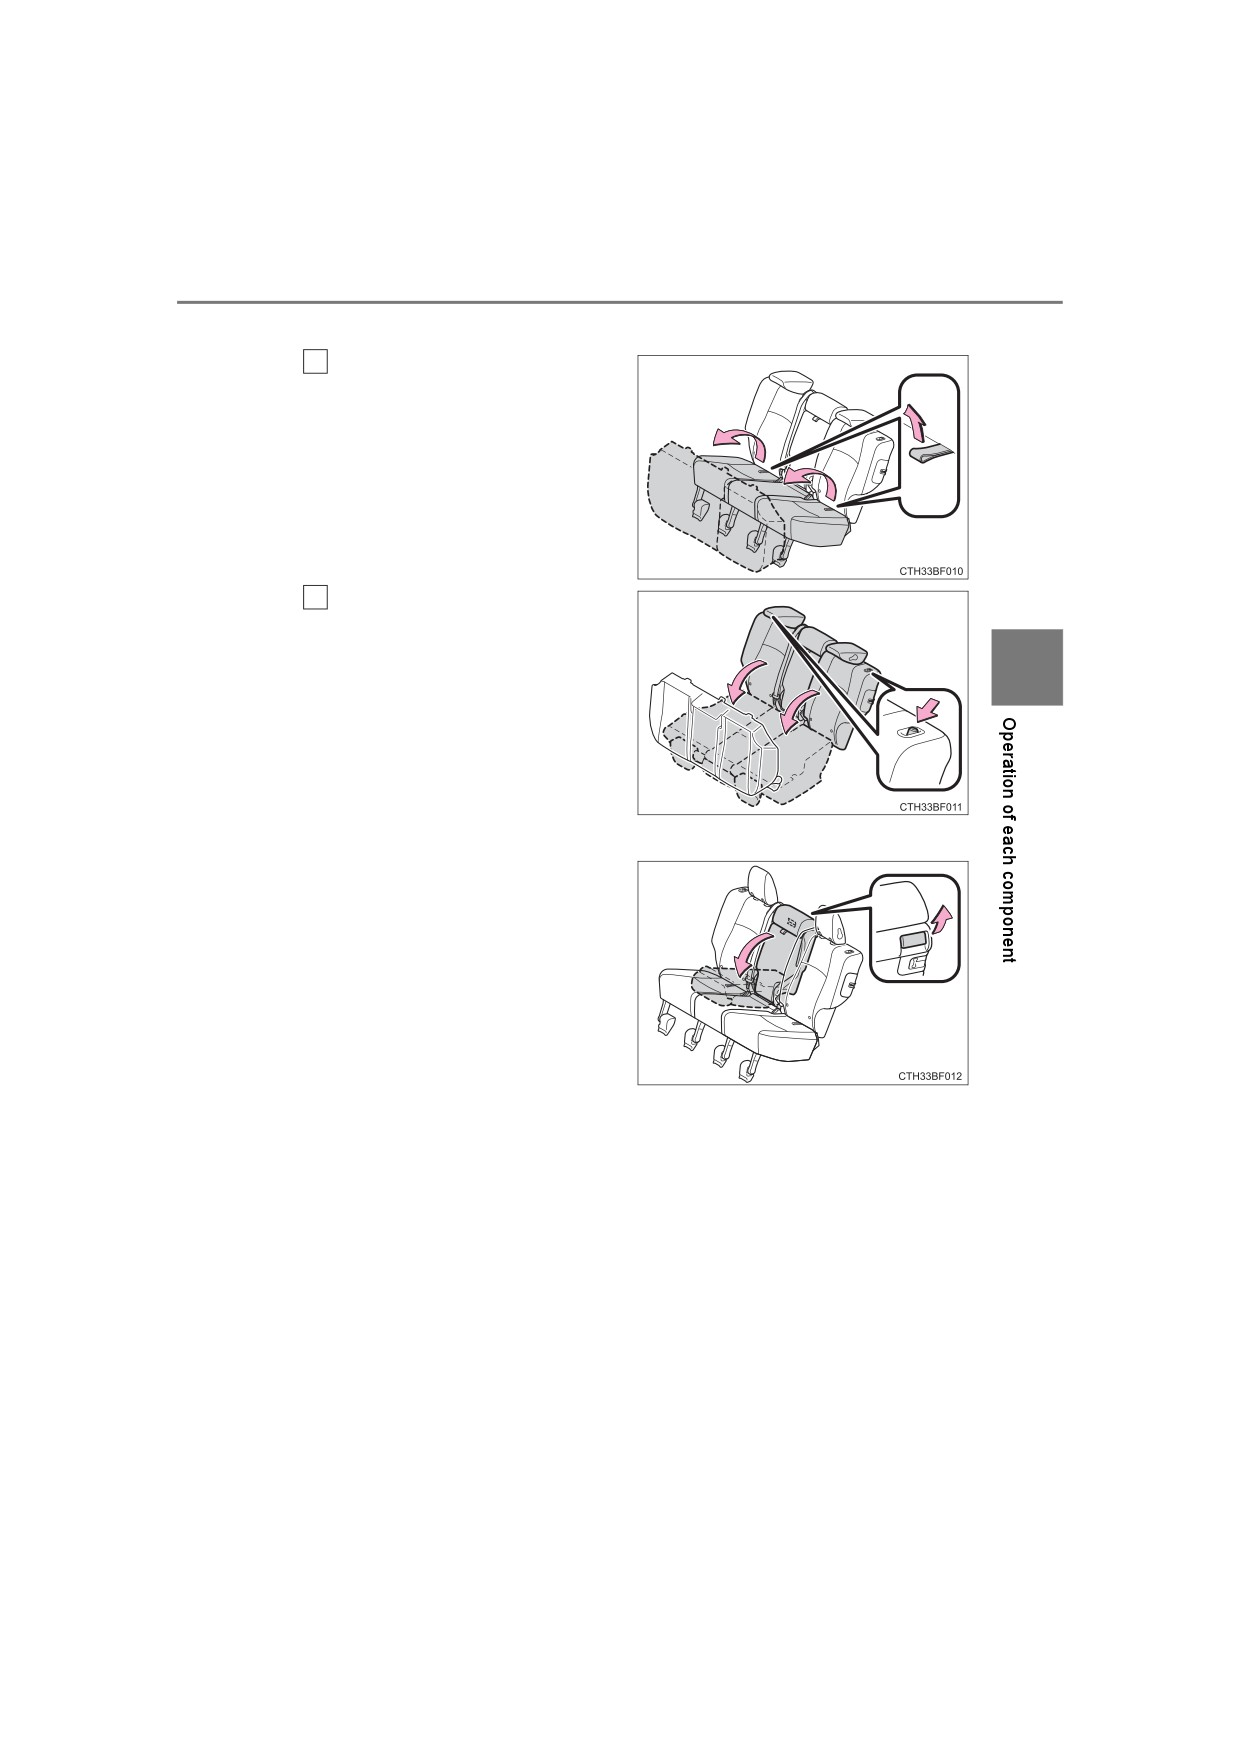
■ Folding down the rear seats
Swing the bottom cushions
1
up by pulling the lock release
strap.
When returning the rear seat
cushions to their original posi-
tions, make sure they are locked
securely.
Push the lock release button
2
and fold down the seatbacks.
To return the rear seatbacks to
3
their original positions, lift them
up until they lock.
■ Folding down rear center seatback only
Pull the center seatback angle
lever behind the seatback and
fold the seatback down.
To return the rear center seat-
back to its original position, lift it
up until it locks.

142
3-3. Adjusting the seats
Folding down the second row seats (vehicles with third row seats)
■ Before folding down the second row seats
1
Adjust the head restraints to
the downmost position.
2
Stow the second row seat
belt buckles.
■ Folding down the second row seats
Pull the seatback lock release
lever and fold the seatback
down.
To return the second row seat-
backs to their original positions,
lift them up until they lock.
■ Folding down the second row center seatback only
Pull the center seatback angle
lever behind the seatback and
fold the seatback down.
To return the second row center
seatback to its original position,
lift it up until it locks.

3-3. Adjusting the seats
143
Moving a second row seat for access to the third row seats (vehi-
cles with third row seats)
■ Getting in the vehicle (right side only)
Pull up the lever and fold down
the seatback. The seat will slide
forward.
Move the seat to the front-most
position.
3
■ Getting out of the vehicle (right side only)
Lift the lever on the back of the
seatback and fold down the
seatback. The seat will slide
forward.
Move the seat to the front-most
position.
■ After passengers have entered/exited the vehicle
Lift up the seatback and slide the seat backward until it locks.

144
3-3. Adjusting the seats
Folding down the third row seats (vehicles with third row seats)
■ Before folding down the third row seats
Pass the seat belts through the
seat belt hangers and secure
the seat belt plates.
This prevents the shoulder belts
from being damaged.
Make sure that the seat belts
are removed from the hangers
before using them.
■ Folding down the third row seats
From inside
Pull the strap to fold down
1
the head restraint.
Pull the lever up.
2
The seat cushion will slide back-
ward.
Pull the lever to unlock the
3
seatback and then fold the
seatback down.

3-3. Adjusting the seats
145
From outside
Pull the strap to fold down
1
the head restraint.
Pull the lever up.
2
The seat cushion will slide back-
ward and the seatback will be
3
unlocked.
Fold the seatback down.
3
146
3-3. Adjusting the seats
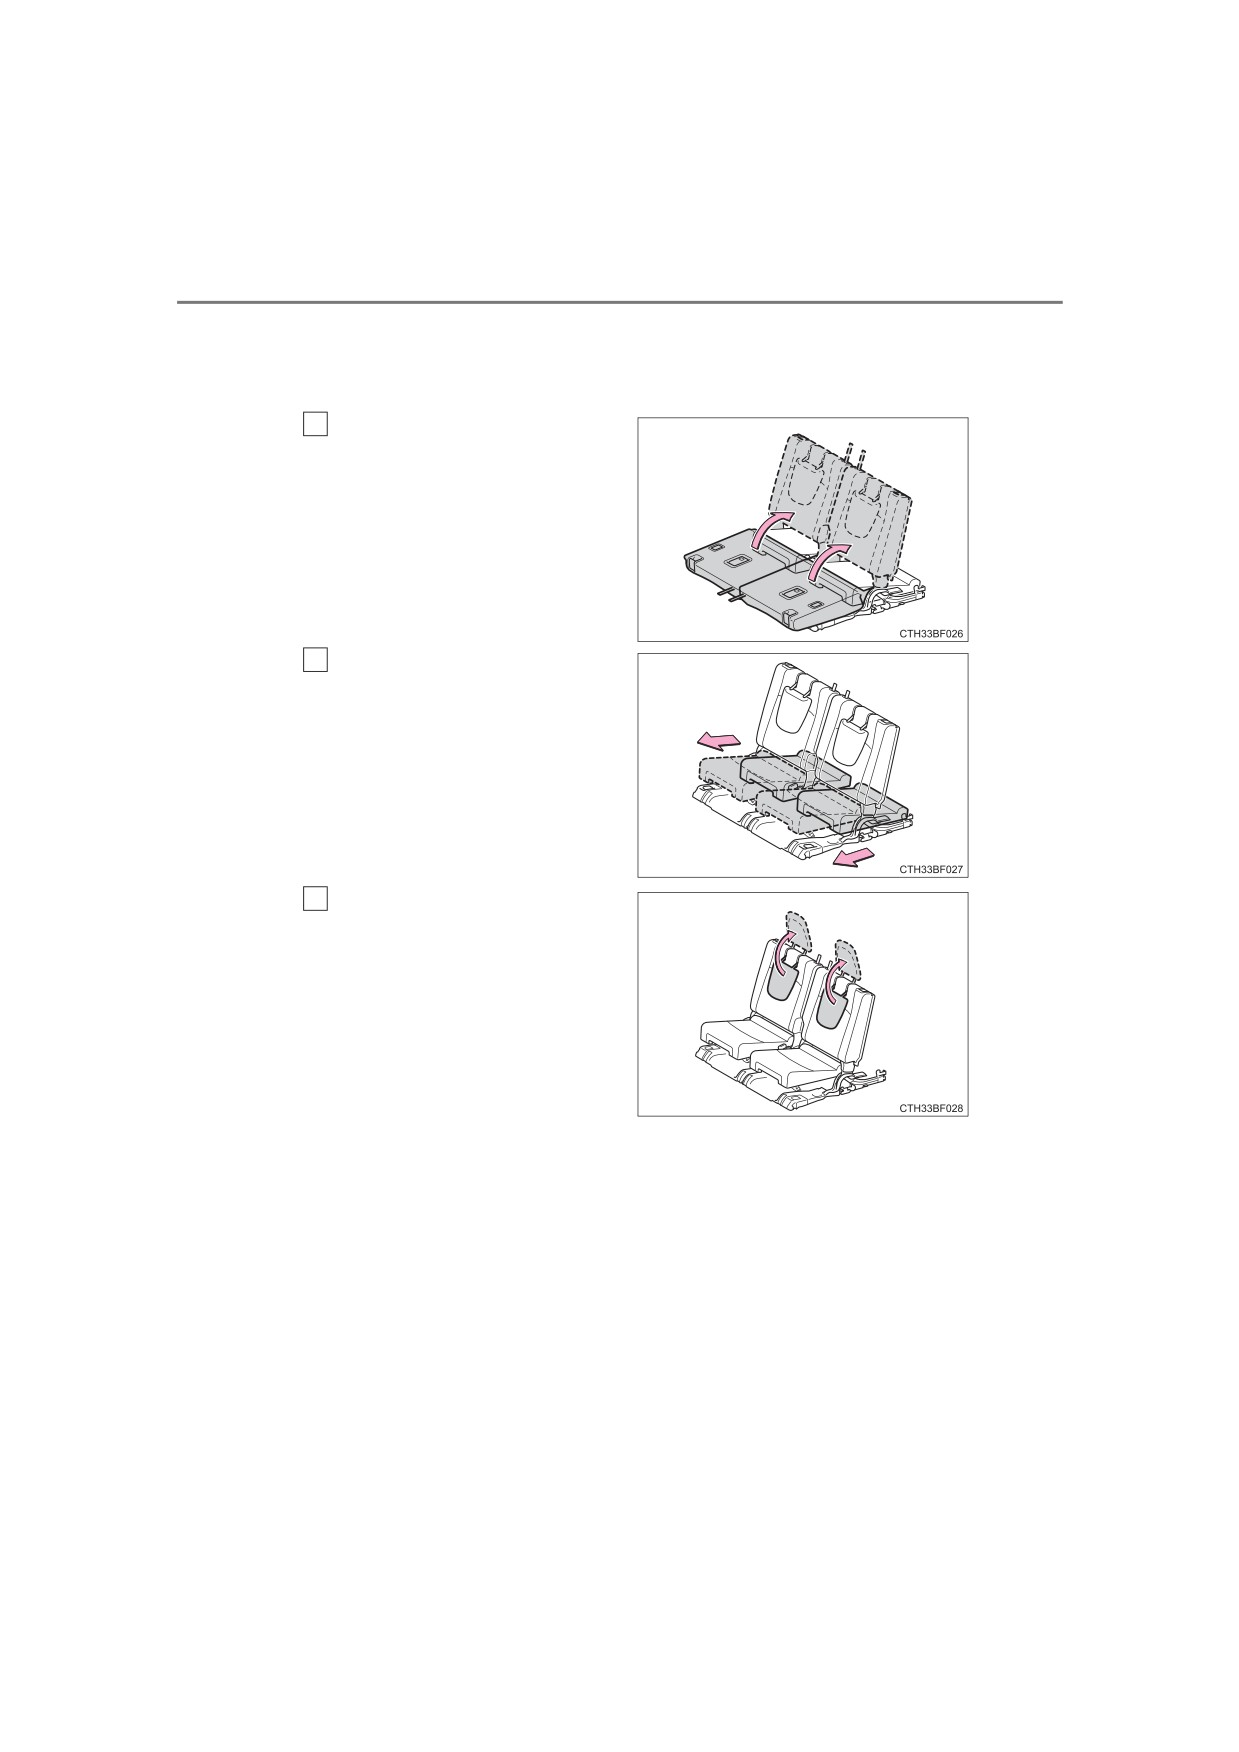
■ Returning the third row seats
As the seat cushions cannot be pulled forward from outside, this
operation can only be performed from inside.
1
Raise the seatbacks to their
original positions.
Make sure they are locked
securely.
2
Pull the seat cushions for-
ward.
Raise the head restraints.
3

3-3. Adjusting the seats
147
WARNING
■ When folding the rear seatbacks down
Observe the following precautions. Failure to do so may result in death or
serious injury.
● Do not fold the seatbacks down while driving.
● Stop the vehicle on level ground, set the parking brake and shift the shift
lever to P.
● Do not allow anyone to sit on a folded seatback or in the luggage compart-
ment while driving.
● Do not allow children to enter the luggage compartment.
■ Seat adjustment
● To reduce the risk of sliding under the lap belt during a collision, do not
3
recline the seat more than necessary.
If the seat is too reclined, the lap belt may slide past the hips and apply
restraint forces directly to the abdomen, or your neck may contact the
shoulder belt, increasing the risk of death or serious injury in the event of
an accident.
Adjustments should not be made while driving as the seat may unexpect-
edly move and cause the driver to lose control of the vehicle.
● Take care when adjusting the seat position to ensure that other passen-
gers are not injured by the moving seat.
● Do not put your hands under the seat or near the moving parts to avoid
injury.
Fingers or hands may become jammed in the seat mechanism.
■ After returning the rear seatback to the upright position
Observe the following precautions. Failure to do so may result in death or
serious injury.
● Make sure the seatback is securely locked by pushing it forward and rear-
ward on the top.
● Check that the seat belts are not twisted or caught in the seatback.
NOTICE
■ Stowing the seat belts
The seat belts and the buckles must be stowed before you fold down the
rear seatbacks.

148
3-3. Adjusting the seats
Driving position memory
This feature automatically adjusts the driver’s seat to suit your
preferences.
Driving position memory
Your preferred driving position (the position of the driver’s seat) can
be recorded and recalled by pressing a button.
Two different driving positions can be recorded into memory.
■ Recording procedure
1
Check that the shift lever is in P.
2
Turn the engine switch to IGNITION ON mode.
3
Adjust the driver’s seat to the desired positions.
4
While pressing the
“SET”
button, or within
3 seconds
after the
“SET” button is
pressed, press button “1” or
“2” until the buzzer sounds.
If
the selected button has
already been preset, the previ-
ously recorded position will be
overwritten.
Recall procedure
1
Check that the shift lever is in P.
2
Turn the engine switch to IGNITION ON mode.
3
Press one of the buttons for the
driving position you want to
recall until the buzzer sounds.
: If equipped

3-3. Adjusting the seats
149
■ To stop the position recall operation part-way through
Perform any of the following:
● Press the “SET” button.
● Press button “1” or “2”.
● Operate any of the seat adjustment switches (only cancels seat position
recall).
■Seat positions that can be memorized (P. 135)
All adjusted positions can be recorded.
■ Operating the driving position memory after turning the engine switch
off
Recorded seat positions can be activated up to 180 seconds after the driver’s
door is opened and another 60 seconds after it is closed again.
3
■ In order to correctly use the driving position memory function
If a seat position is already in the furthest possible position and the seat is
operated in the same direction, the recorded position may be slightly different
when it is recalled.
Memory recall function
Each electronic key can be registered to recall your preferred driving
position.
■ Registering procedure
Record your driving position to button “1” or “2” before performing
the following:
Carry only the key you want to register, and then close the driver’s
door.
If 2 or more keys are in the vehicle, the driving position cannot be
recorded properly.
1
Check that the shift lever is in P.
2
Turn the engine switch to IGNITION ON mode.
3
Recall the driving position that you want to record.

150
3-3. Adjusting the seats
4
While pressing the recalled
button, press and hold the
door lock switch (either lock
or unlock) until the buzzer
sounds.
If the button could not be regis-
tered, the buzzer sounds contin-
uously for approximately
3
seconds.
■ Recall procedure
Make sure that the doors are locked before recalling the driving
position. Carry the electronic key that has been registered to the
driving position, and then unlock and open the driver’s door using
the smart system or wireless remote control.
The driving position will move to the recorded position.
If the driving position is in a position that has already been recorded, the
seat will not move.
■ Cancelation procedure
Carry only the key you want to cancel and then close the driver’s
door.
If 2 or more keys are in the vehicle, the driving position cannot be
canceled properly.
Turn the engine switch to IGNITION ON mode.
1
While pressing the “SET” button, press and hold the door lock
2
switch (either lock or unlock) until the buzzer sounds twice.
If the button could not be canceled, the buzzer sounds continuously for
approximately 3 seconds.
■ Recalling the driving position using the memory recall function
● Different driving positions can be registered for each electronic key. There-
fore, the driving position that is recalled may be different depending on the
key being carried.
● If a door other than the driver’s door is unlocked with the smart system, the
driving position cannot be recalled. In this case, press the driving position
button which has been set.
■ Customization
The unlock door settings of the memory recall function can be customized.
(Customizable features: P. 557)
3-3. Adjusting the seats
151
WARNING
■ Seat adjustment caution
Take care during seat adjustment so that the seat does not strike the rear
passenger or squeeze your body against the steering wheel.
3

152
3-3. Adjusting the seats
Head restraints
Head restraints are provided for all seats.
Front seats
Vertical adjustment
1
Up
Pull the head restraints up.
2
Down
Push the head restraint down while
pressing the lock release button.
Lock release button
Second seats
Vertical adjustment
1
Up
Pull the head restraints up.
2
Down
Push the head restraint down while
pressing the lock release button.
Lock release button
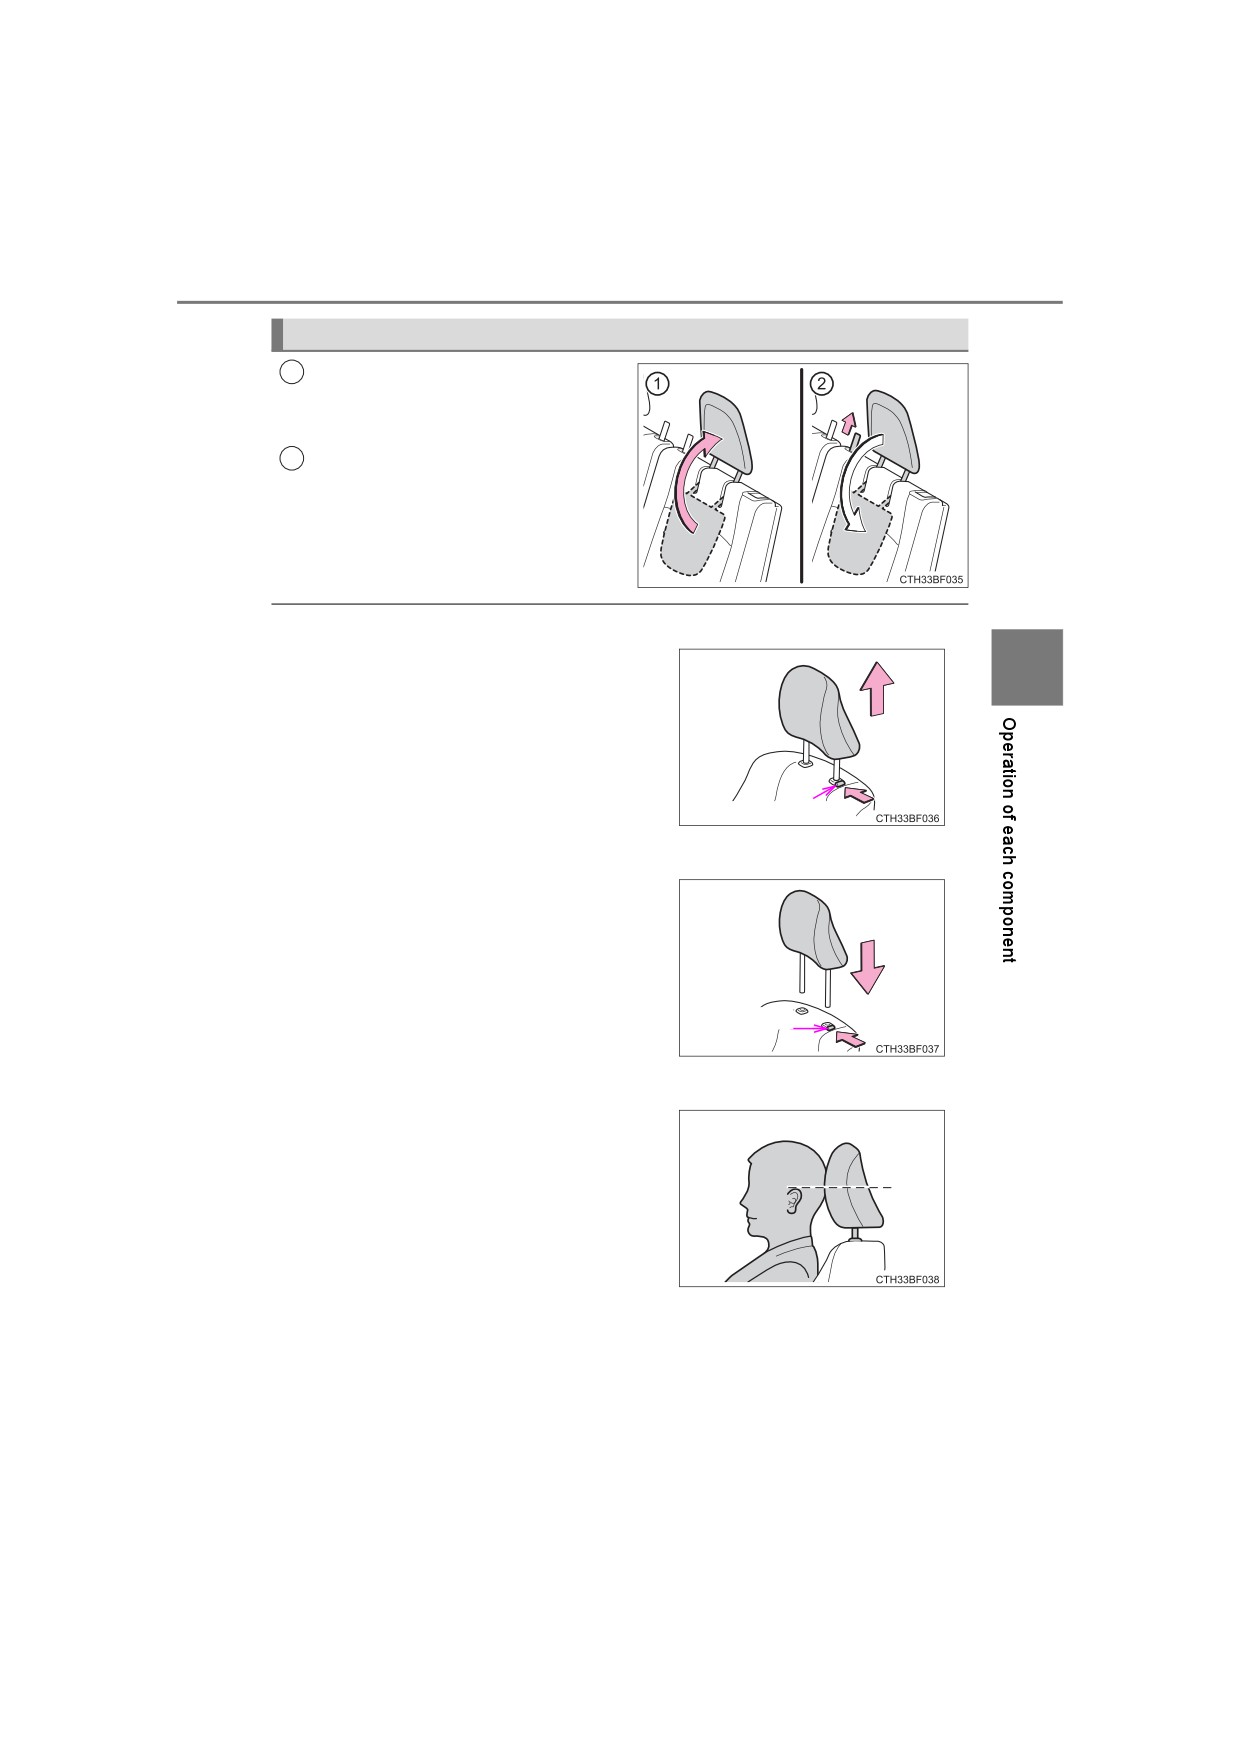
Folding the head restraints (vehi-
cle without third row seats)
1
To use
Lift up the head restraint until it
locks.
2
To fold
Pull the head restraint lock release
lever to fold the head restraint.
3-3. Adjusting the seats
153
Third seats (vehicle with third row seats)
1
To use
Lift up the head restraint until it
locks.
2
To fold
Pull the strap to fold the head
restraint.
■ Removing the head restraints (except third row seats)
Pull the head restraint up while pressing
3
the lock release button.
Lock release button
■ Installing the head restraints (except third row seats)
Align the head restraint with the installa-
tion holes and push it down to the lock
position.
Press and hold the lock release button
when lowering the head restraint.
Lock release
button
■ Adjusting the height of the head restraints (except third row seats)
Make sure that the head restraints are
adjusted so that the center of the head
restraint is closest to the top of your ears.
■ Adjusting the second center seat head restraint
Always raise the head restraint one level from the stowed position when
using.

154
3-3. Adjusting the seats
WARNING
■ Head restraint precautions
Observe the following precautions regarding the head restraints. Failure to
do so may result in death or serious injury.
● Use the head restraints designed for each respective seat.
● Adjust the head restraints to the correct position at all times.
● After adjusting the head restraints, push down on them and make sure
they are locked in position.
● Do not drive with the head restraints removed.
3-4. Adjusting the steering wheel and mirrors
155
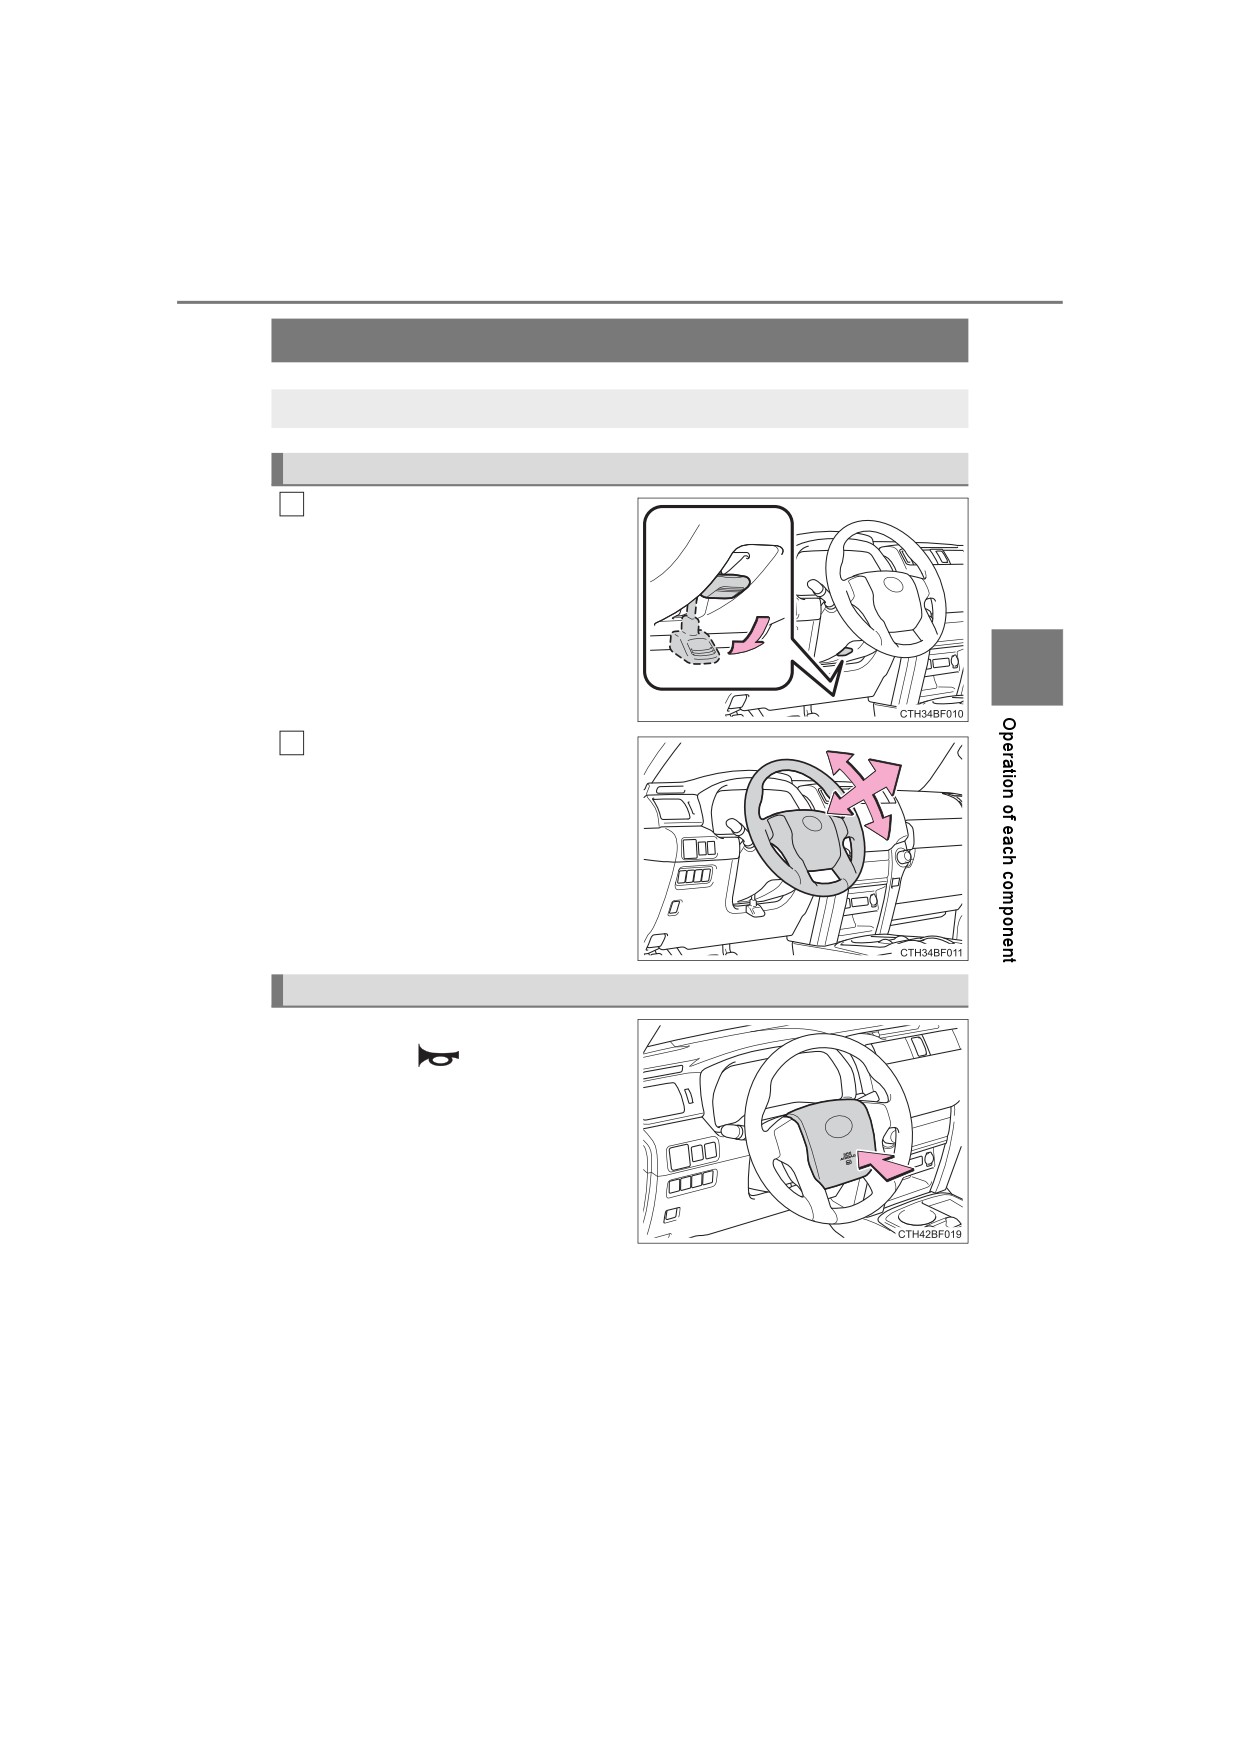
Steering wheel
The steering wheel can be adjusted to a comfortable position.
Adjustment procedure
Hold the steering wheel and
1
push the lever down.
3
Adjust to the ideal position by
2
moving the steering wheel hori-
zontally and vertically.
After adjustment, pull the lever up
to secure the steering wheel.
Horn
To sound the horn, press on or
close to the
mark.

156
3-4. Adjusting the steering wheel and mirrors
WARNING
■Caution while driving
Do not adjust the steering wheel while driving.
Doing so may cause the driver to mishandle the vehicle and cause an acci-
dent, resulting in death or serious injury.
■ After adjusting the steering wheel
Make sure that the steering wheel is securely locked.
Otherwise, the steering wheel may move suddenly, possibly causing an
accident, and resulting in death or serious injury. Also, the horn may not
sound if the steering wheel is not securely locked.
3-4. Adjusting the steering wheel and mirrors
157
Inside rear view mirror
The rear view mirror’s position can be adjusted to enable suffi-
cient confirmation of the rear view.
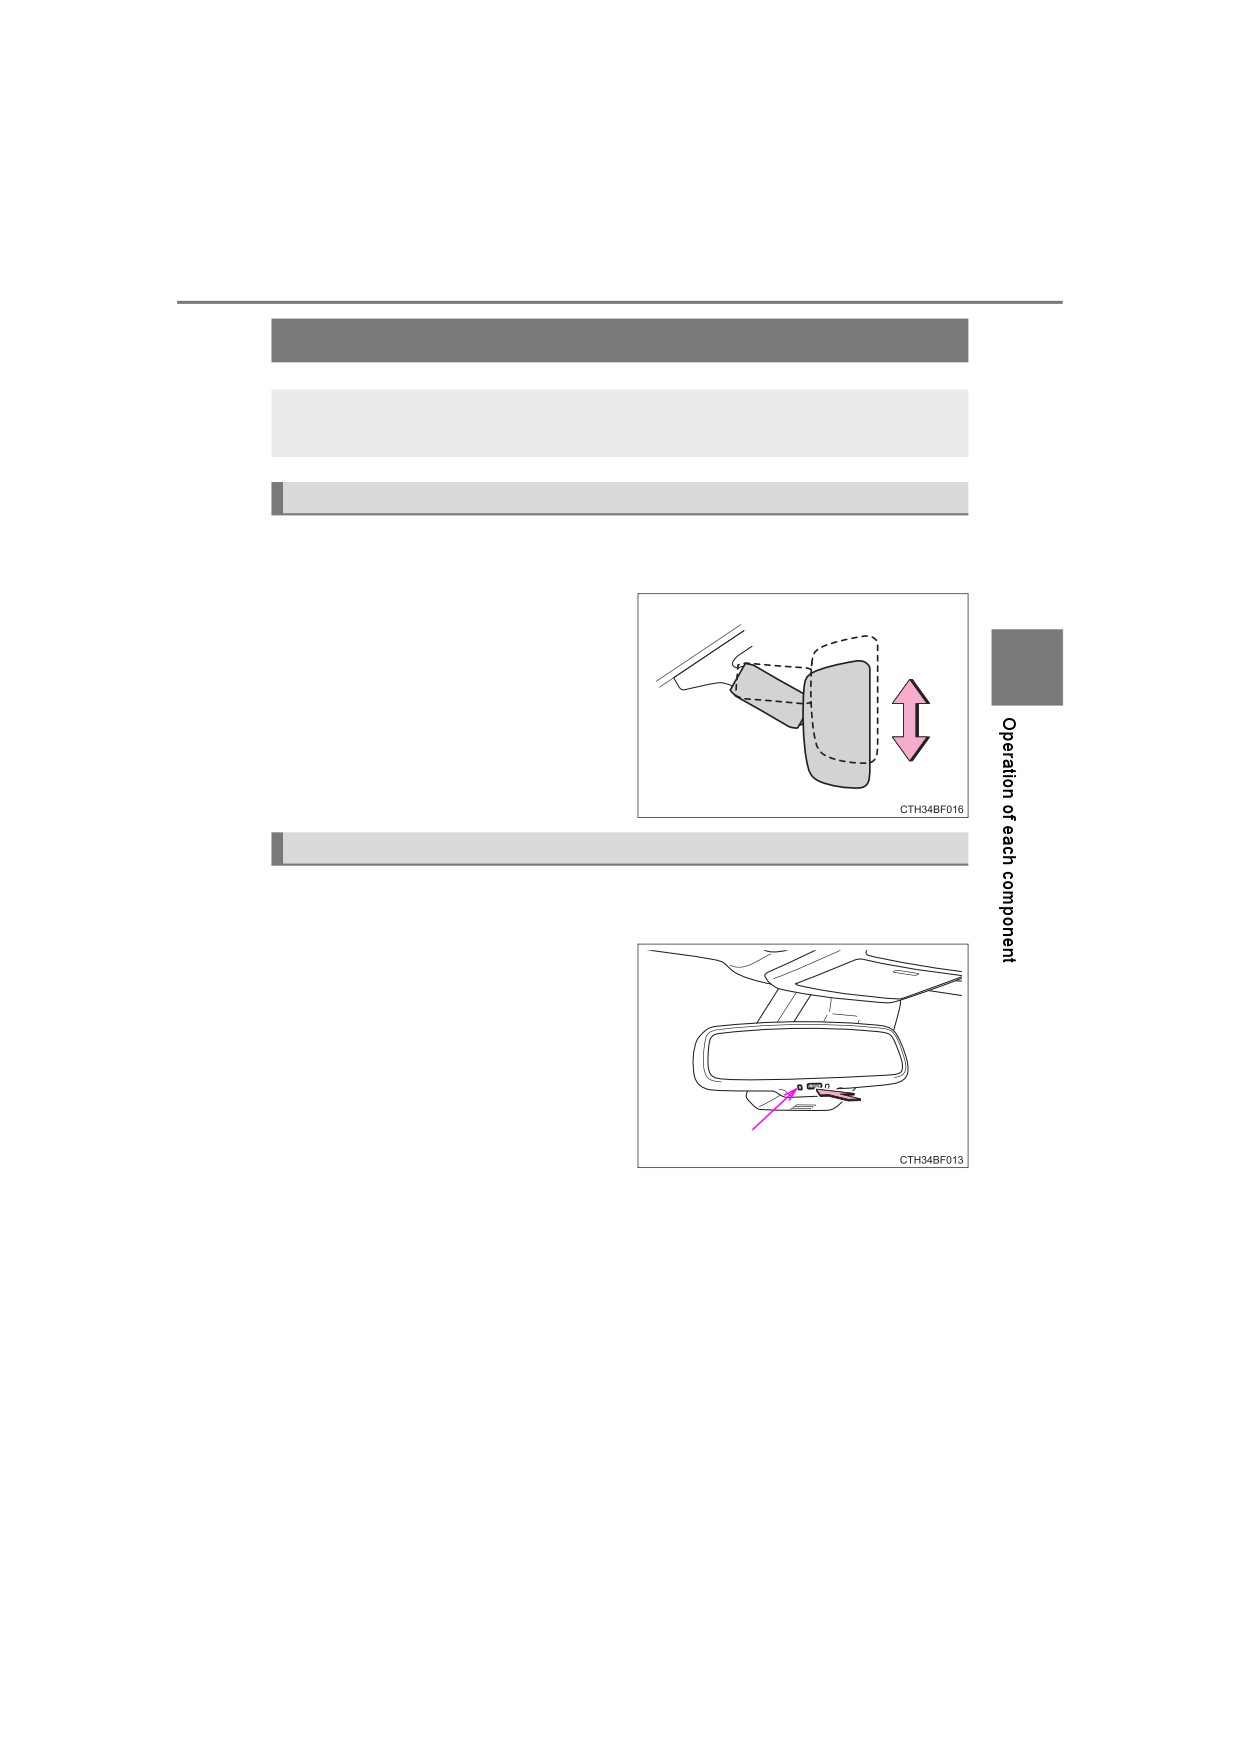
Adjusting the height of rear view mirror
The height of the rear view mirror can be adjusted to suit your driving
posture.
Adjust the height of the rear view
mirror by moving it up and down.
3
Anti-glare function
Responding to the level of brightness of the headlights of vehicles
behind, the reflected light is automatically reduced.
Changing automatic anti-glare
function mode
ON/OFF
When the automatic anti-glare
function is in on mode, the indica-
tor illuminates.
Vehicles without a smart key sys-
tem:
Indicator
The function will set to on mode
each time the engine switch is
turned to the “ON” position.
Pressing the button turns the func-
tion to off mode. (The indicator also
turns off.)
Vehicles with a smart key system:
The function will set to on mode
each time the engine switch is
turned to IGNITION ON mode.
Pressing the button turns the func-
tion to off mode. (The indicator also
turns off.)

158
3-4. Adjusting the steering wheel and mirrors
■ To prevent sensor error
To ensure that the sensors operate prop-
erly, do not touch or cover them.
WARNING
Do not adjust the position of the mirror while driving.
Doing so may lead to mishandling of the vehicle and cause an accident,
resulting in death or serious injury.

3-4. Adjusting the steering wheel and mirrors
159
Outside rear view mirrors
Adjustment procedure
1
To select a mirror to adjust,
press the switch.
1
Left
2
Right
3
2
To adjust the mirror, press the
switch.
1
Up
2
Right
3
Down
4
Left
Folding the mirrors
Push the mirror back in the direc-
tion of the vehicle’s rear.
160
3-4. Adjusting the steering wheel and mirrors
■ Mirror angle can be adjusted when
Vehicles without a smart key system
The engine switch is in the “ACC” or “ON” position.
Vehicles with a smart key system
The engine switch is in ACCESSORY or IGNITION ON mode.
■When the mirrors are fogged up
The outside rear view mirrors can be cleared using the mirror defoggers. Turn
on the rear window defogger to turn on the outside rear view mirror defog-
gers. (P. 354, 361)
WARNING
■ Important points while driving
Observe the following precautions while driving.
Failure to do so may result in loss of control of the vehicle and cause an
accident, resulting in death or serious injury.
● Do not adjust the mirrors while driving.
● Do not drive with the mirrors folded.
● Both the driver and passenger side mirrors must be extended and properly
adjusted before driving.
■ When a mirror is moving
To avoid personal injury and mirror malfunction, be careful not to get your
hand caught by the moving mirror.
■ When the mirror defoggers are operating
Do not touch the rear view mirror surfaces, as they can become very hot
and burn you.

3-5. Opening, closing the windows and moon roof
161
Power windows
Opening and closing procedures
The power windows can be opened and closed using the switches.
Operating the switch moves the windows as follows:
1
Closing
2
One-touch closing*
3
Opening
4
One-touch opening*
*: To stop the window partway, oper-
3
ate the switch in the opposite direc-
tion.
Window lock switch
Press the switch to lock the pas-
senger window switches and back
window switch.
Use this switch to prevent children
from accidentally opening or clos-
ing a passenger window.
162
3-5. Opening, closing the windows and moon roof
■The power windows can be operated when
Vehicles without a smart key system
The engine switch is in the “ACC” or “ON” position.
Vehicles with a smart key system
The engine switch is in IGNITION ON mode.
■ Operating the power windows after turning the engine off
Vehicles without a smart key system
The power windows can be operated for approximately 45 seconds even
after the engine switch is turned to the “ACC” or “LOCK” position. They can-
not, however, be operated once either front door is opened.
Vehicles with a smart key system
The power windows can be operated for approximately 45 seconds even
after the engine switch is turned to ACCESSORY mode or turned off. They
cannot, however, be operated once either front door is opened.
■ Jam protection function
If an object becomes jammed between the window and the window frame
while the window is closing, window movement is stopped and the window is
opened slightly.
■Catch protection function
If an object becomes caught between the door and window while the window
is opening, window movement is stopped.

3-5. Opening, closing the windows and moon roof
163
■When the window cannot be opened or closed
When the jam protection function or catch protection function operates
unusually and the door window cannot be opened or closed, perform the fol-
lowing operations with the power window switch of that door.
● Stop the vehicle. With the engine switch in the “ON” position*1 or in IGNI-
TION ON mode*2, within 4 seconds of the jam protection function or catch
protection function activating, continuously operate the power window
switch in the one-touch closing direction or one-touch opening direction so
that the door window can be opened and closed.
● If the door window cannot be opened and closed even when performing the
above operations, perform the following procedure for function initialization.
Turn the engine switch to the “ON” position*1 or to IGNITION ON
1
mode*2.
2
Pull and hold the power window switch in the one-touch closing direction
3
and completely close the door window.
Release the power window switch for a moment, resume pulling the
3
switch in the one-touch closing direction, and hold it there for approxi-
mately 6 seconds or more.
Press and hold the power window switch in the one-touch opening direc-
4
tion. After the door window is completely opened, continue holding the
switch for an additional 1 second or more.
Release the power window switch for a moment, resume pushing the
5
switch in the one-touch opening direction, and hold it there for approxi-
mately 4 seconds or more.
Pull and hold the power window switch in the one-touch closing direction
6
again. After the door window is completely closed, continue holding the
switch for a further 1 second or more.
If you release the switch while the window is moving, start again from the
beginning.
If the window reverses and cannot be fully closed or opened, have the vehicle
inspected by your Toyota dealer.
*1: Vehicles without a smart key system
*2: Vehicles with a smart key system
■ Door lock linked window operation
● The power windows can be opened and closed using the key or mechanical
key.* (P. 111, 520)
● The power windows can be opened using the wireless remote control.*
(P. 110)
*: These settings must be customized at your Toyota dealer.
■ Customization
Settings (e.g. key linked operation) can be changed.
(Customizable features P. 557)
164
3-5. Opening, closing the windows and moon roof
WARNING
Observe the following precautions.
Failure to do so may result in death or serious injury.
■Closing the windows
● The driver is responsible for all the power window operations, including the
operation for the passengers. In order to prevent accidental operation,
especially by a child, do not let a child operate the power windows. It is
possible for children and other passengers to have body parts caught in
the power window. Also, when riding with a child, it is recommended to use
the window lock switch. (P. 161)
● Check to make sure that all passengers do not have any part of their body
in a position where it could be caught when a window is being operated.
● When using the key or mechanical key and operating the power windows,
operate the power window after checking to make sure that there is no
possibility of any passenger having any of their body parts caught in the
window. Also do not let a child operate window by the key or mechanical
key. It is possible for children and other passengers to get caught in the
power window.
● When exiting the vehicle, turn the engine switch off, carry the key and exit
the vehicle along with the child. There may be accidental operation, due to
mischief, etc., that may possibly lead to an accident.
■ Jam protection function
● Never use any part of your body to intentionally activate the jam protection
function.
● The jam protection function may not work if something gets jammed just
before the window is fully closed. Be careful not to get any part of your
body jammed in the window.
■Catch protection function
● Never use any part of your body or clothing to intentionally activate the
catch protection function.
● The catch protection function may not work if something gets caught just
before the window is fully opened. Be careful not to get any part of your
body or clothing caught in the window.

3-5. Opening, closing the windows and moon roof
165
Power back window
The power back window can be opened and closed using the
switch or key.
Opening and closing procedures
From inside the vehicle
1
Closing
2
One-touch closing*
3
Opening
3
One-touch opening*
4
*: To stop the window partway, oper-
ate the switch in the opposite direc-
tion.
From outside the vehicle (vehicles without a smart key system)
1
Opening
2
Closing
Turn the key fully and hold it.

166
3-5. Opening, closing the windows and moon roof
From outside the vehicle (vehicles with a smart key system)
1
Opening (push and hold)
2
Closing (push and hold)
This operation can only be per-
formed when the electronic key is
within the detection range.
■ The power back window can be operated from inside the vehicle when
Vehicles without a smart key system
The engine switch is in the “ON” position.
Vehicles with a smart key system
The engine switch is in IGNITION ON mode.
● The power back window can be opened when the rear window wiper is
working, but the wiper stops working until the window is closed again.
If the power back window is not fully closed, the rear window wiper, washer,
and defogger will not work.
● If the back door is not fully closed, the power back window cannot be
opened using the switch located in the cabin. (It is still possible to close the
window.)
● If the back door is opened while the power back window is opening or clos-
ing, window operation will stop.
■ The power back window can be operated from outside the vehicle when
(vehicles with a smart key system)
● The engine switch is off.
● The back door is closed.