Toyota Avalon (2019 year). Manual - part 21
 

  Index      Toyota     Toyota Avalon - service manual 2019 year in english


Search            


Content   ..  19  20  21  22   ..


Toyota Avalon (2019 year). Manual - part 21


321

5-2. Using the interior lights

5

Interio

r features

The rear personal lights turn on/off together with the interior light.

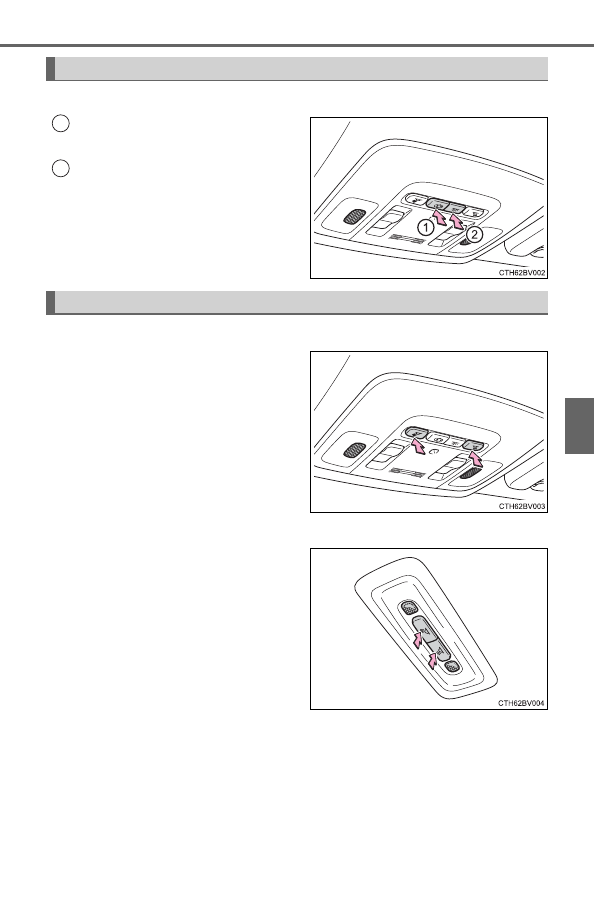
Turns the lights on/off linked to
door positions
Turns the lights on/off

Front
Turns the lights on/off

Rear
Turns the lights on/off

Interior light

1

2

Personal lights

322

5-2. Using the interior lights

Each  time  the  “MOOD”  switch  is
pressed,  the  brightness  level
changes.

Illuminated entry system:
The  lights  automatically  turn  on/off  according  to  the  engine  switch  mode,
the presence of the electronic key, whether the doors are locked/unlocked,
and whether the doors are open/closed.

If the interior lights remain on when the engine switch is turned off, the lights
will go off automatically after 20 minutes.

If  any  of  the  SRS  airbags  deploy  (inflate)  or  in  the  event  of  a  strong  rear
impact, the interior lights will turn on automatically.
The interior lights will turn off automatically after approximately 20 minutes.
The interior lights can be turned off manually. However, in order to help pre-
vent further collisions, it is recommended that they be left on until safety can
be ensured.
(The interior lights may not turn on automatically depending on the force of
the impact and conditions of the collision.)

Some functions can be customized. (

P. 498)

Ambient lights (if equipped)

323

5

Interio

r features

5-3. Using the storage features

List of storage features

Auxiliary boxes

(

P. 327)

Glove box

(

P. 324)

Bottle holders/door pockets

(

P. 325)

Cup holders

(

P. 326)

Console box

(

P. 324)

Auxiliary box/open tray

(

P. 327, 328)

WARNING

Do not leave glasses, lighters or spray cans in the storage spaces, as this
may cause the following when cabin temperature becomes high:
• Glasses may be deformed by heat or cracked if they come into contact

with other stored items.

• Lighters or spray cans may explode. If they come into contact with other

stored  items,  the  lighter  may  catch  fire  or  the  spray  can  may  release
gas, causing a fire hazard.

When driving or when the storage compartments are not in use, keep the
lids closed.
In the event of sudden braking or sudden swerving, an accident may occur
due to an occupant being struck by an open lid or the items stored inside.

1
2
3

4
5
6

324

5-3. Using the storage features

Push the button to open the glove
box.

The glove box  light turns on when  the engine switch is in ACCESSORY  or
IGNITION ON mode.

Push the knob.

Console box tray

Console box light
The console box light turns on when the engine switch is in ACCESSORY or
IGNITION ON mode.

Glove box

Console box

The tray can be removed.

325

5-3. Using the storage features

5

Interio

r features

When storing a bottle, close the cap.

The bottle may not be stored depending on its size or shape.

Bottle holders

Front

Rear

WARNING

Do not place anything other than a bottle in the bottle holders.
Other items may be thrown out of the holders in the event of an accident or
sudden braking and cause injury.

NOTICE

Put the cap on before stowing a bottle. Do not place open bottles in the bot-
tle holders, or glass or paper cups containing liquid. The contents may spill
and glass cups may break.

326

5-3. Using the storage features

Cup holders

Front

Rear

Pull the armrest down.

WARNING

Do not place any objects that fit loosely or are very tall in the cup holders,
otherwise they may fall out while driving, possibly leading to an accident.

To prevent burns, cover hot drinks when placed in the cup holders.

327

5-3. Using the storage features

5

Interio

r features

When small items are placed on top of the tray (type C)

Auxiliary boxes

Type A (if equipped)

Type B

Push the lid.

Pull the armrest down.

Type C

Opening: 
Push the tray forward until it locks. 
Closing: 
Push the tray forward to release the lock and the tray will automati-
cally close.

The tray can be opened while small items
are placed on it.

328

5-3. Using the storage features

When using wireless charger (if equipped)
P. 334

WARNING

Items unsuitable for storing (type A)
Do not store items heavier than 0.4 lb. (0.2 kg).
Doing so may cause the auxiliary box to open and the items inside may fall
out, resulting in an accident.

NOTICE

When opening or closing the tray (type C)

To prevent damaging small items, when opening the tray while small items
are placed on it, make sure the items will not get caught.

To prevent damaging the tray, do not pull the tray to close it. Doing so may
damage the tray.

When on a steep downward incline, the tray may be slow to close auto-
matically.  In  this  case,  the  tray  can  be  pulled  closed  after  pushing  it  to
release the lock.

Open tray

WARNING

Do not store items in the tray that can easily shift or roll out.
Failure to do so may cause items to be thrown out of the tray in the event of
sudden  braking  or  steering.  In  these  cases,  the  items  may  interfere  with
pedal operation or cause driver distraction, resulting in an accident.

329

5-3. Using the storage features

5

Interio

r features

Trunk features

Grocery bag hooks

NOTICE

To prevent damage to the hooks, do not apply too much load to the hooks.

Cargo net

330

5-4. Other interior features

To  set  the  visor  in  the  forward
position, flip it down.
To set the visor in the side posi-
tion,  flip  down,  unhook,  and
swing it to the side.
To use the side extender, place
the  visor  in  the  side  position,
then slide it backward.

Open the cover to use.

The  light  turns  on  when  the  cover
is opened.

If the vanity lights remain on for 20 minutes while the engine is off, the lights
will turn off automatically.

Other interior features

Sun visors

1

2

3

Vanity mirrors

331

5-4. Other interior features

5

Interio

r features

Please use as a power supply for electronic goods that use less than
12 VDC/10 A (power consumption of 120 W). 
Open the lid.

The power outlet can be used when the engine switch is in ACCESSORY or
IGNITION ON mode.

Power outlet

NOTICE

To avoid damaging the power outlet, close the power outlet lid when it is
not in use. 
Foreign objects or liquids that enter the power outlet may cause a short
circuit.

To prevent battery discharge, do not use the power outlet longer than nec-
essary when the engine is not running.

332

5-4. Other interior features

The USB charging ports are used to supply 2.1 A of electricity at 5 V
to external devices (power consumption of 10.5 W).
The USB charging ports are for charging only. They are not designed
for data transfer or other purposes.
Depending on the external device, it may not charge properly. Refer to
the  manual  included  with  the  device  before  using  a  USB  charging
port.

Using the USB charging ports

The USB charging ports can be used when
The engine switch is in ACCESSORY or IGNITION ON mode.

Situations in which the USB charging ports may not operate correctly

If a device which consumes more than 2.1 A at 5 V (10.5 W) is connected

If a device designed to communicate with a personal computer, such as a
USB memory device, is connected

If the connected external device is turned off (depending on device)

If the temperature inside the vehicle is high, such as after the vehicle has
been parked in the sun

About connected external devices
Depending on the connected external device, charging may occasionally be
suspended and then start again. This is not a malfunction.

USB charging ports

Front

Rear

Open  the  console  box  lid  and
open the lid.

Open the lid.

333

5-4. Other interior features

5

Interio

r features

Cable pass through

The cutouts on the console box rim allow
power  cables  to  be  passed  through
when the console box lid is closed.

An electronic device on the console box
tray can be recharged by running power
cables through the clearance of the tray
and  connecting  it  to  the  USB  charging
ports underneath the tray.

To  prevent  damage  to  the  charging
port of an electronic device when it is
placed  on  the  tray  while  it  is  being
charged,  place  the  connector  side  of
the device on the raised portions near
the cutout.

NOTICE

To prevent damage to the USB charging ports

Do not insert foreign objects into the ports.

Do not spill water or other liquids into the ports.

When  the USB  charging ports are not  in use,  close the  lids. If  a foreign
object or liquid enters a port may cause a short circuit.

Do not apply excessive force to or impact the USB charging ports.

Do not disassemble or modify the USB charging ports.

To prevent damage to external devices

Do not leave external devices in the vehicle. The temperature inside the
vehicle may become high, resulting in damage to an external device.

Do not push down on or apply unnecessary force to an external device or
the cable of an external device while it is connected.

To prevent battery discharge
Do not use the USB charging ports for a long period of time with the engine
stopped.

334

5-4. Other interior features

A  portable  device,  such  as  a  smartphone  or  mobile  battery,  can  be
charged by just placing it on the charging area, provided the device is
compatible  with  the  Qi  wireless  charging  standard  created  by  the
Wireless Power Consortium.
The  wireless  charger  cannot  be  used  with  a  portable  device  that  is
larger than the charging area. Additionally, depending on the portable
device,  the  wireless  charger  may  not  operate  properly.  Refer  to  the
operation manual of the portable device.

The “Qi” symbol
The “Qi” symbol is a trademark of the Wireless Power Consortium.

Name for all parts

Power supply switch
Operation indicator light
Charge area

Wireless charger (if equipped)

1
2
3

335

5-4. Other interior features

5

Interio

r features

Using the wireless charger

Push  the  open  tray  forward
until it locks. (

P. 327)

Press  the  power  supply
switch  of  the  wireless  char-
ger.

Pressing  the  switch  again  turns
the wireless charger off.
When  turned  on,  the  operation
indicator light (green) comes on.
When  the  engine  switch  is  turned  off,  the  on/off  state  of  the  wireless
charger will be memorized.

Place  a  portable  device  on
the  charging  area  with  its
charging 

surface 

facing

down.

While  charging,  the  operation
indicator  light  (orange)  will  be
illuminated.
If  charging  does  not  begin,
move  the  portable  device  as
close  to  the  center  of  the
charging area as possible.
When charging is complete, the operation indicator light (green) will illu-
minate.

● Recharging function

• If a certain amount of time has elapsed since charging com-

pleted and the portable device has not been moved, the wire-
less charger will restart charging.

• If  the  portable  device  is  moved  within  the  charging  area,

charging will stop temporarily then restart.

1

2

3

336

5-4. Other interior features

Operation indicator light status

*

: Depending on the portable device, the operation indicator light may stay

illuminated (orange) after charging has completed.

● If the operation indicator light blinks

If  an  error  is  detected,  the  operation  indicator  light  will  blink
(orange).  Take  the  appropriate  measures  according  to  the  table
below.

Operation indicator light

State

Off

The Wireless charger is off

Green (illuminated)

Standby (charging is possible)

Charging is complete

*

Orange (illuminated)

A  portable  device  has  been  placed  on  the
charging  area  (identifying  the  portable
device)

Charging in progress

Operation indicator light

Suspected causes

Measure

Blinks  (orange)  at  a
one  second  interval
continuously

Vehicle to charger com-
munication failure.

Contact  your  Toyota
dealer.

Blinks (orange) 3 times
repeatedly

A  foreign  object  exists
between  the  portable
device  and  charging
area.

Remove  the  foreign
object.

Portable  device  is  not
positioned  properly  on
the charging area.

Move 

the 

portable

device  toward  the  cen-
ter  of  the  charging
area.

Blinks (orange) 4 times
repeatedly

The temperature of the
wireless  charger  is
excessively high.

Stop  charging  immedi-
ately 

and 

continue

charging after a while.


Content   ..  19  20  21  22   ..