Toyota FJ Cruiser (GSJ 10, 15 series). Manual - part 454
 

  Index      Toyota     Toyota FJ Cruiser (model GSJ 10, 15 series) - service repair manual 2007 year


Search            


Content   ..  452  453  454  455   ..


Toyota FJ Cruiser (GSJ 10, 15 series). Manual - part 454


SEAT  –  REAR SEAT ASSEMBLY (for RH Side)

SE–49

SE

REASSEMBLY

CAUTION:
Wear protective gloves. Sharp surfaces on the rear seat 
cushion frame and the rear seatback frame could cause 
injuries to your hands.

1.

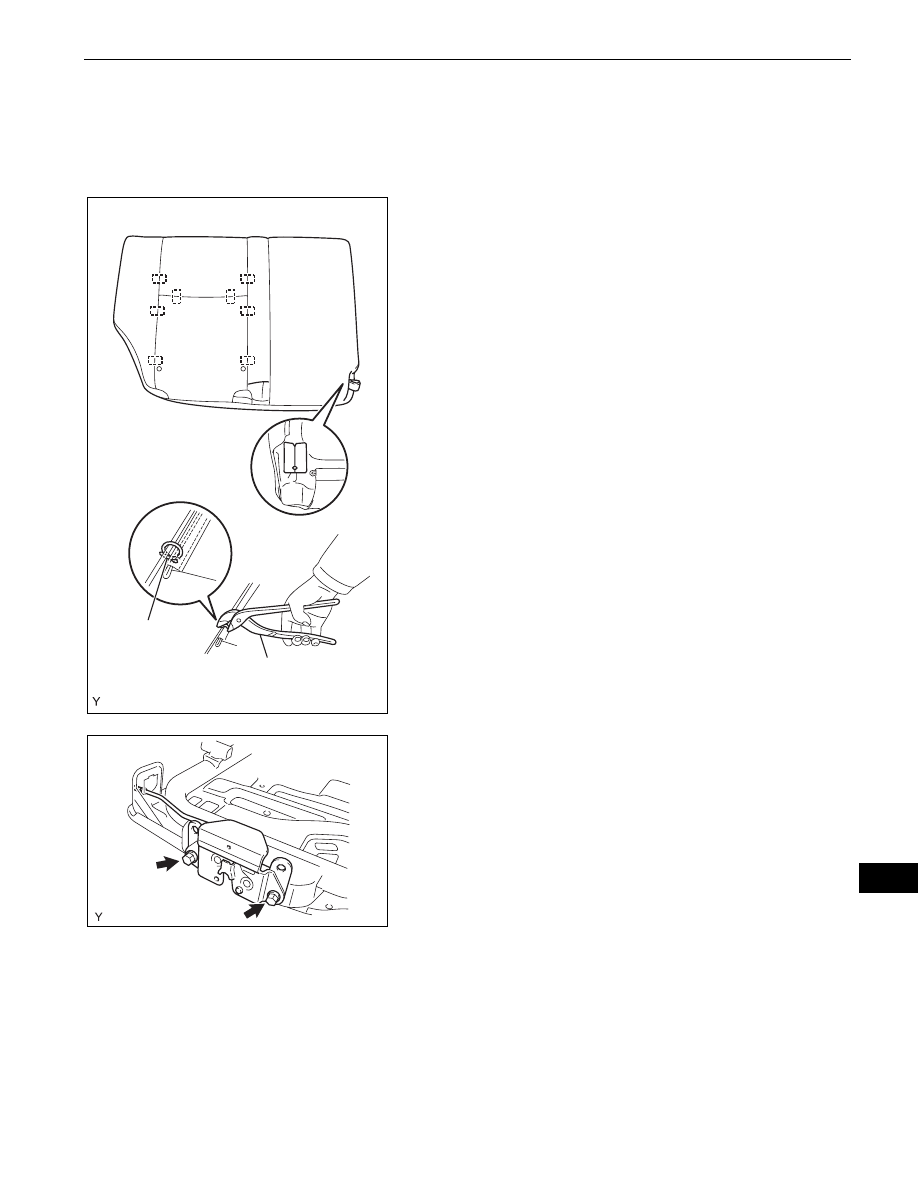
INSTALL REAR SEATBACK COVER
(a) Using hog ring pliers, install the rear seatback cover 

with 8 new hog rings.
NOTICE:

Do not soil or scratch the rear seatback 
cover.

When installing the hog rings, minimize 
wrinkles as far as possible.

(b) Pass the hook of the rear seatback cover through 

the slit in the rear seatback pad.

2.

INSTALL REAR CENTER SEAT OUTER BELT 
ASSEMBLY (See page 

SB-67

)

3.

INSTALL REAR SEATBACK LOCK ASSEMBLY
(a) Install the rear seatback lock with the 2 bolts.

Torque: 18 N*m (185 kgf*cm, 13 ft.*lbf)

New Hog Ring

Hog Ring Pliers

B130775E01

B130772

SE–50

SEAT  –  REAR SEAT ASSEMBLY (for RH Side)

SE

4.

INSTALL REAR SEATBACK FRAME SUB-ASSEMBLY
(a) Install the rear seatback frame.

(b) Using hog ring pliers, install 17 new hog rings.

(c) Install the belt of the rear center seat outer belt into 

the rear seatback cover band.

B130768

New Hog Ring

Hog Ring Pliers

B130767E01

Band

B135129E01

SEAT  –  REAR SEAT ASSEMBLY (for RH Side)

SE–51

SE

5.

INSTALL REAR SEATBACK STOP BUTTON 
GROMMET
(a) Engage the 2 claws and install the rear seatback 

stop button grommet.

6.

INSTALL REAR SEATBACK LOCK RELEASE 
BUTTON
(a) Install rear seatback lock release button.

7.

INSTALL REAR SEAT HEADREST SUPPORT
HINT:
Use the same procedure to install all the rear seat 
headrest supports.
(a) Align the protruding portion of the rear seat headrest 

support with the installation groove of the rear 
seatback frame.

(b) Engage the 2 claws and install the rear seat 

headrest support.

8.

INSTALL TETHER ANCHOR COVER
HINT:
Use the same procedure for both sides.
(a) Engage the 3 claws and install the tether anchor 

cover.

B130771

B130773

Protrusion

B130770E01

B130765

SE–52

SEAT  –  REAR SEAT ASSEMBLY (for RH Side)

SE

(b) Engage the 2 claws and close the cover.

9.

INSTALL REAR SEATBACK LOCK COVER
(a) Engage the claw and install the rear seatback lock 

cover.

(b) Tighten the screw.

10. INSTALL REAR SEAT SHOULDER BELT COVER

(a) Engage the 4 claws and install the rear seat 

shoulder belt cover.

11. INSTALL REAR CENTER SEAT HEADREST 

ASSEMBLY
(a) Push the lock button of the rear seat headrest 

support and install the rear seat headrest.

12. INSTALL REAR SEAT HEADREST ASSEMBLY

(a) Push the lock button of the rear seat headrest 

support and install the rear seat headrest.

B130763

B130761

B135122

Lock Button

B130760E01

Lock Button

B130759E01


Content   ..  452  453  454  455   ..