Toyota FJ Cruiser (GSJ 10, 15 series). Manual - part 130
 

  Index      Toyota     Toyota FJ Cruiser (model GSJ 10, 15 series) - service repair manual 2007 year


Search            


Content   ..  128  129  130  131   ..


Toyota FJ Cruiser (GSJ 10, 15 series). Manual - part 130


ENGINE HOOD / DOOR  –  FRONT DOOR

ED–17

ED

2.

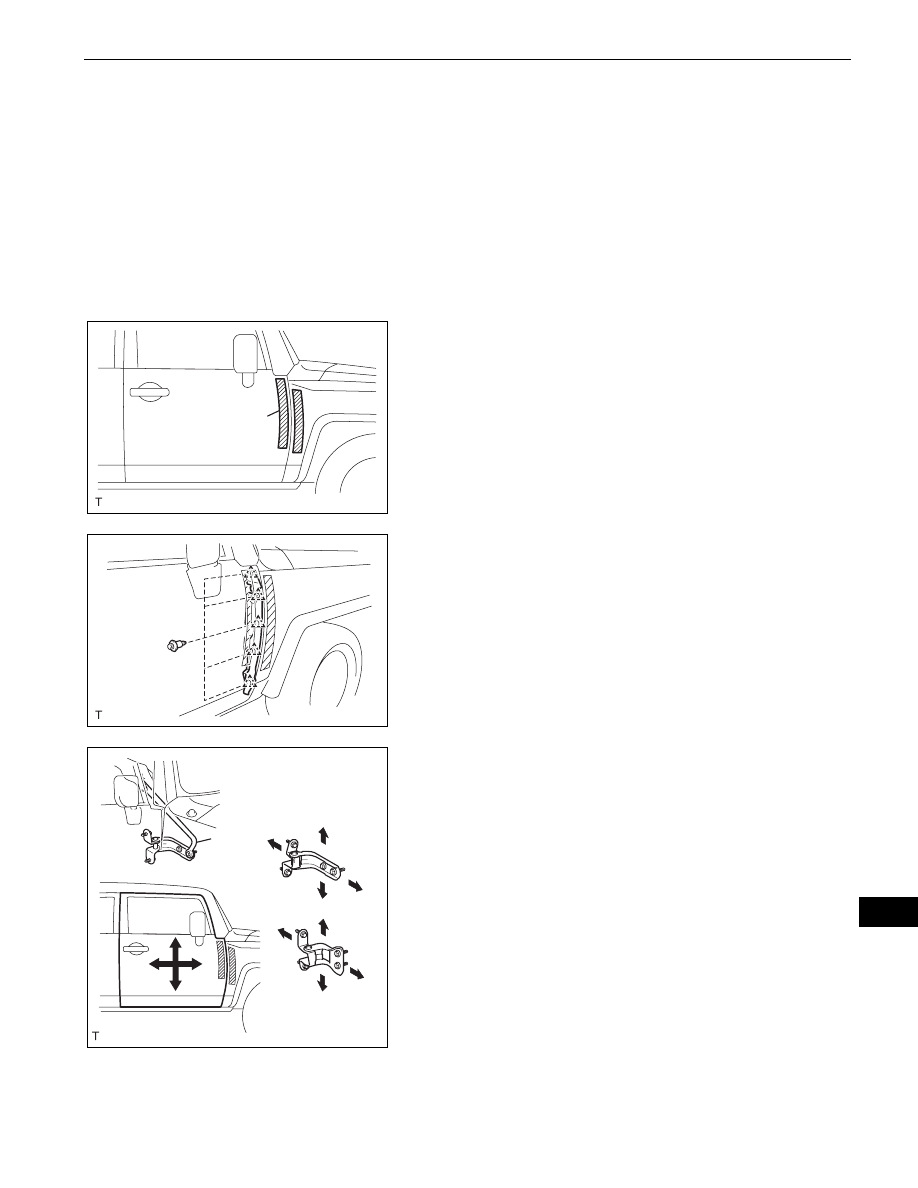
ADJUST FRONT DOOR
(a) Disconnect the cable from the negative battery 

terminal.
CAUTION:
The work must be started at least 90 seconds 
after the ignition switch is turned to OFF and the 
cable is disconnected from the negative battery 
terminal. (The SRS is equipped with a back-up 
power source. If the work is started within 90 
seconds of disconnecting the cable from the 
negative battery terminal and the ignition switch 
being turned to OFF, the SRS may deploy).

(b) Apply strips of protective tape to the door panel and 

fender panel, as shown in the illustration.

(c) Open the door, and then disengage the 5 clips.

HINT:
If any clips are damaged, replace them with new 
ones.

(d) Remove the front fender splash shield from the gap 

between the fender and door.

(e) Using SST, adjust the door horizontally and 

vertically by loosening the body side hinge bolts.
SST

09812-00010

(f)

Tighten the body side hinge bolts after the 
adjustment.
Torque: 26 N*m (265 kgf*cm, 19 ft.*lbf)

Protective Tape

B135985E01

B135986

SST

B135987E01

ED–18

ENGINE HOOD / DOOR  –  FRONT DOOR

ED

(g) Adjust the door horizontally and vertically by 

loosening the door side hinge bolts.

(h) Tighten the door side hinge bolts after the 

adjustment.
Torque: 26 N*m (265 kgf*cm, 19 ft.*lbf)

(i)

Using "Torx" socket wrench T40, adjust the striker 
position by slightly loosening the striker mounting 
screws and hitting the striker with a plastic-faced 
hammer.

(j)

Using "Torx" socket wrench T40, tighten the striker 
mounting screws after the adjustment.
Torque: 23 N*m (235 kgf*cm, 17 ft.*lbf)

(k) Install the front fender splash shield with the 5 clips.
(l)

Connect the cable to the negative battery terminal.
Torque: 3.9 N*m (40 kgf*cm, 35 in.*lbf)

REASSEMBLY

1.

INSTALL CUSHION
(a) Install the 2 cushions.

2.

INSTALL FRONT DOOR OUTSIDE MOULDING SUB-
ASSEMBLY
HINT:
Use the same procedure as for the LH side (see page 

ET-75

).

B135988

B135989

B135986

B135587

ENGINE HOOD / DOOR  –  FRONT DOOR

ED–19

ED

3.

INSTALL FRONT DOOR OUTSIDE HANDLE FRAME 
SUB-ASSEMBLY
(a) Using "Torx" socket wrench T30, install the front 

door outside handle frame with the screw.
Torque: 7.0 N*m (71 kgf*cm, 62 in.*lbf)
NOTICE:
A cover should be inserted between the nut and 
the door panel.

4.

INSTALL FRONT DOOR OUTSIDE HANDLE FRONT 
PAD
(a) Engage the 3 claws and install the front door outside 

handle front pad.

5.

INSTALL FRONT DOOR OUTSIDE HANDLE REAR 
PAD
(a) Engage the 2 claws and install the front door outside 

handle rear pad.

6.

INSTALL FRONT DOOR OUTSIDE HANDLE 
ASSEMBLY
(a) While pushing the front door outside handle in the 

direction of the arrow mark shown in the illustration, 
install the front door outside handle.

7.

INSTALL FRONT DOOR LOCK (See page 

DL-112

)

Slide

Screw

Frame

Nut

Door 
Panel

Outside:

Inside:

Slide

B135586E01

B135584

B135583

B135581

ED–20

ENGINE HOOD / DOOR  –  FRONT DOOR

ED

8.

INSTALL FRONT DOOR OUTSIDE HANDLE COVER
(a) Engage the 2 claws and install the front door outside 

handle cover.

(b) Using "Torx" socket wrench T30, install the cover 

with the door lock key cylinder.
Torque: 5.5 N*m (56 kgf*cm, 49 in.*lbf)
HINT:
Make sure that the door lock key cylinder rod is 
inserted.

(c) Install the hole plug.

9.

INSTALL POWER WINDOW REGULATOR MOTOR 
ASSEMBLY (See page 

WS-35

)

10. INSTALL FRONT DOOR WINDOW REGULATOR SUB-

ASSEMBLY
(a) Apply MP grease to the sliding and rotating areas of 

the front door window regulator.
NOTICE:
Do not apply grease to the window regulator 
spring.

(b) Install the front door window regulator with the 6 

bolts.
Torque: 8.0 N*m (82 kgf*cm, 71 in.*lbf)
NOTICE:
Do not drop the window regulator as it may be 
damaged.

(c) Connect the connector.

11. INSTALL FRONT DOOR GLASS SUB-ASSEMBLY

(a) Install the front door glass onto the front door 

window regulator with the 2 bolts.
Torque: 8.0 N*m (82 kgf*cm, 71 in.*lbf)
NOTICE:
Do not damage the glass.

B135597

B135582

B135598

B138164


Content   ..  128  129  130  131   ..