Toyota FJ Cruiser (GSJ 10, 15 series). Manual - part 104
 

  Index      Toyota     Toyota FJ Cruiser (model GSJ 10, 15 series) - service repair manual 2007 year


Search            


Content   ..  102  103  104  105   ..


Toyota FJ Cruiser (GSJ 10, 15 series). Manual - part 104


1GR-FE ENGINE CONTROL SYSTEM  –  SFI SYSTEM

ES–371

ES

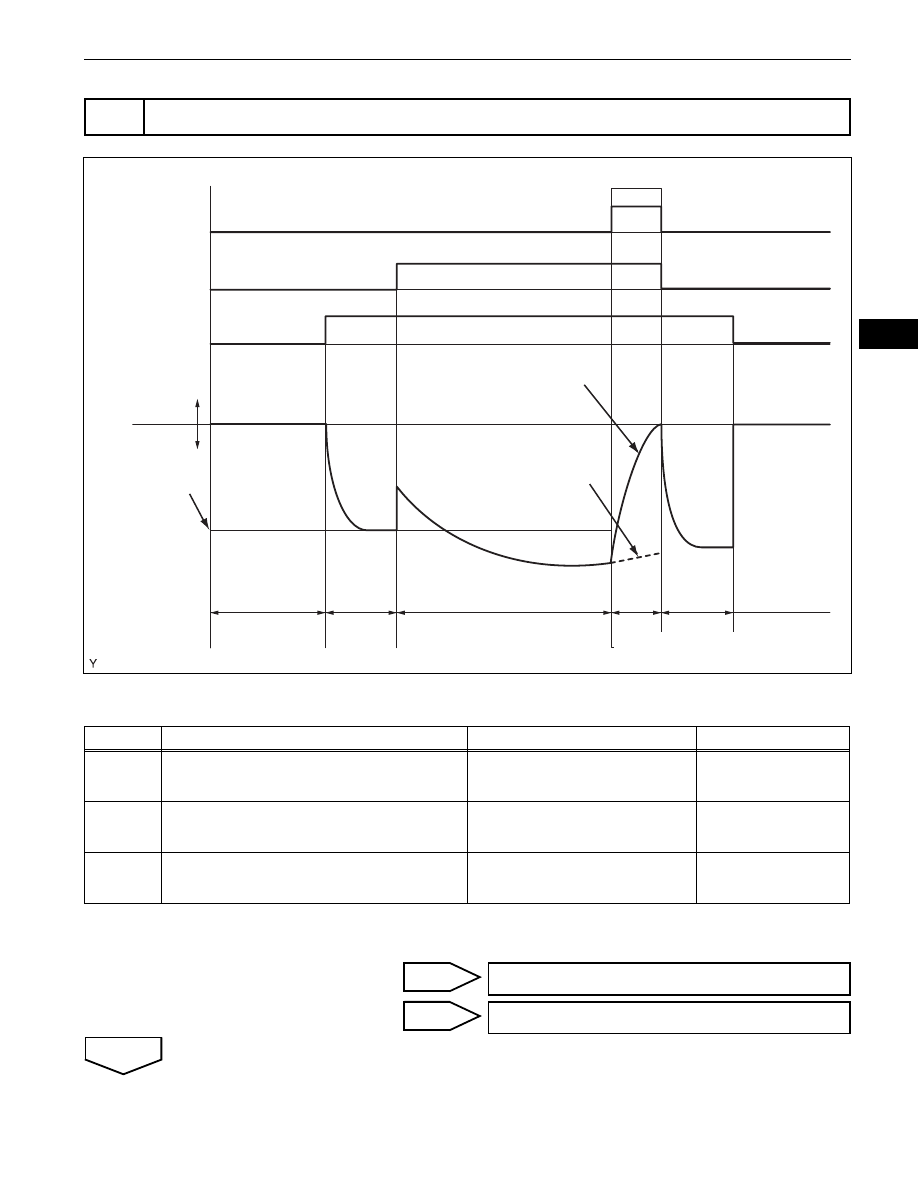
(a) Check the EVAP pressure in step 4/5.

Result

*

: These DTCs are already present in the ECM when the 

vehicle arrives and are confirmed in step 1.

B

C

A

9

PERFORM EVAP SYSTEM CHECK (STEP 4/5)

Purge VSV

Vent Valve

Leak Detection 
Pump

EVAP Pressure

Positive

Negative

First Reference 
Pressure

Steps

Purge VSV Stuck Closed

ON

ON

ON

Time

(Reference)

OK

4/5

10 
seconds

ON: Open

ON: Closed

OFF: Closed

OFF: Vent

A106741E05

DTCs

*

Test Results

Suspected Trouble Areas

Proceed To

-

EVAP pressure increases by 0.3 kPa-g (2.25 mmHg-
g) or more within 10 seconds of proceeding from 
step 3/5 to step 4/5

Not yet determined

A

P0441

EVAP pressure increases by 0.3 kPa-g (2.25 mmHg-
g) or more within 10 seconds of proceeding from 
step 3/5 to step 4/5

Problems in EVAP hose between 
purge VSV and intake manifold

B

P0441

Variation in EVAP pressure less than 0.3 kPa-g (2.25 
mmHg-g) for 10 seconds, after proceeding from 
step 3/5 to step 4/5

Purge VSV stuck closed

C

              Go to step 15

              Go to step 12

ES–372

1GR-FE ENGINE CONTROL SYSTEM  –  SFI SYSTEM

ES

(a) Check the EVAP pressure in step 5/5.
(b) Compare the EVAP pressure in step 3/5 and the second 

reference pressure (step 5/5).

Result

*

: These DTCs are already present in the ECM when the 

vehicle arrives and are confirmed in step 1.

A

B

10

PERFORM EVAP SYSTEM CHECK (STEP 5/5)

Purge VSV

Vent Valve

Leak Detection 
Pump

EVAP Pressure

Positive

Negative

First Reference 
Pressure

Steps

Time

(Reference)

Gross Leak

Small Leak

No Leak

60 
seconds

[Second 
Reference  
Pressure] x 0.2

5/5

ON

ON

ON

ON: Open

OFF: Closed

ON: Closed

OFF: Vent

[Second 
Reference
Pressure]

A106735E09

DTCs

*

Test Results

Suspected Trouble Areas

Proceed To

-

EVAP pressure (step 3/5) lower than 
second reference pressure (step 5/5)

Not yet determined (no leakage from 
EVAP system)

A

P0441 and P0455

EVAP pressure (step 3/5) higher than 
[second reference pressure (step 5/5) 
x 0.2]

Purge VSV stuck open

EVAP gross leak

B

P0456

EVAP pressure (step 3/5) higher than 
second reference pressure (step 5/5)

EVAP small leak

B

              Go to step 36

              Go to step 12

1GR-FE ENGINE CONTROL SYSTEM  –  SFI SYSTEM

ES–373

ES

(a) Check the EVAP pressure in step 3/5.

Result

*

: These DTCs are already present in the ECM when the 

vehicle arrives and are confirmed in step 1.
HINT:
The first reference pressure is the value determined in 
step 2/5.

A

B

11

PERFORM EVAP SYSTEM CHECK (STEP 3/5)

ON

ON

ON

Leak Detection Pump 
Stuck OFF

Reference Orifice 
High-flow

Within 15 minutes

3/5

2/5

Purge VSV

Vent Valve

Leak Detection 
Pump

EVAP Pressure

Positive

Negative

First Reference 
Pressure

Steps

Time

(Reference)

ON: Open

ON: Closed

OFF: Closed

OFF: Vent

A106742E04

DTCs

*

Test Results

Suspected Trouble Areas

Proceed To

P043F

EVAP pressure less than [reference pressure] 
measured at 2/5

Reference orifice high-flow

A

P2401

EVAP pressure almost same as [reference 
pressure] measured at 2/5

Leak detection pump stuck OFF

B

              Go to step 30

              Go to step 23

ES–374

1GR-FE ENGINE CONTROL SYSTEM  –  SFI SYSTEM

ES

(a) Select the following menu items: DIAGNOSIS / 

ENHANCED OBD II/ ACTIVE TEST / EVAP VSV.

(b) Disconnect the hose (connected to the canister) from the 

purge VSV.

(c) Start the engine.
(d) Using the tester, turn off the purge VSV (EVAP VSV: 

OFF).

(e) Use your finger to confirm that the purge VSV has no 

suction.

(f)

Using the tester, turn on the purge VSV (EVAP VSV: 
ON).

(g) Use your finger to confirm that the purge VSV has 

suction.

Result

(h) Reconnect the hose.

B

C

A

(a) Check that the fuel cap is correctly installed and confirm 

the fuel cap meets OEM specifications.

(b) Confirm that the fuel cap is tightened until a few click 

sounds are heard.
HINT:
If an EVAP tester is available, check the fuel cap using 
the tester.
(1) Remove the fuel cap and install it onto a fuel cap 

adaptor.

(2) Connect an EVAP tester pump hose to the adaptor, 

and pressurize the cap to 3.2 to 3.7 kPa (24 to 28 
mmHg) using an EVAP tester pump.

(3) Seal the adaptor and wait for 2 minutes.
(4) Check the pressure. If the pressure is 2 kPa (15 

mmHg) or more, the fuel cap is normal.

Result

12

PERFORM ACTIVE TEST USING INTELLIGENT TESTER (PURGE VSV)

Hose

Purge VSV

G035659E02

Test Results

Suspected Trouble Areas

Proceed To

No suction when purge VSV turned OFF, and 
suction applied when turned ON

Purge VSV normal

A

Suction applied when purge VSV turned OFF

Purge VSV stuck open

B

No suction when purge VSV turned ON

Purge VSV stuck closed

Problems with EVAP hose between purge VSV 
and intake air surge tank

C

              Go to step 14

              Go to step 15

13

CHECK FUEL CAP ASSEMBLY

Test Results

Suspected Trouble Areas

Proceed To

Fuel cap correctly installed

-

A


Content   ..  102  103  104  105   ..