Suzuki Grand Vitara JB419. Service manual - part 4
 

  Index      Suzuki     Suzuki Grand Vitara JB419 (with F9Q engine) - service and repair manual 2007 year


Search            


Content   ..  1  2  3  4  5  ..


Suzuki Grand Vitara JB419. Service manual - part 4


Maintenance and Lubrication:  0B-2

Maintenance Recommended under Severe Driving Conditions

S5JB0B0205002

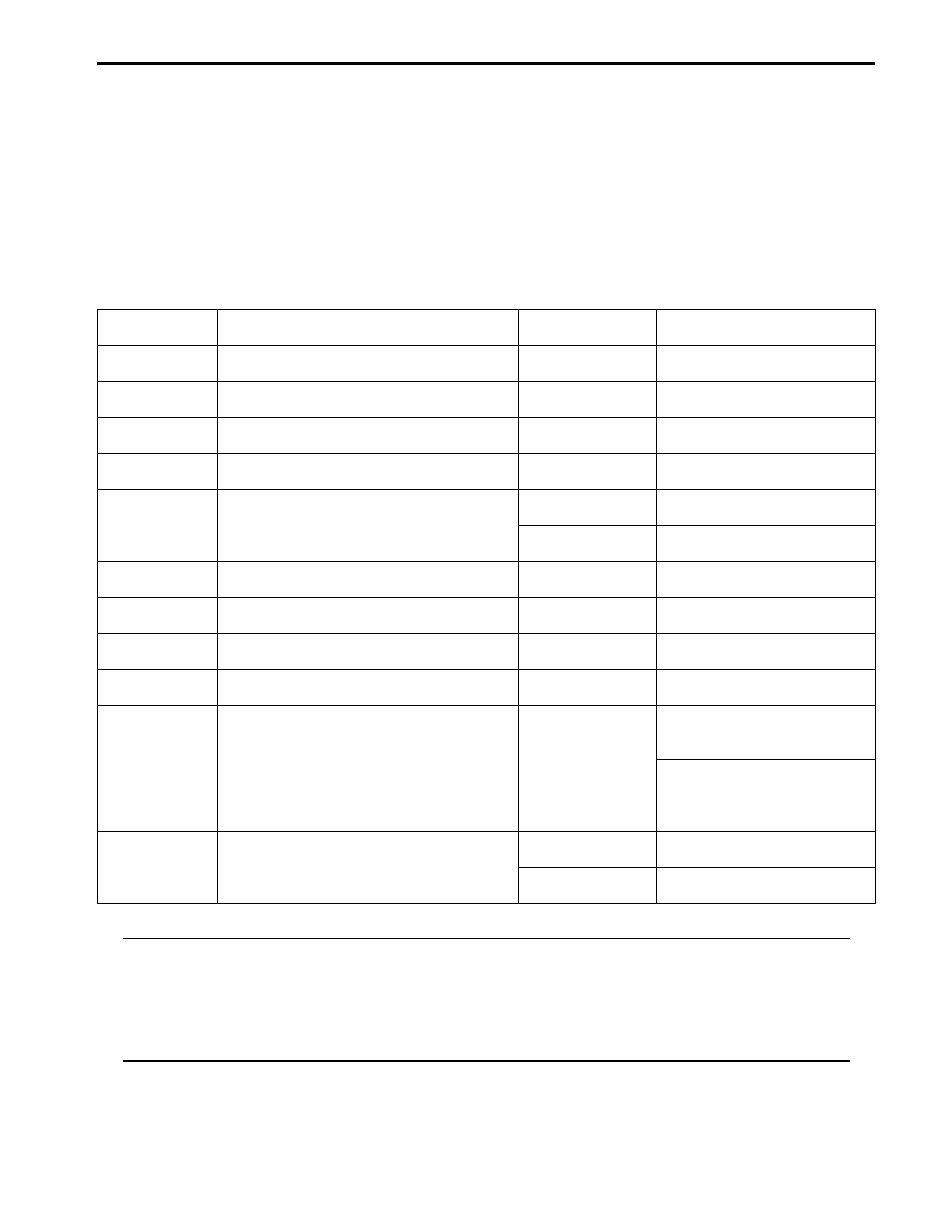
If the vehicle is usually used under the conditions corresponding to any severe condition code, IT IS RECOMMENDED 
that applicable maintenance operation be performed at the particular interval as shown in the following table.
Severe condition code: 
A: Repeated short trips
B: Driving on rough and/or muddy roads
C: Driving on dusty roads
D: Driving in extremely cold weather and/or salted roads
E: Repeated short trips in extremely cold weather
F: Leaded fuel use
G: Low quality fuel use (Diesel engine only)
H: Towing a trailer (if admitted)

NOTE

• “I”: Inspect and correct or replace if necessary.
• “R”: Replace or change.
• “T”: Tighten to specified torque.
• *1: Inspect more frequently if the vehicle is used under dusty conditions.
• *2: Clean more frequently if the air flow from air conditioning decreases.


Severe 

Condition Code

Maintenance

Maintenance 

Operation

Maintenance Interval

– B C D – – – –

Engine accessory drive belt, tensioner and 
idlers

)

R

Every 30,000 km 
(18,000 miles) or 24 months

A – C D E – – –  Camshaft timing belt and tensioner

)

R

Every 45,000 km
(27,000 miles) or 36 months

A – C D E F – H Engine oil and oil filter

)

R

Every 7,500 km 
(4,500 miles) or 6 months

– B – – – – – – Exhaust pipe mountings

)

I

Every 15,000 km 
(9,000 miles) or 12 months

– – C – – – – – Air cleaner filter *1

)

I

Every 2,500 km 
(1,500 miles)

)

R

Every 30,000 km 
(18,000 miles) or 24 months

– – – – – – G – Fuel filter 

)

R

Every 5,000 km (3,000 miles) or 
each time water is detected.

– B – – – – – – Suspension bolts and nuts

)

T

Every 15,000 km 
(9,000 miles) or 12 months

– B C D – – – H Wheel bearings

)

I

Every 15,000 km 
(9,000 miles) or 12 months

– B – D E – – H Drive shaft boots and propeller shafts

)

I

Every 15,000 km 
(9,000 miles) or 12 months

– B – – E – – H

Manual transmission oil / Transfer oil / 
Differential oil

)

/)

R

First time only: 
15,000 km 
(9,000 miles) or 12 months
Second time and after:
Every 30,000 km (18,000 miles) 
or 24 months reckoning from 0 
km (0 mile) or 0 month

– – C D – – – – HVAC air filter (if equipped) *2

)

I

Every 15,000 km 
(9,000 miles) or 12 months

)

R

Every 45,000 km 
(27,000 miles) or 36 months

0B-3 Maintenance and Lubrication: 

Repair Instructions

Engine Accessory Drive Belt, Tensioner and 
Idler Replacement

S5JB0B0206002

WARNING

!


Replacement must be performed with battery 
negative cable disconnected to avoid a 
personal injury.


Replace belt (1), tensioner (2) and idlers (3) with new 
ones referring to “Accessory Drive Belt and Idler Pulley 
Removal and Installation in Section 1J”.
Check crankshaft pulley (4) for wear and damage, and 
replace it as necessary.

Camshaft Timing Belt and Tensioner 
Replacement

S5JB0B0206042

Replace camshaft timing belt (1) and tensioner (2) with 
new ones referring to “Timing Belt and Belt Tensioner 
Removal and Installation in Section 1D”.

Engine Oil and Filter Change

S5JB0B0206004

WARNING

!


• New and used engine oil can be 

hazardous.
Be sure to read “General Precautions in 
Section 00” a
nd observe what in written 
there.

• Steps 1) – 7) must be performed with 

ENGINE NOT RUNNING. For Step 8), be 
sure to have adequate ventilation while 
engine is running.


CAUTION

!


Do not top up oil over FULL level mark on 
dipstick. Too much oil could destroy engine.


Before draining engine oil, check engine for oil leakage. 
If any evidence of leakage is found, make sure to correct 
defective part before proceeding to the following work.

1) Drain engine oil by removing drain plug.
2) After draining oil, wipe drain plug clean. Reinstall 

drain plug.

Tightening torque
Engine oil drain plug (a):  35 N·m (3.5 kgf-m, 25.5 
lb-ft)

3) Loosen oil filter by using oil filter wrench (special 

tool) accessing from between engine mounting and 
radiator outlet hose and from below vehicle.

Special tool
(A):  09915–46510

1

2

3

4

I5JB0B020001-02

I5JB0B020002-01

(a)

I5JB0B020003-01

(A)

I5JB0B020004-01

Maintenance and Lubrication:  0B-4

4) Apply engine oil to new oil filter gasket.

5) Screw new filter on oil filter stand by hand until the 

filter gasket contacts the mounting surface.

CAUTION

!


To tighten oil filter properly, it is important to 
accurately identify the position at which filter 
gasket first contacts the mounting surface.


6) Tighten oil filter (1) 3 / 4 turn from the point of contact 

with the mounting surface using an oil filter wrench 
(2).

7) Replenish oil until oil level is brought to FULL level 

mark on dipstick (about 5.1 liters (9.0 lmp pt.)). 

Engine oil specifications
: about 5.1 liters (9.0 lmp pt.)

The filler inlet is at the top of the cylinder head cover. 
Use only engine oil of ACEA standard C3 grade.
Select the appropriate oil viscosity according to the 
chart [A].
It is highly recommended to use SAE 5W-30 oil.

NOTE
Note that the amount of oil required when 
actually changing oil may somewhat differ 
from the data depending on various 
conditions (temperature, viscosity, etc.)


Proper engine oil viscosity chart

8) Check oil filter and drain plug for oil leakage.
9) Check oil level as follows.

a) Warm up engine to normal operating 

temperature.

b) Stop engine and wait 10 min.
c) Remove dipstick and wipe oil off it with a clean 

lint-free cloth.

d) Screw in dipstick (cap) fully.
e) Remove dipstick again and check oil level.

Add oil, as necessary, to bring oil level to FULL 
level mark (1) on dipstick.

Engine Coolant Change

S5JB0B0206005

WARNING

!


To help avoid danger of being burned, do not 
remove degassing tank cap while engine and 
radiator are still hot. Scalding fluid and steam 
can be blown out under pressure if cap is 
taken off too soon.


Change engine coolant referring to “Cooling System 
Refilling in Section 1F”.

Exhaust system Inspection

S5JB0B0206006

WARNING

!


To avoid danger of being burned, do not 
touch exhaust system when it is still hot. Any 
service on exhaust system should be 
performed when it is cool.


Check exhaust system for loose, damage, leakage, etc. 
referring to “Exhaust System Check in Section 1K”.

Air Cleaner Filter Inspection

S5JB0B0206008

Check that filter is not excessively dirty, damaged or oily 
and clean filter with compressed air from air outlet side 
of filter.
Refer to “Air Cleaner Filter Inspection and Cleaning in 
Section 1D”.

Air Cleaner Filter Replacement

S5JB0B0206009

Replace air cleaner filter with new one referring to “Air 
Cleaner Filter Removal and Installation in Section 1D”.

I5JB0B020005-01

2

3/4

1,(a)

I5JB0B020006-01

C

F

o

o

-30
-22

-20

-4

-10

14

32

50

68

86

104

0

10

20

30

4

0

5W-30

5W-40

0W-30

[A]

I5JB0B020014-02

2. Low level mark 

1

2

I5JB0B020008-01

0B-5 Maintenance and Lubrication: 

Fuel Lines and Connections Inspection

S5JB0B0206010

Visually inspect fuel lines and connections for evidence 
of fuel leakage, hose cracking and damage. Make sure 
all clamps are secure.
Repair leaky joints, if any.
Replace hoses that are suspected of being cracked.

Fuel Filter Replacement

S5JB0B0206011

WARNING

!


This work must be performed in a well 
ventilated area and away from any open 
flames (such as gas hot water heaters).


Replace fuel filter with new one, referring to “Fuel Filter 
and Fuel Heater Removal and Installation in Section 
1G”
.

Steering System Inspection

S5JB0B0206026

1) Check steering wheel for play and rattle, holding 

vehicle in straight forward condition on the ground.

Steering wheel play
“a”: 0 – 30 mm (0 – 1.2 in.)

2) Check universal joints of steering shaft for rattle and 

damage. If rattle or damage is found, replace 
defective part with a new one.

3) Check steering linkage for looseness and damage. 

Repair or replace defective part, if any.

4) Check bolts and nuts for tightness and retighten 

them as necessary. 
Repair or replace defective parts, if any.

5) Check boots of steering linkage for damage (leaks, 

detachment, tear, dent, etc.). If damage is found, 
replace it with new one.
If any dent is found on steering rack boots, correct it 
to original shape by turning steering wheel to the 
right or left as far as it stops and holding it for a few 
seconds.

6) Check wheel alignment referring to “Front Wheel 

Alignment Inspection and Adjustment in Section 2B 
in related manual”.

I5JB0B020009-01

IYSQ01020050-01

I5JB0B020010-01


Content   ..  1  2  3  4  5  ..