Suzuki Grand Vitara JB627. Service manual - part 10
 

  Index      Suzuki     Suzuki Grand Vitara JB627 - service and repair manual


Search            


Content   ..  8  9  10  11   ..


Suzuki Grand Vitara JB627. Service manual - part 10


0B-10 Maintenance and Lubrication: 

Propeller Shafts and Drive Shafts Inspection

S6JB0B0206027

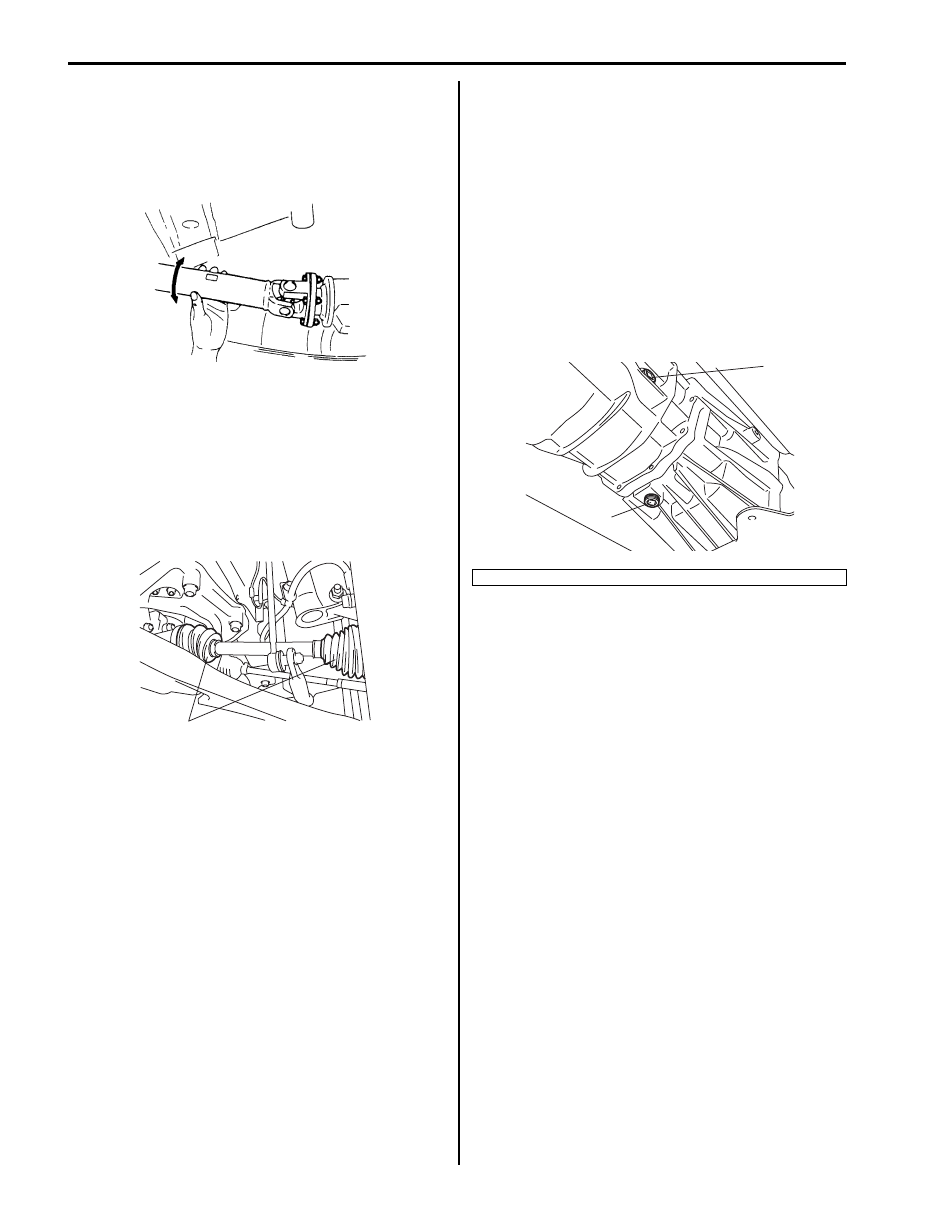
Propeller Shafts Inspection

1) Check universal joint and spline of propeller shaft for 

rattle. If rattle is found, replace defective part with a 
new one.

2) Check propeller shaft (front and rear) flange yoke 

bolts for tightness, and retighten them as necessary.
Refer to “Tightening Torque Specifications in Section 
3D”.

Drive Shafts Inspection
Check drive axle boots (wheel side and differential side) 
(1) for leaks, detachment, tear or other damage.
Replace boot as necessary.

Manual Transmission Oil Inspection

S6JB0B0206028

1) Inspect transmission case for evidence of oil 

leakage. Repair leaky point if any.

2) Make sure that vehicle is placed level for oil level 

check.

3) Remove level / filler plug (1) of transmission.
4) Check oil level.

Oil level can be checked roughly by means of level 
plug hole. That is, if oil flows out of level plug hole or 
if oil level is found up to hole when level / filler plug is 
removed, oil is properly filled.
If oil is found insufficient, pour specified amount of 
specified oil.

5) Tighten level / filler plug to specified torque referring 

to “Manual Transmission Oil Change in Section 5B”.

Manual Transmission Oil Change

S6JB0B0206029

Change transmission oil with new specified oil referring 
to “Manual Transmission Oil Change in Section 5B”.

Automatic Transmission Fluid Inspection

S6JB0B0206030

1) Inspect transmission case for evidence of fluid 

leakage. Repair leaky point, if any.

2) Make sure that vehicle is placed level for fluid level 

check.

3) Check fluid level referring to “A/T Fluid Level Check 

in Section 5A”. If fluid level is low, replenish specified 
fluid.

Automatic Transmission Fluid Change

S6JB0B0206031

1) Inspect transmission case for evidence of fluid 

leakage. Repair leaky point, if any.

2) Make sure that vehicle is placed level.
3) Change fluid referring to “A/T Fluid Change in 

Section 5A”.

I5JB0A020019-02

1

I5JB0A020012-01

2. Drain plug

1

2

I5JB0A020013-01

Maintenance and Lubrication:  0B-11

Automatic Transmission Fluid Cooler Hose 
Inspection

S6JB0B0206032

Check automatic transmission fluid cooler hose for fluid 
leakage, cracks, damage and deterioration. Replace 
hose and/or clamp if any faulty condition is found.

Transfer Oil Inspection (If Equipped)

S6JB0B0206033

1) Check transfer case for evidence of oil leakage. 

Repair leaky point if any.

2) Make sure that vehicle is placed level for oil level 

check.

3) Check oil level referring to “Transfer Oil Level Check 

in Section 3C”.

Differential Oil Inspection

S6JB0B0206034

1) Check differential for evidence of oil leakage.

Repair leaky point if any.

2) Make sure that vehicle is placed level for oil level 

check.

3) Remove level / filler plug of differentials (front and/or 

rear) and check oil level.
Oil level can be checked roughly by means of level 
plug hole. That is, if oil flows out of level plug hole or 
if oil level is found up to hole when level / filler plug is 
removed, oil is properly filled.
If oil is found insufficient, pour specified amount of 
specified oil.

4) Tighten level plug to specified torque.

For front differential, refer to “Front Differential Oil 
Change: Front in Section 3B”
.
For rear differential, refer to “Rear Differential Oil 
Change: Rear in Section 3B”.

Transfer (If Equipped) or Differential Oil Change

S6JB0B0206035

Change transfer oil or differential oil (front and rear) with 
new specified oil respectively.
For transfer, refer to “Transfer Oil Change in Section 
3C”
.
For front differential, refer to “Front Differential Oil 
Change: Front in Section 3B”.
For rear differential, refer to “Rear Differential Oil 
Change: Rear in Section 3B”.

Power Steering (P/S) System Inspection

S6JB0B0206036

1) Visually check power steering system for fluid 

leakage and hose for damage and deterioration.
Repair or replace defective parts, if any.

2) Check fluid level with engine stopped. If it is lower 

than LOWER level line, fill fluid up to UPPER level 
line.

NOTE
Fluid level should be checked when fluid is 
cool.


3) Visually check pump drive belt for cracks and wear 

and tension, referring to “P/S Pump and A/C 
Compressor (If Equipped) Drive Belt Inspection and 
Adjustment in Section 6C”.
If necessary, Adjust or replace it.

1. Oil level / filler plug (Apply sealant.)
2. Drain plug (Apply sealant.)

I5JB0A020025-02

1

2

I5JB0A020015-03

I5JB0C020002-01

I6JB01020010-02

0B-12 Maintenance and Lubrication: 

All Hinges, Latches and Locks Inspection

S6JB0B0206037

Doors
Check that each door of front, rear and back (rear end) 
doors opens and closes smoothly and locks securely 
when closed.
If any malfunction is found, lubricate hinge and latch or 
repair door lock system.

Engine Hood
Check that secondary latch operates properly (check 
that secondary latch keeps hood from opening all the 
way even when pulling hood release handle inside 
vehicle.) Also check that hood opens and closes 
smoothly and properly and hood locks securely when 
closed.
If any malfunction is found, lubricate hinge and latch, or 
repair hood lock system.

HVAC Air Filter Inspection (If Equipped)

S6JB0B0206038

Check air filter for dirt and damage. Clean or replace if 
necessary referring to “HVAC Air Filter Inspection in 
Section 7B”.

HVAC Air Filter Replacement (If Equipped)

S6JB0B0206039

Replace air filter with new one referring to “HVAC Air 
Filter Removal and Installation in Section 7B”.

Final Inspection for Maintenance Service

S6JB0B0206040

WARNING

!


When carrying out road tests, select a safe 
place where no man or no running vehicle is 
seen so as to prevent any accident.


Seats
Check that seat slides smoothly and locks securely at 
any position. Also check that reclining mechanism of 
front seat back allows it to be locked at any angle.

Seat Belt
Inspect belt system including webbing, buckles, latch 
plates, retractors and anchors for damage or wear.
Check that seat belt is securely locked.

Battery Check
Check battery for damage, terminal corrosion and 
condition. 
If battery is equipped with built-in indicator, check battery 
condition by the indicator.

Accelerator Pedal Operation
Check that pedal operates smoothly without getting 
caught or interfered by any other part.

Engine Start
Check engine start for readiness.

WARNING

!


Before performing the following check, be 
sure to have enough room around the 
vehicle. Then, firmly apply both the parking 
brake and the regular brakes. Do not use the 
accelerator pedal. If the engine starts, be 
ready to turn off the ignition promptly. Take 
these precautions because the vehicle could 
move without warning and possibly cause 
personal injury or property damage.


On A/T vehicles, try to start the engine in each select 
lever position. The starting motor should crank only in 
“P” (Park) or “N” (Neutral).
On M/T vehicles, place the shift lever in “Neutral,” 
depress clutch pedal fully and try to start.

I5JB0A020026-01

Maintenance and Lubrication:  0B-13

Exhaust System Check
Check for leakage, cracks or loose supports.

Clutch (for Manual Transmission)
Check for the following.
• Clutch is completely released when depressing clutch 

pedal,

• No slipping clutch occurs when releasing pedal and 

accelerating.

• Clutch itself is free from any abnormal condition.

Gearshift or Select Lever (Transmission)
Check gear shift or select lever for smooth shifting to all 
positions and for good performance of transmission in 
any position.
With A/T vehicle, also check that shift indicator indicates 
properly according to which position select lever is 
shifted to.
With A/T vehicle, make sure that vehicle is at complete 
stop when shifting select lever to “P” range position and 
release all brakes.

Transfer (Motor-shift type)
Check that transfer position indicator on instrument 
cluster turns on properly according to transfer switch 
position.

Brake
Foot brake
Check the following:
• that brake pedal has proper travel,
• that brake works properly,
• that it is free from noise,
• that vehicle does not pull to one side when brake is 

applied,

• and that brake do not drag.

Parking brake
Check that lever has proper travel.

WARNING

!


With vehicle parked on a fairly steep slope, 
make sure nothing is in the way downhill to 
avoid any personal injury or property 
damage. Be prepared to apply regular brake 
quickly even if vehicle should start to move.


Check to ensure that parking brake is fully effective 
when the vehicle is stopped on the safe slope and brake 
lever is pulled all the way.

Steering
• Check to ensure that steering wheel is free from 

instability, or abnormally heavy feeling.

• Check that the vehicle does not wander or pull to one 

side.

Engine
• Check that engine responds readily at all speeds.
• Check that engine is free from abnormal noise and 

abnormal vibration.

Body, Wheels and Power Transmitting System
Check that body, wheels and power transmitting system 
are free from abnormal noise and abnormal vibration or 
any other abnormal condition.

Meters and Gauge
Check that speedometer, odometer, fuel meter, 
temperature gauge, etc. are operating accurately.

Lights
Check that all lights operate properly.

Windshield Defroster
Periodically check that air comes out from defroster 
outlet when operating heater or air conditioning.
Set fan switch lever to max speed position for this check.


Content   ..  8  9  10  11   ..