Seat Arona (2023 year). Manual in english - page 5
 

  Index      Manuals     Seat Arona (2023 year). Manual in english


Search            copyright infringement  


Content      ..     3      4      5      6     ..


Seat Arona (2023 year). Manual in english - page 5


Assistant systems

139

Cruise control system

Fitting certain accessories to the front of

the vehicle, such as a plate holder with ad-
vertising, may interfere with the operation of
the Park Assist.

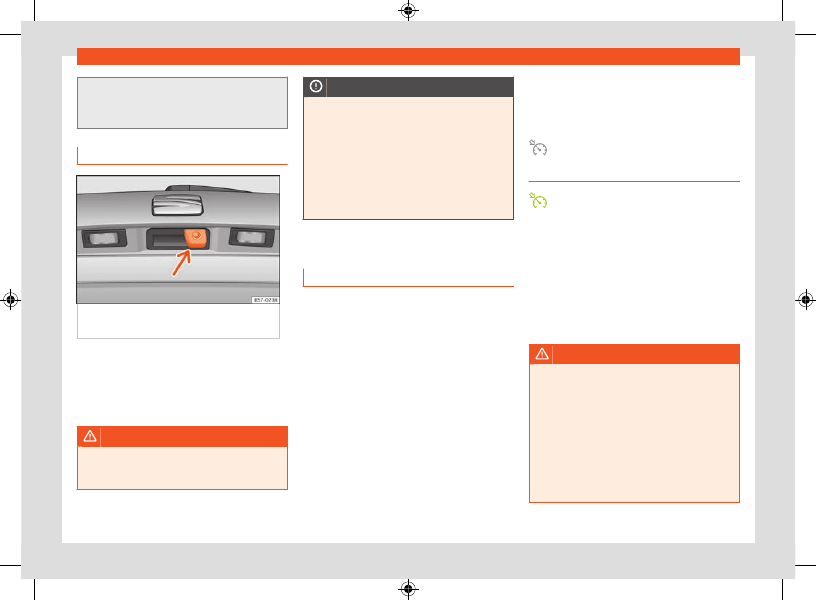
Rear camera

Fig. 100 

 On the rear lid handle: location of the

rear assist camera.

A camera installed in the rear lid handle assists
the driver with reverse parking or manoeuvring.
This provides support to the following function:

Rear View Camera 

››› 

page 173

.

WARNING

Fitting a number plate frame may interfere
with the view shown on the screen, as it may
reduce the camera’s field of vision.

NOTICE

In order to guarantee good system opera-

tion, keep the cameras clean, free of snow or
ice, and do not cover them with stickers or
other objects.

Never use abrasive cleaning products to

clean the camera lens.

Do not use hot or warm water to remove

ice or snow from the camera lens. Doing so
could damage the camera.

Cruise control system

Introduction

The cruise control system (GRA) helps maintain
a constant speed set by you.

Speed range

The cruise control system is available when
driving in forward gear at a speed of over ap-
prox. 20 km/h (15 mph).

Temporarily switching off the cruise control

The saved speed can be exceeded at any time,
e.g. for overtaking. The cruise control is suspen-
ded during acceleration and is then resumed
with the saved speed.

Status display

When the cruise control system is switched on,
the instrument cluster display shows the saved
speed and the system status:

It lights up grey.
The cruise control system is switched on,
but regulation is not active.

It lights up green.
The cruise control system is switched on
and regulation is active.

If there is no speed saved, the instrument clus-
ter display shows ––– instead of speed.

Changing gears

As soon as the clutch pedal is depressed, regu-
lation is suspended and resumes once the gear
change has been made.

WARNING

If it is impossible to drive with sufficient brak-
ing distance and at a constant speed, using
the cruise control system may cause acci-
dents and serious injuries may occur.

 Do not use Travel Assist when visibility is

bad, on steep roads, on windy roads or in
slippery circumstances (such as snow, ice,
rain or loose gravel), or on flooded roads.

 Only use the cruise control system on

paved roads with a firm surface.

CarManuals2.com

140

Assistant systems

 Adapt your speed and safety distance to

the vehicle in front of you at all times to suit
the visibility, weather, road and traffic condi-
tions.

 After use, always switch off the speed lim-

iter to prevent the speed being regulated
against your wishes.

It is dangerous to use a set speed which

is too high for the prevailing road, traffic or
weather conditions.

Operating the cruise control

Fig. 101 

On the multifunction steering wheel:

cruise control operation buttons.

Connecting

 Press the   button.

There is no speed saved and regulation is not
yet operating.

Start regulation

 While driving, press the button  .

The cruise control system saves and regulates
the current speed.

Adjusting the speed

While the GRA is set, the stored speed can be
adjusted:

+ 1 km/h (1 mph)
- 1 km/h (1 mph)
+ 10 km/h (5 mph)
- 10 km/h (5 mph)

The cruise control system only operates the ac-
celeration, 

it does not brake

 the vehicle.

Interrupting the adjustment

 Briefly press the button   or press the brake

pedal.
The speed is stored.

Reinstating the cruise control

 Press the 

 button.

The cruise control system resumes the saved
speed and regulates it.

Switching off

 Press and hold the button  .

The cruise control system switches off and the
saved speed is deleted.

Switching off the speed limiter

 Press the   button.

 Select the speed limiter on the instrument

cluster display.
The cruise control system is switched off.

Troubleshooting

 Cruise control fault

The control lamp switches on yellow.
Abnormal operation. Switch off the cruise con-
trol system and take the vehicle to a specialist
workshop.

The adjustment is interrupted unexpectedly

 If the clutch pedal is pressed for a long time.

The vehicle has exceeded the saved speed

for a long time.

No forward gear has been selected.

A brake assistance system has intervened,

e.g. TCS or ESC.

Front Assist has braked the vehicle.

If the fault continues, disconnect the Emer-

gency Assist and consult a specialised work-
shop.

CarManuals2.com

Assistant systems

141

Speed limiter

Speed limiter

Introduction

The speed limited helps the driver not to ex-
ceed a set speed.

Speed range

The speed limiter helps avoid exceeding a pro-
grammed speed, from 30 km/h (20 mph) ap-
prox. and faster.

By selecting the speed limiter

The speed limitation can be interrupted at any
time by depressing the accelerator pedal fully,
beyond the point of resistance. As soon as the
saved speed is exceeded, the green indicator
light flashes and an audible warning signal may
sound. The speed is stored.
The limiter is reactivated automatically after re-
turning to less than the set speed.

Status display

When the speed limiter is switched on, the
instrument cluster display shows the saved
speed and the system status:

It lights up grey

The speed limiter is switched on but reg-
ulation is not active.

Lights up green

The speed limiter is switched on and ac-
tive.

WARNING

After use, always switch off the speed limiter
to prevent the speed being regulated against
your wishes.

The speed limiter does not relieve the

driver of their responsibility to drive at the
appropriate speed. Do not drive at high
speed if not necessary.

Using the speed limiter under adverse

weather conditions is dangerous and can
cause serious accidents, e.g. aquaplaning,
snow, ice, leaves, etc. Only use the speed
limiter when the status of the road and the
weather conditions allow it.

Operating the speed limiter

Fig. 102 

On the multifunction steering wheel:

buttons to control the speed limiter.

Connecting

Press the   button.

It does not take effect yet.

Start regulation

While driving, press the button 

.

The current speed is saved as a limit speed.

Adjusting the speed

The programmed speed can be set:

+ 1 km/h (1 mph)
- 1 km/h (1 mph)
+ 10 km/h (5 mph)
- 10 km/h (5 mph)

CarManuals2.com

142

Assistant systems

Interrupting the adjustment

Press the   button.

The speed is stored.

Reinstating the cruise control

Press the 

 button.

The limiter will re-activate as soon as the vehi-
cle is moving at a speed lower than the saved
one.

Switching off

Press and hold the button  .

The speed limiter switches off and the speed is
deleted.

Switch to another driver assistance system

Press the   button.

Observe the corresponding message on the

instrument cluster display. The speed limiter is
switched off.

Troubleshooting

The speed limiter is not available

The control lamp switches on yellow.

Malfunctions Switch off the speed limiter and

go to a specialist workshop.

The adjustment is interrupted unexpectedly

You have switched off the Electronic Stabiliza-

tion Control (ESC).

The brakes have overheated. Wait for the

brakes to cool down and check the operation
again.

If the fault continues, consult a specialised

workshop.
For safety reasons, the speed limiter only
switches off fully whenever the driver stops
pressing the accelerator pedal or switches the
system off manually.

ACC - Adaptive Cruise Con-
trol

Introduction

Adaptive Cruise Control (ACC) maintains a
constant speed set by the driver. When ap-
proaching another vehicle in front, the ACC de-
tects it and adapts the speed automatically,
maintaining a distance set by the driver.

Does my vehicle have ACC?

Your vehicle has ACC if it has the ACC func-
tion buttons on the multifunction steering wheel 

››› 

page 82

, or if it has the configuration menu

in the infotainment system.

Speed range

ACC regulates at speeds between 30 and
210 km/h (20 and 130 mph).
If the vehicle is fitted with an automatic gear-
box, the ACC can bring the vehicle to a stand-
still if a vehicle in front of it stops.
If your vehicle is fitted with a manual gearbox,
you must pay attention to speed and gear
changes. The ACC is deactivated if the speed is
too low (less than 30 km/h) of the engine RPM
is too low or high.

Driving with ACC

You can override the ACC at any time. Braking
interrupts the ACC. If you accelerate, regulation
is interrupted during acceleration and then re-
sumed.

Driver intervention prompt

ACC is subject to certain limitations inher-
ent to the system. This means that the
driver will have to control the speed and

distance from other vehicles in certain sit-
uations. In this case, the instrument cluster
display 

will tell you to intervene

 by ap-

plying the brake, and an audio warning will
be played.

Radar sensors

The ACC uses the front radar technology. Read
its maintenance instructions and information
about its limitations 

››› 

page 135

.

CarManuals2.com

Assistant systems

143

ACC - Adaptive Cruise Control

1

2

WARNING

The ACC’s technology cannot overcome the
system's inherent limitations or change the
laws of physics. If used negligently or invol-
untarily, it may cause serious accidents and
injuries. The system is not a replacement for
driver awareness.

Always be prepared to brake or accelerate.

If you press the accelerator pedal the ACC

will stop working. Therefore, it will not brake
or request any braking intervention.

Adapt your speed and safe distance to the

vehicle in front of you at all times to suit visi-
bility, weather, road and traffic conditions.

Do not use the ACC in poor visibility, or on

roads that are steep, with lots of curves or
slippery.

Never use ACC when driving off-road or on

unpaved roads.

The system does not react in time to sta-

tionary obstacles (such as a traffic jam
queue). React soon enough to avoid a haz-
ardous situation.

The system does not react to people, an-

imals or vehicles that are crossing or ap-
proaching in the opposite direction.

If you are driving with a spare wheel fitted,

the ACC system could automatically switch
off. Switch off the system when starting off.

Brake immediately if the ACC does not

slow down enough.

Brake immediately when a driver interven-

tion instruction is displayed on the instru-
ment cluster screen.

If the vehicle continues to move involuntar-

ily after a driver intervention prompt, brake
the vehicle.

Note

If the ACC does not work as described in
this chapter, do not use it until it has been
checked by a specialised workshop. Visiting
a SEAT dealership is recommended.

ACC operation

Fig. 103 

On the instrument panel display: ACC

active.

Fig. 104 

On the multifunction steering wheel:

buttons for operating the ACC.

››› 

Fig. 103

Vehicle ahead detected. It will light up if the
distance to the vehicle is adjusted.
Selected distance level 2.

This information can be displayed on the cen-
tral panel of the 

Assistants

 view, or in the left

hand information profile 

››› 

page 16

. If these

views are not selected, it will be automatically
displayed in the lower central part of the instru-
ment cluster in a simplified manner.
The set speed will be displayed next to the
function status indicator.

Connecting

Press the   button on the multifunction

steering wheel 

››› 

Fig. 104

.

The ACC does not regulate anything yet
(standby).

CarManuals2.com

144

Assistant systems

Start regulation

Activating the ACC system also automatically
activates the ESC and traction control (TCS).

To start regulation, press the button 


››› 

Fig. 104

.

The ACC sets the current speed, or the closest
speed within the valid range (30-210 km/h), as
the cruise speed.

Vehicles with automatic transmission:

 the gear

lever must be in the 

D

S

 or 

M

.

With manual transmission:

 the gear lever must

be in any gear except first and reverse, and the
speed must be higher than approximately 30
km/h (18 mph).
Depending on the driving situation, the follow-
ing indicator lamps come on:

Lights up green

ACC connected, no vehicle detected in
front.

Lights up green

ACC connected, vehicle detected in
front.

When the ACC is in standby, the indicator
lamps light up grey.

Setting speed

To program the speed, press the   or   

››› 

Fig. 104

 buttons to the desired speed. The

speed is adjusted at intervals of 10 km/h (5
mph).

While the ACC is active, you can press the 
button to increase the desired speed by 1 km/h
(1 mph). You can then press 

 to decrease it

by 1 km/h (1 mph).

Setting your distance level

The distance can be set to one of five levels,
from very short to very long:

Press the button   and then the button   or   

››› 

Fig. 104

.

Alternatively, press the button   as many

times as necessary to set the desired distance.
Keep in mind each country’s regulations on
minimum braking distances.

Suspend regulation (standby)

Briefly press the button   

››› 

Fig. 104

 or

press the brake pedal.
The ACC indicator lamp is grey; the speed and
distance are saved.
If the ESC or TCS is switched off, the ACC is
automatically interrupted.

Reinstating the cruise control

Press the 

 button. The ACC regulates to

the last speed and distance setting.

OR

: Press the button 

 to regulate to the

current speed.

Switching off

Press and hold the button  . The set speed is

cleared.

Exceeding the speed regulated by the ACC

While driving with the ACC switched on, the
driver can increase speed by pressing the ac-
celerator pedal. ACC regulation is suspended
until you release the accelerator pedal 

››› 

.

Set the default distance setting

In the Infotainment system, you can pre-select
the distance level when connecting the ACC
from:

Very short, Short, Medium, Long and Very long

using the Infotainment system: 

 Driver assis-

tance > ACC


››› 

page 36

.

Changing the driving profile

In vehicles with the SEAT Drive Profile

, the se-

lected driving profile can have an influence on
the ACC’s acceleration and braking behaviour 

››› 

page 128

.

In vehicles without SEAT Drive Profile

, the be-

haviour of the ACC can also be affected if any
of the following drive profiles are selected in
the infotainment system in 

Drive assist

. ACC

settings will be the same as those in the SEAT
Drive Profile.

CarManuals2.com

Assistant systems

145

ACC - Adaptive Cruise Control

1)

Or on the left, in countries that drive on the left hand side of the road.

WARNING

Before driving off, check that the road is
clear. The radar sensor may not detect ob-
stacles on the road. This could cause an ac-
cident and serious injuries. If necessary, ap-
ply the brake.

NOTICE

If you increase speed using the accelerator
pedal, the ACC may not be able to safely
adjust the speed of the distance due to the
limitations of the system.

Be prepared to react if required by the sit-

uation.

Special driving situations

Fig. 105 

On the instrument panel display: ACC

active, vehicle detected on the left.

Be aware of the limitations and warnings
described at the beginning of this chapter 

››› 

page 142, 

Introduction

.

Avoid undertaking on the right

1)

If a vehicle is detected in the left lane that is
travelling at a speed slower than that set by the
driver, it will brake the vehicle within the comfort
limits of the system to avoid passing it on the
right 

››› 

Fig. 105

.

You can cancel this regulation by changing the
set speed or by pressing the accelerator pedal.
The function works at speeds over 80 km/h
(50 mph). It may not be available in certain
countries.

Overtaking

When the turn signal is switched on for over-
taking, the ACC reduces the distance from the
vehicle in front to help with the overtaking ma-
noeuvre. The set cruising speed will not be ex-
ceeded.
The function works at speeds over 80 km/h
(50 mph). It may not be available in certain
countries.

Stop&Go function

Valid for vehicles with an automatic gearbox

The ACC can bring the vehicle to a standstill (0
km/h) if the vehicle in front stops.

The ACC remains active and the message 

ACC

ready to start

 is displayed on the instru-

ment cluster for a few seconds. During this time,
the vehicle will move off again if the vehicle in
front moves forwards.
If the vehicle in front does not move off, the ve-
hicle can be kept at a standstill with the status

ACC ready to start

 by pressing the brake.

The system can only keep the car stopped for
a few seconds. After this, the 

Brake

 warning

will be displayed and an audio warning will be
played. Press the brake pedal. The vehicle may
start moving forward if you do not do this 

Acci-

dent hazard!

The ACC is deactivated while stopped in the
following cases:

 If the vehicle stops for several minutes.

If a door is opened.

WARNING

If the message 

ACC ready to start

 is

displayed on the instrument cluster display
and the vehicle in front moves off, your vehi-
cle will move off automatically. In this case,
any obstacles in the road may not be detec-
ted. This may cause serious accidents and
injuries.

Always check the road before moving off,

and apply the vehicle brakes yourself if nec-
essary.

CarManuals2.com

146

Assistant systems

ACC system limitations

Fig. 106 

 Vehicle on a bend.   Motorcyclist

ahead, out of range of the radar sensor.

Fig. 107 

   Vehicle changing lanes.   One

vehicle turning and another stationary.

The limits of the ACC system mean that it is not
appropriate in all situations.
SEAT does not recommend using the function in
the following cases 

››› 

:

Heavy rain, snow or fog.

When going through tunnels.

In sections with roadworks.

On routes with curves, e.g. on mountain roads.

On off-road routes.

In covered car parks.

On roads with embedded metal objects such

as train or tram tracks.

On roads with loose gravel.

Pay special attention when using ACC in the
following situations:

On curves

The ACC may not detect the vehicle in front
on a curve, or may regulate the distance from
vehicles in other lanes 

››› 

Fig. 106

  .

Vehicles outside the sensor zone

In the following situations the ACC may not re-
act, or may react slowly or inappropriately:

Vehicles that are not aligned while driving or

that are outside the sensor's detection area,
such as motorcycles 

››› 

Fig. 106

  .

Vehicles that move into your lane, a short dis-

tance from your vehicle 

››› 

Fig. 107

  .

Vehicles with loads or accessories that pro-

trude from the sides, rear or roof.

Objects that are not detected

The ACC function only detects and reacts to
vehicles moving in the same direction. There-
fore it does not detect:

People

Animals

Vehicles travelling in the opposite direction or

crossing the road.

Other stationary obstacles

CarManuals2.com

Assistant systems

147

emergency brake assistance system (Front Assist)

The ACC does not react to stationary vehicles.
If, for example, a vehicle detected by the ACC
turns or moves over and there is a stationary
vehicle in front of it, the ACC will not react to
the second vehicle 

››› 

Fig. 107

  .

WARNING

Using the ACC in the above situations can
cause serious accidents and injuries, and
you could break the law.

Troubleshooting

ACC not available

The indicator lamp lights up yellow:

The radar sensor is dirty or adjusted in-

correctly. Take into account the warnings
described at the beginning of this chapter 

››› 

page 136

There is a fault or a defect. Turn off the vehi-

cle's ignition and turn it on again after a few
minutes.

If the problem persists, consult a specialised

workshop.

The ACC does not work as expected

Make sure that the conditions are met for the

radar sensor to operate properly 

››› 

page 136

.

If the brakes overheat, regulation stops au-

tomatically. Wait for them to cool down and
check the operation again.

Unusual noises during automatic ACC brak-

ing are normal and do not indicate any anoma-
lies.

The following conditions may lead the ACC
not to react:

The accelerator or brake is depressed.

No gear is engaged or the vehicle is in gear 

R

.

The vehicle is reversing.

ESC is operating.

The driver is not wearing his/her seat belt.

The RPM is too high or too low.

A vehicle brake light is faulty.

A trailer brake light is faulty.

The parking brake is applied.

Driving on an excessive slope.

emergency brake assis-
tance system (Front Assist)

Introduction

The objective of the system is to prevent head-
on collisions against objects that may be in the
vehicle’s path or minimise the consequences of
such impacts.
The function is designed to avoid collisions
against:

Parked vehicles.

Vehicles, pedestrians and cyclists that are

travelling in the same lane and direction.

Pedestrians and cyclists who transversely

cross the vehicle path.
Front Assist detects the aforementioned objects
using a radar sensor at the front of the vehicle 

››› 

page 136

.

Depending on several factors and how critical
the situation is, the system operates in a stag-
gered manner.
First informing the driver, and if there is no or
insufficient reaction, then activating an autono-
mous emergency braking as indicated by the
conditions that will be discussed in the follow-
ing points.
The system operation can be cancelled if the
clutch pedal is pressed or the steering wheel is
turned firmly.

CarManuals2.com

148

Assistant systems

WARNING

Front Assist is a driving assistance function

that can never replace the driver’s attention.

Front Assist cannot change the laws of

physics or replace the driver in terms of
keeping control of the vehicle and reacting
to a possible emergency situation.

Following a Front Assist emergency warn-

ing, pay immediate attention to the situation
and try to avoid the collision where appropri-
ate.

Always adapt your speed and distance

away from the vehicle in front of you at
all times to suit visibility, weather, road and
traffic conditions.

The Front Assist alone cannot avoid acci-

dents and serious injuries.

The Front Assist does not react to animals

or vehicles crossing your path or approach-
ing head-on down the same lane.

The Front Assist does not react to pedes-

trians walking head-on in the same lane.

 If the Front Assist does not work as descri-

bed in this chapter (e.g. it repeatedly inter-
venes unnecessarily), switch it off. Have the
system checked by a specialised workshop.
SEAT recommends visiting a SEAT dealer-
ship.

Note

When Front Assist is connected, the indica-
tions of other functions on the screen may be
hidden.

Warning levels and brake assist

Fig. 108 

On the instrument panel display:

advance warning indications.

Front Assist is active from 5 km/h (3 mph). De-
pending on different conditions (vehicle speed,
speed and type of object recognised, etc.),
some of the stages described below are omit-
ted to optimise the performance of the system.

Safety distance warning

If the system detects that you are driving too
close to the vehicle in front, it will warn the
driver with this indication on the instrument
panel display 

.

The timing of the warning varies depending
on driver behaviour, vehicle speed and relative
speed between both.

Advance warning

If the system detects a possible collision with
the vehicle in front, it alerts the driver by means
of an audible warning and an indication on the
instrument panel display   

››› 

Fig. 108

.

The warning moment varies depending on the
traffic situation and driver behaviour. At the
same time, the vehicle will prepare for a possi-
ble emergency braking 

››› 

page 149

.

When Front Assist is connected, the indications
of other functions on the screen may be hidden.

Critical warning

If the driver fails to react to the 

advance warn-

ing

, the system may actively intervene in the

brakes and generate a brief jolt to warn the
driver of the imminent danger of a collision.

Automatic braking

If the driver also fails to react to the 

critical

warning

, the system may initiate independent

emergency braking by progressively increasing
the braking in accordance with the criticality of
the situation.

CarManuals2.com

Assistant systems

149

emergency brake assistance system (Front Assist)

Driver emergency braking assistance sys-
tem

If the driver, after the critical warning, starts
braking but the system detects that the brake
is not being applied with sufficient force, the
braking intensity will be increased.

WARNING

The system cannot prevent a collision, al-

though it can significantly minimise the con-
sequences by reducing the speed and the
force of the impact.

When the Front Assist causes a braking, the

brake pedal is “harder”.

Automatic interventions by the Front Assist

on the brakes may be interrupted by pressing
the clutch, accelerator or moving the wheel.

The Front Assist may brake the vehicle until

it stops completely. However, the brake sys-
tem does not halt the vehicle permanently.
Use the foot brake!

System limitations

Fig. 109 

On the instrument cluster screen:

indication of the system’s initial self-calibration.

Front Assist has certain limitations inherent to
the system. Thus, in certain circumstances,
some of the reactions may be inappropriate
from the driver's standpoint. So pay attention
in order to intervene if necessary.

The following conditions may cause the
Front Assist not to react or to do so too late:

In the first few instants of driving after switch-

ing on the ignition, due to the system’s initial
auto-calibration. During this period, a status
icon 

››› 

Fig. 109

 is displayed.

Unrecognised objects

Loads and accessories of other vehicles that

protrude over the sides, backwards or over the
top.

If there are metal objects, e.g. guard rails or

sheets used in road works.

Other vehicles crossing the vehicle’s path.

Misaligned vehicles.

Narrow vehicles such as motorcycles.

Vehicles approaching in the opposite direc-

tion.

Operating limitations

If the radar sensor is disabled or faulty.

If the radar sensor is dirty or covered.

On taking tight bends or complex paths.

When pressing the accelerator firmly or at full

throttle.

If the TCS has been disconnected or the ESC

is activated in 

Sport

 mode 

››› 

page 133

.

If the ESC is adjusting or is broken.

If several brake lights of the vehicle or electri-

cally connected trailer are damaged.

If the vehicle is reversing.

In case of snow or heavy rain.

In complex driving situations (such as traffic

islands, cut-through roundabouts, etc), Front
Assist may issue warnings and intervene in
braking in an unnecessary manner.

CarManuals2.com

150

Assistant systems

For more details, see section 

››› 

page 135

.

Manual activation and deactivation
of the function

Fig. 110 

On the screen of the instrument panel

Front Assist switched off message.

The Front Assist is active whenever the ignition
is switched on.
When the Front Assist is disabled, so too are
the advance warning and the distance warning
functions. SEAT recommends leaving the Front
Assist activated except in the situations presen-
ted in 

››› 

page 150

.

Switching the Front Assist on and off

With the ignition switched on, the Front Assist
can be deactivated or activated as follows:

In the infotainment system: press the function

button 

 Driver assistance > Front Assist 

››› 

page 36

.

OR:

 Select the corresponding menu option

using the button for the assistants systems 

››› 

page 135

.

When Front Assist is deactivated, the indication

 will be displayed on the instrument cluster.

Each time the ignition is switched on, the Front
Assist will reappear as active.

Activating or deactivating the pre-warning
(advance warning)

The 

advance warning

 can be activated or de-

activated in the infotainment system using the
function button 

Driver assistance > Front

Assist


››› 

page 36

.

The system will store the setting for the next
time the ignition is switched on.
SEAT recommends keeping advance warning
active.
Depending on the vehicle’s infotainment system
the 

advance warning

 function may be adap-

ted in the following modes:

Advance

Medium

Delayed

Deactivated

SEAT recommends driving with the function in
“Medium” mode.

Switching distance warning on and off

The distance warning can be activated or de-
activated in the infotainment system using the
function button 

 Driver assistance > Front

Assist


››› 

page 36

.

The system will store the setting for the next
time the ignition is switched on.
SEAT recommends keeping the distance warn-
ing active.

Deactivating Front Assist temporarily in the
following situations

In the following situations the Front Assist should
be deactivated due to the system's limitations:

When the vehicle is to be towed.

If the vehicle is on a test bed.

When the radar sensor is damaged.

If the radar sensor receives a violent impact.

If it intervenes several times unnecessarily.

If the radar sensor is temporarily covered by

an accessory.

When the vehicle is going to be loaded onto

transportation.

CarManuals2.com

Assistant systems

151

Lane Assist system

Lane Assist system

Introduction

The Lane Assist System helps the driver stay
in his/her lane within the physical limits of the
system. This function is not suitable and is not
designed to keep the vehicle automatically in
the lane.
Using the camera located in the windscreen,
the Lane Assist system detects the lane boun-
daries dividing the lanes in which the vehicle
is travelling. If the vehicle gets too close to
the detected lane limits, the system alerts the
driver through a corrective motion of the steer-
ing wheel. The driver can cancel the steering
corrective action at any time.
No warning is produced with the turn signals
activated, given that the Lane Assist system un-
derstands that a lane change is required.

System limits

Use the Lane Assist system only on large, well-
maintained motorways and highways.
The system is not available under the following
conditions:

The driving speed allowed is below approx.

55 km/h (30 mph).

The system has not detected any lane lines.

On tight bends.

Temporarily in very sporty driving situations.

If the turn signal is switched on before a man-

ual lane change.

If the driver firmly rectifies a system interven-

tion.

If a lane marking is crossed despite system

intervention.

If the driver does not react to a request to

intervene.

WARNING

The intelligent technology in the Lane Assist
system cannot change the limits imposed by
the laws of physics and by the very nature of
the system. Careless or uncontrolled use of
the Lane Assist system may cause accidents
and injury. The system is not a replacement
for driver awareness or manoeuvres when
driving.

Always adapt your speed and the distance

to the vehicles ahead in line with visibility,
weather conditions, the condition of the road
and the traffic situation.

Always keep your hands on the steering

wheel so it can be turned at any time. The
responsibility of staying in the lane is always
the driver's.

The Lane Assist system does not detect

all road markings. The road surfaces, road
structures or objects in poor condition can
be incorrectly detected as road markings un-
der certain circumstances by the Lane Assist
system. Immediately counter any unwanted
intervention of the system.

Please observe the indications on the in-

strument panel and act as is necessary if the
traffic situation permits.

In the following situations there may be

undesired interventions of the system or it
may be that the system does not intervene
at all. In these situations, special attention is
required from the driver and, where appropri-
ate, the temporary deactivation of the lane
assist warning system:

In very sporty driving situations.

In adverse weather conditions and roads

in poor condition.

When passing through areas undergoing

works.

Before gradient changes of grade and

river beds.

Always observe the vehicle surroundings

carefully and drive proactively.

When the area of vision of the camera

becomes dirty, covered or is damaged, the
Lane Assist system function can be affected.

CarManuals2.com

152

Assistant systems

1

2

Driving with the Lane Assist System

Fig. 111 

On the instrument cluster screen:

indications of the lane assist system.

Yellow line: The system intervenes assisting
on the represented side.
White line: Lane line detected. The system
does not intervene.

Control lamps

Lights up green

Lane Assist system active and availa-
ble.

Lights up yellow

The Lane Assist system intervening
with a rectification of the steering.

Switching the lane assist system on or off

In some countries, the Lane Assist System is al-
ways activated when the ignition is switched on.
The connection status is shown in the 

Driver

assistance

 menu of the Infotainment system or

the driver assistance systems menu after press-
ing the corresponding button. These menus can
be used to activate and deactivate the system.
The Lane Assist system is designed to actively
intervene as of approximately 60 km/h (35
mph) and if it has detected the lane boundaries
(system status: active).
If the control lamp of the instrument cluster dis-
play is off, it means that the system is connec-
ted but not ready to intervene or it is disconnec-
ted.
When you activate a turn signal, the system
temporarily goes into a passive state in order to
allow manual lane change.
An energetic rotation or rectification of the
steering wheel by the driver causes the system
to temporarily switch to a passive state.

Driver intervention prompt

If the steering is not corrected manually, the
system prompts the driver through an indication
on the instrument panel display and acoustic
warnings.
If no reaction is obtained from the driver, the
system switches to a passive state.
Regardless of the steering manoeuvres,
through an indication on the instrument panel
display and acoustic warnings, the driver is also
prompted to drive through the centre of the
lane if the steering correction lasts more than
reasonable.

Steering wheel vibration

The following situations may result in a steering
wheel vibration:

The lane ceases to be recognised during a

sudden intervention in the direction of the sys-
tem.
It is also possible to select steering wheel vibra-
tion in the 

Assistants

 menu of the infotainment

system. In this case, when a vehicle with Lane
Assist switched on crosses over a detected lane
marking, the steering wheel will vibrate.

Note

If the lane departure warning assistant is
faulty, it may switch off automatically.

Troubleshooting

 Lane Assist is not available

The control lamp switches on yellow. A relevant
warning is also displayed on the instrument
panel screen.

The field of vision of the camera is dirty.

Clean the windscreen 

››› 

page 304

.

The visibility of the camera is diminished due

to accessories or adhesives.

There is a fault or a defect. Switch the engine

off and on again.

CarManuals2.com

Assistant systems

153

Driving Assist (Travel Assist)

The system behaves differently than expec-
ted

The camera has been altered or damaged,

e.g. because of damage caused to the wind-
screen. Check for visible damage.

Do not mount objects on the steering wheel.

If the problem persists, consult a specialised
workshop.

Note

After switching on the ignition, it may take a
few seconds before a fault is detected in the
system.

Note

If Lane Assist is unavailable, Travel Assist will
be unavailable as well.

Driving Assist (Travel As-
sist)

Introduction

Travel Assist combines adaptive cruise control
(ACC) and the adaptive lane guidance func-
tion. Within the limitations of the system, the ve-
hicle can maintain a distance from the vehicle
in front that is preselected by the driver and
remain in the preferred position within the lane.

Travel Assist uses the same sensors as Adap-
tive Cruise Control (ACC) and Lane Assist.
Therefore, carefully read the information about
the ACC 

››› 

page 142

 and the Lane Assist 

››› 

page 151

 and take into account the limita-

tions of the systems and the indications given in
the information.

How to know if the vehicle is fitted with
Travel Assist

The vehicle is fitted with Travel Assist if the mul-
tifunction steering wheel has the 

 button.

Speed range

Depending on the type of gear, Travel Assist
regulates from 0 km/h (0 mph). The speed can
be set from 30 km/h (20 mph).

Driving with Travel Assist

Travel Assist automatically controls the accel-
erator pedal, the brakes and the steering. In
addition, Travel Assist may, within its limitations,
decelerate the vehicle until it stops behind an-
other that stops and automatically starts again.
You can override assisted adjustment at all
times.

Status display

Fig. 112 

On the instrument cluster display:

display of active regulation (schematic
representation).

1

The colour of the lane markings indicates
the status of the adaptive lane guidance
function.

Yellow:

 adaptive lane guidance function

active.

Grey:

 passive adaptive lane guidance

function.

2

Distance set.

Depending on the equipment, additional de-
tails, e. g. dashed road markings and vehicles
in front, can also be shown on the instrument
cluster display.
Control lamps indicate the status of the system
on the instrument panel display:

Green lamp: travel Assist active, adaptive
cruise control and adaptive lane guid-
ance function are active.

CarManuals2.com

154

Assistant systems

Partially green lamp: Travel Assist active,
adaptive cruise control active and adap-
tive lane guidance function passive.
Grey lamp: Travel Assist deactivated, not
regulating.

Driver intervention prompt

If you remove your hands from the steering
wheel, after a few seconds the system asks
you to take over the steering with an indication
on the instrument panel display and acoustic
warnings.
If you do not react, Travel Assist is deactivated.

WARNING

The Travel Assist smart technology cannot
overcome the limits imposed by the laws of
physics and it only works within the limits
of the system. If Travel assist is used negli-
gently or involuntarily, it may cause serious
accidents and injuries. The system is not a
replacement for driver awareness.

Bear in mind the system limitations and

the indications regarding the control of the
Adaptive Cruise Control (ACC) and Lane As-
sist.

Adapt your speed and safety distance to

the vehicle in front of you at all times to
suit visibility, weather, road and traffic condi-
tions.

Do not use Travel Assist when visibility is

bad, on steep roads, on windy roads or in
slippery circumstances (e. g., snow, ice, rain
or loose gravel), or on flooded roads.

Do not use Travel Assist offroad or on roads

where the surface is not firm. Travel Assist
has been designed for use on paved roads
only.

Travel Assist does not react to people or

animal or vehicles crossing your path or
which approach you head-on in the same
lane.

Brake immediately if Travel Assist does not

slow down enough.

Brake immediately when instructed to do

so on the instrument cluster display, or if
Travel Assist does not reduce speed suffi-
ciently.

Brake when the vehicle continues to move

forward without it being desired after an indi-
cation to brake.

If possible, do not wear gloves while driv-

ing. The system could interpret this as no
driving activity.

If driver intervention is requested on the in-

strument panel display, immediately resume
control of the vehicle.

Keep your hands on the steering wheel at

all times, to ensure you have control over the
steering at all times. The driver is always re-
sponsible for keeping the vehicle in its own
lane.

Always be prepared to adjust the speed

yourself.

Operating Travel Assist

Fig. 113 

Left side of the multifunction steering

wheel

Switch on and start regulation

1. While driving with ACC activated, press 

on the multifunction steering wheel.
The vehicle switches from ACC to Travel As-
sist.

Depending on the driving situation, the vehicle
switches to the following system statuses in
Travel Assist:

When ACC is regulating, Travel Assist main-

tains the current speed and the preset distance
to the vehicle in front.
When lane markings are detected, the vehicle is
also kept in the lane by steering movements.

If ACC is not regulating, Travel Assist remains

selected but in a passive (unregulated) status.
1. Press the 

 button.

CarManuals2.com

Assistant systems

155

Lane departure warning (Side Assist)

Travel Assist switches to the active system
status, depending on the driving situation.

The indicator lamp for the driving situation
lights up on the instrument cluster display. A
message is also displayed.

Interrupting the adjustment

1. Briefly press the button  .

OR:

 press the brake pedal.

The set distance remains saved.

Switch to ACC

1. Press the 

 button on the multi-function

steering wheel.
The vehicle switches from Travel Assist to
the ACC system status corresponding to
the driving situation.

Making other adjustments

All other aspects of Travel Assist are controlled
like the ACC.

Troubleshooting

Travel Assist is not available or does not

work as expected

The control lamp switches on yellow. A relevant
warning is also displayed on the instrument
panel screen.

There is a fault in the sensors. Check the cau-

ses and solutions described in the information
about the ACC 

››› 

page 147

 or the Lane Assist 

››› 

page 152

.

There is a fault or a defect. Switch the engine

off and on again.

The system limits are exceeded.

If the problem persists, consult a specialised

workshop. SEAT recommends visiting a SEAT
dealership.

 Grip the steering wheel

The warning lamp lights up white, and a mes-
sage is shown on the instrument cluster display.

You released the steering wheel for a few sec-

onds. Take hold of the steering wheel and take
control of the vehicle.

 Grip the steering wheel

The warning lamp lights up red and a mes-
sage is shown on the instrument cluster display.
Depending on the situation, an audio warning
sounds or the steering wheel vibrates.

You have let go of the steering wheel for

a long time, or the system limits have been
reached. Immediately take hold of the steering
wheel and take control of the vehicle.

Travel Assist disconnects automatically

 You have released the steering wheel for a

long period.

There is a fault or a defect. Switch the engine

off and on again.

If the problem persists, consult a specialised

workshop. SEAT recommends visiting a SEAT
dealership.

The adjustment is interrupted unexpectedly

 You have turned on the turn signal.

Lane departure warning
(Side Assist)

Introduction

The lane departure warning uses radar sen-
sors to monitor the areas behind the vehicle 

››› 

page 6

. The system does this by measuring

the vehicle's distance from other vehicles and
its speed differential. The lane departure warn-
ing will not work at speeds of less than approx.
15 km/h (9 mph).

CarManuals2.com

156

Assistant systems

The lane width is not detected individually, but
is rather pre-configured in the system. Thus if
you are driving in wide lanes or in between two
lanes, the indications may be incorrect. Further-
more, the system can detect vehicles driving in
the lane next to you (if there are any), and can
also detect stationary objects such as dividers,
and thus give an incorrect indication.

Trailer mode

Side assist is automatically deactivated and
cannot be switched on if the factory-fitted tow-
bar is electrically connected to a trailer or simi-
lar device.
As soon as the driver starts to drive with a trailer
connected electrically to the vehicle, a mes-
sage is displayed on the instrument panel dis-
play indicating that side assist is switched off.
Once the vehicle trailer has been disengaged,
side assist will return to the initial state prior to
the moment the trailer was electrically connec-
ted.
If the tow-bar is not factory fitted, side assist
should be switched off manually when driving
with a trailer.

Physical limitations inherent to the system

In some situations the lane departure warning
may not interpret the traffic situation correctly.
I.e. in the following situations:

on tight bends;

in the case of lanes with different widths;

in areas with significant gradient changes;

in adverse weather conditions;

in the case of special constructions to the

side of the vehicle, e.g., high or irregular divid-
ers.

WARNING

The smart technology incorporated into Side
Assist cannot overcome the limits imposed
by the laws of physics; it only works within
the limits of the system. Accidents and se-
vere injury may occur if Side Assist is used
negligently or involuntarily. The system is not
a replacement for driver awareness.

Adapt your speed and safe distance to the

vehicle in front of you at all times to suit visi-
bility, weather, road and traffic conditions.

Keep your hands on the wheel at all times

to be ready to intervene in the steering at any
time.

Pay attention to the indicator lamps that

may come on in the external rear view mir-
rors and on the instrument cluster, and follow
any instructions they may give.

The lane departure warning could react

to any special constructions that might be
present to the sides of the vehicle, e.g. high
or irregular dividers. This may cause errone-
ous warnings.

Never use the lane departure warning on

unpaved roads. The lane departure warning
has been designed for use on paved roads.

Always pay attention to the vehicle's sur-

roundings.

The control lamps of the lane departure

warning may have limited functionality due
to solar radiation.

Note

If Side Assist does not work as described in
this chapter, stop using it and contact a spe-
cialised workshop.

CarManuals2.com

Assistant systems

157

Lane departure warning (Side Assist)

Driving with Side Assist

Fig. 114 

Control lamp of the lane departure

warning.

Connecting and disconnecting

Side Assist can be switched on and off by
accessing the 

Assistants

 menu of the infotain-

ment system or through the instrument clus-
ter display using the controls on the steering
wheel. If the vehicle is equipped with a multi-
function camera, it can also be accessed by
means of the assistants systems key located on
the main beam headlight lever.

When the lane departure warning is ready to
operate, the indications in the control lamps will
turn on briefly as confirmation.
When the vehicle is restarted, the last adjust-
ment in the system will remain active.

Indication on the exterior mirror

The control lamp provides an indication on the
corresponding side regarding the traffic situa-
tion behind the vehicle, if it is deemed to be
critical. The control lamp on the left-hand side
indicates the traffic situation to the rear left of
the vehicle, and the control lamp on the right-
hand side indicates the traffic situation to the
rear right of the vehicle .
In the case of retrofitted tinted windows or win-
dows with tinted film, the indications of the ex-
ternal mirrors may not be seen clearly.
Keep the external mirrors clean and free of
snow and ice, and do not cover them with ad-
hesives or other similar materials.

It lights up

It turns on once briefly: the lane departure warning
is activated and ready to operate, i.e. when acti-
vating the system.

It lights up continuously: the lane departure warn-
ing has detected a vehicle in the blind spot.

Flashes

A vehicle has been detected in the adjacent lane
and the turn signal has been engaged in the direc-
tion of the detected vehicle.

For vehicles that are also equipped with Lane As-
sist 

››› 

page 151

, a warning to switch lanes will

also appear even though the turn signal has not
been engaged (Lane Assist “Plus”).

The control lamps light up when the ignition is
switched on and should turn off after approxi-
mately 2 seconds. This is the time taken for the
function check.
If there are no indications from the control lamp
of the lane departure warning, this means that
the lane departure warning has not detected
any other vehicles at the rear area.
When the exterior lighting is low, the intensity
with which the control lamps come on is dim-
med. The user can modify the intensity of the
control lamps with up to 5 levels in the infotain-
ment system menu.

Lane assist Plus.

The Lane Assist Plus function can be used by
activating the 

Lane Assist


››› 

page 151

 and

Side Assist

 functions. In this case its functions

are expanded as described below.
If the driver initiates a lane change manoeuvre
in a potential critical situation:

CarManuals2.com

158

Assistant systems

The lamp flashes in the corresponding rear-

view mirror even though the turn signal has not
been activated.

The steering wheel vibrates to warn the driver

of the risk of collision.

torque is applied to correct the steering and

return the vehicle to its lane.

Driving situations

Fig. 115 

Schematic diagram:   Overtaking

with traffic behind the vehicle.   Side Assist
indication on the left hand side.

Fig. 116 

Schematic diagram:   Overtaking in

the central lane and then joining the right lane.

 Side Assist indication on the right hand side.

In the following situations, an indication will be
displayed in the control lamp 

››› 

Fig. 115

   (ar-

row) or 

››› 

Fig. 116

   (arrow):

When being overtaken by another vehicle 

››› 

Fig. 115

  .

When passing another vehicle 

››› 

Fig. 116


with a speed differential of approx. 10 km/h (6
mph). If the vehicle is passing at a considerably
higher speed, no indication will be displayed.

The faster the vehicle approaches, the sooner
an indication will be displayed in the control
lamp, because the lane departure warning
takes into account the speed differential with
other vehicles. Thus even though the distance
from the other vehicle is identical, the indication
will appear sooner in some cases and later in
others.

CarManuals2.com

Parking and manoeuvring

159

Park the vehicle

Parking and manoeu-
vring

Park the vehicle

Parking

When parking your vehicle, all legal require-
ments should be observed.

1. Apply the handbrake
2.

Automatic transmission:

 move the selector

lever to position 

P

.

3. Stop the engine and turn off the ignition.

Turn the steering wheel slightly to engage
the steering lock.

4.

Manual gearbox:

 engage first gear on flat

ground and slopes, or even reverse gear on
hills, and release the clutch pedal.

5. On slopes, turn the steering wheel so that if

the parked vehicle were to start moving, it
would steer toward the kerb.

6. Exit the vehicle 

››› 

. Watch out for other

road users!

7. Take all vehicle keys with you and lock it.

To avoid damage or hazardous situations, al-
ways park the vehicle on a suitable parking sur-
face 

››› 

.

WARNING

If the vehicle is parked incorrectly, it could
roll away, even on gentle slopes. This can
cause accidents and serious injuries.

 When parking, always carry out the opera-

tions in the stipulated order.

Before leaving the vehicle, make sure that

the electronic parking brake is engaged.

WARNING

If children, people who may need assistance
or animals are left unattended in the vehicle,
accidents and serious injuries can occur.

Never leave children, people who may

need assistance or animals unattended in
the vehicle. They could operate the gear
selector and release the electronic parking
brake. The vehicle could be set in motion.

Never leave children, people who may

need assistance, or animals in the vehicle.
Depending on the season, very high or low
temperatures can be reached inside a closed
vehicle.

Always take all vehicle keys with you when

leaving the vehicle.

NOTICE

The presence of irregularities on the ground,
sand or mud can cause damage to the vehi-
cle and mean that it cannot be parked prop-
erly.

Always park the vehicle on firm and flat

ground.

NOTICE

Components on the underside of the vehicle,
such as bumpers, spoilers and running gear
components, can be damaged when running
over objects protruding from the ground.

Drive carefully when entering buildings, on

ramps, driving over kerbs or fixed markings,
and on descents.

NOTICE

Avoid parking the vehicle where the hot ex-
haust system could ignite inflammable mate-
rials, such as dry grass, low bushes, spilt fuel
or flammable materials.

NOTICE

In vehicles with automatic transmission, the
key can only be removed from the ignition
when the lever is in position P.

CarManuals2.com

160

Parking and manoeuvring

Handbrake

Apply the handbrake

Fig. 117 

Handbrake between the front seats.

The handbrake should be applied firmly to pre-
vent the vehicle from accidentally moving. Ap-
ply the handbrake when you leave your vehicle
and when you park.

When the handbrake is on, the red indica-
tor lamp on the instrument cluster lights
up.

Applying the handbrake

 Pull the handbrake lever up 

››› 

Fig. 117

.

Releasing the handbrake

 Pull the lever slightly up, press the unlock

button in the direction of the arro

››› 

Fig. 117

and lower the lever completely 

››› 

.

Always pull the handbrake all the way up, to
avoid driving off while the brake is on 

››› 

.

WARNING

 Never use the handbrake to stop the vehi-

cle when it is in motion. The braking distance
is considerably longer, because braking is
only applied to the rear wheels. Accident
hazard!

Failure to fully lower the handbrake lever

can affect the operation of the system, and
can also cause heating and wear of the rear
brakes.

NOTICE

Always apply the handbrake before you
leave the vehicle. In addition, engage first or
rear gear in the gradient function, or set the
selection lever to P.

General information on
parking systems

Automatic brake operation

The automatic braking feature of a parking sys-
tem is used to reduce the danger of collision
when an obstacle is detected during a parking
manoeuvre.

Braking functions

Depending on the equipment, the following
systems are available:

Park assist plus manoeuvre braking function 

››› 

page 162

.

Rear cross traffic alert emergency brake

function 

››› 

page 175

.

Assisted parking assistant emergency brake

function 

››› 

page 167

.

Requirements

The vehicle is moving between approx.

3 km/h and 8 km/h when manoeuvring

A parking system is switched on.

The brakes are not automatically operated
when park assist is switched on automatically
while moving forward.

What happens in the event of automatic
braking?

If there is an obstacle, the system brakes the
vehicle to a standstill and keeps it stationary for
approx. 2 seconds.

 Press the brake!

Activate

Automatic braking is activated when the

driver switches a parking system on.

CarManuals2.com

Parking and manoeuvring

161

General information on parking systems

Deactivating

The automatic brake operation function de-

activates when a park assist system is switched
off.

OR:

 to temporarily deactivate the manoeuvre

braking function, press the   function button
on the park assist screen and change the set-
ting.

WARNING

Never allow the automatic braking opera-
tions of park assist systems to lead you to
take any risk that compromises safety. In
certain situations, the automatic braking in-
tervention may only work in a limited way
or not work at all. Collisions with obstacles
can injure people and damage the vehicle.
The system is not a replacement for driver
awareness.

Pay attention and do not rely solely on

park assist systems.

 Always be prepared to brake and control

the steering yourself.

Do not take any risks that compromise

safety.

Act in accordance with the warnings and

driving recommendations of the parking sys-
tems.

Note

Switch off the parking system if the auto-

matic brakes operate excessively, e.g. when
driving off-road.

After the park assist’s manoeuvre braking

function has braked the vehicle, driving in the
same direction for 5 metres is deactivated,
and becomes active again after changing
gear or changing the position of the gear se-
lector.

Troubleshooting

The parking system behaves differently than
expected

There can be several causes:

The system requirements are not met.

The sensors or the camera are dirty or have

ice on them 

››› 

page 305

.

The camera lens is not clean and the camera

image is not clear 

››› 

page 305

.

Some noise sources, such as a jackhammer

or a cobblestone surface can interfere with the
ultrasound signal.

The vehicle has some type of damage in the

sensor or camera area, e.g. due to a parking
impact.

 The sensor detection zone or field of view of

the camera are blocked by an accessory, e.g. a
bike rack.

Changes have been made to the paintwork

or structural modifications in the sensor or
camera area, e.g. at the front of the vehicle or
to the running gear.
Also take into account the messages displayed
on the infotainment system screen.

Sensor or camera without visibility, or the
parking system has been switched off

If a sensor fails, that sensor zone is permanently
switched off. The affected sensor zone may be
displayed on the infotainment system with a 
symbol and a greyed-out graphic segment. If
necessary, the parking system switches off the
affected zone.
If the park assist is not working properly, a con-
tinuous audio signal sounds for a few seconds
when it is switched on. If applicable, a message
to this effect is displayed on the instrument
cluster screen

Check if one of the causes indicated above

has occurred.

Once the source of the problem has been

eliminated, the system may be reconnected.

If the problem persists, consult a specialised

workshop.

CarManuals2.com

162

Parking and manoeuvring

A

B

C

Parking aid Plus

Description

Fig. 118 

 Parking aid view on the Infotainment

system display.

Parking aid plus

 assists the driver by giving

visual and audio warnings about obstacles de-
tected in front of and behind the vehicle.
The bumpers are fitted with sensors. When
an obstacle is detected, it is indicated by au-
dible signals and in the Infotainment system 

››› 

Fig. 118

.

When moving close to an obstacle, it is possible
to know if the obstacle is in front of the vehicle
or behind it according to the sound frequency.

The approximate measurement range of the
sensors is:

1.20 m
1.60 m

0.90 m

As you approach the obstacle, the frequency of
the audible signals will increase. The signal will
sound continuously at around 0.30 m: Stop the
vehicle!
If the separation is maintained, the warning vol-
ume is reduced after about 4 seconds.

In order to view the entire periphery of the vehi-
cle, the vehicle must be moved a few metres
forwards or backwards. Therefore, the missing
areas are screened and obstacles at the sides
of the vehicle are displayed 

››› 

Fig. 118


C

.

Special features of ParkPilot with Area View

In the following situations the screened area on
the side of the vehicle is automatically hidden:

 When a vehicle door is opened.

When the TCS is switched off.

When there is TCS or ESC regulation.

If the vehicle remains stationary for more than

approximately 3 minutes.

Error messages

If a an error or fault message is displayed on
the instrument cluster in Park Assist, there is a
fault.
If the fault doesn't disappear before discon-
necting the ignition, it will not be indicated next
time the parking aid is connected.

If a rear sensor is faulty, only the obstacles in
the front area are detected. If a front sensor is
faulty, only the obstacles in the rear area are
displayed. The symbol   is displayed.
We recommend taking the vehicle to a special-
ised workshop to have the fault repaired.

Trailer mode

Fig. 119 

Parking assist display on the screen

with trailer attached.

On vehicles with a factory-fitted trailer hitch,
when the trailer is connected, the rear sensors
will not activate when reverse gear is engaged
or button   is pressed. Therefore, any objects
behind or to the side of the vehicle will not be
indicated on the screen and no audio signals
will sound.
The screen will only display objects detected
at the front, and the vehicle's trajectory will be
hidden.

CarManuals2.com

Parking and manoeuvring

163

Parking aid Plus

Parking assist settings

The audio indications and signals are set in the
infotainment system 

››› 

page 36

:

Automatic activation:

 On/off

Front volume:

 Volume in the front and rear

area.


Rear volume:

 Volume in the rear area.

 Reduce volume:

 When the parking aid is

switched on, the volume of the audio source will
be reduced, depending on the selected option.

 Front sound settings/treble:

 Sound

tone in the front area.


Rear sound settings/treble:

 Sound

tone in the rear area.

WARNING

Always pay attention, by looking directly,

to traffic and the area around the vehicle. As-
sistance systems are not a replacement for
driver awareness. Responsibility always lies
with the driver.

The sensors have blind spots in which ob-

stacles and people are not detected. Pay
special attention to children and animals.

Always keep visual control of the surround-

ings: use the mirrors for additional help.

NOTICE

Park assist plus functions can be affected by
various factors which may cause damage:

Under certain circumstances, the system

does not detect or display certain objects:

Chains, trailer draw bars, bars, fences,

posts and thin trees.

Objects that are located above the sen-

sors, such as protrusions in a wall.

Objects with certain surfaces or struc-

tures, such as wire mesh fences or powder
snow.

Certain surfaces of objects and garments

do not reflect the ultrasound sensors' sig-
nals. The system cannot detect these ob-
jects or people wearing such clothes cor-
rectly.

Sensor signals may be affected by exter-

nal sound sources. This may prevent them
from detecting people or objects.

If the system warns you of the proximity

of a low obstacle, please note that after be-
ing detected by the system, the obstacle in
question may disappear from the measure-
ment sensors as the vehicle moves closer,
and the system will no longer warn of its
presence. In certain circumstances, objects
such as high kerbs that could damage the
underside of the vehicle are not detected.

If the parking distance warning system is

ignored, the vehicle could suffer considera-
ble damage.

Damage to the radiator grille, bumper,

wheel arch and vehicle underbody can mod-
ify the orientation of the sensors. This can
affect the parking aid function.
Have the function checked by a specialised
workshop.

A number plate or number plate holder

with dimensions that exceed the space for
the number plate, or a cured or deformed
number plate can cause false detections or a
loss of visibility for the sensors.

Note

 The display on the Infotainment system

screen shows a slight time delay.

In certain situations, the system can give a

warning even though there is no obstacle in
the detected area:

Rough or cobbled surfaces or surfaces

with long grass.

External ultrasound sources, such as

other vehicles equipped with ultrasound
systems.

Heavy rain or snow, hail or dense exhaust

gases.

If the number plate is not properly se-

cured to the surface of the bumper.

Gradient changes.

In order to guarantee good operation, keep

the sensors clean, free of snow and ice, and
do not cover them with stickers or other ob-
jects.

CarManuals2.com

164

Parking and manoeuvring

If you use high-pressure or vapour equip-

ment for cleaning, do not apply it directly,
unless you do so very briefly, and always
keep a distance of more than 10 cm away.

Fitting certain accessories to the front of

the vehicle, such as a plate holder with ad-
vertising, may interfere with the operation of
the Park Assist.

We recommend that you practice parking

in an area without traffic.

 The volume and tone of the signals and

indications can be changed.

Please observe information on towing a

trailer.

Note

In vehicles without an infotainment system,
these parameters can be modified in a SEAT
Official Service or in a specialised workshop.

Operating Park Assist Plus

Fig. 120 

Centre console: parking aid button

(depending on the version).

Switching on and off manually

Press the   button once.

Automatic activation

Select reverse gear.

EITHER:

 if you drive forward at a speed of less

than 15 km/h (9 mph) and an obstacle is en-
countered, it is detected when it is approx. less
than 95 cm. away. If the automatic connection
is activated, a reduced view is shown.

OR:

 if the vehicle moves backwards.

When the 

Plus Parking Aid

 connects automat-

ically, a diagram of the vehicle and the seg-
ments will appear on screen.
It only operates every time the speed drops be-
low 15 km/h (9 mph) for the first time.

Automatic activation of park assist can be
switched on and off in the infotainment system:

Switch the ignition on.

In the infotainment system, select 

 > Set-

tings > Parking and manoeuvring

.

Check the 

Automatic activation

 box.

OR

, in the parking assistance function, select

Settings > Automatic activation

.

If activated automatically, an audible sound
warning will only be given when obstacles in
front are at a distance of less than 50 cm. ap-
prox.
If it is switched off using the   button, one of
the following actions must be taken for it to re-
activate automatically:

Switch off the ignition and switch it on again.

EITHER:

drive forward at over approx. 15 km/h

(9 mph).

OR:

 move the lever into position 

P

 and back

again.

OR:

 switch the automatic activation on and

off in the Infotainment system.

Automatic disconnection

Drive forward at 15 km/h (9 mph) or faster.

OR:

 move the selector lever to position 

P

.

Temporary sound suppression

Press the   function button on the infotain-

ment screen.

CarManuals2.com

Parking and manoeuvring

165

Rear parking aid

1)

The RVC button will only be displayed when reverse gear is engaged.

Change from reduced view to full view

Select reverse gear.

 Press the car icon on the reduced view

Switch to the reverse assist image (Rear
View Camera “RVC”)

Select reverse gear.

OR

 press the 

RVC

 function button 

1)

.

A short confirmation signal will be heard and
the button symbol will light up when the system
is switched on.

NOTICE

Park assist plus only connects automatically
when driving very slowly. If driving style is
not adapted to the circumstances, an acci-
dent and serious injury or damage may be
caused.

Visual indication segments

Fig. 121 

Parking aid view on the Infotainment

system display.

The optical indication of the segments works as
follows:

White segments

: the obstacle is more than

approx. 30 cm away from the path or in the
direction opposite to travel. They are also dis-
played when the electronic parking brake is ac-
tivated.

Yellow segments

: the obstacles lie on the

vehicle’s path and are at a distance of less than
approx. 30 cm away.

Red segments

: obstacles are less than ap-

prox. 30 cm away.
A guiding track will indicate the anticipated for-
ward or backward trajectory, depending on the
gear that is engaged.

If an obstacle is located in the vehicle’s way, the
corresponding audible warning will sound.
When the penultimate segment is displayed,
the vehicle has reached the collision zone. In
the collision zone, the obstacles are represen-
ted in red (including those out of the path). Stop
the vehicle! 

››› 

 in 

Description

 on page 163

Rear parking aid

Description

The rear park assist is an optical and audible
assistant that warns of obstacles located be-
hind the vehicle.

There are sensors integrated in the rear
bumper. When they detect an obstacle, you are
alerted by audible and visible warnings on the
Infotainment system.
Make particularly sure that the sensors are not
covered by adhesives, residues, dirt and the
like, as this could affect the system's operation.
Cleaning instructions 

››› 

page 305

.

The approximate measurement range of the
rear sensors is:

 Side area: 0.60 m

 Central area: 1.60 m

CarManuals2.com

166

Parking and manoeuvring

As you approach the obstacle, the frequency of
the audible signals will increase. The signal will
sound continuously at around 0.30 m: Stop the
vehicle! 

››› 

 on page 163

.

If the separation is maintained, the warning vol-
ume is reduced after about 4 seconds.

Parking Aid connection

 Select reverse gear.

Parking Aid disconnection

 Drive forward at 15 km/h (9 mph) or faster.

OR:

 place the selector level in position 

P

N

or 

D

 (for automatic gearboxes) or disengage

reverse (for manual gearboxes).

Set the lever to the 

N

 or 

D

 position to maintain

the system active for approximately 8 seconds
before switching off. During this time, the Park-
ing aid will be deactivated if the selector lever is
set to 

P

.

If the Top View Camera system is installed, rear
parking aid will be automatically deactivated
when disengaging reverse gear.

Temporary sound suppression

Press the   function button on the infotain-

ment screen.
If you have the Top View Camera system instal-
led, you cannot use the temporary Parking Aid
sound suppression.

Change from reduced view to full view

Select reverse gear.

OR:

 on vehicles fitted with reverse assist

(Rear View Camera “RVC”) press on the car
icon of the reduced display.

Switch to the reverse assist image (Rear
View Camera “RVC”)

Select reverse gear.

OR:

 press the “RVC” function button.

Parking assist settings

The audio indications and signals are set in the
infotainment system 

››› 

page 36

:


Rear volume:

 Volume in the rear area.

 Reduce volume:

 When the parking aid is

switched on, the volume of the audio source will
be reduced, depending on the selected option.


Rear sound settings/treble:

 Sound

tone in the rear area.

Error messages

If a an error or fault message appears on the in-
strument panel in Parking assist, there is a fault.
If the fault doesn't disappear before discon-
necting the ignition, it will not be indicated next
time the parking aid is connected.
If there is a fault in a sensor, the   symbol is
displayed on the infotainment system display.

We recommend taking the vehicle to a special-
ised workshop to have the fault repaired.

Towing device

In vehicles equipped with a towing bracket de-
vice from the factory, when the trailer is con-
nected, the parking aid will not be activated
when reverse gear is engaged.

WARNING

Observe the safety warnings 

››› 

 in 

De-

scription

 on page 163

.

Visual indication segments

Fig. 122 

Parking aid view on the Infotainment

system display.

The distance to the obstacles can be estimated
with the help of the segments at the rear of the
vehicle.

CarManuals2.com

Parking and manoeuvring

167

Parking aid system (Park Assist)

The optical indication of the segments works as
follows:

White segments

: the obstacle is more than

approx. 30 cm away from the path or in the
direction opposite to travel. They are also dis-
played when the electronic parking brake is ac-
tivated.

Yellow segments

: the obstacles lie on the

vehicle’s path and are at a distance of less than
approx. 30 cm away.

Red segments

: obstacles are less than ap-

prox. 30 cm away.
Whenever the obstacle is located in the vehi-
cle’s direction of travel, the corresponding audi-
ble warning will sound.
When the penultimate segment is displayed,
the vehicle has reached the collision zone. In
the collision zone, the obstacles are represen-
ted in red (including those out of the path). Stop
the vehicle! 

››› 

 in 

Description

 on page 163

.

Parking aid system (Park
Assist)

Introduction

The assisted parking system is an additional
function of ParkPilot 

››› 

page 162

 and helps

the driver find a suitable parking space from
among the following types:

 park driving in reverse in suitable perpendic-

ular and parallel spaces,

park driving forwards in suitable perpendicu-

lar spaces,

exit a parking space driving forwards from a

parallel space.

In vehicles with a Park Assist system and factory
infotainment system, the front, rear and side
areas are represented, and the position of ob-
stacles is shown relative to the vehicle.
The assisted parking system is subject to cer-
tain limitations inherent to the system and
its use requires special attention by the
driver 

››› 

.

WARNING

The technology used in the park assist sys-
tem involves a series of limitations inherent in
the actual system and in the use of ultrasonic
sensors. The use of Park Assist should never
tempt you to take any risk that may compro-
mise safety. The system is not a replacement
for driver awareness.

Any accidental movement of the vehicle

could result in serious injury.

Adapt your speed and driving style at all

times to suit visibility, weather, road and
traffic conditions.

Certain surfaces of objects and garments

do not reflect the ultrasound sensors' sig-
nals. The system cannot detect, at least cor-
rectly, these objects or people wearing such
clothes.

Ultrasound sensor signals may be affected

by external sound sources. In certain circum-
stances this may prevent them from detect-
ing people or objects.

The ultrasound sensors may have blind

spots in which obstacles and people are not
detected.

Monitor the area around the vehicle at all

times, since the ultrasound sensors do not
detect small children, animals or certain ob-
jects in all situations.

WARNING

Quick turns of the steering wheel when park-
ing or exiting a parking space with Park As-
sist can cause serious injury.

Do not hold the steering wheel during ma-

noeuvres to park or exit a parking space un-
til the system requests it. Doing so disables
the system during the manoeuvre, resulting
in the parking being cancelled.

CarManuals2.com

168

Parking and manoeuvring

NOTICE

 In certain circumstances, the ultrasonic

sensors do not detect objects such as trailer
tongues, bars, fences, posts or thin trees, or
an open (or opening) rear lid, which could
damage the vehicle.

Retrofitting of certain accessories to the

vehicle, such as a bicycle rack, may interfere
with the operation of the Park Assist system
and cause damage.

The Park Assist system uses as a reference

parked vehicles, curbs and other objects.
Make sure that the tyres and wheels are not
damaged while parking. If necessary, oppor-
tunely interrupt the parking manoeuvre to
avoid damaging the vehicle.

The ultrasound sensors on the bumper may

be damaged or shifted in the event of a colli-
sion, for example, when entering or exiting a
parking space.

If you use high-pressure or vapour equip-

ment to clean the ultrasound sensors, do not
apply it directly unless very briefly and al-
ways from a distance of more than 10 cm.

A registration plate or plate holder on the

front with larger than the space for the reg-
istration plate, or a registration plate that is
curved or warped can cause:

False detections.

The sensors to lose visibility.

Cancellation of the parking manoeuvre

or defective parking.

 If one of the ultrasonic sensors is dam-

aged, the area corresponding to that group
of sensors (front or rear) is deactivated and
cannot be activated until the fault is correc-
ted. However, you can still use the sensors
of the other bumper as per usual. If there
is a fault in the system, consult a specialist
workshop. SEAT recommends visiting a SEAT
dealership for this.

Note

In order to guarantee good system oper-

ation, keep the ultrasound sensors of the
bumper clean, free of snow or ice, and do not
cover them with adhesives or other objects.

Certain sources of noise, such as rough as-

phalt or paving stones and the noise of other
vehicles can induce the Park Assist system
or ParkPilot to give erroneous warnings. The
presence of metal objects can also affect
the manoeuvre.

In order to become familiar with the system

and its functions, SEAT recommends that you
practice operating the Park Assist system in
an area where there is not too much traffic or
in a car park.

Description of the parking assist sys-
tem

Fig. 123 

In the centre console: button to switch

on the Park Assist system.

The components of the Park Assist system are
the ultrasonic sensors located in the front and
rear bumpers, the   button to switch the sys-
tem on and off and the messages on the instru-
ment panel display.

Prerequisites for parking

The traction control (TCS) must be switched

on 

››› 

page 133

.

Speed when passing next to the parking

space (parallel parking): do not exceed approx.

40 km/h (25 mph)

.

Speed when passing next to the parking

space (angle parking): do not exceed approx.

20 km/h (12 mph)

.

CarManuals2.com

Parking and manoeuvring

169

Parking aid system (Park Assist)

Keep a distance between 

0.5 and 2.0 me-

tres

 when driving past the parking space.

Space length (parallel parking): 

vehicle

length + 0.8 metres

.

Space width (parking bay): 

vehicle width

+ 0.8 meters

.

Do not exceed approximately 

7 km/h

(4 mph)

 when parking.

Requirements for leaving the parking space
(only for parallel parking)

 The traction control (TCS) must be switched

on 

››› 

page 133

.

Space length: 

length of the vehicle

+ 0.5 metres

.

Do not exceed approximately 

7 km/h

(4 mph)

 when exiting the parking space.

Prematurely stopping or automatically in-
terrupting the manoeuvres for parking or ex-
iting a parking space

Park Assist interrupts the manoeuvres for park-
ing or exiting a parking space in any of the fol-
lowing cases:

Press the   button.

When exceeding a speed of approximately 7

km/h (4 mph) more than once.

The driver takes control of the steering wheel.

The parking manoeuvre does not end within 6

minutes after activation of the automatic steer-
ing.

There is a fault in the system (the system is

temporarily unavailable).

The TCS is disconnected.

TCS or ESC intervene with regulation.

The driver door is opened.

To restart the manoeuvre it is necessary that
none of these things occur and that the   but-
ton is pressed again.

Braking to avoid damage due to unsuitable
speed

It is possible that the system operates the
brakes to reduce excess speed. The parking
manoeuvre can then continue. The brakes will
intervene during each parking process.

Special characteristics

The Park Assist system is subject to certain limi-
tations inherent to the system. For example, it is
therefore not possible to use it to enter or exit a
parking space on sharp bends or on very steep
hills.
While entering or exiting a parking space, a
brief signal sounds to prompt the driver to
change between forward and reverse gears
(depending on the case). In successive ma-
noeuvres, the assistant tells the driver to
change gears, at the latest, when the continu-
ous audible signal is given (object present at a
distance of ≤30 cm) by Park Pilot.

When the Park Assist system turns the steer-
ing wheel with the vehicle stationary, the instru-
ment panel also displays the symbol  . Keep
the brake pedal depressed while the symbol
remains on the dash panel display to turn the
wheels with the vehicle stopped. This way, the
system will require fewer manoeuvres to com-
plete the parking action.

Trailer mode

The Park Assist system cannot be switched on if
the factory-fitted towing bracket is electrically
connected to a trailer.

After changing a wheel

If, after changing a wheel, the vehicle stops
entering and exiting parking spaces correctly,
the circumference of the new wheel may be
different and the system may need to adapt to
it. The adaptation is automatic and takes place
during driving. Making turns slowly and in both
directions (20 km/h [12 mph]) for a few minutes
may contribute to this adaptation process .

CarManuals2.com

170

Parking and manoeuvring

Selecting a parking type

Fig. 124 

On the instrument panel display:

display of the assisted parking system with
decreased visibility.

Fig. 125 

On the instrument cluster display:

parking modes indication.

Park assist has the following 3 parking types:

Reverse parallel parking.
Reverse angle parking.
Forward angle parking.

Selecting a parking type after passing in
front of the space

After activating the Park Assist system and
after detecting a parking space, the display
on the instrument panel proposes a parking
mode. The Park Assist system selects the park-
ing mode automatically. The selected mode
is shown on the instrument panel display 

››› 

Fig. 124

. The reduced display of other possi-

ble parking modes is also shown 

››› 

Fig. 125

. If

the mode selected by the system does not cor-
respond to the desired mode, you can select
another mode by pressing the   button.

The necessary conditions to park with Park

Assist have to be met 

››› 

page 168

.

Press the   button.

A control lamp on the   button lights up

when the system is switched on. Additionally,
the selected parking mode is shown on the
instrument panel display and the reduced dis-
play shows another parking mode it can be
changed to.

 Turn on the corresponding turn signal to-

wards the side of the road where you are park-
ing. The instrument panel displays the side cor-
responding to the road. By default, if the turn
signal is not on, it parks on the right in the direc-
tion of traffic.

If necessary, press the   button again to

change to the next parking mode.

Once you have switched to all possible park-

ing modes, if the   button is pressed again, the
system switches off.

Press the   button again to switch the system

back on.

Follow the instructions displayed on the in-

strument panel while paying attention to traffic
and drive the vehicle past the parking space.

Parking in a parking bay without driving past
first

Special case of perpendicular parking space to
park forwards without driving past first:

 The necessary conditions to park with Park

Assist have to be met 

››› 

page 168

.

Move forward towards the parking space

while paying attention to traffic and stop the
vehicle with the front part partially inside the
parking space.

Press the   button once.

A control lamp on the   button lights up

when the system is switched on. Additionally,
the selected parking mode is shown on the
instrument panel display without reduced dis-
play.

Let go of the steering wheel.

CarManuals2.com


Content      ..     3      4      5      6     ..