Renault Talisman (2016 year). Manual - part 13
 

  Index      Renault     Renault Talisman - service manual 2016 year in english


Search            


Content   ..  11  12  13  14   ..


Renault Talisman (2016 year). Manual - part 13


3.10

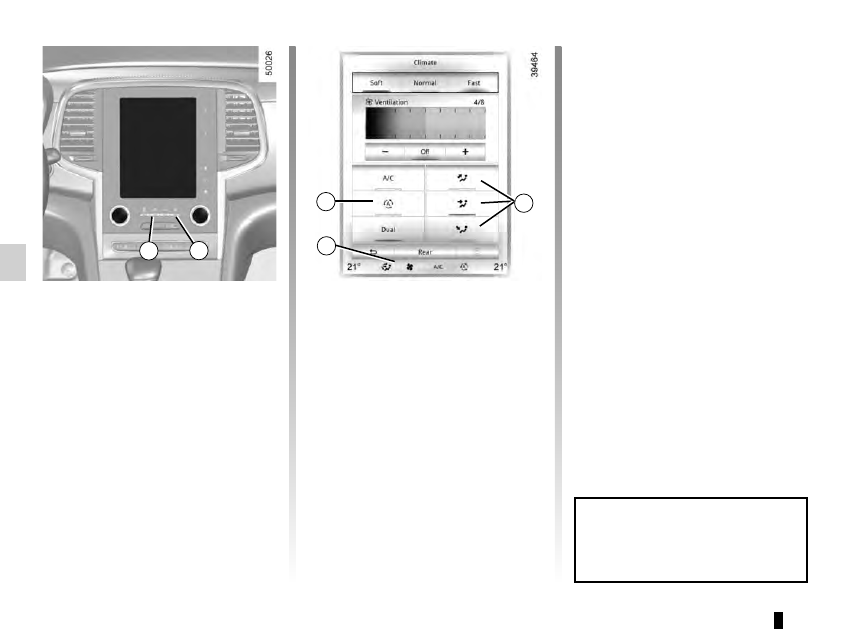
AUTOMATIC CLIMATE CONTROL: Controls A 

(5/5)

Automatic usage
Press button 16 (a warning light comes 

on in zone 14).

Manual use
Press button 5 to force air recirculation.
Prolonged use of this position may lead 

to odours, caused by non-renewal of 

air, and the formation of condensation 

on the windows.
We advise you to return to automatic 

mode as soon as air recirculation is no 

longer needed, by pressing key 16 or 

button 5 again.
To exit this function, press key 16 or 

button 5 again.

Adjusting the distribution 

of air in the passenger 

compartment

Press buttons 12 to select the desired 

distribution (a warning light is displayed 

in zone 14):

Ø

The air flow is mainly directed 

to the demisting vents for the 

windscreen and the side windows.

½

The air flow is mainly directed 

to the dashboard air vents.

¿

The air flow is directed mainly 

towards the footwells.

The demisting/de-icing will still take 

priority over the air recirculation.

5

3

12

16

14

Air recirculation

This function is managed automatically 

but you can also activate it manually.

Note:
–  during recirculation, air is taken from 

the passenger compartment and 

is recycled, with no air being taken 

from outside the vehicle;

– air recirculation allows the exter-

nal atmosphere to be cut off (when 

driving in polluted areas, etc.) and 

to cool the passenger compartment 

temperature more quickly.

3.11

AUTOMATIC CLIMATE CONTROL: Controls B and C 

(1/5)

Indicators

The following indicators are displayed 

on the screen 3:
1  Active mode, ventilation speed and 

air distribution in the passenger com-

partment (temporary display after 

pressing the associated controls).

2  Outside air temperature.
4  Air temperature, left and right.

Automatic mode

The automatic climate control system 

guarantees comfort in the passen-

ger compartment and good visibility 

(except in the event of extreme condi-

tions), whilst optimising consumption. 

The system controls the ventilation 

speed, air distribution, air recirculation, 

and starting and stopping the air condi-

tioning and air temperature.
This mode consists of a choice of three 

programmes:
AUTO: allows the selected comfort 

level to be best attained, depending 

on the exterior conditions. Press the 

button 15.
SOFT: reaches the desired comfort 

level more gently and silently. Press the 

button 14.
FAST: increases the flow of air in the 

passenger compartment. This mode is 

recommended in particular to optimise 

comfort in the rear seats. Press the 

button 16.

10

Some buttons have a warning light 

indicating their operative state.

11

13 14 15

12

8

9

6

Controls Band C

5 and 11 Left and right temperature in-

dication adjustment.

6  De-icing/demisting of the rear screen 

and, depending on the vehicle, the 

door mirrors.

7  Distribution of air in the passenger 

compartment.

8  “Automatic recirculation” function.

9 Air recirculation.

10  “Clear View” function.

12 and 18 Ventilation speeds.

13  “DUAL" function.

1415, and 16 Automatic modes.

17 Air conditioning.

7

18 5

17

16

1

4

4

2

10

11

13 14 15

12

8

9

6

7

18 5

17

16

1

4

4

2

B

C

3

3

3.12

Varying the ventilation speed

In automatic mode, the system uses 

the most suitable amount of air to reach 

and maintain the desired comfort level.
You can still adjust the ventilation 

speed by pressing buttons 12 or 18 or, 

depending on the vehicle, by sliding 

your finger in zone 19.

Temperature adjustment

There are two types of settings:

– uniform passenger compartment 

setting;

–  DUAL function setting to independ-

ently adjust the left and right sides.

Uniform passenger compartment 

setting

Use control 11.
DUAL function setting

Press button 13 to activate. Use con-

trol 11 to adjust the left side and con-

trol 5 for the right side.

The displayed temperature values 

show a comfort level.
When starting the engine, increas-

ing or decreasing the value dis-

played will not allow the com-

fort level to be reached any more 

quickly. The system will always op-

timise the temperature increase or 

decrease (the ventilation system 

does not start instantly at maximum 

speed: it gradually increases). This 

may take several minutes.
Generally speaking, unless there is 

a particular reason not to, the dash-

board air vents should remain open.

Note: The air conditioning configura-

tion depends on the mode selected in 

the “Multi-Sense” menu (please refer to 

the information on “Multi-Sense” in sec-

tion 3).

11

13

12

18 5

11

13

12

18 5

19

AUTOMATIC CLIMATE CONTROL: Controls B and C 

(2/5)

3.13

Press button 10 – the integrated indica-

tor light comes on.
Press button 6 to stop the heated rear 

screen operating, and the integrated in-

dicator goes out.
To adjust the ventilation speed: press 

buttons 12 or 18or slide your finger in 

zone 19.

Clear View function

This function quickly demists and de-

ices the windscreen, the rear screen, 

the front side windows, and the door 

mirrors (depending on the vehicle). It 

imposes automatic operation of the 

air conditioning and rear screen de-ic-

ing and, depending on the vehicle, the 

windscreen electric de-icer.

To exit this function, press either:
– again button 10;
–  one of the buttons 1415 or 16.

14 15

12

6

18

16

19

10

10

14 15

12

6

18

16

AUTOMATIC CLIMATE CONTROL: Controls B and C 

(3/5)

3.14

Switching air conditioning on 

or off

In automatic mode, the system switches 

the air conditioning system on or off, 

depending on the climate conditions.
Press button 17 to: 
–  activate the air conditioning (a warn-

ing light in zone 1 comes on).

–  deactivate the air conditioning (the 

warning light in zone 1 goes out)

Rear screen de-icing/

demisting

Press button 6 – the integrated indica-

tor light comes on. This function en-

ables rapid demisting or de-icing of the 

rear screen and de-icing of the door 

mirrors (on equipped vehicles).
To exit this function, press button 6 

again. Demisting automatically stops.

It is preferable to use one of the automatic programmes AUTO, SOFT or 

FAST.
In automatic mode (indicator light on button 1415 or 16 lit), all air conditioning 

functions are controlled by the system.
You can still modify the system’s choice; in this case, the indicator light on the 

button 1415 or 16 goes out.
To return to automatic mode, press one of programmes AUTO 15SOFT 14 or 

FAST 16.

15

6

17

15

6

17

14

16

14

16

1

1

Stopping the system

To switch the system off, press 

button 12 repeatedly until the message 

OFF appears in zone 1.

12

12

AUTOMATIC CLIMATE CONTROL: Controls B and C 

(4/5)

3.15

Automatic usage
Press button (a warning light comes 

on in zone 1).

Manual use
Press button 9 to force air recirculation.
Prolonged use of this position may lead 

to odours, caused by non-renewal of 

air, and the formation of condensation 

on the windows.
We advise you to return to automatic 

mode as soon as air recirculation is no 

longer needed, by pressing button 8 or 

button 9 again.
To exit this function, press button 8 or 

button 9 again.

Adjusting the distribution 

of air in the passenger 

compartment

Press buttons 7 to select the desired 

distribution (a warning light is displayed 

in zone 1):

Ø

The air flow is mainly directed 

to the demisting vents for the 

windscreen and the side windows.

½

The air flow is mainly directed 

to the dashboard air vents.

¿

The air flow is directed mainly 

towards the footwells.

The demisting/de-icing will still take 

priority over the air recirculation.

Air recirculation

This function is managed automatically 

but you can also activate it manually.

Note:
–  during recirculation, air is taken from 

the passenger compartment and 

is recycled, with no air being taken 

from outside the vehicle;

– air recirculation allows the exter-

nal atmosphere to be cut off (when 

driving in polluted areas, etc.) and 

to cool the passenger compartment 

temperature more quickly.

8

9

7

8

9

7

1

1

AUTOMATIC CLIMATE CONTROL: Controls B and C 

(5/5)

3.16

AIR CONDITIONING: information and advice on use

Do not add anything to the 

vehicle’s ventilation circuit 

(for example, to remove 

bad odours).

There is a risk of damage or of 

fire.

Do not open the refriger-

ant fluid circuit. The fluid 

may damage eyes or skin.

Fuel consumption

You will normally notice an increase in 

fuel consumption (especially in town) 

when the air conditioning is operating.
For vehicles fitted with air conditioning 

with no automatic mode, switch off the 

system when it is not required.
Advice for reducing consumption 

and helping to preserve the environ-

ment
Drive with the air vents open and the 

windows closed.
If the vehicle has been parked in the 

sun, open the doors for a few moments 

to let the hot air escape before starting 

the engine.

Maintenance

Refer to the Maintenance Document 

for your vehicle for the inspection fre-

quency.

Operating faults

As a general rule, contact your ap-

proved dealer in the event of an oper-

ating fault.
–  Reduction in de-icing, demisting 

or air conditioning performance.

This may be caused by the passen-

ger compartment filter cartridge be-

coming clogged.

–  No cold air is being produced.

Check that the controls are set cor-

rectly and that the fuses are sound. 

Otherwise, switch off the system.

Presence of water under the 

vehicle

After prolonged use of the air condi-

tioning system, it is normal for water 

to be present under the vehicle. This is 

caused by condensation.

Advice on use

In some situations, (air conditioning 

off, air recirculation activated, ventila-

tion speed at zero or low, etc.) you may 

notice that condensation starts to form 

on the windows and windscreen.
If there is condensation, use the “Clear 

View” function to remove it, then use 

the air conditioning in automatic mode 

to stop it forming again.

Vehicles equipped with the 


ECO mode: once activated, ECO 

mode can reduce the perform-

ance of the automatic air condition-

ing. Please refer to the information 

on “Driving advice, Eco-driving” in 

Section 2.

3.17

From the driver’s seat, use switch:

  1  for the driver’s side;

  2  for the front passenger side;

  3 and  5 for the rear passenger win-

dows.

From the passenger seats, use 

switch 6.

ELECTRIC WINDOWS 

(1/2)

1

2

3

4

5

6

These systems operate:
–  with the engine running;
–  with the ignition off until one of the 

front doors is opened (limited to ap-

proximately 12 minutes).

– with the engine off, front doors 

closed, after pressing the start 

button.

Press the window switch down or pull it 

up to lower or raise the window to the 

desired height: the rear windows do not 

open fully.

Safety of rear occupants

The driver can disable operation of the rear electric windows by pressing 

switch 4. A confirmation message is displayed on the instrument panel.
Driver’s responsibility

Never leave your vehicle with the RENAULT card or key inside, and never leave 

a child, adult who is not self-sufficient or a pet, even for a short while. They may 

pose a risk to themselves or to others by starting the engine or activating equip-

ment (such as the gear lever or electric windows). If any part of the body becomes 

trapped, reverse the direction of the window immediately by pressing the relevant 

switch.
Risk of serious injury.

Avoid resting any objects against 

a half-open window: there is a risk 

that the electric window could be 

damaged.

3.18

Operating faults

In case of a fault when closing a 

window, the system reverts to normal 

mode: pull the switch as many times as 

necessary until the window closes com-

pletely, hold the switch (still on the clo-

sing side) for around one second, then 

completely lower then raise the window 

to reset the system.
If necessary, contact an approved 

Dealer.

ELECTRIC WINDOWS 

(2/2)

Remote control window 

closing

(vehicles with 4 one-touch electric win-

dows).
When you lock the doors from the out-

side, press the locking button on the  

RENAULTcard twice in quick suc-

cession, or on the driver’s door in 

hands-free mode, and all the windows 

will close automatically (and, depen-

ding on the vehicle, the sunroof).
It is recommended that the user only 

operates the system when the vehi-

cle can be seen clearly and no one is 

inside.

One-touch mode
This mode works in addition to the ope-

ration of the electric windows described 

previously.
Briefly press or pull the window switch 

fully: the window is fully lowered or 

raised. Pressing the switch again stops 

the window moving.
Note: if the window detects resistance 

when closing (e.g.: branch of a tree, 

etc.) it stops and then lowers again by a 

few centimetres.

When closing the windows, 

ensure that no part of the 

body (arm, hand, etc.) is 

protruding from the vehicle.

Risk of serious injury.

3.19

ELECTRIC SUNROOF 

(1/3)

To slide the curtain 1

With the ignition on:
– Full opening:
 move marker 3 on 

button  2 to position A. The points 

in between correspond to the three 

progressive opening positions of the 

curtain;

– to close: move mark 3 on button 2 

to position 0.

To slide the sunroof

With the ignition on:
– to open:
 move mark 3 on button 2 

to position B, depending how far 

you wish it to open. The points in 

between correspond to the five pro-

gressive opening positions;

– To close: move the marker 3 on 

button 2 to position A.

1

2

0

A

B

Moving the position 0 directly to po-

sition  B causes the simultaneous 

opening of the curtain and the roof.

Driver’s responsibility 

when parking or stopping 

the vehicle
Never leave an animal, 

child or adult who is not self-suffi-

cient alone on your vehicle, even for 

a short time.
The reason for this is that the child 

may endanger himself or others by 

starting the engine, activating equip-

ment such as the window winders 

for example, or locking the doors.
If something gets trapped, reverse  

the direction of travel as soon as  

possible by turning button 2 fully to  

the right (position B).
Risk of serious injury.

2

3

3.20

ELECTRIC SUNROOF 

(2/3)

Closing the sunroof by 

remote control

(depending on the vehicle)

If you press the locking button on 

the   card twice in quick succession 

RENAULT,, the windows and the elec-

tric sunroof will close automatically.

It is recommended that the user only 

operates the system when the vehi-

cle can be seen clearly and no one is 

inside.
Special features

Your vehicle is fitted with an anti-pinch 

facility: when the sunroof encounters 

resistance whilst closing (branch of 

a tree, etc.), it stops and then moves 

back a few centimetres.

After closing the sunroof by remote 

control, pressing button 2 allows the su-

nroof to return to its previous position.

Precautions during use

–  Vehicle with loaded roof bars.

As a general rule, if there is a load 

on the roof, use of the sunroof is not 

recommended.
Before using the sunroof, check the 

objects and/or accessories (bike 

racks, roof boxes etc.) attached to 

the roof bars: they should be pro-

perly arranged and secured and 

should not interfere with the opera-

tion of the sunroof.
Contact an approved dealer for de-

tails of possible conversions;

  check  that the sunroof is properly 

closed before leaving your vehicle;

– clean the seal every three months 

using products recommended by our 

Technical Department;

–  do not open the sunroof immedia-

tely after it has rained or immediately 

after washing the vehicle.

2

Special features
Pressing button 2 allows the curtain to 

be automatically positioned depending 

on the position of the sunroof.
Pressing button 2 when the roof and 

the curtain are in the same opening po-

sition enables the curtain to be opened 

fully.

When closing the sunroof, 

ensure that no part of the 

body (arm, hand, etc.) is 

protruding from the vehicle.

Risk of serious injury.

3.21

Operating fault

–  If the sunroof will not close, turn 

switch  2 to position B to open the 

sunroof, then turn switch 2 to posi-

tion 0 until the sunroof is completely 

closed.

–  If the curtain does not close, turn 

switch  2 to position A to open the 

curtain, then turn switch 2 to posi-

tion 0 until the curtain is fully closed.

2

ELECTRIC SUNROOF 

(3/3)

If the blockage persists, keep switch 2 

pressed until it closes completely.
Please consult an authorised dealer.

0

A

B

Important: during this operation, the 

sunroof anti-pinch function is de-

activated. Contact your approved 

Dealer as soon as possible.

Driver’s responsibility 

when parking or stopping 

the vehicle
Never leave an animal, 

child or adult who is not self-suffi-

cient alone on your vehicle, even for 

a short time.
The reason for this is that the child 

may endanger himself or others by 

starting the engine, activating equip-

ment such as the window winders 

for example, or locking the doors.
If something gets trapped, reverse  

the direction of travel as soon as  

possible by turning button 2 fully to  

the right (position B).
Risk of serious injury.

3.22

When the doors or boot are un-

locked and opened, the reading and 

footwell lights come on temporarily.

Map reading lights

Press switch 1 to get:
– permanent lighting;
–  immediate switching off.

1

From the multifunction screen, it is pos-

sible to deactivate/activate the cour-

tesy lights upon opening the doors or 

the boot. To do this, please refer to 

“Vehicle settings customisation menu” 

in Section 1.

INTERIOR LIGHTING 

(1/2)

1

3.23

Luggage compartment lights

Light  3 comes on when the luggage 

compartment is opened.

Glove box light

Light  2 comes on when the cover is 

opened.

INTERIOR LIGHTING 

(2/2)

2

3

3

3.24

Vanity mirror

Lift the cover 3.
The light 2 switches on automatically.

SUN VISOR

Front sun visor

Lower the sun visor 1 on the wind-

screen or unclip it and lower it over the 

side window.

2

3

When driving, ensure the 

courtesy mirror cover is 

closed. Risk of injury.

1

3.25

Door pockets 1

It can hold a bottle.

PASSENGER COMPARTMENT STORAGE, FITTINGS (1/3)

1

Nothing should be placed 

on the floor area in front of 

the driver as such objects 

may slide under the pedal 

during braking manoeuvres, thus 

obstructing its use.

Ensure that no hard, heavy 

or pointed objects are 

placed in the “open” sto-

rage compartments in such 

a way that they may fall onto pas-

sengers during sudden turning or 

braking.

Glove box 2

Pull the handle on the glove compart-

ment to open it. It can hold A4 docu-

ments.

2

Cup holders 3

Slide the cover to open the cup holder.

Storage compartment

Press the button 4.

3

4


Content   ..  11  12  13  14   ..