Renault Kangoo Z.E. (2018 year). Manual - part 9
 

  Index      Renault     Renault Kangoo Z.E. - service manual 2018 year in english


Search            


Content   ..  7  8  9  10   ..


Renault Kangoo Z.E. (2018 year). Manual - part 9


3.8

AIR CONDITIONING, HEATING: programming 

(1/2)

Adjusting the programming

This function enables the electric net-

work (and the not the traction battery) 

to be used under certain conditions, in 

order to obtain a comfortable tempera-

ture prior to using the vehicle.
It triggers the heating in cold weather 

and the air conditioning in warm 

weather.

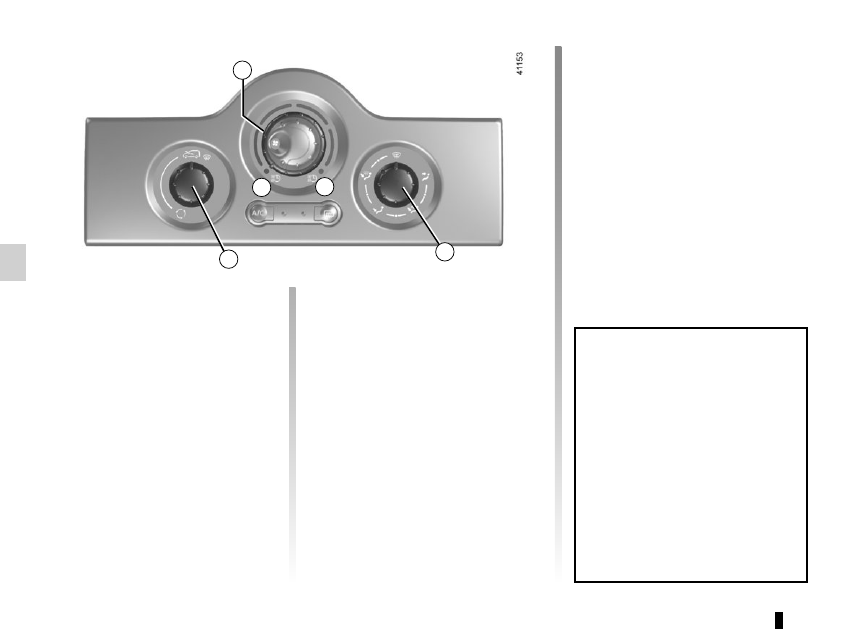
1

Operating conditions
–  The ignition must be switched off;
–  the battery must be charged more 

than 90% for the function to be trig-

gered;

–  the vehicle has to be plugged into 

the mains;

and

– control 1 must be in position 


at  A to program the air condition-

ing or at B to program the heating or 

ventilation.

3

It is recommended to position con-

trol 3 in the air recirculation position 

and air distribution control 2 in po-

sition:

– 

i

 in cold weather;

– 

G

 in high temperatures.

These settings make it possible to 

reach a comfortable temperature in 

the passenger compartment.

A

B

2

Note: depending on the power of the 

charging terminal, a slight reduction in 

the charge level is possible when the 

function is activated.

3.9

AIR CONDITIONING, HEATING: programming 

(2/2)

Activating the function
–  With the ignition on, position the con-

trol 1 in one of the 

 positions;

–  turn off the ignition. The “COMFORT” 

message and the programmed time 

are displayed on the instrument 

panel for a few seconds;

– wait approximately one minute 

before charging your vehicle;

–  plug in your vehicle to a power supply 

(refer to the information on “Electric 

vehicle: charging” in section 1).

The function switches on during the 

hour preceding the programmed time in 

order to reach a comfortable tempera-

ture.

Automatically switching off the 

function
– About 10 minutes after the pro-

grammed time;

– if the charging socket is discon-

nected;

– if control 1 is not in one of the 


positions.

4

5

C

D

Setting the start time for the 

function
–  To programme the start time, use 

buttons C and D to navigate through 

the menu until message COMFORT 

PROG appears.

–  hold down button D on stalk 5 - the 

hours flash;

– press button C to adjust them;

–  hold down button D on stalk 5 - the 

minutes flash;

– press button C to adjust them;
– confirm by pressing button D on 

stalk 5.

The message “COMFORT PROG” and 

the programmed time are displayed on 

the instrument panel 4.

3.10

Conditions of use

–  The engine must be running;
– switch 4 must be engaged;
–  the ventilation control 2 should not 

be at position 0;

–  the temperature control 1 should not 

be at the “Heating off” position 3;

–  The fuel level should not be at mini-

mum.

ADDITIONAL HEATING 

(1/2)

Depending on the vehicle, the addi-

tional heating is designed to heat the 

passenger compartment. Powered 

by a dedicated fuel tank (please see 

“Additional heating tank” in Section 1), 

this increases the comfort level without 

reducing vehicle range.
Switching on this additional heating de-

activates other heating methods and 

the air-conditioning.

2

When the fuel reaches the minimum 

level, a warning light will come on 

on the instrument panel. After a few 

minutes of operation, a message on 

the instrument panel will tell you that 

the additional heating is switched 

off.

3

1

4

3.11

ADDITIONAL HEATING 

(2/2)

Operating fault
If the additional heating does not switch 

on:
–  start the vehicle;
–  switch on the heating by pressing 

switch 4;

–  wait for 5 minutes;
–  turn off the heater;
–  switch off your vehicle ignition;
–  restart the operation 4 or 5 times.
If the additional heating still fails to op-

erate, please contact an authorised 

dealer.

Operating principle

With the engine running, press switch 4.
The operation cuts out:
–  when the ignition is switched off;
–  after a few minutes, when the mini-

mum fuel level has been reached.

With the engine running, 

when you open the driv-

er’s door, a message will 

appear on the instrument 

panel along with a beep to tell you 

to switch off the additional heating.

Warnings concerning the 

use of additional heating
– Do not operate the ad-

ditional heating in an en-

closed location; exhaust fumes 

are poisonous.

–  Do not park the vehicle or oper-

ate the additional heating in lo-

cations where flammable mate-

rial or substances such as grass 

or leaves can come into contact 

with a hot exhaust system.

– Do not operate the additional 

heating when filling the fuel tank.

4

3.12

AIR CONDITIONING: information and operating instructions 

(1/2)

Do not open the refriger-

ant fluid circuit. The fluid 

may damage eyes or skin.

Operating faults

As a general rule, contact your ap-

proved Dealer in the event of an oper-

ating fault.

–  Reduction in de-icing, demisting 

or air conditioning performance. 

This may be caused by the passen-

ger compartment filter cartridge be-

coming clogged.

–  No cold air is being produced. 

Check that the controls are set cor-

rectly and that the fuses are sound. 

Otherwise, switch off the system.

Range

It is normal to notice an increase in 

energy usage when the air conditioning 

is operating.

Switch off the system when it is not re-

quired.
Advice for reducing consumption 

and helping to preserve the environ-

ment
Drive with the air vents on and the win-

dows closed.

If the vehicle has been parked in the 

sun, open the doors for a few moments 

to let the hot air escape before starting 

the engine.

Maintenance

Refer to the Maintenance Document 

for your vehicle for the inspection fre-

quency.

Below approximately 10°C, with the 

engine off it is normal to notice cold 

air enter the passenger compart-

ment via the vents when ventilation 

has not stopped (refer to the infor-

mation on “Heating, air condition-

ing” in section 3). It is recommended 

to position the ventilation control at 

0 in case of brief stops.

Presence of water under the 

vehicle.

After prolonged use of the air condi-

tioning system, it is normal for water 

to be present under the vehicle. This is 

caused by condensation.

Noise

Each time the ignition is switched off, 

the ventilation will be switched off after 

about ten seconds.

Vehicles equipped with  

mode ECO
Once activated, ECO mode may 

reduce air conditioning perform-

ance. Please refer to the informa-

tion on “Driving advice, Eco-driving” 

in Section 2.

Use the air conditioning system reg-

ularly, even in cold weather, running 

it at least once a month for approxi-

mately 5 minutes.

3.13

AIR CONDITIONING: information and operating instructions 

(2/2)

The refrigerant circuit may contain 

fluorinated greenhouse gases.
Depending on the vehicle, you will find 

the following information on label A af-

fixed inside the engine compartment.
The presence and location of the infor-

mation on label A depends on the ve-

hicle.

A

A

A

Do not open the refrigerant 

fluid circuit. The fluid may 

damage eyes or skin.

Ñ

Type of refrigerant fluid   

Type of oil in the air condi-

tioning circuit

Inflammable product 


Consult the driver’s hand-

book

Maintenance

Quantity of refrigerant 

fluid present in the ve-

hicle.

x.xxx kg

G l o b a l   Wa r m i n g 

Potential (CO2 equi-

valent).

GWP xxxxx

Quantity in weight and 

in CO2 equivalent.

CO2 eq 

x.xx t

Before performing any 

action in the engine com-

partment, the ignition must 

be switched off (please see 

the information on “Starting, stop-

ping the engine” in Section 2).

3.14

MULTIMEDIA EQUIPMENT

The presence and location of this 

equipment depends on the vehicle’s 

multimedia equipment.
1 Multimedia touchscreen;
2 multimedia sockets;
3 radio;
4  steering column control;
5 microphone.

To operate this equipment: please 

refer to the instructions for the equip-

ment which should be kept with the 

other vehicle documentation.

1

3

2

4

5

3.15

Luggage compartment light 2

Tilt the switch 2 for permanent lighting.

INTERIOR LIGHTING

1

Courtesy lights

Pressing switch 1 gives:
– permanent lighting;
–  intermittent lighting, which comes on 

when a door is opened. It goes out 

when the doors concerned are prop-

erly closed;

–  immediate switching off.

2

Special features

Depending on the vehicle, remote un-

locking of the doors triggers timed light-

ing of the passenger compartment. If 

one of the front or rear doors is opened, 

the period for which the light is switched 

on will start again.
Then the courtesy light and the luggage 

compartment light dim and go out.
The lighting timer will cut out for vari-

ous reasons:
–  if a door has been open for 15 min-

utes;

–  if all the doors have been closed for 

15 seconds or 5 minutes, depending 

on the vehicle;

–  when the ignition is switched on.

3.16

Front sun visor

Lower sun visor 1.
The clip can be used to hold motorway 

passes, etc..

SUN VISOR/MIRRORS

Courtesy mirror 2

(passenger side)
If the sun visor is fitted with a courtesy 

mirror, it has a cover.

When driving, ensure the 

courtesy mirror cover is 

closed. Risk of injury.

2

1

3.17

Electric windows

With the ignition on:
– press the switch for the window 

concerned to lower it to the desired 

height;

–  lift the switch for the window con-

cerned to raise it to the desired 

height.

From the driver’s seat
Operate the switches as follows:
–  1 for the driver’s side;
–  2 for the front passenger side.

ELECTRIC WINDOWS

From the front passenger seat
Operate switch 3.

1

2

3

Driver’s responsibility

Never leave your vehicle with the key inside, and with a child, adult who 

is not self-sufficient or a pet, even for a short while. They may pose a risk 

to themselves or to others by starting the engine or activating equipment 

(such as the gear lever or electric windows). If any part of the body becomes 

trapped, reverse the direction of the window immediately by pressing the relevant 

switch.

Risk of serious injury.

One-touch electric window

(depending on vehicle)
The one-touch mode works in addition 

to the operation of the electric windows 

described previously.

It is fitted to the driver’s window and 

is used for lowering only.
Briefly press
 switch 1: the window will 

open completely.
Pressing the switch again while the 

window is moving will stop its move-

ment.

Avoid resting any objects against 

a half-open window: there is a risk 

that the electric window could be 

damaged.

3.18

Removable ashtray 1

This is a removable ashtray which can 

be placed in the cup holders.
Lift the cover to open.
To empty it, pull the assembly. The ash-

tray will come out of its housing.

ASHTRAYS, CIGARETTE LIGHTER, ACCESSORIES SOCKETS

1

Cigarette lighter 2

With the ignition on, press it in. It will 

spring back with a click when it is ready. 

Pull it out to use.
After use, replace it without pushing it 

all the way in.

Accessories sockets

You can use the cigarette lighter 

socket2. It is provided for connecting 

accessories approved by the Technical 

Department with a maximum power of 

120 Watts (voltage 12 V).
Depending on the 12V battery charge, 

the accessories socket may stop work-

ing.

2

Connect accessories 

with a maximum power of 

120 Watts only.

When several accessory 

sockets are used at the same time, 

the total power of the connected 

accessories must not exceed 

180 watts.

Fire hazard.

3.19

Dashboard storage 

compartment 2

Centre console storage 

compartment 3

To open, lift cover 4. It will store a 

1.5 litre bottle.

Glovebox

To open the glovebox, lift catch 1.

PASSENGER COMPARTMENT STORAGE, FITTINGS 

(1/3)

1

2

4

3

When turning corners, 

accelerating or braking, 

ensure that the recepta-

cle being held by the cup 

holder is not dislodged.
There is a risk of burning if hot liquid 

escapes.

3.20

Front upper cab storage 

compartment 7

Front door storage 

compartments 5

Bottle holders 6

PASSENGER COMPARTMENT STORAGE, FITTINGS 

(2/3)

No object should be placed 

on the floor (in front of the 

driver). Such objects may 

slide under the pedals 

during sudden braking manoeuvres 

and obstruct their use.

Clip 8

This can be used for storing motorway 

tickets, cards, etc.

Ensure that no hard, heavy 

or pointed objects are 

placed in the “open” stor-

age compartments in such 

a way that they may fall onto pas-

sengers during sudden turning or 

braking.

5

6

7

8

3.21

PASSENGER COMPARTMENT STORAGE, FITTINGS 

(3/3)

Clothes hook 9

Depending on the vehicle, a hook may 

be located on the partition behind the 

front passenger seat.
For safety reasons, this hook may only 

be used to hang clothes.
NB: the maximum permitted load is  

4 kg.

9

9

3.22

The headrest is a safety 

component; check that it is 

fitted and in the correct po-

sition.

Storage position 2

Pull it towards you and lower it com-

pletely.
The fully lowered headrest position 

is a storage position: it should not be 

in this position when a seat is occupied.

To raise it

Slide it to the required height.

To lower it

Pull it towards you and slide it to the re-

quired height.

To remove it

Raise the headrest then press tabs 1 to 

release it.

To refit it

Press tab 1 and insert the rods into the 

holes, with the notches facing forwards.

REAR HEADRESTS

Child’s convertible headrest

If fitted to the vehicle, the child head-

rest and booster cushion can only be 

installed on the rear side seats.
For fitting and use, refer to the equip-

ment instructions.

1

2

3.23

To fold down the seatback

Before moving the bench seat, make 

sure the front seats are pushed forward 

enough, that the rear seat belts are un-

fastened and that nothing will obstruct 

the manoeuvre.
Lower the rear headrests to storage po-

sition.
Pull lever 1 of the seatback you wish to 

fold down (on the right or left-hand side 

of the bench seat), and bring the seat-

back down.

REAR BENCH SEAT: functions 

(1/2)

For safety reasons, carry 

out any adjustments when 

the vehicle is not being 

driven.

When moving the rear 

bench seat, make sure 

the bench seat anchor-

age points are clean (they 

should be free from grit, cloths etc.).

1

Before folding down any rear seat, 

fasten the seat belt buckle of the seat 

concerned into its corresponding catch.
This will prevent the seat belt becoming 

trapped when the seat is returned to its 

position for use.
In all cases, check that the seat belts 

are operating correctly.

The configuration of the 

two-seat bench with the 

small seatback A pulled 

down, does not allow the 

central seat to be used as it would 

be impossible to buckle the seat belt 

(belt buckles inaccessible).

A


Content   ..  7  8  9  10   ..