Peugeot Partner VU (2007 year). Manual - part 7
 

  Index      Peugeot     Peugeot Partner VU - service manual 2007 year in english


Search            copyright infringement  


Content   ..  5  6  7  8   ..


Peugeot Partner VU (2007 year). Manual - part 7


95

Practical information -

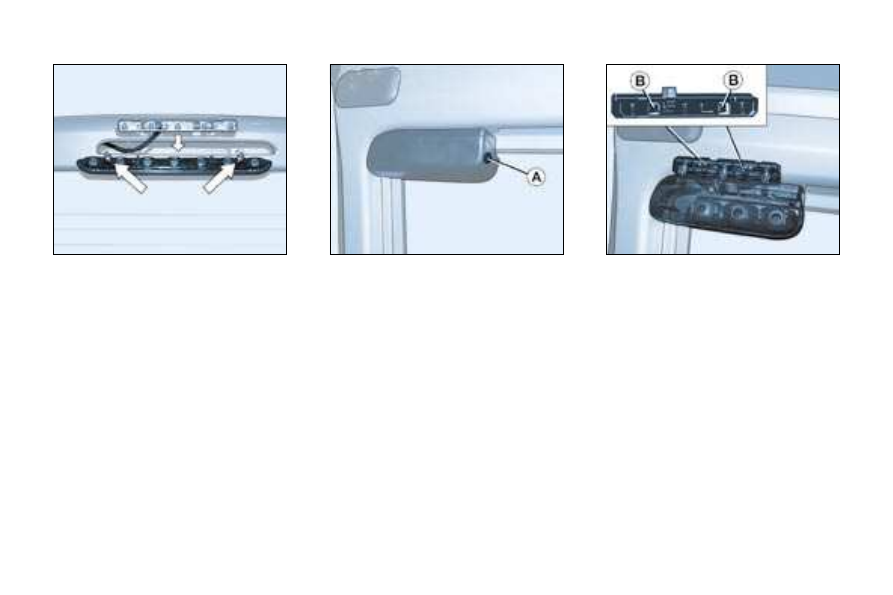
Third brake light (tailgate) 

(W 5 W)

 

With  the  tailgate  open,  unscrew 

the two nuts.

 

Unclip the support to gain access 

to the bulbs.

 

Change the faulty bulb.

Third brake light  

(rear left door) (W 5 W)

 

Remove  the  housing  cover  by 

pressing the tab 

A (round section) 

at the end of the light.

 

Pull the housing cover rearwards.

 

Squeeze the two tabs 

to remove 

the bulb holder.

 

Pull the faulty bulb and change it.

To  refit, proceed in the reverse or-

der.

Practical information

96 -

Removing and fitting a fuse

Before  changing  a  fuse,  the  cause 

of the fault must be found and reme-

died. The fuse numbers are indicated 

on the fuse box.

Use the pliers 

B.

CHANGING A FUSE 

The  fuse  boxes  are  located  under 

the fascia and in the engine compart-

ment.

Fascia fuse box

Unclip the cover to gain access to the 

fuses.

The spare fuses and the pliers 

B are 

secured  on  the  inside  of  the  cov-

er 

A.

Correct

Incorrect

Pliers B

Always  replace  a  faulty  fuse  with 

a fuse of the same rating (two fuse 

types according to manufacturer - 

see images).

Practical information

98 -

The  electrical  circuit  of  your 

vehicle  is  designed  to  oper-

ate with standard or optional 

equipment.
Before installing other electri-

cal equipment or accessories in your 

vehicle, consult a PEUGEOT dealer.

Some  electrical  accessories  or  the 

way in which they are fitted may have

an adverse effect on the operation of 

your vehicle (its electronic control cir-

cuits, the audio circuit and the electri-

cal charging circuit).

PEUGEOT  declines  any  responsi-

bility  for  expenses  incurred  through 

the  repair  of  your  vehicle  or  for  any 

malfunctions  resulting  from  the  in-

stallation  of  auxiliary  accessories, 

not  supplied  and  not  recommended 

by PEUGEOT and not installed in ac-

cordance  with  PEUGEOT’s  instruc-

tions, in particular for any equipment 

the power consumption of which ex-

ceeds 10 milliamps.

The  maxi  fuses  provide  additional 

protection for the electrical systems. 

Any  work  on  these  fuses  must  be 

carried out by a PEUGEOT dealer.

Engine compartment fuse box

To gain access to the box in the en-

gine  compartment  (next  to  the  bat-

tery), unclip the cover.

After  carrying  out  work,  close  the 

cover very carefully.

99

Practical information -

Fuse N°

Rating

Functions

1

10 A

Pre-heat unit (diesel) - Brake and clutch switches - Reversing lights.

2

15 A

Fuel pump.

3

10 A

ABS control unit.

4

10 A

Engine control unit.

5

-

Not used.

6

15 A

Front fog lamps.

7

20 A

Headlamp wash pump.

8

20 A

Fan assembly relay - Engine control unit.

9

15 A

Left-hand dipped beam.

10

15 A

Right-hand dipped beam.

11

10 A

Left-hand main beam.

12

10 A

Right-hand main beam.

13

15 A

Horns.

14

10 A

Front and rear windscreen wash pumps.

15

30 A

Oxygen sensor - Air flow sensor.

16

30 A

Air pump relay.

17

30 A

Front windscreen wiper.

18

40 A

Air conditioning fan.

Practical information

96 -

Removing and fitting a fuse

Before  changing  a  fuse,  the  cause 

of the fault must be found and reme-

died. The fuse numbers are indicated 

on the fuse box.

Use the pliers 

B.

CHANGING A FUSE 

The  fuse  boxes  are  located  under 

the fascia and in the engine compart-

ment.

Fascia fuse box

Unclip the cover to gain access to the 

fuses.

The spare fuses and the pliers 

B are 

secured  on  the  inside  of  the  cov-

er 

A.

Correct

Incorrect

Pliers B

Always  replace  a  faulty  fuse  with 

a fuse of the same rating (two fuse 

types according to manufacturer - 

see images).

97

Practical information -

Fuse

Rating

Functions

1

15 A

Rear wiper (hinged doors) - Rear 12 V sockets.

4

20 A

Multi-function display - Instrument panel - Audio equipment - Steering wheel controls.

5

15 A

Alarm siren. 

6

10 A

Diagnostic socket.

7

15 A

Alarm - Rain and brightness sensor.

9

30 A

Heated seats.

10

40 A

Rear screen and mirrors demisting.

11

15 A

Rear windscreen wiper (tailgate).

12

30 A

Front electric windows.

14

10 A

Engine fuse box - Steering wheel controls.

15

15 A

Instrument panel - Multi-function display - Audio equipment - Parking assistance.

16

30 A

Locking/unlocking controls for doors, bonnet and boot.

20

10 A

Right-hand brake light.

21

15 A

Left-hand brake light.

22

20 A

Front courtesy light - Map reading light - Lighter - Front 12 V socket - Electric mirror.

Practical information

100 -

ECONOMY MODE FUNCTION

After the engine has stopped, certain 

functions  (windscreen  wiper,  elec-

tric  windows,  courtesy  lights,  audio 

equipment, etc.) can only be used for 

a combined duration of approximate-

ly thirty minutes, to prevent discharg-

ing the battery.

Once  the  thirty  minutes  are  over,  a 

switching  to  economy  mode  mes-

sage  appears  on  the  multi-function 

display  and  the  active  functions  are


put on standby.

These  functions  are  reactivated  au-

tomatically  next  time  the  vehicle  is 

driven.

In order to resume the use of these 

functions  immediately,  the  engine 

must be started and left to run for a 

few minutes.

The time available to you will then be 

double the duration for which the en-

gine is left running. However, this pe-

riod will always be between five and

thirty minutes.

BATTERY

To charge the battery using a 

battery charger:

-  Disconnect the battery,

-  Follow the instructions for use giv-

en by the battery charger manufac-

turer,

-  Reconnect  starting  with  the  nega-

tive (-) terminal,

-  Check  that  the  terminals  and  con-

nectors  are  clean.  If  they  are  cov-

ered with sulphate (white or greenish 

deposit), disconnect them and clean 

them.

It is advisable to disconnect the 

battery if the vehicle is not to be 

used  for  a  period  of  more  than 

one month.

Never disconnect a terminal 

when the engine is running.

Never charge a battery with-

out  first disconnecting the

terminals.

After  every  reconnection  of 

the  battery,  switch  on  the  ignition 

and wait 1 minute before starting to 

allow  the  electronic  systems  to  be 

initialised. If slight difficulties are ex-

perienced after this, please contact a 

PEUGEOT dealer.

A  flat battery prevents the

engine from starting.

To start the vehicle from 

another battery:

-  Connect the red cable to the positive 

(+) terminals of the two batteries,

-  Connect  one  end  of  the  green  or 

black cable to the negative (-) ter-

minal of the slave battery,

-  Connect the other end of the green 

or black cable to an earth point on 

the broken down vehicle as far as 

possible from the battery.

Operate  the  starter,  let  the  engine 

run.

Wait for the engine to return to idle, 

then disconnect the cables.

101

Practical information -

Making the connections

A1: -

A2: - Digital control (manufacturer).

A3: - Digital control (manufacturer).

A4: -  Audio equipment multiplexing 

(manufacturer).

A5: -

A6: (+ve) Accessories

A7: (+ve) Permanent

A8: (-ve) Earth

B1: (+) -

B2: (-) -

B3: (+) Front right speaker and 

tweeter

B4: (-) Front right speaker and 

tweeter

B5: (+) Front left speaker and tweeter

B6: (-) Front left speaker and tweeter

B7: (+) -

B8: (-) -

FITTING SPEAKERS

The  factory-fitted equipment allows

the fitting of:

-  35  mm  diameter  tweeters  in  the 

fascia,

-  165  mm  diameter  speakers  in  the 

front doors.

FITTING AUDIO EQUIPMENT

Your vehicle is equipped with certain 

factory-fitted audio equipment:

-  roof aerial,

-  coaxial aerial cable,

-  basic interference suppression,

-  supply to front speakers and tweet-

ers,

-  two 8-way connectors.

Contact a PEUGEOT dealer 

before  fitting audio equip-

ment or speakers in your ve-

hicle.

Practical information

102 -

SNOW SCREEN*

The snow screen is installed on the 

lower part of the front bumper to pre-

vent the accumulation of snow at the 

radiator cooling fan.
When the snow has cleared (tem-

perature above 10 °C), remove the 

snow screen.

*  According to country.

FITTING

 Offer  up  the  snow  screen  facing 

the front bumper.

 Put it in place positioning the low-

er clips 

in the bumper.

 

Press  the  snow  screen  at  each 

upper clip 

B.

REMOVAL

 Press  the  two  upper  clips 

B  and 

pull the snow screen.

103

Practical information -

Without lifting (four wheels on the 

ground)

You must always use a towbar.

Never use the radiator cross-

member.

When towing another vehicle, 

it must freewheel (gearbox in 

neutral).

By lifting (two wheels only on the 

ground)

It  is  preferable  to  lift  the  vehicle  by 

the wheels.

TOWING YOUR VEHICLE

From the front or the rear

Attach the towbar to the towing eye.

Practical information

104 -

TOWING A TRAILER, 

CARAVAN, BOAT, etc.

We  recommend  the  use  of  original 

PEUGEOT  towbars  that  have  been 

tested and approved from the design 

stage of your vehicle and that the fit-

ting  of  the  towbar  is  entrusted  to  a 

PEUGEOT dealer.

Your  vehicle  is  primarily  designed 

for  transporting  people  and  luggage 

but it may also be used for towing a 

trailer.

Driving with a trailer subjects the tow-

ing vehicle to more significant stress

and  its  driver  must  be  particularly 

careful.

Air  density  decreases  with  altitude, 

thus  reducing  engine  performance. 

Above  1 000  metres,  the  maximum 

towing load must be reduced by 10 % 

and so on for every 1 000 metres of 

altitude.

Driving advice

Distribution of loads: Distribute the 

load in the trailer so that the heaviest 

items are as close as possible to the 

axle and the nose weight approach-

es  the  maximum  permitted  without 

exceeding it.

Cooling: Towing a trailer on a slope 

increases  the  temperature  of  the 

coolant. 

As  the  fan  is  electrically  controlled, 

its cooling capacity is not dependent 

on the engine speed.

On  the  contrary,  use  a  high  gear  to 

lower  the  engine  speed  and  reduce 

your speed.

The maximum towing load on a long 

slope  depends  on  the  gradient  and 

the outside temperature.

In all cases, pay attention to the cool-

ant temperature.

If  the  warning  light  comes  on,  stop 

the vehicle and switch off the engine 

as soon as possible.

Tyres:  Check  the  tyre  pressures  of 

the towing vehicle and of the trailer, 

observing  the  recommended  pres-

sures.

Braking: Towing increases the brak-

ing distance. 

Lights:  Check  the  electrical  signal-

ling on the trailer.

Side wind: Take into acount the in-

creased sensitivity to side wind. 

105

Practical information -

ACCESSORIES FOR YOUR 

PARTNER

A  wide  choice  of  accessories  recom-

mended by PEUGEOT and original parts 

is available through the dealer network.

These  accessories  and  parts,  after 

being  tested  and  approved  for  reli-

ability and safety, are all adapted to 

your PEUGEOT vehicle.

This product range offered by PEUGEOT Ac-

cessories is structured around 5 categories:

-  PROTECTION

-  TOURING

-  IN-CAR TECHNOLOGY

-  STYLING

-  UNIVERSAL,

it is dedicated to:

Depending on the country in 

which the vehicle is sold, it is 

compulsory to have a safety 

jacket,  a  signalling  triangle 

and  a  set  of  spare  bulbs 

available in the vehicle.

The fitting of electrical equipment or

accessories  which  are  not  recom-

mended by PEUGEOT may result in 

a  failure  of  your  vehicle’s  electronic 

system.

Please  note  this  specific warning.

You  are  advised  to  contact  a  repre-

sentative of the Marque to be shown 

the  range  of  recommended  equip-

ment and accessories.


"Universal":  Screenwash, 

interior  and  exterior  main-

tenance and cleaning prod-

ucts...

"Protection":  Separation 

grille,  window  protectors, 

anti-theft alarm, wheel locks, 

parking  assistance,  signal-

ling triangle, first aid kit, fog

lamps, safety jacket...

"In-Car Technology": Audio 

systems,  audio-  telephone, 

speakers, CD changer, navi-

gation  system,  telephone 

console...

"Touring":  Rear  and  side 

windows,  audio-telephone 

console,  seat  covers  com-

patible  with  side  air  bags, 

mats,  rubber  boot  carpet, 

thermoformed  side  protec-

tors,  low  partition  interior 

grille,  luggage  net,  door  deflectors,

roof rack, thermoformed interior pro-

tectors, wooden interior fittings, load-

ing roller, towbar, roof bars (load on 

longitudinal  bars:  75  kg  max:  har-

mony:  100  kg  max),  snow  chains, 

tailgate bicycle carrier, booster seats 

and child seats...

Note

To  prevent  the  mat  from  becoming 

caught under the pedals:

-  ensure  that  the  mat  is  positioned 

and secured correctly,

-  never fit one mat on top of another.

"Styling":  Alloy  wheels, 

door sills, mud flaps...

Technical data

106 -

PETROL ENGINES AND GEARBOXES

(1) Draining by gravity - (2) Draining by suction

Model codes

GBKFWC

GCKFWC

ENGINES

1.4 litre

Cubic capacity (cm

3

)

1 360

Bore x stroke (mm)

75 x 77

EU standard maximum power (kW)

55

Maximum power at engine speed (rpm)

5 500

EU standard maximum torque (Nm)

120

Maximum torque at engine speed (rpm)

3 400

Fuel

Ron 95 - Ron 98

Catalytic converter

Yes

Gearbox

Manual

(5 speed)

Oil capacity (in litres)

Engine (with cartridge replacement)

3 (1) - 3.25 (2)

Gearbox-Final drive

2

107

Technical data -

DIESEL ENGINES AND GEARBOXES

Model codes

GB9HWC

GC9HWC

GB9HXC

GC9HXC

GBWJYB

GCWJYB

GBRHYB

GCRHYB

ENGINES

1.6 litre Turbo HDI 1.6 litre Turbo HDI

1.9 litre

2 litre Turbo HDI

Cubic capacity (cm

3

)

1 560

1 560

1 867

1 997

Bore x stroke (mm)

75 x 88.3

75 x 88.3

82.2 x 88

85 x 88

EU standard maximum power (kW)

55

66

51

66

Maximum power at engine speed (rpm)

4 000

4 000

4 600

4 000

EU standard maximum torque (Nm)

170

215

125

205

Maximum torque at engine speed (rpm)

1 750

1 750

2 500

1 900

Fuel

Diesel

Diesel

Diesel

Diesel

Catalytic converter

Yes

Yes

Yes

Yes

Gearbox

Manual

(5 speed)

Manual

(5 speed)

Manual

(5 speed)

Manual

(5 speed)

Oil capacity (in litres)

Engine (with cartridge replacement)

3,8

3,8

4,8

4,5

Gearbox-Final drive

1,9

1,9

1,9

1,9

Technical data

108 -

CONSUMPTION

The consumption values presented here correspond to the values communicated at the time of printing. These consumption 

values were established in accordance with directive 80/1268/CEE. They may vary depending on the style of driving, traffic

conditions, weather conditions, the load in the vehicle, the maintenance of the vehicle and the use of the accessories.

In accordance with directive 80/1268/CEE in M.P.G. (litres/100 km)

Engine

Gearbox

Model codes

Version

Urban driving

Inter-urban

Mixed

1.4 litre

Manual

GBKFWC

GCKFWC

600 kg

800 kg

28.5 (9.9)

28.5 (9.9)

44.8 (6.3)

44.8 (6.3)

37.6 (7.5)

37.6 (7.5)

1.6 litre Turbo HDI

Manual

GB9HWC

GC9HWC

600 kg

800 kg

42.2 (6.7)

42.2 (6.7)

60.1 (4.7)

60.1 (4.7)

52.4 (5.4)

52.4 (5.4)

1.6 litre Turbo HDI

Manual

GB9HXC

GC9HXC

600 kg

800 kg

41.5 (6.8)

41.5 (6.8)

61.4 (4.6)

61.4 (4.6)

52.4 (5.4)

52.4 (5.4)

1.9 litre

Manual

GBWJYB

GCWJYB

600 kg

800 kg

30.4 (9.3)

30.4 (9.3)

49.6 (5.7)

49.6 (5.7)

40.4 (7.0)

40.4 (7.0)

2 litre Turbo HD

Manual

GBRHYB

GCRHYB

600 kg

800 kg

41.5 (6.8)

40.9 (6.9)

61.4 (4.6)

60.1 (4.7)

47.1 (6.0)

47.1 (6.0)

109

Technical data -

PETROL WEIGHTS AND TOWING LOADS (IN KG)

The GTW and towing load values indicated are valid up to a maximum altitude of 1 000 metres; the towing load mentioned 

must be reduced by 10 % for each additional 1 000 metres.

The speed of a towing vehicle must not exceed 60 mph (100 km/h) (comply with the legislation in force in your country).

High exterior temperatures may result in a reduction in the performance of the vehicle in order to protect the engine; when 

the exterior temperature is above 37 °C, limit the towed load.

*  The weight of the braked trailer may be increased, within the GTW limit, on condition that the GVW of the towing vehicle is 

reduced by the same amount; warning, towing with a lightly loaded towing vehicle may have an adverse effect on its road 

holding ability.

Engine

1.4 litre

Model

600 kg

800 kg

Gearbox

Manual

Manual

Model codes

GBKFWC

GCKFWC

• Kerb weight

1 055

1 055

•  Gross vehicle weight (GVW)

1 655

1 855

• Gross train weight (GTW)

2 555

2 755

• Unbraked trailer

500

500

• Braked trailer (within GTW)

900

900

•  Braked trailer*  

(with load transfer within GTW)

-

-

• Recommended nose weight

70

70

• Recommended weight on roof rack

100

100


Content   ..  5  6  7  8   ..