Peugeot Partner Tepee (2017 year). Manual - part 11
 

  Index      Peugeot     Peugeot Partner Tepee - service manual 2017 year in english


Search            copyright infringement  


Content   ..  9  10  11  12   ..


Peugeot Partner Tepee (2017 year). Manual - part 11


 159

CHECKS

7

Partner2VP_en_Chap07_Verification_ed02-2016

Checks

Partner2VP_en_Chap07_Verification_ed02-2016

CHECKS

Carbon filter and passenger compartment filter

Particle filter (Diesel)

Maintenance of the particle filter must 

be carried out by a PEUGEOT dealer.
On acceleration after the vehicle has 
been running for a prolonged period 
at very low speed or at idle, you may, 
in exceptional circumstances, notice 
the emission of water vapour at the 
exhaust. This water vapour does not 
have any adverse effect on vehicle 
handling or the environment.

Battery

At the start of summer or winter, have 
your battery checked by a PEUGEOT 

dealer or a qualified workshop.

Brake pads

Brake pad wear depends on the style 
of driving, in particular for vehicles 
which are used in town, over short 
distances. It may be necessary to 
check the thickness of the pads, even 
between services.
Unless there is a leak on the circuit, a 

drop in the brake fluid level indicates 

that the brake pads are worn.

Brake disc / drum wear

For information on checking the brake 
disc / drum wear, contact a PEUGEOT 
dealer.

Parking brake

Where the parking brake travel is too great 
or there is a reduction in the performance 
of the system, the parking brake should be 
adjusted, even between services.
Have the system checked by a PEUGEOT 

dealer or a qualified workshop.

Oil filter

Change the filter regularly in 

accordance with the manufacturer's 
servicing schedule.

An access flap allows replacement of 

the filters.

The carbon filter permits continuous 

and effective filtering of dust.

If the passenger compartment filter 

becomes blocked, this may reduce the 
performance of the air conditioning 
system and generate unpleasant 
odours.
We recommend the use of a combined 

passenger compartment filter. By 

means of its second special active 

filter, it contributes to the purification 

of the air breathed by the occupants 
and the cleanness of the passenger 
compartment (reduction of allergic 
symptoms, unpleasant odours and 
greasy deposits).
Refer to theservicing and warranty 
booklet for the replacement interval for 
these components.

Depending on the environment (dusty 
atmosphere...) and the use of the 
vehicle (urban driving...), change them 
twice as often if necessary.

160

Partner2VP_en_Chap07_Verification_ed02-2016

Checks

Partner2VP_en_Chap07_Verification_ed02-2016

Good practice

Bleeding water from the Diesel 

filter

Manual gearbox

Have the level checked in accordance with 
the manufacturer's servicing schedule.

In order to avoid damaging the 
electrical units, we strongly 
advise you not to use high 

pressure washing to clean the engine 
compartment.
After washing the vehicle dampness, 
or in winter, ice may form on the brake 

discs and pads: braking efficiency may 

be reduced. Make some light brake 
applications to dry and de-ice the 
brakes.

If this warning lamp comes 

on, bleed the filter. Otherwise 

bleed regularly each time the 
engine oil is changed.

HDi engines use advanced 
technology. All work requires 
special training, so should be 

entrusted to a PEUGEOT dealer.

Depending on country of sale.

To drain the water, unscrew the bleed 

screw located on the filter.
Operate until all of the water no longer 

flows in the transparent pipe, then 

tighten the bleed screw.

Only use products recommended by 
PEUGEOT or products of equivalent 

quality and specification.
In order to optimise the operation 
of units as important as the braking 
system, PEUGEOT selects and offers 

specific products.

 161

CHECKS

7

Partner2VP_en_Chap07_Verification_ed02-2016

Fuel

Partner2VP_en_Chap07_Verification_ed02-2016

REFUELLING

Low fuel level

Filling

The fuel tank must be filled 

with the 

engine off.

-  Open the fuel filler flap.

Insert the key, then turn it a quarter 
turn.

Remove the cap and hook it onto 
the clip located on the inside of the 

flap.

When filling with fuel, a 

mechanical system prevents 
opening of the left-hand side door. 

When the fuel filler flap is open, ensure 

that no one tries to slide this door.
Once the flap has been closed, the 

sliding side door may jam, push the 
door to close it then open it.

When the low fuel level is 
reached, this warning lamp 
comes on.

A label affixed to the inside of the flap 

reminds you of the type of fuel to be 
used.
You must fill with at least 5 litres of fuel 

for it to be registered by the fuel gauge.
When the fuel filler cap is opened, 

there may be a slight inrush of air. This 
vacuum is entirely normal and is due to 
the sealing of the fuel system.
When filling the fuel tank, do not 

continue after the 3

rd

 cut-off of the 

nozzle. This could cause malfunctions.
The capacity of the fuel tank is 
approximately 60 litres (or 55 litres 
according to version).
-  After filling the fuel tank, lock the 

cap and close the flap.

You then have 

approximately 8 litres 

of fuel remaining.
Fill up without delay to avoid running 
out of fuel.
Never risk driving until you run out of 
fuel as this may damage the emissions 
control and injection systems.

162

Partner2VP_en_Chap07_Verification_ed02-2016

Fuel

Partner2VP_en_Chap07_Verification_ed02-2016

Travelling abroad

Certain fuels could damage the 

engine of your vehicle. In certain 

countries, the use of a particular 

fuel may be required (specific 

octane rating, specific sales 

name…) to ensure correct operation 

of the engine.
For any additional information, contact 
your dealer.

Fuel used for petrol engines

The petrol engines are compatible with 
bio-fuels that conform to current and 
future European standards and can be 

obtained from filling stations:

Petrol that meets the EN228 
standard, mixed with a bio-fuel 
meeting the EN15376 standard.

The only petrol additives 
authorised for use are those 
that meet the B715001 
standard.

Fuel used for Diesel engines

The Diesel engines are compatible 
with biofuels that conform to current 
and future European standards and 

can be obtained from filling stations:

Diesel fuel that meets 
standard EN590 mixed 
with a biofuel that meets 
standard EN14214 
(possibly containing up 
to 7 % Fatty Acid Methyl 
Ester),

The use of B20 or B30 fuel 
meeting standard EN16709 
is possible in your Diesel 
engine. However, this use, 
even occasional, requires 
strict application of the 
special servicing conditions 
referred to as "Arduous 
conditions".

Diesel fuel that 
meets standard 
EN16734 mixed with 
a biofuel that meets 
standard EN14214 
(possibly containing 
up to 10 % Fatty Acid 
Methyl Ester),

For more information, contact a 

PEUGEOT dealer or a qualified 

workshop.

-  Paraffinic Diesel 

fuel that meets 
standard EN15940 
mixed with a biofuel 
that meets standard 
EN14214 (possibly 
containing up to 7 % 
Fatty Acid Methyl Ester).

The use of any other type of (bio)
fuel (vegetable or animal oils, 
pure or diluted, domestic fuel...) 

is strictly prohibited (risk of damage to 
the engine and fuel system).

The only Diesel additives 
authorised for use are those that 
meet the B715000 standard.

 163

CHECKS

7

Partner2VP_en_Chap07_Verification_ed02-2016

AdBlue

®

Partner2VP_en_Chap07_Verification_ed02-2016

DIESEL PRIMING PUMP

If you run out of fuel, it is necessary to 
prime the fuel circuit.

Other HDi engines

Fill the fuel tank with at least 

five litres of Diesel.

Squeeze and release the manual 
priming pump, under the bonnet, 
under the protective cover.

Operate the starter until the engine 
starts.

BlueHDi engine

-  Fill the fuel tank with at least five 

litres of Diesel.

Switch on the ignition (without 
starting the engine).

Wait around 6 seconds and switch 
off the ignition.

Repeat the operation 10 times.

Operate the starter to run the 
engine.

FUEL CUT-OFF

In a serious collision, a mechanism 
automatically prevents fuel from 
reaching the engine.

The flashing of this warning 

lamp is accompanied by a 
message in the screen.

Check that there is no odour or 
leakage of fuel outside the vehicle and 
re-establish the fuel supply:

switch off the ignition 
(STOP position),

remove the key,

put the key back in the ignition,

switch on the ignition and start.

164

Partner2VP_en_Chap07_Verification_ed02-2016

AdBlue

®

Partner2VP_en_Chap07_Verification_ed02-2016

BLUEHDI AND ADBLUE

®

SCR technology

AdBlue

®

 is the brand name of the 

solution needed for operation of the 
SCR system.

The aim of BlueHDi is to reduce the 
emissions of NOx (nitrous oxides) in 
the air by up to 90%, using a system 
that converts NOx into water vapour 
and nitrogen in a dedicated catalytic 
converter: SCR (Selective Catalytic 
Reduction).
This objective meets the "Euro 6" 
emissions standard adopted by the 
European Union aimed at limiting the 
emissions of pollutants from internal 
combustion engines.
The SCR technology used on BlueHDi 
engines involves the injection of 
AdBlue

®

 into the exhaust system.

BlueHDi vehicles have a specific 

AdBlue

®

 additive tank with a 

capacity 

of 17 litres.

It has an exterior filler with a 

blue filler 

cap, located to the left of the Diesel 

fuel filler cap.
Filling of the AdBlue

®

 tank can be 

done using 5 or 10 litre containers, 
1.89 litre bottles, or when at a fuel 

filling station equipped with a special 

AdBlue

®

 delivery pump for light 

vehicles.

This operation can also be carried 
out by a PEUGEOT dealer or a 

qualified workshop.

Please note that the high delivery 

pumps at some filling stations, 

intended only for lorries and coaches, 
are not suitable for cars or light 
commercial vehicles.
Never use these pumps.

 165

CHECKS

7

Partner2VP_en_Chap07_Verification_ed02-2016

AdBlue

®

Partner2VP_en_Chap07_Verification_ed02-2016

Good practice
While the quantity of AdBlue

®

 in 

the additive tank is sufficient, no 

information is displayed.
On the other hand, once the fluid 

level drops to the quantity needed 
for a range of 1 500 miles (2 400 km) 
driving, you are warned by different 
temporary signals (warning lamp, 
message, audible signal).
As more miles are covered, these 
signals intensify and the message 
becomes permanent.
When the AdBlue

®

 tank is empty, 

restarting becomes impossible.
It is strongly recommended that you 
do not wait for the successive alerts 
before topping-up the AdBlue

®

 additive, 

but do this as soon as possible.

Filling the AdBlue

®

 tank

For light vehicles, 5 or 10 litre 
containers and 1.89 litre 
(1/2 US gallon) bottles are available 
from PEUGEOT dealers, until they are 
equipped with AdBlue

®

 delivery pumps.

If you want to fill the AdBlue

®

 tank 

yourself, ensure that you have a 

suitable filler pipe, which may or may 

not be supplied with the additive 
container.

166

Partner2VP_en_Chap07_Verification_ed02-2016

AdBlue

®

Partner2VP_en_Chap07_Verification_ed02-2016

Range indicators

Rules on the display of alerts

For more information on the 
displays and warning lamps, refer 
to chapter 3, "Instruments and 
controls" section.

Range greater than 1 500 miles  

(2 400 km)
No information displayed.

Once the 1 500 miles (2 400 km) 
threshold is reached, the UREA 
warning lamp comes on temporarily 
and the remaining range message is 
displayed.
The alert is repeated every 200 miles 
(300 km) until the next threshold is 
reached.
Every time the ignition is switched 
on, the alert is given, together with an 
audible signal.

Remaining range less than 

1 500 miles (2 400 km) and greater 

than 350 miles (600 km)

Driving range

With the touch screen:

If the range is greater than 3 100 miles 
(5 000 km), a range value is not given.

Press this button to display 
the information.

select the "Driving 
assistance" menu,

select "Diagnostic",

select CHECK.

Different levels of alert are triggered 
according to the remaining driving 
range threshold
You will be informed as each mileage 
threshold is reached and the alerts will 
change from temporary to permanent.

The 1

st

 is triggered at a remaining 

driving range of 1 500 miles 
(2 400 km).

The 2

nd

 is triggered at a remaining 

driving range of 350 miles 
(600 km).

Up to 0 miles, at which point it will 
be impossible to restart the engine 
after a stop.

 167

CHECKS

7

Partner2VP_en_Chap07_Verification_ed02-2016

AdBlue

®

Partner2VP_en_Chap07_Verification_ed02-2016

Once the 350 miles (600 km) threshold is 

reached, the UREA warning lamp flashes 

and the Service warning lamp comes 
on, accompanied by a message on the 
remaining driving range.
The alert is repeated every 30 seconds 
with an update of the remaining driving 
range in steps of 30 miles (50 km) 
travelled.
Every time the ignition is switched on, 
the alert is given together with an audible 
signal.
At 0 miles the system installed in the 

vehicle to meet the emissions standard 

will prevent engine starting.

Your vehicle's exhaust emissions no 
longer meet the "Euro 6" standard and 
the engine will not start.

To be able to 

restart the vehicle, you 

must add at least 

4 litres of AdBlue

®

.

Pour the additive into the tank (by 

the filler with the blue cap).

Switch on the ignition without 
starting.

Wait 10 seconds before starting the 
engine.

Remaining range less than 350 miles 

(600 km) and more than 0 miles

Starting prevented, breakdown related 

to a lack of AdBlue

®


in the special tank

The 0 fluid level has been reached.

Avoid waiting until the 

remaining range is 0 miles!

The alert is repeated when driving until 
the AdBlue

®

 tank has been topped-up 

with sufficient additive.
Unless the additive in the special 
additive tank is topped-up, you risk 
immobilisation of the vehicle.

Following this, make a further fill 

to the special additive tank, the 
capacity of which is 

17 litres.

Fault with the SCR system

The UREA, Service and diagnostic 
warning lamps comes on.
Every time the ignition is switched on, 

the emissions fault is confirmed by an 

audible signal and a message.
If it is a temporary fault, the alert 
disappears as soon as the exhaust 
emissions return to the levels required 
by the standard.

Detection

On the other hand, if the warning 
lamps are still on after 30 miles 
(50 km) of driving, the fault is 

confirmed.

An engine start prevention system will 
be activated automatically after  
650 miles (1 100 km) travelled 

following this confirmation.
Go to a PEUGEOT dealer or a 

qualified workshop.

Or go to a PEUGEOT dealer or a 

qualified workshop.

168

Partner2VP_en_Chap07_Verification_ed02-2016

AdBlue

®

Partner2VP_en_Chap07_Verification_ed02-2016

Fault confirmed
In addition to the previous signals, 

the UREA warning lamp flashes and 

the remaining range allowed will be 
displayed in miles (kilometres).
The alert will be repeated every  
30 seconds with an update of the 
driving range in steps of 30 miles  
(50 km).
Go to a PEUGEOT dealer or a 

qualified workshop as soon as 

possible.
You risk not being able to start the 
engine.

Starting prevented, having 

covered the 650 miles (1 100 km)

At each attempt at starting, the alert is 
activated and the message "Emissions 
fault: Starting prevented" is displayed.

Refilling / Topping-up the 

AdBlue

®

Precautions to take
Use only AdBlue

®

 that meets the 

ISO 22241 standard.
The AdBlue

®

 fluid is an urea-based 

solution.
This fluid is non-flammable, colourless 

and odourless.
To be kept in a cool area.

Containers (5 or 10 litres) and 

bottles (1.89 litres) of AdBlue

®

Please check the use-by date.
Read the instructions on the label.
Ensure that you have a suitable 

filler pipe, which may or may not be 

supplied with the container.

In the event of an overflow, wipe 

around the filler mouth using a 

damp cloth.

If any AdBlue

®

 fluid is split or splashed 

on to you, wash immediately with cold 
water or wipe yourself with a clean 
damp cloth.
If the fluid has crystallised, clean it off 

using a sponge and hot water.

To facilitate filling, an adaptor is 

available from PEUGEOT dealers.

 169

CHECKS

7

Partner2VP_en_Chap07_Verification_ed02-2016

AdBlue

®

Partner2VP_en_Chap07_Verification_ed02-2016

Filling

Ensure that the vehicle is parked on a 

flat and level surface.
Pour the contents of the container / 
bottle into the dedicated tank.

After filling the AdBlue

®

 tank, observe 

the following procedure:

Switch on the ignition without 
starting.

Wait 10 seconds before starting the 
engine.

Never dispose of empty AdBlue

®


containers and bottles in the 
household waste.

Place them in a special container 
provided this purpose or take them to 
your dealer.

Keep AdBlue

®

 out of the reach of 

children, in its original container.

Never transfer AdBlue

®

 to another 

container: it would loose its purity.
Never dilute the fluid with water.

Never pour the fluid into the Diesel fuel 

tank.

Recommendations on storage

Never store containers or bottles of 
AdBlue

®

 in your vehicle.

Freezing of the AdBlue

®

AdBlue

®

 freezes at about -11°C 

(12.2° F) and deteriorates above 25°C 
(77°F).
It is recommended that containers and 
bottles be stored in a cool area and 
protected from direct sunlight.
Under these conditions, the fluid can 

be kept for at least a year.
Additive that has been frozen can 
be used once it has thawed out in 
ambient air.

The SCR system includes an 
AdBlue

®

 tank heater that ensures 

operation of the vehicle in normal 
conditions.

In exceptional situations, such as when 
the vehicle is kept at temperatures 
below -15°C (5°F) for a long period, 
there may be an emission fault alert 
related to freezing of the AdBlue

®


additive.
Park the vehicle in an area at a more 
moderate temperature for a few hours 
until the AdBlue

®

 becomes a fluid 

again.
The emissions warning lamp does not 
go off immediately, but does so after a 
few miles of driving.

170

Battery

Partner2VP_en_Chap08_Aide-rapide_ed02-2016

BATTERY

Before disconnecting the battery, you 
must wait for 2 minutes after switching 
off the ignition.
Never disconnect a terminal when the 
engine is running.
Never charge a battery without first 

disconnecting the terminals.
After every reconnection of the battery, 
switch on the ignition and wait 1 minute 
before starting to allow the electronic 
systems to be initialised. If problems 
remain after doing this, please contact 

a PEUGEOT dealer or a qualified 

workshop.
After changing bulbs, wait 
approximately 3 minutes before 
reconnecting the battery.

 It is advisable to disconnect the 
battery if the vehicle is not to be 
used for a period of more than 
one month.

To charge the battery using  

a battery charger

Disconnect the battery.

Follow the instructions for use 
given by the battery charger 
manufacturer.

Reconnect starting with the 
negative (-) terminal.

Check that the terminals and 
connectors are clean. If they are 
covered with sulphate (white or 
greenish deposit), disconnect them 
and clean them.

To start the vehicle from 

another battery

Connect the red cable to the 
positive (+) terminals of the 
two batteries.

Connect one end of the green 
or black cable to the negative (-) 
terminal of the slave battery.

Connect the other end of the green 
or black cable to an earth point on 
the broken down vehicle as far as 
possible from the battery.

Operate the starter, let the engine run.

Wait for the engine to return to idle, 
then disconnect the cables.

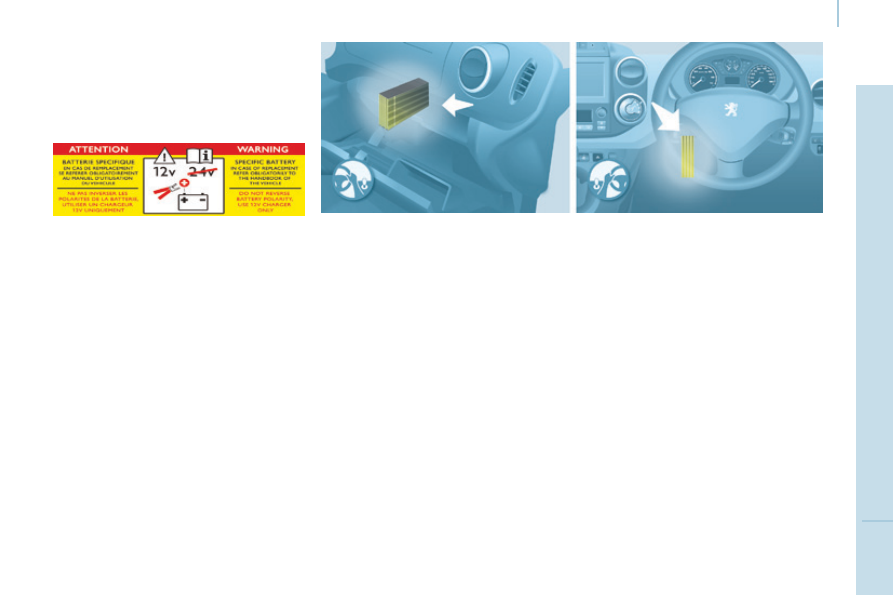
The presence of this label 
indicates the use of a 12 V 
lead-acid battery with special 

technology and specification, for which 

the involvement of a PEUGEOT dealer 

or qualified workshop is required when 

replacing or disconnecting the battery.
Failure to observe this 
recommendation may cause premature 
wear of the battery.

After refitting the battery, the Stop & 

Start system will only be active after 
several hours depending on the 
climatic conditions and the state of 
charge of the battery (up to about  
8 hours).

The Stop & Start battery does not have 
to be disconnected for charging.

171

Battery

QUICK HELP


8

Partner2VP_en_Chap08_Aide-rapide_ed02-2016

ECONOMY MODE

After the engine has stopped, with 
the key in the ignition position, certain 
functions (windscreen wiper, electric 
windows, courtesy lamps, audio 
equipment, etc.) can only be used for a 
cumulative duration of thirty minutes, to 
prevent discharging of the battery.
Once the thirty minutes have elapsed, 
the active functions are put on standby 

and the battery warning lamp flashes 

accompanied by a message in the 
screen.
To resume the use of these functions 
immediately, start the engine and let it 
run for a few minutes.
The time available will then be double 
the time for which the engine was left 
running. However, this time will always 

be between five and thirty minutes.

A flat battery will prevent the 

engine from starting.

172

Partner2VP_en_Chap08_Aide-rapide_ed02-2016

Changing a wheel

Partner2VP_en_Chap08_Aide-rapide_ed02-2016

The temporary tyre repair kit consists 
of a compressor and a bottle 
(containing a sealant).

Using the kit

-  Tick the deflated wheel on the 

speed limitation sticker then affix 

the sticker to the vehicle's steering 
wheel to remind you that a wheel is 
in temporary use.

Clip the bottle 

1 on the compressor 2.

Connect the bottle 

1 to the valve of 

the tyre to be repaired.

Take care to unwind the 
compressor pipe before connecting 
it to the bottle.

Connect the power lead to one of 
the vehicle's 12V sockets.

Switch on the compressor by 
pressing button 

A until the tyre 

pressure reaches 2.0 bars. If this 
pressure cannot be reached, the 
tyre cannot be repaired.

Remove and store the compressor.

Drive immediately, for a few miles 
(kilometres), at reduced speed, to 

fill the puncture.

Adjust the pressure using the 
compressor in accordance with the 
recommendation for the vehicle and 

check that the leak is filled correctly 

(no further loss of pressure).

Drive at reduced speed (50 mph 
[80 km/h]). The tyre must be 
examined and repaired by a 
specialist as soon as possible.

After use, the bottle can be stored in 
a plastic bag, supplied in the kit, to 
avoid staining your vehicle with traces 

of fluid.

Warning: the sealant product is 
harmful if swallowed and causes 
irritation to the eyes.

Keep it out of reach of children.
After use, do not discard the bottle 
into the environment, take it to a 
PEUGEOT dealer or to an specialised 
waste disposal site.
Replacement bottles of sealant are 
available from PEUGEOT dealers.

TEMPORARY PUNCTURE 

REPAIR KIT

The kit is located in one of the two 
storage compartments located under 
the front seats.
Vehicles supplied with a temporary 
puncture repair kit do not have a spare 
wheel or tooling (jack, wheelbrace, ...).

173

QUICK HELP


8

Partner2VP_en_Chap08_Aide-rapide_ed02-2016

Changing a wheel

Partner2VP_en_Chap08_Aide-rapide_ed02-2016

1. Parking the vehicle

The occupants must get out of the 
vehicle and wait in a safe location.

If possible, park the vehicle on 
level, stable and non-slippery 
ground.

Apply the parking brake, switch 

off the ignition and engage first or 

reverse gear.

Place a chock under the wheel 
diagonally opposite the one to be 
changed.

CHANGING A WHEEL

under the passenger footwell behind 
the driver's seat.

If necessary, move the seat forward 
to access the storage compartment 
from the rear.

-  Remove the flap then take out the 

jack and the tool carrier.

Remove the tools needed from the 
carrier.

1. Jack.

2. Wheelbrace.

3. Chock.

4.  Spanner for the Zenith roof bars 

and rear lamps.

5.  Alloy wheel trim removal tool.

6.  Towing eye.

If the vehicle is fitted with a towbar, 

it is sometimes necessary to raise 
the vehicle slightly to make it easier 
to remove the spare wheel from its 
carrier.

2. Tools

The tools are stowed in a storage area 

closed by a flap under a front seat.
However, if the vehicle is not equipped 
with a spare wheel, the towing eye is 
located in the storage compartment 

On certain types of ground and/
or if considerable loads are being 
transported, call a PEUGEOT dealer or 

a qualified workshop.

The jack and tools are specific to your 

vehicle. Do not use them for other 
purposes.

174

Partner2VP_en_Chap08_Aide-rapide_ed02-2016

Changing a wheel

Partner2VP_en_Chap08_Aide-rapide_ed02-2016

3. Spare wheel

Unscrew the bolt using the 
wheelbrace until the carrier is 
lowered fully.

Open the rear doors to gain access 
to the spare wheel.

Detach the carrier from the hook 
and place the spare wheel near the 
wheel to be changed.


Content   ..  9  10  11  12   ..