Peugeot 4007 (2012 year). Manual - part 4
 

  Index      Peugeot     Peugeot 4007 - service manual 2012 year in english


Search            copyright infringement  


Content   ..  2  3  4  5   ..


Peugeot 4007 (2012 year). Manual - part 4


2

COMFORT

  Manual operation 
 It is possible to set one or more func-

tions manually while leaving the other 

functions in automatic mode. 

  
 Switching to manual mode may result 

in discomfort (temperature, humidity, 

odour, condensation) and does not of-

fer optimum comfort.  

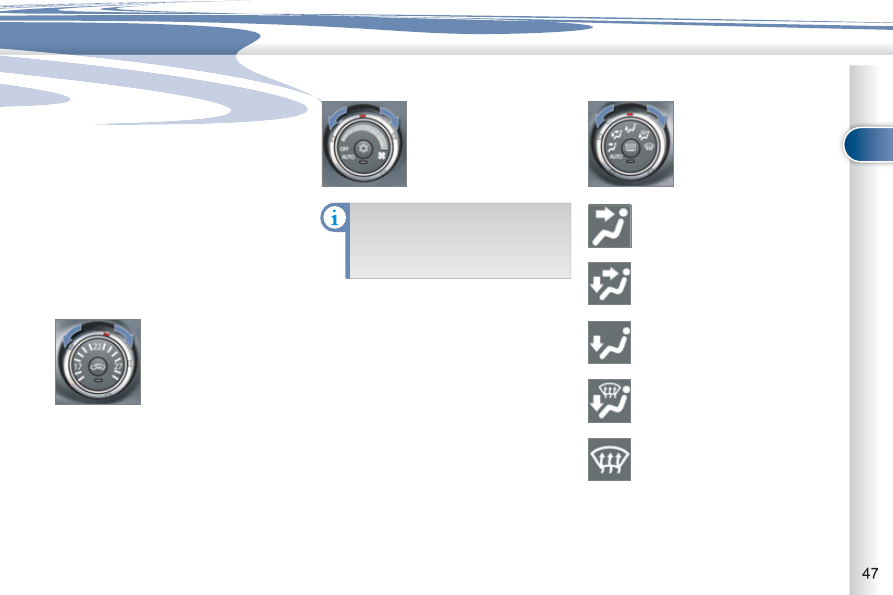
  Temperature adjustment (1) 

  Air fl ow adjustment (2) 

   )  

Turn the dial to the 

right to increase the 

air fl ow or to the left to 

decrease it.  

   )  Turn the temperature 

control dial to the right 

to increase the tem-

perature and to the left 

to decrease it.   

   )  

Place the dial in the 

position required to di-

rect the air towards:  

 To avoid condensation and dete-

rioration of the quality of the air 

in the passenger compartment, 

ensure that a suffi cient  fl ow  of 

air is maintained.  

 the central and side vents, 

 the central and side vents and 

the footwells, 

 the footwells, 

 the windscreen, the side 

windows and the footwells, 

 the windscreen and the side 

windows. 

 The air distribution can be adapted by 

placing the adjustment dial in the inter-

mediate positions.  

  Air distribution adjustment (3) 

2

COMFORT

  Air conditioning On/Off (5) 

   )  Press button  

5  to activate the air 

conditioning.  

 The indicator lamp comes on.  

  Intake of exterior air/

Recirculation of interior air (4)

  This function insulates the passenger 

compartment from exterior odours and 

smoke. 
   )  Press button  

4  to select the air in-

take mode.  

 When the indicator lamp on button  4  is 

off, the exterior air intake function is on. 
 When the indicator lamp on button  4  is 

on, the intake of exterior air is off and 

the system is in air recirculation mode.

  Do not drive for long periods in 

interior air recirculation mode, 

except in truly exceptional atmo-

spheric conditions.  

  Personalisation of the Exterior 

air intake/Interior air recirculation 

function 
 This function is controlled automati-

cally. However, you can deactivate its 

automatic control if you wish to change 

the air intake mode at any time.  

  Personalisation of the Air 

Conditioning On/Off function 
 This function is controlled automati-

cally. However, you can deactivate its 

automatic control if you wish to activate 

or deactivate the air conditioning at 

any time.  

 The settings are retained, even 

after switching off the ignition.  

  Changing the status 
 Press the Air intake/Interior air recircu-

lation button for at least 10 seconds. 
 When the status changes from active to 

inactive, three bleeps are heard and the 

indicator lamp fl ashes three times. 
 When the status changes from inactive 

to active, two bleeps are heard and the 

indicator lamp fl ashes three times.  

  Automatic control active 
 If the air distribution adjustment dial and 

the air fl ow adjustment dial are placed 

in the "AUTO" position, the Air intake/

Interior air recirculation function is also 

controlled automatically.  

  Automatic control inactive 
 Even if the air distribution adjustment 

dial and the air fl ow adjustment dial are 

placed in the "AUTO" position, the Air 

intake/Interior air recirculation function 

is no longer controlled automatically. 

  Changing the status 
 Press the Air Conditioning On/Off button 

for at least 10 seconds. 
 When the status changes from active to 

inactive, three bleeps are heard and the 

indicator lamp fl ashes three times. 
 When the status changes from inactive 

to active, two bleeps are heard and the 

indicator lamp fl ashes three times.  

  Automatic control active 
 If the air distribution adjustment dial and 

the air fl ow adjustment dial are placed in 

the "AUTO" position, or if the tempera-

ture control dial is set to the minimum 

temperature, the air conditioning system 

is controlled automatically.  

  Automatic control inactive 
 The air conditioning system is no longer 

controlled automatically.  

2

COMFORT

  Windows and windscreen demisting/defrosting  

  Demisting/defrosting 
   1.   Press button  A  to select "exterior air 

intake". The indicator lamp on this 

button goes off. 

  2.   Place the air distribution dial in the 

"windscreen, side windows and 

footwells" position. 

  3.   Select the air fl ow required. 
  4.   Select the temperature required. 
  5.   Press the "air conditioning on/off" 

button  B  to activate the air condi-

tioning. The indicator lamp on this 

button comes on.   

  Rapid demisting/defrosting 
   1.   Place the air distribution dial in the 

"windscreen and side windows" po-

sition. 

  2.   Select the maximum air fl ow. 
  3.   Select the maximum temperature.    

  Rear screen demisting/

defrosting (6) 

 With the engine running, press button  6  

to activate the demisting/defrosting of the 

rear screen and door mirrors. 
 The indicator lamp on the button comes 

on while the demisting/defrosting is in 

operation. 
 The demisting/defrosting goes off au-

tomatically to prevent excessive con-

sumption of current. 
 Demisting/defrosting can be stopped 

before it is switched off automatically 

by pressing the button again. 

 It is advisable to switch off the 

rear screen demisting/defrost-

ing as soon as possible as lower 

current consumption reduces 

fuel consumption.  

2

COMFORT

FRONT SEATS

  Manual mode 

  Forwards-backwards adjustment 
 Raise the control bar and slide the seat 

forwards or backwards. 
 When your seat is at the correct dis-

tance, move it forwards and backwards 

slightly without using the control bar to 

check that it is secured correctly.  

  Seat back angle adjustment 
 Pull the control upwards to adjust the 

seat back. 
 When the seat back is at the correct angle, 

release the control. 

 To prevent the seat back from 

moving forward sharply and 

knocking you, press on it with 

your back or push it with your 

hand while operating the lever.   

  Driver's seat cushion height and 

angle adjustment 
 Pull and/or push the control several 

times to adjust the height of the seat.  

2

COMFORT

  Electric mode (driver's seat only) 

  Forwards-backwards adjustment 
 Push the control forwards or rearwards to 

move the seat to the position required.  

  Driver's seat cushion height and 

angle adjustment 
 Pull or push the front of the control to raise 

or lower the front of the seat cushion. 
 Pull or push the rear of the control to raise 

or lower the rear of the seat cushion. 
 Pull or push the entire control to raise or 

lower the entire seat cushion.  

  Seat back angle adjustment 
 Tilt the control forwards or rearwards to 

straighten or tilt the seat back. 

ONT SEATS

FRONT SEATS

 To avoid discharging the battery, 

use the electric mode with the 

engine running.   

2

COMFORT

       Front armrest 

          Heated seats adjustment 

 You can move the console housing cover 

in order to use it as an armrest.  

  With the engine running , tilt the button 

to the position required. 
 The temperature of the seat is regulated 

automatically. 
 There are two setting positions: 
   -  

"HI": High heating 

  -  

"LO": Low heating  

 When the button is in the intermediate 

position, the heating is switched off. 
 The indicator lamps  A  come on when 

the system is activated.   

        Head restraint height adjustment 

   )   To raise it, pull upwards. 
  )  To lower it, push it downwards, 

pressing the height adjustment but-

ton at the same time. 

  )  To remove it, raise it to the high 

position, then remove it pressing 

the height adjustment button at the 

same time. 

  )  To refi t it, engage the rods of the 

head restraint in the apertures, 

pressing the height adjustment but-

ton at the same time.  

 Never drive with the removed 

head restraints in the vehicle as 

they could be thrown around the 

vehicle on sharp braking. They 

must always be in place and ad-

justed correctly. 
 After installing the head restraint, 

check that the height adjustment 

button has engaged correctly. 

 The adjustment is correct when 

the top of the head restraint is 

aligned with the top of the head 

of the seated person.   

2

COMFORT

AR SEATS (ROW 2) 

REAR SEATS (ROW 2) 

  Seat back angle adjustment 

 Pull the control and adjust. 
 When the seat back is at the correct 

angle, release the control. 
 Sit in the centre of the rear bench seat 

to check that the two seats are at the 

same level and that the angle of their 

seat backs is the same. 

  Forwards-backwards adjustment 

 Pull the control towards the outside and 

adjust. 
 When your seat is at the correct dis-

tance, release the control. 
 To ensure that the seat is secured cor-

rectly, move it forwards and backwards 

slightly without using the control.  

 When operating the seats, en-

sure that no person or object 

is in the vicinity of the moving 

parts to avoid any risk of injury 

or damage. 
 To prevent the seat back from 

moving forwards sharply and 

knocking you, press on it with 

your back or push it with your 

hand while operating the lever.   

  The rear seats can be folded in two 

parts (1/3 - 2/3). 

2

COMFORT

       Rear armrest 

 Lower the armrest to use it. 
 To return to the initial confi guration, 

push the armrest until it locks in its ver-

tical position.  

       Access to the third row 

 The passenger gains access to the 

third row of seats by tilting a second 

row seat. 
 To put this seat back in place, refer to 

the following pages.  

2

COMFORT

       Folding the second row *  

   1.   Raise the rear seat lever  A , or  
 

Pull the button in the boot  B  for at least one second, or  


Pull the rear seat releasing strap  C  towards you. 

  2.   The seat backs fold forwards then the cushion rises and folds forwards. 
  3.   After carrying out these operations, press on the seat lightly to check that it is secured correctly.  

 Before folding the seats, lower the head restraints fully. 
 Before folding the seat backs forwards, insert the seat belt buckles in the slots provided for this purpose in the rear seat 

cushion. 

  Before   folding   the     seats    ensure that no object   or person is hindering   the execution of the operations.  
 Do not place luggage on the folded seats.  

  *   According to version.  

2

COMFORT

  Returning the second row to the normal position 

   1.   Lower the seat pulling simultane-

ously on the releasing strap  

A  lo-

cated at the rear of the cushion and 

supporting the seat with your hand. 

 Force may be necessary to carry out these operations. 
 On vehicles fi tted with a third row, the rear of the cushion of the second row is fi tted with a low level lamp  B . 
 When the releasing strap is pulled, the lamp comes on for approximately 10 seconds to illuminate the fl oor at the 

base of the third row.  

  2.   Press on the cushion to put it in 

place until it engages. 

  3.   Pull the seat back upright pulling si-

multaneously on the releasing strap 

located at the rear of the seat back. 

  4.   After putting the seat back back in 

place, push the seat and the seat 

back lightly to ensure that they are 

secured correctly.  

2

COMFORT

       "Lowered seats" configuration 

   1.   Remove the head restraints from the front seats. 
  2.   Raise the rear armrest and remove the load space cover. 
  3.   Move the rear seats as far back as possible. 
  4.   Move the front seats as far forward as possible and tilt their seat backs fully. 
  5.   Tilt the seat back of the rear seats.  

 To return the seats to their normal position, carry out these operations in reverse order.  

2

COMFORT

REAR BENCH SEAT (ROW 3) 

ROW 3)

  The rear bench seat can be folded. It is 

stowed in a location in the fl oor of the 

vehicle. 

 The label on the bench seat back illus-

trates the various steps to the followed 

when unfolding and folding the rear 

bench seat.  

   1.   Open the tailgate and the lower tail-

gate (refer to the "Access" section). 

  2.   Pull the cover  A  from the rear and 

fi x it to the seat back using the press 

stud of the band  B . 

  Unfolding the bench seat 

 For comfort, it is advisable to 

stow the bench seat when its is 

not is use. 

2

COMFORT

  3.   Pull the black strap  C  located at the 

centre of the seat back to raise the 

seat back. 

  4.   Pull the black strap  D  to release the 

bench seat cushion. 

  5.   Tilt the bench seat rearwards. 

  6.   Raise the head restraints. 

  7.   Lift and push the bench seat as-

sembly forwards until it locks.  

 Undo the press stud of band  B  to re-

lease the cover.  

2

COMFORT

   1.   Open the tailgate and the lower tail-

gate (refer to the "Access" section). 

  2.   Lift the cover  A  and fi x it to the seat 

back using the press stud of the 

band  B . 

  3.   Unlock the head restraints by slid-

ing the controls  

C  and fold them 

onto the seat back. 

  4.   Pull the grey strap  D  and bring the 

bench seat towards you. Press on 

the bench seat to lock it. 

  5.   Tilt and push the bench seat for-

wards. 

  6.   Pull the black strap  E  located at the 

centre of the seat back to fold the 

seat back.  

 Undo the press stud of the band  B  to 

put the cover back in place.  

  Folding the bench seat 

2

COMFORT

OOR MIRRORS

DOOR MIRRORS

        Electric folding/unfolding 
   -   from inside, with the ignition switch 

in the "ON" or "ACC" position 

   )  by pressing the control  C .  

  -   from inside, with the ignition switch 

in the "LOCK" position: 

   )  by pressing the control  C, within 

30 seconds.   

  -   from outside using the remote con-

trol: 

   )  

by pressing the "closed padlock 

button briefl y 3 times to fold them, 

  )  by pressing the "open padlock" but-

ton briefl y 3 times to unfold them.   

  Adjustment 

 The mirrors can be adjusted when the 

ignition switch is in the "ON" or "ACC" 

position. 
   )   Move control  A  to the right or to the left 

to select the corresponding mirror. 

  )   Direct control  B  in all four directions 

to adjust the mirror.  

 When adjustment is complete, return 

control  A  to the central position.  

 If you switch the engine off then 

re-start it with the mirrors folded, 

they will unfold automatically 

when the vehicle reaches 20 mph 

(30 km/h). 
 If the mirrors have been folded 

manually or electrically after 

starting the engine, they are not 

unfolded automatically. 
 In this case: 
   )   Press the control  C  to unfold 

them.    

 If you have folded the mirrors 

using the control  

C , you must 

use this control to unfold them, 

otherwise the mirrors will not be 

lock in place correctly. 

 The folding and unfolding of 

the door mirrors can be con-

fi gured via the colour screen 

"Equipment" menu or deactivat-

ed by a PEUGEOT dealer or a 

qualifi ed workshop. 

 The mirrors can also be folded manually. 

2

COMFORT

REAR VIEW MIRROR

  Adjust the mirror by moving it up or 

down and/or to the left or right. 
 The rear view mirror has two positions: 
   -  day 

(normal), 

  -  night 

(anti-dazzle). 


 To change from one to the other, push 

or pull the lever on the lower edge of 

the mirror.  

  *   According to country of sale.  

 AUTOMATIC REAR VIEW 

 AUTOMATIC REAR VIEW 

MIRROR *

  This automatically and gradually changes 

between the day and night positions. 
 To prevent dazzling, the glass of the 

mirror darkens automatically depend-

ing on the intensity of the light from be-

hind. It clears as the light (headlamps of 

following vehicles, sunlight) decreases, 

ensuring maximum visibility. 
 You can deactivate automatic mode by 

pressing the " AUTO " button.  

AUTOMATIC REAR VIEW

AUTOMATIC REAR VIEW

MIRROR WITH R

TH REVERSING

CAMERA  

CAMERA*

  Combined with a camera fi tted at the 

rear of the vehicle, this mirror allows the 

driver to see what there is behind the 

vehicle when reversing. 
 With reverse engaged, is screen is 

displayed automatically in the mirror 

glass. 
 A warning message appears suggest-

ing that you check around your vehicle. 
 The screen disappears when another 

gear is engaged. 
 You can deactivate automatic mode by 

pressing the " AUTO " button.  


Content   ..  2  3  4  5   ..