Peugeot 607 Dag (2009 year). Manual - part 3
 

  Index      Peugeot     Peugeot 607 Dag - service manual 2009 year in english


Search            


Content   ..  1  2  3  4   ..


Peugeot 607 Dag (2009 year). Manual - part 3


1

33

 TRIP COMPUTER 

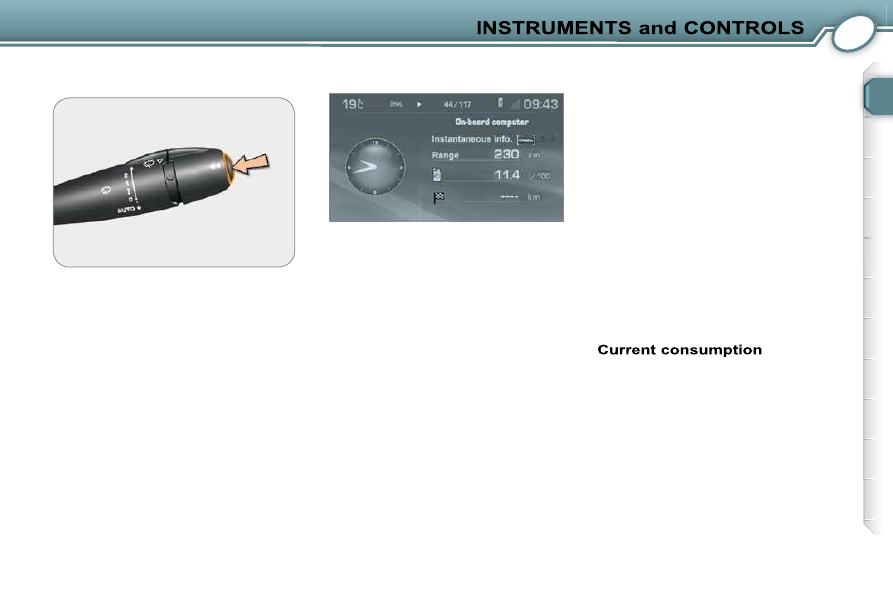
 Each press on the button, located at the 
end of the  wipers stalk , displays differ-
ent trip computer data in succession: 

  Colour and map screen DT 

   -  

the  "Current info"  with: 

       the range, the current consump-

tion  and  the  distance  remaining 

to be travelled,  

  -  

 "Route 1"  with: 

       the  distance  travelled,  the  aver-

age consumption and the average 

speed calculated over route  "1" ,  

  -  

 "Route  2"   with  the  same  charac-
teristics for a second route.   

  Range (km or miles) 

 This  shows  the  distance  that  can  still 

be covered with the fuel remaining in 

the  tank  in  accordance  with  the  av-

erage  consumption  over  the  last  few 

miles (kilometres). 
 This fi gure may increase if there is a 

change  in  the  style  of  driving  or  the 

road  surface,  producing  a  signifi cant 

drop in current consumption. 
 When the range is less than 30 miles 
(50 km),  four  dashes  are  displayed. 

After  fi lling  with  fuel,  the  range  is 

displayed  when  it  exceeds  62 miles 
(100 km). 
 If dashes are displayed for long periods 
instead  of  digits,  contact  a  PEUGEOT 
dealer.  

(l/100 or km/l or mpg) 

 This is the average quantity of fuel con-

sumed during the last few seconds. 
 This  function  is  displayed  only  when 

the  vehicle  is  travelling  at  a  speed 

greater than 20 mph (30 km/h).  

  Average consumption 
(l/100 or km/l or mpg) 

 This  is  the  average  fuel  consumption 

since the computer was last set to zero.  

1

34

  Distance travelled 
(km or miles) 

 This  indicates  the  distance  travelled 

since  the  computer  was  last  set  to 
zero.  

  Distance remaining to be 
travelled (km or miles) 

 This  is  the  distance  remaining  to  be 

travelled  to  the  fi nal  destination.  It  is 

either  calculated  by  the  navigation 

system if guidance is activated or en-

tered by the user. 
 If  the  distance  is  not  entered,  dashes 
are displayed in place of the digits.  

  Average speed (km/h or mph) 

 This  is  the  average  speed  calculated 

since  the  computer  was  last  set  to 
zero (with the ignition on).  

 The routes  "1"  and  "2"  are independ-

ent but have identical application. 
 Route   "1"   for  example  allows  you  to 
make daily calculations and route  "2"  
monthly calculations. 

  The routes 

  Zero reset 
 When the required route is displayed, 
press  the  end  of  the  wipers  stalk  for 
more than two seconds.   

  Access via the general menu 

  DT screen  

  "TRIP" menu 
 Press  the   "MENU"   or   "TRIP"   button 
to gain access to the general menu. 
 Select  the   "Trip  computer"   applica-

tion using the navigator, then confi rm. 

 The "Trip computer" menu offers various 

options: 
   -  

Inputting  of  the  distance  to  be 

travelled, 

  -  

Warnings log, 

  -  

Status of the functions.   

1

35

  Warnings log 
 This  summarises  the  active  warning 

messages,  displaying  them  on  the 
multifunction display in succession.  

  Status of the functions 
 This summarises the active or inactive 

status of the functions present on the 

vehicle.  

  Inputting the distance remaining to 
be travelled 
 When  guidance  is  not  activated,  this 

enables  you  to  enter  an  approximate 

distance to the fi nal destination.   

 The  different  trip  computer  data  also 
appears  on  the  instrument  panel  dis-
play at the same time.  

panel display 

2

36

 DT COLOUR AND MAP 
SCREEN 

 This  displays  the  following  informa-
tion, via the PC Com control pad: 
   -  

the time, 

  -  

the date, 

  -  

the exterior temperature (the value 

displayed fl ashes if there is a risk 

of ice), 

  -   the accesses check, 
  -  

the  vehicle  functions  warning  or 
status  messages,  displayed  tem-
porarily, 

  -  

the audio sources displays, 

  -  

the  telematic  systems  displays 
(telephone, services, ...), 

  -  

the trip computer displays, 

  -   the confi guration displays, 
  -  

the satellite navigation system dis-
plays.   

  Management of the displays 

 The   "AUDIO" ,   "NAV" ,   "TRIP"   and 
 "TEL"  buttons on the PC Com control 
pad permit displaying in the main win-
dow. 

 Example: "Confi guration"  

  "Confi guration" menu 

 The  brightness  of  the  display 
and  of  the  instrument  panel 
may  change  when  the  lights 
are switched on automatically.  

  General menu 

 Press  the   "MENU"   button  to  gain 
access  to  the   

general  menu   and 

select one of the following functions: 
   -  

"Navigation-Guidance", 

  -  

"Audio functions", 

  -  

"Trip computer", 

  -   "Confi guration", 

  -  

"Directory", 

  -  

"Telematics", 

  -  

"Map", 

  -  

"Video".  

 This  provides  access  to  successive 

confi rmation windows. 

 Example: "TRIP"  

2

37

  Confi guration of the display 
   -  

"Selection  of  the  colours":  selec-
tion of the colours available for the 
display. 

  -  

"Brightness and brilliance". 

  -  

"Sound": selection of the sound ambi-
ence, setting of the voice synthesiser 
and of the voice commands. 

  -  

"International parameters": 

       setting of the date and time, 
      selection of the units: temperature 

(°C  or  °F)  and  fuel  consumption 

(l/100, mpg or km/l).  

  -  

"Selection 

of 

the 

language": 

 German,  Spanish,  French,  English, 
Italian,  Dutch,  Portuguese  and 
Brazilian Portuguese.  

 "Video" menu 

  Defi ning the vehicle parameters 
 This  enables  you  to  activate  or  deac-
tivate  certain  driving  and  comfort  ele-
ments: 
   -  

"Automatic  switching  on  of  the 
lights", 

  -  

"Follow-me-home 

lighting" 

and 

"Duration", 

  -  

"Remote control action", 

  -   "Permanent locking of the boot".  

 You can connect video equipment (cam-
corder,  digital  camera,  DVD  player,  ...) 

to the three video sockets located in the 

glove box.  

 For  safety  reasons,  confi gura-

tion of the multifunction displays 
by  the  driver  must  be  carried 
out while stationary.   

 Example:  "Automatic  switching  on  of 
the lights"  

  Video display is only possible 

when stationary. 
 Select  the   "Video"   menu  from  the 
 

general menu : 
   -  

"Activate  video  mode"  to  activate/
deactivate the video, 

  -  

"Video  parameters"  to  set  the  dis-
play  format,  the  brightness,  the 
contrast and the colours.  

 Pressing  the   "DARK"   button  discon-
nects the video display  . 
 Successive presses of the  "SOURCE"  
button permit the selection of an audio 
source other than that of the video.   

3

38

3

39

 VENTILATION 

   1.   Windscreen de-icing or demisting 

vents 

  2.   Front window de-icing or 

demisting vents 

  3.   Side vents 
  4.   Centre vents 
  5.   Air outlets to the front passengers' 

feet 

  6.   Air outlets to the rear passengers' 

feet  

  Recommendations for 
use and notes 

 If  the  interior  temperature  re-

mains  very  high  following  a  prolonged 
period parked in the sun, do not hesitate 
to ventilate the passenger compartment 
for a few minutes. 
 To obtain uniform air distribution, take 
care not to obstruct the exterior air in-
take grille located at the bottom of the 
windscreen,  the  vents,  the  air  outlets 
under  the  front  seats  and  the  air  ex-
tractor in the boot. 
  In cold weather, in order to obtain uni-
form  comfort,  more  rapid  demisting 

or if the fl ow of air on your face feels 

uncomfortable, it is advisable to close 
vents 3 and 4.
  
 When washing the vehicle using high 
pressure  equipment,  do  not  direct 
the  jet  towards  the  exterior  air  intake 
grille. 
 To  obtain  optimum  demisting,  we 
recommend that the windows are kept 
clean on the inside of the vehicle. 
 In certain cases of particularly arduous 
use  (towing  the  maximum  load  on  a 
steep  gradient  when  the  temperature 
is high), cutting off the air conditioning 
permits the recovery of engine power 
and, therefore, an increase in the tow-
ing capacity. 

 For  the  air  conditioning  to  be  fully 
effective, the windows must be closed. 
 Ensure  that  the  passenger  compart-

ment  fi lter  is  in  good  condition.  Have 

the  fi lter  elements  replaced  regularly. 

If you drive in a dusty environment, re-
place them twice as often. 
 The  air  conditioning  system  does  not 
contain chlorine and does not present 
any danger to the ozone layer. 
 Operate  the  air  conditioning  for  5  to 
10 minutes, once or twice a month to 
keep it in perfect working order. 
 The  water  resulting  from  the  conden-
sation  of  the  air  conditioning  system 
is discharged via an opening provided 
for  this  purpose.  Therefore,  a  puddle 
of water may form underneath the ve-
hicle when stationary. 
 If the system does not produce cold air, 
do not use it and contact a PEUGEOT 
dealer. 
 Flashing  of  the  points  separating  the 
setting  value  digits  indicates  a  mal-
function of the air conditioning. Consult 
a PEUGEOT dealer.  

 Use of the automatic regulation 
of the air conditioning is recom-
mended.  It  permits  optimised 
automatic  control  of  all  of  the 

following  functions:  air  fl ow,  passenger 

compartment temperature and air distri-
bution,  using  various  sensors  (exterior 
temperature and sunshine), so there is 
no  need  to  change  your  reference  set-
tings other than the value displayed. 

3

40

 AUTOMATIC AIR CONDITIONING (DUAL ZONE) 

      Press the  "AUTO"  button(s).  

  Note:  when the visibility programme  9  
or the air intake/recirculation  10  is se-
lected,  the  passenger's   "AUTO"   but-
ton  is  deactivated;  the  indicator  light 

of  the  corresponding  button  fl ashes 

temporarily. 

  3 -  Adjustment of the driver's 

temperature  

  4 -  Adjustment of the passenger 

temperature  

      Press  the  up  or  down 

arrow  to  change  the 
temperature  on  the  driv-
er's  side   3   or  passenger 
side  4 .  

 The system is automatically set to the 
value required. 
 Depending on the level of comfort se-
lected, the system controls the air dis-

tribution, fl ow, temperature and intake 

of  air  in  order  to  guarantee  comfort 
and  an  adequate  circulation  of  air  in 
the  passenger  compartment.  You  do 
not have to make any adjustments. 
 The  "AUTO"  symbol is displayed. 

  Dual  zone:   this  is  the  differentiated 
regulation  of  the  temperature  and  air 
distribution on the driver's side and the 
front passenger side. 
 The driver and his front passenger can 
each  adjust  the  temperature  and  the 
distribution  of  the  air  to  suit  their  re-
quirements. 
  1 -  Driver's automatic comfort 

programme  

  2 -  Passenger automatic comfort 

programme  

 This is the usual air conditioning system 
operating mode. 

 When  the  engine  is  cold,  to 
prevent  too  great  a  distribu-

tion of cold air, the air fl ow will 

only  reach  its  optimum  level 
progressively. 

 On  entering  the  vehicle,  the 
interior  temperature  may  be 
much colder (or warmer) than 
is  comfortable.  There  is  no 

need  to  change  the  temperature  dis-
played  in  order  to  obtain  rapidly  the 
level of comfort required. 
 The automatic regulation of the air con-
ditioning will use its maximum perform-
ance settings to correct the temperature 
difference as quickly as possible.  

 The value indicated on the display cor-
responds to a level of comfort and not 
to a temperature in degrees Celsius or 
Fahrenheit, depending on the choice of 

confi guration validated on the display. 
 A  setting  around  the   value  21   makes 
it possible to obtain optimum comfort. 

However, depending on your require-

ments,  a  setting  between  18  and  24 
is usual. 

3

41

 To limit the discomfort resulting from use of the manual controls, we recommend 
the following settings: 

  Control via the manual controls 
 It  is  possible  to  adjust  one  or  more 
functions  manually  while  leaving  the 
other functions in automatic mode. 
 The   "AUTO"   button  indicator  light  is 
switched off. 
 Switching to manual mode may result 
in  discomfort  (temperature,  humidity, 
odour,  condensation)  and  is  not  ad-
vantageous for comfort. 
 To return to automatic mode, press the 
 "AUTO"  button. 

  Exterior 

temperatures  

  Air 

distribution  

  Positions of 

the vents (3) 

and (4)  

  Comfort in the 

rear seats  

  Blower 

(minimum)  

  Low  


 Vents closed. 

 -  Increase the 

blower air 

fl ow.  

-  Close the 

centre vents. 


  Average  


 Four vents 

open. 


  High  


 Four vents 

open. 

 -  Open the 

vents.  

-  Increase the 

blower air 

fl ow. 


3

42


9 -  Automatic visibility programme  

 In certain cases, the comfort 
programme  may  not  be  suf-

fi cient to demist or de-ice the 

windows  (humidity,  several 
passengers, ice). 

      In this case, select the visibility pro-

gramme and open the side vents in 
order to clear the windows quickly.
It  controls  the  air  conditioning,  air 

fl ow and intake and distributes the 

ventilation  to  the  windscreen  and 
side windows.  

 The  symbols   "A/C" ,   "AUTO"   and  air 

fl ow (fan) are displayed. 
 Once  the  inconvenience  has  been 
eliminated,  pressing  button   1   or   2   re-
turns the system to the comfort setting. 

      Press the  OFF  button.  

  7 -  Adjustment  of  the  driver's  air 

distribution  

  8 -  Adjustment of the passenger air 

distribution  

 Successive  presses  of  these  buttons 

enable you to direct the fl ow of air on 

the  driver's  side  or  on  the  passenger 
side alternately towards: 
   -  

the windscreen and footwells, 

  -  

the footwells, 

  -  

the centre vent, side vent and foot-
wells, 

  -  

the centre vent and side vent, 

  -  

the windscreen.  

  6 -  Deactivation of the air 

conditioning (OFF)  


5 - Blower and air fl ow  

       Press  buttons   "+"  

and   "-"   respectively 
to  increase  or  de-

crease the air fl ow.  

 The air fl ow symbol (fan) is fi lled in in 

relation to the value required. 
 To  prevent  condensation  and  dete-
rioration of the quality of the air in the 
passenger  compartment,  ensure  that 

an adequate fl ow of air is maintained. 

 This action switches off the display and 
the  indicator  lights  and  deactivates  all 
of the functions of the system, with the 
exception of the rear screen demisting. 
 The  temperature-related  comfort  is  no 
longer controlled (temperature, humidity, 
condensation). 
 Avoid  driving  for  too  long  with  the  air 
conditioning deactivated. 
      Pressing  this  button  again  or  but-

tons   5 ,   7   or   8   or  one  of  the  two 
 "AUTO"   buttons  reactivates  the 
system  with  the  values  set  before 
it was switched off.  

3

43

  10 -  Intake of exterior air/

Recirculation of interior air  

 This function enables you to 
isolate  the  passenger  com-
partment from exterior fumes 
and odours. 

  11 -  Rear screen and mirrors 

demisting  

      Press this button, with the 

engine running, to demist 
the  rear  screen  and  the 
exterior mirrors. The indi-
cator light comes on.  

 Demisting is switched off automatical-
ly to avoid an excessive consumption 
of current and in relation to the exterior 
temperature. 
 It  may  be  stopped  by  pressing  this 
button  again  or  when  the  engine  is 
switched off.   
 However, the demisting resumes if the 

engine is switched on again within one 
minute. 
 Switch off the rear screen and exterior 
mirrors  demisting  when  you  consider 
this  necessary  as  low  current  con-
sumption reduces fuel consumption. 

  12 - Air conditioning On/Off (A/C)  

 The deactivation of this func-
tion  may  result  in  tempera-
ture,  humidity,  odour  and 
smoke discomfort. 

      Press  this  button  to  switch  off  the 

air conditioning.  

 The symbol  "A/C"  is switched off. 
      Press this button again to return to 

automatic operation of the air con-
ditioning.  

 The symbol  "A/C"  is displayed.   

      Press  this  button  to  set  the  air 

intake  mode,  the  indicator  light 
comes  on  in  recirculation  mode. 
Prolonged  operation  in  interior  air 
recirculation  mode  may  result  in 
the formation of condensation and 
deterioration  of  the  quality  of  the 
interior air.  


Do  not  drive  in  air  recirculation 
mode for prolonged periods, except 
in  truly  exceptional  atmospheric 
conditions.  


The  message  associated  with  the 
control  is  displayed  on  the  multi-
function display. 

     Press this button again to return to 

automatic control of the air intake.  


For  your  comfort,  when  the  igni-

tion is switched off, the settings are 
stored until it is switched on again.
  

3

44

 MIRRORS 

   Automatically adjustable mirrors 

for parking 
 These  allow  you  to  see  the  ground 
(kerb, wall...) when carrying out park-
ing manoeuvres in reverse gear.  

     The end of the driver and pas-
senger mirrors is convex in or-
der  to  reduce  the  "blind  spot" 

(area  at  edge  defi ned  by  a 

dotted line). 

 As  a  result,  objects  observed  in  the 
driver  and  passenger  mirrors  are,  in 
reality, closer than they appear. 
 This  must  be  taken  into  account  to 
judge  correctly  the  distance  of  vehi-
cles approaching from behind.   

  Tilting the mirror to the parking 
position 
      Turn control  A  to the right or to the 

left. 

     Engage reverse gear.  
The  exterior  mirror  corresponding  to 
the side on which you are parking tilts 
downwards.   

  Exterior mirrors 

   -  

from outside: 

     Lock  the  vehicle  using  the  re-

mote control.   

  When the vehicle is parked, the exterior 

mirrors can be folded back manually.   

  Adjustment 
      Turn  knob   A   to  the  right  or  to  the 

left  to  select  the  corresponding 
mirror. 

     Move  knob   A   in  all  four  directions 

to adjust.   

  Folding back the mirrors 

electrically 
   -  

from inside: 

     With the ignition on, turn knob  A  

rearwards.   

 If  the  mirrors  are  folded  back  using 
knob   A , they  will  not  unfold when  the 
vehicle  is  unlocked  using  the  remote 
control. You must turn knob  A  again. 

  Automatic day/night exterior 

mirrors 
 These  darken  automatically  depending 
on the brightness from the rear. 
 They  are  linked  with  the  automatic 
day/night  interior  mirror  (see  para-
graph  "Automatic  day/night  interior 
mirror"). 

     To  ensure  maximum  visibility  during 
manoeuvres,  the  mirror  clears  au-
tomatically  when  reverse  gear  is  en-
gaged.   

  Initial setting of the function 
      Engage reverse gear. 
     Select and adjust the left and right 

mirrors in succession.  

 These settings will be stored when the 
vehicle is locked.  

  Returning the mirror to the normal 
position 
      Change out of reverse gear.  
 After  a  few  seconds,  the  glass  of  the 
corresponding mirror resumes its nor-
mal position. 
 You can deactivate the function by return-
ing control  A

  to the central position " ". 

3

45

  Automatic day/night interior 

mirror 

  Operation 
 Switch on the ignition and press switch  1 : 
   -  

Indicator light  2  lit (switch pressed): 
automatic operation. 

  -  

Indicator light  2  off: automatic sys-
tem  off.  The  mirror  remains  at  its 
most clear.   

  Special feature 
  To  ensure  maximum  visibility 
during manoeuvres, the mirror 
clears  automatically  when  re-
verse gear is engaged.   

 The interior mirror has two positions: 
   -  

day (normal), 

  -  

night (anti-dazzle).  

 To change from one to the other, push 
or  pull  the  lever  on  the  lower  edge  of 
the mirror.  

 STEERING WHEEL HEIGHT 
AND DEPTH ADJUSTMENT 

 This 

automatically 

and 

gradually 

 changes  between  the  day  and  night 
positions.  To  prevent  dazzling,  the 
glass  of  the  mirror  darkens  automati-
cally depending on the intensity of the 
light from behind. It clears as the light 
(headlamps of following vehicles, sun-
light)  decreases,  ensuring  maximum 
visibility. 

      When the vehicle is stationary, un-

lock the steering wheel by pushing 
handle  A . 

     Adjust the height and depth of the 

steering wheel. 

     Lock by pulling handle  A  fully.  

3

45

  Automatic day/night interior 

mirror 

  Operation 
 Switch on the ignition and press switch  1 : 
   -  

Indicator light  2  lit (switch pressed): 
automatic operation. 

  -  

Indicator light  2  off: automatic sys-
tem  off.  The  mirror  remains  at  its 
most clear.   

  Special feature 
  To  ensure  maximum  visibility 
during manoeuvres, the mirror 
clears  automatically  when  re-
verse gear is engaged.   

 The interior mirror has two positions: 
   -  

day (normal), 

  -  

night (anti-dazzle).  

 To change from one to the other, push 
or  pull  the  lever  on  the  lower  edge  of 
the mirror.  

 STEERING WHEEL HEIGHT 
AND DEPTH ADJUSTMENT 

 This 

automatically 

and 

gradually 

 changes  between  the  day  and  night 
positions.  To  prevent  dazzling,  the 
glass  of  the  mirror  darkens  automati-
cally depending on the intensity of the 
light from behind. It clears as the light 
(headlamps of following vehicles, sun-
light)  decreases,  ensuring  maximum 
visibility. 

      When the vehicle is stationary, un-

lock the steering wheel by pushing 
handle  A . 

     Adjust the height and depth of the 

steering wheel. 

     Lock by pulling handle  A  fully.  

3

46

 FRONT SEATS 

  B - Seat cushion angle adjustment 

  C - Seat height adjustment 

  A -  Forwards-backwards 

adjustment 

 Push  the  control  forwards  or  back-
wards to slide the seat.  

 Tilt  the  front  of  the  control  upwards  or 
downwards to obtain the required angle.  

 Tilt the rear part of the control upwards 
or  downwards  to  obtain  the  required 
height. 

  Electric front seats 

 The  electric  functions  of  the 
driver's  seat  are  deactivated 
one minute after the ignition is 
switched off. 

 The  operation  of  the  electric 
seats will be deactivated tem-
porarily if the energy economy 
mode is activated.  

3

47

  E -  Head restraint height and angle 

adjustment 

  F -  Lumbar adjustment 

(manual adjustment) 

  D - Seat back angle adjustment 

 Never  drive  with  the  head  re-
straints removed; they must be 
in place and adjusted correctly.  

 Tilt the control to the front or the rear to 
obtain the correct angle.  

 Tilt the control upwards or push it down-
wards to obtain the correct height. 

 Raise or lower the  lever to obtain the 
required position.  

  The  setting  is  correct  when 
the  upper  edge  of  the  head 
restraint is level with the top 
of the head.
  

 The  head  restraint  angle  can  also  be 
adjusted manually. 
 To  remove  the  head  restraint,  tilt  the 
seat  back  to  45°  and  place  the  head 
restraint in the high position, then pull 
with both hands. 


Content   ..  1  2  3  4   ..