Peugeot 308 SW BL (2013 year). Manual - part 8
 

  Index      Peugeot     Peugeot 308 SW BL - service manual 2013 year in english


Search            


Content   ..  6  7  8  9   ..


Peugeot 308 SW BL (2013 year). Manual - part 8


6

111

FITTINGS

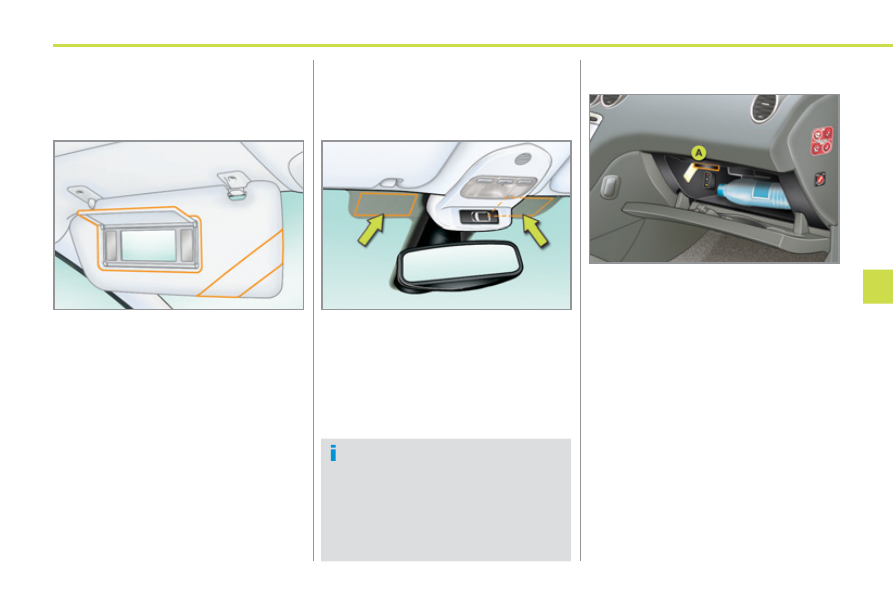
ILLUMINATED GLOVE BOX 

 This has areas for storing a bottle of wa-

ter, the vehicle's handbook pack... 
 Its lid has areas for storing a pen, a pair 

of spectacles, tokens, cards, a can... 

SUN VISOR

 Component which protects against sunlight 

from the front or the side, also equipped 

with an illuminated courtesy mirror. 

   )   With the ignition on, raise the con-

cealing fl ap; the mirror is lit automat-

ically.  

 This sun visor is also equipped with a 

ticket holder. 

TOLL CARD / CAR PARK 

TICKET WINDOWS 

 Facility for affi xing toll cards and/or car 

park tickets. 

 These windows are located on each 

side of the base of the rear view mirror. 
 They are two non-refl ective areas of the 

athermic windscreen. 

 The athermic windscreen limits 

heating of the passenger compart-

ment by reducing the effects of the 

sun's rays (ultra-violet). It consists 

of a refl ective layer, which also 

blocks certain radio-electric signals 

(toll card payments, ...). 

   )  To open the glove box, raise the 

handle.  

 The lamp comes on when the lid is 

opened. 

 If your vehicle is fi tted with air condition-

ing, the glove box has an air vent  

A , 

which can be opened or closed. This 

distributes the same conditioned air as 

the vents in the passenger compart-

ment. 

6

112

FITTINGS

12 V ACCESSORY SOCKET 

   )   To connect a 12 V accessory (max 

power: 120 W), lift the cover and 

connect a suitable adaptor.  

ILLUMINATED ASHTRAY 

   )  Pull the drawer for access to the 

ashtray. 

  )   To empty the ashtray, after opening, 

press the tab and remove the ash-

tray.  

 BAG HOOK

   )   Press the lower part of the hook to 

unfold it. 

  )   Hang the strap of your bag on the 

hook to secure it.  

PEUGEOT CONNECT USB

  This connection box, consisting of a 

USB port, is located in the front arm-

rest. 
 It permits the connection of portable 

equipment, such as an iPod 

®

  digital au-

dio player of generation 5 or later or a 

USB stick. 
 It reads the audio fi le formats (mp3, 

ogg, wma, wav...) which are transmitted 

to your audio equipment and played via 

the vehicle's speakers. 
 You can manage these fi les using the 

steering wheel controls or the audio 

equipment control panel and display 

them on the multifunction screen.  

  When it is in use, the portable equip-

ment charges automatically.  

  For more information on the use of this 

equipment, refer to the "Audio and Tele-

matics" section.  

6

113

FITTINGS

FRONT ARMREST 

 Comfort and storage device for the driv-

er and front passenger. 

 The height and length of the armrest 

cover can be adjusted for greater com-

fort. 

  Height adjustment 

   )   Raise the cover to the required posi-

tion (low, intermediate or high). 

  )   If you raise the cover slightly beyond 

the high position, guide it when low-

ering it to the low position.   

STORAGE BOX 

 Storage area, built into the rear of the 

front armrest, for the rear passengers. 
   )  To empty the box, after opening, 

press the tab and remove it.  

  Storage 

 The armrest's compartment can hold up 

to 6 CDs. 
   )   Raise the lever  1 . 
  )   Raise the cover fully.   

  Longitudinal adjustment 

   )  Slide the cover fully forwards or 

rearwards.   

6

114

FITTINGS

  To avoid any risk of jamming of the 

pedals: 
   -   only use mats which are suited 

to the fi xings already present in 

the vehicle; these fi xings  must 

be used, 

  -  never 

fi t one mat on top of an-

other.  

 The use of mats not approved by 

PEUGEOT may interfere with ac-

cess to the pedals and hinder the 

operation of the cruise control / 

speed limiter.   

MATS 

 Removable carpet protection. 

  Refitting 

 To refi t the mat on the driver's side: 
   )   position the mat correctly, 
  )  refi t the fi xings by pressing, 
  )   check that the mat is secured cor-

rectly.  

  Fitting 

 When  fi tting the mat for the fi rst  time, 

on the driver's side use only the fi xings 

provided in the wallet attached. 
 The other mats are simply placed on 

the carpet.  

  Removal 

 To remove the mat on the driver's side: 
   )   move the seat as far back as pos-

sible, 

  )  unclip the fi xings, 
  )   remove the mat.   

STORAGE DRAWER 

  Opening 

   )   Raise the front of the drawer and pull it.   

 Do not place heavy objects in the 

drawer.  

  Removal 

   )   Bring the drawer to the end of its 

travel. 

  )   Press the ends of the slides. 
  )   Raise the drawer and pull it fully.   

  Refitting 

   )   Engage the drawer in its slides. 
  )   At the end of its travel, press on the 

top of the drawer to secure it.  

 The storage drawer is located under the 

front passenger's seat. 

6

FITTINGS

REAR ARMREST

SKI FLAP 

  Opening 

   )   Lower the rear armrest. 
  )  Pull the fl ap handle downwards. 
  )  Lower the fl ap. 
  )  Load the objects from inside the 

boot.   

   )   Lower the rear armrest for a more 

comfortable position. 

  )   Raise the cover to gain access to its 

storage compartment.  

 This has a storage tray, two cup holders 

and two pen holders. 

"AIRCRAFT" TYPE 

TABLES 

   )   To use the table, raise it fully until it 

locks in the high position. 

  )   To store the table, lower it, passing 

the point of resistance, to the low 

position.  

 On the passenger side, do not for-

get to fold the "aircraft" type table 

before placing the seat in the table 

position. 
 Do not place hard or heavy objects 

on the table. They could become 

dangerous projectiles in the event 

of emergency braking or impact. 

 Comfort and storage device for the rear 

passengers. 

 Arrangement for storing and transport-

ing long objects. 

 Installed on the back of each front seat, 

these allow you to set down objects and 

each is equipped with a cup holder. 

6

116

FITTINGS

BOOT FITTINGS

    1.    Rear parcel shelf    
 

(see details on following page) 

  2.    Hooks    
 

(see details on following page) 

  3.    Stowing rings  

  4.    Luggage retaining strap  

  5.    Enclosed storage tray  

  6.    Open storage tray  

  7.    Storage box    
 

(see details on following page)   

6

117

FITTINGS

 To remove the shelf: 
   )   unhook the two cords, 
  )   raise the shelf slightly, then remove it.  

       Rear parcel shelf 

  Access to the storage box 
 An additional hook under the shelf 

is used to hold up the boot fl oor us-

ing its cord, to facilitate access to 

the tools and spare wheel or the 

temporary puncture repair kit...   

 The hooks can be used to secure shop-

ping bags. 

       Hooks 

 There are several options for storing the 

shelf: 
   -   either upright behind the front 

seats, 

  -  or 

fl at at the base of the boot.   

   )   Raise the boot carpet for access to 

the storage box.  

 This has areas for the storage a box of 

spare bulbs, a fi rst aid kit, two warning 

triangles... 
 It also contains the vehicle tools, the 

temporary puncture repair kit...  

       Storage box 

6

118

FITTINGS

BOOT FITTINGS

   1.    Rear parcel shelf    
 

(see details on following page) 

  2.    12 V accessories socket    
 

(see details on following page) 

  3.    Hooks    
 

(see details on following page) 

  4.    Stowing rings  

  5.    Storage tray  

  6.    High load retaining net    
 

(see details on following page) 

  7.    Luggage retaining strap   

6

119

FITTINGS

       Rear parcel shelf 

 This consists of four sections three of 

which can be folded back on each other. 

 There are several options for storing the 

rear parcel shelf: 
   -   either folded back on itself near the 

rear seats (1), 

  -   or folded back on itself and stored 

in a location provided under the rear 

seats (2).  

 To fold it from the boot: 
   )   unclip the load space cover from its 

side supports, 

  )   take hold of the load space cover by 

its handle  A , 

  )  fold it concertina-style to the rear 

seats.  

 To unfold it from the boot: 
   )   take hold of the load space cover by 

its handle  A , 

  )   unfold it to the boot pillars, 
  )   clip the load space cover on its side 

supports.  

       Hooks 

  Maximum loads 
 7.5 kg, rear parcel shelf unfolded 

with high load retaining net at row 2.   

 The hooks can be used to hold shop-

ping bags.  

6

120

FITTINGS

       High load retaining net 

 Hooked onto the special upper and low-

er fi xings, this permits use of the entire 

loading volume up to the roof: 
   -  

behind the rear seats (row 2), 

  -   behind the front seats (row 1) when 

the rear seats are folded.  

 To use it in row 1: 
   )   open the covers of the upper fi xings  1 , 
  )   unroll the high load retaining net, 
  )   position one of the ends of the net's 

metal bar in the corresponding up-

per fi xing   1 , then do the same with 

the other end, 

  )   slacken the straps fully, 
  )   fi x the snap hook of each of the 

straps on the corresponding bar  3 , 

located under the cushion of the 

rear seats, 

  )   fold the rear seats, 
  )   tighten the straps, 
  )   check that the net is hooked and 

tightened correctly.  

 To use it in row 2: 
   )   fold or remove the load space cover, 
  )   open the covers of the upper fi xings  2 , 
  )   unroll the high load retaining net, 
  )   position one of the ends of the net's 

metal bar in the corresponding up-

per fi xing   2 , then do the same with 

the other end, 

  )   fi x the snap hook of each of the 

straps in the corresponding ring  4 , 

located on the rear seats mecha-

nism support, 

  )   tighten the straps, 
  )   check that the net is hooked and 

tightened correctly.  

 When positioning the net, check 

that the strap loops are visible from 

the boot; this will make slackening 

or tightening easier. 

 This net can be stored in the stor-

age tray on the fl oor.  

6

121

FITTINGS

BOOT FITTINGS

   1.    Load space screen    
 

(see details on following page) 

  2.    Storage box  

  3.    12 V accessory socket    
 

(see details on following page) 

  4.    Hooks    
 

(see details on following page) 

  5.    Stowing rings  

  6.    High load retaining net    
 

(see details on following page) 

  7.    Rear armrests with cup holder  

  8.    Luggage retaining strap  

  9.    Location for torch or for Hi-Fi am-

plifi er    


(see details on following page) 

  10.   Temporary puncture repair kit   

6

FITTINGS

          Load space screen 

 To install the load space screen: 
   )   position one of the ends of the roller 

in its support, 

  )   insert the second end in its support; 

the catch locks automatically, 

  )   unroll the load space screen to the 

boot pillars, 

  )   insert the load space screen guides 

in the rails on the boot pillars.  

 To remove the load space screen: 
   )  remove the load space screen 

guides from the rails on the boot pil-

lars, 

  )   roll up the load space screen in its 

roller, 

  )   pull and support the catch at one of 

the ends of the roller to release it, 

  )   remove the roller from its support 

from the released end, then from the 

second.  

 To store the load space screen, place it 

at the boot sill, roller uppermost and fl ap 

facing inwards.  

6

123

FITTINGS

       High load retaining net 

 Hooked onto the special upper and low-

er fi xings, this permits use of the entire 

loading volume up to the roof behind 

the seats of the 2nd row. 

       12 V accessory socket 

   )   To connect a 12 V accessory (max 

power: 120 W), remove the cap and 

connect an appropriate adaptor. 

  )   Turn the key to the ignition on posi-

tion.   

 To use the net in the 2nd row (additional 

seats folded or removed): 
   )  roll up or remove the load space 

screen, 

  )   open the covers of the upper fi xings  1 , 
  )   unroll the high load retaining net, 
  )   position one of the ends of the net's 

metal bar in the corresponding up-

per fi xing   1 , then do the same with 

the other end, 

  )   attach the snap hook of each of the 

net's straps in the corresponding 

ring  2 , located on the lower fi xing of 

the rear side seat belt, 

  )   tighten the straps, 
  )   check that the net is hooked and 

tightened correctly.   

 When positioning the net, check 

that the strap loops are visible from 

the boot; this will make slackening 

or tightening easier. 

       Hooks 

 The hooks can be used to hold shop-

ping bags.  

6

124

FITTINGS

          Torch 

 This is a removable lamp, fi tted in the 

boot wall, which can be used to light the 

boot or as a torch. 
 For the boot lamp function, refer to the 

"Visibility - § Boot lamp" section. 

  Operation 
 This torch operates with NiMH type re-

chargeable batteries. 
 It has a battery life of approximately 

45 minutes and charges while you are 

driving. 

  Use 
   )  Extract the torch from its location 

pulling it upwards. 

  )  Press the switch, located on the 

back, to switch the torch on or off. 

  )   Unfold the support, located on the 

back, to set down and raise the 

torch; for example, when changing 

a wheel.   

  Storing 
   )   Put the torch back in place in its lo-

cation starting with the lower part.  


If you have forgotten to switch off 

the torch, this switches it off auto-

matically.  

          Side blinds 

 Fitted on the rear windows of the 2nd 

row, these protect your young children 

from the sun. 

   )   Pull the blind by the central tab. 
  )  Position the blind attachments on 

the corresponding hooks.   

 Observe the polarities when fi tting 

the rechargeable batteries. 
 Never replace the rechargeable 

batteries with normal disposable 

batteries.  

 It the torch is not engaged correct-

ly, it may not charge and may not 

come on when the boot is opened.   

7

125

CHILD SAFETY

  PEUGEOT recommends  that chil-

dren should travel in the  rear seats  

of your vehicle: 
   -  

 "rearwards-facing"  up to the 

age of 2, 

  -  

 "forwards-facing"  over the 

age of 2.  

GENERAL POINTS RELATING

TO CHILD SEATS

CHILD SEAT IN THE FRONT

  "Forwards-facing" 
 When a "forwards-facing" child seat is 

installed on the  front passenger seat , 

adjust the vehicle's seat to the interme-

diate longitudinal position with the seat 

back upright and leave the passenger 

airbag activated.  

  "Rearwards-facing" 
 When a "rearwards-facing" child seat is 

installed on the  front passenger seat , 

it is essential that the passenger airbag 

is deactivated. Otherwise,  

the child 

would risk being seriously injured or 

killed if the airbag were to infl ate .  

  *    The rules for carrying children are 

specifi c to each country. Refer to the 

current legislation in your country.  

 Although one of PEUGEOT's main cri-

teria when designing your vehicle, the 

safety of your children also depends on 

you. 
 For maximum safety, please observe 

the following recommendations: 
   -   in accordance with European reg-

ulations,  

all children under the 

age of 12 or less than one and a 

half metres tall must travel in ap-

proved child seats suited to their 

weight , on seats fi tted with a seat 

belt or ISOFIX mountings * , 

  -  

 statistically, the safest seats in 

your vehicle for carrying children 

are the rear seats,  

  -  

 a child weighing less than 9 kg 

must travel in the "rearwards-fac-

ing" position both in the front and 

in the rear.   

  Intermediate longitudinal position   

7

126

CHILD SAFETY

   Passenger airbag OFF  

  Refer to the advice given on the label 

present on both sides of the passen-

ger's sun visor.  

  To assure the safety of your child, you must deactivate the passenger's front 

airbag when you install a child seat in the rearwards facing position on the 

front passenger's seat. 
 Otherwise, there is a risk that the child could be seriously injured or killed if 

the airbag were deployed.   


Content   ..  6  7  8  9   ..