Peugeot 308 CC (2014 year). Manual - part 13
 

  Index      Peugeot     Peugeot 308 CC - service manual 2014 year in english


Search            


Content   ..  11  12  13  14   ..


Peugeot 308 CC (2014 year). Manual - part 13


04  NAVIGATION - GUIDANCE 

  Select: 

   -  

"Visual  alert" 

  -  

"Audible  alert" 

  -  

"Alert  only  in  guidance" 

  -  

"Overspeed  alarm  only".  

 The choice of time of notifi cation defi nes 

how long in advance that Risk area 

warnings are given. 

 Select  " 

OK " to confi rm the screen.  

  Select  " 

Guidance options " and confi rm, 

then select " 

Set parameters for risk 

areas " and confi rm.  

  These functions are only available if risk areas have been 

downloaded and installed on the system. 

 The detailed procedure for updating risk area POIs can be found at 

http://peugeot.navigation.com.   

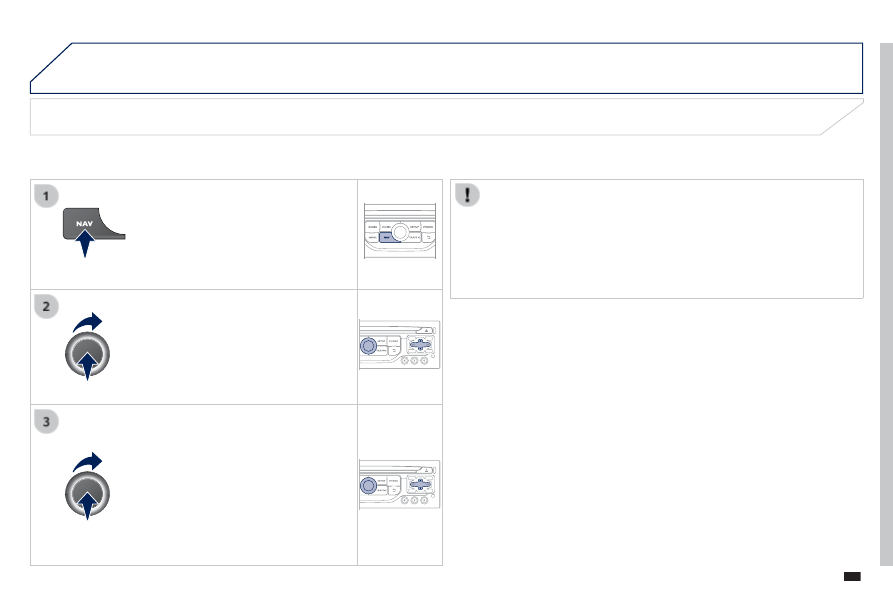
  Press   

NAV  to display the " Navigation - 

guidance "  menu.  

  Settings for risk area / danger area alerts 

04

192

  Adding  a  stage 

  Press   

NAV  to display the 

Navigation - guidance "  menu.  

  Select  " 

Journey leg and route "  then 

confi rm.  

  Select  " 

Close to " a route passing 

close to the stage or " 

Strict " for a route 

passing through the stage. 

 Confi rm " 

OK " to start the guidance, and 

give a general indication of the guidance 

route.   

  Select  " 

Add a stage " then confi rm 

 The address of the stage is entered as 

a destination, by " 

Enter an address ", 

a contact in " 

Directory ", or " Previous 

destinations ".  

  Organising  stages 

  To organise stages, carry out operations 1 

to 2 again, then select " 

Order/delete 

journey legs " and confi rm.  

  Select and confi rm to save the 

modifi cations.  

  Select the stage that you want to move 

in the order.  

  Select  " 

Delete " to delete the stage.   

 NAVIGATION - GUIDANCE 

04

193

      Route  options 

  Calculation  criteria  

  Select  " 

Guidance options " and confi rm.  

  Select  " 

OK " and confi rm to save the 

modifi cations.   

  Select  " 

Defi ne calculation criteria "  and 

confi rm. 

 This function allows modifi cation of: 

   -  

the  guidance  criteria:  (" 

Fastest 

route ",  " Shortest route ", 

Distance/Time "), 

  -  

the  exclusion  criteria:  (" 

With tolls " 

or " 

With Ferry "), 

  -   traffi c avoidance: (" 

Traffi c info ").   

  Press   

NAV  to display the 

Navigation - guidance "  menu.  

 If traffi c avoidance (Traffi c info) is selected, the system suggests 

an alternative route if there is a delay on the guidance route.   

 NAVIGATION - GUIDANCE 

04

194

  Press   

NAV  to display the 

Navigation - guidance "  menu.  

  Map  management 

  Selecting the points of interest displayed on the map  

  Select  " 

Map management " and confi rm.  

  Select from the various categories the 

ones that you want to display on the 

screen.  

  Select  " 

Map details " and confi rm.  

  Select  " 

Default " to have only " Filling stations, garages "  and 

Risk areas " appear on the map (if installed in the system).  

  Select  " 

OK " then confi rm and select 

OK " again then confi rm to save the 

modifi cations.   

 NAVIGATION - GUIDANCE 

04

195

  Select  " 

Map management " and confi rm.  

  Select: 

   -  

Vehicle direction " to have the map 

follow the direction of travel, 

  -  

North direction " to keep the map 

always North up, 

  -  

Perspective view " to display a 

perspective  view.   

  Select  " 

Map orientation " and confi rm.  

  The colour of the map, different from the day and night mode, is 

confi gured in the " 

SETUP "  menu.  

   Map  orientation  

  Press   

NAV  to display the 

Navigation - guidance "  menu.  

  Street names are visible on the map from the 100 m scale.   

 NAVIGATION - GUIDANCE 

04

196

  Press   

NAV  to display the 

Navigation - guidance "  menu.  

      Navigation  voice  synthesis 

  Select  " 

Guidance options " and confi rm.  

  Adjusting the volume / Deactivation  

  Select  " 

Set speech synthesis "  and 

confi rm.  

  Select the volume graph and confi rm.  

  Select  " 

Deactivate " to deactivate voice messages.  

  Select  " 

OK " and press the dial to 

confi rm.   

  Adjust the volume to the desired level 

and confi rm.  

  The volume of messages can be adjusted during the transmission 

of the message using the volume adjustment control.  

  The volume setting of guidance messages is also accessible via 

the " 

SETUP " / " Voice synthesis "  menu.  

 NAVIGATION - GUIDANCE 

04

197

   Male  voice  /  Female  voice  

  Press   

SETUP  to display the 

confi guration menu.  

  Select  " 

Select male voice " or " Select 

female voice " then confi rm " Yes

 " then confi rm " 

 " then confi rm " 

 "  to 

activate a male or female voice. The 

system  restarts.   

  Select  " 

Voice synthesis " and confi rm.  

 NAVIGATION - GUIDANCE 

05

198

  Access to the "TRAFFIC INFORMATION" menu 

  Go from the list to the menu (left/right). 

  "   "   "   "   "   "   "   "   "   "   "   "   "   "   "   "   "   " 

Traffi c information

Traffi c information

Traffi c information

Traffi c information

Traffi c information

Traffi c information

Traffi c information

Traffi c information

Traffi c information

Traffi c information

Traffi c information

Traffi c information

Traffi c information

Traffi c information

Traffi c information

Traffi c information

Traffi c information

Traffi c information

Traffi c information "   "   "   "   "   "   "   "   "   "   "   "   "   "   "   "   "   "  

 or   

 Press  " 

TRAFFIC ". 

 TRAFFIC  INFORMATION 

05

199

        Configure  the  filtering  and  display  of  TMC  messages 

  TMC (Traffi c Message Channel) messages contain information on traffi c and weather conditions, received in real time and transmitted to the 

driver in the form of audible announcements and symbols on the navigation map. 

 The navigation system can then suggest an alternative route to avoid a traffi c problem.  

  Press  the   

TRAFFIC  button to display the 

Traffi c information "  menu.  

  Select  the  " 

Geographic fi lter "  function 

Geographic fi lter

Geographic fi lter

and confi rm.  

  The system offers a choice of: 

   -  

Retain all the messages ",  

 or 

  -  

Retain the messages "

    -   " 

Around the vehicle ", 

(confi rm the mileage to modify 

and select the distance), 

  -   " 

On the route ".    

  Confi rm " 

OK " to save the modifi cations.   

  We  recommend: 

   -   a fi lter on the route and 

  -   a fi lter around the vehicle of: 

   -   12 miles (20 km) in urban areas, 

  -   30  miles  (50  km)  on  motorways.    

 TRAFFIC  INFORMATION 

05

200

      Principal  TMC  symbols 

  Red and yellow triangle: traffi c information, for example: 

  Black and blue triangle: general information, for example: 

      Receiving  TA  messages 

  The TA (Traffi c Announcement) function gives priority to TA alert 

messages. To operate, this function needs good reception of a 

radio station transmitting this type of message. When a traffi c report 

is transmitted, the current audio source (Radio, CD, USB, …) is 

interrupted automatically to play the TA message. Normal playback 

of the audio source resumes at the end of the transmission of the 

message.  

  Press   

RADIO  to display the " FM / AM 

band "  menu.  

  Select  " 

Guidance options "  then 

confi rm.  

  Activate or deactivate " 

TA " then confi rm.  

  The volume setting for TA messages can be adjusted only during the 

transmission of this type of alert.  

  Activate or deactivate the function at any time by pressing 

the button. 

 During a message, press the button to interrupt it.   

 TRAFFIC  INFORMATION 

06

201

  Access to the "TELEPHONE" menu 

  "   "   "   "   "   "   "   "   "   "   "   "   "   "   "   "   "   " 

Telephone

Telephone

Telephone

Telephone

Telephone

Telephone

Telephone

Telephone

Telephone

Telephone

Telephone

Telephone

Telephone

Telephone

Telephone

Telephone

Telephone

Telephone

Telephone

Telephone

Telephone

Telephone

Telephone "   "   "   "   "   "   "   "   "   "   "   "   "   "   "   "   "   "  

  Go from the list to the menu (left/right). 

 or   

  Press  this  button.  

  To make a call, select a number in the list and confi rm " 

OK " 

to start the call.  

  Connecting a different telephone deletes the list of 

recent  calls.  

No telephone connected. 

 Telephone  connected. 

 Incoming  call. 

 Outgoing  call. 

 Synchronisation  of 

contacts in progress. 

 Telephone call in 

progress.  

  In the top bar of the permanent 

display 

 USING THE TELEPHONE 

06

202

 USING THE TELEPHONE 

            Pairing  a  Bluetooth  telephone  

First connection 

  For reasons of safety and because they require prolonged attention 

on the part of the driver, the operations for pairing the Bluetooth 

mobile telephone to the hands-free system of the audio unit must be 

carried out with the  

vehicle stationary . 

  In the Bluetooth menu of your telephone, select 

the name of the system from the list of devices 

detected.  

  Press  this  button.  

  Select  " 

Bluetooth functions "  and 

confi rm.  

  Select  " 

Peripherals search " and confi rm. 

 The list of peripheral devices detected 

is displayed. Wait until the " 

Connect " 

button is available.  

 You can check the compatibility of your telephone at www.peugeot.co.uk 

(services).  

  Activate the telephone's Bluetooth function 

and ensure that it is "visible to all" (telephone 

confi guration).  

  Quick procedure from the telephone  

  Enter a minimum 4 fi gure code in the telephone and 

confi rm.  

  Enter the same code in the system, 

select " 

OK " and confi rm.  

  Procedure  from  the  system  

06

203

 USING THE TELEPHONE 

  Select  " 

Connect " and confi rm.  

  The system offers to connect the 

telephone: 

   -  

in  " 

Hands-free mode "  (telephone 

only), 

  -  

in  " 

Audio " mode (streaming: playing 

music fi les on the telephone), 

  -  

or  " 

All " (for selection of both 

modes).  

 Select  " 

OK " and confi rm.  

  Then accept automatic connection on the telephone to allow the 

telephone to reconnect automatically every time the vehicle is 

started.  

  The ability of the system to connect in only one mode depends on 

the telephone. The two modes may both connect by default.  

  The  " 

Hands-free mode " should be used in preference if 

"Streaming" is not desired.  

  The services available depend on the network, the SIM card and the compatibility of the Bluetooth telephone used. Check the telephone 

manual and with your network provider for details of the services available to you.  

  Depending on the type of telephone, the system will ask you to 

accept or not the transfer of your contacts.  

  On return to the vehicle, the last telephone connected 

automatically reconnects, within around 30 seconds after 

switching on the ignition (Bluetooth activated and visible). 

 To modify the automatic connection mode, remove the pairing 

and pair the telephone again with the desired mode.   

  Enter a minimum 4 fi gure code in the telephone 

and confi rm.  

  Enter the same code in the system, 

select " 

OK " and confi rm.  

  Select the name of the desired 

peripheral from the list of devices 

detected then confi rm  .

06

204

 USING THE TELEPHONE 

  Directory configuration / Synchronisation with the telephone 

  Press   

PHONE  then select " Contacts 

management " and confi rm.  

  Select  " 

New contact " to enter a new 

contact.  

  Select  " 

Sort by Name/First name "  to 

choose the order in which they appear.  

  Select  " 

Delete all contacts " to delete 

the contacts saved in the system.  

  Select  " 

Synchronization options ": 

   -  

No  synchronization:  only  the 

contacts saved in the system 

(always present). 

  -  

Display  telephone  contacts:  only 

the contacts saved in the telephone. 

  -   Display SIM card contacts: only 

the contacts saved on the SIM card. 

  -  

Display  all  phone  contacts: 

contacts on the SIM card and in 

the  telephone.   

  Select  " 

Import all the entries " to import 

all the contacts in the telephone and 

save them in the system. 

 Once imported, a contact remains visible 

whatever telephone is connected.  

  Select  " 

Contact mem. status " to see the 

number of contacts saved in the system 

or imported, and the free memory.   

06

205

  Editing, importing or deleting a contact 

  Press   

PHONE  then select " Directory of 

contacts " and confi rm.  

  Select the desired contact and confi rm.  

  Select  " 

Open " to view a contact on the 

telephone or modify a contact saved in 

the  system.  

  Select  " 

Import " to copy a contact from 

the telephone to the system.  

  Select  " 

Delete " to delete a contact 

recorded in the system.  

 USING THE TELEPHONE 

  Select   

OK  or press the back button to exit 

this  menu.   

  Once the contact has been imported, the Bluetooth symbol 

disappears, replaced by the telephone symbol which shows that the 

contact has been saved in the system.  

  It is not possible to modify or delete contacts in the telephone or the 

SIM card via the Bluetooth connection.  

  In  the  " 

Directory of contacts " menu, the import and deletion of 

contacts is done one by one.  

06

206

 USING THE TELEPHONE 

  Press   

PHONE   twice.  

  Select  " 

Dial " then confi rm.  

  Select  " 

Directory of contacts "  then 

confi rm.  

  Dial the telephone number using the 

virtual keypad selecting each number 

in turn. 

 Confi rm " 

OK " to make the call.   

  Press   

TEL  or twice on  PHONE .  

  Calling  a  new  number  

   Calling  a  contact  

  Select the desired contact and confi rm. 

 If access was via the  

PHONE   button, 

select " 

Call " and confi rm.  

  Select the number and confi rm to start 

the  call.   

      Making  a  call 

  Use of the telephone is not recommended while driving. We 

recommended that you park safely or make use of the steering 

mounted  controls.  


Content   ..  11  12  13  14   ..