Peugeot 307 (2007.5). Manual - part 3
 

  Index      Peugeot     Peugeot 307 2007.5 - service manual in english


Search            


Content   ..  1  2  3  4   ..


Peugeot 307 (2007.5). Manual - part 3


MULTIFUNCTION DISPLAYS

32

   Presentation 

 This displays the following information: 
   -  

the time, 

  -  

the date, 

  -  

the  outside  temperature *   (this 

l ashes if there is a risk of ice), 

  -   the status of the accesses (doors, 

boot, ...), 

  -  

the warning messages (e.g.: "Emis-

sion control system faulty") or infor-

mation messages (e.g.: "Auto lights 

on"),  displayed  temporarily,  can 

be cleared by pressing the  "ESC"  

button, 

  -   the  trip  computer  (see  corre-

sponding section).    

   *    With air conditioning only.    

   Parameter configuration 

 There are three display control buttons: 
   -  

 "ESC"  to abandon the operation 
in progress, 

  -  

 "MENU" 

  to  scroll  through  the 

menus or sub-menus, 

  -  

 "OK"  

to select the menu or sub-

menu required.    

   General menu 

 Press  the   "MENU"  

button  to  scroll 

through  the  various  menus  of  the 
general menu: 
   -   vehicle coni guration, 
  -  

options, 

  -  

display settings, 

  -  

languages, 

  -  

units.  

 Press  the   "OK"  

button to select the 

menu required.  

(RD4 AUDIO EQUIPMENT)  

MULTIFUNCTION DISPLAYS

33

Vehicle coni guration

 Once  the  "Vehicle  coni guration" 

menu  has  been  selected,  you  can 

activate  or  deactivate  the  following 

equipment: 
   -   wiper  linked  with  reverse  gear 

(refer to the "Visibility" section), 

  -  

"follow-me-home"  lighting  (refer 

to the "Visibility" section), 

  -   parking  assistance  (refer  to  the 

"Driving" section).    

   Options 
 Once  the  "Options"  menu  has  been 

selected, you can start diagnostics of 

the  status  of  the  equipment  (active, 

not active, faulty).   

   Languages 
 Once the "Languages" menu has been 

selected, you can change the language 

used by the display (Français, Italiano, 
Nederlands,  Portugues,  Portugues-

Brasil, Deutsch, English, Espanol).   

   Display settings 
 Once  the  "Display  settings"    menu 

has been selected, you can gain ac-

cess to the following settings: 
   -  

year, 

  -  

month, 

  -  

day, 

  -  

hour, 

  -  

minutes, 

  -  

12 or 24 hour mode.  

   Units 
 Once the "Units" menu has been se-

lected,  you  can  change  the  units  of 

the following parameters: 
   -   temperature (°C or °F), 
  -  

fuel consumption (l/100, mpg or km/l).  

 Once  you  have  selected  a  setting, 

press the  "OK"  

button to change its 

value. 

 Wait  for  approximately  ten  sec-

onds without any action to allow the 

changed data to be recorded or press 

the  "ESC"  

button to cancel. 

 The  display  then  returns  to  the  nor-
mal display.   

 For safety reasons, coni gu-

ration  of  the  multifunction 

displays  by  the  driver  must 

take place when stationary.    

MULTIFUNCTION DISPLAYS

34

 * 

  With air conditioning only.   

   General menu 

 Press the  "MENU"

  button to gain ac-

cess to the general menu, then press 

the   "  "   or   "  "

   buttons  to  scroll 

through the following items: 
   -  

radio-CD, 

  -   vehicle coni guration, 
  -  

options, 

  -  

display settings, 

  -  

languages, 

  -  

units.  

 Press  the   "OK"  

button to select the 

menu required.  

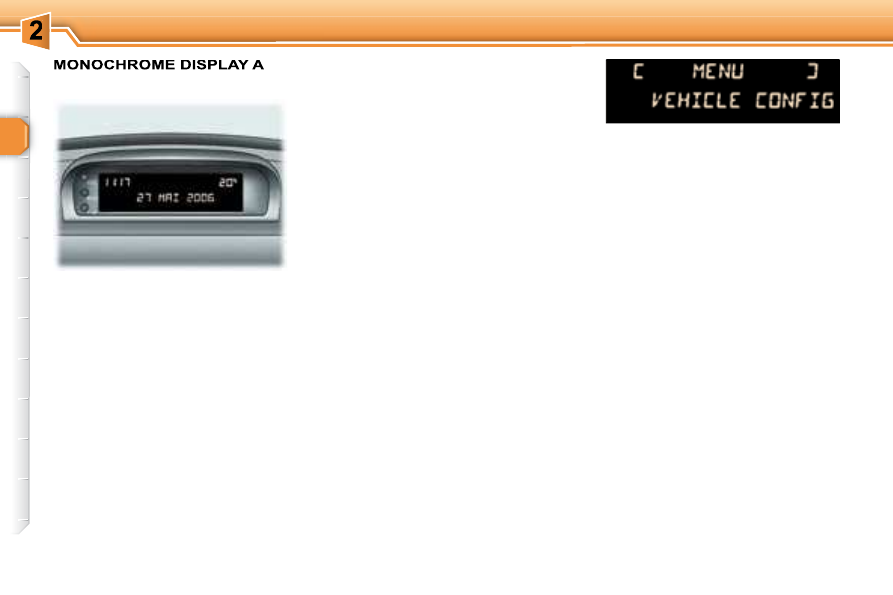
   Presentation 

 This  displays  the  following  informa-
tion,  via  the  RD4  audio  equipment 

control keypad: 
   -  

the time, 

  -  

the date, 

  -  

the  outside  temperature *   (this 

l ashes if there is a risk of ice), 

  -   the audio source displays (radio, 

CD, ...), 

  -   the status of the accesses (doors, 

boot, ...), 

  -  

the  warning  messages  (e.g.: 

"Emission control system faulty") 

or  information  messages  (e.g.: 

"Auto  lights  on"),  displayed  tem-

porarily, can be cleared by press-

ing the  "ESC"  button, 

  -   the  trip  computer  (see  corre-

sponding section).    

   Radio-CD 
 With  the  RD4  audio  equipment 

switched  on,  once  the  "Radio-CD" 

menu  has  been  selected,  you  can 

activate  or  deactivate  the  functions 

linked with the use of the radio (RDS 

following, REG mode), the CD or the 

CD changer (introscan, random play, 

CD repeat). 

 For  further  details  concerning  the 

"Radio-CD"  application,  refer  to  the 

RD4 part of the "Audio and Telemat-

ics" section.   

Vehicle coni guration

 Once  the  "Vehicle  coni guration" 

menu  has  been  selected,  you  can 

activate  or  deactivate  the  following 

equipment: 
   -   rear wiper linked with reverse gear 

(refer to the "Visibility" section), 

  -  

"follow-me-home"  lighting  (refer 

to the "Visibility" section), 

  -   parking  assistance  (refer  to  the 

"Driving" section).    

   Options 
 Once  the  "Options"  menu  has  been 

selected, you can start diagnostics of 

the  status  of  the  equipment  (active, 

not active, faulty).   

  MONOCHROME DISPLAY A  

MULTIFUNCTION DISPLAYS

35

   Display settings 
 Once  the  "Display  settings"    menu 

has been selected, you can gain ac-

cess to the following settings: 
   -  

year, 

  -  

month, 

  -  

day, 

  -  

hour, 

  -  

minutes, 

  -  

12 or 24 hour mode.  

       Languages 

 Once  the  "Languages"  menu  has 

been  selected,  you  can  change 

the  language  used  by  the  display 
(Français, Italiano, Nederlands, Por-

tugues,  Portugues-Brasil,  Deutsch, 

English, Espanol).   

   Units 
 Once the "Units" menu has been se-

lected,  you  can  change  the  units  of 

the following parameters: 
   -   temperature (°C or °F), 
  -  

fuel consumption (l/100, mpg or km/l).  

 Once  you  have  selected  a  setting, 

press  the   "  "   or   "  "   buttons  to 

change its value. 

 Press  the    ""    or    ""    buttons  to 
move to the previous or next setting 

respectively. 
 Press the  "OK"  

button to record the 

change and return to the normal dis-

play  or  press  the   "ESC"   button  to 

cancel. 

 For safety reasons, coni gu-

ration  of  the  multifunction 

displays  by  the  driver  must 

take place when stationary.    

MULTIFUNCTION DISPLAYS

36

  MONOCHROME DISPLAY C 
(WITHOUT RD4 AUDIO EQUIPMENT)  

   Parameter configuration 

 There  are  three  buttons  and  a  navi-

gator  to  enable  you  to  control  the 

screen: 
   -  

 "MENU"   to  display  the  general 
menu 
,

  -  

 "MODE"  

to  change  the  perma-

nent  application  (trip  computer, 

date, ...), 

  -  

 "ESC"   to abandon the operation 
in progress, 

  -  

 Rotation of the navigator:  move-

ment on the display or changing 

of a setting, 

  -  

 Press  on  the  navigator: 

 coni r-

mation of the selection.    

   Presentation 

 It displays the following information: 
   -  

the time, 

  -  

the date, 

  -  

the  exterior  temperature  (this 

l ashes if there is a risk of ice), 

  -   the  accesses  check  (doors, 

boot, ...), 

  -  

the warning messages (e.g.: "Depol-

lution system faulty") or information 

messages  (e.g.:  "Automatic  head-

lamp  lighting  activated"),  displayed 

temporarily, can be cleared by press-

ing the  "ESC"  button, 

  -   the  trip  computer  (see  corre-

sponding section),    

   General menu 

 Press the  "MENU"  

button to access 

the general menu: 
   -   trip computer (see corresponding 

section), 

  -   personalisation-coni guration.  

 Turn the navigator to select the menu 

required,  then  coni rm  by  pressing 

the navigator.   

   "Personalisation-
Configuration" menu 

 Once this menu has been selected, you 

can access the following functions: 

   -   dei ne the vehicle parameters, 

  -   display coni guration, 

  -   selection of the language.   

MULTIFUNCTION DISPLAYS

37

Dei ne the vehicle parameters

 Once  this  menu  has  been  selected, 

you can activate or deactivate the fol-

lowing equipment: 
   -   wiper  linked  with  reverse  gear 

(refer to the "Visibility" section), 

  -  

"follow-me-home"  lighting  and 

duration  (refer  to  the  "Visibility" 

section), 

  -   parking  assistance  (refer  to  the 

"Driving" section).  

   Selection of the language 
 Once  this  menu  has  been  selected, 

you  can  change  the  language 

used  on  the  display  (Deutsch, 

English,  Espanol,  Français,  Italiano, 
Nederlands,  Portugues,  Portugues-

Brasil). 

Display coni guration

 Once  this  menu  has  been  selected, 

you can access the following settings: 
   -  

brightness-video setting, 

  -  

date and time setting, 

  -   selection of the units.  

 Once  you  have  selected  a  setting, 

press the navigator. 
 Turn the navigator to change its value. 

 Press  the  navigator  to  record  the 

change and move on to the next set-

ting  or  press  the   "ESC"   button  to 

cancel.   

  Example   :  "Duration  of  the  "follow-
me-home" lighting"   

 For safety reasons, coni gu-

ration  of  the  multifunction 

displays  by  the  driver  must 

take place when stationary.    

MULTIFUNCTION DISPLAYS

38

   *    With air conditioning only.   

   Controls 

 From the RD4 audio equipment con-

trol panel, you can: 
    

 press the  "MENU"  button to gain 

access to the  general menu , 

   

 press the   ""   or   ""   buttons to 

scroll  through  the  items  on  the 

screen, 

   

  press  the   "MODE"   button  to 

change  the  permanent  application 

(trip computer, audio source, ...), 

   

 press the   "

"   or   ""   buttons to 

change a setting value, 

   

 press  the   "OK"  

button  to  con-

i rm,  

or 
   

 press the  "ESC"  button to aban-

don the operation in progress.    

   Displays on the screen 

 This displays the following information: 
   -  

the time, 

  -  

the date, 

  -  

the  outside  temperature *   (this 

l ashes if there is a risk of ice), 

  -   the status of the accesses (doors, 

boot, ...), 

  -   the audio sources (radio, CD, ...), 

  -   the trip computer (refer to the cor-

responding section).  

 Warning  messages  (e.g.:  "Emission 

control system faulty") or information 

messages (e.g.: "Automatic switching 

on of the headlamps activated") may 

appear  temporarily.  These  can  be 

cleared by pressing the  "ESC"  button.   

   General menu 

    

 Press the  "MENU"  button to gain 

access to the  general menu 

   -   audio functions, 
  -   trip computer (refer to the cor-

responding section), 

  -   personalisation-coni guration, 
  -   telephone (hands-free kit).  

     Press the   "  or   "  buttons to 

select  the  menu  required,  then 

coni rm  by  pressing  the   "OK"  

button.    

  MONOCHROME SCREEN C  

   "Audio functions" menu 

 With  the  RD4  audio  equipment 

switched  on,  once  this  menu  has 

been selected you can activate or de-

activate the functions linked with use 

of the radio (RDS, REG, RadioText), 

the CD or the CD changer (introscan, 

shufl e, CD repeat). 

 For  further  details  concerning  the 

"Audio  functions"  application,  refer 

to  the  RD4  part  of  the  "Audio  and 

Telematics" section.   

   "Trip computer" menu 

 Once  this  menu  has  been  selected, 

you can consult information concern-

ing the status of the vehicle (warnings 

log, status of the functions, ...).   

MULTIFUNCTION DISPLAYS

39

   "Personalisation-
Configuration" menu 

 Once  this  menu  has  been  selected, 

you can gain access to the following 

functions: 

   -   dei ne the vehicle parameters, 

  -   display coni guration, 

  -   selection of the language.    

   Display configuration 

 Once  this  menu  has  been  selected, 

you can gain access to the following 

settings: 
   -  

brightness-video setting, 

  -  

date and time setting, 

  -   selection of the units.    

 Example:   setting  of  the  duration  of 

the "follow-me-home" lighting  

    

 Press  the    ""    or    "   buttons, 

then the  "OK"  button to select the 

menu required. 

   

 Press  the    ""    or    ""    buttons, 

then  the   "OK"  

button  to  select 

the "Lighting and signalling" line. 

   

  Press  the    ""    or    ""    buttons 

to set the value required (15, 30 

or  60  seconds),  then  press  the 

 "OK"  

button to coni rm. 

 For  safety  reasons,  it  is  im-

perative that coni guration of 

the multifunction displays by 

the  driver  takes  place  when 

stationary.   

   Define the vehicle parameters 

 Once  this  menu  has  been  selected, 

you can activate or deactivate the fol-

lowing equipment: 
   -   wiper  linked  with  reverse  gear 

(refer to the "Visibility" section), 

  -  

"follow-me-home"  lighting  (refer 

to the "Visibility" section), 

  -   parking  assistance  (refer  to  the 

"Driving" section).  

   

 Press  the      ""    or    "   buttons, 

then the  "OK"  

button to select the 

 "OK"

   box  and  coni rm  or  press 

the  "ESC"

  button to cancel.    

   Selection of the language 

 Once  this  menu  has  been  selected, 

you  can  change  the  language  used 

by  the  display  (Deutsch,  English, 

Espanol, Français, Italiano, Nederlands, 

Portugues, Portugues-Brasil).   

   "Telephone" menu 

 With  the  RD4  audio  equipment 

switched on, once this menu has been 

selected you can coni gure your Blue-

tooth  hands-free  kit  (matching),  con-

sult  the  various  telephone  directories 

(calls  log,  services,  ...)  and  manage 

your  communications  (pick  up,  hang 

up, call waiting, secret mode, ...). 

 For  further  details  concerning  the 

"Telephone"  application,  refer  to  the 

RD4 part of the "Audio and Telemat-

ics" section. 

MULTIFUNCTION DISPLAYS

40

  COLOUR DISPLAY  

   Displays on the screen 

 When the ignition is switched on, this 

displays the following information au-

tomatically and directly: 
   -  

the time, 

  -  

the date, 

  -  

the  outside  temperature  (if  there 

is a risk of ice, you are warned by 

a message).  

 Warning  messages  (e.g.:  "Fuel  level 

low") and vehicle function status mes-

sages (e.g.: "Automatic switching on of 

the headlamps activated") may appear 

temporarily. These can be cleared by 

pressing the  "ESC"  button.   

   General menu 

 When the RT4 GPS audio/telephone 

is  switched  on,  select  the  menu 

which  corresponds  to  the  following 

applications: 
   -  

the satellite navigation system, 

  -   the guidance on the map, 

  -   the trafi c information, 

  -   the  audio  sources  (radio,  CD, 

Jukebox, ...), 

  -   the  telephone  directories  and 

functions, 

  -   the  coni guration  of  the  screen 

and the setting of the parameters 

of the vehicle’s equipment, 

  -  

the displaying of a video, 

  -   the vehicle diagnostics (warnings 

log and status of the functions).    

   Controls 

 From the RT4 GPS audio/telephone 

control panel, to select one of the ap-

plications: 
    

 press the  "MENU"  button to gain 

access to the  general menu  ,

   

 turn  the  dial  to  move  the 

selection, 

   


press  the  dial  to  coni rm  the 

selection,  

 or 
    

 press the  "ESC"  button to abandon 

the  operation  in  progress  and 
return to the previous display.  

 For  further  details  concerning  these 

applications, refer to the RT4 part of 

the "Audio and Telematics" section.   

MULTIFUNCTION DISPLAYS

41

   Selection of the language 
 Once the "Selection of the language" 

menu  has  been  selected,  you  gain 

access to the following parameters: 

   -   selection  of  the  display,  informa-

tion  and  voice  commands  lan-

guage (Français, English, Italiano, 

Portugues,  Espanol,  Deutsch, 

Nederlands).    

Display coni guration

 Once  the  "Display  coni guration" 

menu  has  been  selected,  you  gain 

access to the following parameters: 

   -   selection of the palette of colours 

available for the display, 

  -  

setting  of  the  brightness  and 

brilliance of the display, 

  -  

setting of the date and time (12 or 
24 hour mode, adjustment of the 

minutes on GPS),  

  -  

selection of the units (temperature 

in 

°Celsius 

or 

°Fahrenheit; 

consumption  in  l/100  km  or  mpg 

or km/l).    

   Sounds 
 Once  the  "Sounds"  menu  has  been 

selected, you gain access to the fol-

lowing parameters: 
   -   setting of the voice commands, 

  -   setting  of  the  voice  synthesiser 

(volume  of  the  instructions 

and  other  messages,  male  or 

female), 

  -   activation of the auxiliary input AUX.    

Dei ne the vehicle parameters

 Once  the  "Dei ne  the  vehicle  para-

meters"  menu  has  been  selected, 

you can activate or deactivate certain 

driving and comfort equipment: 

   -   parking  assistance  (refer  to  the 

"Driving" section), 

  -   wiper  linked  with  reverse  gear 

(refer to the "Visibility" section), 

  -  

"follow-me-home"  lighting  and 

duration  (refer  to  the  "Visibility" 

section).  

   "Configuration" menu 

    

 Press the  "MENU"  button on the 

RT4 GPS audio/telephone to gain 

access to the  general menu 

   


Turn  the  dial  to  select  the 


"Coni guration"  menu,  then 

press it to coni rm.  

 Once  this  menu  has  been  selected, 

you can gain access to the following 

functions:  

MULTIFUNCTION DISPLAYS

42

   "Video" menu 

 You  can  connect  video  equipment 

(camcorder,  digital  camera,  DVD 

player,  ...)  to  the  three  audio/video 

sockets, located in the glove box. 
  Videos  can  only  be  displayed 
when stationary. 
 
 Once  this  menu  has  been  selected, 

you can select: 

   -   "Activate video mode" to activate/

deactivate the video, 

  -   "Video  parameters"  to  set  the 

display  format,  the  brightness, 

the contrast and the colours.  

      Press  the   "MODE"   or   "DARK"  

button to disconnect the displaying 

of the video. 

     Press  the   "SOURCE"   button 

several  times  in  succession  to 

select an audio source other than 

that of the video.    

   


Select  the  line  "Duration  of  the 

"follow-me-home"  lighting"  then 

coni rm. 

    Example:  setting the duration of the 
"follow-me-home" lighting 
    


Turn  the  dial  to  select  the 


"Lighting coni guration" menu, 

then press it to coni rm. 

   


Select the duration then press the 

dial.  

   

 Turn  the  dial  to  set  the  value 

required (15, 30 or 60 seconds), 

then press the dial.  

  

   Select  the   "OK"   box,  then 

coni rm.  

 The  RT4  GPS  audio/tele-

phone  must  reinitialise  and 

restart  in  order  to  change 

the  voice  used  by  the  voice 

synthesiser (male or female) 

or the language used by the 
system. 

 For  safety  reasons,  it  is  im-

perative that coni guration of 

the multifunction displays by 

the  driver  takes  place  when 

stationary.    

43

COMFORT

  VENTILATION 

   1.   Windscreen de-icing or demisting 

vents. 

  2.   Front window de-icing or demist-

ing vents. 

   Advice on operation 

      If,  when  the  vehicle  has  been 

parked in the sun for a long time, 
the  interior  temperature  remains 
very high, do not hesitate to ven-
tilate the passenger compartment 
for a few minutes.  


Place  the  air  l ow  control  at  a 

level  sufi cient  to  ensure  a  good 

renewal  of  air  in  the  passenger 
compartment.   


When the air l ow control is in posi-

tion  0  (deactivation of the system), 
temperature related comfort is no 

longer guaranteed but a slight l ow 

of air, due to the movement of the 
vehicle, can still be felt. 

     For even air distribution, take care 

not to obstruct the exterior air in-
take grille at the base of the wind-
screen,  the  vents,  the  air  outlets 
under  the  front  seats  and  the  air 

extractor located behind the l aps 

in the boot.  


Check  that  the  passenger  com-

partment  i lter  is  in  good  condi-

tion.  Have  the  i lters  replaced 

regularly.  If  you  drive  in  a  dusty 
environment,  change  them  twice 
as often.   

 Switch  off  the  rear  screen 
and  exterior  mirrors  demist-
ing as soon as you consider 
this  necessary  as  reducing 
the  current  consumption  re-

duces the fuel consumption.   

  3.   Side vents. 
  4.   Centre vents. 
  5.   Air outlet to front footwells. 
  6.   Air outlet to rear footwells.   

COMFORT

44

  HEATING/VENTILATION 

2. Air l ow adjustment

 The  heating  and  ventilation  only  op-
erate when the engine is running.   

 Turn  the  control  from  posi-
tion  1  to position  4  to obtain 

an air l ow sufi cient to en-

sure your comfort.   

3. Air distribution adjustment

   Windscreen,  side  windows 
and footwells. 

   Footwells. (vents closed) 

 Centre and side vents. 

   Turn  the  control  from  blue 
(cold)  to  red  (warm)  to  ad-
just the temperature to your 
requirements.   

   Windscreen  and  side  win-
dows. 

1. Temperature adjustment

 The  air  distribution  can  be  adjusted 
by placing the control in an interme-
diate position, marked " 

 ".   

45

COMFORT

5. Demisting the rear screen and

exterior mirrors

 Pressing  the  button  once 
demists  the  rear  screen 
and the exterior mirrors. 
 This  switches  off  automati-
cally  to  prevent  an  exces-

sive consumption of current. 
 Pressing again reactivates demisting. 
 It  is  possible  to  stop  demisting  be-
fore it is switched off automatically by 
pressing the button again.   

4. Air intake/Air recirculation

 Pressing  button   4   permits 
recirculation  of  the  interior 
air.  This  is  indicated  by  il-
lumination  of  the  indicator 
light.  As  soon  as  possible, 

press  button   4   again  to  permit  the 
intake of outside air to prevent dete-
rioration  of  the  air  quality  and  avoid 
misting  of  the  windows.  This  is  indi-
cated by the switching off of the indi-
cator light.   

 The  recirculation  of  interior  air  en-
ables  you  to  isolate  the  passenger 
compartment  from  exterior  odours 
and smoke. 
 The outside air intake enables you to 
prevent and eliminate the condensa-
tion on the windscreen and side win-
dows. 
 When  the  air  recirculation  is  used 
in a humid climate, there is a risk of 
misting of the windows. 

Rapid demisting of the windscreen
   To quickly de-ice or demist the wind-
screen and side windows: 

   -  

place  the  air  distribution  control 
in the "windscreen and side win-
dows" position, 

  -  

place air intake control button  4  in 
the  "Outside Air  Intake"  position, 
(button  4  indicator light off), 

  -  

place  the  temperature   1   and  air 

l ow   2   controls  at  maximum,  as 

indicated  by  the  "Windscreen 
and side windows" symbol on the 
control panel, 

  -  

close the centre vents.     

COMFORT

46

  MANUAL AIR CONDITIONING 

2. Temperature adjustment

1. Air conditioning On/Off

 Turn  the  control  from  blue 
(cold)  to  red  (warm)  to  ad-
just the temperature to your 
requirements.   

4. Air distribution adjustment

 Windscreen  and  side  win-
dows. 

 Windscreen,  side  windows 
and footwells. 

 Footwells (vents closed). 

 The  air  conditioning  is  de-
signed to operate effectively 
in all seasons, with the win-
dows  closed.  In  summer,  it 
enables the temperature to 

be lowered and in winter, above 0 °C, 
it  increases  the  effectiveness  of  the 
demisting. 
 Press  the  switch,  the  indicator  light 
comes on. 
  

The air conditioning does not op-

erate while the air l ow adjustment

control 3 is in position "0" .   

 Centre and side vents. 

 The  air  conditioning  only  operates 
when the engine is running.  

3. Air l ow adjustment

 Turn  the  control  from  posi-
tion  1  to position  4  to obtain 

an air l ow sufi cient to en-

sure your comfort.   

 The  air  distribution  can  be  adjusted 
by placing the control in an interme-
diate position, marked " 

 ".   

47

COMFORT

6. Demisting the rear screen and

the mirrors

 Pressing  the  button  once 
demists  the  rear  screen 
and the exterior mirrors. 
 This  switches  off  automati-
cally  to  prevent  an  exces-

sive consumption of current.  
 Pressing again reactivates demisting. 
 It  is  possible  to  stop  demisting  be-
fore it is switched off automatically by 
pressing the button again.  

 In  certain  cases  of  particu-
larly arduous use (towing the 
maximum  load  on  a  steep 
gradient  in  high  tempera-

tures), switching off the air condition-
ing  permits  the  recovery  of  engine 
power  and  therefore  an  increase  in 
the towing capacity. 
 In order for the air conditioning to be 
fully  effective,  the  windows  must  be 
closed. 
 The air conditioning system does not 
contain  chlorine  and  does  not  pres-
ent any danger to the ozone layer. 
 Operate  the  air  conditioning  system 
for  5  to  10  minutes,  once  or  twice  a 
month,  to  keep  it  in  perfect  working 
order. 
 The  water  produced  by  the  air  con-
ditioning condensation is discharged 
through an opening provided for this 
purpose. Therefore, a puddle of wa-
ter may form underneath the vehicle 
when stationary. 
 In  order  to  ensure  that  the  air  condi-
tioning system operates correctly, reg-
ular checks are also recommended. 
 If the system does not produce cold air, 
do not use it and contact a PEUGEOT 
dealer.    

5. Air intake/Air recirculation

 Pressing  button   5   permits 
recirculation  of  the  interior 
air.  This  is  indicated  by  il-
lumination  of  the  indicator 
light. 

 As  soon  as  possible,  press  button 
 5   again  to  permit  the  intake  of  out-
side  air,  to  prevent  deterioration  of 
the air quality and to avoid misting of 
the windows. This is indicated by the 
switching off of the indicator light.   

 The  interior  air  recirculation  enables 
you  to  isolate  the  passenger  com-
partment  from  exterior  odours  and 
smoke. 
 The outside air intake enables you to 
prevent  and  eliminate  misting  of  the 
windscreen and side windows. 
 Used simultaneously with the air con-
ditioning,  air  recirculation  enables 
performance to be improved. 
 Used  in  a  humid  climate,  air  recir-
culation  may  result  in  misting  of  the 
windows. 

Rapid demisting of the wind-

screen
 To quickly de-ice or demist the wind-
screen and side windows: 
   -  

place  the  air  distribution  control 
in the "windscreen and side win-
dows" position, 

  -  

place  the  temperature   2   and  air 

l ow   3   controls  at  maximum,  as 

indicated  by  the  "Windscreen 
and side windows" symbol on the 
control panel, 

  -  

close the centre vents, 

  -  

switch  air  intake  button   5   to  the 
"Outside Air Intake" position (but-
ton  5  indicator light off), 

  -  

start the air conditioning by press-
ing button  1 .  


Content   ..  1  2  3  4   ..