Peugeot 307 SW Dag (2007.5). Manual - part 6
 

  Index      Peugeot     Peugeot 307 SW Dag 2007.5 - service manual in english


Search            


Content   ..  4  5  6  7   ..


Peugeot 307 SW Dag (2007.5). Manual - part 6


72

ACCESS

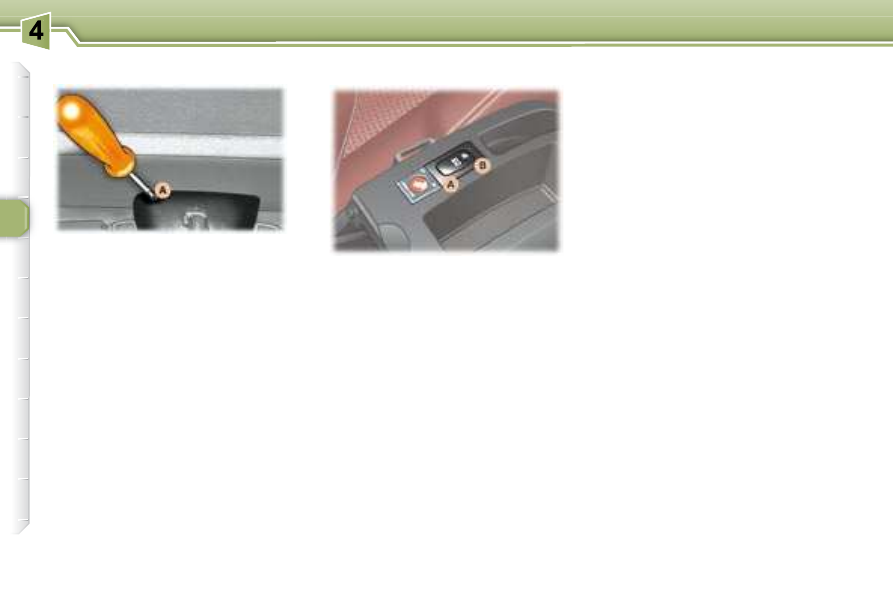
 This  enables  the  tailgate  to  be  un-

locked in the event of a central lock-

ing fault. 
   -   Fold  back  the  rear  seats  to  gain 

access to the lock from inside the 
boot, 

  -   Insert  a  small  screwdriver  into 

hole   A   of  the  lock  to  unlock  the 
tailgate.    

   Safety auto-reverse 
 At the end of its travel, if the shutter 
encounters an obstacle to closing, it 

stops and moves back slightly.    

  Your  vehicle  is  i tted  with  a  tinted 

glass panoramic roof which increas-

es  the  light  and  visibility  in  the  pas-

senger  compartment.  Its  electric 

concealing shutter improves temper-

ature conditions. 

  To open: 

 press part   of the switch. 

  To close: 

 press part   of the switch. 

  Manually: 

 press  the  switch  without 

going past the point of resistance; the 

shutter stops as soon as the switch is 

released. 

  Automatically: 

 press  the  switch 

beyond  the  point  of  resistance;  one 

press fully opens or closes the shut-

ter. Press the switch again to stop the 

shutter.   

   Notes 
 If  the  shutter's  power  supply  is  cut 

off, while it is moving or immediately 

after it has stopped, you must reini-

tialise the safety auto-reverse: 

   -   press section  B  of the switch until 

the  shutter  is  completely  closed 

(closing in stages of a few centi-

metres).  

 In the event of unwanted opening of 

the  shutter  on  closing,  and  immedi-

ately after the shutter has stopped: 

   -   press section  A  of the switch until 

the shutter is fully open, 

  -   release section  A  and immediate-

ly  afterwards  press  section   B   of 

the switch until the shutter is fully 

closed (closing in stages of a few 

centimetres).  

  The  safety  auto-reverse  function 
is  not  active  during  these  opera-
tions.
     

  PANORAMIC ROOF  

   Tailgate release 

72

ACCESS

 This  enables  the  tailgate  to  be  un-

locked in the event of a central lock-

ing fault. 
   -   Fold  back  the  rear  seats  to  gain 

access to the lock from inside the 
boot, 

  -   Insert  a  small  screwdriver  into 

hole   A   of  the  lock  to  unlock  the 
tailgate.    

   Safety auto-reverse 
 At the end of its travel, if the shutter 
encounters an obstacle to closing, it 

stops and moves back slightly.    

  Your  vehicle  is  i tted  with  a  tinted 

glass panoramic roof which increas-

es  the  light  and  visibility  in  the  pas-

senger  compartment.  Its  electric 

concealing shutter improves temper-

ature conditions. 

  To open: 

 press part   of the switch. 

  To close: 

 press part   of the switch. 

  Manually: 

 press  the  switch  without 

going past the point of resistance; the 

shutter stops as soon as the switch is 

released. 

  Automatically: 

 press  the  switch 

beyond  the  point  of  resistance;  one 

press fully opens or closes the shut-

ter. Press the switch again to stop the 

shutter.   

   Notes 
 If  the  shutter's  power  supply  is  cut 

off, while it is moving or immediately 

after it has stopped, you must reini-

tialise the safety auto-reverse: 

   -   press section  B  of the switch until 

the  shutter  is  completely  closed 

(closing in stages of a few centi-

metres).  

 In the event of unwanted opening of 

the  shutter  on  closing,  and  immedi-

ately after the shutter has stopped: 

   -   press section  A  of the switch until 

the shutter is fully open, 

  -   release section  A  and immediate-

ly  afterwards  press  section   B   of 

the switch until the shutter is fully 

closed (closing in stages of a few 

centimetres).  

  The  safety  auto-reverse  function 
is  not  active  during  these  opera-
tions.
     

  PANORAMIC ROOF  

   Tailgate release 

73

ACCESS

  The  engine  must  be  switched  off 

when i lling with fuel.  
   

   Open the fuel i ller l ap.  

     Insert  the  key  then  turn  it  to  the 

left. 

  

   Remove  the  cap  and  hang  it  on 

the hook located on the inside of 

the l ap.  

 A label afi xed to the inside of the fuel 

i ller l ap indicates which type of fuel 

to use. 
 When you i ll your tank, do not continue 

after  the  third  cut-off  of  the  pump. 

This could cause your vehicle to mal-

function. 
  The capacity of the tank is approx-
imately 60 litres.
  
   

   After i lling the tank, lock the cap 

and close the fuel i ller l ap.    

   Low fuel level 

 When  the  minimum 
fuel  level  in  the  tank 

is reached, this warn-

ing light comes on on 

the instrument panel. 

  You  can  still  drive  approximately 
30 miles (50 km).
  

   Operating fault 
 With the ignition on, if the fuel gauge 
needle  remains  in  or  returns  to  the 

rest  position  (below  zero),  this  in-

dicates  a  malfunction  of  the  fuel 
gauge. 
 Contact a PEUGEOT dealer.   

                   FILLING WITH FUEL  

   1.6 litre 16V BioFlex engine 

 Your  BioFlex  vehicle  is  an  adapt-

able vehicle. It has been designed to 

run  equally  well  on  unleaded  petrol 

(RON  95  or  RON  98)  or  ethanol  (in 

Europe,  this  is  a  mixture  containing 

85 %  ethanol  and  15 %  unleaded 

petrol, referred to as E85). 

 So, irrespective of the quantity of fuel 

remaining  in  your  tank  and  regard-

less  of  the  type  of  fuel  (unleaded 

petrol, E85 or a mixture of the two), 

you can i ll your tank at any time with 

unleaded petrol (RON 95 or RON 85) 

or ethanol E85. 
 This  vehicle  will  run  on  unleaded 

petrol only without experiencing any 

problems. 

 In  wintry  conditions,  start-

ing  the  engine  from  cold 

may  sometimes  prove  difi -

cult.  During  these  very  cold 

periods, it is advisable to favour un-

leaded  petrol  to  guarantee  optimum 

starting conditions.     

74

VISIBILITY

   Front and rear lights (ring A) 

      Place  ring   A

   in  the  required

position.  

   Dipped/Main beam change 
   

   Pull the stalk towards you.    

Vehicles i tted with front fog

lamps and a rear fog
lamp (ring C) 

 Lights off 

 Side lights  

 Dipped/main beam 

headlamps  

 Rear fog lamp 

 Front  fog  lamps  ( i rst   rota-

tion of the ring forwards) 

 Front  and  rear  fog 

lamps  (2 nd   rotation 

of the ring forwards).  
  Note:

   to  switch  off 

the  rear  fog  lamp 

and  the  front  fog 

lamps, turn the ring backwards twice 

in succession. 

Vehicles i tted with a rear

fog lamp (ring B) 

 This  operates  with  the  dipped/main 

beam headlamps. 
  Note: 

 when the lights are switched off 

automatically, the rear fog lamp and 

the dipped headlamps will remain on. 

Turn the ring backwards to switch off 

the rear fog lamp. The dipped head-

lamps will then be switched off. 

 The  front  fog  lamps  operate  with  the 

side lights and the dipped headlamps. 

   Front fog lamps and
rear fog lamp 

      Turn ring  B  or  C

  forwards to switch 

on  and  backwards  to  switch  off. 

The  status  is  coni rmed  by  the 

indicator  light  on  the  instrument 

panel    .   

   Lights on buzzer 
 With the ignition off and the automat-

ic switching on of the lights deactivat-

ed, when the driver's door is opened, 

a buzzer sounds to warn you that you 

have left your lights on.    

 In  good  or  rainy  weather, 

both day and night, the front 

fog  lamps  and  the  rear  fog 

lamp  are  dazzling  and  are 

prohibited. 

 Do not forget to switch them off when 

they are no longer needed.   

  LIGHTS STALK  

 The rear fog lamp will be de-

activated automatically when 

towing or when a bicycle car-

rier  i tted  with  a  fog  lamp  is 

i tted. 

 Automatic  switching 

on of the lights 

75

VISIBILITY

   Automatic switching on
of the lights 

 Side  lights  and  dipped  beam  head-

lamps  switch  on  automatically  if  the 

light  is  poor,  or  during  operation  of 

the  windscreen  wipers.  They  switch 

off  as  soon  as  the  light  becomes 

bright enough or the windscreen wip-

ers stop. 
  Note:

   in  foggy  weather  or  in  snow, 

the brightness sensor can detect suf-

i cient  light.  As  a  consequence,  the 

lights will not come on automatically.  

      Deactivation 
      Turn  ring   A

   to  a  position  other 

than  "AUTO"

 . Switching off is ac-

companied by a message on the 

multifunction display.  

  If  the  brightness  sensor  does  not 
function  correctly,
   the  lights  come 

on  accompanied  by  the  service 

warning  light,  an  audible  signal  and 

a message on the multifunction dis-

play. 
 Contact a PEUGEOT dealer. 

   Manual "Follow-me-home"
lighting 
  When the automatic switching on of 
the lights function is deactivated
 , the 

side  lights  and  dipped  headlamps  re-

main on for the duration selected for the 

automatic "follow-me-home" lighting. 
  

If  the  vehicle  is  not  i tted  with  the

automatic switching on of the lights 
function

 , when you leave your vehi-

cle, the side lights and dipped head-

lamps remain on for thirty seconds.   

   Direction indicators

(l ashers)

  Left:

  downwards. 

  Right:

  upwards. 

  Note:

   if  you  forget  to  cancel  the  di-

rection  indicator,  the  volume  of  the 

audible  signal  will  increase,  if  you 

are  driving  at  a  speed  greater  than 

50 mph (80 km/h).   

   Automatic "Follow me home" 
lighting 
 With the ignition off, when you leave 

your  vehicle  with  the   automatic 

switching on of the lights function 
activated

 , the side lights and dipped 

headlamps remain on for the select-

ed duration. 

   Activation: 
   

   switch off the engine, 

  

   "l ash" the headlamps, 

     get out of the vehicle and lock it.    

   Deactivation: 
   

   "l ash" the headlamps again, 

     get out of the vehicle and lock it.     

 To  deactivate  or  activate 

this function, go to the mul-

tifunction display coni gura-

tion menu. 
 The  duration  of  the  timed 

period  must  also  be  set  (15,  30, 

60 seconds),  via  the  multifunction 

display  coni guration  menu,  except 

in  the  case  of  the   monochrome 
screen A

  for which it is pre-set.       

   Cancelling: 
   

   "l ash" the headlamps, 

     get out of the vehicle and lock it.    

   Activation 
      Turn ring  A  to the  "AUTO"

  posi-

tion. The automatic lighting is ac-

companied by a message on the 

multifunction display.  

 Do  not  cover  the  brightness 

sensor, coupled with the rain 

sensor, located in the centre 

of  the  windscreen,  behind 

the  interior  mirror.  It  is  used  for  the 

automatic switching on of the lights.    

76

VISIBILITY

 For  vehicles  i tted  with  halogen 

bulbs, depending on the load in your 

vehicle,  adjusting  the  beam  of  your 

headlamps is recommended. 
  0.

    1 or 2 people in the front seats.  

  -.

    3 people.  

  1.

    5 or 7 people.  

  -.    Intermediate setting.  
  2.

    5 or 7 people + maximum

authorised load.  

  -.    Intermediate setting.  
  3.

    Driver + maximum authorised 

load.  

  Initial setting is position 0.   

 On vehicles with xenon bulbs: 
  when  stationary

 ,  the  system  auto-

matically  corrects  the  height  of  the 

beam, whatever the load of the vehi-

cle. The driver is then assured of hav-

ing optimum lighting and not causing 

a nuisance to other road users. 

  In  cases  of  malfunction , 

the  service  warning  light 

comes on on the instrument 

panel,  accompanied  by  an 

audible  signal  and  a  mes-

sage  on  the  multifunction  display. 

The  system  places  your  headlamps 

to the low position. 

 Do not touch the xenon bulbs. Con-

tact a PEUGEOT dealer.  

  Daytime lights *  

 On vehicles which are equipped with 

daytime lights, the dipped headlamps 

come on when the vehicle is started. 

   *    According to country.   

 The instruments and controls 

(instrument panel, multifunc-

tion  display,  air  conditioning 

control panel, ...) are only lit 

on switching to the automatic switch-

ing on of the lights mode or when the 

lights are switched on manually.  

 This  warning  light  comes 

on on the instrument panel. 

 MANUAL ADJUSTMENT OF 
THE HEADLAMPS  

  AUTOMATIC HEADLAMP
ADJUSTMENT 

75

VISIBILITY

   Automatic switching on
of the lights 

 Side  lights  and  dipped  beam  head-

lamps  switch  on  automatically  if  the 

light  is  poor,  or  during  operation  of 

the  windscreen  wipers.  They  switch 

off  as  soon  as  the  light  becomes 

bright enough or the windscreen wip-

ers stop. 
  Note:

   in  foggy  weather  or  in  snow, 

the brightness sensor can detect suf-

i cient  light.  As  a  consequence,  the 

lights will not come on automatically.  

      Deactivation 
      Turn  ring   A

   to  a  position  other 

than  "AUTO"

 . Switching off is ac-

companied by a message on the 

multifunction display.  

  If  the  brightness  sensor  does  not 
function  correctly,
   the  lights  come 

on  accompanied  by  the  service 

warning  light,  an  audible  signal  and 

a message on the multifunction dis-

play. 
 Contact a PEUGEOT dealer. 

   Manual "Follow-me-home"
lighting 
  When the automatic switching on of 
the lights function is deactivated
 , the 

side  lights  and  dipped  headlamps  re-

main on for the duration selected for the 

automatic "follow-me-home" lighting. 
  

If  the  vehicle  is  not  i tted  with  the

automatic switching on of the lights 
function

 , when you leave your vehi-

cle, the side lights and dipped head-

lamps remain on for thirty seconds.   

   Direction indicators

(l ashers)

  Left:

  downwards. 

  Right:

  upwards. 

  Note:

   if  you  forget  to  cancel  the  di-

rection  indicator,  the  volume  of  the 

audible  signal  will  increase,  if  you 

are  driving  at  a  speed  greater  than 

50 mph (80 km/h).   

   Automatic "Follow me home" 
lighting 
 With the ignition off, when you leave 

your  vehicle  with  the   automatic 

switching on of the lights function 
activated

 , the side lights and dipped 

headlamps remain on for the select-

ed duration. 

   Activation: 
   

   switch off the engine, 

  

   "l ash" the headlamps, 

     get out of the vehicle and lock it.    

   Deactivation: 
   

   "l ash" the headlamps again, 

     get out of the vehicle and lock it.     

 To  deactivate  or  activate 

this function, go to the mul-

tifunction display coni gura-

tion menu. 
 The  duration  of  the  timed 

period  must  also  be  set  (15,  30, 

60 seconds),  via  the  multifunction 

display  coni guration  menu,  except 

in  the  case  of  the   monochrome 
screen A

  for which it is pre-set.       

   Cancelling: 
   

   "l ash" the headlamps, 

     get out of the vehicle and lock it.    

   Activation 
      Turn ring  A  to the  "AUTO"

  posi-

tion. The automatic lighting is ac-

companied by a message on the 

multifunction display.  

 Do  not  cover  the  brightness 

sensor, coupled with the rain 

sensor, located in the centre 

of  the  windscreen,  behind 

the  interior  mirror.  It  is  used  for  the 

automatic switching on of the lights.    

76

VISIBILITY

 For  vehicles  i tted  with  halogen 

bulbs, depending on the load in your 

vehicle,  adjusting  the  beam  of  your 

headlamps is recommended. 
  0.

    1 or 2 people in the front seats.  

  -.

    3 people.  

  1.

    5 or 7 people.  

  -.    Intermediate setting.  
  2.

    5 or 7 people + maximum

authorised load.  

  -.    Intermediate setting.  
  3.

    Driver + maximum authorised 

load.  

  Initial setting is position 0.   

 On vehicles with xenon bulbs: 
  when  stationary

 ,  the  system  auto-

matically  corrects  the  height  of  the 

beam, whatever the load of the vehi-

cle. The driver is then assured of hav-

ing optimum lighting and not causing 

a nuisance to other road users. 

  In  cases  of  malfunction , 

the  service  warning  light 

comes on on the instrument 

panel,  accompanied  by  an 

audible  signal  and  a  mes-

sage  on  the  multifunction  display. 

The  system  places  your  headlamps 

to the low position. 

 Do not touch the xenon bulbs. Con-

tact a PEUGEOT dealer.  

  Daytime lights *  

 On vehicles which are equipped with 

daytime lights, the dipped headlamps 

come on when the vehicle is started. 

   *    According to country.   

 The instruments and controls 

(instrument panel, multifunc-

tion  display,  air  conditioning 

control panel, ...) are only lit 

on switching to the automatic switch-

ing on of the lights mode or when the 

lights are switched on manually.  

 This  warning  light  comes 

on on the instrument panel. 

 MANUAL ADJUSTMENT OF 
THE HEADLAMPS  

  AUTOMATIC HEADLAMP
ADJUSTMENT 

77

VISIBILITY

    Special position of the front
windscreen wiper 
 In the minute following switching off 

of the ignition, any action on the stalk 

positions the wipers in the centre of 

the windscreen. 

 This  action  enables  you  to  position 

the  wiper  blades  for  winter  parking, 

cleaning  or  replacement  (See  sec-

tion  "Practical  information  -  Chang-

ing a wiper blade"). 

 To park the wipers after this has been 

done, switch on the ignition and op-

erate the stalk.    

    Windscreen and headlamp wash 
 Pull  the  windscreen  wiper  stalk  to-

wards  you.  The  windscreen  wash 

then  the  windscreen  wipers  operate 

for a i xed period. 

 The  headlamp  wash  is  also  activat-

ed,  if the headlamps are on.     

   Automatic windscreen
wipers  

 In  AUTO

  mode, the windscreen wip-

ers operate automatically and  adapt 

their  speed  to  the  intensity  of  the 
rainfall
 .  

   Front windscreen wiper with 
automatic wipe 

  2


Fast wipe (heavy rain). 

  1


Normal wipe (moderate rain). 

  I


Intermittent wipe. 

  0    

Off. 

   AUTO  

   Automatic  or  single  wipe 

(press downwards). 

 In the  I

 ntermittent position, the wiping 

speed is in proportion to the speed of 

the vehicle. 
 In   AUTO

  mode, the wiping speed is 

in  proportion  to  the  intensity  of  the 

rainfall.  The  i rst  press  of  the  stalk 

downwards  activates  the  automatic 

wipe. 

 Subsequent presses trigger a single 

wipe.   

  WINDSCREEN WIPER
STALK  

   Front windscreen wiper with 
intermittent wipe  

  2

   Fast wipe (heavy rain). 

  1

   Normal wipe (moderate rain). 

  I

   Intermittent wipe. 

  0   Off. 
  

   Single wipe (press downwards). 

 In  the   I

 ntermittent  position,  the  wip-

ing speed is in proportion to the ve-

hicle speed.   

78

VISIBILITY

 Do not cover the rain sensor 

located  on  the  windscreen 

behind the interior mirror. 
 When using an automatic car 

wash, switch off the ignition. 

 In winter, it is advisable to wait for the 

windscreen to completely clear of ice 

before operating the automatic wipe.    

   Activation 
 Activation  of  the  function  is  accom-

panied  by  a  message  on  the  multi-

function display. 

 Turn ring  A

  to the i rst notch 

for intermittent wiping. 

 When  reverse  gear  is  en-

gaged,  if  the  windscreen 

wipers are in operation, the 

rear wiper will start wiping. 

 To  activate  or  deactivate 
this  function,  go  to  the 

multi-function  display  con-

i guration menu. 

 If  there  is  a  signii cant  ac-

cumulation of snow or ice and when 

using a bicycle carrier on the tailgate, 

deactivate the automatic rear wiping 

by going to the multifunction display 

coni guration menu.  

 Turn  ring   A

   past  the  i rst 

notch; the windscreen wash 

then  the  windscreen  wiper 

operate for a i xed period.    

   Deactivation 
 Deactivation  of  the  function  is  ac-

companied  by  a  message  on  the 

multifunction display. 

 The function is deactivated when the 

windscreen wipers stalk is moved to 

position  I ,  1  or  2 . 
  In  the  event  of  malfunction   of  the 

automatic  windscreen  wipers,  the 

windscreen wipers will operate in in-

termittent mode. 
 Contact a PEUGEOT dealer to have 
the system checked. 

   Rear windscreen wash 

   1. Front courtesy light 

 In this position, the courtesy 

light  comes  on  automati-

cally: 

   -   when the vehicle is unlocked, 

  -   when the key is removed from the ignition, 

  -   when a door is opened, 

  -   when  the  vehicle  location  func-

tion is used.  

 Permanently off. 

 It switches off gradually: 

   -   when the vehicle is locked, 

  -   when the ignition is switched on, 

  -   with  the  ignition  off,  30  seconds 

after the last door is closed.  

  COURTESY LIGHTS   

   Rear windscreen wiper 

  The automatic windscreen 
wipers  function  must  be 
reactivated  if  the  ignition 
has  been  switched  off  for 

more  than  one  minute,  by  press-
ing the stalk downwards.
    

78

VISIBILITY

 Do not cover the rain sensor 

located  on  the  windscreen 

behind the interior mirror. 
 When using an automatic car 

wash, switch off the ignition. 

 In winter, it is advisable to wait for the 

windscreen to completely clear of ice 

before operating the automatic wipe.    

   Activation 
 Activation  of  the  function  is  accom-

panied  by  a  message  on  the  multi-

function display. 

 Turn ring  A

  to the i rst notch 

for intermittent wiping. 

 When  reverse  gear  is  en-

gaged,  if  the  windscreen 

wipers are in operation, the 

rear wiper will start wiping. 

 To  activate  or  deactivate 
this  function,  go  to  the 

multi-function  display  con-

i guration menu. 

 If  there  is  a  signii cant  ac-

cumulation of snow or ice and when 

using a bicycle carrier on the tailgate, 

deactivate the automatic rear wiping 

by going to the multifunction display 

coni guration menu.  

 Turn  ring   A

   past  the  i rst 

notch; the windscreen wash 

then  the  windscreen  wiper 

operate for a i xed period.    

   Deactivation 
 Deactivation  of  the  function  is  ac-

companied  by  a  message  on  the 

multifunction display. 

 The function is deactivated when the 

windscreen wipers stalk is moved to 

position  I ,  1  or  2 . 
  In  the  event  of  malfunction   of  the 

automatic  windscreen  wipers,  the 

windscreen wipers will operate in in-

termittent mode. 
 Contact a PEUGEOT dealer to have 
the system checked. 

   Rear windscreen wash 

   1. Front courtesy light 

 In this position, the courtesy 

light  comes  on  automati-

cally: 

   -   when the vehicle is unlocked, 

  -   when the key is removed from the ignition, 

  -   when a door is opened, 

  -   when  the  vehicle  location  func-

tion is used.  

 Permanently off. 

 It switches off gradually: 

   -   when the vehicle is locked, 

  -   when the ignition is switched on, 

  -   with  the  ignition  off,  30  seconds 

after the last door is closed.  

  COURTESY LIGHTS   

   Rear windscreen wiper 

  The automatic windscreen 
wipers  function  must  be 
reactivated  if  the  ignition 
has  been  switched  off  for 

more  than  one  minute,  by  press-
ing the stalk downwards.
    

79

VISIBILITY

   3. 2 nd  row rear reading lights 

 Permanently off. 

 The reading light comes on: 

   -   when the vehicle is unlocked, 

  -   when the key is removed from the 

ignition, 

  -   when a door is opened, 

  -   when  the  vehicle  location  func-

tion is used.  

 It switches off gradually: 

   -   when the vehicle is locked, 

  -   when the ignition is switched on, 

  -   with  the  ignition  off,  30  seconds 

after the last door is closed.  

 With the ignition on (function not avail-

able  in  economy  mode),  press  the 

switch to obtain permanent lighting. 

 Press the switch again to switch the 

reading light off.   

 In this position, the courtesy 

light  comes  on  automati-

cally: 

   4. 3 rd  row rear courtesy light 

 Permanently  on  when  the 

ignition  is  on  (function  not 
available in economy mode).    

   -   when the vehicle is unlocked, 

  -   when the key is removed from the ignition, 

  -   when a door is opened, 

  -   when  the  vehicle  location  func-

tion is used.  

 Permanently on. 

   2. Front map reading lights 

 Different lighting times are available: 

   -   with the ignition off or on, approxi-

mately 10 minutes, 

  -   in economy mode, approximately 

30 seconds, 

  -   when  the  engine  is  running,  no 

limit.    

 With  the  ignition  on,  press 

the corresponding switch.   

 It switches off gradually: 

   -   when the vehicle is locked, 

  -   when the ignition is switched on, 

  -   with  the  ignition  off,  30  seconds 

after the last door is closed.  

80

LAYOUT

 With  the  ignition  on,  the  mirror  is 

automatically  lit  up  when  the  l ap  is 

opened.  

 The  athermic  windscreen  has  two 

non-rel ective  zones  located  either 

side  of  the  base  of  the  interior  mir-

ror. 
 They  are  intended  for  afi xing  toll 

cards and/or car park tickets.   

  SUN VISOR WITH ILLUMINATED 
COURTESY MIRROR 

  AREAS FOR TOLL CARDS/ 
CAR PARK TICKETS 

81

LAYOUT

 INTERIOR LAYOUT 

  2.    Front ashtray   
Pull the lid to open the ashtray.  

To empty it after opening, press the 

tab and remove the ashtray. 

  3.    Storage  

  4.    12 volt socket (100 W max)   
This  is  a  lighter  type  socket,  i tted 

with a cap. It is supplied with current 

from the running position. 

  5.    Door tray  

  6.    Storage/Can holder  

  7.    Waste container   
To empty, open it fully (past the point 

of resistance) then pull on the recep-

tacle to remove it.  
To rei t, lock it in place on the cover.  

It  contains    three  sockets *    B   for 

connecting video equipment.  

The layout allows storage of a water 

bottle, a pen, the vehicle handbook, 

a pair of spectacles, tokens, etc. 

  *    Colour screen only.  

   1.    Glove box with cooling facility   
This is i tted with a lock.  

To  open  the  glove  box,  lift  the  han-

dle.  
The glove box lights when the lid is 

opened.   
It  has  a  ventilation  nozzle  that  can 
be  closed   A ,  distributing  the  same 

cooled  air  as  the  vents  of  the  pas-

senger compartment.  

82

LAYOUT

  When i tting the mat for the i rst time, 

use  only  the  i xings  supplied  in  the 

wallet attached. 
 When  removing  the  mat  on  the 

driver's side: 

   -   push the seat as far back as 

possible, 

  -   unscrew the i xings fully, 

  -   remove the i xings, then the mat.  

      FITTING/REMOVING THE MAT    

 When  rei tting,  position  the 

mat correctly and replace the 

i xings by pressing them in. 

 Ensure  that  the  mat  is  se-

cured correctly. 
 To  avoid  any  risk  of  jamming  of  the 

pedals: 

   -   ensure that the mat is positioned 

correctly. 

  -   never i t one mat on top of an-

other.   

 For further details, refer to the 

operating manuals "Video kit 

operation"  and  "VMA8582  7 

inch LCD colour monitor".  

  ENTERTAINMENT SCREEN KIT 

 This  video  assembly  will  enable  the 

rear  passengers  to  pass  the  time 

pleasantly  while  watching  their  fa-

vourite i lm or playing their favourite 

game, by means, in particular, of the 

connection of a DVD player or games 

console to the central support, i tted 

between the front seats. 

 The entertainment screen kit consists 

of: 

   -   a 16/9 ths , 7 inch, LCD colour 

monitor with direction adjustment 

in the three axes, 

  -   two high frequency, wireless, 

stereo headphones, 

  -   a removable support, 

  -   three audio/video sockets on 

the i xed base and in the glove 

compartment.  

 The monitor and the support can be 

removed  and  stored,  each  in  their 

own protective cover. 

 The entertainment screen kit accepts 

all types of audio/video source, PAL/

NTSC  compatible,  such  as:  DVD 

player, camcorder, games console, ... 
 These sources are connected to the 
three audio/video sockets,  AV1  in the 

glove  compartment  or   AV2   on  the 

i xed base. 

83

LAYOUT


Content   ..  4  5  6  7   ..