Peugeot 207 Dag (2010 year). Manual - part 2
 

  Index      Peugeot     Peugeot 207 Dag - service manual 2010 year in english


Search            


Content   ..   1  2  3   ..


Peugeot 207 Dag (2010 year). Manual - part 2


!

34

 For  safety  reasons,  confi guration 

of  the  multifunction  screen  by  the 
driver must only be done when sta-
tionary.   

  Display settings 
 Once  the  "Display  settings"  menu  has 
been selected, you  can  gain  access  to 
the following settings: 
   -  

year, 

  -  

month, 

  -  

day, 

  -  

hour, 

  -  

minutes, 

  -  

12 or 24 hour mode.  

  Language 
 Once  the  "Language"  menu  has  been 
selected, you can change the language 
used by the display (Français, Italiano, 
Nederlands, 

Portugues, 

Portugues-

Brasil, Deutsch, English, Espanol).  

  Units 
 Once  the  "Units"  menu  has  been  se-
lected, you can change the units of the 
following parameters: 
   -  

temperature (°C or °F), 

  -  

fuel consumption (l/100 km, mpg or km/l).  

      Once  you  have  selected  a  setting, 

press  the  "  "  or  "  "  buttons  to 
change its value. 

     Press  the  "  "  or  "  "  buttons  to 

switch  respectively  to  the  previous 
or next setting. 

     Press  the   "OK"   button  to  record 

the change and return to the normal 
display or press the  "ESC"  button to 
cancel.   

  Vehicle confi guration 

  Options 
 Once the "Options" menu has been se-
lected, you can start diagnostics of the 
status of the equipment (active, not ac-
tive, faulty).  

 Once the "Vehicle Confi guration" menu 

has been selected, you can activate or 
deactivate the following equipment: 
   -  

wiper linked with reverse gear (refer 
to the "Visibility" section), 

  -  

directional  headlamps  (refer  to  the 
"Visibility" section), 

  -  

"guide-me-home"  lighting  (refer  to 
the "Visibility" section).   

35

MONOCHROME SCREEN C (WITH 
PEUGEOT CONNECT SOUND) 

  Main menu 

  Displays on the screen 

 This displays the following information: 
   -  

time, 

  -  

date, 

  -   ambient temperature *  (this fl ashes if 

there is a risk of ice), 

  -  

status  of  the  openings  (doors, 
boot...), 

  -  

audio sources (radio, CD...), 

  -  

trip computer (refer to the end of the 
section).  

 Warning  messages  (e.g.:  "Emission 
control  system  faulty")  or  information 
messages  (e.g.:  "Automatic  headlamp 
lighting  activated")  may  appear  tempo-
rarily. These can be cleared by pressing 
the " ESC " button.  

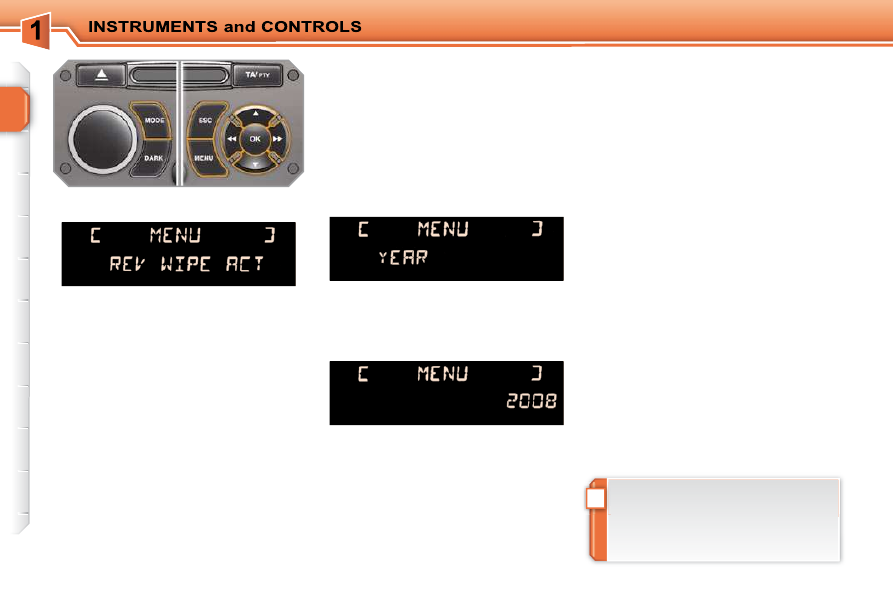
  Controls 

 From the audio equipment control panel, 
you can: 
      press the " MENU " button to gain ac-

cess to the  main menu , 

     press the "  " or "  " buttons to scroll 

through the items on the screen, 

     press the " MODE " button to change 

the permanent application (trip com-
puter, audio source...), 

     press  the  "  "  or  "  "  buttons  to 

change a setting value, 

     press the " OK

 " button to confi rm,  


or 

     press the " ESC " button to abandon 

the operation in progress.   

  "Audio functions" menu 

 With the audio equipment switched on, 
once this menu has been selected you 
can activate or deactivate the functions 
linked with use of the radio (RDS, REG, 
RadioText)  or  the  CD  (introscan,  shuf-

fl e, CD repeat). 
 For  more  information  on  the  "Audio 
functions"  application,  refer  to  the
Peugeot  Connect  Sound  part  of  the 
"Audio and Telematics" section.  

  *    With air conditioning only.  

      Press  the   "MENU"   button  for  ac-

cess to the  main menu : 

   -   audio functions, 
  -   trip  computer  (refer  to  the  end  of 

the section), 

  -   personalisation-confi guration, 
  -   telephone  (Bluetooth  hands-free 

system).   

      Press  the  "      "  buttons  to  select 

the menu required, then confi rm by 

pressing the " OK " button.   

36

  "Trip computer" menu 

 Once this menu has been selected, you 
can consult information concerning the 
status of the vehicle (alert log, status of 
the functions...). 

      Press  the   "MENU"   button  to  gain 

access to the general menu. 

     Press the arrows, then the  "OK"  but-

ton  to  select  the   "Trip  computer"  
menu. 

     On  the   "Trip  computer"   menu,  se-

lect one of the following applications:   

  Enter the distance to the destination 
 This allows you to enter an approximate 

value for the distance to the fi nal desti-

nation.  

  Status of functions 
 This  summarises  the  active  or  inactive 
status  of  the  functions  present  on  the 
vehicle.  

  Alert log 
 This  summarises  the  active  warning 
messages,  displaying  them  in  succes-
sion on the multifunction screen  

!

37

  Defi ne the vehicle parameters 
 Once  this  menu  has  been  selected,  you  can 
activate or deactivate the following equipment: 
   -  

wiper linked with reverse gear (refer 
to the "Visibility" section), 

  -  

directional  headlamps  (refer  to  the 
"Visibility" section), 

  -  

"guide-me-home"  lighting  (refer  to 
the "Visibility" section). 

  -  

rear  parking  sensors  (see  "Driving" 
section).  

  Choice of language 
 Once  this  menu  has  been  selected,  you 
can  change  the  screen  display  language 
(Deutsch, 

English, 

Espanol, 

Français, 

Italiano, Nederlands, Portugues, Portugues-
Brasil, Türkçe * ).  

  "Telephone" menu 
 With the audio equipment switched on, 
once this menu has been selected you 

can  confi gure  your  Bluetooth  hands-

free  system  (pairing),  consult  the  vari-
ous  telephone  directories  (calls  log, 
services...)  and  manage  your  commu-
nications (pick up, hang up, call waiting, 
secret mode...). 
 For further details concerning the "Tele-
phone" application, refer to the Peugeot 
Connect  Sound  part  of  the  "Audio  and 
Telematics" section.  

 Example:  setting  of  the  duration  of  the 
"guide-me-home" lighting 

  "Personalisation-Configuration" 
menu 

 Once this menu has been selected, you 
can  gain  access  to  the  following  func-
tions: 
   -   defi ne the vehicle parameters, 

  -   display confi guration, 
  -  

choice of language.  

      Press the "  " or "  " buttons, then 

the  " OK "  button  to  select  the  menu 
required. 

     Press the "  " or "  " buttons, then 

the " OK " button to select the "Guide-
me-home headlamps" line. 

     Press the "  " or "  " buttons to set 

the value required (15, 30 or 60 sec-
onds), then press the " OK " button to 

confi rm. 

     Press the "  " or "  " buttons, then 

the  " OK "  button  to  select  the  " OK " 

box and confi rm or press the " ESC " 

button to cancel.   

  Display confi guration 
 Once this menu has been selected, you 
can  gain  access  to  the  following  set-
tings: 
   -  

brightness-video setting, 

  -  

date and time setting, 

  -  

selection of the units.   

 For  safety  reasons,  confi guration 

of  the  multifunction  screen  by  the 
driver must only be done when sta-
tionary.  

  * According to country.  

i

38

           16/9 COLOUR SCREEN 
(WITH PEUGEOT CONNECT NAVIGATION) 

 For more information on these ap-
plications,  refer  to  the  "Audio  and 
Telematics"  section  or  to  the  spe-

cifi c  user  guide  given  to  you  with 

the other owner's documents.  

  Displays on the screen 

 This  displays  the  following  information 
automatically and directly: 
   -  

time, 

  -  

date, 

  -  

altitude, 

  -  

ambient  temperature  (the  value  dis-

played fl ashes if there is a risk of ice), 

  -  

check on openings, 

  -  

warning and vehicle function status 
messages, displayed temporarily, 

  -  

audio functions, 

  -  

trip computer information, 

  -  

satellite navigation system information.   

  Controls 

 From  the  Peugeot  Connect  Navigation 
control  panel,  to  select  one  of  the  ap-
plications: 
      press the dedicated  "RADIO" ,  "MU-

SIC" ,  "NAV" ,  "TRAFFIC" ,  "SETUP"  
or  "PHONE"  button for access to the 
corresponding menu, 

     turn  the  navigator  to  move  the  se-

lection, 

  

   press  the  navigator  to  confi rm  the 

selection,  


or 

     press the  "ESC"  button to abandon 

the  current  operation  and  return  to 
the previous display.  

!

39

  "SETUP" menu 

       Press  the   "SETUP"   button  for  ac-

cess to the  "SETUP"  menu. This al-
lows you to select from the following 
functions: 

   -   "System language", 
  -   "Date and time", 
  -   "Display", 
  -   "Vehicle", 
  -   "Units", 
  -   "System".    

  System language 
 This menu allows you to select the lan-
guage  used  by  the  display:  Deutsch, 
English,  Espanol,  Français,  Italiano, 
Nederlands, Polski, Portugues, Türkçe * .  

  *   According to country.  

  Date and time 
 This  menu  allows  you  to  set  the  date 
and time, the format of the date and the 
format  of  the  time  (refer  to  the  "Audio 
and Telematics" section or to the specif-
ic user guide given to you with the other 
owner's documents).  

  Display 
 This menu allows you to set the bright-
ness  of  the  screen,  the  screen  colour 
scheme and the colour of the map (day/
night or auto mode).  

  Vehicle 
 This  menu  allows  you  to  activate  or 
deactivate  certain  driving  and  comfort 
equipment: 
   -  

wiper linked with reverse gear (refer 
to the "Visibility" section), 

  -  

guide-me-home  lighting  and  dura-
tion (refer to the "Visibility" section), 

  -  

directional  headlamps  (refer  to  the 
"Visibility" section).   

  Units 
 This  menu  allows  you  to  select  the 
units:  temperature  (°C  or  °F)  and  con-
sumption (km/l, l/100 or mpg).  

  System 
 This menu allows you to restore the fac-

tory confi guration, display the software 

version and activate scrolling text.  

 For  safety  reasons,  confi guration 

of  the  multifunction  screen  by  the 
driver  must  only  be  done  when 
stationary.  

40

TRIP COMPUTER 

      Press the button, located at the end 

of  the   wiper  stalk ,  to  display  the 
various  items  of  trip  computer  data 
in succession.  

The  trip  computer  provides  the  follow-
ing information: 

 System which provides current informa-
tion concerning the trip travelled (range, 
fuel consumption...). 

      Press  the  control  for  more  than 

two seconds  to  reset  to  zero  the 
distance  travelled,  the  average 
fuel  consumption  and  the  average 
speed.    

  Monochrome screen A 

  Zero reset 

  Information displays 

   -  

range, 

  -  

current fuel consumption, 

  -   distance travelled, 

  -  

average fuel consumption, 

  -  

average speed.  

     The  next  press  then  returns  you  to 

the normal display.   

!

i

i

42

  Distance remaining to be 
travelled 
 (miles or km) 
 This  is  the  distance  remaining 

to be travelled to the fi nal destination. It 

is calculated either instantly by the navi-
gation  system  if  guidance  is  activated, 
or entered by the user. 
 If  the  distance  is  not  entered,  dashes 
are displayed in place of the digits.  

  Average speed 
 (mph or km/h) 
 This  is  the  average  speed  cal-
culated since the last trip com-
puter zero reset (ignition on).   

  Range 
 (miles or km) 
 This  indicates  the  num-
ber  of  miles  (or  kilometres) 

which can still be travelled with the fuel 
remaining  in  the  tank  in  relation  to  the 
average fuel consumption over the last 
few miles (kilometres) travelled. 

  Current fuel consumption 
 (l/100 km or km/l or mpg) 
 This  is  the  average  quantity  of 
fuel consumed over the last few 
seconds. 

  Average fuel 
consumption 
 (l/100km or km/l or mpg) 
 This  is  the  average  quantity 
of  fuel  consumed  since  the 
last trip computer zero reset.  

  Distance travelled 
 (miles or km) 
 This  indicates  the  distance 
travelled  since  the  last  trip 
computer zero reset.  

  A few definitions… 

 When  the  range  falls  below  20  miles 

(30 km), dashes are displayed. After fi ll-

ing with at least 5 litres of fuel, the range 
is recalculated and is displayed when it 
exceeds 60 miles (100 km). 

 If  dashes  are  displayed  continu-
ously  while  driving  in  place  of  the 
digits, contact a PEUGEOT dealer.  

 This function is only displayed from 
20 mph (30 km/h).  

 This fi gure may increase following 

a  change  of  driving  style  or  relief, 

resulting in a signifi cant change in 

the current fuel consumption. 

41

  16/9 colour screen 

   -   the current information tab 

with: 

       the range, 
      the current fuel consumption, 
      the  distance  remaining 

to be travelled,  

  Trip zero reset 

  Monochrome screen C  

      Press the button, located at the end 

of  the   wiper  stalk,   to  display  the 
various  trip  computer  tabs  in  suc-
cession: 

  Information displays 

      When the trip required is displayed, 

press  the  control  for  more  than 
two seconds.  

  -   the trip  "1"  tab with: 

       the distance travelled, 
      the  average  fuel  con-

sumption, 

      the average speed,    
   for the fi rst trip. 

   -   the trip  "2"  tab with: 

       the distance travelled, 
      the  average  fuel  con-

sumption, 

      the average speed,   
   for the second trip. 

      Press again to return to the normal 

display.   

 System  which  provides  current  infor-
mation  concerning  the  route  travelled 
(range, fuel consumption, …). 

 Trips   "1"   and   "2"   are  independent  but 
their use is identical. 
 Trip  "1"  permits, for example, daily calcu-
lations, and trip  "2"  monthly calculations.   

!

i

i

42

  Distance remaining to be 
travelled 
 (miles or km) 
 This  is  the  distance  remaining 

to be travelled to the fi nal destination. It 

is calculated either instantly by the navi-
gation  system  if  guidance  is  activated, 
or entered by the user. 
 If  the  distance  is  not  entered,  dashes 
are displayed in place of the digits.  

  Average speed 
 (mph or km/h) 
 This  is  the  average  speed  cal-
culated since the last trip com-
puter zero reset (ignition on).   

  Range 
 (miles or km) 
 This  indicates  the  num-
ber  of  miles  (or  kilometres) 

which can still be travelled with the fuel 
remaining  in  the  tank  in  relation  to  the 
average fuel consumption over the last 
few miles (kilometres) travelled. 

  Current fuel consumption 
 (l/100 km or km/l or mpg) 
 This  is  the  average  quantity  of 
fuel consumed over the last few 
seconds. 

  Average fuel 
consumption 
 (l/100km or km/l or mpg) 
 This  is  the  average  quantity 
of  fuel  consumed  since  the 
last trip computer zero reset.  

  Distance travelled 
 (miles or km) 
 This  indicates  the  distance 
travelled  since  the  last  trip 
computer zero reset.  

  A few definitions… 

 When  the  range  falls  below  20  miles 

(30 km), dashes are displayed. After fi ll-

ing with at least 5 litres of fuel, the range 
is recalculated and is displayed when it 
exceeds 60 miles (100 km). 

 If  dashes  are  displayed  continu-
ously  while  driving  in  place  of  the 
digits, contact a PEUGEOT dealer.  

 This function is only displayed from 
20 mph (30 km/h).  

 This fi gure may increase following 

a  change  of  driving  style  or  relief, 

resulting in a signifi cant change in 

the current fuel consumption. 

43

VENTILATION 

  Air treatment 

 The incoming air follows various routes 
depending  on  the  controls  selected  by 
the driver: 
   -  

direct arrival in the passenger com-
partment (air intake), 

  -  

passage  through  a  heating  circuit 
(heating), 

  -  

passage  through  a  cooling  circuit 
(air conditioning).  

 The temperature control enables you to 
obtain  the  level  of  comfort  required  by 
mixing the air of the various circuits. 
 The air distribution control enables you 
to diffuse the air in the passenger com-
partment combining several air vents. 
 The  air  fl ow  control  enables  you  to 

increase  or  reduce  the  speed  of  the 
ventilation blower.  

  Air intake 

 The air circulating in the passenger com-

partment is fi ltered and originates either 

from the outside via the grille located at 
the base of the windscreen or from the 
inside in air recirculation mode.  

  Control panel 

 The controls of this system are grouped 
together on control panel  A  on the centre 
console.  Depending  on  the  model,  the 
functions offered are: 
   -  

the level of comfort required, 

  -   air fl ow, 
  -  

air distribution, 

  -  

demisting-defrosting, 

  -  

manual  or  digital  air  conditioning 
controls.   

  Air distribution 

   1.   Windscreen demisting-defrosting ents. 
  2.   Front side window demisting-defrosting 

vents. 

  3.   Side adjustable air vents. 
  4.   Central adjustable air vents. 
  5.   Air outlets to the front footwells. 
  6.   Air outlets to the rear footwells.   

i

44

  The  condensation  created  by  the 
air  conditioning  results  in  a  dis-
charge  of  water  under  the  vehicle 
which is perfectly normal.   

 In order for these systems to be fully effective, follow the operation and main-
tenance guidelines below: 
      To obtain an even air distribution, take care not to obstruct the exterior air 

intake grilles located at the base of the windscreen, the nozzles, the vents 
and the air outlets, as well as the air extractor located in the boot. 

     Do not cover the sunshine sensor, located on the dashboard; this is used 

for regulation of the air conditioning system. 

     Operate the air conditioning system for at least 5 to 10 minutes, once or 

twice a month to keep it in perfect working order. 

  

   Ensure  that  the  passenger  compartment  fi lter  is  in  good  condition  and 

have the fi lter elements replaced regularly (refer to the "Checks" section).  

   We  recommend  the  use  of  a  combined  passenger  compartment  fi lter. 

Thanks  to  its  special  active  additive,  it  contributes  to  the  purifi cation  of 

the  air  breathed  by  the  occupants  and  the  cleanliness  of  the  passenger 
compartment (reduction of allergic symptoms, bad odours and greasy de-
posits). 

     To guarantee correct operation of the air conditioning system, you are also 

advised to have it checked regularly as recommended in the Warranty and 
Maintenance Record. 

     If the system does not produce cold air, deactivate it and contact a PEUGEOT 

dealer.  

 When  towing  the  maximum  load  on  a  steep  gradient  in  high  temperatures, 
switching off the air conditioning increases the available engine power and so 
improves the towing ability.  

  If after an extended stop in sunshine, the interior temperature is very high, fi rst 

ventilate the passenger compartment for a few moments.  
Put the air fl ow control at a setting high enough to quickly change the air in the 

passenger compartment. 
 The air conditioning system does not contain chlorine and does not present 
any danger to the ozone layer.  

45

HEATING/VENTILATION 

  Manual control panel  

  Electric control panel  

 MANUAL AIR CONDITIONING 

  Manual control panel  

  Electric control panel  

i

46

  2. Air fl ow adjustment 

     Turn the dial from position  1  

to  position   4   to  obtain  an 

air fl ow suffi cient to ensure 

your comfort. 

 Windscreen,  side  windows 
and footwells. 

 Footwells. (vents closed) 

 Central and side vents. 

     Turn  the  dial  from  blue 

(cold) to red (hot) to adjust 
the temperature to suit your 
requirements.   

 Windscreen and side windows. 

  1. Temperature adjustment 

 The  air  distribution  can  be 
adapted  by  placing  the  dial 
in  an  intermediate  position, 

marked by a dot " ".  

 HEATING 

 The heating/ventilation or air condition-
ing systems can only operate when the 
engine is running.  

  Control panel with manual control 

  4. Air intake/Air recirculation 
 The  intake  of  exterior  air  prevents  the 
formation of mist on the windscreen and 
side windows. 
 The recirculation of interior air prevents 
exterior  odours  and  smoke  from  enter-
ing the passenger compartment. 
 Return  to  exterior  air  intake  mode  as 
soon as possible to avoid deterioration 
of the air quality and prevent misting.  

  Control panel with electric control 

  Demisting/defrosting 

 To  quickly  demist  or  defrost  the  wind-
screen and side windows: 
      place  the  air  intake  control   4   in  the 

"Exterior air intake" position, 

     place the air distribution dial  3  in the 

"Windscreen" position, 

     place the temperature dial  1  and the 

air fl ow dial  2  in the maximum position, 

     close the central vents, 
     switch  on  the  air  conditioning  by 

pressing the  "A/C"  button.  

  

   If you place the air fl ow control 

in position  0  (deactivation of the 
system),  the  temperature  is  no 
longer maintained at a comfort-
able  level.  However,  a  slight 

fl ow of air, due to the movement 

of the vehicle, can still be felt.   

  3. Air distribution adjustment 

      Move the manual control to the right to 

the "Interior air recirculation" position. 

     Move  the  manual  control  to  the  left 

to return to the "Exterior air intake" 

position.   

     Press the button to recircu-

late  the  interior  air.  This  is 
displayed  by  lighting  of  the 
indicator lamp. 

     Press the button again to permit the 

intake  of  exterior  air.  This  is  con-

fi rmed  by  the  indicator  lamp  going 

off.    

45

HEATING/VENTILATION 

  Manual control panel  

  Electric control panel  

 MANUAL AIR CONDITIONING 

  Manual control panel  

  Electric control panel  

i

46

  2. Air fl ow adjustment 

     Turn the dial from position  1  

to  position   4   to  obtain  an 

air fl ow suffi cient to ensure 

your comfort. 

 Windscreen,  side  windows 
and footwells. 

 Footwells. (vents closed) 

 Central and side vents. 

     Turn  the  dial  from  blue 

(cold) to red (hot) to adjust 
the temperature to suit your 
requirements.   

 Windscreen and side windows. 

  1. Temperature adjustment 

 The  air  distribution  can  be 
adapted  by  placing  the  dial 
in  an  intermediate  position, 

marked by a dot " ".  

 HEATING 

 The heating/ventilation or air condition-
ing systems can only operate when the 
engine is running.  

  Control panel with manual control 

  4. Air intake/Air recirculation 
 The  intake  of  exterior  air  prevents  the 
formation of mist on the windscreen and 
side windows. 
 The recirculation of interior air prevents 
exterior  odours  and  smoke  from  enter-
ing the passenger compartment. 
 Return  to  exterior  air  intake  mode  as 
soon as possible to avoid deterioration 
of the air quality and prevent misting.  

  Control panel with electric control 

  Demisting/defrosting 

 To  quickly  demist  or  defrost  the  wind-
screen and side windows: 
      place  the  air  intake  control   4   in  the 

"Exterior air intake" position, 

     place the air distribution dial  3  in the 

"Windscreen" position, 

     place the temperature dial  1  and the 

air fl ow dial  2  in the maximum position, 

     close the central vents, 
     switch  on  the  air  conditioning  by 

pressing the  "A/C"  button.  

  

   If you place the air fl ow control 

in position  0  (deactivation of the 
system),  the  temperature  is  no 
longer maintained at a comfort-
able  level.  However,  a  slight 

fl ow of air, due to the movement 

of the vehicle, can still be felt.   

  3. Air distribution adjustment 

      Move the manual control to the right to 

the "Interior air recirculation" position. 

     Move  the  manual  control  to  the  left 

to return to the "Exterior air intake" 

position.   

     Press the button to recircu-

late  the  interior  air.  This  is 
displayed  by  lighting  of  the 
indicator lamp. 

     Press the button again to permit the 

intake  of  exterior  air.  This  is  con-

fi rmed  by  the  indicator  lamp  going 

off.    


Content   ..   1  2  3   ..