Peugeot 207 CC (2014 year). Manual - part 4
 

  Index      Peugeot     Peugeot 207 CC - service manual 2014 year in english


Search            


Content   ..  2  3  4  5   ..


Peugeot 207 CC (2014 year). Manual - part 4


2

COMFORT

47

207CC_EN_CHAP02_CONFORT_ED01-2014

HEATING/VENTILATION 

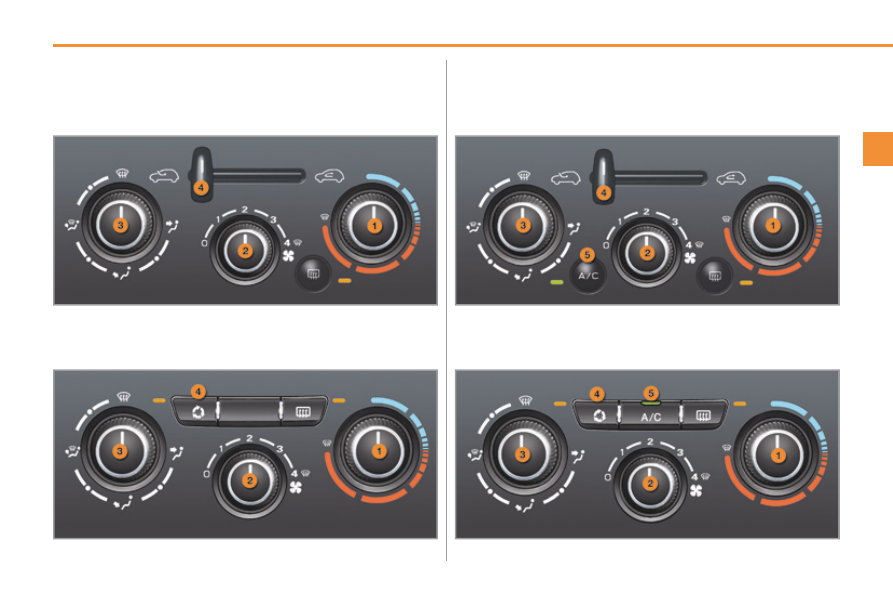
  Manual  control  panel  

  Electric  control  panel  

 MANUAL  AIR  CONDITIONING 

  Manual  control  panel  

  Electric  control  panel  

2

i

COMFORT

48

207CC_EN_CHAP02_CONFORT_ED01-2014

  2. Air fl ow adjustment 

    

 Turn the dial from posi-

tion  

1  to position  4  to obtain 

an air fl ow suffi cient to en-

sure your comfort. 

 Windscreen, side windows 

and footwells. 

 Footwells (vents closed). 

 Central and side vents. 

    


Turn the dial from blue 

(cold) to red (hot) to adjust 

the temperature to suit your 

requirements.   

 Windscreen and side windows. 

  1.  Temperature  adjustment 


The air distribution can be 

adapted by placing the dial 

in an intermediate position, 

marked by a dot "●".  

 The heating/ventilation or air condition-

ing systems can only operate when the 

engine is running.  

 HEATING/VENTILATION  AND 

MANUAL AIR CONDITIONING 

  Manual  control  panel 

  4.  Air  intake/Air  recirculation 

 The intake of exterior air prevents the 

formation of mist on the windscreen and 

side windows. 

 The recirculation of interior air prevents 

exterior odours and smoke from enter-

ing the passenger compartment. 

 Return to exterior air intake mode as 

soon as possible to avoid deterioration 

of the air quality and prevent misting.  

  Electric  control  panel 

  Demisting/defrosting 

 To quickly demist or defrost the wind-

screen and side windows: 

      place the air intake control  

4  in the 

"Exterior air intake" position, 

     place the air distribution dial  

3  in the 

"Windscreen" position, 

     place the temperature dial  

1  and the 

air fl ow dial  

2  in the maximum posi-

tion, 

     close the central vents, 

   

 switch on the air conditioning by 

pressing the  

"A/C"   button.  

     If you place the air fl ow control 

in position  

0  (deactivation of the 

system), the temperature is no 

longer maintained at a comfort-

able level. However, a slight 

fl ow of air, due to the movement 

of the vehicle, can still be felt.   

  3.  Air  distribution  adjustment 

      Move the manual control to the right 

to the "Interior air recirculation" posi-

tion. 

     Move the manual control to the left 

to return to the "Exterior air intake" 

position.   

     Press the button to recircu-

late the interior air. This is 

displayed by lighting of the 

indicator lamp. 

     Press the button again to permit the 

intake of exterior air. This is con-

fi rmed  by  the  indicator  lamp  going 

off.    

2

i

COMFORT

49

207CC_EN_CHAP02_CONFORT_ED01-2014

  5.  Air  conditioning  On/Off 


The air conditioning is de-

signed to operate effectively in 

all seasons, with the windows 

closed. 

 The control button is located on 

the heating or air conditioning 

system control panel. 

       REAR  SCREEN  DEMIST  - 

DEFROST 

    


Switch off the demisting/

defrosting of the rear screen 

and door mirrors as soon as 

appropriate as lower current 

consumption results in reduced 

fuel  consumption.   

 If the engine is switched off before the 

demisting/defrosting is switched off auto-

matically, demisting/defrosting will resume 

next time the engine is switched on. 

  Switching  on 


The rear screen demisting/defrosting 

can only operate when the engine is 

running. 

      Press this button to demist/defrost 

the rear screen and (depending on 

version) the door mirrors. The indica-

tor lamp associated with the button 

comes  on.   

  Switching  off 


The demisting/defrosting switches off 

automatically to prevent an excessive 

consumption of current. 

      It is possible to stop the demisting/de-

frosting operation before it is switched 

off automatically by pressing the but-

ton again. The indicator lamp associ-

ated with the button switches off.  

 It enables you to: 

   -  

lower  the  temperature,  in  summer, 

  -   increase the effectiveness of the de-

misting, in winter above 0 °C.   

  Switching  on 

      Press the  

"A/C"  button, the associ-

ated indicator lamp comes on.  


The air conditioning does not ope-

rate  when  the  air  fl ow  adjustment 

dial 2 is in position "0".   

  Switching  off 

      Press the  

"A/C"  button again, the 

associated indicator lamp switches 

off.    

          The demist/defrost is deactivated 

when the retractable roof is stored 

in the boot.  

2

i

i

COMFORT

50

207CC_EN_CHAP02_CONFORT_ED01-2014

 When the engine is cold, to prevent 

too great a distribution of cold air, 

the air fl ow will only reach its opti-

mum level gradually. 

 In cold weather, it favours the distri-

bution of warm air to the windscreen, 

the side windows and the footwells 

only.  

 On entering the vehicle, if the in-

terior temperature is much colder 

or warmer than the comfort value, 

there is no need to alter the value 

displayed in order to obtain the re-

quired level of comfort. The system 

corrects the temperature differ-

ence automatically and as quickly 

as possible. 


 The air conditioning can only operate 

with the engine running. 

 The driver and front passen-

ger can each set the tempera-

ture to suit their requirements. 

      Turn dial  

2  or  3  to the left to reduce 

the value or to the right to increase it.  


A setting around 21 enables you to 

obtain an optimum level of comfort. 

Depending on your requirements, a set-

ting between 18 and 24 is usual. 

 In addition, it is recommended that you 

avoid a left/right setting difference of 

more than 3. 

  4.  Automatic  visibility  programme 


The automatic comfort pro-

gramme may not be suffi cient 

to quickly demist or defrost 

the windscreen and side win-

dows (humidity, several pas-

sengers, ice...). 

     In this case, select the automatic 

visibility  programme.  

 The system automatically controls the 

air conditioning, the air fl ow and the air 

intake and provides optimum distribu-

tion of the ventilation to the windscreen 

and side windows. 

  Automatic  operation 

     Press the  

"AUTO"   button. 

The  

"AUTO"  symbol is dis-

played.  

  2.  Driver's  side  adjustment  

DUAL-ZONE DIGITAL AIR CONDITIONING 

 We recommend that you use this mode: 

it provides optimised automatic control of 

all of the functions, passenger compart-

ment temperature, air fl ow, air distribution 

and air recirculation, in accordance with 

the comfort value that you have selected. 

 This system is designed to operate ef-

fectively in all seasons, with the windows 

closed. 

 The value indicated on the display cor-

responds to a level of comfort and not 

to a temperature in degrees Celsius or 

Fahrenheit. 

  1.  Automatic  comfort  programme 

  3. Passenger's side adjustment 

2

!

!

i

COMFORT

51

207CC_EN_CHAP02_CONFORT_ED01-2014

      To exit this programme, press the  

"visibility"  

button again or the  

"AUTO"  button, the in-

dicator lamp on the button switches off and 


"AUTO"   is  displayed.    

     Press this button to switch 

the air conditioning off.  

  6.  Air  distribution  adjustment 

    

 Press this button several 

times in succession to di-

rect  the  air  fl ow  in  turn  to-

wards: 

  7. Air fl ow adjustment 

     Press the  

"small fan"   but-

ton to reduce the air fl ow. 

  8.  Air  intake/Air  recirculation 

  Deactivation of the system 

      Press the  

"small fan"  button until 

the fan symbol disappears.  

 This action deactivates all of the func-

tions of the air conditioning system. 


The temperature is no longer main-

tained at a comfortable level. However, 

a slight fl ow of air, due to the movement 

of the vehicle, can still be felt. 

      Press the  

"large fan"  button again 

or the  

"AUTO"  button to reactivate 

the system with the values which 

were set before it was deactivated.  

     Press this button to recircu-

late the interior air. The air 

recirculation symbol is dis-

played.  

  5.  Air  conditioning  On/Off 

 Avoid driving for too long with the 

air conditioning deactivated.  

 Avoid prolonged operation in inte-

rior air recirculation mode (risk of 

condensation and of deterioration 

of the air quality).   

   -  

the  windscreen,  the  side  windows 

and the footwells, 

  -   the windscreen and side windows 

(demisting or defrosting), 

  -   the central and side vents, 

  -   the central vents, the side vents and 

the footwells, 

  -  

the  footwells.    

    Press the  

"large fan"   but-

ton to increase the air fl ow.  

 The air fl ow symbol, the fan, is fi lled in 

progressively in relation to the value re-

quired.  


Air recirculation prevents exterior 

odours and smoke from entering the 

passenger compartment. 

      As soon as possible, press this but-

ton again to permit the intake of 

exterior air and prevent misting.  

 For maximum cooling or heating of 

the passenger compartment, you 

can exceed the minimum value of 

14 or the maximum value of 28. 

      Turn dial  

2  or  3  to the left until 


"LO"  is displayed or to the right 

until  

"HI"   is  displayed.  

  Resuming  manual  control 

 Depending on your requirements, you 

can make a different selection from that 

offered by the system by changing a 

setting. The other functions will still be 

controlled automatically. 

        Press the  

"AUTO"  button to return 

to fully automatic operation.  

 Switching the system off may result in 

discomfort (humidity, condensation). 

      Press the button again to return to 

automatic operation of the air con-

ditioning. The symbol  

"A/C"  is dis-

played.   

2

!

COMFORT

52

207CC_EN_CHAP02_CONFORT_ED01-2014

FRONT SEATS 

 Seat consisting of a seat cushion, seat 

back and head restraint which can all 

be adjusted to adapt your position for 

maximum ease of driving and comfort.  

  1.  Forwards-backwards  adjustment 

      Lift the control and slide the seat for-

wards  or  backwards.   

  2.  Driver's or passenger's seat 

height adjustment 

     Pull the lever upwards or push it 

downwards as many times as nec-

essary to obtain the required posi-

tion.   

  3. Seat back angle adjustment 

      Push the lever towards the rear.   

  Before moving the seat backwards, ensure that there is nothing that might prevent the full travel of the seat, so as to 

avoid the risk of of jamming the seat caused by the presence of objects on the fl oor behind the seat or rear passengers. 

If the seat jams, stop the movement immediately.  

2

!

!

COMFORT

207CC_EN_CHAP02_CONFORT_ED01-2014

  4. Access to rear seats 

      Pull the lever to fold the seat back 

and move the seat forwards.  


On repositioning, the seat returns to 

its initial position.  

      To raise the head restraint, pull it up-

wards. 

     To remove the head restraint, press 

the lug  

A  and pull the head restraint 

upwards. 

     To put the head restraint back in po-

sition, locate the stems of the head 

restraint in the holes, taking care to 

keep them in line with the seat back. 

     To lower the head restraint, press 

the lug  

A  and the head restraint at 

the same time.  

 No person or object must prevent 

the seat runner from returning to 

its initial position; return to this po-

sition is necessary for the seat to 

lock in place.  

  5. Head restraint height adjustment 

 The head restraint has a frame with 

a notch which prevents the head 

restraint from lowering; this is a 

safety device which provides pro-

tection in the event of an impact. 


The adjustment is correct when 

the upper edge of the head re-

straint is level with the top of the 

head.  

 Never drive with the head restraints 

removed; they must be in place 

and correctly adjusted.   

2

!

i

!

COMFORT

54

207CC_EN_CHAP02_CONFORT_ED01-2014

REAR SEATS 

 Fixed  two-seat  bench  fi tted  with  roll-

over bars to ensure your protection 

should the vehicle roll over. 

  Following an accident, have the roll-

over bars checked by a PEUGEOT 

dealer.  

STEERING WHEEL ADJUSTMENT 

        

When stationary , pull the control 

lever to release the adjustment 

mechanism. 

     Adjust the height and reach to suit 

your driving position. 

     Push the control lever to lock the ad-

justment  mechanism.  

 As a safety precaution, these op-

erations should only be carried out 

with the vehicle stationary.  

                       6. Heated seats switch 

 With the engine running, the front seats 

can be heated separately. 

      Use the adjustment dial, placed on 

the side of each front seat, to switch 

on and select the level of heating re-

quired:  


0 :  Off. 


1 :  Low. 


2 :  Medium. 


3 :  High  


The seat heating switch settings 

remain memorised for two min-

utes after the ignition has been 

switched  off.   

2

i

!

!

COMFORT

55

207CC_EN_CHAP02_CONFORT_ED01-2014

MIRRORS 

  Door  mirrors 

 Adjustable mirror permitting the lateral 

rearward vision necessary when over-

taking or parking. 

  Adjustment 

      Slide switch  

A  to the right or to the 

left to select the corresponding 

m irror. 

     Move knob  

B  in all four directions to 

adjust. 

     Return switch  

A  to the centre posi-

tion.   


The folding and unfolding of the 

door mirrors can be deactivated by 

a  PEUGEOT  dealer  or  a  qualifi ed 

workshop. 

 Never manually fold or unfold elec-

trically folding mirrors.  

  Folding 

      From outside: lock the vehicle using 

the remote control or the key. 

     From inside: with the ignition on, pull 

switch  

A   rearwards.   


If the mirrors are folded using the 

 control   

A , they will not unfold when the 

vehicle is unlocked. It is necessary to 

pull on control  

A   again.  

  The objects observed are, in real-

ity, closer than they appear. 

 Take this into account to correctly 

judge the distance of vehicles ap-

proaching from behind. 

  Unfolding 

      From outside: unlock the vehicle us-

ing the remote control or the key. 

     From inside: with the ignition on, pull 

switch  

A   rearwards.   

 As a safety measure, the mirrors 

should be adjusted to reduce the 

"blind  spots".   

2

i

COMFORT

56

207CC_EN_CHAP02_CONFORT_ED01-2014

      Rear  view  mirror 


Adjustable mirror providing a central 

rearward view. 

 Equipped with an anti-dazzle system, 

which darkens the mirror glass and re-

duces the nuisance to the driver caused 

by the sun, headlamps from other ve-

hicles...  

  Adjustment 

      Adjust the mirror so that the glass is 

directed correctly in the "day" position.   


In order to ensure optimum vis-

ibility during your manoeuvres, the 

mirror lightens automatically when 

reverse gear is engaged.   

        Automatic day/night model  

   Manual  day/night  model  

  Day/night  position 

      Pull the lever to change to the "night" 

anti-dazzle position. 

     Push the lever to change to the normal 

"day"  position.    

 By means of a sensor, which measures 

the light from the rear of the vehicle, this 

system automatically and progressively 

changes between the day and night 

uses. 

2

!

COMFORT

57

207CC_EN_CHAP02_CONFORT_ED01-2014

SUN VISOR 

 Component which protects against sunlight 

from the front or the side, also equipped 

with an illuminated courtesy mirror. 

      With the ignition on, raise the conceal-

ing fl ap; the mirror is lit automatically.  

 This sun visor is also equipped with a 

ticket holder. 

  To avoid any risk of jamming of the 

pedals: 

   -   only use mats which are suited 

to the fi xings already present in 

the  vehicle;  these  fi xings  must 

be used, 

  -   never fi t one mat on top of an-

other.  

 The use of mats not approved by 

PEUGEOT may interfere with ac-

cess to the pedals and hinder the 

operation of the cruise control / 

speed limiter. 

 The mats approved by PEUGEOT 

have two fi xings located below the 

seat.   

MATS 

 Removable carpet protection. 

  Refitting 

 To refi t the mat on the driver's side: 

      position the mat correctly, 

     refi t the fi xings by pressing, 

     check that the mat is secured cor-

rectly.  

  Fitting 

 When  fi tting  the  mat  for  the  fi rst  time, 

on the driver's side use only the fi xings 

provided in the wallet attached. 

 The other mats are simply placed on 

the  carpet.  

  Removal 

 To remove the mat on the driver's side: 

      move the seat as far back as possible, 

     unclip the fi xings, 

     remove  the  mat.   

2

COMFORT

58

207CC_EN_CHAP02_CONFORT_ED01-2014

INTERIOR FITTINGS 


1.    Illuminated glove box   


(see details on following page) 


2.    Storage compartment    with  


non-slip mat  


3.    Card  /ticket   holder  
  

4.    Door    pocket  
  

5.    Storage compartment with 

non-slip mat  


6.    USB port   


(see details on following page) 


7.    12 V  accessory    socket     


(see details on following page) 


8.    Cup holder   

2

i

COMFORT

59

207CC_EN_CHAP02_CONFORT_ED01-2014

       Illuminated glove box 

 This has an upper open storage com-

partment, a recess and locations for 

storing a bottle of water, the vehicle's 

handbook, ... 

 Its lid has locations for storing a pen, a pair 

of spectacles, tokens, cards, a can, ... 

 It is fi tted with a lock. 

    

 To open the glove box, raise the 

handle.  

 It is lit when the lid is opened. 

 It houses the front passenger airbag de-

activation switch  

A . 

 If the vehicle is fi tted with air condition-

ing, it provides access to the ventila-

tion nozzle  

B , which can be opened or 

closed, distributing the same condi-

tioned air as the vents in the passenger 

compartment.  

       12 V accessory socket 

       To connect a 12 V accessory (maxi-

mum power: 120 Watts), lift the cov-

er and connect a suitable adaptor.   

PEUGEOT CONNECT USB 

  The   

"AUX"  connection box, located in 

the centre console, comprises an aux-

iliary JACK socket and/or a USB port. 

 It permits the connection of a portable 

device, such as a digital audio player of 

the iPod 

®

  or USB memory stick type. 

 It reads certain audio fi le formats allow-

ing them to be heard via the vehicle's 

speakers. 

 You  can  manage  these  fi les  using  the 

steering mounted controls or the audio 

system control panel and display them 

in the multifunction screen.  

  Connected to the USB port, the porta-

ble device charges automatically while 

in  use.  

  For more information on the use of 

this equipment, refer to the "Audio 

equipment and telematics" sec-

tion.  

  Do not exceed the maximum power rat-

ing of the socket (risk of damage to your 

device).   

2

COMFORT

60

207CC_EN_CHAP02_CONFORT_ED01-2014

BOOT FITTINGS 


1.    Load space cover     net   


(see details on following page) 


2.    Windstop storage case   


(see details on following page) 


3.    Luggage retaining strap   

2

i

!

i

COMFORT

61

207CC_EN_CHAP02_CONFORT_ED01-2014

 In the "cabriolet" confi guration, this de-

fi nes the luggage space in the boot. 

       Load space cover net 

 When it has been removed and folded, 

the windstop should be stored in its pro-

tective case. 

 This case can be stored by means of a 

strap on the right-hand side of the boot. 

          Windstop storage case 

 When the load space cover net is in place, 

the following conditions must be observed: 

   -   the luggage must not raise the cover net, 

  -   luggage must not be placed on top of the 

cover  net.  


The load space cover net must 

always be in place before a roof 

opening operation is started (refer 

to the "Familiarisation - Access" 

section).   

 For installation of the windstop, re-

fer to the following pages "Fitting/

removing the windstop".  

2

COMFORT

62

207CC_EN_CHAP02_CONFORT_ED01-2014

  Windstop  folded  

FITTING/REMOVING 

THE WINDSTOP 

 In the "cabriolet" confi guration, the wind-

stop improves comfort in the passenger 

compartment. 

 The vertical part of the windstop can be 

folded down to improve visibility when 

reversing. 

 It is supplied folded in four in its protec-

tive case. 

  Windstop  unfolded  

  Fitting 

     Clip the ends of the assembly until a 

click is heard. 

     Unfold the windstop by opening the 

two parts to 90° until a click is heard. 

     Unfold the windstop frame guides. 

     Engage the guides in the points lo-

cated behind the rear seat belts. 

      Unfold each of the two parts fully. 


Content   ..  2  3  4  5   ..