Peugeot 206 CC (2006 year). Manual - part 8
 

  Index      Peugeot     Peugeot 206 CC - service manual 2006 year in english


Search            


Content   ..  6  7  8  9   ..


Peugeot 206 CC (2006 year). Manual - part 8


100 - Practical information

01-01-2006

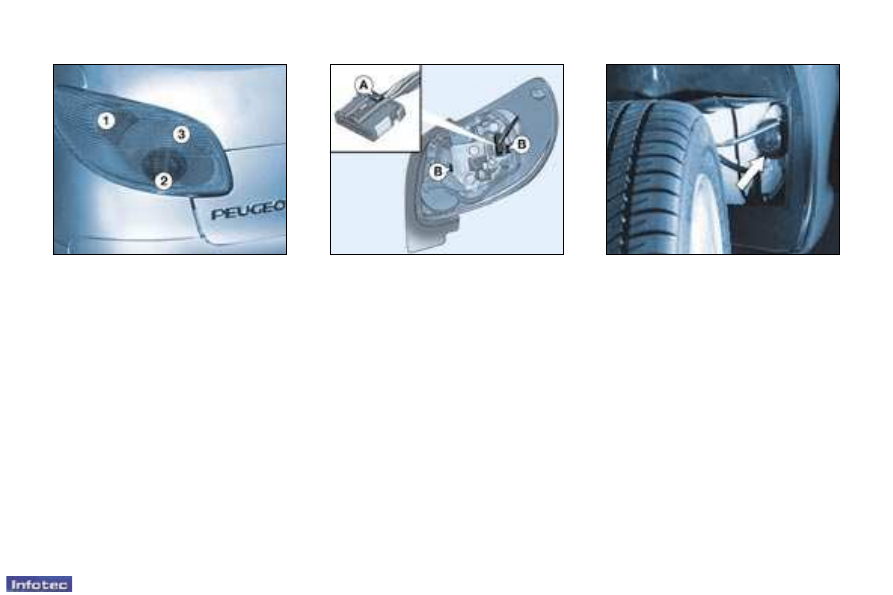
1.  Direction indicators P21W.

2.  Reversing lights P21W.

3.  Brake lights/side lights P21/5W.

Rear lights

Unclip  the  luggage  compartment 

side trim.

Remove the wing bolt.

Release the light unit.

Press  the  lug

 A  and  disconnect  the 

connector.

Remove the foam.

Move  aside  the  tabs 

B  and  remove 

the bulb holder.

Change the faulty bulb.

When  refitting, ensure that the bulb

holder and the light are repositioned 

correctly.

Front fog lamps H1 55W

Press underneath the access flap to

release it.

Open the flap.

Turn the cover to remove it.

Disconnect the bulb.

Pinch both ends of the securing clip 

to release the bulb. 

101

-

Practical information

01-01-2006

Rear fog lamp P21W

Unclip  the  light  and  release  the 

assembly.

Turn the pin connector a quarter turn 

and remove it.

Change the bulb.

Number plate lights W5W

Insert  a  thin  screwdriver  into  one  of 

the exterior holes of the transparent 

cover.

Push it outwards to unclip it.

Remove the transparent cover.

Change the faulty bulb. 

102 - Practical information

01-01-2006

Removing and refitting a fuse

Before changing a fuse, the cause of 

the fault must be found and remedied. 

The  fuse  numbers  are  indicated  on 

the fuse box.

Use the pliers 

A.

CHANGING A FUSE

The  fuse  boxes  are  located  under


the  fascia  and  in  the  engine 

compartment.

The spare fuses and the pliers 

A are 

secured  inside  the  fascia  fuse  box 

lid.

Correct

Incorrect

Pliers 

A

Always  replace  a  faulty  fuse  with 

a fuse of the same rating (two fuse 

types according to manufacturer - 

see image).

Fascia fuse box

Unscrew  the  catch  a  quarter  turn 

using a coin, then remove the cover 

to gain access to the fuses.

102 - Practical information

01-01-2006

Removing and refitting a fuse

Before changing a fuse, the cause of 

the fault must be found and remedied. 

The  fuse  numbers  are  indicated  on 

the fuse box.

Use the pliers 

A.

CHANGING A FUSE

The  fuse  boxes  are  located  under


the  fascia  and  in  the  engine 

compartment.

The spare fuses and the pliers 

A are 

secured  inside  the  fascia  fuse  box 

lid.

Correct

Incorrect

Pliers 

A

Always  replace  a  faulty  fuse  with 

a fuse of the same rating (two fuse 

types according to manufacturer - 

see image).

Fascia fuse box

Unscrew  the  catch  a  quarter  turn 

using a coin, then remove the cover 

to gain access to the fuses.

103

-

Practical information

01-01-2006

Fuse no.

Rating

Functions

1

15A

Alarm siren

4

20A

Multifunction display - Navigation control unit - Boot lighting - Radio - Retractable roof control 

unit - Steering wheel stalks - Trailer

5

15A

Automatic gearbox diagnosis

6

10A

Coolant level - Automatic gearbox - Radio - Steering wheel angle sensor (ESP)

7

15A

Alarm

9

30A

Hydraulic pump 

10

40A

Exterior mirror demisting

11

15A

Wiper

12

30A

Front windows

14

10A

Engine fuse box - Air bags - Steering wheel stalks - Rain sensor

15

15A

Instrument panel - Multifunction display - Navigation control unit - Air conditioning - Radio

16

30A

Door locking / unlocking controls - Deadlocking controls

20

10A

Right brake light

21

15A

Left brake light - 3rd brake light

22

20A

Front courtesy light - Glove box lighting - Cigarette lighter

S1

Shunt

PARC shunt

104 - Practical information

01-01-2006

or

Your  vehicle’s  electrical 

circuit  is  designed  to 

operate  with  standard  or 

optional equipment.

Before  installing  additional  elec-

trical  equipment  or  accessories, 

consult a PEUGEOT dealer.

Some electrical accessories, or the 

way in which they are fitted, may

adversely  affect  the  operation  of 

your vehicle (the electronic control 

circuits,  the  radio  circuit  and  the 

electrical charging circuit).

PEUGEOT  does  not  accept 

any  responsibility  for  expenses 

incurred by repairs or for any faults 

resulting  from  the  installation  of 

additional  accessories  which  are 

not  supplied  or  recommended 

by  PEUGEOT  and  which  were 

not  installed  in  accordance  with 

the  manufacturer’s  instructions, 

in  particular  equipment  with 

a  consumption  greater  than  

10 milliamps.

Engine compartment fuse box

To  access  the  unit  located  in  the 

engine  compartment  (next  to  the 

battery), unclip the cover.

Fuse no.

Rating

Functions

1*

20A

Fan unit

2*

60A

ABS/ESP

3*

30A

ABS/ESP

4*

70A

Built-in systems interface supply  

5*

70A

Built-in systems interface supply  

6*

-

Not used

7*

30A

Ignition switch supply 

8*

-

Not used

*  The  maxi  fuses  provide  additional  protection  for  the  electrical  systems. Any 

work on them must be carried out by a PEUGEOT dealer.

After  changing  the  fuse,  close  the 

cover very carefully.

105

-

Practical information

01-01-2006

Fuse no.

Rating

Functions

1

10A

Pre-heat unit (Diesel) - Water in diesel sensor - Reversing lights switch - Speed sensor - Air 

flow sensor (Diesel)

2

15A

Canister solenoid valve - Fuel pump

3

10A

ABS/ESP engine control unit - ESP brake switch

4

10A

Automatic gearbox control unit - Engine control unit

5

-

Not used

6

15A

Front fog lamps

7

-

Not used

8

20A

Fan unit relay - Engine control unit - Diesel injection pump - Diesel high pressure regulator -  

Engine management solenoid valve

9

15A

Left dipped headlamps

10

15A

Right dipped headlamps

11

10A

Left main beam headlamps

12

15A

Right main beam headlamps

13

15A

Horn

14

10A

Front windscreen wash pump

15

30A

Throttle housing heater - Diesel injection pump - Oxygen sensor - Engine control unit - Air flow

sensor - Ignition coil - Engine management solenoid valve - Diesel heater - Injectors

16

30A

Air pump relay

17

30A

Fast and slow-speed wiper

18

40A

Air conditioning fan

106 - Practical information

01-01-2006

ECONOMY MODE FUNCTION

After  the  engine  has  stopped,  with 

the  key  in  the  accessories  position, 

certain  functions  (windscreen  wiper, 

electric  windows,  courtesy  lights, 

audio  equipment,  etc.)  can  only  be 

used  for  a  cumulative  duration  of 

thirty minutes, to prevent discharging 

the battery.

Once the thirty minutes are over, the 

message 

“Economy mode active” 

appears on the multifunction display 

and  the  active  functions  are  put  on 

standby.

To resume the use of these functions 

immediately, start the engine and let 

it run for a few minutes.

The  time  that  you  will  then  have 

available  will  be  double  the  time 

during which the engine was running. 

However,  this  time  will  always  be 

between five and thirty minutes.

A flat battery will prevent the engine

from starting. 

BATTERY

To charge the battery using a 

battery charger:

-  Disconnect the battery,

-  Follow  the  instructions  for  use 

given  by  the  battery  charger 

manufacturer,

-  Reconnect 

starting 

with 

the 

negative (-) terminal,

-  Check  that  the  terminals  and 

connectors  are  clean.  If  they  are 

covered  with  sulphate  (white  or 

greenish deposit), disconnect them 

and clean them.

It is advisable to disconnect the 

battery if the vehicle is not to be 

used  for  a  period  of  more  than 

one month.

-  Wait  for  2  minutes  after 

switching off the ignition 

before disconnecting the 

battery.

-  Never  disconnect  a  terminal 

when the engine is running.

-  Never  charge  a  battery  without 

first disconnecting the terminals.

-  Close  the  windows  and  the 

roof  before  disconnecting  the 

battery. 

-  After  every  reconnection  of  the 

battery,  switch  on  the  ignition 

and wait 1 minute before starting 

to allow the electronic systems to 

be initialised. If slight difficulties

are experienced after this, please 

consult a PEUGEOT dealer.

To start the vehicle from another 

battery:

-  Connect the red cable to the positive 

(+) terminals of the two batteries,

-  Connect  one  end  of  the  green 

or  black  cable  to  the  negative  (-) 

terminal of the slave battery,

-  Connect the other end of the green 

or black cable to an earth point on 

the broken down vehicle, as far as 

possible from the battery,

Operate  the  starter,  let  the  engine 

run.

Wait for the engine to return to idle, 

then disconnect the cables.

107

-

Practical information

01-01-2006

FITTING SPEAKERS 

The  factory-fitted equipment allows

the fitting of:

-  165  mm  diameter  speakers  in  the 

front doors,

-  130  mm  diameter  speakers  in  the 

rear doors, 

-  22.5  mm  diameter  tweeters  in  the 

mirror trims.

FITTING AUDIO EQUIPMENT

Your vehicle is equipped with certain 

factory-fitted audio equipment:

-  roof aerial,

-  coaxial aerial cable,

-  basic interference suppression,

-  supply to front speakers,

-  supply to rear speakers,

-  two 8-way connectors.

Making the connections

A1  :  -

A2  :  -

A3  :  -

A4  :  -

A5  :  -

A6  :  (+ve)  Ignition positive 

A7  :  (+ve)  Permanent

A8  :   

Earth

B1  :  (+) 

Rear right speaker 

B2  :  (-) 

Rear right speaker 

B3  :  (+) 

Front right speaker and 

tweeter 

B4  :  (-) 

Front right speaker and 

tweeter 

B5  :  (+) 

Front  left  speaker  and 

tweeter 

B6  :  (-) 

Front  left  speaker  and 

tweeter 

B7  :  (+) 

Rear left speaker 

B8  :  (-) 

Rear left speaker

Consult  a  PEUGEOT 

dealer  before  installing 

audio 

equipment 

or 

speakers in your vehicle. 

108 - Practical information

01-01-2006

Special features of the automatic 

gearboxes

When towing with all four wheels on 

the ground, the following rules must 

be adhered to:

-  gear lever in position 

N,

-  tow the vehicle at a speed less than 

30 mph (50 km/h) over a distance 

of not more than 30 miles (50 km),

-  do not add oil to the gearbox. 

From the front or the rear

Attach the tow bar to the towing eye.

TOWING YOUR VEHICLE

Never  use  the  radiator 

crossmember.

BOOT LUGGAGE CARRIER*

A  boot  luggage  carrier  is  available 

from your PEUGEOT dealer. 

When  it  is  used,  take  care  not  to 

conceal the third brake light.

Follow  the  manufacturer’s  recom-

mendations.

Without lifting (four wheels on the 

ground)

You must always use a tow bar.

*  Available as an accessory. 

By lifting (two wheels only on the 

ground)

It  is  preferable  to  lift  the  vehicle  by 

the wheels.

109

-

Practical information

01-01-2006

TOWING A TRAILER, 

CARAVAN, BOAT, etc.

We  recommend  the  use  of  original 

PEUGEOT  towbars  that  have  been 

tested and approved from the design 

stage  of  your  vehicle  and  that  the 

fitting of the towbar is entrusted to a 

PEUGEOT dealer.

Your  vehicle  is  primarily  designed 

for  transporting  people  and  luggage 

but it may also be used for towing a 

trailer.

Driving  with  a  trailer  subjects  the 

towing  vehicle  to  more  significant 

stress  and  its  driver  must  be 

particularly careful.

Air  density  decreases  with  altitude, 

thus  reducing  engine  performance.  

Above  1000  metres,  the  maximum 

towing load must be reduced by 10% 

and so on for every 1000 metres of 

altitude.

Driving advice

Distribution of loads: Distribute the 

load in the trailer so that the heaviest 

items are as close as possible to the 

axle and the nose weight approaches 

the  maximum  permitted  without 

exceeding it.

Cooling: 

Towing a trailer on a slope increases 

the temperature of the coolant.  

As  the  fan  is  electrically  controlled, 

its cooling capacity is not dependent 

on the engine speed.

On  the  contrary,  use  a  high  gear  to 

lower  the  engine  speed  and  reduce 

your speed.

The maximum towing load on a long 

slope  depends  on  the  gradient  and 

the outside temperature.

In  all  cases,  pay  attention  to  the 

coolant temperature.

If  the  warning  light  comes  on,  stop 

the vehicle and switch off the engine 

as soon as possible.

Tyres: 

Check the tyre pressures of the towing 

vehicle  and  of  the  trailer,  observing 

the recommended pressures.

Braking:

Towing  increases  the  braking  dis-

tance.  

Lights:

Check the electrical signalling on the 

trailer.

Side wind:

Take  into  acount  the  increased 

sensitivity to side wind.  

110 - Practical information

01-01-2006

BODYWORK MAINTENANCE 

To  preserve  the  paintwork  and  the 

plastic  trim  on  your  vehicle,  we 

recommend  that  you  wash  them 

regularly. 

-  by  hand:  there  are  no  specific

precautions to take;

-  using  an  automatic  car  wash: 

repeated use of poorly maintained 

automatic  car  washes  can  lead 

to  the  appearance  of  microscopic 

scratches which give the paintwork 

a  matt  appearance  (especially 

visible on dark colours);

-  using  a  high  pressure  washer: 

always follow the recommendations 

on  the  equipment  (pressure  and 

spraying distance).

  If  there  are  damaged  areas  on 

the  vehicle  (painted  bumpers  or 

headlamps), it is not recommended 

to direct the high pressure jet onto 

them. Wash these areas by hand.

  Also  avoid  the  entry  of  water  into 

the locks.

For  all  questions  relating  to  the 

maintenance of your vehicle, contact 

an approved dealer who can advise 

you  on  quality  products  selected  by 

our departments.

-  Clean  off  bird  drop-

pings,  resinous  depos-

its, tar stains and grease 

marks  as  soon  as  pos-

sible;  (these  all  contain 

substances  which  can 

cause  serious  damage 

to the paintwork).

-  Do not use a dry or abrasive cloth 

or detergent or solvent products 

to clean the double lens, complex 

surface  headlamps  as  they  are 

fitted with polycarbonate glass

covered in a protective finish.

-  Do not use petrol, oil or cloth stain 

removers to clean the bodywork 

and plastic parts of your vehicle.

-  To  prevent  the  development  of 

bodywork  corrosion  as  a  result 

of  accidental  damage  (stone 

chips, scratches, etc.) have them 

repaired swiftly. 

111

-

Practical information

01-01-2006

ROOF EMERGENCY MODE

112 - Practical information

01-01-2006

Moving shelf

Roof hook(s)

Pressure release

Screen

Shelf release

Boot lid

Tailgate flap

113

-

Practical information

01-01-2006

Manual closing of the roof 

(emergency mode)

In the event of an electric or hydraulic 

malfunction of the roof, it is possible 

to close this manually.

This is an 

emergency solution.

If  at  all  possible,  have  this 

operation  carried  out  by  your 

PEUGEOT dealer.

You  will  find below the instructions

which  enable  the  professionals  to 

carry out this operation.

 Park the vehicle on level ground.

 Lower the windows.

  Switch off the ignition.

  Take the key out of the ignition.

  Apply the handbrake.

  Open the boot lid.

The roof closing operation 

requires extreme caution.

Take  care  not  to  pinch 

your 

hands 

in 

the 

mechanisms.

This 

operation 

requires 

considerable  physical  force  and 

may result in serious injury.

Two  people  are  needed  to  carry 

out this operation.

Take  all  necessary  precautions 

(gloves, ...).

  Unhook the screen 

1 and release 

it while holding it steady.

  Take the Allen key out of the repair 

aerosols insulated box 

2.

 Push the Allen key 

3 firmly into the

pressure  release  screw 

4,  then 

unscrew  it

  a  quarter  turn  to  the 

left.

 Remove  and  keep  hold  of  the 

key.

114 - Practical information

01-01-2006

 Go  to  the  rear  left  of  the  vehicle 

then  take  the  moving  shelf 

5  in 

your left hand.

 With  your  right  hand,  insert  the 

Allen  key  into  the  opening 

6  by 

one centimetre (shelf release).

 Tilt  the  assembly  downwards 

while supporting the shelf.

 Remove the Allen key and place it 

outside the boot.

 Let  go  of  the  shelf  which  will  tilt 

completely.

 Press the catch 

7 while lifting the 

boot  lid  then  put  the  assembly 

down gently (repeat this operation 

on the other side of the lid).

  Close the boot lid.

  From  the  right  rear  side  of  the 

vehicle,  open  the  boot  lid 

completely.


While  holding  the  lid,  insert 

the Allen  key  (short  section)  fully 

into the white eye 

9. The lid thus 

remains open.


Content   ..  6  7  8  9   ..