Mitsubishi L200 (2018 year). Manual - part 7
 

  Index      Mitsubishi     Mitsubishi L200 - service manual 2018 year in english


Search            


Content   ..  5  6  7  8   ..


Mitsubishi L200 (2018 year). Manual - part 7


l

When the engine switch or the operation
mode is in the following conditions, the
average  fuel  consumption  display  is  au-
tomatically reset.
[Except for vehicles equipped with key-
less operation system]
The  ignition  switch  is  in  the  “ACC”  or
“LOCK”  position  for  about  4  hours  or
longer.
[For vehicles equipped with keyless op-
eration system]
The  operation  mode  is  in  ACC  or  OFF
for about 4 hours or longer.

NOTE

l

The  average  fuel  consumption  display  can
be  reset  separately  for  the  auto  reset  mode
and for the manual reset mode.

l

The memory of the auto reset mode or man-
ual  reset  mode  for  the  average  fuel  con-
sumption  display  is  erased  if  the  battery  is
disconnected.

l

The  initial  (default)  setting  is  “Auto  reset
mode”.

Changing the fuel consumption

display unit

E00523001808

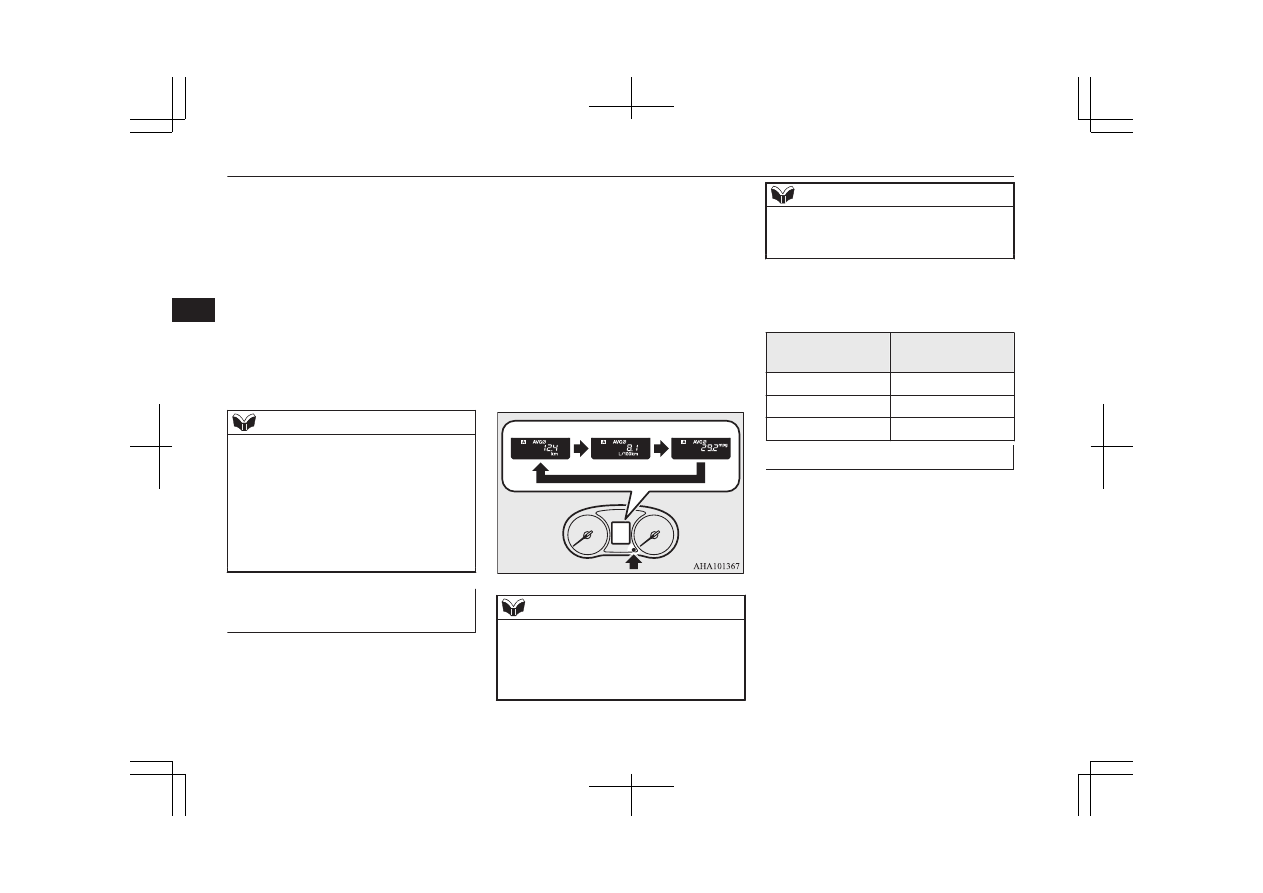
The display unit for fuel consumption can be
switched. The distance and amount units are
also switched to match the selected fuel con-
sumption unit.

1. When  you  lightly  press  the  multi  infor-

mation  display  switch  a  few  times,  the
information display switches to the aver-
age fuel consumption display.
Refer  to  “Information  display”  on  page
5-03.

2. Press and hold the multi information dis-

play switch for about 5 seconds or more
until buzzer sound is heard twice.

3. Press and hold the multi information dis-

play  switch  to  switch  in  sequence  from
“km/L”  →  “L/100  km”  →  “mpg”  →
“km/L”.

NOTE

l

The  display  units  for  the  driving  range,  the
average  fuel  consumption  are  switched,  but
the units for the indicating needle (speedom-
eter),  the  odometer,  the  tripmeter  and  the
service reminder will remain unchanged.

NOTE

l

The  memory  of  the  unit  setting  is  erased  if
the battery is disconnected, and it returns au-
tomatically to factory setting.

The distance units is also switched in the fol-
lowing  combinations  to  match  the  selected
fuel consumption unit.

Fuel consumption

Distance (driving

range)

km/L

km

L/100 km

km

mpg

mile(s)

Changing the temperature unit

E00523101753

The display unit for outside temperature can
be switched.

1. When  you  lightly  press  the  multi  infor-

mation  display  switch  a  few  times,  the
information  display  switches  to  the  out-
side temperature display.
Refer  to  “Information  display”  on  page
5-03.

2. Each  time  you  press  the  multi  informa-

tion  display  switch  for  2  seconds  or
more  on  outside  temperature  display,
you can switch from °C to °F or from °F
to  °C  unit  of  outside  temperature  dis-
play.

Multi-information display

5-10

OKTE18E1

Instruments and controls

5

NOTE

l

The  temperature  value  on  air  conditioner
panel is switched in conjunction with outside
temperature  display  unit  of  the  multi  infor-
mation display.
However,  “°C”  or  “°F”  are  not  shown  to
temperature display of an air conditioner.

Multi-information display

5-11

OKTE18E1

Instruments and controls

5

Indication and warning lamps (multi information display)

E00501504093

Type 1

Type 2

1. Front fog lamp indication lamp*

® p. 5-13

2. Turn-signal indication lamps/Hazard

warning indication lamps 

® p. 5-13

3. High-beam indication lamp 

® p. 5-13

4. Auto Stop & Go (AS&G) indication

lamp* 

® p. 6-23

5. Lane departure warning (LDW) standby

indication lamp (green)* 

® p. 6-75

Lane departure warning (LDW) lamp
(amber)* 

® p. 6-75

6. Position lamp indication lamp*

® p. 5-14

7. Lane departure warning (LDW) system

ON indication lamp* 

® p. 6-75

8. Rear fog lamp indication lamp

® p. 5-13

9. Cruise control indication lamp*

® p. 6-63

10. Diesel particulate filter (DPF) warning

lamp 

® p. 6-22

11. Diesel preheat indication lamp

® p. 5-14

12. Charge warning lamp 

® p. 5-16

13. Check engine warning lamp 

® p. 5-15

14. Fuel filter indication lamp 

® p. 5-14

15. A/T (automatic transmission) fluid tem-

perature warning lamp (vehicles with
A/T) 

® p. 6-34

16. Oil pressure warning lamp 

® p. 5-16

17. Auto Stop & Go (AS&G) OFF indica-

tion lamp* 

® p. 6-26

18. Washer fluid level warning lamp*

® p. 5-16

19. Multi-information display 

® p. 5-02

20- For details, refer to “Warning activa-

tion” on page 3-12 (if so equipped).

21. For details, refer to “Warning activa-

tion” on page 3-12 (if so equipped).

22- Door ajar warning lamp 

® p. 5-16

Indication and warning lamps (multi information display)

5-12

OKTE18E1

Instruments and controls

5

23- Seat belt reminder/warning lamp

® p. 4-08

24- Anti-lock brake system (ABS) warning

lamp 

® p. 6-57

25- Active Stability & Traction Control

(ASTC) indication lamp 

® p. 6-61

26- Active Stability & Traction Control

(ASTC) OFF indication lamp

® p. 6-61

27- Supplement Restraint System (SRS)

warning lamp 

® p. 4-34

28- Brake warning lamp 

® p. 5-15

29. Rear differential lock indication lamp*

® p. 6-45

30. 2WD/4WD operation indication lamp*

® p. 6-38

31. Low-range indication lamp* 

® p. 6-38

32- 2WD/4WD operation indication lamp*

® p. 6-42

33- Low-range indication lamp* 

® p. 6-42


Indication lamps

E00501600100

Turn-signal indication lamps/

Hazard warning indication

lamps

E00501701616

These indication lamps blink
in the following situations.

l

When  the  turn-signal
lever  is  moved  to  acti-
vate a turn-signal lamp.
Refer  to  “Turn-signal
lever” on page 5-20.

l

When the hazard warning flasher switch
is pressed to activate the hazard warning
lamps.
Refer  to  “Hazard  warning  flasher
switch” on page 5-21.

l

When  the  hazard  warning  lamps  auto-
matically activate due to sudden braking
while driving.
Refer  to  “Emergency  stop  signal  sys-
tem*” on page 6-56.

High-beam indication lamp

E00501801271

This  indication  lamp  illumi-
nates when the high-beam is
used.

Front fog lamp indication

lamp*

E00501901621

This  lamp  illuminates  while
the front fog lamps are on.

Rear fog lamp indication lamp

E00502001397

This  lamp  illuminates  while
the rear fog lamp is on.

Indication lamps

5-13

OKTE18E1

Instruments and controls

5

Position lamp indication lamp*

E00508901301

This  indication  lamp  illumi-
nates  while  the  position
lamps are on.

Diesel preheat indication lamp

E00502301390

This indicates the glow plug
preheat condition.
[Except  for  vehicles  equip-
ped  with  keyless  operation
system]
When  the  ignition  switch  is

turned to the “ON” position, the lamp illumi-
nates.  As  the  glow  plug  becomes  hot,  the
lamp goes out and the engine can be started.
[For  vehicles  equipped  with  keyless  opera-
tion system]
When  the  operation  mode  is  put  in  ON,  the
lamp  illuminates  and  preheating  of  the  glow
plug  starts  automatically.  As  the  glow  plug
becomes  hot,  the  lamp  goes  out  and  the  en-
gine starts.

CAUTION

l

If  the  diesel  preheat  indication  lamp  comes
on  after  the  engine  is  started,  the  engine
speed  may  not  rise  above  the  idling  speed
because  of  fuel  freezing.  In  this  case,  keep
the engine idling for about 10 minutes, then
turn off the ignition switch or put in OFF the
operation  mode,  and  immediately  turn  it  on
or put in ON again to confirm that the diesel
preheat indication lamp is off.

NOTE

l

If the engine is cold, the diesel preheat indi-
cation lamp is on for a longer time.

l

[Except  for  vehicles  equipped  with  keyless
operation system]
When the engine has not been started within
about 5 seconds after the diesel preheat indi-
cation  lamp  went  out,  return  the  ignition
switch  to  the  “LOCK”  position.  Then,  turn
the  ignition  switch  to  the  “ON”  position  to
preheat the engine again.

l

When the engine is warm, the diesel preheat
indication lamp does not come on even if the
ignition  switch  is  placed  in  the  “ON”  posi-
tion or the operation mode is in ON.

Fuel filter indication lamp

E00509901353

This  indication  lamp  illumi-
nates  when  the  ignition
switch is turned to the “ON”
position  or  the  operation
mode is put in ON, and goes
off after the engine has star-

ted. If it lights up while the engine is running,
it indicates that water has accumulated inside
the fuel filter; if this happens, take action as
follows.
 
Remove the water from the fuel filter. Refer
to “Removal of water from the fuel filter” on
page 8-11.
 
When  the  lamp  goes  out,  you  can  resume
driving. If it either does not go out or comes
on from time to time, we recommend you to
have the vehicle inspected.

Indication lamps

5-14

OKTE18E1

Instruments and controls

5

Warning lamps

E00502400147

Brake warning lamp

E00502503875

This  lamp  illuminates  when
the  ignition  switch  is  turned
to  the  “ON”  position  or  the
operation mode is put in ON,
and goes off after a few sec-
onds.

Always make sure that the lamp goes off be-
fore driving.
With  the  ignition  switch  or  the  operation
mode in ON, the brake warning lamp illumi-
nates under the following conditions:

l

When  the  parking  brake  lever  has  been
engaged.

l

When  the  brake  fluid  level  in  the  reser-
voir falls to a low level.

l

When  the  brake  force  distribution  func-
tion is not operating correctly.

 
With  the  ignition  switch  or  the  operation
mode in ON, a buzzer sounds under the fol-
lowing condition:

l

The  vehicle  speed  exceeds  8  km/h
(5 mph) with the parking brake applied.

CAUTION

l

In the situations listed below, brake perform-
ance  may  be  compromised  or  the  vehicle
may  become  unstable  if  brakes  are  applied
suddenly;  consequently,  avoid  driving  at
high speeds or applying the brakes suddenly.
Furthermore,  the  vehicle  should  be  brought
to  a  stop  in  a  safe  location  and  to  have  it
checked.

The brake warning lamp does not illumi-
nate when the parking brake is applied or
does not turn off when the parking brake
is released.

The  ABS  warning  lamp  and  brake  warn-
ing lamp illuminate at the same time
For details, refer to “ABS warning lamp”
on page 6-57.

The  brake  warning  lamp  remains  illumi-
nated during driving.

l

The  vehicle  should  be  brought  to  a  halt  in
the  following  manner  when  brake  perform-
ance has deteriorated.

Depress the brake pedal harder than usual.
Even  if  the  brake  pedal  moves  down  to
the very end of its possible stroke, keep it
pressed down hard.

Should the brakes fail, use engine braking
to reduce your speed and pull the parking
brake lever.
Depress  the  brake  pedal  to  operate  the
stop lamp to alert the vehicles behind you.

Check engine warning lamp

E00502603137

This lamp is a part of an on-
board  diagnostic  system
which  monitors  the  emis-
sions,  engine  control  system
or A/T control system.
If  a  problem  is  detected  in

one of these systems, this lamp illuminates or
flashes.
Although your vehicle will usually be driva-
ble and not need towing, we recommend you
to have the system checked as soon as possi-
ble.
This lamp will also illuminate when the igni-
tion  switch  is  turned  “ON”  or  the  operation
mode is put in ON, and goes off after the en-
gine has started. If it does not go off after the
engine  has  started,  we  recommend  you  to
have the vehicle checked.

CAUTION

l

Prolonged  driving  with  this  lamp  on  may
cause further damage to the emission control
system.  It  could  also  affect  fuel  economy
and drivability.

l

If the lamp does not illuminate when the ig-
nition switch is turned to the “ON” position
or the operation mode is put in ON, we rec-
ommend you to have the system checked.

Warning lamps

5-15

OKTE18E1

Instruments and controls

5

CAUTION

l

If  the  lamp  illuminates  while  the  engine  is
running,  avoid  driving  at  high  speeds  and
have 

the 

system 

inspected 

by 

a

MITSUBISHI  MOTORS  Authorized  Serv-
ice Point as soon as possible.
Accelerator  pedal  and  brake  pedal  response
may  be  negatively  influenced  under  these
conditions.

NOTE

l

The  engine  electronic  control  module  ac-
commodating the onboard diagnostic system
has  various  fault  data  (especially  about  the
exhaust emission) stored.

This  data  will  be  erased  if  a  battery  cable  is
disconnected  which  will  make  a  rapid  diag-
nosis  difficult.  Do  not  disconnect  a  battery
cable when the check engine warning lamp is
ON.

Charge warning lamp

E00502702304

This  lamp  illuminates  when
the  ignition  switch  is  turned
to  the  “ON”  position  or  the
operation mode is put in ON,
and goes off after the engine
has started.

CAUTION

l

If it illuminates while the engine is running,
there  is  a  problem  in  the  charging  system.
Immediately  park  your  vehicle  in  a  safe
place  and  we  recommend  you  to  have  it
checked.

Oil pressure warning lamp

E00502801816

This  lamp  illuminates  when
the  ignition  switch  is  turned
to  the  “ON”  position  or  the
operation mode is put in ON,
and  the  lamp  goes  off  after
the engine has started. If it il-

luminates while the engine is running, the oil
pressure is too low.
If the warning lamp illuminates while the en-
gine is running, turn the engine off and have
it inspected.

CAUTION

l

If this lamp illuminates when the engine oil
level is not low, have it inspected.

l

This  warning  lamp  does  not  indicate  the
amount of oil in the crankcase. This must be
determined by checking the oil level on the
dipstick, while the engine is switched off.

l

If  you  continue  driving  with  low  engine  oil
level or with this warning lamp illuminated,
engine seizure may occur.

NOTE

l

The oil pressure warning lamp should not be
treated  as  an  indication  of  the  engine’s  oil
level.  The  oil  level  must  be  checked  using
the dipstick.

Door ajar warning lamp

E00503302020

This  lamp  illuminates  when
a  door  is  either  open  or  not
completely closed.
If  the  vehicle  speed  reaches
approximately 

km/h

(5 mph) with a door open or

incompletely closed, a buzzer sounds 4 times
as a warning.

CAUTION

l

Before  moving  your  vehicle,  check  that  the
warning lamp is OFF.

Washer fluid level warning

lamp*

E00569300042

This  lamp  comes  on  when
the  washer  fluid  is  running
low.
If  the  lamp  comes  on,  re-
plenish  the  container  with
washer fluid.

Refer to “Washer fluid” on page 10-08.

Warning lamps

5-16

OKTE18E1

Instruments and controls

5

refer to “Capacity” on page 11-17.

Combination headlamps
and dipper switch

E00506004514

Headlamps

NOTE

l

Do  not  leave  the  lamps  on  for  a  long  time
while the engine is stationary (not running).
A run-down battery could result.

l

When it rains, or when the vehicle has been
washed, the inside of the lens sometimes be-
comes  foggy,  but  this  does  not  indicate  a
functional problem.
When the lamp is switched on, the heat will
remove  the  fog.  However,  if  water  gathers
inside the lamp, we recommend you to have
it checked.

l

The  bulbs  of  the  high  intensity  discharge
headlamps (if so equipped) have the follow-
ing characteristics.

While  the  headlamps  are  used,  the  light
will gradually become a bluish-white col-
our.

The life time of a bulb becomes shorter as
it  is  repeatedly  turned  on  and  off.  When
the  bulb  approaches  the  end  of  its  life
time,  the  brightness  may  decrease,  the
bulb  may  flicker,  and  the  light  may  be-
come a reddish colour. If this occurs, have
the  vehicle  inspected  by  a  MITSUBISHI
MOTORS Authorized Service Point.

NOTE


Type 1

Rotate the switch to turn on the lamps.

OFF All lamps off

Position, tail, licence plate and instru-
ment panel lamps on

Headlamps and other lamps go on

Type 2

Rotate the switch to turn on the lamps.

OFF

All lamps off

AUTO

With the ignition switch or the
operation mode is in ON, head-
lamps, position, tail, licence plate
and instrument panel lamps turn
on and off automatically in ac-
cordance with outside light level.
All lamps turn off automatically
when the ignition switch is turned
to “OFF” position or the opera-
tion mode is put in OFF.

Position, tail, licence plate and in-
strument panel lamps on

Headlamps and other lamps go on

Combination headlamps and dipper switch

5-17

OKTE18E1

Instruments and controls

5

NOTE

l

The  sensitivity  of  the  automatic  on/off  con-
trol can be adjusted. For further information,
contact  a  MITSUBISHI  MOTORS  Author-
ized Service Point.

l

If  the  front  fog  lamps  (if  so  equipped)  turn
on  when  they  are  supposed  to  with  the
switch  in  the  “AUTO”  position,  the  lamps
turn  off  automatically  with  the  ignition
switch or operation mode off.

l

When  the  headlamps  are  turned  off  by  the
automatic  on/off  control  with  the  ignition
switch in the “ON” position or the operation
mode  in  ON,  the  front  fog  lamps  (if  so
equipped)  and  rear  fog  lamps  also  go  off.
When  the  headlamps  are  subsequently
turned back on by the automatic on/off con-
trol, the front fog lamps also come on but the
rear  fog  lamp  stays  off.  If  you  wish  to  turn
the rear fog lamp back on, operate the switch
again.

l

Do not cover the sensor (A) for the automat-
ic on/off control by affixing a sticker or label
to the windscreen.

NOTE

l

If  the  lamps  do  not  turn  on  or  off  with  the
switch  in  the  “AUTO”  position,  manually
operate  the  switch  and  we  recommend  you
to have your vehicle checked.

Lamps (headlamps, fog lamp,

etc.) auto-cutout function

l

If  the  following  operation  is  performed
while the lamp switch is in the “

” po-

sition,  the  lamps  are  automatically
turned  off  when  the  driver’s  door  is
opened.
[Except  vehicles  equipped  with  keyless
operation system]
The  ignition  switch  is  turned  to  the
“LOCK” or “ACC” position, or the key
is removed from the ignition switch.
[For vehicles equipped with keyless op-
eration system]
The operation mode is in OFF or ACC.

l

If  the  following  operation  is  performed
while the lamp switch is in the “

” po-

sition,  the  lamps  are  automatically
turned  off  if  the  driver’s  door  then  re-
mains  closed  for  approximately  three
minutes.
[Except  vehicles  equipped  with  keyless
operation system]
The  ignition  switch  is  turned  to  the
“LOCK” or “ACC” position, or the key
is removed from the ignition switch.
[For vehicles equipped with keyless op-
eration system]
The operation mode is in OFF or ACC.

NOTE

l

The  lamp  auto-cutout  function  can  also  be
disabled.
For further information, we recommend you
to  consult  a  MITSUBISHI  MOTORS  Au-
thorized Service Point.

Lamp monitor buzzer

E00506101732

If  the  following  operation  is  performed,  a
buzzer will sound to remind the driver to turn
off the lamps.
[Except  for  vehicles  equipped  with  keyless
operation system]

Combination headlamps and dipper switch

5-18

OKTE18E1

Instruments and controls

5

If the driver’s door is opened when the key is
in  the  “LOCK”  or  “ACC”  position  or  re-
moved  from  the  ignition  switch  while  the
lamps are on.
[For  vehicles  equipped  with  keyless  opera-
tion system]
If the driver’s door is opened when the opera-
tion mode is in ACC or OFF while the lamps
are on.
 
In  both  cases,  the  buzzer  will  automatically
stop  if  the  auto-cutoff  function  is  activated,
the  lamp  switch  is  turned  off,  or  the  door  is
closed.

Daytime running lamp

E00530601343

The  daytime  running  lamps  comes  on  when
the engine is running and the lamp switch is
in  the  “OFF”  or  “AUTO”  position  and  the
tail lamps are off.

Dipper (High/Low beam

change)

E00506201717

When  the  lamp  switch  is  in  the  “

”  posi-

tion, the beam changes from high to low (or
low  to  high)  each  time  the  lever  is  pulled
fully  (1).  While  the  high-beam  is  on,  the
high-beam  indication  lamp  in  the  instrument
cluster will also illuminate.

Headlamp flasher

E00506300199

The  high-beams  flash  when  the  lever  is
pulled slightly (2), and will go off when it is
released.
When the high-beam is on, the high-beam in-
dication lamp in the instrument cluster will il-
luminate.

NOTE

l

The  high-beams  can  also  flash  when  the
lamp switch is OFF.

l

If you turn the lamps off with the headlamps
set  to  high-beam,  the  headlamps  are  auto-
matically returned to their low-beam setting
when  the  lamp  switch  is  next  turned  to  the

” position.

Headlamp levelling switch

E00506402035

The  angle  of  the  headlamp  beam  varies  de-
pending on the load carried by the vehicle.
The headlamp levelling switch can be used to
adjust  the  headlamp  illumination  distance
(when the lower beam is illuminated) so that
the  headlamps’  glare  does  not  distract  the
drivers of approaching vehicles.

Headlamp levelling switch

5-19

OKTE18E1

Instruments and controls

5

Set the switch (referring to the following ta-
ble)  to  the  appropriate  position  according  to
the number of people and the load in the ve-
hicle.

CAUTION

l

Always perform adjustments before driving.
Do not attempt to adjust while driving, as it
could cause an accident.

NOTE

l

When  adjusting  the  beam  position,  first  put
the dial in the “0” position (the highest beam
position).

Vehicle con-

dition

(Single cab)

Switch posi-

tion

“0”

“2”

●: 1 person

: Full luggage loading

Switch position 0- Driver only
Switch position 2- Driver  +  Full  luggage

loading

Vehicle con-

dition

(Club cab)

Vehicle con-

dition

(Double cab)

Switch posi-

tion

“0”

“3” or “4”

●: 1 person

: Full luggage loading

Switch position 0- Driver only
Switch position 3- Driver  +  Full  luggage

loading
Except for vehicles with
high  intensity  discharge
headlamps  and  16  inch
tyre

Switch position 4- Driver  +  Full  luggage

loading
Vehicles  with  high  in-
tensity  discharge  head-
lamps and 16 inch tyre

Turn-signal lever

E00506502863

The turn-signal lamps flash when the lever is
operated (with the ignition switch or the op-
eration mode is in ON). At the same time, the
turn-signal indicator flashes.

1- Turn-signals

When  making  a  normal  turn,  use  posi-
tion  (1).  The  lever  will  return  automati-
cally when cornering is completed.

Turn-signal lever

5-20

OKTE18E1

Instruments and controls

5

2- Lane-change signals

When moving the lever to (2) slightly to
change a lane, the turn-signal lamps and
indication lamp in the instrument cluster
will only flash while the lever is operat-
ed.
Also,  when  you  move  the  lever  to  (2)
slightly  then  release  it,  the  turn-signal
lamps and indication lamp in the instru-
ment cluster will flash 3 times.

NOTE

l

If  the  lamp  flashes  unusually  quickly,  the
bulb in a turn-signal lamp may have burned
out. We recommend you to have the vehicle
inspected.

l

It is possible to activate the following func-
tions.

Flashing  of  the  turn-signal  lamps  when
the  lever  is  operated  with  the  ignition
switch or the operation mode is in ACC.

The turn-signal lamps 3-flash function for
lane changes can be deactivated.

The time required to operate the lever for
the 3-flash function can be adjusted.

Changing  of  the  tone  of  a  sounding  buz-
zer as the turn-signal lamps flash.

For further information, we recommend you
to  consult  a  MITSUBISHI  MOTORS  Au-
thorized Service Point.

Hazard warning flasher
switch

E00506602183

Use the hazard warning flasher switch when
the  vehicle  has  to  be  parked  on  the  road  for
any emergency.
The  hazard  warning  flashers  can  always  be
operated, regardless of the ignition switch po-
sition or the operation mode.
Push the switch to turn on the hazard warning
flashers,  all  turn-signal  lamps  flash  continu-
ously.
To turn them off, push the switch again.

NOTE

l

On  vehicles  equipped  with  the  emergency
stop signal system, while the hazard warning
lamps  are  blinking  due  to  having  manually
pushed  the  switch,  the  emergency  stop  sig-
nal system does not operate.
Refer  to  “Emergency  stop  signal  system*”
on page 6-56.

Hazard warning flasher switch

5-21

OKTE18E1

Instruments and controls

5

Fog lamp switch*

E00506700089

Front fog lamp switch*

E00508301826

The  front  fog  lamps  can  be  operated  while
the headlamps or tail lamps are on. Turn the
knob  in  the  “ON”  direction  to  turn  on  the
front fog lamps. An indication lamp in the in-
strument cluster will also come on. Turn the
knob  in  the  “OFF”  direction  to  turn  off  the
front fog lamps. The knob will automatically
return  to  its  original  position  when  you  re-
lease it.

NOTE

l

The front fog lamps are automatically turned
off  when  the  headlamps  or  tail  lamps  are
turned  off.  To  turn  the  front  fog  lamps  on
again,  turn  the  knob  in  the  “ON”  direction
after turning on the headlamps or tail lamps.

l

Do not use fog lamps except in conditions of
fog,  otherwise  excessive  lamp  glare  may
temporarily blind oncoming vehicle drivers.

Rear fog lamp switch

E00508401700

The rear fog lamp can be operated when the
headlamps or front fog lamps (if so equipped)
turn on.
An  indication  lamp  in  the  instrument  cluster
comes  on  when  the  rear  fog  lamp  is  turned
on.
 
[Vehicle without front fog lamps]
Turn the knob once in the “ON” direction to
turn on the rear fog lamp. To turn the rear fog
lamp off, turn the knob once in the “OFF” di-
rection. The knob will automatically return to
its original position when you release it.
 
[Vehicle with front fog lamps]

Turn the knob once in the “ON” direction to
turn  on  the  front  fog  lamps.  Turn  the  knob
once  more  in  the  “ON”  direction  to  turn  on
the rear fog lamp. To turn the rear fog lamp
off,  turn  the  knob  once  in  the  “OFF”  direc-
tion. Turn the knob once more in the “OFF”
direction to turn off the front fog lamps. The
knob will automatically return to its original
position when you release it.

NOTE

l

The rear fog lamp is automatically turned off
when the headlamps or front fog lamps (if so
equipped) are turned off.

l

To turn the rear fog lamp on again, turn the
knob once in the “ON” direction after turn-
ing on the headlamps. (Vehicle without front
fog lamps)

Fog lamp switch*

5-22

OKTE18E1

Instruments and controls

5

NOTE

l

To turn the rear fog lamp on again, turn the
knob twice in the “ON” direction after turn-
ing  on  the  headlamps.  (Vehicle  with  front
fog lamps)

Wiper and washer switch

E00507102824

The  windscreen  wipers  and  washer  can  be
operated with the ignition switch or the oper-
ation mode in ON or ACC.
If the blades are frozen to the windscreen, do
not operate the wipers until the ice has mel-
ted  and  the  blades  are  freed,  otherwise  the
wiper motor may be damaged.

CAUTION

l

If  the  washer  is  used  in  cold  weather,  the
washer  fluid  sprayed  against  the  glass  may
freeze,  which  may  hinder  visibility.  Warm
the  glass  with  the  defroster  or  rear  window
demister before using the washer.

Windscreen wipers

E00516900127

Except for vehicles equipped
with rain sensor

E00527001268

MIST-

Misting function
The wipers will operate once.

OFF-

Off

INT-

Intermittent (Speed sensitive)

LO-

Slow

HI-

Fast

To adjust intermittent intervals
With the lever in the “INT” (speed sensitive
intermittent operation) position, the intermit-
tent  intervals  can  be  adjusted  by  turning  the
knob (A).

1- Fast
2- Slow

NOTE

l

The  speed-sensitive-operation  function  of
the windscreen wipers can be deactivated.
For further information, we recommend you
to  consult  a  MITSUBISHI  MOTORS  Au-
thorized Service Point.

Misting function
Move the lever in the direction of the arrow
and release, to operate the wipers once.

Wiper and washer switch

5-23

OKTE18E1

Instruments and controls

5

Use  this  function  when  you  are  driving  in
mist or drizzle.

Vehicles with rain sensor

E00526401845

MIST-

Misting function
The wipers will operate once.

OFF-

Off

AUTO-

Auto-wiper control
Rain sensor
The wipers will automatically
operate depending on the degree
of wetness on the windscreen.

LO-

Slow

HI-

Fast

Rain sensor
Can only be used when the ignition switch or
the operation mode is in ON.
If  the  lever  is  put  in  the  “AUTO”  position,
the  rain  sensor  (A)  will  detect  the  extent  of
rain (or snow, other moisture, dust, etc.) and
the wipers will operate automatically.
Keep  the  lever  in  the  “OFF”  position  if  the
windscreen is dirty and the weather is dry.
Wiper  operation  under  these  conditions  can
scratch the windscreen and damage the wip-
ers.

CAUTION

l

With  the  ignition  switch  or  the  operation
mode  in  ON  and  the  lever  in  the  “AUTO”
position, the wipers may automatically oper-
ate in the situations described below.
If  your  hands  get  trapped,  you  could  suffer
injuries or the wipers could malfunction. Be
sure  to  turn  the  ignition  switch  to  the
“LOCK” position or put the operation mode
in OFF, or move lever to the “OFF” position
to deactivate the rain sensor.

When  cleaning  the  outside  surface  of  the
windscreen,  if  you  touch  on  top  of  the
rain sensor.

When  cleaning  the  outside  surface  of  the
windscreen,  if  you  wipe  with  a  cloth  on
top of the rain sensor.

When using an automatic car wash.

A  physical  shock  is  applied  to  the  wind-
screen.

A  physical  shock  is  applied  to  the  rain
sensor.

NOTE

l

To  protect  the  rubber  parts  of  the  wipers,
this  operation  of  the  wipers  does  not  take
place even if the lever is put in the “AUTO”
position  when  the  vehicle  is  stationary  and
the  ambient  temperature  is  about  0  °C  or
lower.

Wiper and washer switch

5-24

OKTE18E1

Instruments and controls

5

NOTE

l

Do not cover the sensor by affixing a sticker
or label to the windscreen. Also, do not put
any  water-repellent  coating  on  the  wind-
screen. The rain sensor would not be able to
detect  the  extent  of  rain,  and  the  wipers
might stop working normally.

l

In  the  following  cases,  the  rain  sensor  may
be malfunctioning.
For further information, we recommend you
to  consult  a  MITSUBISHI  MOTORS  Au-
thorized Service Point.

When the wipers operate at a constant in-
terval  despite  changes  in  the  extent  of
rain.

When  the  wipers  do  not  operate  even
though it is raining.

l

The wipers may automatically operate when
things such as insects or foreign objects are
affixed to the windscreen on top of the rain
sensor  or  when  the  windscreen  is  frozen.
Objects  affixed  to  the  windscreen  will  stop
the  wipers  when  the  wipers  cannot  remove
them. To operate the wipers again, move the
lever in the “LO” or “HI” position.
Also,  the  wipers  may  operate  automatically
due  to  strong  direct  sunlight  or  electromag-
netic  wave.  To  stop  the  wipers,  place  the
lever in the “OFF” position.

l

Contact  a  MITSUBISHI  MOTORS  Author-
ized Service Point when replacing the wind-
screen  or  reinforcing  the  glass  around  the
sensor.

To adjust the sensitivity of the rain sensor
With  the  lever  in  the  “AUTO”  (rain  sensor)
position, it is possible to adjust the sensitivity
of the rain sensor by turning the knob (B).

“+”- Higher sensitivity to rain
“−”- Lower sensitivity to rain

NOTE

l

It is possible to activate the following func-
tions.

Automatic  operation  (rain  droplet  sensi-
tive) can be changed to intermittent opera-
tion (vehicle-speed sensitive).

Automatic  operation  (rain  droplet  sensi-
tive) can be changed to intermittent opera-
tion (except vehicle-speed sensitive).

For further information, we recommend you
to  consult  a  MITSUBISHI  MOTORS  Au-
thorized Service Point.

Misting function
Move the lever in the direction of the arrow
and release, to operate the wipers once.
 
Use  this  function  when  you  are  driving  in
mist or drizzle.
The  wipers  will  operate  once  if  the  lever  is
raised  to  the  “MIST”  position  and  released
when  the  ignition  switch  or  the  operation
mode is in the “ON” or “ACC” position. The
wipers will continue to operate while the lev-
er is held in the “MIST” position.

Wiper and washer switch

5-25

OKTE18E1

Instruments and controls

5


Content   ..  5  6  7  8   ..