Mitsubishi ASX (2018 year). Manual - part 18
 

  Index      Mitsubishi     Mitsubishi ASX - service manual 2018 year in english


Search            


Content   ..  16  17  18  19   ..


Mitsubishi ASX (2018 year). Manual - part 18


There  are  limitations  on  the  files  and  media
that can be used, therefore read the following
prior  to  recording  MP3/WMA/AAC  format
audio  files  on  discs  or  USB  devices.  Addi-
tionally, ensure you read the user manuals for
your  CDR/RW  drive  and  the  writing  soft-
ware, and ensure these are used correctly.
If the MP3/WMA/AAC format audio files in-
cludes  title  information  or  other  data,  then
this can be displayed.

CAUTION

l

CD-ROM  and  CD-R/RW  media  can  only
play back MP3 format audio files.

l

Actions such as copying audio CDs or files
and  either  distributing  these  to  others  for
free or for charge, or uploading files via the
Internet  or  other  means  to  servers  is  an  in-
fringement of the law.

l

Do  not  append  the  file  extensions  “.mp3”,
“.wma”,  or  “.m4a”,  to  other  than
MP3/WMA/AAC format files. Playing back
discs with these types of files recorded upon
them  may  cause  the  files  to  be  incorrectly
identified  for  playback,  which  may  lead  to
loud  noise,  resulting  in  speaker  damage  or
accident.

NOTE

l

Depending  on  the  condition  of  the  disc  re-
corder  or  recording  software  used,  correct
playback  may  not  be  possible.  In  these  ca-
ses, refer to the user manual for your product
or software.

l

Depending  on  your  computer’s  operating
system,  version,  software,  or  settings,  files
may  not  have  a  file  extension  appended.  In
these  cases,  append  the  file  extensions
“.mp3”,  “.wma”,  or  “.m4a”  when  copying
the files.

l

Files  larger  than  2GB  in  size  cannot  be
played back.

Data Formats That Can Be

Played Back

E00736200027

Data  formats  that  can  be  played  on  discs
(CD-ROM, CDR/RW) and USB devices dif-
fer.

Data format

DISC

USB device

MP3

WMA

X

AAC

X

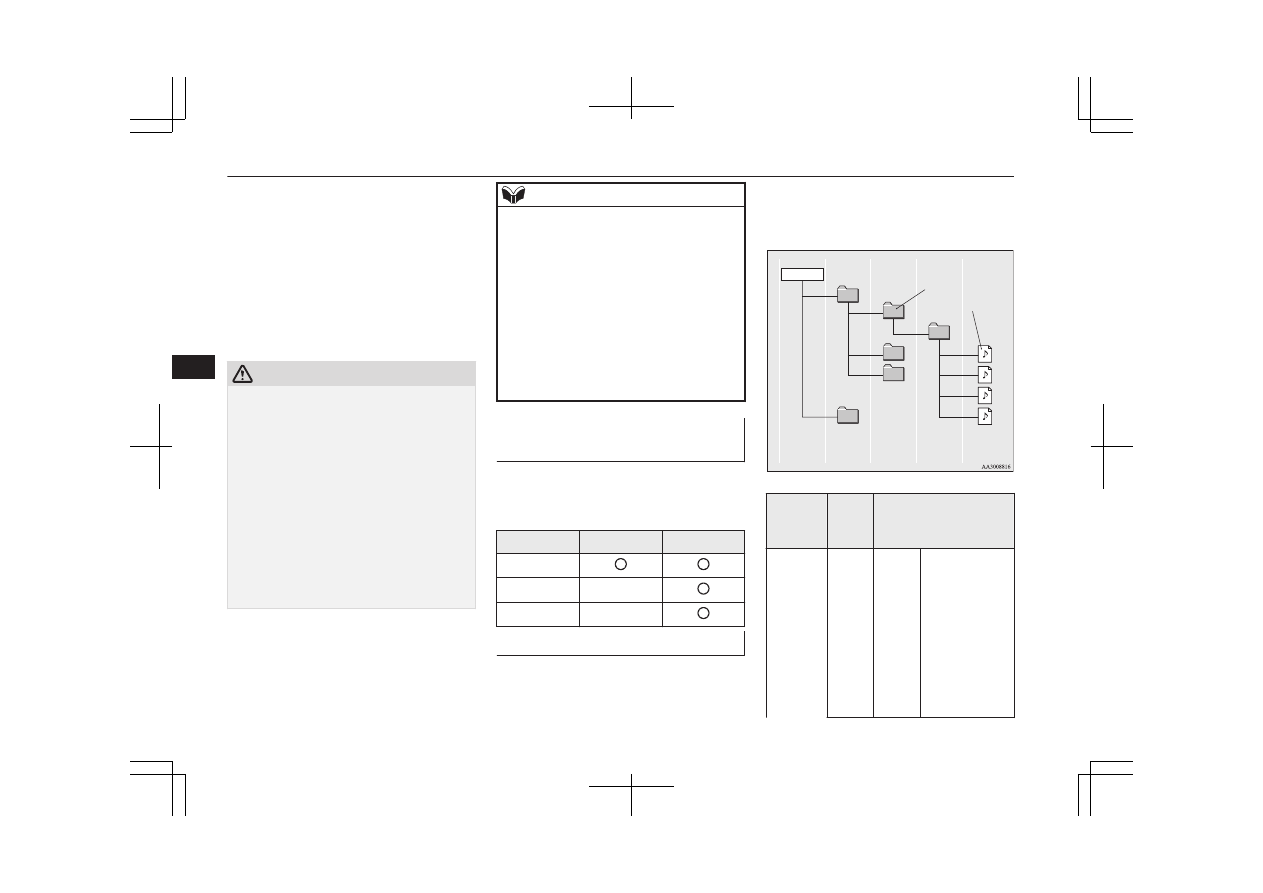
Folder Structure

E00736300060

Up to 8 folder levels can be recognized.

You can create a folder structure as in Genre
-  Artist  -  Album  -  Track  (MP3/WMA/AAC
format audio files) for management of tracks.

Folder

ROOT

Audio file

1 level

2 level

3 level

4 level

5 level

Name

Speci-

fica-

tion

Explanation

Format

specifica-

tions

ISO96
60

Level
1

Maximum 8
character file
name, and 3
character file
extension. (sin-
gle-byte alpha-
numeric capital
letters, numer-
als, “_” may be
used)

Audio Files (MP3/WMA/AAC)

7-16

OGAE18E1

For pleasant driving

7

Name

Speci-

fica-

tion

Explanation

ISO96
60 ex-
tension

Joliet

Files  names  up
to  a  maximum
64 

characters

can be used.

Multises-

sion

Not supported (only first session
supported)

Maxi-

mum

number

of levels

8 levels (if the root is the 1

st

 lev-

el)

Maxi-

mum

folder

number

700 folders (including root)

Maxi-

mum file

number*

1

65,535 files (total number on
media. Other than MP3, WMA,
and AAC files not included)

File name

and fold-

er name

restric-

tions

Maximum 64 bytes (for Uni-
code, 32 characters), files/folders
with file/folder names longer
than this will not be displayed or
played back.

USB sup-

ported

formats

The recommended file system is
FAT32.
1 partition only

*

1

: Do not include other than

MP3/WMA/AAC files. However, if
storing many tracks within the same
folder, these may not be recognized
even if less than the maximum number
of tracks. In these cases, divide the
tracks up into multiple folders.

NOTE

l

The  order  in  which  folders  and  audio  files
are displayed on this product may be differ-
ent to how they are displayed on a computer.

What Is MP3?

E00736400029

MP3 is the abbreviation of “MPEG-1 Audio
Layer 3”. MPEG is an abbreviation of “Mo-
tion Picture Experts Group”, and this is a vid-
eo compression standard used in video CDs,
etc.
MP3  is  one  of  the  audio  compression  meth-
ods  contained  in  the  MPEG  audio  standard,
and reduces the quality of sounds that are be-
yond the auditory resolution of the human ear
and  that  are  hidden  by  louder  sounds,  thus
creating  high-quality  data  with  a  lower  data
size.
This can compress CD audio to approximate-
ly 1/10 its original data size without percepti-
ble loss, approximately 10 CDs can be writ-
ten to a single CD-R/RW disc.

CAUTION

l

MP3  files  different  to  the  standards  at  right
may  not  play  back  correctly,  or  file/folder
names may not be displayed correctly.

Standards  for  MP3  Files  That

Can Be Played Back

Specifications  for  MP3  files  that  can  be
played are as shown below.

Item

Details

Specification MPEG-1 AUDIO LAYER3

Specification MPEG-2 AUDIO LAYER3

Sampling fre-
quency [kHz]

MPEG-1: 32/44.1/48

MPEG-2: 16/22.05/24

Bit rate [kbps] MPEG-1: 32 to 320

MPEG-2: 8 to 160

VBR (varia-

ble bit rate)

Support

Channel

mode

Stereo/ Joint stereo/ Dual
channel/ Monaural

File exten-

sion

mp3

Audio Files (MP3/WMA/AAC)

7-17

OGAE18E1

For pleasant driving

7

Item

Details

Supported tag

information

ID3 tag Ver. 1.0, Ver. 1.1,
Ver. 2.2, Ver. 2.3, Ver. 2.4
(ISO-8859-1, UTF-16 (Uni-
code)), Titles, Artist name,
Album name

Maximum
number of

characters

that can be

indicated on

the display

64 characters

What Is WMA?

E00736600021

WMA is the abbreviation of Windows Media
Audio, and this is an audio compression for-
mat  from  Microsoft.  This  is  a  compression
format  that  has  a  higher  compression  ratio
than MP3.

NOTE

l

Microsoft,  Windows  Media,  and  Windows
are  registered  trademarks  of  Microsoft  Cor-
poration (USA) and in other countries.

CAUTION

l

WMA  supports  digital  rights  management
(DRM).  This  product  cannot  play  back
WMA files protected using this system.

CAUTION

l

WMA files different to the standards at right
may  not  play  back  correctly,  or  file/folder
names may not be displayed correctly.

l

“Pro”, “Lossless”, and “Voice” are not sup-
ported.

Standards for WMA Files That

Can Be Played Back

Specifications  for  WMA  files  that  can  be
played are as shown below.

Item

Details

Specification Windows Media Audio Ver-

sion7.0/8.0/9.0

Sampling fre-
quency [kHz]

32/44.1/48

Bit rate

[kbps]

48 to 320

VBR

(variable bit

rate)

Support

Channel

mode

Stereo/Monaural

File exten-

sion

wma

Supported tag

information

WMA tags
Title name, Artist name, Al-
bum name

Item

Details

Maximum
number of

characters

that can be

indicated on

the display

64 characters

What is AAC?

E00736800023

AAC is the abbreviation of Advanced Audio
Coding,  and  this  is  an  audio  compression
standard used in “MPEG-2” and “MPEG-4”.
This  features  1.4x  the  compression  of  MP3,
with comparable audio quality.

CAUTION

l

AAC  supports  digital  rights  management
(DRM). This product cannot play back AAC
files protected using this system.

l

AAC files different to the standards at right
may  not  play  back  correctly,  or  file/folder
names may not be displayed correctly.

Standards  for  AAC  Files  That

Can Be Played Back

Specifications  for  AAC  files  that  can  be
played are as shown below.

Audio Files (MP3/WMA/AAC)

7-18

OGAE18E1

For pleasant driving

7

Item

Details

Specification

Advanced Audio
Coding
MPEG4/AAC-LC
MPEG2/AAC-LC

Sampling

frequency

[kHz]

MPEG4 8/11.025/12/16/22.05

/24/32/44.1/48

MPEG2 8/11.025/12/16/22.05

/24/32/44.1/48

Bit rate

[kbps]

MPEG4 8 to 320

MPEG2 8 to 320

VBR (variable bit

rate)

Support

Channel mode

Stereo/Monaural

File extension

m4a

Supported tag infor-

mation

AAC tags or ID3
tags
Title, Artist name,
Album name

Maximum number of

characters that can be

indicated on the dis-

play

64 characters

Important Points on Safety
for the Customer

E00737000035

This  product  features  a  number  of  pictorial
indications as well as points concerning han-
dling so that you can use the product correct-
ly and in a safe manner, as well as prevent in-
jury  or  damage  to  yourself,  other  users,  or
property.

WARNING

l

The driver should not pay close attention
to the display while driving.
This  may  prevent  the  driver  looking
where  they  are  going,  and  cause  an  acci-
dent.

l

The driver should not perform complica-
ted operations while driving.
Performing  complicated  operations  while
driving  may  prevent  the  driver  looking
where  they  are  going,  and  cause  an  acci-
dent.
Therefore  stop  the  vehicle  in  a  safe  loca-
tion before performing such operations.

l

Do  not  use  during  malfunctions,  such  as
when no sound is audible.
This may lead to accident, fire, or electric
shock.

l

Ensure  water  or  other  foreign  objects  do
not enter the product.
This  may  lead  to  smoking,  fire,  electric
shock, or malfunction.

WARNING

l

Do not insert foreign objects into the disc
slot.
This  may  lead  to  fire,  electric  shock,  or
malfunction.

l

In  the  event  of  abnormalities  occurring
when  foreign  objects  or  water  enter  the
product,  resulting  in  smoke  or  a  strange
smell, immediately stop using the product,
and  consult  a  MITSUBISHI  MOTORS
Authorized Service Point.
Continuing to use the product may result
in accident, fire, or electric shock.

l

Do  not  disassemble  or  modify  the  prod-
uct.
This  may  lead  to  malfunction,  fire,  or
electric shock.

l

During  thunderstorms,  do  not  touch  the
antenna or the front panel.
This  may  lead  to  electrical  shock  from
lightning.

CAUTION

l

Do not block ventilation holes or heat sinks
on the product.
Blocking ventilation holes or heat sinks may
prevent  heat  from  escaping  from  within  the
product, leading to fire or malfunction.

Important Points on Safety for the Customer

7-19

OGAE18E1

For pleasant driving

7

CAUTION

l

Do not turn the volume up to the extent that
you cannot hear sounds from outside the ve-
hicle while driving.
Driving  without  being  able  to  hear  sounds
from outside the vehicle may result in an ac-
cident.

l

Do  not  insert  your  hand  or  fingers  into  the
disc slot.
This may result in injury.

Operation Keys

E00737100023

Turn the Power ON/ OFF

E00737200024

1. Press the PWR/VOL key.

Turn the power on, and resume playback
from the previous status.

2. Press the PWR/VOL key.

Turn the power OFF.

NOTE

l

Hold  down  the  steering  MODE  key  to  also
turn the audio function ON/OFF.

Adjust Volume

E00737300025

1. Turn  the  PWR/VOL  key  to  adjust  the

volume.

Turn  the  PWR/VOL  key  clockwise  to
increase,  and  counter-  clockwise  to  de-
crease the volume.

NOTE

l

The  maximum  value  for  volume  is  45,  and
the minimum is 0.

NOTE

l

The initial setting for volume is “17”.

Insert/Eject Discs

E00737401166

1. Insert the disc into the disc slot with the

label surface up.

Disc slot

Disc
*Label side

Push  the  disc  in  a  certain  amount,  and
the  product  will  pull  the  disc  in,  and
playback will start.

2. Press the 

 key.

This will eject the disc from the product,
so remove the disc.

Operation Keys

7-20

OGAE18E1

For pleasant driving

7

CAUTION

l

When  replacing  discs,  first  ensure  that  the
vehicle is stopped in an area in which stop-
ping is permitted.

l

Do  not  insert  your  hand,  fingers,  or  foreign
objects  into  the  disc  slot.  This  may  lead  to
injury, smoking, or fire.

l

8 cm CDs are not supported.

Operation Keys

7-21

OGAE18E1

For pleasant driving

7

Explanation of Buttons

E00737501385

This explains names and functions of each part.

1-

 key

Use to eject a disc.

2- 3

 key/4

 key

For audio, rewind/fast forward.
For radio, use as preset keys 3 and 4.

3- 2RDM key

For audio, play random playback; for ra-
dio, use as preset key 2.

4- 1RPT key

For audio, play repeat playback; for ra-
dio, use as preset key 1.

5- RADIO key

Switch the radio and the band.

6- PWR/VOL key

Adjust the volume, and turn the power
ON/OFF.

7- MEDIA key

Switch between CD and other sources.

8- DISP key

Switch the content of the display.

9- PTY/SCAN key

For audio, play scan playback; for radio,
search PTY.

10- TP key

Receive traffic messages.

11- Disc slot

12- PAGE key

Display indicator page advance.

13- 5 

 key

Play/Pause Bluetooth Audio*, and use as
preset key 5 for radio.

14- 6 

 key

Return during audio track search, and
stop Bluetooth Audio*.
For radio, use as preset key 6.

15-

 key/

 key

For audio, select audio track/file; for ra-
dio, perform automatic station selection.

Operation Keys

7-22

OGAE18E1

For pleasant driving

7

16- MENU key

Switch to Menu mode.

17-

/SEL key

Adjust audio quality and select items.
For radio, manually select stations.

*: Requires a separately-purchased Bluetooth-capable audio device in equipment by type (vehicles with a Bluetooth

®

 2.0 interface).


Steering wheel audio remote

control switches*

E00737601647

1- Vol + key, - key

Adjust  audio  functions  and  the  mobile
phone function volume.

2-  key,   key

Select CD and other audio source tracks
and radio stations.
Hold down to skip up and down through
tracks.

3- MODE Key

Hold  down  to  turn  the  audio  function
ON/OFF. Additionally, each time this is
pressed, this switches the audio source.
The  order  of  switching  is  as  shown  be-
low.  If  devices  are  not  connected,  then
these  are  to  be  skipped,  and  the  next
source selected.

CD or MP3

MW

LW

DAB1, 2, 3

*3

FM1, 2, 3

Bluetooth Audio

*2

iPod

*1

 or USB device

*

1

: An  iPod  cable  (available  separately)  is

required.

*

2

: Requires  a  separately-purchased  Blue-

tooth-capable  audio  device  (vehicles
with a Bluetooth

®

 2.0 interface).

*

3

: Requires DAB tuner connection.

Listen to Radio

E00737700032

This explains how to listen to FM, MW, and
LW radio broadcasts.

To Listen to the Radio

Press the RADIO key to switch the band.
 
Switch between FM1, FM2, FM3, MW, and
LW bands.
The selected band is indicated on the display.

NOTE

l

This switches in the order FM1, FM2, FM3,
DAB1*, DAB2*, DAB3*, MW, and LW.
*:When a DAB tuner is connected.

Manual/Seek Station Selection

Turn the  /SEL key to the frequency to lis-
ten to.

Listen to Radio

7-23

OGAE18E1

For pleasant driving

7

/SEL key

(counter-

clockwise)

Reduces the frequency being
received.

/SEL key

(clockwise)

Increases the frequency be-
ing received.

 key

(hold down)

Release the button to start
seek station selection, and
when a station is received,
scanning stops.

 key

(hold down)

Preset Memory

Register the broadcast station in advance, and
select this at a later time.
 

1. Tune in to the frequency to register.
2. Hold  down  any  of  the  keys  from  the

1RPT key to the 6 

 key.

 
A  “Beep”  sounds,  and  the  preset  key  is
registered.

NOTE

l

The preset memory can register a maximum
of  6  stations  for  each  band  (FM1,  FM2,
FM3).

l

If a preset key that already has a station reg-
istered  is  selected,  then  this  is  overwritten
with the new preset.

NOTE

l

Pressing the preset key will select the previ-
ously registered frequency.

Auto Memory (Auto Store)

The top 6 stations with a strong signal can be
automatically  registered  in  order  with  preset
keys.
Hold down the RADIO key.
 
After completion of auto store operations, the
product  will  receive  the  station  registered  in
the preset key [1].

CAUTION

l

Please be aware that the formerly-registered
frequency  in  the  memory  will  be  overwrit-
ten.

NOTE

l

Using auto store for FM1 and FM2 switches
to FM3.

PTY Search

Select PTY (program content), and automati-
cally scan for stations.

1. During  FM  reception,  press  the  PTY/

SCAN key.
This  switches  to  the  PTY  selection
mode.

2. Turn the  /SEL key to select PTY.

The  PTY  (program  content)  indicator
will  flash,  and  station  selection  will  au-
tomatically  start.  When  a  station  is  re-
ceived, the station name is displayed.

NOTE

l

This receives the station detected first.

l

10  seconds  after  reception,  PTY  search
mode will be cancelled.

Listen to DAB*

E00739100014

This explains how to listen to DAB.

To listen to DAB

1. Press  the  RADIO  key  to  switch  the

band.
Switch  between  DAB1,  DAB2,  and
DAB3 bands.
The  selected  band  is  indicated  on  the
display.

Listen to DAB*

7-24

OGAE18E1

For pleasant driving

7

NOTE

l

This switches in the order FM1, FM2, FM3,
DAB1, DAB2, DAB3, MW, and LW.

Select a Service

1. Hold down the 

 key or the 

 key.

Receives the lead services of the ensem-
bles that can be received.

2. Press the 

 key or the 

 key to select

the service.

 key

(hold down)

Automatically receives low-
er lead services within en-
sembles that can be received.

 key

(hold down)

Automatically receives high-
er lead services within en-
sembles that can be received.

 key

Switches to lower services.

 key

Switches to higher services.

NOTE

l

Going  to  the  first  service  or  last  service
within the ensemble switches to the next en-
semble.

Register the Service

Register  the  service  in  advance,  and  select
this at a later time.

1. Tune in to the service to register.
2. Hold  down  any  of  the  keys  from  the

1RPT key to the 6 

 key.

A  “Beep”  sounds,  and  the  preset  key  is
registered.

NOTE

l

If a preset key that already has a service reg-
istered  is  selected,  then  this  is  overwritten
with the new preset.

l

Pressing the preset key will select the previ-
ously registered service.

Search for a Service

Search for ensembles and services that can be
received.

1. Turn  the 

/SEL  key  to  select  the  en-

semble.

2. Press the  /SEL key.

The service name within the selected en-
semble is displayed.

3. Turn  the 

/SEL  key  to  select  the  serv-

ice.

4. Press the  /SEL key.

Receive the selected service.

NOTE

l

If  the  text  information  for  the  service  name
cannot  be  obtained,  then  nothing  is  dis-
played.

l

If there is no operation for 10 seconds, then
service search mode will be cancelled.

PTY Search

Select PTY (program content), and automati-
cally scan for services.

1. Press the PTY/SCAN key.

This  switches  to  the  PTY  selection
mode.

2. Turn the  /SEL key to select PTY.
3. Press the 

 key or 

 key.

This starts PTY search.

 key

Lower PTY search starts.

 key

Higher PTY search starts.

NOTE

l

When  selecting  PTY,  press  any  of  the  keys
from  the  1RPT  key  to  the  6 

  key  to

switch to the PTY registered as a preset.

l

When selecting PTY, select the PTY to reg-
ister,  and  hold  down  any  of  the  keys  from
the 1RPT key to the 6 

 key to register the

PTY as a preset.

Listen to DAB*

7-25

OGAE18E1

For pleasant driving

7

NOTE

l

While in PTY select status, if there is no op-
eration  for  2  seconds,  then  an  upwards
search within the selected PTY will start.

Listen to Traffic Messages

E00739200015

This explains how to listen to traffic messag-
es.

To Listen to Traffic Messages

1. When not in MW or LW mode, press the

TP key.
If  traffic  messages  are  being  broadcast,
these are received.

CAUTION

l

When receiving a MW or LW signal, traffic
messages cannot be received.

NOTE

l

Receiving  traffic  messages  will  indicate
“TRAF  INF”  on  the  display,  and  if  text  in-
formation can be received, the station name
is displayed.

NOTE

l

If  traffic  messages  are  received,  then  this
will  switch  to  the  volume  of  the  previously
received  traffic  messages  or  emergency
broadcasts. The volume when receiving traf-
fic messages or emergency broadcasts is that
at  which  subsequent  broadcasts  will  be  re-
ceived.

Traffic Message Standby Mode

When the broadcast of traffic messages starts,
this automatically switches to the station that
is broadcasting traffic messages.

1. When not in MW or LW mode, press the

TP key.
“TP” is indicated on the display, and the
product switches to standby mode.
If  traffic  messages  are  being  broadcast,
these are received.

2. When not in MW or LW mode, press the

TP key.
“TP”  disappears  from  the  display,  and
standby mode will be cancelled.

CAUTION

l

When receiving a MW or LW signal, traffic
message standby mode will be cancelled.

Listen to CDs

E00737800062

This  explains  how  to  listen  to  audio  CDs
(CD-DA/CD-TEXT).

Play CDs

Insert the disc.
 
Insert  a  disc  to  automatically  start  playback.
→ “Insert/Eject Discs” on page 7-20
If  a  disc  is  already  within  the  product,  press
the  MEDIA  key  to  switch  to  CD  as  the
source.

Select the Track

Press  the 

  key  or 

  key  to  select  the

track.
 
This enables selection of the next or previous
track.

Fast Forward or Rewind

Hold down the 3

 key or the 4

 key.

 
Fast forward/rewind is possible.

Switch Playback Mode

Repeat playback, random playback, and scan
playback are possible.

Listen to Traffic Messages

7-26

OGAE18E1

For pleasant driving

7

Repeat Playback (RPT)

Press the 1RPT key.
 
Repeat playback of the track currently being
played.

NOTE

l

Pressing again will cancel.

l

Selecting  a  track,  ejecting,  fast  forwarding,
or rewinding will cancel.

Random Playback (RDM)

Press the 2RDM key.
 
Play the tracks on the disc in a random order.

NOTE

l

Pressing again will cancel.

l

Ejecting will cancel this.

Scan Playback (SCAN)

Press the PTY/SCAN key.
 
Play the first 10 seconds of each of the tracks
on the whole disc in order.

NOTE

l

Press  this  button  again  during  playback  if
you  wish  to  hear  that  track,  and  that  track
will play normally.

Listen to MP3s

E00737900047

This explains how to listen to audio files on a
disc.

CAUTION

l

CD-ROM  and  CD-R/RW  media  can  only
play back MP3 format audio files.

To Listen to MP3s

Insert the disc.
 
Insert  a  disc  to  automatically  start  playback.
→ “Insert/Eject Discs” on page 7-20
If  a  disc  is  already  within  the  product,  press
the  MEDIA  key  to  switch  to  CD  as  the
source.

NOTE

l

Depending on the file structure, it may take
some time to read the contents of the disc.

Select the Track (File)

Press  the 

  key  or 

  key  to  select  the

track.
 
This enables selection of the next or previous
track.

Fast Forward or Rewind

Hold down the 3

 key or the 4

 key.

 
Fast forward/rewind is possible.

Switch Playback Mode

Repeat playback, random playback, and scan
playback are possible.

Repeat Playback (RPT)

Press the 1RPT key.
 
Repeat playback of the track currently being
played.

NOTE

l

Pressing again will cancel.

l

Selecting a file, ejecting, fast forwarding, or
rewinding will cancel.

Listen to MP3s

7-27

OGAE18E1

For pleasant driving

7

Folder Repeat Playback

Hold down the 1RPT key.
 
Repeat playback of the tracks within the fold-
er currently being played.

NOTE

l

Pressing again will cancel.

l

Even  if  the  file  is  selected,  folder  repeat
playback will not be cancelled.

Random Playback (RDM)

Press the 2RDM key.
 
Play the tracks in the folder in a random or-
der.

NOTE

l

Pressing again will cancel.

Folder Random Playback

Hold down the 2RDM key.
 
Play all tracks in folders on the disc in a ran-
dom order.

NOTE

l

Pressing again will cancel.

Scan Playback (SCAN)

Press the SCAN key.
 
Play the first 10 seconds of each of the tracks
in the folder currently being played in order.

Search Tracks

Search folders and files, and select a track.

1. Turn the  /SEL key to select the folder.
2. Press the  /SEL key.

 
Files  within  the  selected  folder  are  dis-
played.

3. Turn the  /SEL key to select the file.
4. Press the  /SEL key.

 
This plays the selected file (track).

NOTE

l

While the folder is selected, press the 6 
key to cancel track search mode.

l

If there is no operation for 10 seconds after
selecting the folder, then track search mode
will be cancelled.

NOTE

l

Select the folder, and hold down the 

/SEL

key  to  start  playback  from  the  first  track  in
that folder.

l

While the file is selected, press the 6 

 key

to return to the previous operation.

l

While  the  file  is  selected,  hold  down  the  6

 key to cancel rack search mode.

l

If there is no operation for five seconds after
selecting the file, that file is played back.

l

Disc operations such as selecting a track will
cancel track search mode.

Listen to an iPod

E00738001156

By  connecting  commercially-available  iPod/
iPhone devices to this product, you can play
back tracks on these through the product.

CAUTION

l

Do  not  leave  the  iPod/iPhone  unattended  in
the vehicle.

l

Never hold these devices in your hand to op-
erate while driving, as this is dangerous.

l

No  indemnification  for  data  loss  resulting
when  the  iPod/iPhone  is  connected  to  the
product will be possible.

l

Depending on how the devices are handled,
audio files being damaged or lost, therefore
it is recommended that data be backed up.

Listen to an iPod

7-28

OGAE18E1

For pleasant driving

7

NOTE

l

Depending on the generation, model, or soft-
ware  version  of  the  iPod/iPhone,  playback
on  this  product  may  not  be  possible.
(→7-12)  Additionally,  playback  as  ex-
plained  in  this  document  may  not  be  possi-
ble.

l

For vehicles with a Bluetooth

®

 2.0 interface,

the  types  of  devices  that  can  be  connected
may vary.
For  details,  access  the  MITSUBISHI
MOTORS website.
Please read and agree to the “Warning about
Links  to  the  Web  Sites  of  Other  Compa-
nies”.  The  websites  mentioned  above  may
connect  you  to  websites  other  than  the
MITSUBISHI MOTORS website.
http://www.mitsubishi-motors.com/en/prod-
ucts/index.html

l

Usage of iPod/iPhone hardware with the lat-
est software version is recommended.

l

Regarding  how  to  connect  the  iPod/iPhone,
refer  to  “How  to  connect  an  iPod”  on  page
7-68.

l

When  connecting  the  iPod/iPhone,  use  a
commerciallyavailable  iPod  connection  ca-
ble.

l

Set up the device in order that no unsafe ac-
tions, such as plugging in the connection ca-
ble are taken while driving.

l

When  inserting  and  removing  the  iPod/
iPhone, for safety’s sake first stop the vehi-
cle.

l

Depending on the status of the iPod/iPhone,
it may take some time until the device is rec-
ognized, or playback starts.

NOTE

l

Buttons  on  the  product  will  not  operate
while iPod/iPhone is connected.

l

iPod/iPhone  specifications  and  settings  may
mean  that  connection  is  not  possible,  or  re-
sult in differences in operation or display.

l

Depending on audio data in the iPod/iPhone,
track information may not be displayed cor-
rectly.

l

Depending  on  the  status  of  the  vehicle  and
device,  the  iPod/iPhone  may  not  play  back
after starting the engine.

l

Data  containing  copyright  information  may
not play back.

l

It  is  recommended  that  the  iPod/iPhone
equaliser settings be set to flat.

l

Operate the iPod/iPhone while connected to
this product.

l

If  the  iPod/iPhone  is  connected  via  Blue-
tooth  as  a  Bluetooth-  capable  audio  device,
then  do  not  connect  the  iPod/iPhone  using
an iPod cable. Connection using both meth-
ods will result in erroneous operation.

l

If an iPod/iPhone does not operate correctly,
then remove the iPod/iPhone from the prod-
uct, reset, then reconnect.

Play iPod

Press  the  MEDIA  key  to  set  the  iPod  as  the
source.
 
The  selected  source  is  indicated  on  the  dis-
play.

Select the Track (File)

Press  the 

  key  or 

  key  to  select  the

track.
 
This enables selection of the next or previous
track.

Fast Forward or Rewind

Hold down the 3

 key or the 4

 key.

 
Fast forward/rewind is possible.

Switch Playback Mode

Repeat  playback  and  shuffle  playback  are
possible.

Repeat Playback (RPT)

Press the 1RPT key.
 
Repeat playback of the track currently being
played.

NOTE

l

Pressing again will cancel.

Shuffle Playback (RDM)

Press the 2RDM key.
 

Listen to an iPod

7-29

OGAE18E1

For pleasant driving

7

Play  tracks  in  the  category  currently  being
played in a random order.

NOTE

l

Pressing again will cancel.

Album Shuffle Playback

Hold down the 2RDM key.
 
Play  back  the  album  in  a  random  order
(tracks in any order on the album).

NOTE

l

Pressing again will cancel.

Search Tracks

Search categories or track names, and select a
track.

1. Turn the   /SEL key to select the cate-

gory.

2. Press  the 

/SEL  key.  Categories  or

tracks  within  the  selected  category  are
displayed.

3. Turn the   /SEL key to select the cate-

gory or track.

4. Press the  /SEL key.

Repeat  steps  1  to  4,  and  search  for
tracks.
Select  the  track,  and  press  the 

  /SEL

key to play.

NOTE

l

While  the  category  (1

st

  level)  is  selected,

press  the  6 

  key  to  cancel  track  search

mode.

l

If there is no operation for 10 seconds after
selecting  the  category,  then  track  search
mode will be cancelled.

l

Select  the  category,  and  hold  down  the

 /SEL key to start playback from the first

track in that category.

l

While  the  track  is  selected,  press  the  6 
key to return to the previous operation.

l

While the track is selected, hold down the 6

 key to cancel track search mode.

l

If there is no operation for five seconds after
selecting the track, that file is played back.

l

iPod operations such as selecting a track will
cancel track search mode.

Listen to Audio Files on a
USB Device

E00736501388

By  connecting  commercially-available  USB
devices such as USB memory to this product,
you  can  play  back  audio  files  on  these
through the product.

CAUTION

l

Do not leave the USB device unattended in
the vehicle.

l

Never hold these devices in your hand to op-
erate while driving, as this is dangerous.

l

Do not use hard discs, card readers, or mem-
ory readers, as damage may occur to these or
to the data contained therein. If these are er-
roneously  connected,  then  turn  the  ignition
switch  to  the  “LOCK”  position  or  put  the
operation mode in OFF, then remove.

l

Because of the risk of data loss, it is recom-
mended that files be backed up.

l

No guarantee is made as regards damage to
the USB device, nor regarding loss or dam-
age to data contained therein.

l

Depending on how the devices are handled,
audio files being damaged or lost, therefore
it is recommended that data be backed up.

NOTE

l

Digital  audio  players  that  support  the  mass
storage  class  specifications  can  be  connec-
ted.

l

For details regarding the types of USB devi-
ces  that  can  be  connected  and  the  types  of
files that can be played back in vehicles with
a  Bluetooth

®

  2.0  interface,  refer  to  “Types

of  connectable  devices  and  supported  file
specifications” on page 7-68.

l

Regarding how to connect USB devices, re-
fer  to  “How  to  connect  a  USB  memory  de-
vice” on page 7-67.

Listen to Audio Files on a USB Device

7-30

OGAE18E1

For pleasant driving

7

NOTE

l

When connecting a USB device, use a con-
nection cable. Failure to use a connection ca-
ble  when  connecting  may  place  undue  load
on, or damage the USB connector.

l

Set up the device in order that no unsafe ac-
tions, such as plugging in the connection ca-
ble are taken while driving.

l

When  inserting  and  removing  the  USB  de-
vice, for safety’s sake first stop the vehicle.

l

Do  not  insert  other  than  audio  devices  into
the  USB  port.  Damage  to  the  device  or
equipment may result.

l

Depending on the status of the USB device,
it may take some time until the device is rec-
ognized, or playback starts.

l

Depending  on  USB  devices,  buttons  on  the
product  will  not  operate  while  the  USB  de-
vice is connected.

l

USB device specifications and settings may
mean  that  connection  is  not  possible,  or  re-
sult in differences in operation or display.

l

Depending on audio data in the USB device,
track information may not be displayed cor-
rectly.

l

Depending  on  the  status  of  the  vehicle  and
device,  the  iPod/iPhone  may  not  play  back
after starting the engine.

l

Data  containing  copyright  information  may
not play back.

l

This product can play back MP3, WMA, and
AAC format audio files.

l

Depending on the type of USB device, usage
may not be possible, or functions that can be
used may be restricted.

NOTE

l

The  recommended  file  system  for  USB
memory is FAT32.

l

The  maximum  supported  capacity  for  USB
memory is 32GB.

l

Operate the USB device containing recorded
audio files while connected to this product.

Play Back of Audio Files on a

USB Device

Press the MEDIA key to set
 
USB as the source. The selected source is in-
dicated on the display.

Select the Track (File)

Press  the 

  key  or 

  key  to  select  the

track.
 
This enables selection of the next or previous
track.

Fast Forward or Rewind

Hold down the 3

 key or the 4

 key.

 
Fast forward/rewind is possible.

Switch Playback Mode

Repeat playback, random playback, and scan
playback are possible.

Repeat Playback (RPT)

Press the 1RPT key.
 
Repeat playback of the track currently being
played.

NOTE

l

Pressing again will cancel.

l

Selecting a file will cancel this.

Folder Repeat Playback

Hold down the 1RPT key.
 
Repeat playback of the tracks within the fold-
er currently being played.

NOTE

l

Pressing again will cancel.

l

Even  if  the  file  is  selected,  folder  repeat
playback will not be cancelled.

Folder 

Random 

Playback

(RDM)

Press the 2RDM key.

Listen to Audio Files on a USB Device

7-31

OGAE18E1

For pleasant driving

7


Content   ..  16  17  18  19   ..