Lexus NX450H+ (2024 year). Manual in english - page 22
 

  Index      Manuals     Lexus NX450H+ (2024 year). Manual in english


Search            copyright infringement  


Content      ..     20      21      22      23     ..


Lexus NX450H+ (2024 year). Manual in english - page 22


If the 20 hour rate capacity of the replacement battery is low, even if the vehicle is
used frequently, the 12-volt battery may discharge and hybrid system may not be
able to start.

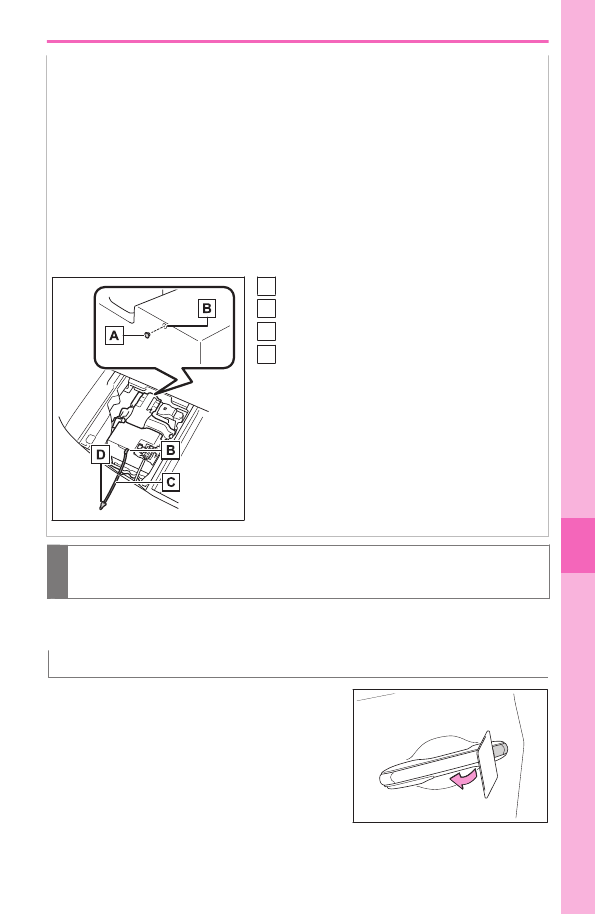
After replacing the 12-volt battery, install the following to the exhaust holes of the new
12-volt battery.

*1

Use the exhaust hose that was attached to the removed 12-volt battery and make
sure that it is securely engaged to the hole in the vehicle.

Use the exhaust hole plug that is included with the new 12-volt battery or the one
installed to the removed 12-volt battery.

Contact your Lexus dealer for details.


A

Exhaust hole plug

B

Exhaust hole

C

Exhaust hose

D

Hole in vehicle

When the doors cannot be locked from outside the vehicle after the 12-volt
battery was discharged

The doors cannot be locked using the Smart access system with push-button start
or wireless remote control.

Disabling the operation of the driver’s door

1

Insert a plastic card, etc. into the gap in the
door handle to pry up the cover.

To avoid damage, do not apply excessive force to
the cover.

*1 : 

The exhaust holes of the new 12-volt battery may be plugged.

9-3. If the hybrid system will not start

695

9

When tr

ouble arises

2

Remove the cover by pressing it on the rear.

3

Using the mechanical key, turn the door lock
to the lock side to disable the door.

4

Check that the door cannot be opened.

Disabling the operation of doors other than the driver’s door

1

Open the door. Using the mechanical key,
slide the cover as shown in the illustration.

To avoid damage, do not apply excessive force to
the cover.

2

Insert the mechanical key into the opening.

3

Remove the mechanical key and slide the
emergency lock cover back to its original
position.

9-3. If the hybrid system will not start

696

4

Check that all of the doors cannot be opened.

When removing the 12-volt battery terminals

When disconnecting a 12-volt battery terminal, contact your Lexus dealer.
If a 12-volt battery terminal is disconnected, the doors will not be able to be opened
using the door opener switches and the electronic key may become trapped in the
vehicle.
To prevent the electronic key (mechanical key) from being locked inside the
vehicle, make sure to remove it from the vehicle before disconnecting a 12-volt
battery terminal.

If the electronic key (mechanical key) is to be left in the vehicle, make sure to open
a window so an inside manual release handle can be operated.

WARNING

When removing the 12-volt battery terminals

Always remove the negative (-) terminal first. If the positive (+) terminal contacts any
metal in the surrounding area when the positive (+) terminal is removed, a spark may
occur, leading to a fire in addition to electrical shocks and death or serious injury.

Avoiding 12-volt battery fires or explosions

Observe the following precautions to prevent accidentally igniting the flammable gas that
may be emitted from the 12-volt battery:
Do not smoke, use matches, cigarette lighters or allow open flame near the 12-volt
battery.

9-3. If the hybrid system will not start

697

9

When tr

ouble arises

WARNING

12-volt battery precautions

The 12-volt battery contains poisonous and corrosive acidic electrolyte, while related
parts contain lead and lead compounds. Observe the following precautions when han-
dling the 12-volt battery:

When working with the 12-volt battery, always wear safety glasses and take care not
to allow any battery fluids (acid) to come into contact with skin, clothing or the vehicle
body.

Do not lean over the 12-volt battery.

In the event that battery fluid comes into contact with the skin or eyes, immediately
wash the affected area with water and seek medical attention.
Place a wet sponge or cloth over the affected area until medical attention can be
received.

Always wash your hands after handling the 12-volt battery support, terminals, and
other battery-related parts.

Do not allow children near the 12-volt battery.

INFORMATION

If a 12-volt battery terminal has been disconnected

If a 12-volt battery terminal has been disconnected, the doors cannot be locked or
unlocked using the Smart access system with push-button start system or wireless
remote control, and the door opener switches will not operate.
Make sure to remove the electronic key (mechanical key) from the vehicle before
disconnecting a 12-volt battery terminal.
If the electronic key (mechanical key) is to be left in the vehicle, open a window so an
inside manual release handle can be operated.

The doors may not be able to be unlocked using the Smart access system with
push-button start immediately after a 12-volt battery terminal is disconnected and
reconnected.
If the doors cannot be unlocked, use the wireless remote control or mechanical key to
lock and unlock the doors.

When a 12-volt battery terminal is disconnected, information recorded by various
computers will be cleared.

Some systems may require initialization.

9-3. If the hybrid system will not start

698

When the interior lights or headlights do not illuminate and the hybrid
system cannot be started

Cause

Remedy

The 12-volt battery
may be discharged.

Restarting the hybrid system using the jumper (or boos-
ter) cables.
Contact your Lexus dealer if the problem cannot be
repaired, or if repair procedures are unknown.

One or both of the 12-
volt battery terminals
may be disconnected.

Check if a 12-volt battery terminal is disconnected.
Contact your Lexus dealer if the problem cannot be
repaired, or if repair procedures are unknown.

 Related Links 

Restarting the hybrid system when the 12-volt battery is discharged(P. 709)
If the vehicle 12-volt battery is discharged(P. 693)
Key types(P. 102)
Locking/unlocking the doors(P. 117)
Opening/closing the doors(P. 113)
Using the mechanical key(P. 707)
If a door cannot be opened using the door opener switch(P. 713)
When removing the 12-volt battery terminals(P. 697)
Items to initialize(P. 803)

9-3. If the hybrid system will not start

699

9

When tr

ouble arises

When the horn sounds at a low volume and the hybrid system cannot be
started

Cause

Remedy

The 12-volt battery may be dis-
charged.

Restarting the hybrid system using the
jumper (or booster) cables.

The 12-volt battery terminal connec-
tions may be loose or corroded.

The 12-volt battery terminals may be loose
or corroded.

 Related Links 

Restarting the hybrid system when the 12-volt battery is discharged(P. 709)
If the vehicle 12-volt battery is discharged(P. 693)

9-3. If the hybrid system will not start

700

When the horn does not sound and the hybrid system cannot be started

Cause

Remedy

The 12-volt battery may
be discharged.

Restarting the hybrid system using the jumper (or boos-
ter) cables.
Contact your Lexus dealer if the problem cannot be
repaired, or if repair procedures are unknown.

One or both of the 12-
volt battery terminals
may be disconnected.

Check if a 12-volt battery terminal is loose.
Contact your Lexus dealer if the problem cannot be
repaired, or if repair procedures are unknown.

 Related Links 

If the vehicle 12-volt battery is discharged(P. 693)
Restarting the hybrid system when the 12-volt battery is discharged(P. 709)

9-3. If the hybrid system will not start

701

9

When tr

ouble arises

If a tire is flat

Precautions for when you have a flat tire

Your vehicle is not equipped with a spare tire, but instead you can continue driving
the vehicle with run-flat tires even if any tire goes flat. In this case, slow down and
drive with extra caution.
Take your vehicle to the nearest Lexus dealer or authorized tire dealer as soon as
possible if any tire goes flat.
The vehicle can be driven for a maximum of 50 miles (80 km) at a speed below
50 mph (80 km/h) after the tire pressure warning light comes on.

A run-flat tire has a 

 mark on the side wall.

INFORMATION

In some conditions (such as at high temperatures)

You cannot continue driving for up to 50 miles (80 km).

NOTICE

When replacing the tires

When removing or fitting the wheels, tires or the tire pressure warning valve and
transmitter, contact your Lexus dealer as the tire pressure warning valve and transmitter
may be damaged if not handled correctly.

When driving over bumps

If a vehicle has a flat tire, the vehicle height will be lower than usual. Ensure that nothing
strikes the bottom of the vehicle.

To avoid damage to the tire pressure warning valves and transmitters

When a tire is repaired with liquid sealants, the tire pressure warning valve and transmit-
ter may not operate properly. If a liquid sealant is used, contact your Lexus dealer or
other qualified service shop as soon as possible. Make sure to replace the tire pressure
warning valve and transmitter when replacing the tire.

9-4. If a tire is flat

702

If a door cannot be opened or locked

If a key has been lost

New genuine mechanical keys can be made by your Lexus dealer using another
mechanical key and the key number stamped on your key number plate.
Keep the plate in a safe place such as your wallet, not in the vehicle.

NOTICE

If the electronic key remains lost, the risk of vehicle theft increases significantly. Visit
your Lexus dealer immediately with all remaining electronic keys and the card key

*

that were provided with your vehicle.

* : 

If equipped

9-5. If a door cannot be opened or locked

703

9

When tr

ouble arises

When the doors/windows/moon roof cannot be operated using an elec-
tronic key

If communication between the electronic key and vehicle is interrupted or the
electronic key cannot be used because the battery is depleted, the smart access
system with push-button start and wireless remote control cannot be used.

The smart access system with push-button start may have been disabled by a
customize setting.
In this case, change the customize setting to enable the smart access system
with push-button start.

NOTICE

When taking the vehicle to your Lexus dealer due to a malfunction of the smart
access system with push-button start, make sure to bring all registered electronic keys
(including the card key).

The electronic key may have been set to battery saving mode.
battery saving mode has been set, cancel it.
The battery of the electronic key may be discharged.

Replace the battery.

Using the mechanical key.

The 12-volt battery may be discharged.
Restarting the hybrid system using the jumper (or booster) cables.

Replace the electronic key battery

Replace the battery with a new one if it is depleted.
The battery for the card key is available only at Lexus dealers. Your Lexus dealer
can replace the battery for you.
Prepare the following before replacing the battery:

Flathead screwdriver

Small flathead screwdriver

Lithium battery CR2032

9-5. If a door cannot be opened or locked

704

INFORMATION

Use a CR2032 lithium battery

Batteries can be purchased at your Lexus dealer, local electrical appliance shops or
camera stores.

Replace only with the same or equivalent type recommended by the manufacturer.

Dispose of used batteries according to the local laws.

If the electronic key battery is depleted

The following symptoms may occur:

The smart access system with push-button start and wireless remote control will not
function properly.

The operational range will be reduced.

1

Take out the mechanical key.

2

Remove the cover.

To prevent damage to the key, cover the tip of the
flathead screwdriver with a tape.

3

Remove the depleted battery.

Insert a new battery with the “+” terminal facing
up.

9-5. If a door cannot be opened or locked

705

9

When tr

ouble arises

WARNING

Battery precautions

Observe the following precautions. Failure to do so may result in death or serious
injury.

Do not swallow the battery. Doing so may cause chemical burns.

A coin battery or button battery is used in the electronic key. If a battery is
swallowed, it may cause severe chemical burns in as little as 2 hours and may
result in death or serious injury.

Keep away new and removed batteries from children.

If the cover cannot be firmly closed, stop using the electronic key and stow the key
in the place where children cannot reach, and then contact your Lexus dealer.

If you accidentally swallow a battery or put a battery into a part of your body, get
emergency medical attention immediately.

To prevent battery explosion or leakage of flammable liquid or gas

Replace the battery with a new battery of the same type. If a wrong type of battery
is used, it may explode.

Do not expose batteries to extremely low pressure due to high altitude or ex-
tremely high temperatures.

Do not burn, break or cut a battery.

NOTICE

When replacing the battery

Use a flathead screwdriver of appropriate size. Applying excessive force may deform
or damage the cover.

For normal operation after replacing the battery

Observe the following precautions to prevent accidents:

Always work with dry hands.
Moisture may cause the battery to rust.

Do not touch or move any other component inside the remote control.

Do not bend either of the battery terminals.

9-5. If a door cannot be opened or locked

706

Using the mechanical key

To take out the mechanical key, push the release
button and take the key out.
The mechanical key can only be inserted in one
direction, as the key only has a groove on one
side. If the key cannot be inserted in a lock cylin-
der, turn it over and attempt to insert it again.
After using the mechanical key, return it to its
original position and carry it with the electronic
key. If the electronic key battery is depleted, the
entry function is not operating properly, or the
vehicle 12-volt battery is discharged, you will
need the mechanical key.

NOTICE

Do not apply excess force when inserting the mechanical key into the card key. Doing so
may damage the card key.

INFORMATION

If the incorrect key is used

The key cylinder rotates freely to isolate inside mechanism.

Card key

If it is difficult to take out the mechanical key, push down the release button using a pen
tip, etc. If it is still difficult to pull it out, use a coin, etc.

To store the mechanical key in the card key, insert it while pressing the release button.

Alarm

If a door is unlocked using the mechanical key when the alarm system is set, a 10 second
pre-alarm sounds.

9-5. If a door cannot be opened or locked

707

9

When tr

ouble arises

Locking/unlocking the doors

1

Insert a plastic card, etc. into the gap in the
door handle to pry up the cover.

To avoid damage, do not apply excessive force to
the cover.

2

Remove the cover by pressing it on the rear.

3

Use the mechanical key in order to perform the following operations:


1

Unlocks all the doors
Turning the key unlocks the driver’s door. Turning
the key again unlocks the other doors.

2

Locks all the doors

INFORMATION

Key linked functions


1

Opens the windows and the moon roof (turn
and hold)

*1

2

Closes the windows and the moon roof (turn
and hold)

*1

*1 : 

These settings must be customized at your Lexus dealer.

9-5. If a door cannot be opened or locked

708

WARNING

Operate the power window or moon roof after checking to make sure that there is
no possibility of any passenger having any of their body parts caught in the window or
moon roof. Also, do not allow children to operate the mechanical key. It is possible for
children and other passengers to get caught in the power window or moon roof.

Restarting the hybrid system when the 12-volt battery is discharged

If you have a set of jumper (or booster) cables and a second vehicle with a 12-volt
battery, you can jump start your vehicle by following the steps below.

INFORMATION

The hybrid system cannot be started by push-starting.

WARNING

Avoiding 12-volt battery fires or explosions

Observe the following precautions to prevent accidentally igniting the flammable gas that
may be emitted from the 12-volt battery:

Make sure each jumper cable is connected to the correct terminal and that it is not
unintentionally in contact with any other than the intended terminal.

Do not allow the other end of the jumper cable connected to the “+” terminal to come
into contact with any other parts or metal surfaces in the area, such as brackets or
unpainted metal.

Do not allow the + and - clamps of the jumper cables to come into contact with each
other.

Do not smoke, use matches, cigarette lighters or allow open flame near the 12-volt
battery.

12-volt battery precautions

The 12-volt battery contains poisonous and corrosive acidic electrolyte, while related
parts contain lead and lead compounds. Observe the following precautions when han-
dling the 12-volt battery:

When working with the 12-volt battery, always wear safety glasses and take care not
to allow any battery fluids (acid) to come into contact with skin, clothing or the vehicle
body.

Do not lean over the 12-volt battery.

In the event that battery fluid comes into contact with the skin or eyes, immediately
wash the affected area with water and seek medical attention. Place a wet sponge or
cloth over the affected area until medical attention can be received.

9-5. If a door cannot be opened or locked

709

9

When tr

ouble arises

WARNING

Always wash your hands after handling the 12-volt battery support, terminals, and
other battery-related parts.

Do not allow children near the 12-volt battery.

When replacing the 12-volt battery

After replacing, securely attach the exhaust hose and exhaust hole plug to the exhaust
hole of the new 12-volt battery. If not properly installed, gases (hydrogen) may leak into
the vehicle interior, and there is the possible danger of the gas igniting and exploding.  

1

Confirm that the electronic key is being car-
ried.

When connecting the jumper (or booster) cables,
depending on the situation, the alarm may activate
and the doors may lock.

2

Open the hood and exclusive jump starting
terminal cover.

3

Open the exclusive jump starting terminal
cover.

4

Connect a positive jumper cable clamp to   on your vehicle and connect the
clamp on the other end of the positive cable to   on the second vehicle. Then,
connect a negative cable clamp to   on the second vehicle and connect the
clamp at the other end of the negative cable to   .

Use jumper cables that can reach the specified terminals and connecting point.

9-5. If a door cannot be opened or locked

710

A

Exclusive jump starting terminal (your vehicle)

B

Positive (+) battery terminal (second vehicle)

C

Negative (-) battery terminal (second vehicle)

D

Metallic point shown in the illustration

NOTICE

When handling jumper cables

When connecting the jumper cables, ensure that they do not become entangled in
the cooling fan or belt.

When connecting jumper cables

Make sure to connect jumper cables to the specified terminals and connecting point.
Failure to do so may adversely affect the electronic devices or damage to them.

Exclusive jump starting terminal

The exclusive jump starting terminal is intended to charge the 12-volt battery on your
vehicle from another vehicle in an emergency.
Do not use the exclusive jump starting terminal to jump start another vehicle.

5

Start the engine of the second vehicle. Increase the engine speed slightly
and maintain at that level for approximately 5 minutes to recharge the 12-volt
battery of your vehicle.

6

Open and close any of the doors of your vehicle with the power switch off.

7

Maintain the engine speed of the second vehicle and start the hybrid system of
your vehicle by turning the power switch to ON.

8

Make sure the "READY" indicator comes on.

If the indicator light does not come on, contact your Lexus dealer.

9-5. If a door cannot be opened or locked

711

9

When tr

ouble arises

9

Once the hybrid system has started, remove the jumper cables in the exact
reverse order from which they were connected.

Once the hybrid system starts, have the vehicle inspected at your Lexus dealer as soon
as possible.

WARNING

After recharging the 12-volt battery, have the 12-volt battery inspected by your Lexus
dealer as soon as possible.
If the 12-volt battery is deteriorating, continued use may cause the 12-volt battery to
emit a malodorous gas, which may be detrimental to the health of passengers.

9-5. If a door cannot be opened or locked

712

If a door cannot be opened using the door opener switch

If a door cannot be opened using the door opener switch, it can be opened
using a manual release handle.

Operating a manual release handle

NOTICE

Normally, the manual release handles cannot be used to open the doors. To enable
manual release handle operation, perform the following. If the following is not performed
and/or a manual release handle is operated with force, it may deform or be damaged.

▶ 

Outside the vehicle

Pull the manual release handle 

 to open the door.

Normally, the manual release handles cannot be used to open the doors.
To open a door, enable manual release handle operation.

 P.715

▶ 

Inside the vehicle

Pull the manual release handle 

 twice to open the door.

Pulling the handle once will enable operation. Pulling the handle again will open the door.

9-5. If a door cannot be opened or locked

713

9

When tr

ouble arises

INFORMATION

Manual release handle operating conditions

If the vehicle is involved in a severe frontal or rear collision, manual release handle
operation will be enabled for all of the doors.
However, the manual release handle may not become operable depending on the
force of the impact and conditions of the collision.

When the 12-volt battery voltage drops slowly while a door was unlocked
It may not work depending on how it is lowered.

When manual release handle operation is enabled from inside the vehicle

When manual release handle operation is enabled from outside the vehicle using a
mechanical key

Conditions which manual release handle operation is disabled

Normally, operation of the outside manual release handles is disabled, and they cannot
be used to open the doors.
When operation is enabled by operating a manual release handle or using a mechani-
cal key, operation will be disabled automatically if the door is opened using the door
opener switch or locked.

Operation of the inside manual release handles is disabled when the power switch is in
ON, and they cannot be used to open the doors.
When operation is enabled by operating a manual release handle or using a mechani-
cal key, operation will be disabled automatically if the door is opened using the door
opener switch or locked.

9-5. If a door cannot be opened or locked

714

To prevent a door from being opened accidentally, when the power switch is in ON,
after an inside manual release handle is operated once, operation will automatically be
disabled after approximately 1 second.

 Related Links 

Using the mechanical key(P. 707)

Enabling outside manual release handle operation using a mechanical key

Operation of a manual release handle can be enabled by unlocking a door with the
mechanical key.

1

Insert a plastic card, etc. into the gap in the
door handle to pry up the cover.

To avoid damage, do not apply excessive force to
the cover.

2

Remove the cover by pressing it on the rear.

3

Using the mechanical key, turn the lock cylin-
der to the unlock side to enable the manual
release handle operation.

The mechanical key can only be inserted in one
direction, as the key only has a groove on one
side.
If the key cannot be inserted in a lock cylinder,
turn it over and re-attempt to insert it.

9-5. If a door cannot be opened or locked

715

9

When tr

ouble arises

If the rear doors cannot be opened from the inside

The child-protector lock may be engaged.
Open the door from outside the vehicle and disengage the child-protector lock.

 Related Links 

Preventing the rear doors from being opened from the inside of the vehicle (child-protec-
tor lock)(P. 90)

9-5. If a door cannot be opened or locked

716

If the back door cannot be opened

The back door can be unlocked from the inside.

1

Using a flathead screwdriver, remove the
cover.

To protect the cover, place a rag between the
flathead screwdriver and the cover as shown in
the illustration.

2

Loosen the screw and turn back the cover.

3

Using a screwdriver, push the lever.

9-5. If a door cannot be opened or locked

717

9

When tr

ouble arises

If the moon roof/sunshade malfunctions

If the moon roof does not operate correctly

If the moon roof closes but then re-opens slightly

1

Stop the vehicle.

2

Press and hold the 

switch.

*1

The moon roof will close, reopen and pause for approximately 10 seconds.

*2

Then it will close again, tilt up and pause for approximately 1 second. Finally, it will tilt
down, open and close.

3

Check to make sure that the moon roof completely stops and then release
the switch.

If the moon roof does not fully close even after performing the above procedure
correctly, have the vehicle inspected by your Lexus dealer.

If the moon roof tilts down but then tilts back up

1

Stop the vehicle.

2

Press and hold the 

switch until the moon roof moves into the tilt up

position and stops.

*3

3

Release the switch once and then press and hold the 

 switch again.

*3

The moon roof will pause for approximately 10 seconds in the tilt up position.

*4

4

Check to make sure that the moon roof is completely closed and then
release the switch.

If the moon roof does not fully close even after performing the above procedure
correctly, have the vehicle inspected by your Lexus dealer.

*1 : 

If the switch is released at the incorrect time, the procedure will have to be performed

again from the beginning.

*2 : 

If the switch is released after the above mentioned 10 second pause, automatic
operation will be disabled. In that case, press and hold the 

 or 

 switch, and

the moon roof will tilt up and pause for approximately 1 second. Then it will tilt down,

open and close. Check to make sure that the moon roof is completely closed and then

release the switch.

*3 : 

If the switch is released at the incorrect time, the procedure will have to be performed

again from the beginning.

*4 : 

If the switch is released after the above mentioned 10 second pause, automatic
operation will be disabled. In that case, press and hold the 

 or 

 switch, and

the moon roof will tilt up and pause for approximately 1 second. Then it will tilt down,

open and close. Check to make sure that the moon roof is completely closed and then

release the switch.

9-6. If the moon roof/sunshade malfunctions

718

If refueling cannot be performed

If the fuel filler door cannot be opened

If the fuel filler door opener switch cannot be operated, contact your Lexus
dealer to service the vehicle. In case where refueling is urgently necessary, the
following procedure can be used to open the fuel filler door.

1

Remove the cover inside the luggage com-
partment by inserting a screwdriver.

When removing the cover, to prevent damage,
cover the tip of the screwdriver with a rag.

2

Pull the lever.

NOTICE

When opening the fuel filler door manually

Do not open the fuel filler door manually except in an emergency. Fuel may
overflow.

Using the lever to open the fuel filler door may not allow for an adequate
reduction in fuel tank pressure before refueling. To prevent fuel from spilling
out, turn the cap slowly when removing it.

During refueling, fuel may spill out from the filler opening due to air being
discharged from inside the fuel tank. Therefore, fill the fuel tank carefully and
slowly.

9-7. If refueling cannot be performed

719

9

When tr

ouble arises

If the plug-in hybrid system cannot be used normally

If the hybrid battery (traction battery) of the plug-in hybrid system
cannot be charged

If the charging port lid does not open

In an emergency, if the charging port lid cannot be opened using the normal
procedure, it can be opened using the charging port lid lock emergency release
lever.

Opening the charging port lid in an emergency

1

Using a flathead screwdriver, remove the cover inside the luggage compart-
ment as shown in the illustration.

When removing the cover, to prevent damage, cover the tip of the screwdriver with a
rag.

2

Insert a hand from the lower side of the vehicle obliquely upward, and hook a
finger to the emergency release lever.

3

Move the emergency release lever in the direction shown in the illustration.

Make sure to move in the direction shown in the illustration. Applying force in other
directions may damage the emergency release lever.

9-8. If the plug-in hybrid system cannot be used normally

720

The charging port lid is unlocked and can be opened.

4

Press the central rear edge of the charging port lid to open it.

This unlocking method is a temporary correction procedure for emergency use only. If
the problem persists, have the vehicle inspected by your Lexus dealer immediately.

The power source indicator on the CCID (Charging Circuit Interrupt-
ing Device) does not illuminate, even though the plug is connected to an
external power source.

Cause

Remedy

Plug is not properly con-
nected to socket

Check that the plug is properly connected to the
socket.

Power is out

After power is restored, carry out the charging pro-
cedure again.

Remote switch is off

If the remote switch is equipped, turn the switch on.

Building breaker is tripped
and power is cut off

Check that the breaker is connected and if there is
no malfunction, check if the vehicle can be charged
through another socket.
If charging is possible, the first socket may have a
malfunction. Contact the building or facility manag-
er, or an electrician.

Short circuit between
CCID (Charging Circuit
Interrupting Device) and
plug

Immediately stop charging and contact your Lexus
dealer.

9-8. If the plug-in hybrid system cannot be used normally

721

9

When tr

ouble arises

The error warning indicator on the CCID (Charging Circuit Interrupt-
ing Device) flashes.

Cause

Remedy

Electrical leakage detec-
tion function or self-diag-
nostic function operates
and power is cut off.

When the voltage is insufficient, the error warning
indicator may flash when there is noise interference.
Perform a reset and connect to a proper power
source.
If charging does not start, immediately stop charging
and contact your Lexus dealer.

Charging indicator of the charging port does not illuminate, even
though charging connector is connected.

Cause

Remedy

The plug is not prop-
erly connected to the
socket

Check that the plug is properly connected to the socket.

Charging connector
is not securely con-
nected to AC charg-
ing inlet

Check the connection status of the charging connector.

When connecting the charging connector, make sure
not to touch the latch release button. Insert the charg-
ing connector securely until you hear a click. The
charging connector may not be connected correctly if
the latch release button is pressed while inserting.

After connecting the charging connector, check that
the latch release button is not pressed and the charg-
ing indicator of the charging port is turned on.
If the charging indicator of the charging port does
not illuminate, even though the charging connector is
securely connected, there may be a malfunction in the
system. Immediately stop charging and contact your
Lexus dealer.

Hybrid battery (trac-
tion battery) is already
fully charged

When the hybrid battery (traction battery) is fully charg-
ed, charging is not performed.

9-8. If the plug-in hybrid system cannot be used normally

722

Cause

Remedy

The charger does not
operate

Please contact the facility manager when there is a prob-
lem with charger.

When the charging indicator on the charging port is blinking

Cause

Remedy

When charging indicator of the charg-
ing port flashes: Charging schedule is
registered

When you wish to charge according to
the charging schedule, wait until the set
time.
To start charging, set [Charge now] to
on.

When charging indicator of the charg-
ing port rapidly flashes: Malfunction
occurred in an external power source
or the vehicle

Start the hybrid system and follow the
instructions displayed by the message on
the multi-information display.

9-8. If the plug-in hybrid system cannot be used normally

723

9

When tr

ouble arises

If the charging connector cannot be disconnected from the AC charg-
ing inlet

If the charging connector cannot be unlocked

The charging connector can be unlocked by operating the emergency release
lever.

Unlocking the charging connector in an emergency

1

Using a flathead screwdriver, remove the cover inside the luggage compart-
ment as shown in the illustration.

When removing the cover, to prevent damage, cover the tip of the screwdriver with a
rag.

2

Move the emergency release lever in the direction shown in the illustration.

Move the emergency release lever only in the direction shown in the illustration. Even
if a click sound is heard after beginning operation, do not stop pulling the emergency
release lever until it cannot be moved. If the emergency release lever is moved in any
other direction, it may be damaged.

The charging connector is unlocked and can be removed.
This procedure is a temporary correction procedure for emergency use only. If the
problem persists, have the vehicle inspected by your Lexus dealer immediately.
Do not operate the emergency release lever when the charging connector can be
unlocked in the normal procedure.

9-8. If the plug-in hybrid system cannot be used normally

724

INFORMATION

After operating the connector lock emergency release lever, push it back to its
original position until a click sound is heard.

9-8. If the plug-in hybrid system cannot be used normally

725

9

When tr

ouble arises

When a malfunction occurs during charging

The indicators on the CCID (Charging Circuit Interrupting Device) use a
combination of different statuses (not illuminated, illuminated or flashing) to
inform the user of internal malfunctions.

When the error warning indicator is illuminated or flashing, temporarily remove the plug
from the outlet and then reconnect it to check if the error indicator turns off.
If the error warning indicator turns off, charging is now possible. If it does not turn off,
perform the correction procedure in the following chart.

Power indicator

Error warning indi-

cator

Status

Cause/Correction

procedure

Not illuminated

Not illuminated or
illuminated

Charging system
error

An electrical leak-
age is detected and
charging is can-
celed, or there is a
malfunction in the
AC charging cable.
Consult your Lexus
dealer.

Illuminated

Flashes

Flashes

Flashes

Plug temperature
detection malfunc-
tion

There is a malfunc-
tion in the plug tem-
perature detection
part.
Consult your Lexus
dealer.

Flashes

Not illuminated

Plug temperature
increase detection

An increase in the
temperature of the
plug is detected
due to an improper
connection be-
tween the socket
and plug.
Check that the plug
is securely connect-
ed to the socket.

9-8. If the plug-in hybrid system cannot be used normally

726


Content      ..     20      21      22      23     ..