Lexus NX350 (2024 year). Manual in english - page 4
 

  Index      Manuals     Lexus NX350 (2024 year). Manual in english


Search            copyright infringement  


Content      ..     2      3      4      5     ..


Lexus NX350 (2024 year). Manual in english - page 4


Precautions when adjusting the Digital Rear-view Mirror

Adjusting the display (digital mirror mode)

The icons will disappear if a button is not operated for approximately 5 seconds
or more.

If the displayed image is adjusted, it may appear distorted. This is not a malfunc-
tion.

If the brightness of the Digital Rear-view Mirror is set too high, it may cause eye
strain. Adjust the Digital Rear-view Mirror to an appropriate brightness. If your
eyes become tired, change to optical mirror mode.

The brightness of the Digital Rear-view Mirror will change automatically accord-
ing to the brightness of the area in front of your vehicle.

The digital anti-glare mode operates only in locations where the surroundings
are dark. Depending on the surrounding illumination environment, the image
may not darken and it may not be possible to reduce headlight glare from
vehicles to the rear.

To prevent the light sensors from malfunctioning

To prevent the light sensors from malfunctioning,
do not touch or cover them.

WARNING

Observe the following precautions. Failure to do so may result in death or serious injury.

While driving

Do not adjust the position of the Digital Rear-view Mirror or adjust the display settings
while driving.
Stop the vehicle and operate the Digital Rear-view Mirror control switches. Failure
to do so may cause a steering wheel operation error, resulting in an unexpected
accident.

Always pay attention to the vehicle’s surroundings.
The size of the vehicles and other objects may look different when in digital mirror
mode and optical mirror mode. When backing up, make sure to directly check the
safety of the area around your vehicle, especially behind the vehicle. Additionally, if a

1-6. Obtaining the correct driving posture

120

WARNING

vehicle approaches from the rear in the dark, such as at night, the surrounding area
may appear dim.

Cleaning the Digital Rear-view Mirror

Cleaning the mirror surface

If the mirror surface is dirty, the image on the display may be difficult to see. Clean
the mirror surface gently using a soft dry cloth.

INFORMATION

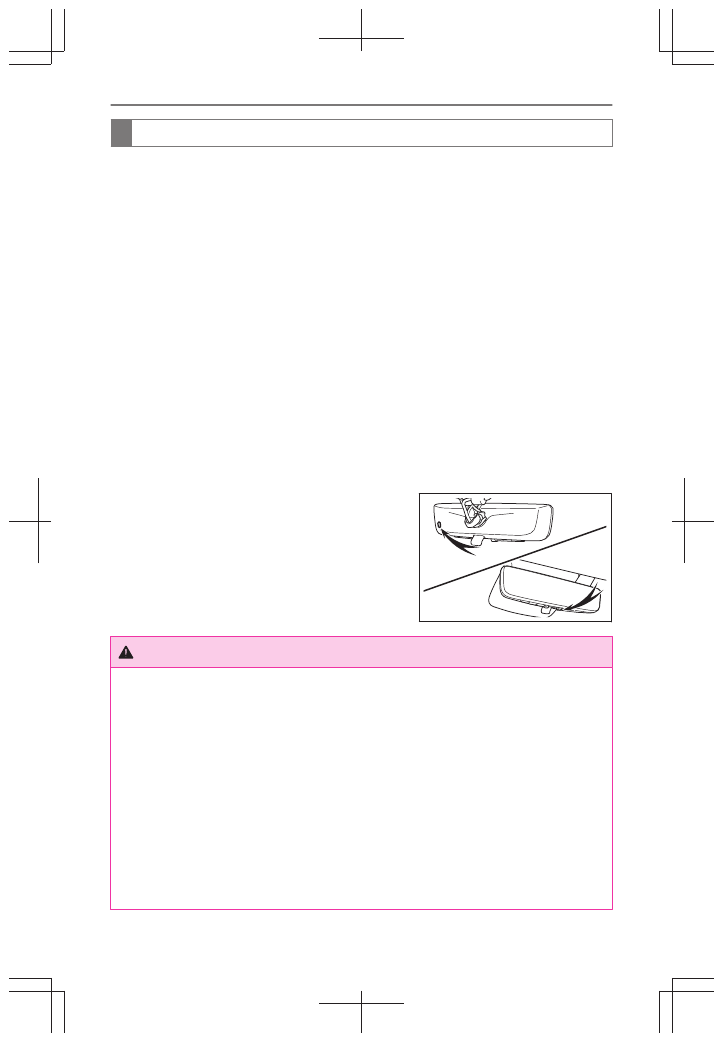
The camera

The camera for the Digital Rear-view Mirror is locat-
ed as shown.

NOTICE

To prevent the camera from malfunctioning

Observe the following precautions, otherwise the Digital Rear-view Mirror may not
operate properly.

Do not strike or hit the camera or subject it to a strong impact, as the camera
installation position and angle may be changed.

Do not remove, disassemble or modify the camera.

Do not allow an organic solvent, car wax, window cleaner or glass coating to
adhere to the camera. If this happens, wipe it off as soon as possible.

When applying colored film (including transparent film) to the rear window glass,
do not apply it to the area in front of the camera. If film is applied to the area in front
of the camera, the image from the camera may not display properly.

Do not subject the camera to a strong impact as this could cause a malfunction. If this
happens, have the vehicle inspected by your Lexus dealer as soon as possible.

1-6. Obtaining the correct driving posture

121

1

Befor

e driving

NOTICE

Do not block the vent holes of the mirror. Other-
wise, the mirror may be hot, leading to a malfunc-
tion or a fire.

If you notice any symptoms about the Digital Rear-view Mirror

If you notice any of the following symptoms, refer to the following table for the likely
cause and the solution.
If the symptom is not resolved by the solution, have the vehicle inspected by your
Lexus dealer.

Symptom

Likely cause

Solution

The image is
difficult to see.

The mirror surface is dirty.

Clean the mirror surface gently, using
a soft dry cloth.

Sunlight or headlights are shin-
ing directly into the Digital
Rear-view Mirror.

Change to optical mirror mode. (If
the light is coming through the moon
roof

*

 or panoramic moon roof

*

, close

the sunshade or electronic sunshade.)

* : 

If equipped

1-6. Obtaining the correct driving posture

122

Symptom

Likely cause

Solution

The image is
difficult to see.

The vehicle is in a dark area.

The vehicle is near a TV
tower, broadcasting station,
electric power plant, or oth-
er location where strong ra-
dio waves or electrical noise
may be present.

The temperature around the
camera is extremely high/
low.

The ambient temperature is
extremely low.

It is raining or humid.

Sunlight or headlights are
shining directly into the cam-
era lens.

The vehicle is under fluores-
cent lights, sodium lights,
mercury lights, etc.

Exhaust gas is obstructing
the camera.

Change to optical mirror mode.
(Change back to digital mirror mode
when the conditions have improved.)

Foreign matters such as water
droplets or dust is on the cam-
era lens.

Have the vehicle inspected by your
Lexus dealer.

The luggage in the luggage
compartment is reflected off
the rear window glass and ob-
structing the camera.

Change to optical mirror mode.

Move the luggage to a position
where it does not obstruct the
camera or cover it with a black
cloth to reduce the amount it is
reflected off the rear window glass.

The rear window glass is fog-
ged up.

Change to optical mirror mode. After
defogging the rear window using the
rear window defogger, use the digital
mirror mode again.

The outside of the rear window
glass is dirty.

Use the rear window wiper to remove
dirt.

1-6. Obtaining the correct driving posture

123

1

Befor

e driving

Symptom

Likely cause

Solution

The image is
difficult to see.

The inside of the rear window
glass is dirty.

Have the vehicle inspected by your
Lexus dealer.

The image is
out of align-
ment.

The back door is not fully
closed.

Fully close the back door.

The camera or its surrounding
area has received a strong im-
pact.

Change to optical mirror mode and
have the vehicle inspected by your
Lexus dealer.

The display is
dim and [

]

is displayed.

The system may be malfunc-
tioning.

Change to optical mirror mode and
have the vehicle inspected by your
Lexus dealer.

[

] goes off.

[

] is dis-

played.

The Digital Rear-view Mirror is
extremely hot. (The display will
gradually become more dim. If
the temperature continues to
increase, the Digital Rear-view
Mirror will turn off.)

Reducing the cabin temperature is
recommended to reduce the temper-
ature of the mirror. ([

] will disap-

pear when the mirror becomes cool.)

If [

] does not disappear even

though the mirror is cool, have the
vehicle inspected by your Lexus deal-
er.

The lever can-
not be operat-
ed properly.

The lever may be malfunction-
ing.

Change to optical mirror mode and
have the vehicle inspected by your
Lexus dealer.
To change to optical mirror mode,
press and hold the menu button for
approximately 10 seconds.

Adjusting the angle of the outside rear view mirrors

INFORMATION

When using the outside rear view mirrors in a cold weather

When it is cold and the outside rear view mirrors are frozen, it may not be possible to
fold/extend them or adjust the mirror surface. Remove the ice, snow, etc. covering the
outside rear view mirrors.

1-6. Obtaining the correct driving posture

124

WARNING

Do not adjust the position of the mirror while driving.

1

To select a mirror to adjust, press the switch.


A

Select the left mirror

B

Select the right mirror

2

To adjust the mirror, press the switch.


A

Adjust the mirror surface up

B

Adjust the mirror surface right

C

Adjust the mirror surface down

D

Adjust the mirror surface left

INFORMATION

Mirror angle can be adjusted when

The engine switch is in ACC or ON.

Automatic adjustment of the mirror angle (vehicles with driving position memo-
ry)

A desired mirror face angle can be entered to memory and recalled automatically by
the driving position memory.

Linked mirror function when reversing (vehicles with driving position memory)

When the mirror select switch is in the “L” or “R” position, the outside rear view
mirrors will automatically angle downwards when the vehicle is reversing in order to
give a better view of the ground.
To disable this function, move the mirror select switch to the neutral position (be-
tween “L” and “R”)
With the shift position in R, adjust the mirror angle at a desired position to set the
mirror angle used when the vehicle is reversing.
The adjusted angle will be memorized and the mirror will automatically tilt to the
memorized angle whenever the shift position is shifted to R from next time.

1-6. Obtaining the correct driving posture

125

1

Befor

e driving

The memorized downward tilt position of the mirror is linked to the normal position
(angle adjusted with the shift position in other than R). Therefore, if the normal
position is changed after adjustment, the tilt position will also change.
When the normal position is changed, readjust the angle in reversing.

Using the reverse-linked function when it is cold

When reverse-linked function used in cold weather, the door mirror could be frozen
and may not automatically point the mirror surface downward. In this event, remove
any ice and snow from the mirror surface.

 Related Links 

Customizable features(P. 711)

Folding/extending the outside rear view mirrors


▶ 

Using the switch

Press the switch to fold the mirrors.

Press it again to extend them to the original position.


▶ 

Setting automatic mode

Automatic mode allows the folding or extend-
ing of the mirrors to be linked to locking/un-
locking of the doors.
Press the switch to set automatic mode.

The indicator 

 will come on.

Pressing the switch once more will return to manual
mode.

WARNING

Observe the following precautions.

Do not drive with the mirrors folded.

Do not touch an outside rear view mirror when it is moving. Failure to do so may lead
to your finger being pinched or the mirror being damaged.

As the mirror surface will be hot, do not touch an outside rear view mirror when the
mirror heater is operating.

1-6. Obtaining the correct driving posture

126

WARNING

Both the driver and passenger side mirrors must be extended and properly adjusted
before driving.

1-6. Obtaining the correct driving posture

127

1

Befor

e driving

1-6. Obtaining the correct driving posture

128

2

Driving the vehicle

2-1. Starting and stopping the engine

Starting the engine..................

130

Stopping the engine................

134

Stop & Start system .................

136

2-2. Driving procedures

Driving procedure ...................

144

Breaking in your new Lexus.

147

Intended use of each shift

position ......................................

148

Changing the shift position .

150

Starting off...................................

156

Operations when turning

left or right or changing
lanes............................................

157

Changing the shift range......

158

Changing the gear step........

160

2-3. Parking the vehicle

When parking the vehicle.....

162

Stopping.......................................

164

Parking the vehicle...................

166

2-4. Refueling

Refueling ......................................

178

129

2

Driving the v

ehicle

Starting and stopping the engine

Starting the engine

Starting the engine

WARNING

Always start the engine while sitting in the driver’s seat. Do not depress the accelerator
pedal while starting the engine under any circumstances.

NOTICE

When starting the engine

Do not race a cold engine.

If the engine becomes difficult to start or stalls frequently, have your vehicle checked
by your Lexus dealer immediately.

Operation of the engine switch

If the engine switch seems to be operating somewhat differently than usual, such as
the switch sticking slightly, there may be a malfunction. Contact your Lexus dealer
immediately.

1

Check that the parking brake is set.

The parking brake indicator will come on.

2

Firmly depress the brake pedal.

 and a message will be displayed on the multi-information display. If it is not

displayed, the engine cannot be started.

3

Press the engine switch shortly and firmly.

When operating the engine switch, one short, firm
press is enough. It is not necessary to press and
hold the switch.
The engine will crank until it starts or for up to 30
seconds, whichever is less.
Continue depressing the brake pedal until the
engine is completely started.
The engine can be started from any engine switch mode.

INFORMATION

Engine switch illumination

According to the situation, the engine switch illumination operates as follows.

2-1. Starting and stopping the engine

130

If a door is open or the engine switch is turned from ACC or ON to OFF, the
engine switch light will illuminate dimly.

If the brake pedal is depressed while carrying an electronic key, the engine switch
light will illuminate brightly.

When the engine switch is in ACC or ON, the engine switch illumination illumi-
nates.

If the engine does not start

The engine immobilizer system may not have been deactivated. Contact your
Lexus dealer.

If a message related to start-up is shown on the multi-information display, read the
message and follow the instructions.

Operation of the engine switch

If the switch is not pressed shortly and firmly, the engine switch mode may not
change or the engine may not start.

If attempting to restart the engine immediately after turning the engine switch off,
the engine may not start in some cases. After turning the engine switch off, please
wait a few seconds before restarting the engine.

 Related Links 

Manual applying/releasing of the parking brake (manual mode)(P. 169)
Shift position display and how to change the shift position(P. 151)

Changing the engine switch mode

Modes can be changed by pressing the engine switch with brake pedal released.
(The mode changes each time the switch is pressed.)

2-1. Starting and stopping the engine

131

2

Driving the v

ehicle


1

OFF

*1

The emergency flashers can be used.

2

ACC

*2

Some electrical components such as the
audio system can be used. "ACCESSORY"
will be displayed on the multi-information
display.

3

ON
All electrical components can be used.
"IGNITION ON" will be displayed on the
multi-information display.

INFORMATION

When ACC customization is in off

With the engine switch is turned off, the center display can still be used for a certain
time until the battery saving function starts operating.

When the safe exit assist is operating, a buzzer will sound and a voice guidance will be
given.

Auto power off function

If the vehicle is left in ACC or ON (the engine is not operating) for more than 20
minutes with the shift position in P, the engine switch will automatically turn to OFF.

If the battery is low with the shift position is in P and the engine switch is in ACC or
ON (the engine is not operating). The engine switch is automatically turn to OFF.

However, this function cannot entirely prevent the battery discharge. Do not leave the
vehicle with the engine switch in ACC or ON for long periods of time when the engine is
not operating.

When the shift control system malfunctions

If the shift control system is malfunctioning, when attempting to turn the engine switch off,
it may not be able to be turned off. In this situation, it may be possible to turn the engine
switch off by applying the parking brake and then operating the engine switch.
If there is a malfunction in the system, have the vehicle inspected by your Lexus dealer
immediately.

*1 : 

The engine switch will remain ON when a shift position other than P is selected.

*2 : 

ACC mode can be enabled/disabled through a customize setting.

2-1. Starting and stopping the engine

132

NOTICE

Do not leave the vehicle with the engine switch in ACC or ON for long periods of time
when the engine is not operating.
If "ACCESSORY"or "IGNITION ON" is displayed on the meters while the engine is not
running, the engine switch is not off. Exit the vehicle after turning the engine switch off.

 Related Links 

Customizable features(P. 711)

2-1. Starting and stopping the engine

133

2

Driving the v

ehicle

Stopping the engine

Stopping the engine

WARNING

If you want to stop the engine in an emergency while driving the vehicle, press and
hold the engine switch for more than 2 seconds, or press it briefly 3 times or more in
succession.
However, do not touch the engine switch while driving, except in an emergency. Turning
the engine off while driving will not cause loss of steering or braking control, however
the power assist to these systems will be lost. This will make it more difficult to steer and
brake. Pull over and stop the vehicle as soon as it is safe to do so.

1

Stop the vehicle completely.

2

Set the parking brake.

3

Press the P position switch.

Check that the shift position indicator shows P and the parking brake indicator is
illuminated.

4

Press the engine switch.

The engine will stop, and the meter display will be extinguished (the shift position
indicator will be extinguished a few seconds after the meter display).

5

Release the brake pedal and check that the display on the instrument cluster is
off.

INFORMATION

Automatic engine shut off feature

The vehicle is equipped with a feature that automatically shuts off the engine when
the shift position is in P with the engine running for an extended period.

The engine will automatically shut off after approximately 1 hour if it has been left
running while the shift position is in P.

The timer for the automatic engine shut off feature will reset if the brake pedal is
depressed or if the shift position is in a position other than P.

After the vehicle is parked, if the door is locked with the door lock switch from
the inside or the mechanical key from the outside, the automatic engine shut off
feature will be disabled. The timer for the automatic engine shut off feature will be
re-enabled if the driver’s door is opened.

2-1. Starting and stopping the engine

134

When the engine is stopped (NX350)

Even if the engine switch is turned off, the cooling fan may continue to operate for a
short time.

 Related Links 

Manual applying/releasing of the parking brake (manual mode)(P. 169)
Shift position display and how to change the shift position(P. 151)

Situations where idling is necessary before stopping the engine
(NX350)

To prevent damage to the turbocharger, immediately after high-load driving, such
as continuous driving up steep mountain roads, driving on a race track, or when
towing a trailer or another vehicle (vehicles with a towing package), allow the
engine to idle for approximately 1 minute before stopping the engine.
Idling is not necessary after normal city driving or high-speed driving (at the legal
or recommended highway speed limit).

2-1. Starting and stopping the engine

135

2

Driving the v

ehicle

Stop & Start system

Stop & Start sysmem effort and caution

The Stop & Start system stops and starts the engine according to brake pedal
or shift lever operation when the vehicle is stopped, such as at a stoplight, intersec-
tion, etc., in order to improve fuel economy and reduce noise pollution caused by
the engine idling.

Points for use

If the engine switch is pressed when the engine is stopped by the Stop & Start
system, the engine will not be able to be restarted by the automatic engine
start function. In this case, restart the engine using the normal engine starting
procedure.

When the engine is being restarted by the Stop & Start system, the power
outlets may be temporarily unusable, but this does not indicate a malfunction.

Installation and removal of electrical components and wireless devices may
affect the Stop & Start system.
Contact your Lexus dealer.

When stopping the vehicle for a longer period of time, turn the engine switch off
to stop the engine completely.

When the engine is restarted by the Stop & Start system, the steering wheel may
temporarily feel heavy.

Hill-start assist control

When the engine is stopped by the Stop & Start system when the vehicle is on an
incline, when the brake pedal is released, brake force is temporarily maintained to
prevent the vehicle from rolling backwards before the engine is restarted and drive
force is generated. When drive force is generated, the maintained brake force is
automatically canceled.

This function operates on flat surfaces as well as steep inclines.

Sound may be generated from the brake system, but this does not indicate a
malfunction.

Brake pedal response may change and vibration may occur, but this does not
indicate a malfunction.

2-1. Starting and stopping the engine

136

WARNING

When the Stop & Start system is operating

Make sure to disable the Stop & Start system while the vehicle is in a poorly ventilated
area. If not disabled, the engine may be automatically restarted unexpectedly, causing
exhaust gases to collect and enter the vehicle, possibly resulting in death or a serious
health hazard.

Do not leave the vehicle while the engine is stopped by the Stop & Start system (while
the Stop & Start indicator is on). An accident may occur due to the automatic engine
start function.

Depress the brake pedal and apply the parking brake when necessary while the
engine is stopped by the Stop & Start system (while the Stop & Start indicator is on).

NOTICE

To ensure the system operates correctly

If any of the following situations occur, the Stop & Start system may not operate correctly
Have the vehicle checked by your Lexus dealer.

While the driver’s seat belt is fastened, the driver’s and front passenger’s seat belt
reminder light flashes.

Even though the driver’s seat belt is not fastened, the driver’s and front passenger’s
seat belt reminder light does not illuminate.

Even though the driver’s door is closed, the open door warning light is illuminated or
the interior light is illuminated when the interior light switch is in the door position.

Even though the driver’s door is open, the open door warning light does not illuminate
or the interior light does not illuminate when the interior light switch is in the door
position.

 Related Links 

Starting the engine(P. 130)

2-1. Starting and stopping the engine

137

2

Driving the v

ehicle

Stop & Start system operation

Stopping the engine

While driving with the D shift position selected,
depress the brake pedal and stop the vehicle. The
engine will stop automatically. When the engine
stops, the Stop & Start indicator will illuminate.

Restarting the engine

Release the brake pedal. The engine will start automatically. When the engine
starts, the Stop & Start indicator will turn off.

When the brake hold system is operating

When the engine is stopped by the Stop & Start system, if the brake pedal is
released the engine will remain stopped.

If the accelerator pedal is depressed while the engine is stopped by the Stop &
Start system, the engine will restart.

While the engine is stopped by the Stop & Start system, if the engine is restarted,
the brake hold system will continue to apply the brakes, unless the operation
conditions of the brake hold system are no longer met.

When the dynamic radar cruise control is operating

When the vehicle is stopped by the dynamic radar cruise control, the engine will
stop automatically even though the brake pedal is not depressed.

When the preceding vehicle starts off, the engine will restart automatically.

If the engine is restarted automatically by the Stop & Start system during a
controlled stop by the dynamic radar cruise control, the controlled stop will
continue.

INFORMATION

Operating conditions

The Stop & Start system is operational when all of the following conditions are met:

The vehicle has been driven a certain amount of time.

The brake pedal is being depressed firmly. (Except when the vehicle is stopped by
the dynamic radar cruise control when in vehicle-to-vehicle distance control mode)

The D shift position is selected.

2-1. Starting and stopping the engine

138

The driver’s seat belt is fastened.

The driver’s door is closed.

The windshield defogger is off.

The accelerator pedal is not being depressed.

The engine is adequately warmed up.

The outside temperature is 23°F (-5°C) or higher.

The hood is closed.

In the following situations the engine may not be stopped by the Stop & Start system.
This is not a malfunction of the Stop & Start system.

When the air conditioning system is being used.

When the battery is undergoing a periodic recharge.

When the battery is not sufficiently charged, such as if the vehicle has been parked
for a long time and the battery charge has decreased, the electric load is large, the
battery fluid temperature is excessively low or the battery has deteriorated.

When the brake booster vacuum is low.

When the elapsed time since the engine was restarted is short.

When the vehicle is stopped frequently, such as when in a traffic jam.

When the engine coolant temperature or transmission fluid temperature is ex-
tremely low or high.

When the vehicle is stopped on a steep incline.

When the vehicle is being driven in a high altitude area.

When the battery fluid temperature is extremely low or high.

For a while after the battery terminals have been disconnected and reconnected.

When the engine is stopped by the Stop & Start system, the engine will be restarted
automatically if any of the following conditions are met: (To enable the engine to be
stopped by the Stop & Start system again, drive the vehicle.)

The air conditioning system is turned on.

The windshield defogger is turned on.

The shift lever is shifted from D or P.

The shift lever is shifted from P. (When the engine is stopped by the Stop & Start
system when the shift lever is in P.)

The driver’s seat belt is unfastened.

The driver’s door is opened.

The Stop & Start cancel switch is pressed.

2-1. Starting and stopping the engine

139

2

Driving the v

ehicle

The accelerator pedal is depressed.

The vehicle starts to roll on an incline.

When the engine is stopped by the Stop & Start system, the engine may restart
automatically in the following situations: (To enable the engine to be stopped by the
Stop & Start system again, drive the vehicle.)

When the brake pedal is pumped or strongly depressed.

When the air conditioning system is being used.

When a switch of the air conditioning system is operated (windshield defogger
switch, etc.).

If the battery charge becomes low.

When the hood is opened

If the hood is opened while the engine is stopped by the Stop & Start system, the
engine will stall and will not be able to be restarted by the automatic engine start
function. In this case, restart the engine using the normal engine starting procedure.

If the hood is closed after the engine is started with the hood open, the Stop & Start
system will not operate. Close the hood, turn the engine switch off, wait 30 seconds or
more, and then start the engine.

 Related Links 

Brake hold system(P. 229)
Opening the hood(P. 510)
Starting the engine(P. 130)
Defog the windshield(P. 207)
Customizable features(P. 711)

Disabling the Stop & Start system

When the air conditioning is in automatic mode and the engine is stopped by the
Stop & Start system, the fan may operate at a low speed in order to prevent the
temperature in the cabin from increasing or decreasing or may be stopped.
In the following situations, disable the Stop & Start system.

When you want to prioritize air conditioning system performance

If the windshield is fogged up

If an odor is emitted from the air conditioning system

Press the Stop & Start cancel switch to disable the Stop & Start system.

2-1. Starting and stopping the engine

140

The Stop & Start cancel indicator will illuminate.
Pressing the switch again will enable the Stop &
Start system and the Stop & Start cancel indica-
tor will turn off.

INFORMATION

Automatic enabling of the Stop & Start system

If the Stop & Start system is disabled using the Stop & Start cancel switch, it will be
automatically re-enabled once the engine switch is turned off and then the engine is
started.

Multi-information display messages

If the following situations, 

 and a message may be displayed on the multi-infor-

mation display.

▶ 

When the engine cannot be stopped by the Stop & Start system

Message

Details/Actions

"Stop & Start
System Mal-
function Visit
Your Dealer"

The Stop & Start system may be malfunctioning.
Have the vehicle checked by your Lexus dealer.

"Press Brake
More to Acti-
vate"

The brake pedal is not sufficiently depressed.
If the brake pedal is depressed further, the system will operate.

▶ 

Vehicles without downhill

assist control system

▶ 

Vehicles with downhill as-

sist control system

2-1. Starting and stopping the engine

141

2

Driving the v

ehicle

Message

Details/Actions

"Non-Dedicat-
ed Battery "

A battery not designed for use with a Stop & Start system may have
been installed.
The Stop & Start system does not operate.
Have the vehicle checked by your Lexus dealer.

"Battery
Charging"

The battery charge may be low.
Stopping of the engine is temporarily prohibited to prioritize charg-
ing of the battery. After the engine runs for a certain amount of time,
the system will be enabled.

A refresh charge may be occurring
After a refresh charge for up to an hour completes, the system can
be operated.

If displayed continuously for a long time (more than an hour)
The battery may be deteriorated. Contact your Lexus dealer for
details.

"Stop & Start
system unavail-
able"

The Stop & Start system is temporarily disabled.
Allow the engine to run for some time.

The engine may have been started with the hood open.
Close the hood, turn the engine switch off, wait for 30 seconds or
more, and then start the engine.

"In Prepara-
tion"

The vehicle is being driven in a high altitude area.

The brake booster vacuum is low.
When the brake booster vacuum reaches a predetermined level, the
system will be enabled.

"For Climate
Control"

The air conditioning system is being used when the ambient temper-
ature is high or low.
If the difference between the set temperature and cabin temperature
becomes small, the system will be enabled.

The windshield defogger is on.

2-1. Starting and stopping the engine

142

▶ 

When the engine automatically restarts while stopped by the Stop & Start

system

Message

Details/Actions

"In Preparation"

The brake pedal has been depressed further or pumped.
The system will be enabled after the engine runs and the brake booster
vacuum reaches a predetermined level.

"For Climate
Control"

The air conditioning system has been turned on or is being used.

The windshield defogger has been turned on.

"Battery
Charging"

The battery charge may be low.
The system will be enabled after the engine runs to sufficiently charge
the battery.

The audio system is suddenly cut off

When the volume of the audio system is excessively high, sound output from the
audio system may suddenly be cut off in order to reduce battery consumption.
To re-enable the audio system, turn the engine switch off, wait for 3 seconds or
more and then turn it to ACC or ON.
The audio system may not be activated if the battery terminals are disconnected
and then reconnected.
Turn the engine switch off and then repeat the following operation twice to
activate the audio system normally.

Turn the engine switch to ON and then to OFF.

2-1. Starting and stopping the engine

143

2

Driving the v

ehicle

Driving procedures

Driving procedure

WARNING

When driving the vehicle

When backing up, you may twist your body around, leading to difficulty in operating
the pedals.
Make sure to operate the pedals properly.

Make sure to keep a correct driving posture even when moving the vehicle only
slightly. This allows you to depress the brake and accelerator pedals properly.

Depress the brake pedal using your right foot.
Depressing the brake pedal using your left foot may delay response in an emergency,
resulting in an accident.

Do not drive the vehicle over or stop the vehicle near flammable materials. The
exhaust system and exhaust gases can be extremely hot. These hot parts may cause a
fire if there is any flammable material nearby.

Never turn the engine switch off during normal driving. If the engine is stopped while
driving, steering and brake operations will still be possible, however, power assist will
no longer be provided and the steering wheel and brakes will become difficult to
operate. After checking the safety of the area around your vehicle, stop the vehicle
on the side of the road. In an emergency, if the vehicle cannot be stopped normally,
perform an emergency stop.

Use engine braking (downshift) to maintain a safe speed when driving down a steep
hill. Using the brakes continuously may cause the brakes to overheat and lose effec-
tiveness.

Do not adjust the positions of the steering wheel, the seat, or the inside or outside rear
view mirrors while driving. Doing so may result in a loss of vehicle control.

Always check that all passengers’ arms, heads or other parts of their body are not
outside the vehicle.    

AWD models: This vehicle is not designed for extreme off-roading.

When driving in sand or mud is unavoidable, drive carefully and avoid continuous
driving on sand or mud.

Do not drive on extremely rocky roads or extremely uneven roads.

Do not drive across a river or through other bodies of water. This may cause elec-
tric/electronic components to short circuit, damage the engine or cause other serious
damage to the vehicle.

Do not drive in excess of the speed limit. Even if the legal speed limit permits it, do
not drive over 85 mph (140 km/h) unless your vehicle has high-speed capability tires.
Driving over 85 mph (140 km/h) may result in tire failure, loss of control and possible

2-2. Driving procedures

144

WARNING

injury. Be sure to consult a tire dealer to determine whether the tires on your vehicle
are high-speed capability tires or not before driving at such speeds.

Avoid sudden braking, acceleration, and steering inputs when driving on slick road
surfaces. Doing so may cause the tires to lose traction, leading to loss of control of the
vehicle.

Avoid sudden accelerator pedal operations and shift operations when driving on slick
road surfaces. Doing so may cause engine braking or changes in engine speed may
cause the vehicle to slide sideways.

After driving through a puddle, lightly depress the brake pedal to make sure that
the brakes are functioning properly. Wet brake pads may prevent the brakes from
functioning properly. If the brakes on only one side are wet and not functioning
properly, steering control may be affected.  

AWD models:
Avoid spinning the wheels and depressing the accelerator pedal more than necessary.
Doing so may damage the transmission and other components.

If you hear a squealing or scraping noise (brake pad wear limit indicators)

Have the brake pads checked and replaced by your Lexus dealer as soon as possible.
Rotor damage may result if the pads are not replaced when needed.
It is dangerous to drive the vehicle when the wear limits of the brake pads and/or those of
the brake discs are exceeded.

NOTICE

Avoiding damage to vehicle parts    

Do not turn and hold the steering wheel at either fully turned position for an extended
period of time. Doing so may damage the power steering.

When driving over bumps or areas where the road height changes, drive as slowly as
possible. Otherwise the wheels, etc. may be damaged.

If you get a flat tire while driving    

In the following situations, firmly hold the steering wheel and gradually apply the brakes
to decrease the vehicle’s speed, as a tire may be flat or damaged:

When the steering wheel pulls either direction

When there are abnormal sounds or vibrations

When the vehicle leans abnormally

2-2. Driving procedures

145

2

Driving the v

ehicle

NOTICE

When encountering flooded roads

Do not drive on roads which have become flooded due to heavy rain, etc. Doing so may
cause serious damage to the vehicle, such as the following:

Engine stalling

Shorts in electrical components

Engine damage caused by water immersion

In the event that you drive on a flooded road and the vehicle is flooded, be sure to have
your Lexus dealer check the following:    

Brake function  

Changes in quantity and quality of oil and fluid used for the engine, transmission,
transfer (AWD models), rear differential (AWD models), etc.

Lubricant condition for the propeller shaft (AWD models), bearings and suspension
joints (where possible), and the function of all joints, bearings, etc.  

If the shift control system is damaged by flooding, it may not be possible to change the
shift position to P, or from P to other positions.
In this case, contact your Lexus dealer.

Avoiding damage to the turbocharger (NX350)

Make sure to idle the engine immediately after high-speed driving or hill climbing. Stop
the engine only after the turbocharger has cooled down. Failure to do so may cause
damage to the turbocharger.

Operating your vehicle in a foreign country

Comply with the relevant vehicle registration laws and confirm the availability of
the correct fuel.

2-2. Driving procedures

146

Breaking in your new Lexus

To extend the life of the vehicle, observing the following precautions is recom-
mended:

For the first 200 miles (300 km):
Avoid sudden stops.

For the first 1000 miles (1600 km):

Do not drive at extremely high speeds.

Avoid sudden acceleration.

Do not drive continuously in low gears.

Do not drive at a constant speed for extended periods.

For the first 500 miles (800 km):
Do not tow a trailer. (vehicles with towing package)

2-2. Driving procedures

147

2

Driving the v

ehicle

Intended use of each shift position

Select the shift position depending on your purpose and situation.

Shift position

Objective or function

P

Parking the vehicle/starting the engine

R

Reversing

N

Neutral

D

Normal driving

(1)

M

M mode driving

(2)

(1)

To improve fuel efficiency and reduce noise, set the shift position in D for normal

driving. You can choose gear range suitable for your driving situation by operating the

paddle shift switches.

(2)

Any gear range can be fixed when driving in M mode.


INFORMATION

When engine braking is not performed

When the vehicle is being driven with the dynamic radar cruise control operating, engine
braking will not be performed even if the following operations are performed.

While driving in D position, downshifting to 7/6/5 or 4.

When Sport mode is selected while driving in D position.

If a message about a shift operation is shown

To prevent the shift position from being selected incorrectly or the vehicle from moving
unexpectedly, the shift position may be changed automatically or operating the shift lever
may be required. In this case, change the shift position following the messages on the
multi-information display.

AI-SHIFT

AI-SHIFT automatically selects the suitable gear according to driver's operations and the
driving conditions. AI-SHIFT automatically operates when the shift position is in D. (This
function will be canceled if the shift position is change to M.)

WARNING

Avoid sudden accelerator pedal operations and shift operations when driving on slick
road surfaces. Engine braking or changes in engine speed may cause the vehicle to slide
sideways.

2-2. Driving procedures

148

NOTICE

Situations where shift control system malfunctions are possible

If any of the following situations occurs, shift control system malfunctions are possible.
Immediately stop the vehicle in a safe place on level ground, apply the parking brake, and
then contact your Lexus dealer.

When the warning message indicating the shift control system appears on the multi-in-
formation display.

The display indicates that no shift position is selected for more than a few seconds.

2-2. Driving procedures

149

2

Driving the v

ehicle

Changing the shift position

WARNING

Do not let the vehicle roll backward while a forward driving position is selected, or roll
forward while the shift position is in R.
Doing so may cause the engine to stall or lead to poor brake and steering perform-
ance, resulting in an accident or damage to the vehicle.

Do not shift the shift position to P while the vehicle is moving. Doing so can damage
the transmission and may result in a loss of vehicle control.

Do not shift the shift position to R while the vehicle is moving forward. Doing so can
damage the transmission and may result in a loss of vehicle control.

Do not shift the shift position to a driving position while the vehicle is moving back-
ward. Doing so can damage the transmission and may result in a loss of vehicle
control.

Changing the shift position to N while the vehicle is moving will disengage the engine
from the transmission. Engine braking is not available when N is selected.

Be careful not to change the shift position with the accelerator pedal depressed.
Changing the shift position to any positions other than P or N may lead to unexpected
rapid acceleration of the vehicle that may cause an accident and result in death or
serious injury. After changing the shift position, make sure to confirm the current shift
position displayed on the shift position indicator inside the meter.

 Related Links 

If a warning message is displayed(P. 570)

2-2. Driving procedures

150

Shift position display and how to change the shift position


A

Shift lever

Operate the shift lever gently and securely in
the direction of the arrow on the shift position
indicator.
To shift to N , slide the shift lever in the direction
of the arrow and hold it.
Release the shift lever after each shifting opera-
tion to allow it to return to its regular position
(

).

Shifting to M is only possible when the shift
position is in D.
When shifting from P to N, D or R, from N, D,
M or R to P, from D or M to R, or from R to D,
ensure that the brake pedal is being depressed
and the vehicle is stationary.

B

Shift position indicator

Meter display:

The current shift position is illuminated.

Shift lever display:

The current shift position is illuminated.
When selecting the shift position, make
sure that the shift position has been
changed to the desired position by check-
ing the shift position indicator provided on
the instrument cluster.

C

P position switch

Fully stop the vehicle and set the parking brake,
and then press the P position switch.
When the shift position is changed to P, the
switch illuminates.
Check that the shift position indicator shows P.

INFORMATION

Changing the shift position in each engine switch mode

The shift position cannot be changed when the engine switch is in ACC or off.

When the engine switch is in ON, the shift position can only be changed to N.

2-2. Driving procedures

151

2

Driving the v

ehicle


Content      ..     2      3      4      5     ..