Lexus NX250 (2024 year). Manual in english - page 6
 

  Index      Manuals     Lexus NX250 (2024 year). Manual in english


Search            copyright infringement  


Content      ..     4      5      6      7     ..


Lexus NX250 (2024 year). Manual in english - page 6


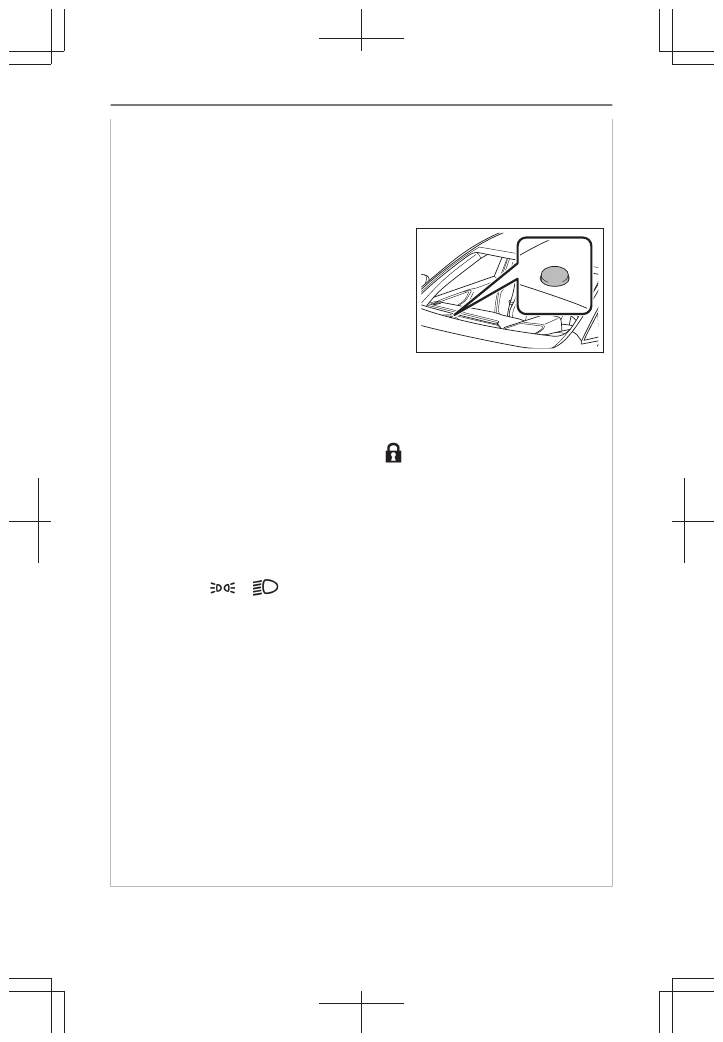
Headlight control sensor

The sensor may not function properly if an object is placed on the sensor, or anything
that blocks the sensor is affixed to the windshield. Doing so interferes with the sensor
detecting the level of ambient light and may cause the automatic headlight system to
malfunction.

Automatic light off system

When the headlights come on:
The lights turn off 30 seconds after a door is opened and closed if the engine switch
is turned off. (The lights turn off immediately if 

 on the key is pressed after all the

doors are locked.)

When only the tail lights come on:
The tail lights turn off automatically if the engine switch is turned off and the driver’s
door is opened.

To turn the lights on again, turn the engine switch to ON, or turn the light switch off once

and then back to 

 or 

.

Light reminder buzzer

A buzzer sounds when the engine switch is turned off or turned to ACC and the driver’s
door is opened while the lights are turned on.

Battery-saving function

In order to prevent the battery of the vehicle from discharging, if the headlights and/or tail
lights are on when the engine switch is turned off the battery saving function will operate
and automatically turn off all the lights after approximately 20 minutes. When the engine
switch is turned to ON, the battery-saving function will be disabled.
When any of the following are performed, the battery-saving function is canceled once
and then reactivated. All the lights will turn off automatically 20 minutes after the
Battery-saving function has been reactivated:

When the headlight switch is operated

When a door or the back door is opened or closed

3-1. Driving when the surrounding area is dark

184

Turning on the high beam headlights


1

With the headlights on, push the lever for-
ward.

The high beam headlights will turn on.
Pull the lever to its original position to turn the
high beam headlights off.

2

Pull the lever rearward and release it.

The high beams will flash once.
The high beam headlights can be illuminated
this way even with the headlights off.

Operation of the cornering lights

*

When any of the following conditions are met, while the headlights (low beam)
are on, the cornering lights will turn on and light up the direction of movement of
the vehicle. The cornering lights are designed to ensure excellent visibility when
turning at intersections or parking at night.

The steering wheel is being operated

The turn signal lever is being operated

The shift position is in R

INFORMATION

Cornering light control

When vehicle speed is approximately 22 mph (35 km/h) or higher, the cornering
lights will not turn on.

The lights will automatically turn off if they remain illuminated for 30 minutes.

Operation of the AFS (Adaptive Front-lighting System) 

*

The AFS (Adaptive Front-lighting System) ensures excellent visibility when turn-
ing at intersections and on curves by automatically adjusting the angle of the
headlights according to vehicle speed and the angle of the tires as controlled by
steering input.
The AFS operates at speeds of 6 mph (11 km/h) or higher.

* : 

If equipped

3-1. Driving when the surrounding area is dark

185

3

Driving accor

ding to the conditions

Operation of the automatic headlight leveling system

*

The level of the headlights is automatically adjusted according to the number of
passengers and the loading condition of the vehicle to ensure that the headlights
do not interfere with other road users.

* : 

If equipped

3-1. Driving when the surrounding area is dark

186

Automatically changing between the low beam headlights and high
beam headlights

AHS (Adaptive High-beam System)

*

The Adaptive High-beam System uses a front camera located on the upper
portion of the windshield to detect the brightness of the lights of vehicles ahead,
streetlights, etc., and automatically controls the light distribution of the headlights.

WARNING

For safe use

Do not overly rely on the Adaptive High-beam System. Always drive safely, taking care to
observe your surroundings and turning the high beams on or off manually if necessary.

To prevent unintentional operation of the Adaptive High-beam System

When it is necessary to disable the system: 

 P.344

System controls

According to the vehicle speed, the brightness and illuminated area of the high
beams are adjusted.

The high beams are illuminated so that the area around a vehicle ahead is
shaded. (Shaded high beam)
The shaded high beam helps ensure forward visibility while reducing the daz-
zling effect on the drivers of vehicles ahead.


A

Area illuminated by the high beams

B

Area illuminated by the low beams

According to the distance to a preceding vehicle, the illuminated area of the low
beams is adjusted.

* : 

If equipped

3-1. Driving when the surrounding area is dark

187

3

Driving accor

ding to the conditions

Using the Adaptive High-beam System

1

Press the Adaptive High-beam System
switch.

2

Turn the headlight switch to the [AUTO] or

[

] position.

When the headlight switch lever is in the low
beam position, the AHS system will be enabled
and the AHS indicator will illuminate.

INFORMATION

System operating conditions

When all of the following conditions are met, the high beams will illuminate and the
system will operate:

The vehicle speed is approximately 19 mph (30 km/h) or more

The area ahead of the vehicle is dark.

When all of the following conditions are met, the headlights will change to the shaded
high beams according to the position of vehicles ahead:

The vehicle speed is approximately 19 mph (30 km/h) or more

The area ahead of the vehicle is dark.

There is a vehicle ahead with lights on.

There are few streetlights or other lights on the road ahead.

If any of the following conditions are met, the system will change to the low beams:

The vehicle speed is approximately 16 mph (25 km/h) or lower.

The area ahead of the vehicle is not dark.

There are many vehicles ahead.

There are many streetlights or other lights on the road ahead.

3-1. Driving when the surrounding area is dark

188

Front camera detection

In the following situations, the high beams may not be automatically changed to the
shaded high beams:

When a vehicle cuts in front of your vehicle

When another vehicle crosses in front of the vehicle

When vehicles ahead are repeatedly detected and then hidden due to repeated
curves, road dividers or roadside trees

When a vehicle ahead approaches from a far lane

When a vehicle ahead is far away

When a vehicle ahead has no lights

When the lights of a vehicle ahead are dim

When a vehicle ahead is reflecting strong light, such as the headlights of your
vehicle

Situations in which the sensors may not operate properly: 

 P.349

The high beams may change to the shaded high beams if a vehicle ahead that is using
fog lights without its headlights turned on is detected.

House lights, street lights, traffic signals, and illuminated billboards or signs and other
reflective objects may cause the high beams to change to the shaded high beams,
cause the high beams not to change to the shaded high beams, or change the area
that is not illuminated.

The following may change the speed at which the shaded areas change or the timing
at which the headlights change to the low beams:

The brightness of lights of vehicles ahead

The movement and direction of vehicles ahead

The distance between the vehicle and a vehicle ahead

When a vehicle ahead only has lights illuminated on one side

When a vehicle ahead is a two-wheeled vehicle

The condition of the road (gradient, curve, condition of the road surface, etc.)

The number of passengers and amount of luggage

The light distribution control of the headlights may not match the driver's expectations

Bicycles and other small vehicles may not be detected.

In the following situations, the system may not be able to correctly detect the bright-
ness of the surroundings. This may cause the low beams to remain on or the high
beams to flash or dazzle pedestrians or vehicles ahead. In such a case, it is necessary
to manually change between the high beams and low beams.

When there are lights similar to headlights or tail lights in the surrounding area

3-1. Driving when the surrounding area is dark

189

3

Driving accor

ding to the conditions

When headlights or tail lights of vehicles ahead are turned off, dirty, changing color,
or not aimed properly

When the headlights are repeatedly changing between the high beams and low
beams.

When use of the high beams is inappropriate or when the high beams may be
flashing or dazzling pedestrians or other drivers.

When the vehicle is used in an area in which vehicles travel on the opposite side
of the road of the country for which the vehicle was designed, for example using a
vehicle designed for right-hand traffic in a left-hand traffic area, or vice versa

When it is necessary to disable the system: 

 P.344

Situations in which the sensors may not operate properly: 

 P.349

Customization

The settings of some functions can be changed. 

 P.720

Turning the high beams on/off manually

Changing to the high beams

Push the lever forward.

The AHS indicator will turn off and the high
beam indicator will turn on.
Pull the lever to its original position to enable the
Adaptive High-beam System again.

Changing to the low beams

Press the Adaptive High-beam System switch.

The AHS indicator will turn off.
Press the switch to enable the Adaptive High-
beam System again.

Temporarily changing to the low beams

It is recommended to switch to the low beams when use of the high beams is
inappropriate or when the high beams may cause problems or distress to other
drivers or pedestrians nearby.

3-1. Driving when the surrounding area is dark

190

Pull the lever rearward and then return it to its
original position.

The high beams will illuminate while the lever is
pulled, however, after the lever is returned to its
original position, the low beams will remain on for
a certain amount of time. After this, the Adaptive
High-beam System will operate.

AHB (Automatic High Beam)

*

The Automatic High Beam uses a front camera located on the upper portion of the
windshield to detect the brightness of the lights of vehicles ahead, streetlights, etc.,
and automatically changes the head lights between the high beams and low beams.

WARNING

For safe use

Do not overly rely on the Automatic High Beam. Always drive safely, taking care to
observe your surroundings and turning the high beams on or off manually if necessary.

To prevent unintentional operation of the Automatic High Beam

When it is necessary to disable the system: 

 P.344

Using the Automatic High Beam system

1

Press the Automatic High Beam switch.

2

Turn the headlight switch to the [AUTO] or

[

] position.

When the headlight switch lever is in the low
beam position, the AHB system will be enabled
and the AHB indicator will illuminate.

* : 

If equipped

3-1. Driving when the surrounding area is dark

191

3

Driving accor

ding to the conditions

INFORMATION

Automatic operating conditions of the high beams

When all of the following conditions are met, the high beams will illuminate automati-
cally:

The vehicle speed is approximately 21 mph (34 km/h) or more.

The area ahead of the vehicle is dark.

There are no vehicles ahead with lights on.

There are few streetlights or other lights on the road ahead.

If any of the following conditions are met, the headlights will change to the low beams:

Vehicle speed drops below approximately 17 mph (27 km/h).

The area ahead of the vehicle is not dark.

There is a vehicle ahead with lights on.

There are many streetlights or other lights on the road ahead.

Front camera detection

In the following situations, the high beams may not be automatically changed to the
low beams:

When a vehicle cuts in front of your vehicle

When another vehicle crosses in front of the vehicle

When vehicles ahead are repeatedly detected and then hidden due to repeated
curves, road dividers or roadside trees

When a vehicle ahead approaches from a far lane

When a vehicle ahead is far away

When a vehicle ahead has no lights

When the lights of a vehicle ahead are dim

When a vehicle ahead is reflecting strong light, such as own headlights

Situations in which the sensors may not operate properly: 

 P.349

The headlights may change to the low beams if a vehicle ahead that is using fog lights
without its headlights turned on is detected.

House lights, street lights, traffic signals, and illuminated billboards or signs may cause
the high beams to change to the low beams, or the low beams to remain on.

The following may change the the timing at which the headlights change to the low
beams:

The brightness of lights of vehicles ahead

The movement and direction of vehicles ahead

3-1. Driving when the surrounding area is dark

192

The distance between the vehicle and a vehicle ahead

When a vehicle ahead only has lights illuminated on one side

When a vehicle ahead is a two-wheeled vehicle

The condition of the road (gradient, curve, condition of the road surface, etc.)

The number of passengers and amount of luggage

The headlights may change between the high beams and low beams unexpectedly.

Bicycles and other small vehicles may not be detected.

In the following situations, the system may not be able to correctly detect the bright-
ness of the surroundings. This may cause the low beams to remain on or the high
beams to flash or dazzle pedestrians or vehicles ahead. In such a case, it is necessary
to manually change between the high beams and low beams.

When there are lights similar to headlights or tail lights in the surrounding area

When headlights or tail lights of vehicles ahead are turned off, dirty, changing color,
or not aimed properly

When the headlights are repeatedly changing between the high beams and low
beams.

When use of the high beams is inappropriate or when the high beams may be
flashing or dazzling pedestrians or other drivers.

When the vehicle is used in an area in which vehicles travel on the opposite side
of the road of the country for which the vehicle was designed, for example using a
vehicle designed for right-hand traffic in a left-hand traffic area, or vice versa

When it is necessary to disable the system: 

 P.344

Situations in which the sensors may not operate properly: 

 P.349

Temporarily reducing front camera sensitivity

The sensitivity of the front camera can be temporarily reduced.

1. Turn the engine switch off with the following conditions met.

The headlight switch is in the [

] or [AUTO] position.

The headlight switch lever is in the low beam position.

The Automatic High Beam switch is on.

2. Turn the engine switch to ON.
3. Within 60 seconds after performing step 2, push the headlight switch lever to the

high beam position then pull it to the original position quickly 10 times, then leave the
lever in its original position.

4. If the sensitivity is changed, the Automatic High Beam indicator will blink 3 times.

3-1. Driving when the surrounding area is dark

193

3

Driving accor

ding to the conditions

Turning the high beams on/off manually

Changing to the high beams

Push the lever forward.

The Automatic High Beam indicator will turn off
and the high beam indicator will turn on.
Pull the lever to its original position to enable the
Automatic High Beam system again.

Changing to the low beams

Press the Automatic High Beam switch.

The Automatic High Beam indicator will turn off.
Press the switch to enable the Automatic High
Beam system again.

Temporarily changing to the low beams

It is recommended to switch to the low beams when use of the high beams is
inappropriate or when the high beams may cause problems or distress to other
drivers or pedestrians nearby.

Pull the lever rearward and then return it to its
original position.

The high beams will illuminate while the lever
is pulled, however, after the lever is returned to
its original position, the low beams will remain
on for a certain amount of time. After this, the
Automatic High Beam system will operate.

3-1. Driving when the surrounding area is dark

194

Driving when the surrounding area is bright

Using the sun visors


1

To set the visor in the forward position, flip it
down.

2

To set the visor in the side position, flip
down, unhook, and swing it to the side.

3

To use the side extender, place the visor in
the side position, then slide it backward.

3-2. Driving when the surrounding area is bright

195

3

Driving accor

ding to the conditions

Inside rear view mirror anti-glare function (vehicles with auto anti-glare
inside rear view mirror)

Responding to the level of brightness of the headlights of vehicles behind, the
reflected light is automatically reduced.

This function turns on each time the engine switch is turned to ON.

INFORMATION

To prevent sensor malfunction

Do not touch or cover the sensors. Doing so may cause the sensor to malfunction.

3-2. Driving when the surrounding area is bright

196

Digital Rearview Mirror anti-glare function (optical mirror mode)

The automatic anti-glare function in the optical mirror mode can be enabled/disa-
bled.
The automatic anti-glare function is enabled each time the engine switch is
changed to ON.

1

Press the menu button.

The setting display will be displayed.

2

Press the menu button repeatedly and select

 .

The setting display will be displayed.

3

Press [

 ] or [

 ] to enable (ON)/disable (OFF) the automatic

anti-glare function.

The icons will disappear if a button is not operated for approximately 5 seconds or
more.

3-2. Driving when the surrounding area is bright

197

3

Driving accor

ding to the conditions

Driving in the rain

Precautions for driving in the rain

Observe the following precautions when driving in the rain.

Drive carefully when it is raining, because visibility will be reduced, the windows
may become fogged-up, and the road will be slippery.

Drive carefully when it starts to rain, because the road surface will be especially
slippery.

Refrain from high speeds when driving on an expressway in the rain, as there
is a risk of a layer of water forming between the tires and the road surface,
preventing the steering and brakes from operating properly.

3-3. Driving in the rain

198

Ensuring visibility in the rain

Operate the wiper lever to change the operation of wipers between manual and
automatic operation or to operate the washers.

Using the front wipers

WARNING

Vehicles with rain-sensing windshield wipers:
Take care that your fingers, etc. do not become caught in the windshield wipers.
The windshield wipers may operate unexpectedly in AUTO mode if the sensor is touched
or the windshield is subject to vibration.

NOTICE

Observe the following precautions when using the front wipers.

Do not leave the front wipers on longer than necessary with the engine off. Doing so
may lead to discharge of the battery.

Do not use the front wipers when the windshield is dry, as they may damage the
windshield.

Operating the 

 lever operates the wipers or washer as follows.

Intermittent windshield wipers with interval adjuster

*


▶ 

Type A

1

 Off

2

 Intermittent operation

3

 Low speed operation

4

 High speed operation

5

 Temporary operation

* : 

If equipped

3-3. Driving in the rain

199

3

Driving accor

ding to the conditions


▶ 

Type B

1

 Off

2

 Intermittent operation

3

 Low speed operation

4

 High speed operation

5

 Temporary operation

Rain-sensing windshield wipers

*


▶ 

Type A

1

 Off

2

 Rain-sensing operation

The wipers operate automatically if the sensor
detects rain. The system automatically adjusts
the speed of the wipers in accordance with rain
volume and vehicle speed.

3

 Low speed operation

4

 High speed operation

5

 Temporary operation

3-3. Driving in the rain

200


▶ 

Type B

1

 Off

2

 Rain-sensing operation

The wipers operate automatically if the sensor
detects rain. The system automatically adjusts
the speed of the wipers in accordance with rain
volume and vehicle speed.

3

 Low speed operation

4

 High speed operation

5

 Temporary operation

INFORMATION

The front window wiper and washer can be operated when

The engine switch is in ON.

Using the voice control system

*

The front wipers can be operated one sweep using the voice control system.
For details, refer to the"MULTIMEDIA OWNER'S MANUAL".

Changing the speed of the wipers

Intermittent windshield wipers with interval adjuster

The speed of the wipers can be adjusted when intermittent operation is selected.


▶ 

Type A

1

Increases the intermittent windshield wiper
speed

2

Decreases the intermittent windshield wip-
er speed

3-3. Driving in the rain

201

3

Driving accor

ding to the conditions


▶ 

Type B

1

Increases the intermittent windshield wiper
speed

2

Decreases the intermittent windshield wip-
er speed

Rain-sensing windshield wipers

When 

 is selected, the wipers will operate automatically when the sensor

detects falling rain. The system automatically adjusts wiper timing in accordance
with rain volume and vehicle speed.


▶ 

Type A

1

Increases the sensitivity

2

Decreases the sensitivity


▶ 

Type B

1

Increases the sensitivity

2

Decreases the sensitivity

INFORMATION

Effects of vehicle speed on wiper operation (vehicles with rain-sensing windshield
wipers)

Vehicle speed affects the intermittent wiper speed.

Raindrop sensor (vehicles with rain-sensing windshield wipers)

The raindrop sensor determines the amount of raindrops that contact the windshield.

3-3. Driving in the rain

202

As an optical sensor is used, it may not operate properly when sunlight from the rising
or setting of the sun intermittently strikes the windshield, or if bugs, etc. are present on
the windshield.

If the temperature of the raindrop sensor is 194°F (90°C) or higher, or 5°F (-15°C) or
lower, automatic operation may not occur.
In this case, operate the wipers in any mode other than AUTO mode.

Using the front washers

WARNING

When it is cold, do not use the washer fluid until the windshield is warm.
The fluid may freeze on the windshield, decreasing visibility, possibly leading to an
accident.

NOTICE

If a washer nozzle is blocked, contact your Lexus dealer.
Do not try to clear it with a pin or other object. The nozzle will be damaged.

 Pull the lever.

The front wipers and washers will operate.
The front wipers will automatically operate a cou-
ple of times after the front washers operate.
Vehicles with headlight cleaners: When the
headlights are on and the lever is pulled and held,
the headlight cleaners will operate once. After
this, the headlight cleaners will operate every 5th time the lever is pulled.

NOTICE

If washer fluid does not spray, do not operate the switch continuously as doing so may
damage the washer fluid pump.

3-3. Driving in the rain

203

3

Driving accor

ding to the conditions

INFORMATION

The windshield wipers and washer can be operated when

The engine switch is in ON.

Drip prevention wiper sweep (vehicles with rain-sensing windshield wipers)

After the washers have operated and the wipers operate several times, they will operate
one more time after a short delay to prevent drips.
However, this function will not operate while driving.

If no windshield washer fluid sprays

If there is washer fluid in the washer fluid tank, check if the washer nozzles are blocked.

Using the voice control system

*

The front washer can be operated using the voice control system. (Operation is possible
only when the vehicle is stopped.)
For details, refer to the "MULTIMEDIA OWNER'S MANUAL".

Using the rear wipers

NOTICE

Observe the following precautions when using the rear wipers.

Do not leave the rear wiper on longer than necessary with the engine off. Doing so
may lead to discharge of the battery.

When the rear window is dry, do not use the wiper, as it may damage the rear window.

INFORMATION

The rear window wiper and washer can be operated when

The engine switch is in ON.

Using the voice control system

*

The rear wiper can be operated one sweep using the voice control system.
For details, refer to the"MULTIMEDIA OWNER'S MANUAL".

Operating the 

 switch operates the rear wiper as follows:

* : 

If equipped

3-3. Driving in the rain

204


▶ 

Type A

1

 Off

2

 Intermittent operation

3

 Normal operation


▶ 

Type B

1

 Off

2

 Intermittent operation

3

 Normal operation

Using the rear washer

NOTICE

If a washer nozzle is blocked, contact your Lexus dealer.
Do not try to clear it with a pin or other object. The nozzle will be damaged.

3-3. Driving in the rain

205

3

Driving accor

ding to the conditions

 Push the lever.

The rear wiper and washer will operate.
The washer will automatically operate and clean
the camera for Lexus parking assist monitor.
The rear wiper will automatically operate a cou-
ple of times after the rear washer operates.

NOTICE

If washer fluid does not spray, do not operate the switch continuously as doing so may
damage the rear washer fluid pump.

INFORMATION

The rear window wiper and washer can be operated when

The engine switch is in ON.

If no windshield washer fluid sprays

If there is washer fluid in the washer fluid tank, check if the washer nozzles are blocked.

Using the voice control system

*

The rear washer can be operated using the voice control system. (Operation is possible
only when the vehicle is stopped.)
For details, refer to the "MULTIMEDIA OWNER'S MANUAL".

* : 

If equipped

3-3. Driving in the rain

206

Driving when the windows or mirrors are fogged up

Defog the windshield

Defoggers are used to defog the windshield and front side windows.

WARNING

Do not use the windshield defogger in extremely humid areas when the air condition-
ing system is set to a low temperature.
The difference between the temperature of the outside air and that of the windshield
can cause the outer surface of the windshield to fog up, blocking your vision.

Do not place anything on the instrument panel
which may cover the air outlets.
Otherwise, air flow may be obstructed, preventing
the windshield defoggers from defogging.

Press the windshield defogger switch.

The dehumidification function will operate and the air flow will increase.
Set the outside/recirculated air mode switch to outside air mode if the recirculated air
mode is used. (It may switch automatically.)
To defog the windshield and the side windows quickly, turn the air flow and temperature up.
To return to the previous mode, press the windshield defogger switch again when the
windshield is defogged.

INFORMATION

Fogging up of the windows

The windows will easily fog up when the humidity in the vehicle is high.
Pressing “A/C” button or selecting “A/C” will dehumidify the air from the outlets and
defog the windshield effectively.

3-4. Driving when the windows or mirrors are fogged up

207

3

Driving accor

ding to the conditions

If you turn “A/C” off, the windows may fog up more easily.

The windows may fog up if the recirculated air mode is used.

3-4. Driving when the windows or mirrors are fogged up

208

Defog the rear window

Press the rear windshield and outside rear view mirror defogger switch.
The rear window defogger and outside rear view mirror defoggers will operate and defog
the rear window and outside rear view mirrors.
The defoggers will automatically turn off after a period of time.

WARNING

Do not touch the surface of the outside rear view mirrors when the rear window
defogger and outside rear view mirror defoggers are operating, as the surface of the
mirrors will become extremely hot and may cause burns.

3-4. Driving when the windows or mirrors are fogged up

209

3

Driving accor

ding to the conditions

Defog the outside rear view mirrors

Press the rear windshield and outside rear view mirror defogger switch.

The rear window defogger and outside rear view mirror defoggers will operate and defog
the rear window and outside rear view mirrors.
The defoggers will automatically turn off after a period of time.

WARNING

Do not touch the surface of the outside rear view mirrors when the rear window
defogger and outside rear view mirror defoggers are operating, as the surface of the
mirrors will become extremely hot and may cause burns.

3-4. Driving when the windows or mirrors are fogged up

210

Driving when it is cold

Preparing for cold weather

Carry out the necessary preparations and inspections before driving the vehicle in
cold weather. Always drive the vehicle in a manner appropriate to the prevailing
weather conditions.

Necessary inspection items

Use fluids that are appropriate to the prevailing outside temperatures.

Engine oil

Engine coolant

Washer fluid

Have a service technician inspect the condition of the battery.

Mounting winter tires

Have the vehicle fitted with four winter tires.
Ensure that all of the tires are the same size and brand.

WARNING

Observe the following precautions when winter tires are mounted to the vehicle.
Failure to do so may lead to loss of control of the vehicle.

Use tires of the specified size.

Maintain the recommended level of air pressure.

Do not drive in excess of 75 mph (120 km/h), regardless of the type of winter tires
mounted.

When using winter tires, mount them to all four wheels.

NOTICE

When having winter tires repaired or replaced, contact your Lexus dealer or a legitimate
tire retailer.
This is because the removal and mounting of winter tires affects the operation of the tire
pressure warning valves and transmitters.

When using tire chains

Install the tire chains to the front two tires.

*1

Make sure to use tire chains which match the tire size.

*1 : 

Tire chains cannot be mounted on 235/50R20 tires.

3-5. Driving when it is cold

211

3

Driving accor

ding to the conditions

INFORMATION

Observe the following precautions when installing, removing, and handling tire chains:

Install and remove tire chains in a safe location.

Install tire chains to the front tires only.
Do not install tire chains to the rear tires.

Install tire chains following the instructions provided with the tire chains.

Install tire chains to the front tires as tightly as possible. Retighten the chains after
driving 1/4 - 1/2 mile (0.5 - 1.0 km).

WARNING

Observe the following precautions when tire chains are installed to the vehicle.
Failure to do so may lead to the vehicle not being able to be driven safely.

Do not drive in excess of the speed limit specified for the tire chains being used, or 30
mph (50 km/h), whichever is lower.

Avoid driving on bumpy road surfaces or over potholes.

Avoid sudden acceleration, abrupt steering, sudden braking and shifting operations
that cause sudden engine braking.

Slow down sufficiently before entering a curve to ensure that vehicle control is
maintained.

Do not use LTA (Lane Tracing Assist).

Do not use LDA (Lane Departure Alert).

NOTICE

Fitting tire chains

The tire pressure warning valves and transmitters may not function correctly when tire
chains are fitted.

Selecting tire chains

Use the correct tire chain size when mounting the tire chains. Chain size is
regulated for each tire size.

Vehicles with 235/60R18 tires

3-5. Driving when it is cold

212


A

Side chain (0.12 in. [3 mm] in diameter)

B

Side chain (0.39 in. [10 mm] in width)

C

Side chain (0.98 in. [25 mm] in length)

D

Cross chain (0.16 in. [4 mm] in diameter)

E

Cross chain (0.55 in. [14 mm] in width)

F

Cross chain (0.98 in. [25 mm] in length)

Vehicles with 235/50R20 tires
Tire chains cannot be mounted on the 235/50R20 tires.
Snow tires should be used instead.

Regulations on the use of tire chains

Regulations regarding the use of tire chains vary depending on location and type of
road. Always check local regulations before installing chains.

3-5. Driving when it is cold

213

3

Driving accor

ding to the conditions

Cold weather driving tips

Things to check before driving in cold weather

Perform the following according to the driving conditions:

Do not try to forcibly open a window or move a wiper that is frozen. Pour warm
water over the frozen area to melt the ice. Wipe away the water immediately to
prevent it from freezing.

To ensure proper operation of the climate control system fan, remove any snow
that has accumulated on the air inlet vents in front of the windshield.

Check for and remove any excess ice or snow that may have accumulated on
the exterior lights, outside rear view mirrors, windows, vehicle’s roof, chassis,
around the tires or on the brakes.

Remove any snow or mud from the bottom of your shoes before getting in the
vehicle.

When the outside door opener switch becomes stiff, it may be difficult to press
on it. Open the door while pressing the door opener switch slightly harder.

Precautions for driving in cold weather

Accelerate the vehicle slowly, keep a safe distance between you and the vehicle
ahead, and drive at a reduced speed suitable to road conditions.

Precautions for parking in cold weather

Turn automatic mode of the parking brake off. Otherwise, the parking brake
may freeze and not be able to be released automatically.
Also, avoid using the following as the parking brake may operate automatically,
even if automatic mode is off.

Brake hold system

Park the vehicle and shift the shift position to P without setting the parking
brake. The parking brake may freeze up, preventing it from being released. If
the vehicle is parked without setting the parking brake, make sure to block the
wheels.

Failure to do so may be dangerous because it may cause the vehicle to move unexpect-
edly, possibly leading to an accident.

When the parking brake is in automatic mode, release the parking brake after
change the shift position to P.

If the vehicle is parked without setting the parking brake, confirm that the shift
position cannot be moved out of P.

3-5. Driving when it is cold

214

If the vehicle is left parked with the brakes damp in cold temperatures, there is a
possibility of the brakes freezing.

INFORMATION

Linked mirror function when reversing

When used in cold weather during reverse driving, the door mirror could be frozen and
may not automatically point the mirror surface downward. In this event, remove any ice
and snow from the mirror surface.

Warming the windshield to allow frozen wipers to be moved

*

Use the windshield wiper de-icer to help prevent the windshield wiper blades from
freezing to the windshield.
Select the [Deicer] switch on the option screen.

The windshield wiper de-icer will automatically turn off after a period of time.

WARNING

Do not touch the lower part of the windshield or parts along the front pillars when the
windshield wiper de-icer is on, as they will be hot and may cause burns.

* : 

If equipped

3-5. Driving when it is cold

215

3

Driving accor

ding to the conditions


Content      ..     4      5      6      7     ..